Document Metadata
Format: PDF 1.4
Title: Cisco Emergency Responder Onsite Security Guide for Release 15 and SUs
Author: Jayasree N
Creator: DITA Open Toolkit
Producer: XEP 4.30.961; modified using iText 2.1.7 by 1T3XT
Creation Date: D:20250212122033Z
Mod Date: D:20250212042619-08'00'
Page 1
Cisco Emergency Responder Onsite Security Guide for Release 15 and
SUs
First Published: 2023-12-18
Americas Headquarters
Cisco Systems, Inc.
170 West Tasman Drive
San Jose, CA 95134-1706
USA
http://www.cisco.com
Tel: 408 526-4000
800 553-NETS (6387)
Fax: 408 527-0883

Page 2
THE SPECIFICATIONS AND INFORMATION REGARDING THE PRODUCTS IN THIS MANUAL ARE SUBJECT TO CHANGE WITHOUT NOTICE. ALL STATEMENTS,
INFORMATION, AND RECOMMENDATIONS IN THIS MANUAL ARE BELIEVED TO BE ACCURATE BUT ARE PRESENTED WITHOUT WARRANTY OF ANY KIND,
EXPRESS OR IMPLIED. USERS MUST TAKE FULL RESPONSIBILITY FOR THEIR APPLICATION OF ANY PRODUCTS.
THE SOFTWARE LICENSE AND LIMITED WARRANTY FOR THE ACCOMPANYING PRODUCT ARE SET FORTH IN THE INFORMATION PACKET THAT SHIPPED WITH
THE PRODUCT AND ARE INCORPORATED HEREIN BY THIS REFERENCE. IF YOU ARE UNABLE TO LOCATE THE SOFTWARE LICENSE OR LIMITED WARRANTY,
CONTACT YOUR CISCO REPRESENTATIVE FOR A COPY.
The Cisco implementation of TCP header compression is an adaptation of a program developed by the University of California, Berkeley (UCB) as part of UCB's public domain version of
the UNIX operating system. All rights reserved. Copyright © 1981, Regents of the University of California.
NOTWITHSTANDING ANY OTHER WARRANTY HEREIN, ALL DOCUMENT FILES AND SOFTWARE OF THESE SUPPLIERS ARE PROVIDED “AS IS" WITH ALL FAULTS.
CISCO AND THE ABOVE-NAMED SUPPLIERS DISCLAIM ALL WARRANTIES, EXPRESSED OR IMPLIED, INCLUDING, WITHOUT LIMITATION, THOSE OF
MERCHANTABILITY, FITNESS FOR A PARTICULAR PURPOSE AND NONINFRINGEMENT OR ARISING FROM A COURSE OF DEALING, USAGE, OR TRADE PRACTICE.
IN NO EVENT SHALL CISCO OR ITS SUPPLIERS BE LIABLE FOR ANY INDIRECT, SPECIAL, CONSEQUENTIAL, OR INCIDENTAL DAMAGES, INCLUDING, WITHOUT
LIMITATION, LOST PROFITS OR LOSS OR DAMAGE TO DATA ARISING OUT OF THE USE OR INABILITY TO USE THIS MANUAL, EVEN IF CISCO OR ITS SUPPLIERS
HAVE BEEN ADVISED OF THE POSSIBILITY OF SUCH DAMAGES.
Any Internet Protocol (IP) addresses and phone numbers used in this document are not intended to be actual addresses and phone numbers. Any examples, command display output, network
topology diagrams, and other figures included in the document are shown for illustrative purposes only. Any use of actual IP addresses or phone numbers in illustrative content is unintentional
and coincidental.
All printed copies and duplicate soft copies of this document are considered uncontrolled. See the current online version for the latest version.
Cisco has more than 200 offices worldwide. Addresses and phone numbers are listed on the Cisco website at www.cisco.com/go/offices.
Cisco and the Cisco logo are trademarks or registered trademarks of Cisco and/or its affiliates in the U.S. and other countries. To view a list of Cisco trademarks, go to this URL:
https://www.cisco.com/c/en/us/about/legal/trademarks.html. Third-party trademarks mentioned are the property of their respective owners. The use of the word partner does not imply a
partnership relationship between Cisco and any other company. (1721R)
© 2023 Cisco Systems, Inc. All rights reserved.
Page 3
C O N T E N T S
Get Started
1
C H A P T E R 1
Get Started Overview
1
Accessibility Features
1
Cisco Emergency Responder
3
C H A P T E R 2
Cisco Emergency Responder Overview
3
Access User Web Interface
4
Acknowledge Emergency Calls
5
View Emergency Calls
6
Emergency Call Information
6
View Emergency Call Alert
8
Use Phone Search
9
Locate Phone by Extension
10
View History of Emergency Calls
11
Call History Fields
12
Safety and Performance Information
15
C H A P T E R 3
Cisco Product Security
15
Cisco Emergency Responder Onsite Security Guide for Release 15 and SUs
iii

Page 4
Cisco Emergency Responder Onsite Security Guide for Release 15 and SUs
iv
Contents
Page 5
C H A P T E R 1
Get Started
• Get Started Overview, on page 1
• Accessibility Features, on page 1
Get Started Overview
The Cisco Emergency Responder User Guide provides you with the information you need to use Cisco
Emergency Responder.
The Onsite Security personnel added in Cisco Emergency Responder should read this guide to understand
the tasks they need to perform and to learn about the Emergency Responder User web interface.
Accessibility Features
Cisco Emergency Responder provides functionality for users that allows them to access buttons in the window
without using a mouse. These navigation shortcuts assist visually impaired or blind users with the application.
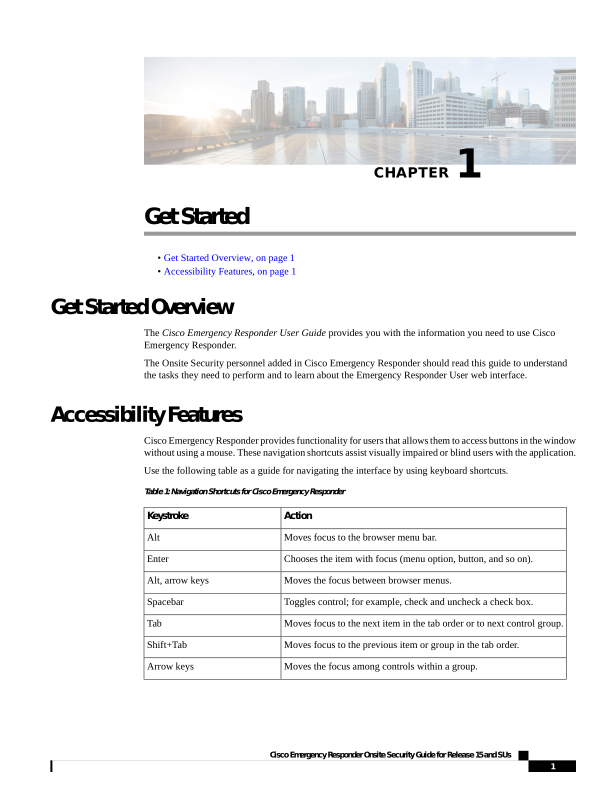
Use the following table as a guide for navigating the interface by using keyboard shortcuts.
Table 1: Navigation Shortcuts for Cisco Emergency Responder
Action
Keystroke
Moves focus to the browser menu bar.
Alt
Chooses the item with focus (menu option, button, and so on).
Enter
Moves the focus between browser menus.
Alt, arrow keys
Toggles control; for example, check and uncheck a check box.
Spacebar
Moves focus to the next item in the tab order or to next control group.
Tab
Moves focus to the previous item or group in the tab order.
Shift+Tab
Moves the focus among controls within a group.
Arrow keys
Cisco Emergency Responder Onsite Security Guide for Release 15 and SUs
1

Page 6
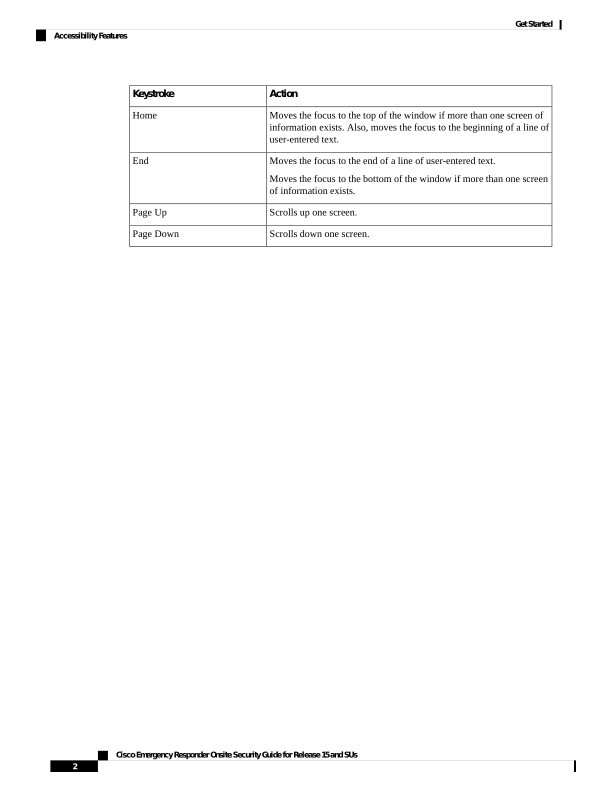
Action
Keystroke
Moves the focus to the top of the window if more than one screen of
information exists. Also, moves the focus to the beginning of a line of
user-entered text.
Home
Moves the focus to the end of a line of user-entered text.
Moves the focus to the bottom of the window if more than one screen
of information exists.
End
Scrolls up one screen.
Page Up
Scrolls down one screen.
Page Down
Cisco Emergency Responder Onsite Security Guide for Release 15 and SUs
2
Get Started
Accessibility Features
Page 7
C H A P T E R 2
Cisco Emergency Responder
• Cisco Emergency Responder Overview, on page 3
• Access User Web Interface, on page 4
• Acknowledge Emergency Calls, on page 5
• View Emergency Calls, on page 6
• View Emergency Call Alert, on page 8
• Use Phone Search, on page 9
• Locate Phone by Extension, on page 10
• View History of Emergency Calls, on page 11
Cisco Emergency Responder Overview
Cisco Emergency Responder is an emergency communication system that helps you respond to a crisis quickly
and efficiently.
Emergency Responder also maintains a record of the emergency calls that your system receives so that you
can access this information later.
The following is a brief overview of what happens when someone places an emergency call:
• Someone places an emergency call.
• Emergency Responder receives the call and forwards it to the public safety answering point (PSAP) for
your area.
• At the same time, Emergency Responder provides information about the emergency call in the Emergency
Call Alert window. This information includes the time and date of the emergency call, the extension of
the caller, the caller's alerting name, the ERL name, and the phone location. Additional details about the
caller location, such as the complete physical address for the ERL and the port description, are displayed
after you click on a call record. Depending on how your Administrator sets up your system your Emergency
Call Alert Window may show alerts specific from the ERLs assigned to you. You will still have the
option to view all alerts in the system.
Emergency Responder displays the port description only for automatically tracked
phones. For manually configured line numbers, this field is empty.
Note
Cisco Emergency Responder Onsite Security Guide for Release 15 and SUs
3


Page 8
• Depending on how your administrator sets up your system, you may receive a voice alert that provides
you with the caller's extension. You might also receive an email with the caller name, the Emergency
Response Location (ERL) name, and the time of the emergency call.
• After you determine the location of the caller, you can respond to the call according to your company
emergency response policy.
• As soon as the caller places the emergency call, Emergency Responder refreshes the Emergency Call
Alert window. If Emergency Responder cannot perform the real-time update, the Emergency Call Alert
window refreshes in 30 seconds.
Emergency Responder provides you with only the extension of the caller; you
cannot listen to the actual emergency call.
Note
Access User Web Interface
You must log in to Emergency Responder to view web alerts and obtain more information about an emergency
call.
To log in to the Emergency Responder User web interface, follow these steps.
Procedure
Step 1
In your browser location field, enter the URL provided by your administrator.
The main Emergency Responder User web interface appears.
Step 2
Choose Cisco ER User from the Navigation drop-down menu and click Go.
The Cisco Emergency Responder User Login window appears.
Step 3
Enter your username and password. Click Login. If you cannot log in, contact your system administrator.
The Emergency Call Alert window appears.
Note
If you are a remote user authenticated in Cisco Unified Communications Manager, a notification message to
change the password is displayed when the expiry is due.
To exit the Emergency Responder User web interface from any window, choose the Logout link at the top
of the window.
Tip
For help with using a feature on any Emergency Responder User window, choose Help > Help for this
Screen.
Cisco Emergency Responder Onsite Security Guide for Release 15 and SUs
4
Cisco Emergency Responder
Access User Web Interface

Page 9
Acknowledge Emergency Calls
After you are notified of an emergency call, the next step is to acknowledge it. To acknowledge an emergency
call means that:
• You take responsibility to act according to your company emergency response policy on behalf of that
call.
• You understand that your policy might require you to go to the physical location of the caller, or it might
require that you monitor the emergency situation by telephone.
• You understand that when you acknowledge a call, Emergency Responder keeps it in the system for 24
hours. After 24 hours, Emergency Responder removes that call from the Emergency Call Alert window
list and that the entry disappears from your Emergency Call Alert window and the Emergency Call
Alert window of all on-site-alert personnel in your system.
A red link indicates unacknowledged calls. A black link indicates acknowledged
calls.
All security personnel who have access to the Emergency Responder User web
interface can see the emergency calls on the Emergency Call Alert window.
Note
If a call record is removed from the list in the Emergency Call Alert window, Emergency Responder still
saves the call information. After an emergency call has been acknowledged, you can see the call information
by viewing the Call History. For information about how to view the Call History, see View History of
Emergency Calls, on page 11.
You can also see detailed information about that caller location by looking up the phone extension. For
information about viewing details about a caller location, see Emergency Call Information.
Before you begin
This procedure assumes that you are logged in to Emergency Responder and that the Emergency Call Alert
window is displayed.
For instructions on logging in to Emergency Responder, see the Access User Web Interface, on page 4.
To display the Emergency Call Alert window from any page on the Emergency Responder User website,
choose Web Alert.
To acknowledge an emergency call and remove the emergency call from the list, follow these steps:
Procedure
Step 1
In the Emergency Call Alert window, click ACKNOWLEDGE for the emergency call you want to
acknowledge.
A message appears and prompts you to confirm your acknowledgment.
Step 2
Click OK.
Cisco Emergency Responder Onsite Security Guide for Release 15 and SUs
5
Cisco Emergency Responder
Acknowledge Emergency Calls

Page 10
Emergency Responder refreshes the Emergency Call Alert window and the Emergency Call Alert window
of all on-site-alert personnel in your system, removing the call you just acknowledged.
View Emergency Calls
To view all emergency calls, click Find without entering any criteria.
To narrow your search, follow these steps.
Procedure
Step 1
Select the field you want to search, select the search relationship, and enter the search string.
To search a combination of fields, follow these steps:
• Click More to add additional search fields.
• Select Any at the top of the list to display calls that match any search criteria (an OR search).
• Select All to list only calls that match every criteria (an AND search).
• Click Fewer to remove the search criterion at the bottom of the list. You can view this button only after
you click More.
Step 2
From the drop-down list, choose the number of records per page to be displayed for each search.
Step 3
After you enter the search criteria, click Find.
Emergency Call Information
To respond to an emergency call, you might need more information than is displayed on the Emergency Call
Alert window, or you might need to provide these details to law enforcement or other emergency personnel.
You can click on a call record in the Emergency Call Alert window to view details about a call.
The system administrator sets the displayed fields, such as the street address and the three-digit area code.
The PSAP operator also sees these displayed fields.
These details might not describe the exact physical location of the caller, but they should describe the origin
of the emergency call. If you find that these details are not helpful in locating the emergency caller, contact
your system administrator.
For additional information, see View History of Emergency Calls, on page 11.
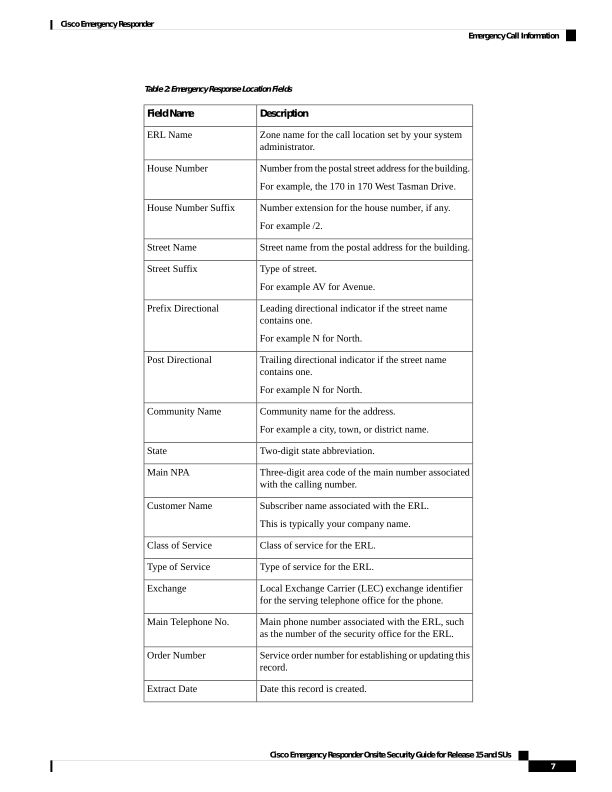
The following table describes the fields you see after you click on a call record from the Emergency Call
Alert window.
Cisco Emergency Responder Onsite Security Guide for Release 15 and SUs
6
Cisco Emergency Responder
View Emergency Calls
Page 11
Table 2: Emergency Response Location Fields
Description
Field Name
Zone name for the call location set by your system
administrator.
ERL Name
Number from the postal street address for the building.
For example, the 170 in 170 West Tasman Drive.
House Number
Number extension for the house number, if any.
For example /2.
House Number Suffix
Street name from the postal address for the building.
Street Name
Type of street.
For example AV for Avenue.
Street Suffix
Leading directional indicator if the street name
contains one.
For example N for North.
Prefix Directional
Trailing directional indicator if the street name
contains one.
For example N for North.
Post Directional
Community name for the address.
For example a city, town, or district name.
Community Name
Two-digit state abbreviation.
State
Three-digit area code of the main number associated
with the calling number.
Main NPA
Subscriber name associated with the ERL.
This is typically your company name.
Customer Name
Class of service for the ERL.
Class of Service
Type of service for the ERL.
Type of Service
Local Exchange Carrier (LEC) exchange identifier
for the serving telephone office for the phone.
Exchange
Main phone number associated with the ERL, such
as the number of the security office for the ERL.
Main Telephone No.
Service order number for establishing or updating this
record.
Order Number
Date this record is created.
Extract Date
Cisco Emergency Responder Onsite Security Guide for Release 15 and SUs
7
Cisco Emergency Responder
Emergency Call Information
Page 12
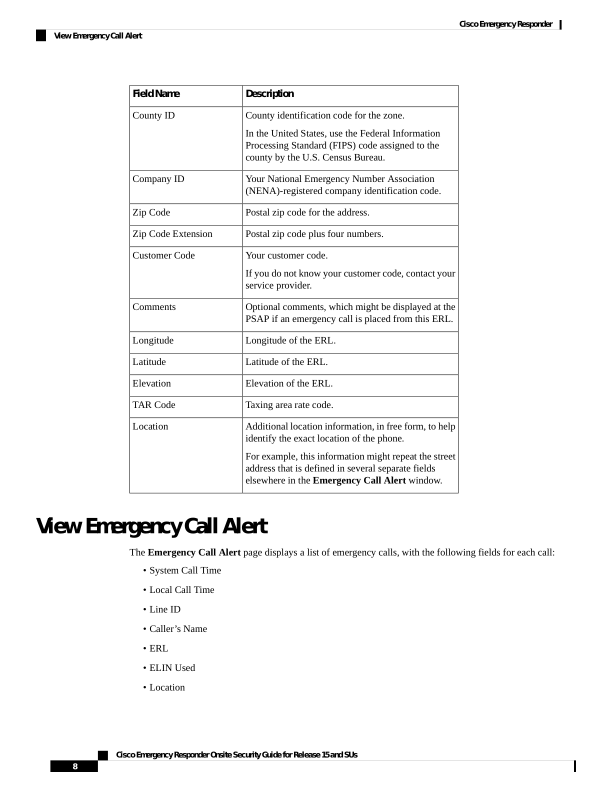
Description
Field Name
County identification code for the zone.
In the United States, use the Federal Information
Processing Standard (FIPS) code assigned to the
county by the U.S. Census Bureau.
County ID
Your National Emergency Number Association
(NENA)-registered company identification code.
Company ID
Postal zip code for the address.
Zip Code
Postal zip code plus four numbers.
Zip Code Extension
Your customer code.
If you do not know your customer code, contact your
service provider.
Customer Code
Optional comments, which might be displayed at the
PSAP if an emergency call is placed from this ERL.
Comments
Longitude of the ERL.
Longitude
Latitude of the ERL.
Latitude
Elevation of the ERL.
Elevation
Taxing area rate code.
TAR Code
Additional location information, in free form, to help
identify the exact location of the phone.
For example, this information might repeat the street
address that is defined in several separate fields
elsewhere in the Emergency Call Alert window.
Location
View Emergency Call Alert
The Emergency Call Alert page displays a list of emergency calls, with the following fields for each call:
• System Call Time
• Local Call Time
• Line ID
• Caller’s Name
• ERL
• ELIN Used
• Location
Cisco Emergency Responder Onsite Security Guide for Release 15 and SUs
8
Cisco Emergency Responder
View Emergency Call Alert
Page 13
• Street
• Phone Location
You need user or system administrator authority to access the Emergency Call Alert window. Java Runtime
Environment (JRE) must be installed on your machine to monitor web alerts.
Note
Use the following procedure to view the Emergency Call Alert window.
Procedure
Step 1
In the Cisco Emergency Responder User window, click Web Alert.
The Emergency Call Alert window appears.
Step 2
You may see specific alerts from ERLs assigned to you, depending on how your administrator has set up the
system. Click All to view all the alerts in the system.
Step 3
To view the Call Details window, click on a call record.
The Call Details window appears. For additional information about the displayed fields, see Emergency Call
Information, on page 6.
Use Phone Search
If you need to see location details about a call that is no longer visible in the Emergency Call Alert window,
use the phone search to look up the extension. If you do not know the caller extension number, you can find
it in the Call History window. For information about how to view a call history, see View History of Emergency
Calls, on page 11.
You can perform both partial string searches and E.164 Dial Plans searches with Phone Search. If you are
searching E.164 Dial Plans then a plus sign (+) should come before the number.
Note
• If an emergency call is placed immediately after the Emergency Responder server is started, the caller
location details might not be available right away. Results of a phone search using this caller extension
say No matching phone for the given extension.
• A caller might place an emergency call from one Emergency Response Location (ERL) and then
immediately move to a different ERL. If Emergency Responder registers this move before you use the
Phone Search feature, the phone search window displays the location details of the second ERL.
• If you try to view location details for a phone that shares an extension, the phone search window displays
details for all phones for that extension. To refine your search, click Select a phone to view details.
Choose the phone whose details you want to view based on the Last Time of Emergency Call field.
Tip
Cisco Emergency Responder Onsite Security Guide for Release 15 and SUs
9
Cisco Emergency Responder
Use Phone Search


Page 14
Use the following procedure to perform a phone search.
Procedure
Step 1
Choose Phone Search from the main menu.
The Locate Phone by Extension window appears.
Step 2
In the Phone Extension field, enter the extension of the caller about whom you want more information and
click Find.
For additional information, see Emergency call information.
To return to the Emergency Call Alert window, choose Web Alert from the main menu.
Detailed information about the caller appears at the bottom of the window.
Locate Phone by Extension
Use the Locate Phone by Extension page to search the Call History for a phone by an extension number. If
a phone is located, the results show the Call Details.
You need user or system administrator authority to perform a Phone Search.
Note
Perform the following steps to search for a phone by an extension number.
Procedure
Step 1
In the Emergency Call Alert window, click Phone Search.
The Locate Phone By Extension window appears.
The following table describes the Locate Phone by Extension page.
Table 3: Locate Phone by Extension Page
Description
Field and Button
Text box into which you enter the extension of the phone
that you want to locate.
You can perform a partial string search of the extension.
Phone Extension
Starts the phone search.
Find button
Step 2
Enter a phone extension in the Phone Extension field.
Step 3
Click Find
Cisco Emergency Responder Onsite Security Guide for Release 15 and SUs
10
Cisco Emergency Responder
Locate Phone by Extension

Page 15
The search results are displayed.
View History of Emergency Calls
Emergency Responder maintains history records for 10,000 most recent emergency calls.
You can use this information to track specific details about emergency calls, such as how many emergency
calls were placed on a date, from a caller, or that contain a specific keyword. This information can also be
used for reporting purposes or to set staffing levels. For example, you could use this information to determine
the number of on-site-alert personnel needed for a time period.
You can also use this feature to provide recent call-history information to law enforcement agencies or to
other emergency personnel.
If needed, you can enter or view additional information about an emergency call in the Comments field.
If you need to obtain call details for earlier emergency calls, ask your system administrator to provide this
information. Your system administrator may have saved these records.
Tip
To view Call History, follow these steps:
Procedure
Step 1
Choose Call History from the main menu.
The Call History window appears.
Step 2
Use the drop-down lists and text field to enter specific call-search conditions. Click More to add conditions,
or click Fewer to remove the last condition that you added.
Note
If you specify more than one call-search condition, you must indicate if you want all or any of the conditions
satisfied. For example, if you want to view all medical emergency calls that came from your company office
in San Jose on July 6, your conditions might look like this:
Find Details of calls where all of the conditions are satisfied and where Date is 07/06/2013 and where
ERL Name is Exactly SanJoseBuilding and Comments contains medical.
Step 3
Click Find.
Information appears about those calls that meet the specified search conditions.
If the information does not fit in one window, Emergency Responder uses more than one window to list the
calls.
To see more information, click the links or enter a specific page number in the Page field and click the Page
link.
Step 4
To enter or modify comments about an emergency call, click the Edit Link in the Comments field for that
call record.
Cisco Emergency Responder Onsite Security Guide for Release 15 and SUs
11
Cisco Emergency Responder
View History of Emergency Calls

Page 16
The Call Details window appears.
Comments appear in the Comments About the Call field of the Call Details window:
• If the comment is longer than the field, use the right and left arrow keys on your computer keyboard to
scroll through the comment.
• To add or modify a comment, enter the information and click Update.
• To return a comment to its last saved value, click Reset.
Step 5
Click Close to close the Call Details window.
Call History Fields
The Call History page appears when you select Call History.
Authorization Requirements
You need user or system administrator authority to access this page.
Description
Use the Call History page to view the history of emergency calls that were made from your network.
The following table describes the Call History page.
Table 4: Call History Page
Description
Button or Field
Allows you to enter search criteria to select the emergency calls you want to
view.
Search criteria
Cisco Emergency Responder Onsite Security Guide for Release 15 and SUs
12
Cisco Emergency Responder
Call History Fields
Page 17
Description
Button or Field
Provides a list of emergency calls that match your search criteria:
• ERL Name - Click the name to view details about the emergency response
location (ERL).
• Caller’s Extension - The extension used to place the emergency call.
• Caller’s name - The alerting name of the caller.
• Time - The time the call is made.
• Date - The date the call is made.
• ELIN Used - The route pattern and Emergency Location Identification
Number (ELIN) combination used for the call.
• Location - The phone location, based on whether the phone is configured
manually, or if it's configured automatically based on the switch port or IP
subnet.
• Call Acknowledged - The acknowledged status of a call on the Web Alert
page.
• Acknowledged By - The ID of the user who acknowledged the call.
• Time Acknowledged - The time that the call is acknowledged.
• Date Acknowledged - The date that the call is acknowledged.
• Comments - All comments entered about the call. Click Edit to enter or
change comments about the call in the Call Details page. If a large number
of calls match your search criteria, Emergency Responder uses several pages
to display them:
• Click the First, Previous, Next, and Last links to move between pages
• Enter a specific page number in the Page field and press Enter to move
to that page
Call records
Click Update to include your comments in the call history for the call.
Note
You can only perform this action from the Call Details page.
Update
Click Reset to remove unsaved comments. You can then reenter comments.
Note
You can only perform this action from the Call Details page.
Reset
Click Close to close the Call Details page.
Note
You can only perform this action from the Call Details page.
Close
The following table describes the fields you see when you view a history of emergency calls.
Cisco Emergency Responder Onsite Security Guide for Release 15 and SUs
13
Cisco Emergency Responder
Call History Fields
Page 18
Table 5: Call History Fields
Description
Field name
Zone name that your system administrator set for that
call location.
ERL Name
Extension from which the emergency call is placed.
Caller’s Extension
Alerting name set on Unified Communications
Manager for the caller.
Caller’s Name
Time that the emergency call is placed.
Time
Date that the emergency call is placed.
Date
Call-back number your PSAP operator uses to contact
an emergency caller if the emergency call gets
disconnected.
ELIN Used
The phone location, based on whether the phone is
configured manually, or if it's configured
automatically based on the switch port or IP subnet.
Location
The acknowledged status of a call on the Web Alert
window.
Call Acknowledged
The ID of the user who acknowledged the call.
Acknowledged By
The time that the call is acknowledged.
Time Acknowledged
The date that the call is acknowledged.
Date Acknowledged
This field that contains an Edit Link that allows you
to enter comments about the call. See View History
of Emergency Calls, on page 11 for details about
entering comments.
Comments
Cisco Emergency Responder Onsite Security Guide for Release 15 and SUs
14
Cisco Emergency Responder
Call History Fields
Page 19
C H A P T E R 3
Safety and Performance Information
• Cisco Product Security, on page 15
Cisco Product Security
This product contains cryptographic features and is subject to United States and local country laws governing
import, export, transfer, and use. Delivery of Cisco cryptographic products does not imply third-party authority
to import, export, distribute, or use encryption. Importers, exporters, distributors and users are responsible
for compliance with U.S. and local country laws. By using this product you agree to comply with applicable
laws and regulations. If you are unable to comply with U.S. and local laws, return this product immediately.
Cisco Emergency Responder Onsite Security Guide for Release 15 and SUs
15

Page 20
Cisco Emergency Responder Onsite Security Guide for Release 15 and SUs
16
Safety and Performance Information
Cisco Product Security