Document Metadata
Format: PDF 1.7
Title: Install CUCM Cluster Using Data Export and Import Feature
Producer: iText® Core 7.2.5 (AGPL version), pdfHTML 4.0.5 (AGPL version) ©2000-2023 iText Group NV
Creation Date: D:20250722144721-05'00'
Mod Date: D:20250722133124-07'00'
Page 1
Install CUCM Cluster Using Data Export and
Import Feature
Contents
Introduction
Prerequisites
Requirements
Components Used
Configure
Configurations
Export Data from the Source Cluster Publisher to the SFTP Server
Export Data from the Source Cluster Subscriber to the SFTP Server
Shutdown the Source Cluster Publisher
Install New Publisher Using Exported Data
Shutdown the Source Cluster Subscriber
Install New Subscriber Using Exported Data
Verify
Related Information
Introduction
This document describes the procedure of CUCM installation using Data Export and Import feature.
Prerequisites
Requirements
Cisco recommends that you have knowledge of these topics.
CUCM
•
IP Phone
•
Components Used
The information in this document is based on these software versions.
Source CUCM cluster versions - 12.5.1.15900-66.
•
Destination CUCM cluster versions - 15.0.1.11900-23.
•
The information in this document was created from the devices in a specific lab environment. All of the
devices used in this document started with a cleared (default) configuration. If your network is live, ensure
that you understand the potential impact of any command.
Configure
Page 2
Configurations
Data export is done on the old source CUCM cluster and data import is done on the new destination cluster.
Your source cluster version must be Release 10.5 or higher. If your source cluster version is not Release
12.5(1) SU5 or higher, you must install the latest version of the ciscocom.DataExport COP file on each node
of the source system.
Steps included for CUCM installation using data export and import feature:
Export data from the source cluster Publisher to the SFTP server.
•
Export data from the source cluster Subscriber to the SFTP server.
•
Shutdown the source cluster Publisher.
•
Shutdown the source cluster Subscriber.
•
Install new Publisher using exported data.
•
Install new Subscriber using exported data.
•
Export Data from the Source Cluster Publisher to the SFTP Server
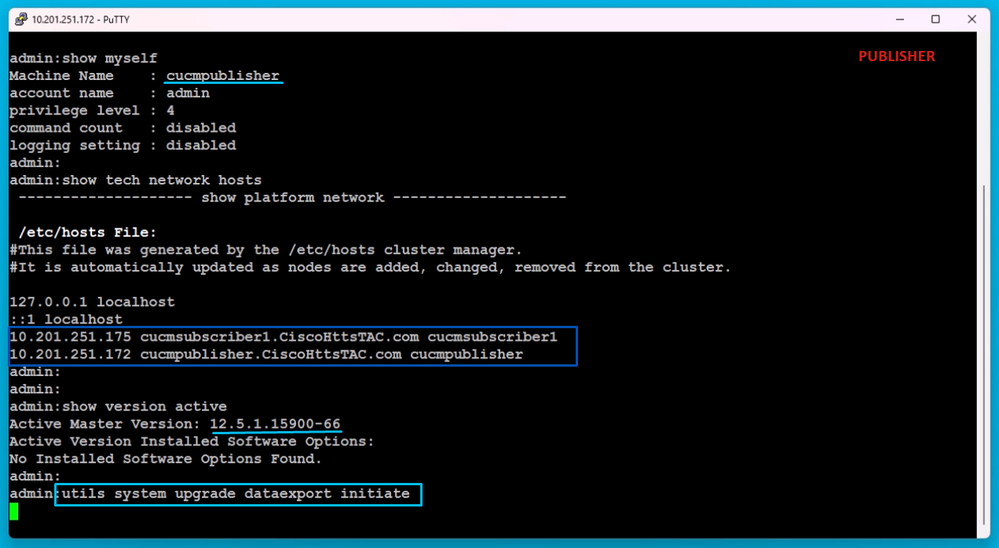
Source cluster version is 12.5.1.15900-66.
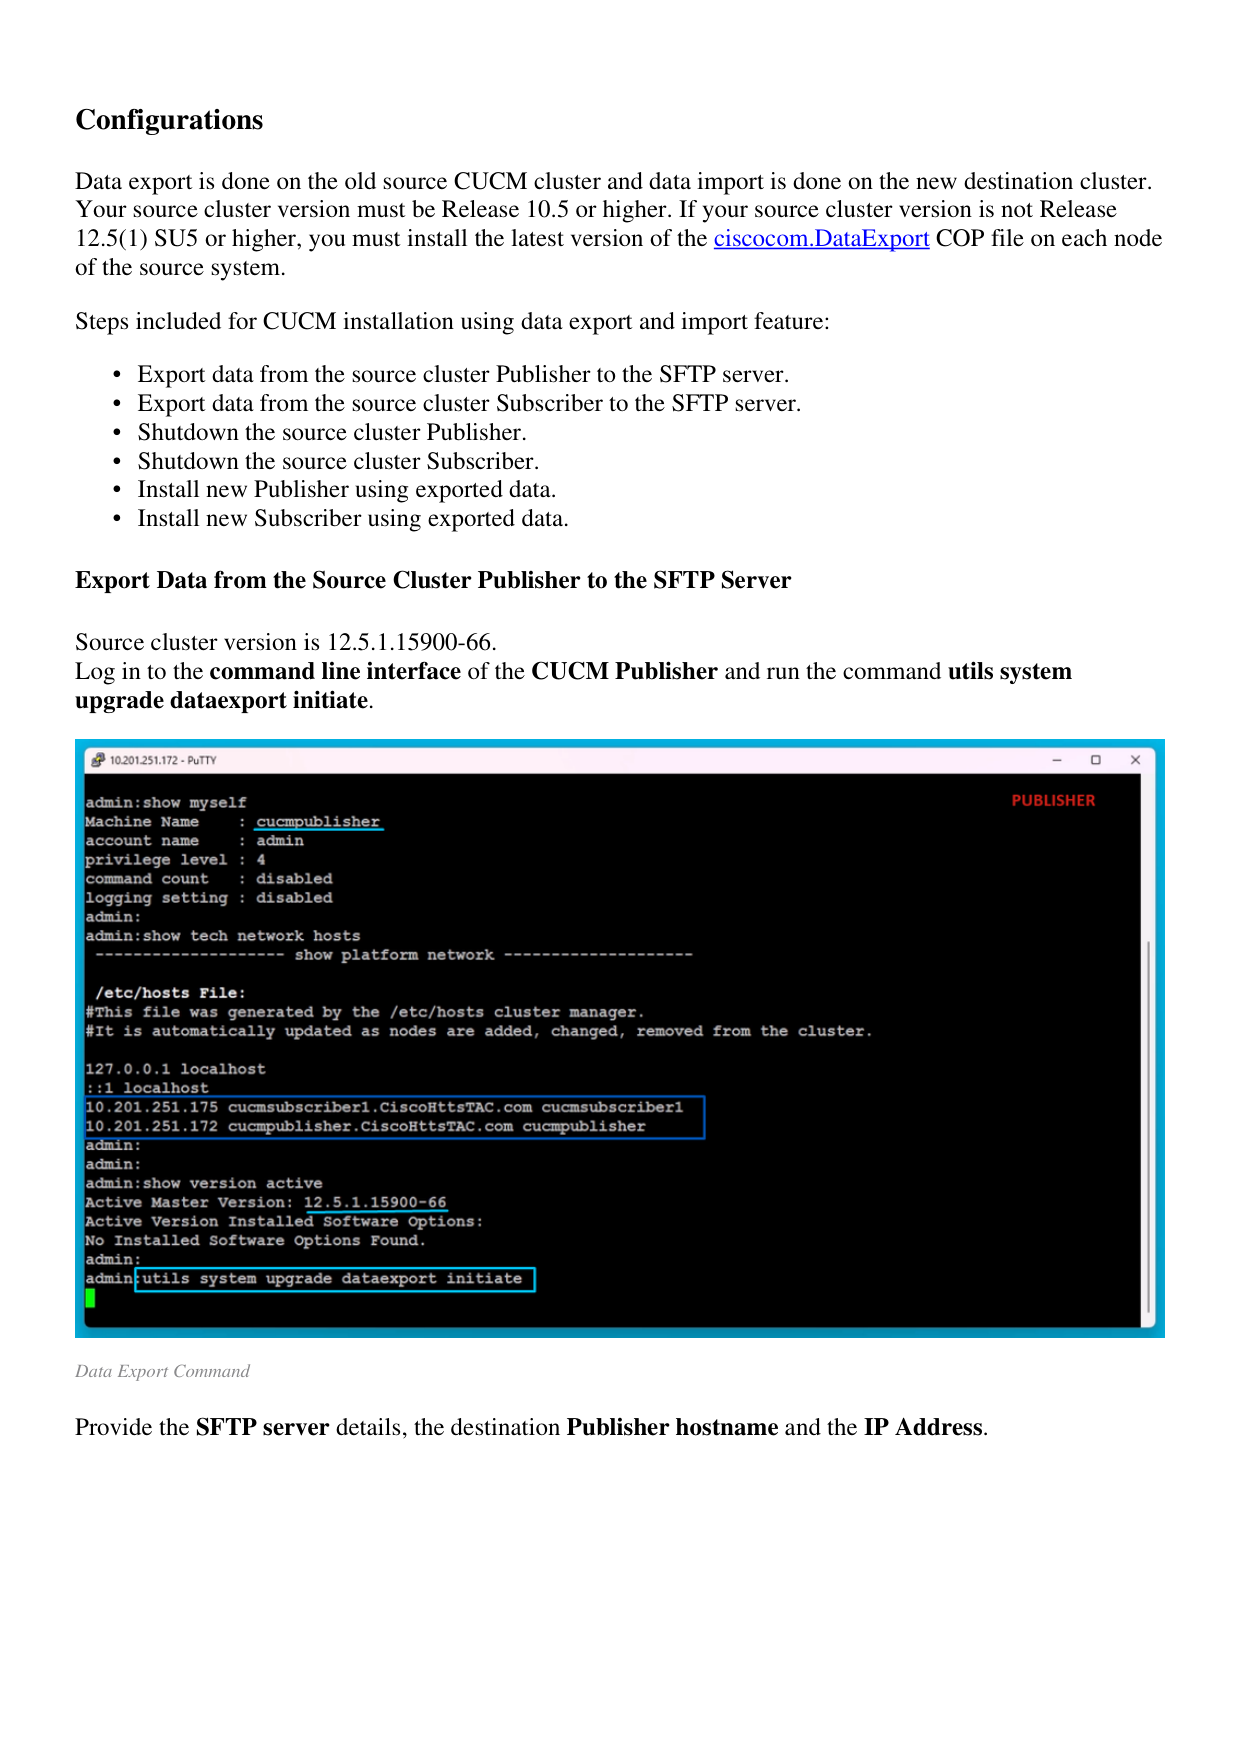
Log in to the command line interface of the CUCM Publisher and run the command utils system
upgrade dataexport initiate.
Data Export Command
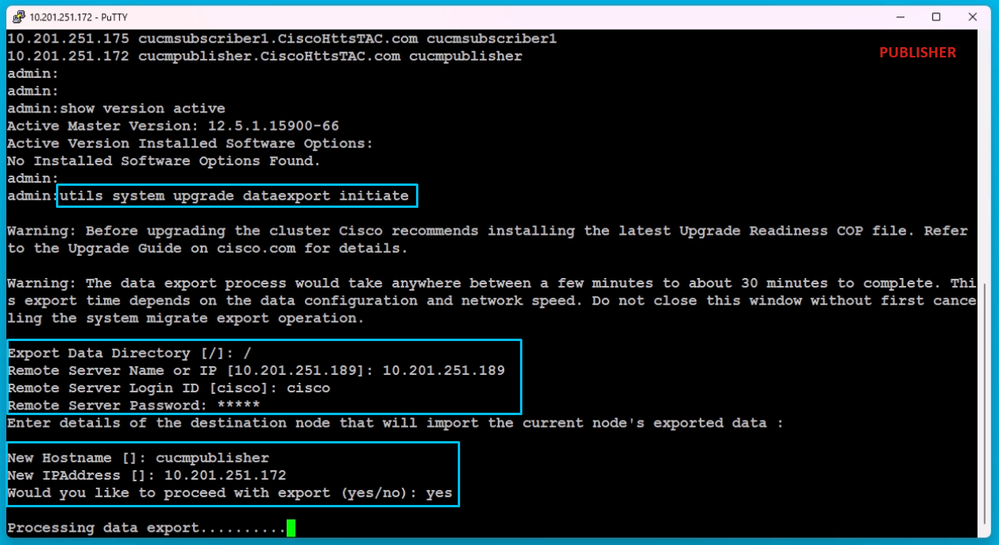
Provide the SFTP server details, the destination Publisher hostname and the IP Address.
Page 3
Note: Here, Iyou use the same hostname and IP address of the Publisher.

Page 4
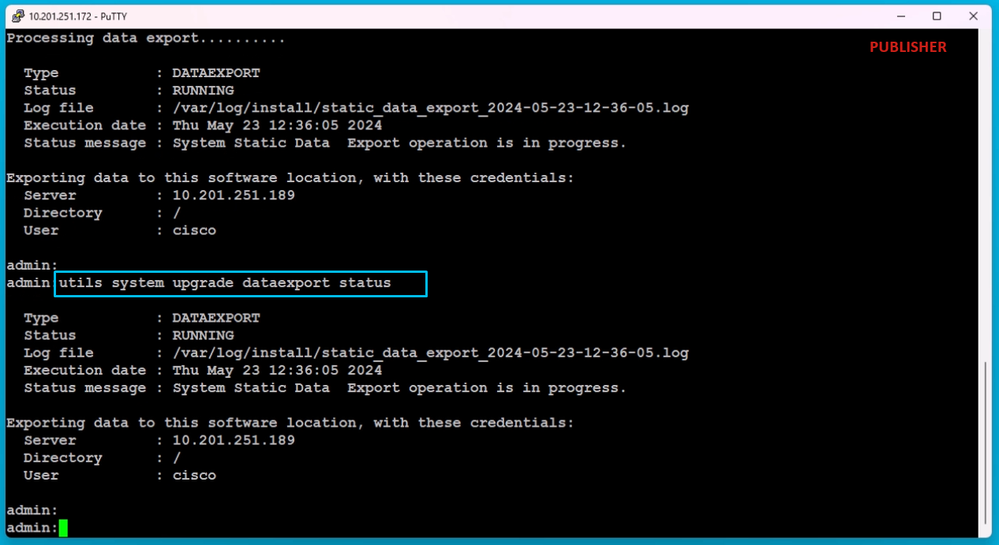
Processing Data Export
Run the command utils system upgrade dataexport status for checking whether the data export process is
completed or not.
Data Export Progress Check
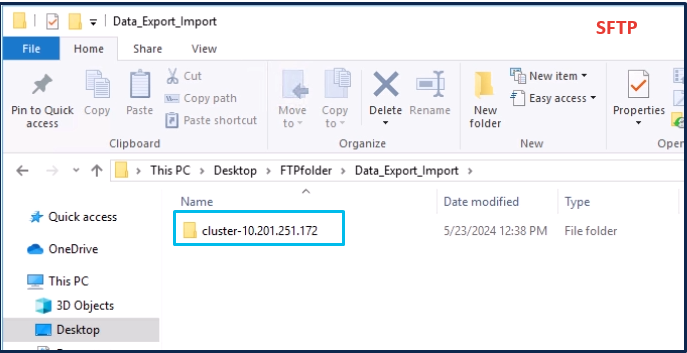
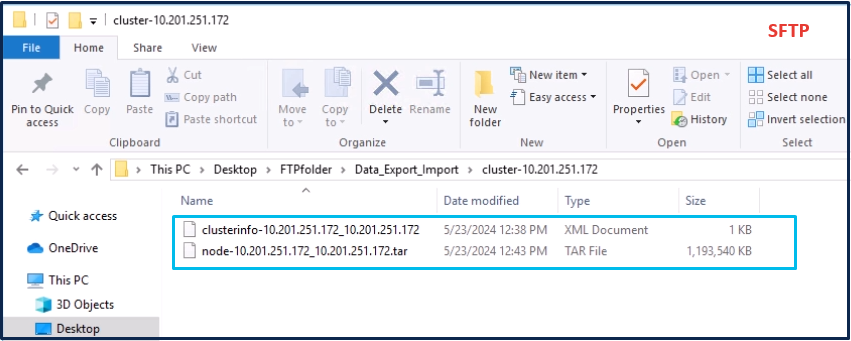
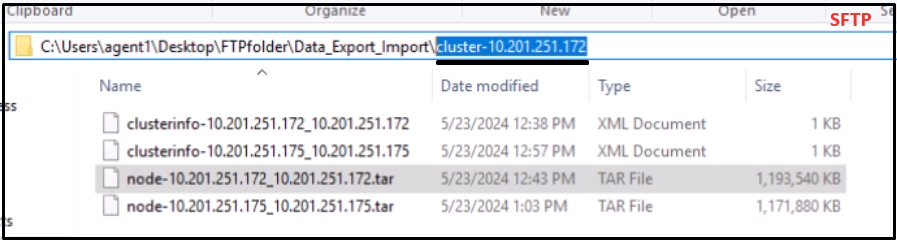
In the SFTP server, a new folder is automatically created with name like cluster-Publisher IP Address and
the exported data is downloaded into it.
Page 5
Exported Data Location in the SFTP Server
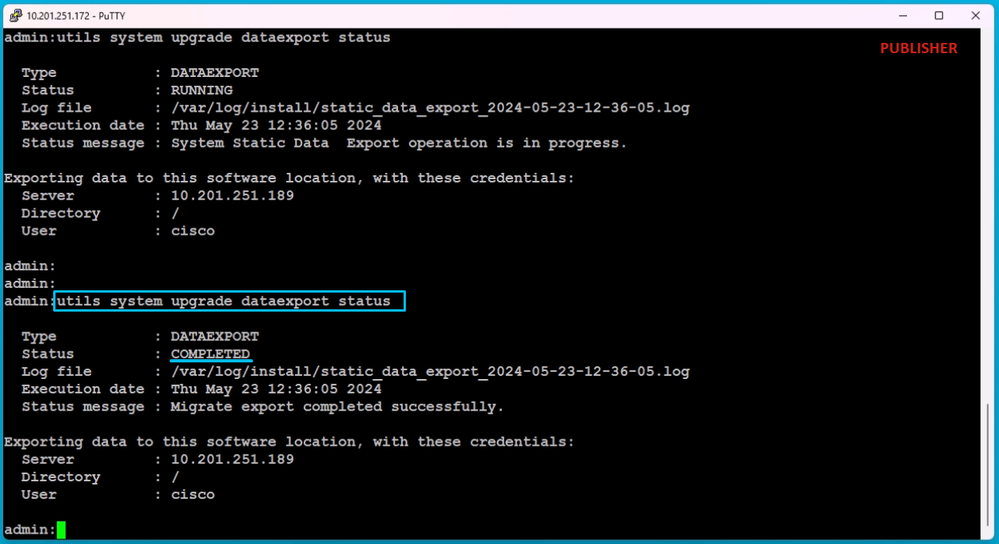
After export is done for the Publisher, the status shows completed from the output of utils system upgrade
dataexport status.
Data Export is Completed for the Publisher
Page 6
Data Export is Completed for the Publisher
Export Data from the Source Cluster Subscriber to the SFTP Server
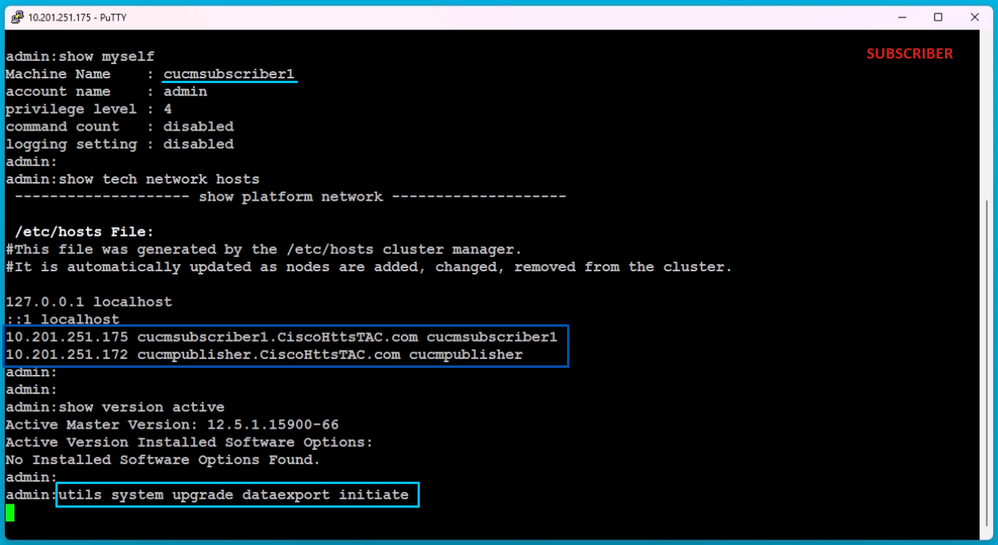
The steps are same as you did for the Publisher.
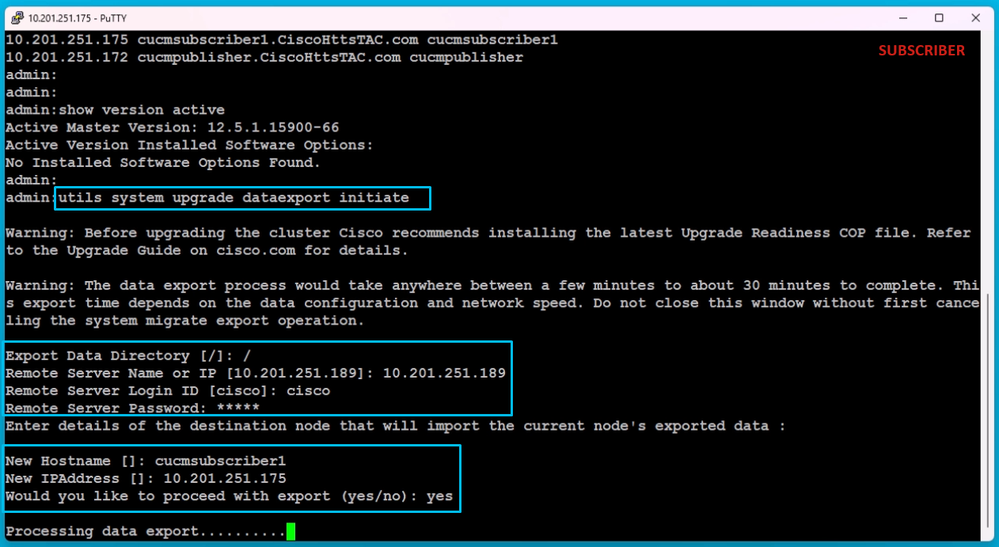
Run the command utils system upgrade dataexport initiate.
Data Export on the Subscriber
Provide the SFTP server details, the destination Subscriber hostname and IP Address.
Page 7
Note: In this lab, you use the same source cluster Subscriber hostname and IP Address.

Page 8
Processing Data Export
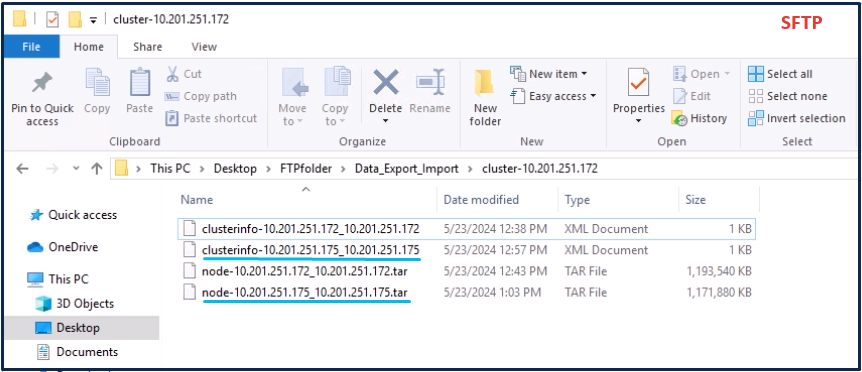
In the same folder location (cluster-Publisher IP Address) of the SFTP, the Subscriber exported data
exists.
Data Export is Completed for Subscriber
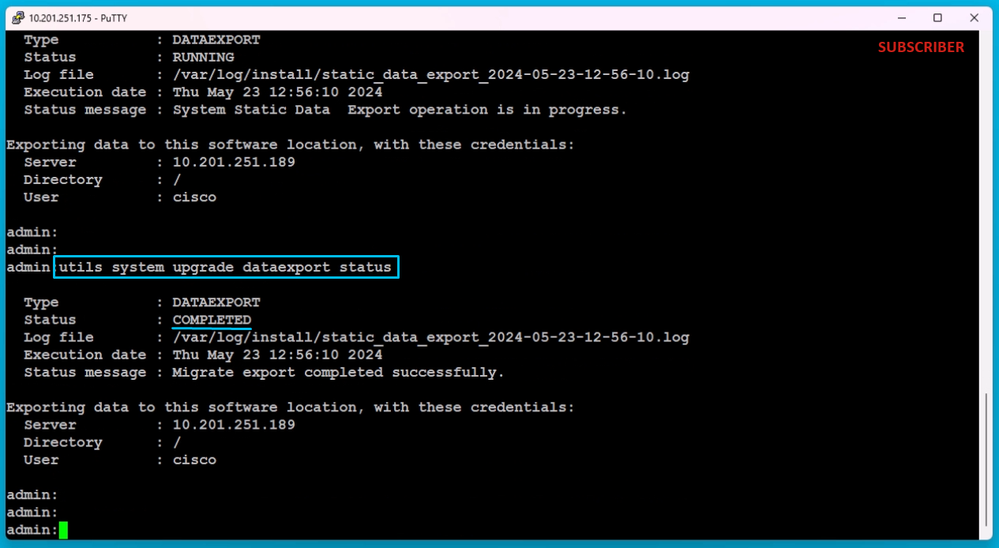
After export is done for the Subscriber, the status shows completed from the output of utils system
upgrade dataexport status.
Page 9
Data Export is Completed for Subscriber
Shutdown the Source Cluster Publisher
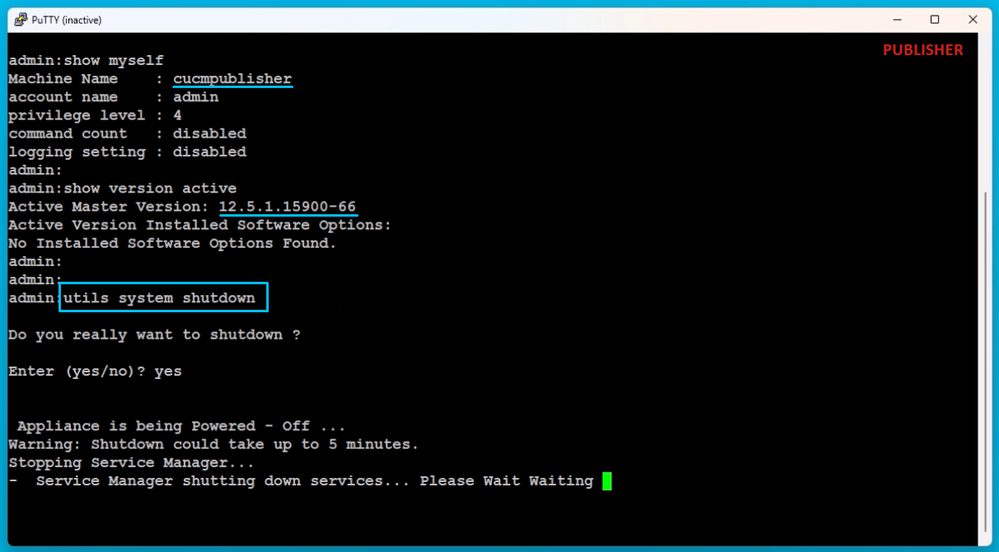
Shutdown the Publisher by executing the command utils system shutdown.
Shutdown the Publisher
Install New Publisher Using Exported Data
Page 10
Build a Virtual Machine for the Publisher using appropriate OVA Template.
Mount 15.0.1.11900-23 version bootable image to the Virtual Machine (VM) and turn ON the VM.
Press OK button after the media check is success.
Choose Cisco Unified Communication Manager and click OK button.
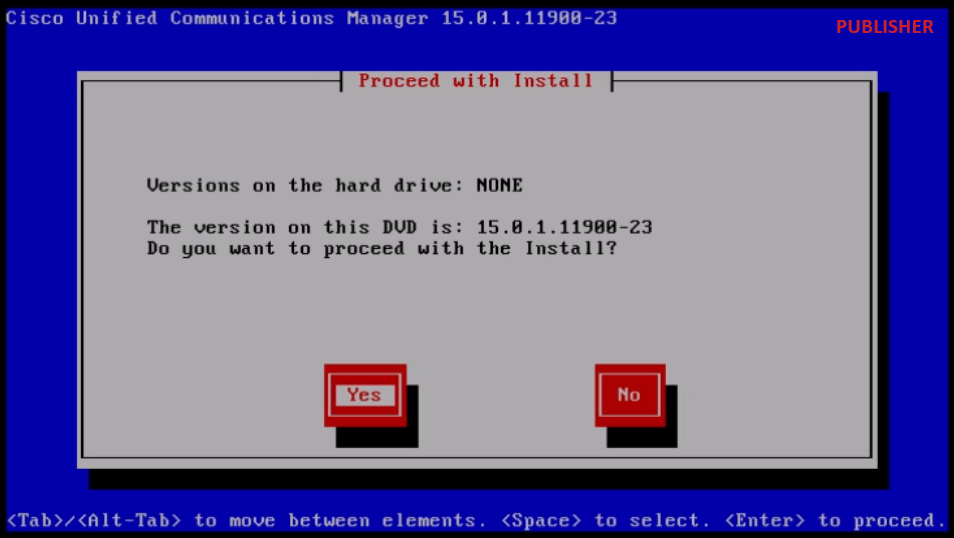
Press Yes button to proceed with installation of 15.0.1.11900-23 version.
Proceed with Install
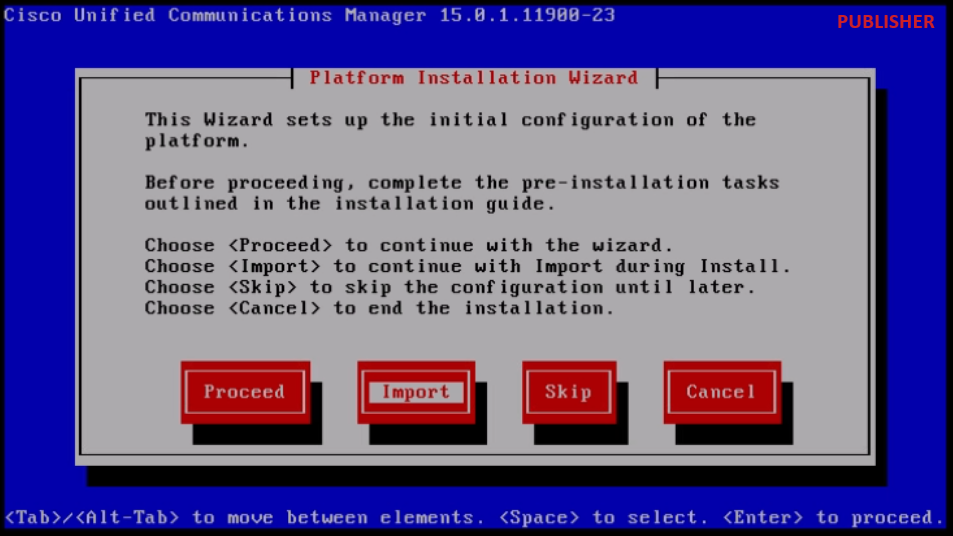
Click Import button in the Platform Installation Wizard.
Page 11
Platform Installation Wizard
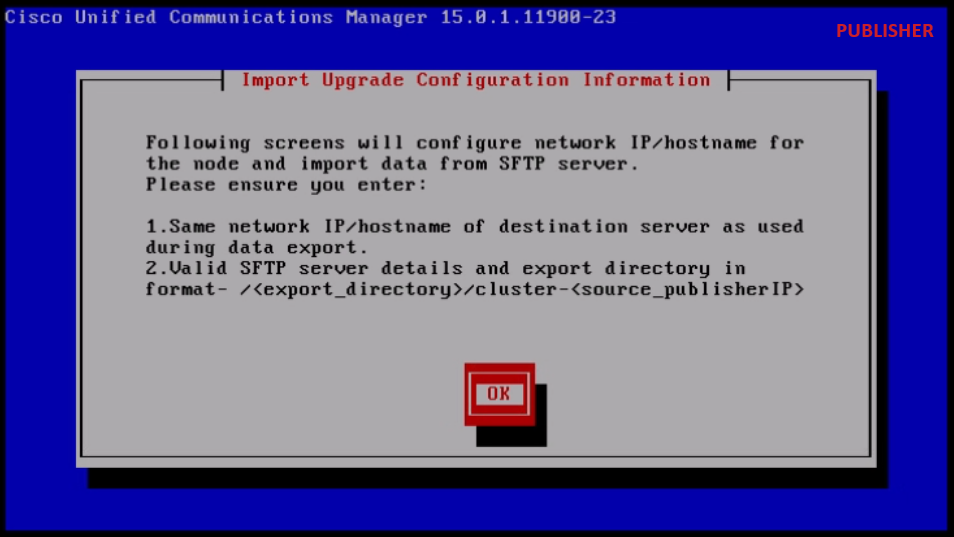
After reading the displayed information, click OK button in the Import Upgrade Configuration
information.
Import Upgrade Configuration Information
Choose appropriate timezone and then click OK button.
Click Continue button in the Auto Negotiation Configuration.
Page 12
Click No button to have the default value in MTU Configuration.
Press No button under the DHCP Configuration.
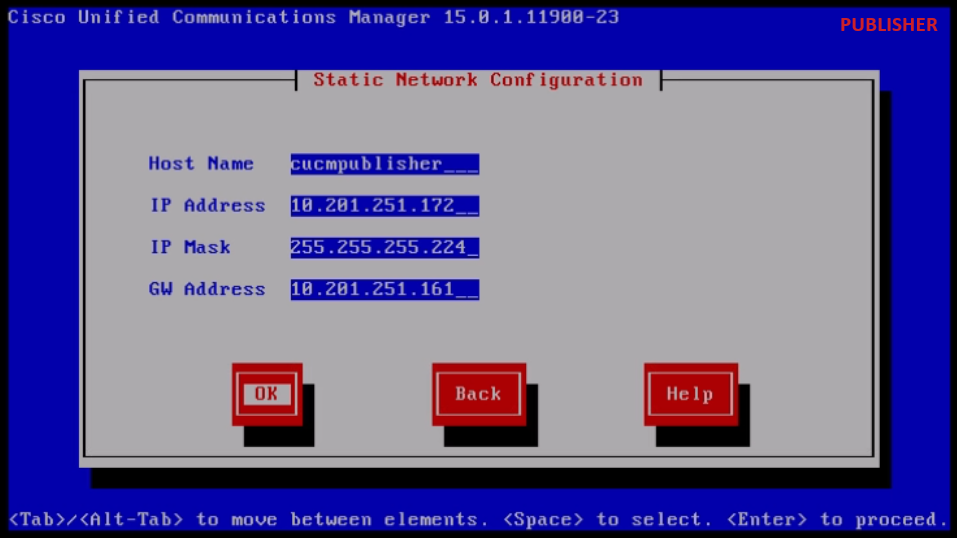
Provide the Host Name, IP Address, IP Mask and Gateway (GW) Address and then press OK button.
Static Network Configuration
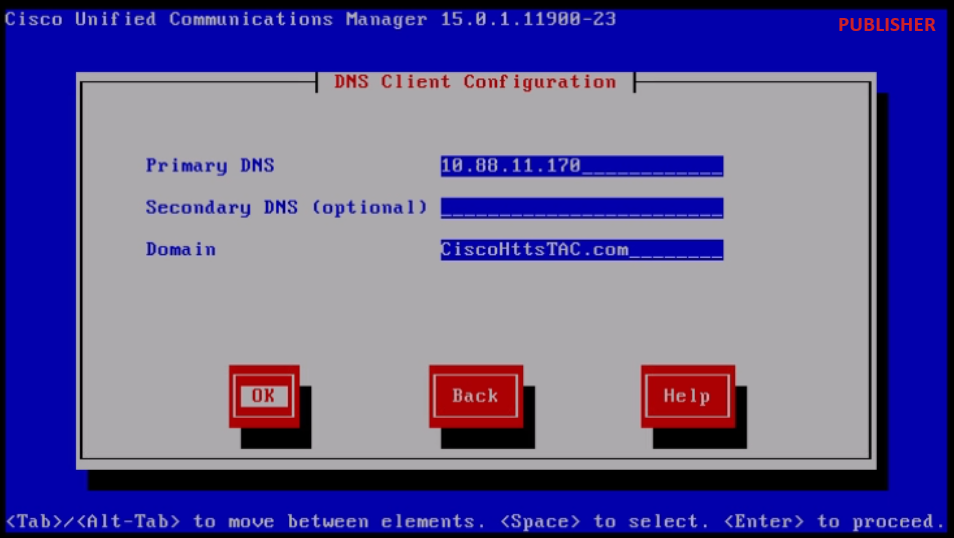
Click Yes button under the DNS Client Configuration.
Provide the Primary DNS server IP Address and Domain and then click OK button.
Page 13
DNS Client Configuration
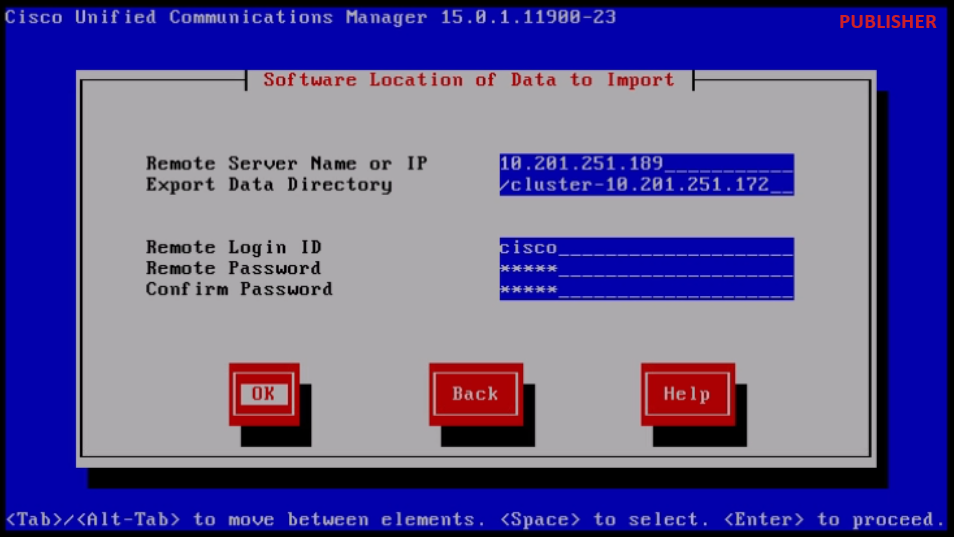
Provide the SFTP server information (IP, directory, login ID and Password) where you have the exported
data of the source cluster and then press OK button.
Page 14
Note: Location of the Publisher exported data is present in the folder cluster-
Publisher_IP_Address as shown in the screenshot.
Exported Data Location in the SFTP Server
Page 15
Software Location of Data to Import
Provide the Certificate information and click OK button.
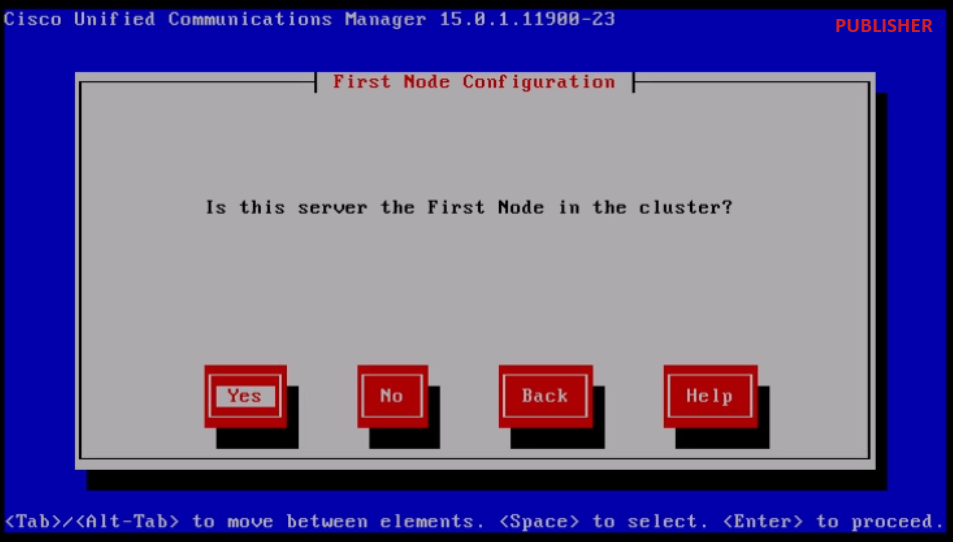
Press Yes button under First Node Configuration.
First Node Configuration
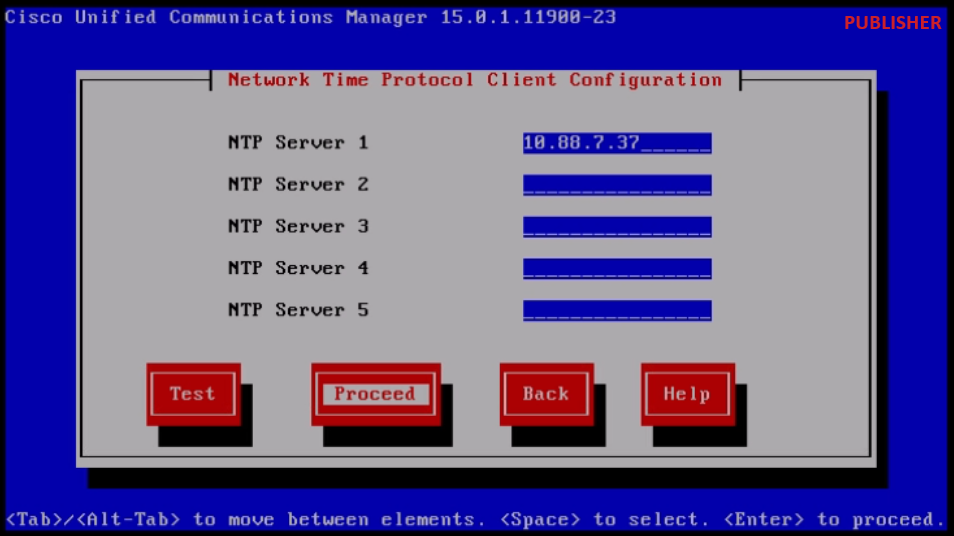
Configure the Network Time Protocol (NTP) server and then click Proceed button.
Page 16
NTP Client Configuration
Click No button for SMTP Host Configuration.
Page 17
Note: If want to configure SMTP, then press Yes button and configure the SMTP host.
Choose appropriate option under Smart Call Home Enable Page and click OK button.
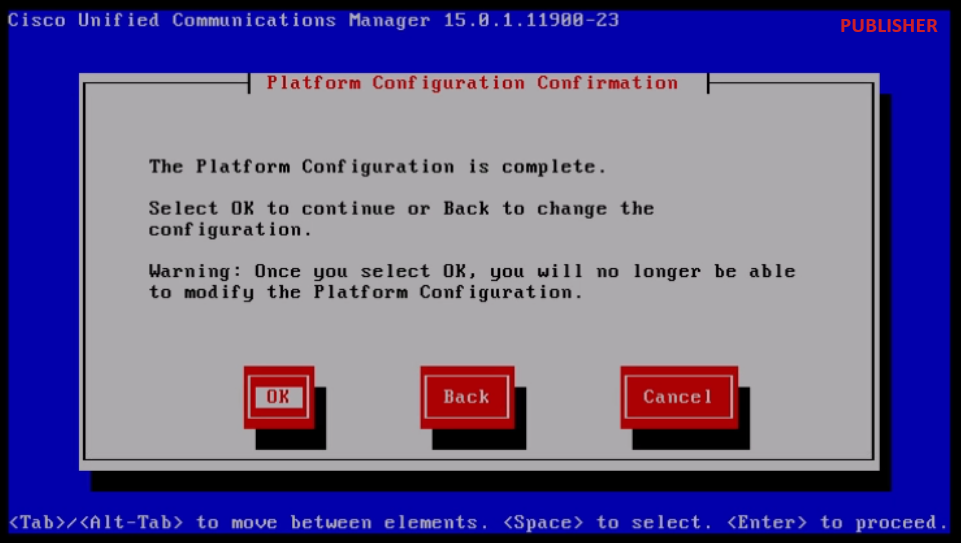
Click OK button under Platform Configuration Confirmation page to proceed with installation.

Page 18
Platfrom Configuration Confirmation
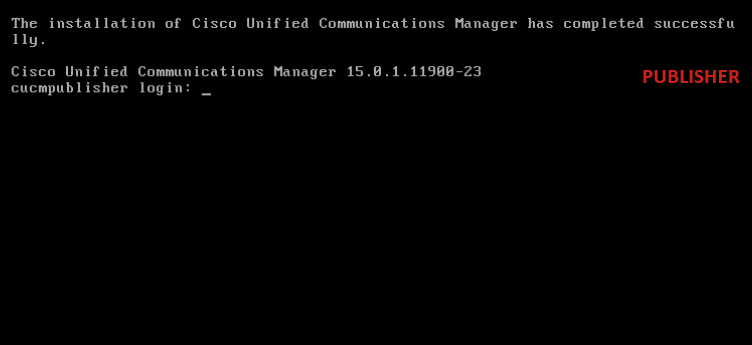
After few minutes, the installation of the Publisher is finished using the import feature.
Publisher Installation is Completed Successfully
Shutdown the Source Cluster Subscriber
Page 19
Note: There is no need to shut down all the subscriber nodes in the cluster in one go. You can shut
down only the specific subscriber to which you are performing the import operation.
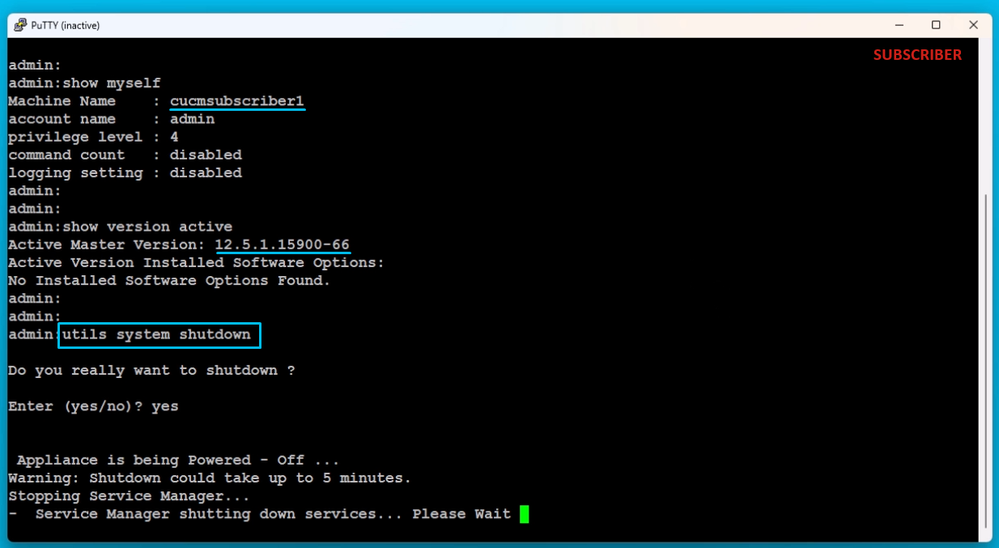
Shutdown the Subscriber by executing the command utils system shutdown.

Page 20
Shutdown the Subscriber
Install New Subscriber Using Exported Data
Build a Virtual Machine for the Subscriber using appropriate OVA Template.
Mount 15.0.1.11900-23 version bootable image to the Virtual Machine (VM) and turn ON the VM.
Press OK button after the media check is success.
Choose Cisco Unified Communication Manager and click OK button.
Press Yes button to proceed with installation of 15.0.1.11900-23 version.
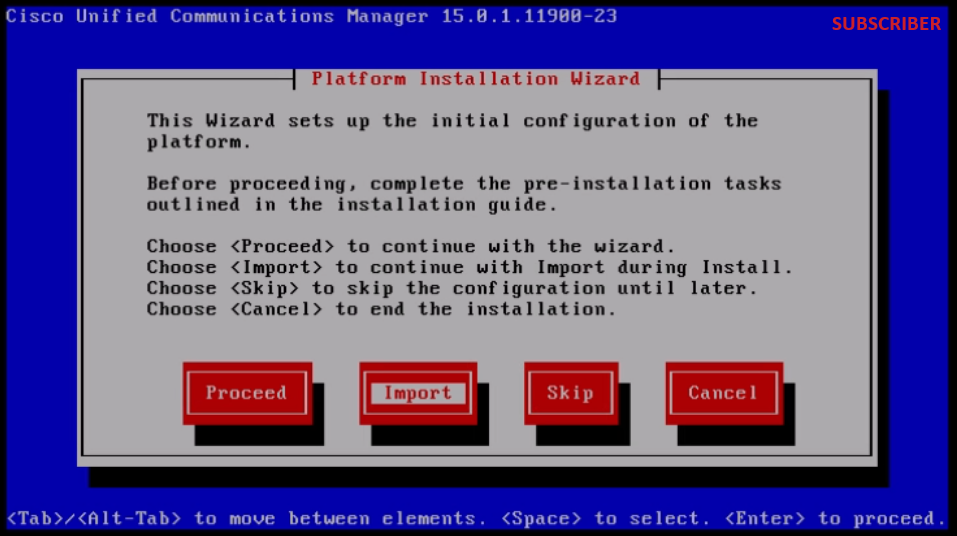
Click Import button in the Platform Installation Wizard.
Page 21
Platform Installation Wizard
After reading the displayed information, click OK button in the Import Upgrade Configuration information.
Choose appropriate timezone and then click OK button.
Click Continue button in the Auto Negotiation Configuration.
Click No button to have the default value in MTU Configuration.
Press No button under the DHCP Configuration.
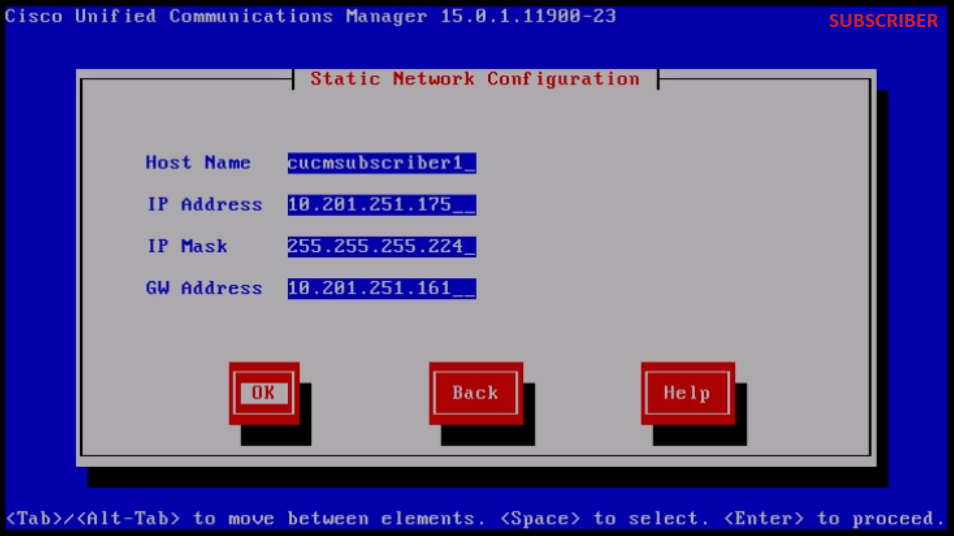
Provide the Host Name, IP Address, IP Mask and Gateway (GW) Address for the Subscriber server and
then press OK button.
Page 22
Static Network Configuration
Click Yes button under the DNS Client Configuration.
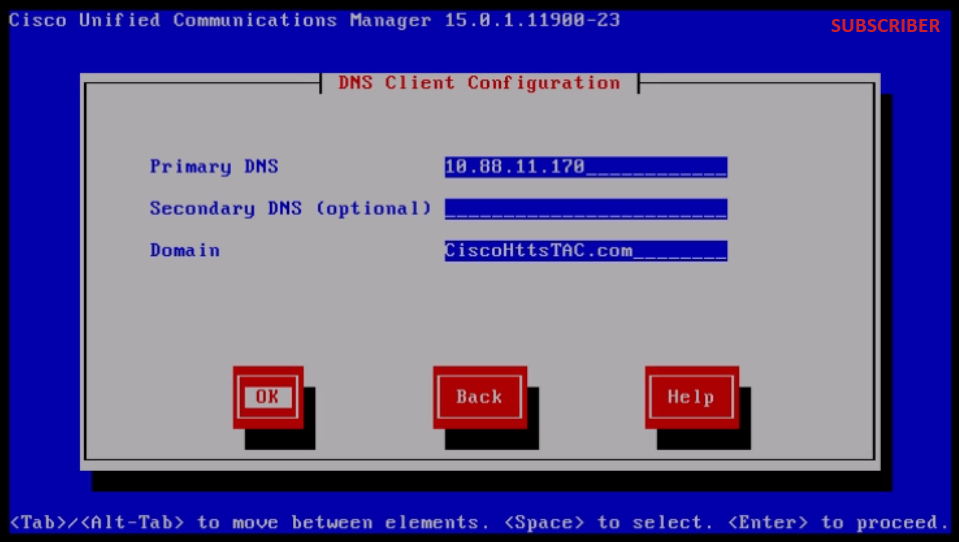
Provide the Primary DNS and Domain and then click OK button.
DNS Client Configuration
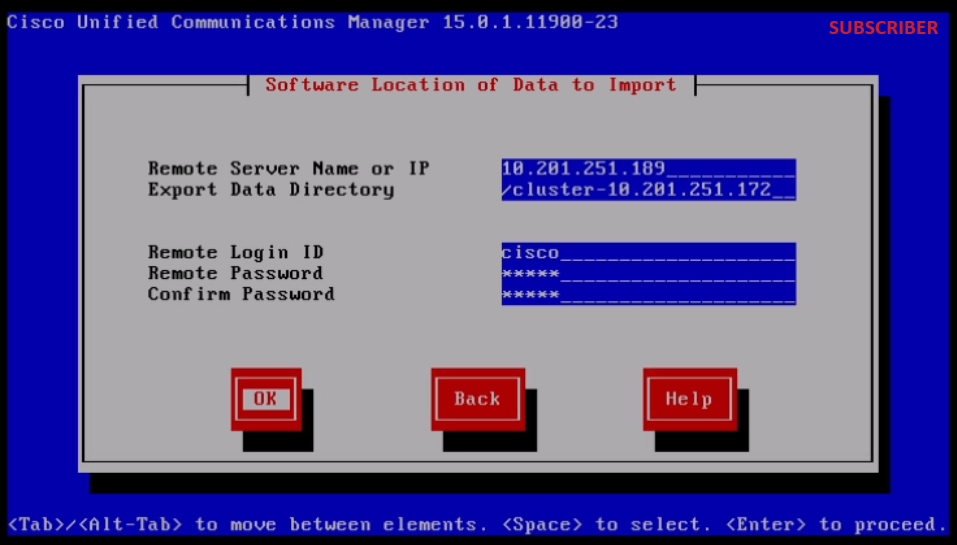
Provide the SFTP server information (IP, directory, login ID and Password) where you have the exported
data of the source cluster and then press OK button.
Page 23
Software Location of Data to Import
Page 24
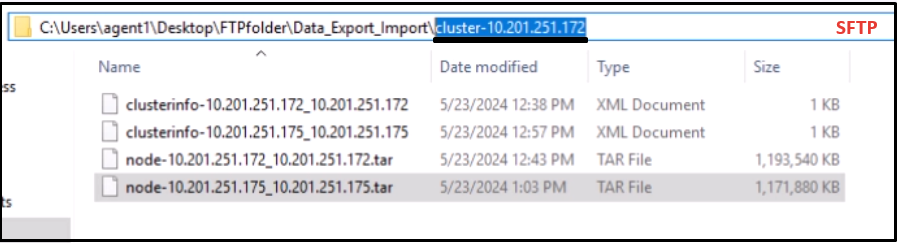
Note: Location of the Subscriber exported data is present in the folder cluster-
Publisher_IP_Address as shown in the screenshot.
Subscriber Exported Data Location in SFTP Server
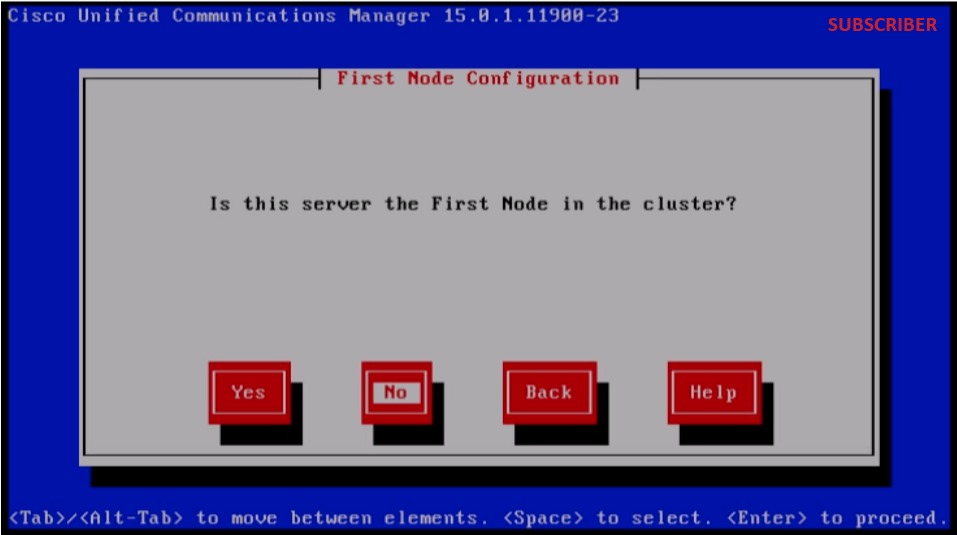
Provide the Certificate information and click OK button.
Press No button under First Node Configuration.
Page 25
First Node Configuration
Press OK button on the First Node Configuration page.
Click No button under Network Connectivity Test Configuration page.
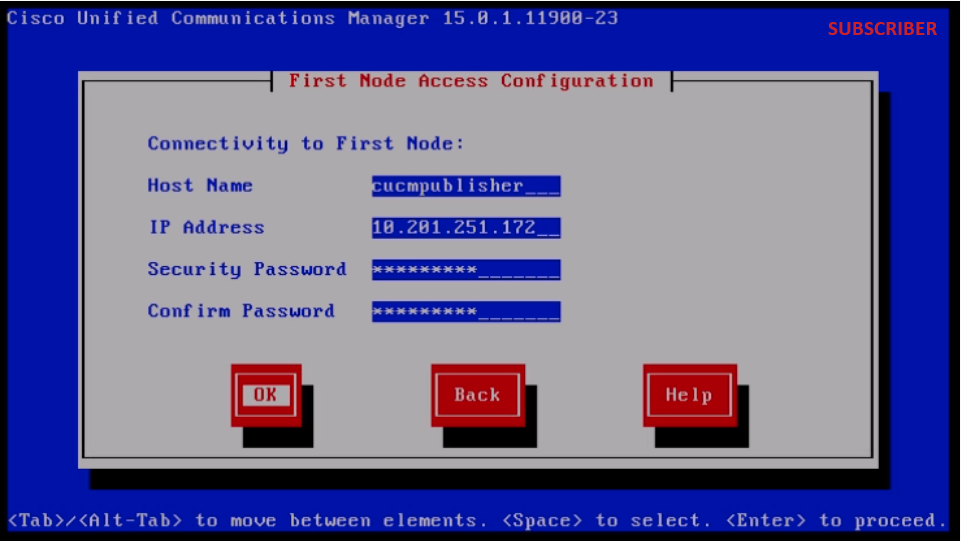
Provide the Publisher host name and IP Address in the First Node Access Configuration page and click
OK button.
Page 26
Note: The Security Password is auto-populated via imported data in this page.

Page 27
First Node Access Configuration
Click No button for SMTP Host Configuration.
Page 28
Note: If want to configure SMTP, then press Yes button and configure the SMTP host.
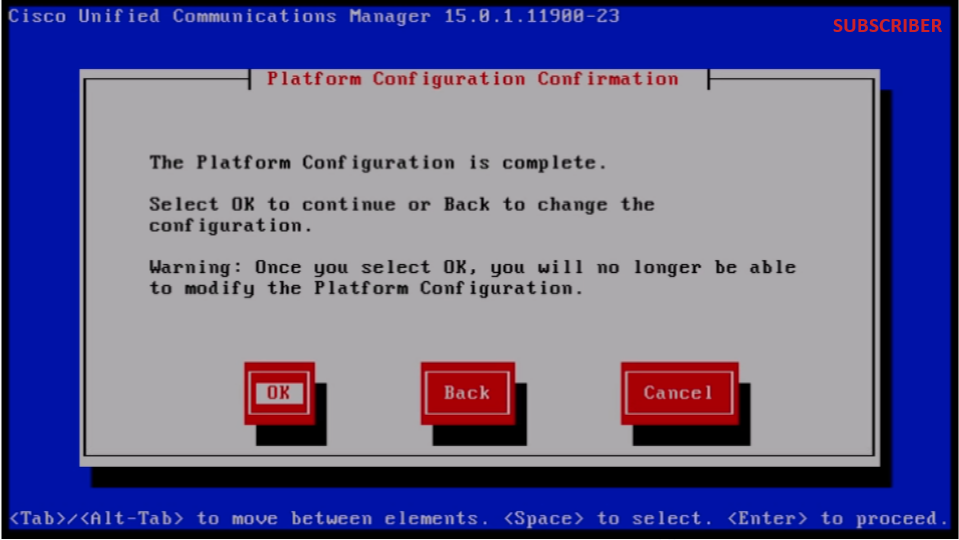
Click OK button under Platform Configuration Confirmation page to proceed with installation.

Page 29
Platform Configuration Confirmation
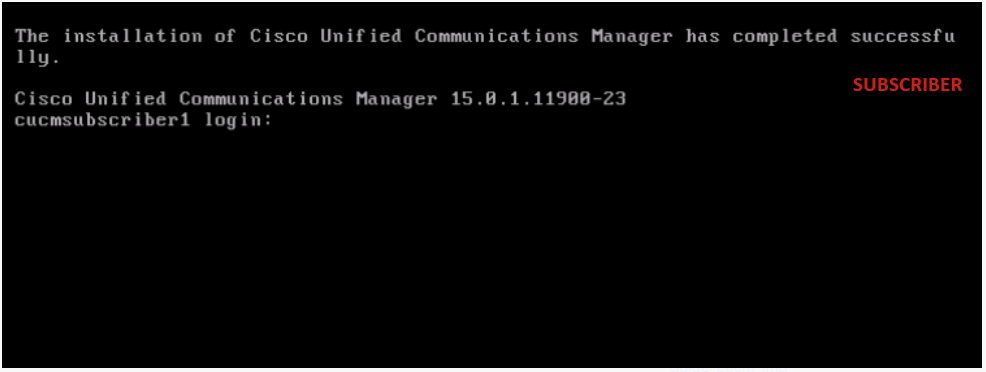
After few minutes, the installation of the Subscriber is successful using import feature.
Subscriber Installation is Successful
Verify
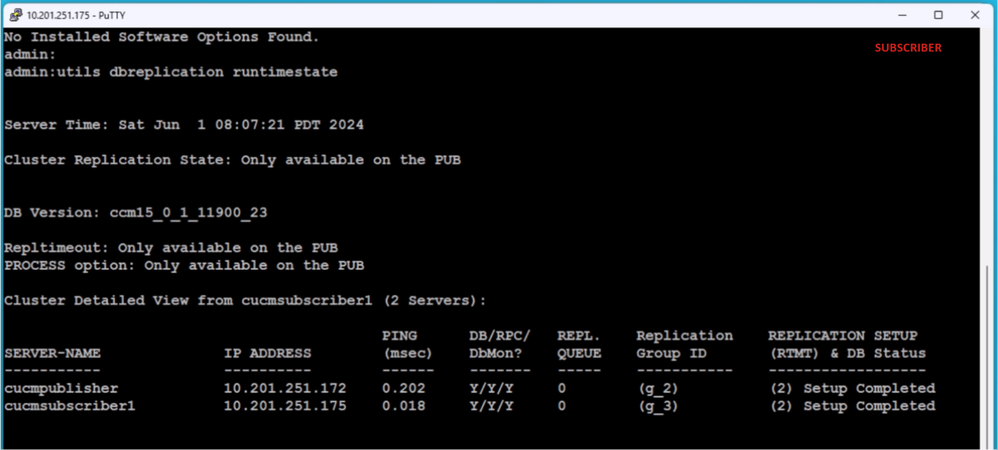
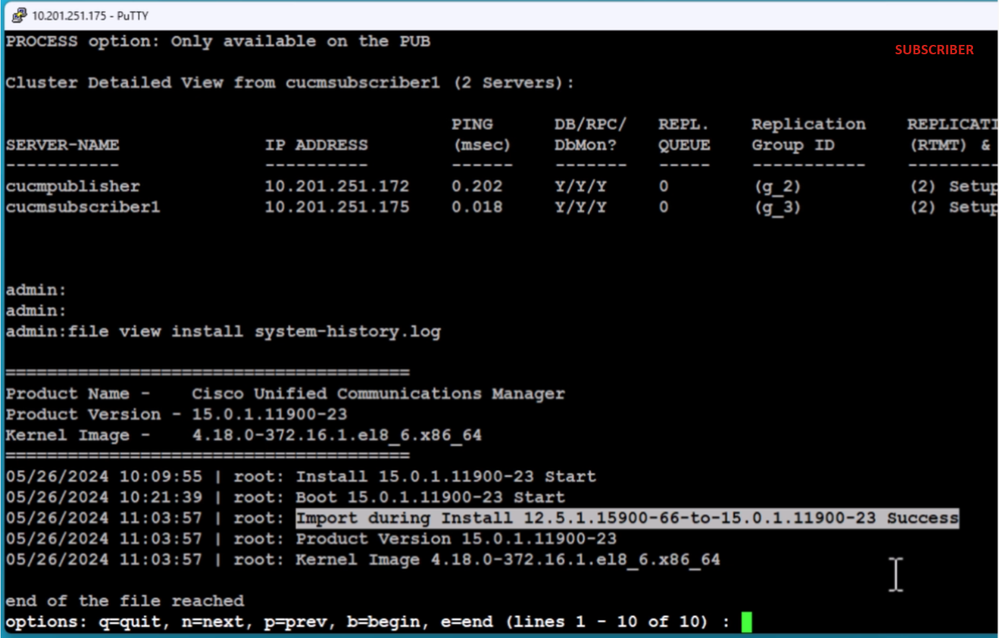
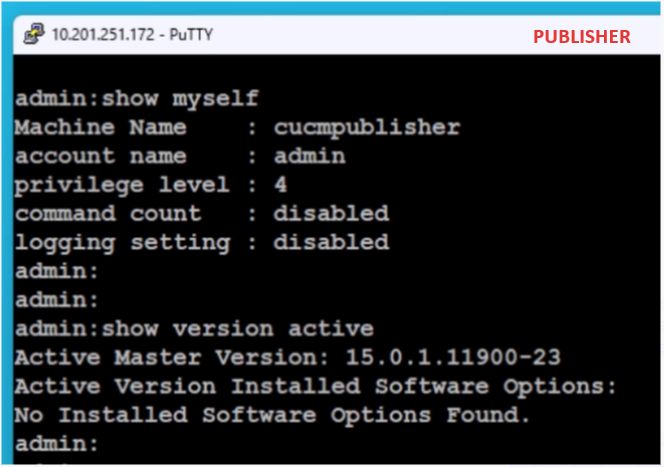
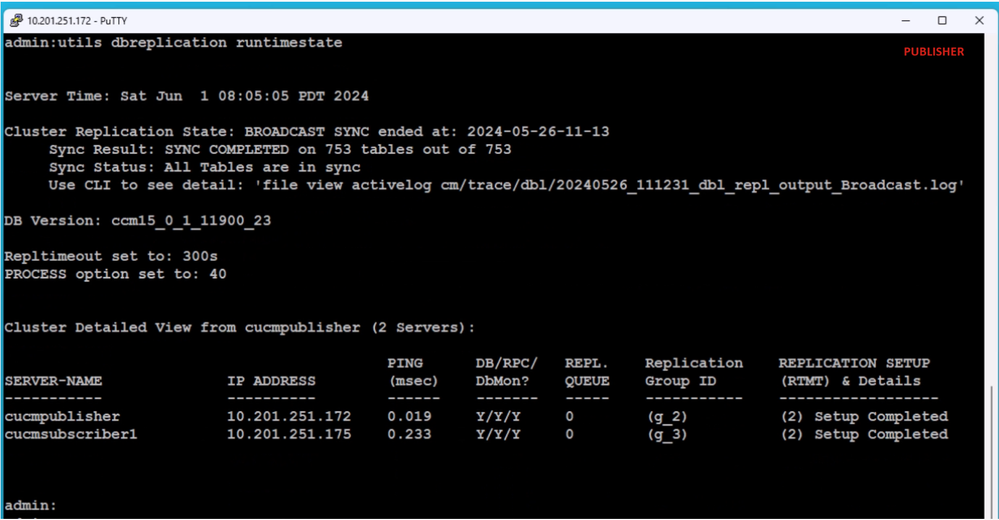
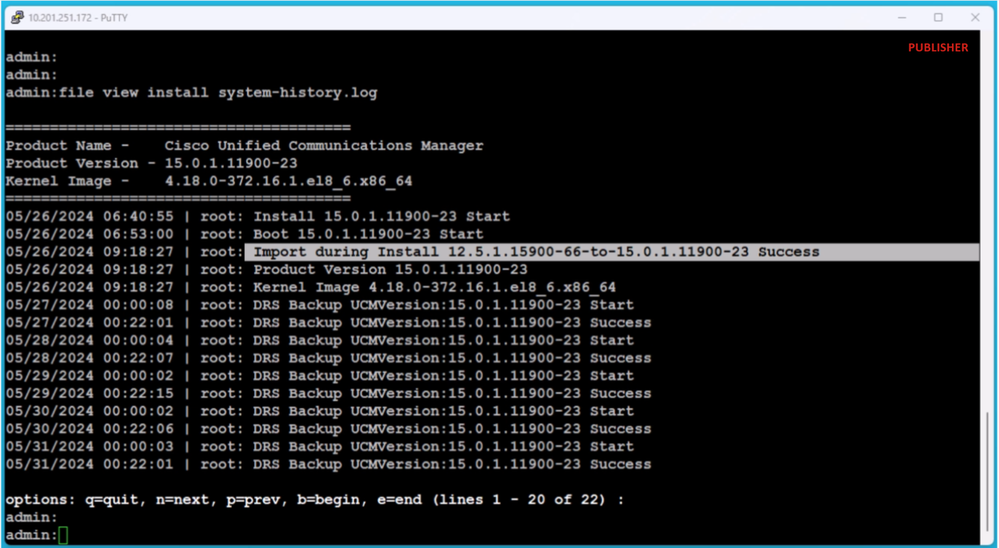
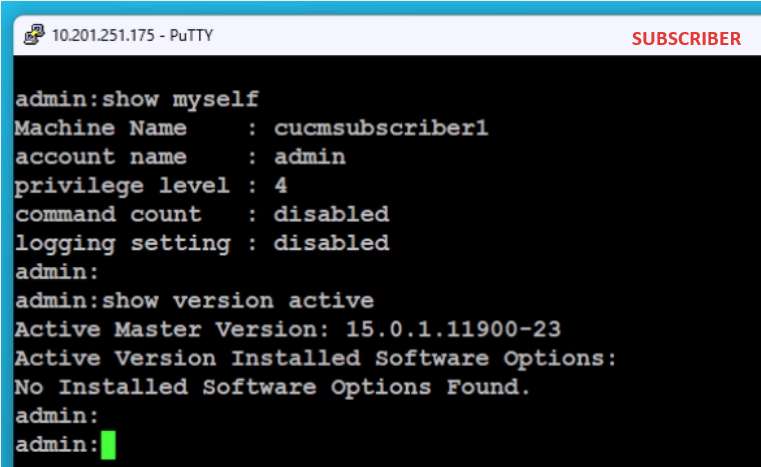
After successful installation of the Publisher and Subscriber, run the commands to validate.
show myself
show version active
utils dbreplication runtimestate
file view install system-history.log
PUBLISHER
Page 30
Publisher Verification
Publisher Verification
Page 31
Publisher Verification
SUBSCRIBER
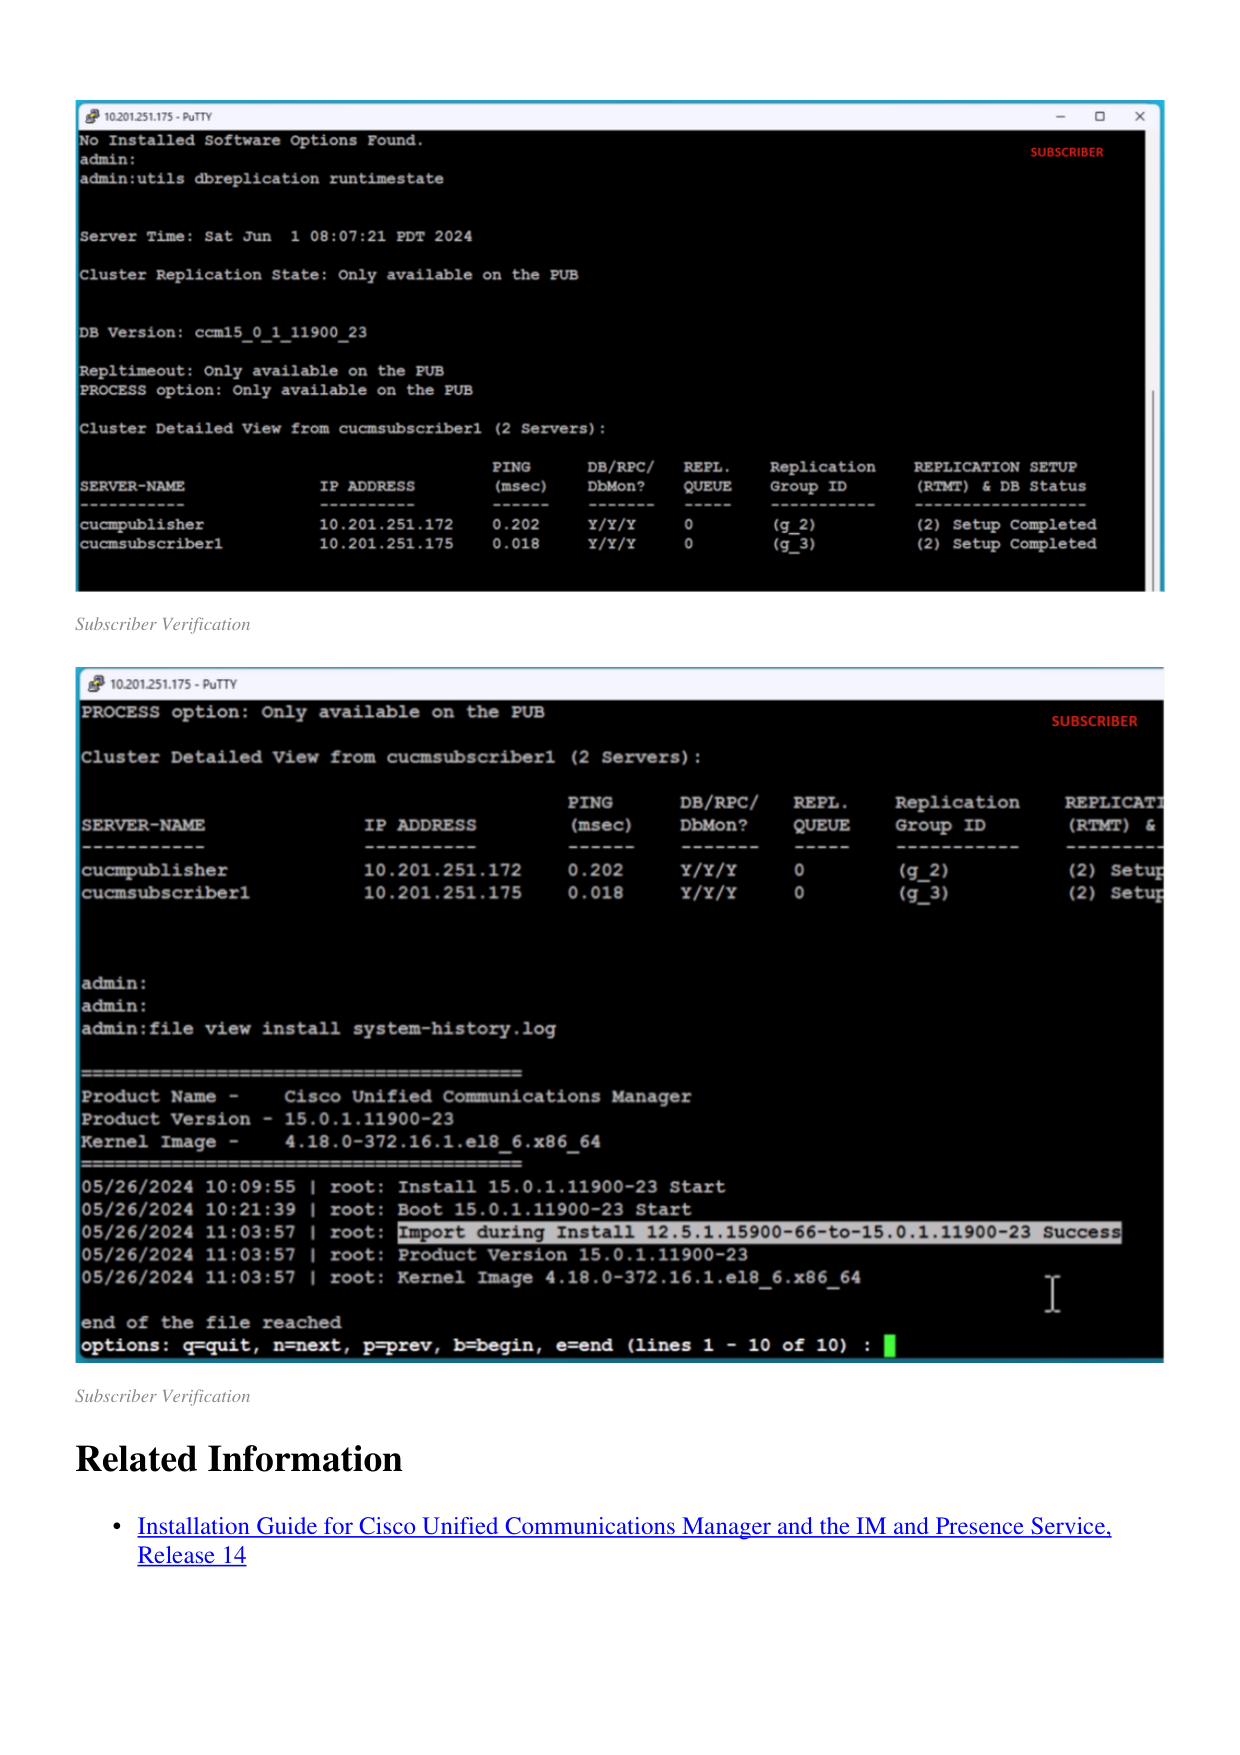
Subscriber Verification
Page 32
Subscriber Verification
Subscriber Verification
Related Information
Installation Guide for Cisco Unified Communications Manager and the IM and Presence Service,
Release 14
•