Document Metadata
Format: PDF
Title: Configure CUCM Private Line Automatic Ring-down (PLAR)
Page 1
Configure CUCM Private Line Automatic Ring-
down (PLAR)
Contents
Introduction
Prerequisites
Requirements
Components Used
Related Products
Configuration Steps
SCCP PLAR Configuration
Step 1. Create a Partition for the PLAR Destination
Step 2. Create a New CSS
Step 3. Create a Translation Pattern
Step 4. Assign the Desired Calling Search Space for the PLAR Phone
SIP PLAR Configuration
Step 1. Create SIP PLAR Dial Rules
Step 2. Create a New Pattern
Step 3. Assign the Rule to the SIP Phones
Verify
Introduction
This document describes how to configure a Cisco IP Phone for PLAR or Hotdial with Cisco Unified
Communications Manager (CUCM).
Prerequisites
Requirements
Cisco recommends that you have knowledge of these topics:
Cisco Unified Communications Manager (CUCM)
•
Calling Search Space (CSS)
•
Partition (PT)
•
Translation Patterns
•
Session Initiation Protocol (SIP) Dial Rules
•
Components Used
The information in this document was created from the devices in a specific lab environment. All of the
devices used in this document started with a cleared (default) configuration. If your network is live, ensure
that you understand the potential impact of any command.
Page 2
CUCM 10.5
•
Skinny Client Control Protocol (SCCP) & SIP phones register with CUCM
•
The information in this document was created from the devices in a specific lab environment. All of the
devices used in this document started with a cleared (default) configuration. If your network is live, ensure
that you understand the potential impact of any change.
Related Products
This document can also be used with these hardware and software versions:
CUCM 8.X/9.X/11.X/12.X/14.X
•
Configuration Steps
SCCP PLAR Configuration
In order to allow the phone to automatically dial a pre-configured phone number when the IP Phone goes
off-hook, a CSS is configured with a partition that contains a translation pattern with a blank translation
pattern string. This results in Cisco Call Manager immediately matching this pattern. The translation pattern
then transforms the called number which is none to the destination number (Hotdial) where the call is
delivered.
Note: Since a Directory Number (DN) configured for PLAR dials a preconfigured number when it
goes off-hook, you cannot use PLAR DN to dial any other numbers. For example, this is a typical
configuration in hotel lobbies.
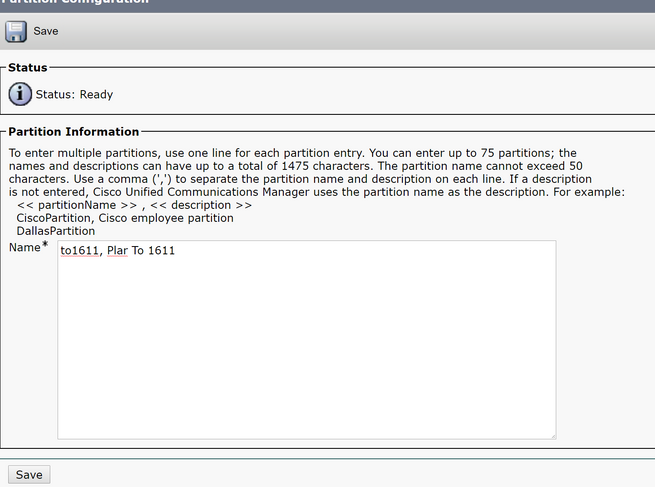
Step 1. Create a Partition for the PLAR Destination
Navigate to Call Routing> Class Control>Partition and then Add a New Partition. Enter the required
details and click Insert.

Page 3
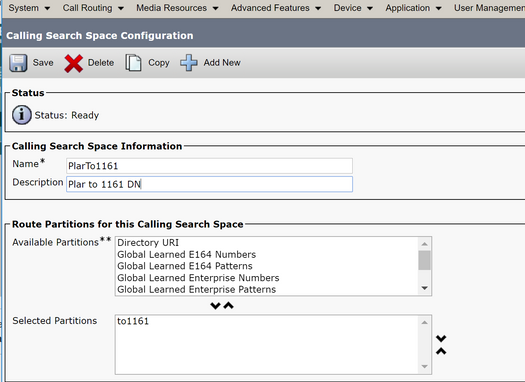
Step 2. Create a New CSS
Navigate to Call Routing> Class Control> Calling Search Space and then click Add a New Calling
Search Space.
Page 4
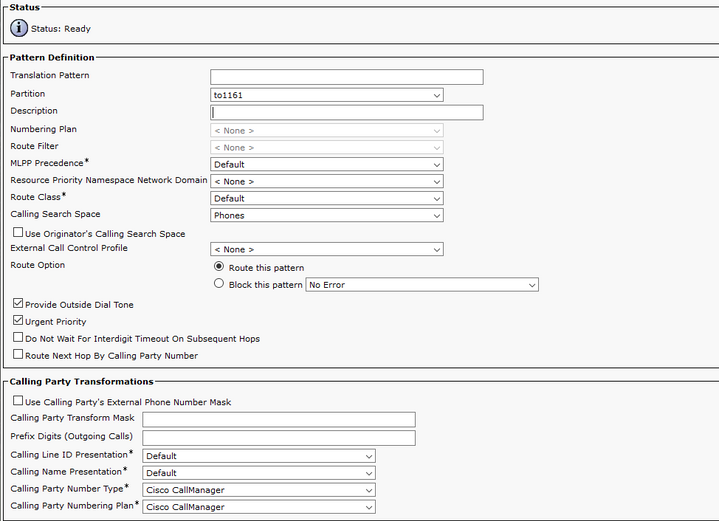
Step 3. Create a Translation Pattern
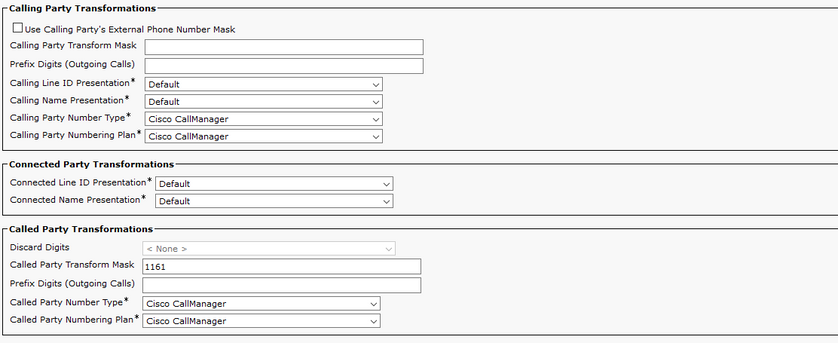
Navigate toCall Routing> Translation Pattern and then click Add a New Translation Pattern. Select the
desired partition name and CSS that were previously created in Step One and Step Two. Finally, under
Called Party Transformation Mask, enter the PLAR target number. Click Insert.
Note: Ensure that the Translation Pattern field is left blank.

Page 5
Note: The design behind the example is base on DN 1161. 1161 is the target for the PLAR, but this
configuration guarantees that 1161 can get a call from any other phone.
The CSS used in the first screenshot for the Translation Pattern has access to the target DN partition.
Step 4. Assign the Desired Calling Search Space for the PLAR Phone
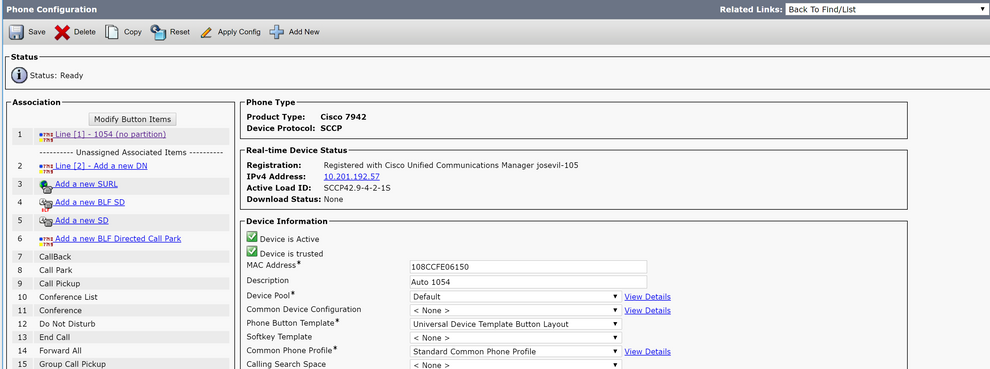
Navigate to Device > Phone.
•
Click Find in order to locate all the registered IP phones in Cisco Unified Communications Manager
•
Select the PLAR phone, and choose the DN to PLAR.
•
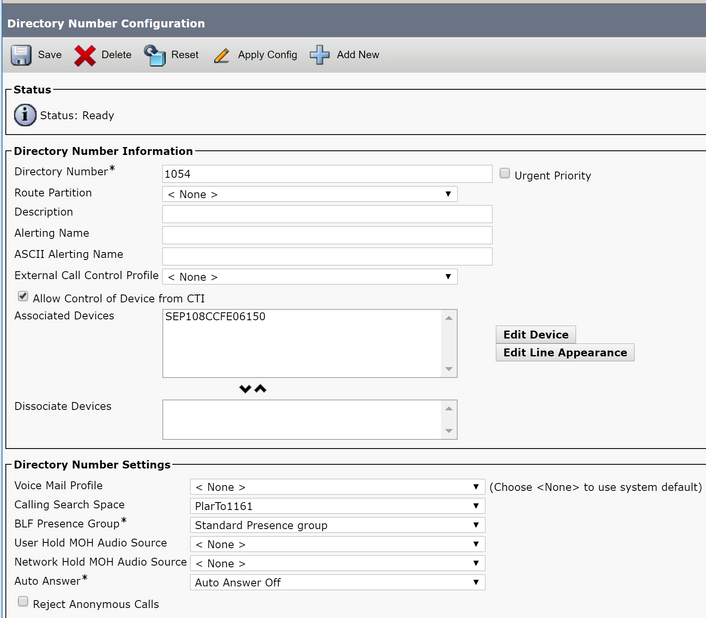
Assign the CSS to the DN for PLAR.
•

Page 6
Note: This configuration example creates a PLAR on DN 1054 to 1161, but the CSS is configured to a
DN level, which provides the ability to assign another DN to a different button on the phone, allowing
to make normal calls from the same IP Phone without affecting the PLAR feature.

Page 7
SIP PLAR Configuration
Step 1. Create SIP PLAR Dial Rules
Navigate toCall Routing > Dial Rules > SIP Dial Rules
•
Click Add New.
•
Step 2. Create a New Pattern
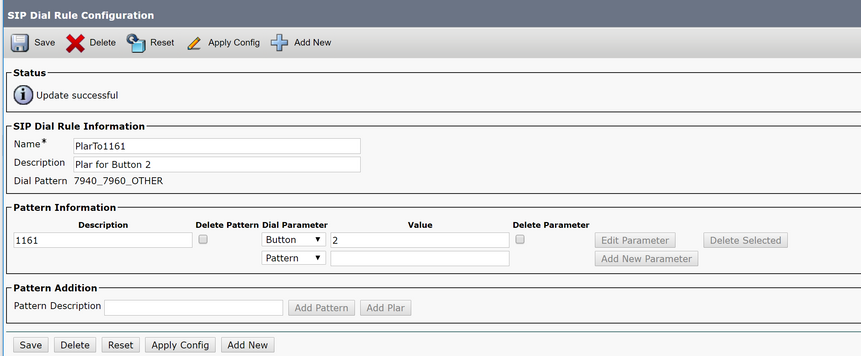
Add a pattern description. Typing the description activates buttons Add Pattern and Add Plar.
•
Click Add Plar.
•
Page 8
Note: Set the Value field to 1 if this is a single line IP Phone.
Note: The description field is optional.
Note: The Dial Parameter is set to button in order to force the PLAR feature to only 1 DN of the
device.
Note: If PLAR is required in another button or IP Phone, another PLAR Rule needs to be created.
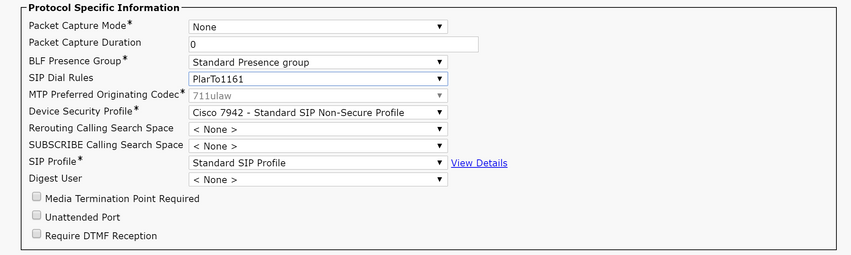
Step 3. Assign the Rule to the SIP Phones
This is only required on SIP phones.


Page 9
Verify
In order to verify that the configuration was performed correctly take the phone off hook. The phone
automatically dials the number 1161.