Document Metadata
Format: PDF
Title: SAML SSO Deployment Guide for Cisco Unified Communications Applications, Release 15 and SUs
Author: Unknown
Creator: DITA Open Toolkit
Page 1
SAML SSO Deployment Guide for Cisco Unified Communications
Applications, Release 15 and SUs
First Published: 2023-12-18
Last Modified: 2025-05-26
Americas Headquarters
Cisco Systems, Inc.
170 West Tasman Drive
San Jose, CA 95134-1706
USA
http://www.cisco.com
Tel: 408 526-4000
800 553-NETS (6387)
Fax: 408 527-0883


Page 2
© 2023–2025 Cisco Systems, Inc. All rights reserved.
Page 3
C O N T E N T S
Preface
vii
P R E F A C E
Purpose
vii
Audience
vii
Organization
vii
Conventions
vii
Additional Information
viii
Cisco Product Security Overview
viii
New and Changed Information
1
C H A P T E R 1
New and Changed Information
1
SAML-Based SSO Solution
3
C H A P T E R 2
About SAML SSO Solution
3
Single Sign on Single Service Provider Agreement
4
SAML-Based SSO Features
4
Basic Elements of a SAML SSO Solution
4
Cisco Unified Communications Applications that Support SAML SSO
5
SAML SSO Support for Cisco Unified Communications Manager Web Interfaces
6
Configure Unique Identification Value for Platform Users
7
Recovery URL Sign-in Option for Cisco Unified OS Administration
7
Software Requirements
8
Selecting an Identity Provider (IdP)
8
SAML Components
9
SAML SSO Call Flow
10
Java Requirements for SAML SSO Login to RTMT via Okta
12
SAML SSO Deployment Guide for Cisco Unified Communications Applications, Release 15 and SUs
iii

Page 4
SAML SSO Requirements for Identity Providers
13
C H A P T E R 3
Requirements for Identity Providers
13
SAML Agreement Types
14
Metadata Exchange
15
SAML Assertions
17
SAML OAuth Authentication Flow
19
SAML SSO Configuration
21
C H A P T E R 4
SAML-Based SSO Prerequisites
21
NTP Setup
21
DNS Setup
21
Directory Setup
22
Certificate Management and Validation
22
Certificates Signed by a Certificate Authority
23
Configure Multiserver SAN Certificates
24
Deploy Certificate Issuer for Microsoft Edge Interoperability
24
SAML SSO Configuration Task Flow
25
Initiate SSO Configuration on Collaboration Applications
25
Metadata Download Example
27
Configure SAML SSO on Identity Provider
28
Enable SAML SSO for Cisco Collaboration Applications
28
SAML SSO Additional Tasks
30
Restart Cisco Tomcat Service
30
Additional Expressway Configuration for ADFS
30
Configure SSO Login Behavior for Cisco Jabber on iOS
31
Access the Recovery URL
31
Update Server Metadata After a Domain or Hostname Change
32
Update IdP Metadata
33
Manually Provision Server Metadata
33
Reconfigure OpenAM SSO to SAML SSO Following an Upgrade
34
Re-Provisioning Cluster After Network Migration
34
SAML SSO Deployment Interactions and Restrictions
35
SAML SSO Deployment Guide for Cisco Unified Communications Applications, Release 15 and SUs
iv
Contents
Page 5
End User SAML SSO
37
C H A P T E R 5
End User SAML SSO Configuration
37
SAML-Based SLO
39
C H A P T E R 6
Support for SAML-Based Single Logout (SLO)
39
Example Configuration of SAML-Based Single Logout with ADFS 2.0
40
SAML SSO Deployment Guide for Cisco Unified Communications Applications, Release 15 and SUs
v
Contents
Page 6
SAML SSO Deployment Guide for Cisco Unified Communications Applications, Release 15 and SUs
vi
Contents
Page 7
Preface
• Purpose, on page vii
• Audience, on page vii
• Organization, on page vii
• Conventions, on page vii
• Additional Information, on page viii
• Cisco Product Security Overview, on page viii
Purpose
The SAML SSO Deployment Guide for Cisco Unified Communications Applications provides information on
how to enable the Security Assertion Markup Language Single Sign-On (SAML SSO) solution, which allows
administrators to access a defined set of Cisco collaboration applications seamlessly after signing into one of
those applications. This document describes the various applications that can be used with the SAML-based
SSO solution as well as the supported Identity Providers (IdPs) that provide the user authentication for the
solution. This document provides links to product documentation for configuration of specific collaboration
applications.
Audience
This document is intended for system administrators who are familiar with the SAML-based SSO solution
for the various Cisco Unified Communications applications and supported IdPs. This guide also requires
knowledge of Network Time Protocol (NTP) and Domain Name System (DNS) server settings.
Organization
The following table provides the organization of this guide.
Conventions
This document uses the following conventions.
SAML SSO Deployment Guide for Cisco Unified Communications Applications, Release 15 and SUs
vii

Page 8
Description
Convention
Commands and keywords are in boldface.
boldface font
Arguments for which you supply values are in italics.
italic font
A non-quoted set of characters. Do not use quotation
marks around the string or the string will include the
quotation marks.
string
Terminal sessions and information the system displays
are in screen font.
screen font
Information you must enter is in boldface screen font.
boldface screen font
Arguments for which you supply values are in italic
screen font.
italic screen font
Nonprinting characters, such as passwords, are in
angle brackets.
< >
Notes use the following conventions:
Means reader take note. Notes contain helpful suggestions or references to material not covered in the
publication.
Note
Tips use the following conventions:
Means the information contains useful tips.
Tip
Additional Information
For information on obtaining documentation, submitting a service request, and gathering additional information,
see the monthly What'sNew in CiscoProduct Documentation, which also lists all new and revised Ciscotechnical
documentation, at:
http://www.cisco.com/en/US/docs/general/whatsnew/whatsnew.html
Subscribe to the What'sNew in CiscoProduct Documentation as a Really Simple Syndication(RSS) feed and
set content to be delivered directly to your desktop using a reader application. The RSS feeds are a free service
and Cisco currently supports RSSVersion2.0.
Cisco Product Security Overview
This product contains cryptographic features and is subject to United States and local country laws governing
import, export, transfer and use. Delivery of Cisco cryptographic products does not imply third-party authority
to import, export, distribute or use encryption. Importers, exporters, distributors and users are responsible for
SAML SSO Deployment Guide for Cisco Unified Communications Applications, Release 15 and SUs
viii
Preface
Additional Information


Page 9
compliance with U.S. and local country laws. By using this product you agree to comply with applicable laws
and regulations. If you are unable to comply with U.S. and local laws, return this product immediately.
Further information regarding U.S. export regulations may be found at
http://www.access.gpo.gov/bis/ear/ear_data.html
SAML SSO Deployment Guide for Cisco Unified Communications Applications, Release 15 and SUs
ix
Preface
Preface
Page 10
SAML SSO Deployment Guide for Cisco Unified Communications Applications, Release 15 and SUs
x
Preface
Preface
Page 11
C H A P T E R 1
New and Changed Information
• New and Changed Information, on page 1
New and Changed Information
The following table provides an overview of the significant changes to the features in this guide up to this
current release. The table does not provide an exhaustive list of all changes made to the guide or of the new
features up to this release.
Table 1: New Features and Changed Behavior in Unified Communications Manager and IM and Presence Service
See
Description
Date
Enable SAML SSO for Cisco
Collaboration Applications, on page
28
Enhancements added for Single
Sign-On Service Provider.
October 01, 2024
Example Configuration of
SAML-Based Single Logout with
ADFS 2.0, on page 40
Added procedure for SAML-Based
Single Logout (SLO).
March 05, 2024
Re-Provisioning Cluster After
Network Migration, on page 34
Added support for re-provisioning
after network migration.
December 18, 2023
SAML SSO Deployment Guide for Cisco Unified Communications Applications, Release 15 and SUs
1

Page 12
SAML SSO Deployment Guide for Cisco Unified Communications Applications, Release 15 and SUs
2
New and Changed Information
New and Changed Information
Page 13
C H A P T E R 2
SAML-Based SSO Solution
• About SAML SSO Solution, on page 3
• Single Sign on Single Service Provider Agreement, on page 4
• SAML-Based SSO Features, on page 4
• Basic Elements of a SAML SSO Solution, on page 4
• Cisco Unified Communications Applications that Support SAML SSO, on page 5
• SAML SSO Support for Cisco Unified Communications Manager Web Interfaces, on page 6
• Software Requirements, on page 8
• Selecting an Identity Provider (IdP), on page 8
• SAML Components, on page 9
• SAML SSO Call Flow, on page 10
• Java Requirements for SAML SSO Login to RTMT via Okta, on page 12
About SAML SSO Solution
When deploying Cisco Jabber with Cisco Webex meeting server, Unified Communications Manager and the
Webex meeting server must be in the same domain.
Important
SAML is an XML-based open standard data format that enables administrators to access a defined set of Cisco
collaboration applications seamlessly after signing into one of those applications. SAML describes the exchange
of security related information between trusted business partners. It is an authentication protocol used by
service providers (for example, Unified Communications Manager) to authenticate a user. SAML enables
exchange of security authentication information between an Identity Provider (IdP) and a service provider.
SAML SSO uses the SAML 2.0 protocol to offer cross-domain and cross-product single sign-on for Cisco
collaboration solutions. SAML 2.0 enables SSO across Cisco applications and enables federation between
Cisco applications and an IdP. SAML 2.0 allows Cisco administrative users to access secure web domains to
exchange user authentication and authorization data, between an IdP and a Service Provider while maintaining
high security levels. The feature provides secure mechanisms to use common credentials and relevant
information across various applications.
The authorization for SAML SSO Admin access is based on Role-Based Access Control (RBAC) configured
locally on Cisco collaboration applications.
SAML SSO Deployment Guide for Cisco Unified Communications Applications, Release 15 and SUs
3


Page 14
SAML SSO establishes a Circle of Trust (CoT) by exchanging metadata and certificates as part of the
provisioning process between the IdP and the Service Provider. The Service Provider trusts the IdP's user
information to provide access to the various services or applications.
Service providers are no longer involved in authentication. SAML 2.0 delegates authentication away from
the service providers and to the IdPs.
Important
The client authenticates against the IdP, and the IdP grants an Assertion to the client. The client presents the
Assertion to the Service Provider. Since there is a CoT established, the Service Provider trusts the Assertion
and grants access to the client.
Single Sign on Single Service Provider Agreement
Single sign-on allows you to access multiple Cisco collaboration applications after logging on to one of them.
In the releases earlier than Unified Communications Manager Release 11.5, when administrators enabled
SSO, each cluster node generated its own service provider metadata (SP metadata) file with a URL and a
certificate. Each generated file had to be uploaded separately on Identity Provider (IDP) server. As the IDP
server considered each IDP and SAML exchange as a separate agreement, the number of agreements that
were created was equivalent to the number of nodes in the cluster.
To improve the user experience and to reduce the total cost of the solution for large deployments, this release
is enhanced. Now, it supports a single SAML agreement for a Unified Communications Manager cluster
(Unified Communications Manager and Instant Messaging and Presence (IM and Presence)).
SAML-Based SSO Features
Enabling SAML SSO results in several advantages:
• It reduces password fatigue by removing the need for entering different user name and password
combinations.
• It transfers the authentication from your system that hosts the applications to a third party system. Using
SAML SSO, you can create a circle of trust between an IdP and a service provider. The service provider
trusts and relies on the IdP to authenticate the users.
• It protects and secures authentication information. It provides encryption functions to protect authentication
information passed between the IdP, service provider, and user. SAML SSO can also hide authentication
messages passed between the IdP and the service provider from any external user.
• It improves productivity because you spend less time re-entering credentials for the same identity.
• It reduces costs as fewer help desk calls are made for password reset, thereby leading to more savings.
Basic Elements of a SAML SSO Solution
• Client (the user’s client): This is a browser-based client or a client that can leverage a browser instance
for authentication. For example, a system administrator’s browser.
• Service provider: This is the application or service that the client is trying to access. For example, Unified
Communications Manager.
SAML SSO Deployment Guide for Cisco Unified Communications Applications, Release 15 and SUs
4
SAML-Based SSO Solution
Single Sign on Single Service Provider Agreement

Page 15
• An Identity Provider (IdP) server: This is the entity that authenticates user credentials and issues SAML
Assertions.
• Lightweight Directory Access Protocol (LDAP) users: These users are integrated with an LDAP directory,
for example Microsoft Active Directory or OpenLDAP. Non-LDAP users reside locally on the Unified
Communications server.
• SAML Assertion: It consists of pieces of security information that are transferred from IdPs to the service
provider for user authentication. An assertion is an XML document that contains trusted statements about
a subject including, for example, a username and privileges. SAML assertions are usually digitally signed
to ensure their authenticity.
• SAML Request: This is an authentication request that is generated by a Unified Communications
application. To authenticate the LDAP user, Unified Communications application delegates an
authentication request to the IdP.
• Circle of Trust (CoT): It consists of the various service providers that share and authenticate against one
IdP in common.
• Metadata: This is an XML file generated by an SSO-enabled Unified Communications application (for
example, Unified Communications Manager, Cisco Unity Connection, and so on) as well as an IdP. The
exchange of SAML metadata builds a trust relationship between the IdP and the service provider.
• Assertion Consumer Service (ACS) URL: This URL instructs the IdPs where to post assertions. The
ACS URL tells the IdP to post the final SAML response to a particular URL.
All in-scope services requiring authentication use SAML 2.0 as the SSO mechanism.
Note
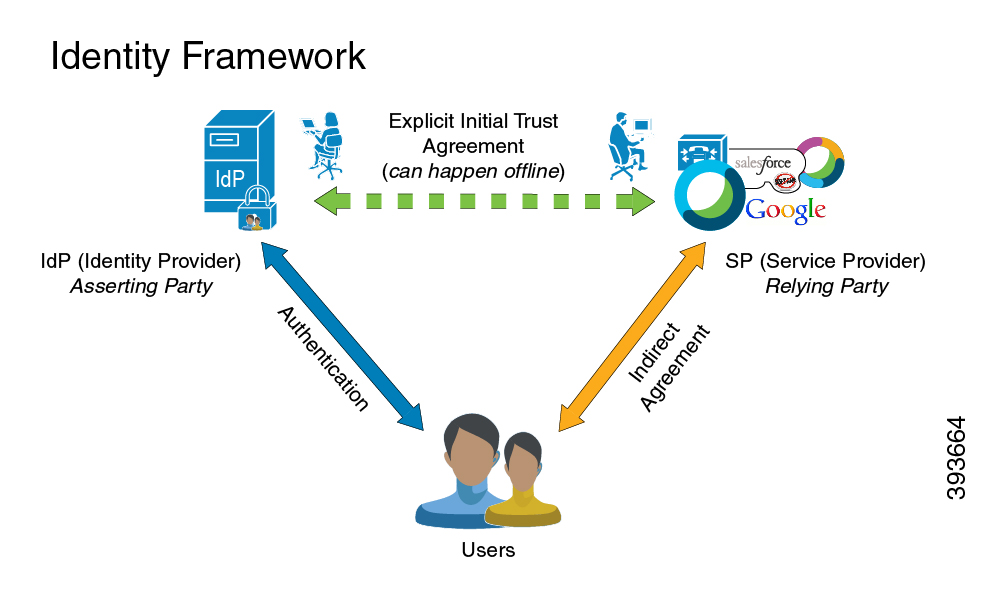
See the following figure for the identity framework of a SAML SSO solution.
Cisco Unified Communications Applications that Support SAML
SSO
• Unified Communications Manager
• Unified Communications Manager IM and Presence Service
SAML SSO Deployment Guide for Cisco Unified Communications Applications, Release 15 and SUs
5
SAML-Based SSO Solution
Cisco Unified Communications Applications that Support SAML SSO

Page 16
See the "SAML Single Sign-On" chapter in the Features and Services Guide for
Cisco Unified Communications Manager, Release 10.0(1) for detailed information
on configuring SAML SSO.
Note
• Cisco Unity Connection
See the "Managing SAML SSO in Cisco Unity Connection" chapter in the System
Administration Guide for Cisco Unity Connection Release 10.x for additional
information on configuring the SAML SSO feature on the Cisco Unity Connection
server.
Note
• Cisco Prime Collaboration
See the "Single Sign-On for Prime Collaboration" section under "Managing
Users" chapter in the Cisco Prime Collaboration 10.0 Assurance Guide - Advanced
guide to get detailed information on the SAML SSO configuration steps on the
Cisco Prime Collaboration server.
Note
• Windows version of Cisco Unified Real-Time Monitoring Tool (RTMT).
See the "Configure SSO for RTMT" procedure under "Configure Initial System
and Enterprise Parameters" chapter in the System Configuration Guide for Cisco
Unified Communications Manager guide to get detailed information on how to
enable SAML SSOfor RTMT.
Note
• Cisco Expressway
See the Cisco Expressway Administrator Guide to get SAML SSO setup
information for Cisco Expressway.
Note
SAML SSO Support for Cisco Unified Communications Manager
Web Interfaces
With this release, the Cisco Unified OS Administration and Disaster Recovery System are now the Security
Assertion Markup Language (SAML) SSO-supported applications. If SAML SSO is enabled, you can launch
these applications or other supported applications, such as Unified Communications Manager, after a single
sign-in with an Identity Provider (IdP). You no longer need to sign in to these applications separately.
SAML SSO Deployment Guide for Cisco Unified Communications Applications, Release 15 and SUs
6
SAML-Based SSO Solution
SAML SSO Support for Cisco Unified Communications Manager Web Interfaces

Page 17
To support SAML SSO for Cisco Unified OS Administration and Disaster Recovery System, the Level 4
administrator creates the Level 0 and Level 1 administrators in the active directory. The Level 4 administrator
adds the platform administrators in all the nodes of a cluster. With this addition, the platform administrators
are synchronized between the active directory and the platform database. While configuring users in platform
database, the administrator must configure the uid value for the user. Cisco Unified OS Administration and
Disaster Recovery System applications use the uid value to authorize a user. The IdP server authenticates
their credentials against the active directory server and sends a SAML response. After authentication, Unified
Communications Manager authorizes the users from the platform database using the uid value. For details
on uid value, see Configure Unique Identification Value for Platform Users, on page 7 procedure.
If SAML SSO is enabled for the existing release and you upgrade from earlier release to the new release, the
SAML SSO support is available for Unified OS Administration and Disaster Recovery System applications
in the new release. The SAML SSO support for these applications is also enabled when you enable SAML
SSO for any Unified Communications Manager web applications. To enable the SAML SSO support for the
new release, see the SAML SSO Enablement topic from the SAML SSO Deployment Guide for Cisco Unified
Communications Applications at http://www.cisco.com/c/en/us/support/unified-communications/
unified-communications-manager-callmanager/products-maintenance-guides-list.html.
When SAML SSO support is enabled for a Unified Communications Manager administrator, it is applicable
across the cluster. However, for the Cisco Unified OS Administration and Disaster Recovery System
applications, each platform administrator is specific to a node and these user details are not replicated across
the cluster. So, each platform user is created in each subscriber node of a cluster.
Note
Configure Unique Identification Value for Platform Users
The unique identification (UID) value is used to authorize a platform user to do SSO login on platform pages.
The Level 4 administrator can configure this value for platform administrators in one of the following ways:
• While creating the platform users by using the set account name command on the CLI.
• While updating the existing uid value.
For details, see the set account name and set account ssouidvalue commands in the Command Line Interface
Reference Guide for Cisco Unified Communications Solutions.
Note
Recovery URL Sign-in Option for Cisco Unified OS Administration
With this release, platform administrators can access Cisco Unified OS Administration either by signing in
to one of the SAML SSO-enabled applications or by using the recovery URL option. This option is available
as Recovery URL to bypass Single Sign On link on the main page of the SSO-enabled nodes. Platform users
can sign in to Cisco Unified OS Administration if they have Recovery URL access.
SAML SSO Deployment Guide for Cisco Unified Communications Applications, Release 15 and SUs
7
SAML-Based SSO Solution
Configure Unique Identification Value for Platform Users

Page 18
If you only enable SSO and not the Recovery URL, and an authenticating user has insufficient access privileges
they will only receive a 403 Error (Access Denied Response). However, if you enable Recovery URL, the
error occurrence will redirect an authenticating user to the Recovery URL page.
Note
The Level 4 administrator configures the recovery URL sign-in option for platform users. The administrator
can enable this option while the platform administrators are being created through CLI or when their details
are being updated using the CLI command. For details on the CLI commands for recovery URL login for new
and existing platform administrators, see the set account ssorecoveryurlaccess command in the Command
Line Interface Reference Guide for Cisco Unified Communications Solutions.
By default, the Recovery URL to bypass Single Sign On link is enabled for the Level 4 administrator. This
link is enabled for the platform administrators Level 0 and Level 1 in case of upgrade from earlier release to
the new release.
Note
Software Requirements
The SAML SSO feature requires the following software components:
• Cisco Unified Communications applications, release 10.0(1) or later.
• An LDAP server that is trusted by the IdP server and supported by Cisco Unified Communications
applications.
• An IdP server that complies with SAML 2.0 standard.
• Login flow supported by Unified Comunications Manager is SP-initiated.
Selecting an Identity Provider (IdP)
Cisco Collaboration solutions use SAML 2.0 (Security Assertion Markup Language) to enable SSO (single
sign-on) for clients consuming Unified Communications services.
SAML-based SSO is an option for authenticating UC service requests originating from inside the enterprise
network, and it is now extended to clients requesting UC services from outside via Mobile and Remote Access
(MRA).
If you choose SAML-based SSO for your environment, note the following:
• SAML 2.0 is not compatible with SAML 1.1 and you must select an IdP that uses the SAML 2.0 standard.
• SAML-based identity management is implemented in different ways by vendors in the computing and
networking industry, and there are no widely accepted regulations for compliance to the SAML standards.
• The configuration of and policies governing your selected IdP are outside the scope of Cisco TAC
(Technical Assistance Center) support. Please use your relationship and support contract with your IdP
Vendor to assist in configuring the IDP properly. Cisco cannot accept responsibility for any errors,
limitations, or specific configuration of the IdP.
SAML SSO Deployment Guide for Cisco Unified Communications Applications, Release 15 and SUs
8
SAML-Based SSO Solution
Software Requirements

Page 19
Although Cisco Collaboration infrastructure may prove to be compatible with other IdPs claiming SAML 2.0
compliance, only the following IdPs have been tested with Cisco Collaboration solutions:
• OpenAM 10.0.1
• Microsoft
® Active Directory
® Federation Services 2.0, 3.0, 4.0, and 5.0
• Microsoft Entra ID
• PingFederate
® 6.10.0.4
• F5 BIG-IP 11.6.0
• Okta 2017.38
SAML Components
A SAML SSO solution is based on a particular combination of assertions, protocols, bindings, and profiles.
The various assertions are exchanged among applications and sites using the protocols and bindings, and those
assertions authenticate the users among sites. The SAML components are as follows:
• SAML Assertion: It defines the structure and content of the information that is transferred from IdPs to
service providers. It consists of packets of security information and contains statements that service
providers use for various levels of access-control decisions.
SAML SSO provides the following types of statements:
• Authentication statements- These statements assert to the service provider about the method of
authentication that occurs between the IdP and the browser at a particular time.
• Attribute statements- These statements assert about certain attributes (name-value pairs) that are
associated with the user. The attribute assertions contain specific information about the user. The
service providers use attributes to make access-control decisions.
• SAML protocol: A SAML protocol defines how the SAML requests for and gets assertions. This protocol
is responsible for the SAML request and response elements that consist of certain SAML elements or
assertions. The SAML 2.0 contains the following protocols:
• Assertion Query and Request Protocol
• Authentication Request Protocol
• SAML binding: A SAML binding specifies the mapping of SAML assertion and/or protocol message
exchanges with standard messaging formats or communication protocols like SOAP exchanges. Unified
Communications 10.0 supports the following SAML 2.0 bindings:
• HTTP Redirect (GET) Binding
• HTTP POST Binding
• SAML profile: A SAML profile provides a detailed description of the combination of SAML assertions,
protocols, and bindings to support well-defined use cases. Unified Communications 10.0 supports the
SAML 2.0 Web Browser SSO Profile.
SAML SSO Deployment Guide for Cisco Unified Communications Applications, Release 15 and SUs
9
SAML-Based SSO Solution
SAML Components
Page 20
SAML SSO Call Flow
This section describes how the SAML SSO feature enables single sign-on for Unified Communications
applications. This section also explains the relationship between the IdP and the service provider, and helps
identify the importance of the various configuration settings to enable single sign-on.
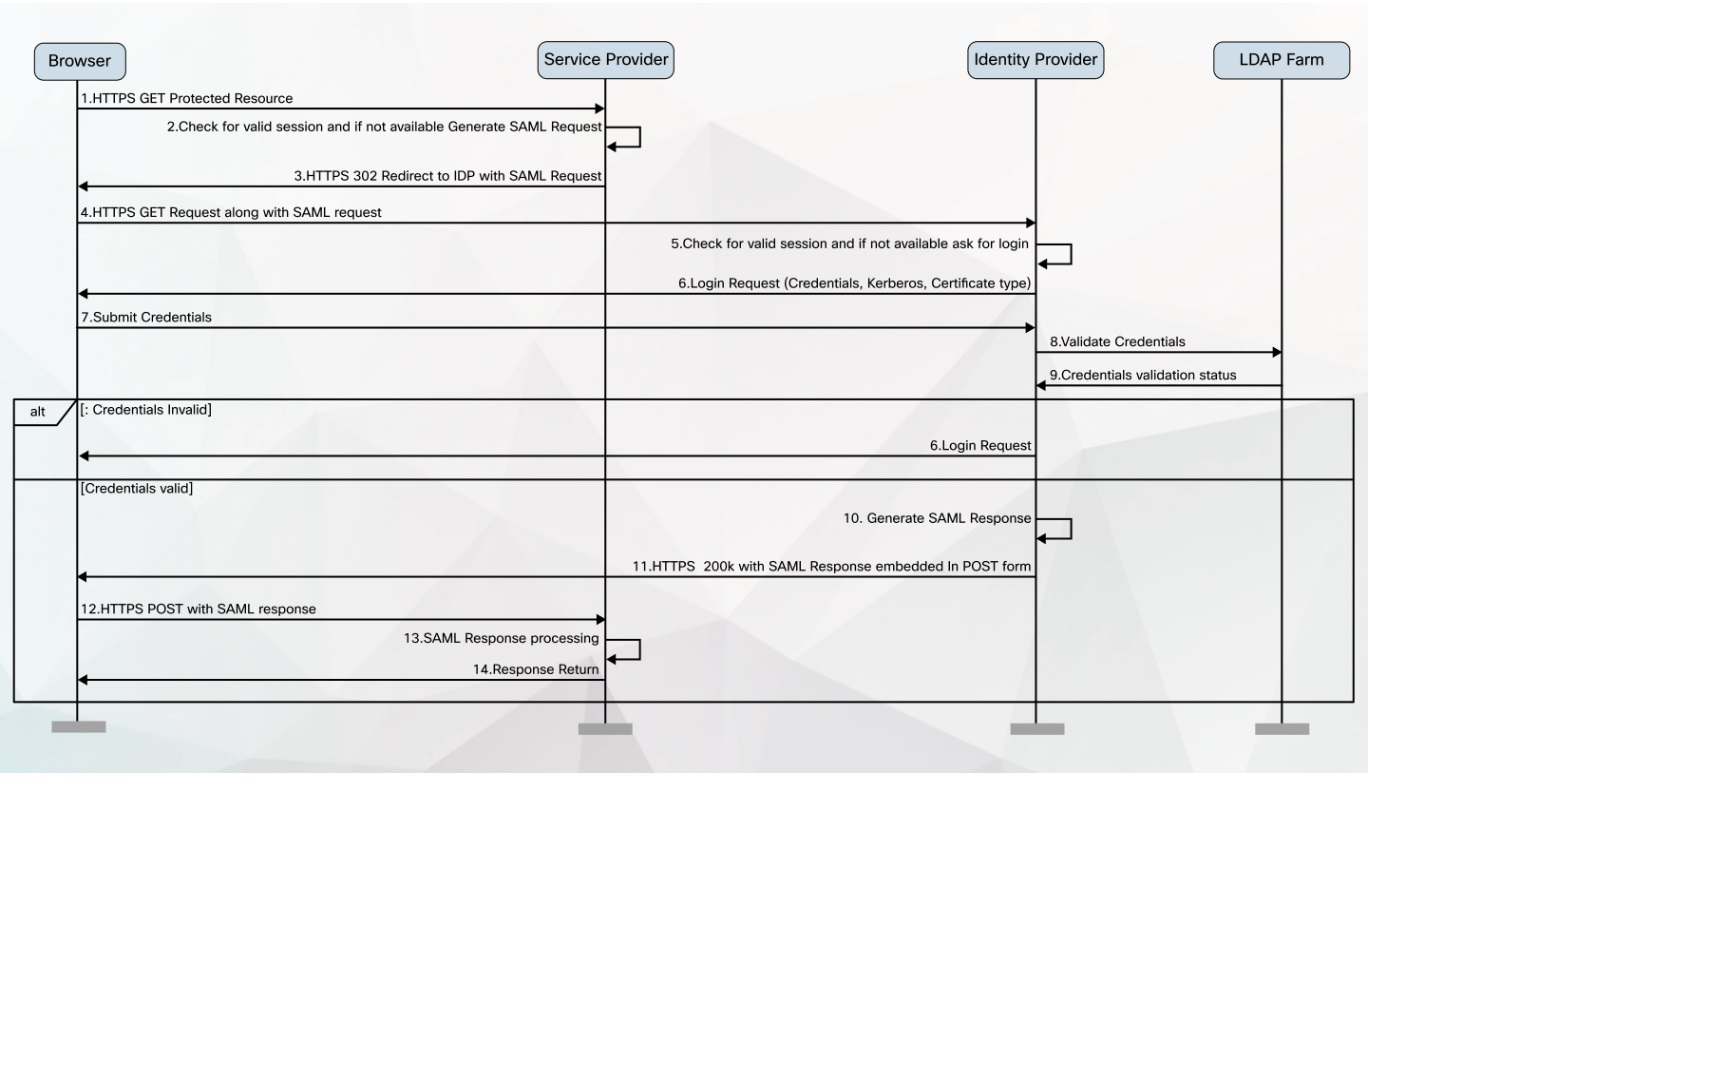
Figure 1: SAML SSO Call Flow for Credential Requests from IdP
A browser-based client attempts to access a protected resource on a service provider.
Note
The browser does not have an existing session with the service provider.
1
SAML SSO Deployment Guide for Cisco Unified Communications Applications, Release 15 and SUs
10
SAML-Based SSO Solution
SAML SSO Call Flow
Page 21
Upon receipt of the request from the browser, the service provider generates a SAML authentication
request.
Note
The SAML request includes information indicating which service provider generated the request.
Later, this allows the IdP to know which particular service provider initiated the request.
The IdP must have the Assertion Consumer Service (ACS) URL to complete SAML authentication
successfully. The ACS URL tells the IdP to post the final SAML response to a particular URL.
Note
Unified Communications Manager and VOS products use the Assertion Consumer Service Index
URL, which is compliant with SAML 2.0 standards.
Note
The authentication request can be sent to the IdP, and the Assertion sent to the service provider
through either Redirect or POST binding. For example, Unified Communications Manager supports
POST binding in either direction.
2
The service provider redirects the request to the browser.
Note
The IdP URL is preconfigured on the service provider as part of the SAML metadata exchange.
3
The browser follows the redirect and issues an HTTPS GET request to the IdP. The SAML request
is maintained as a query parameter in the GET request.
4
Check for valid session. If not available, authenticate the user based on the corresponding IDP preferred
authentication methods such as, password-based, MFA-based, or certificate-based, and so on.
5
In the absence of any existing cookie within the browser, the IdP generates a login request to the
browser and authenticates the browser using whatever authentication mechanism is configured and
enforced by the IdP.
Note
The authentication mechanism is determined by the security and authentication requirements of the
customer. This could be form-based authentication using username and password, Kerberos, PKI,
and so on. This example assumes form-based authentication.
6
The user enters the required credentials in the login form and posts them back to the IdP.
Note
The authentication challenge for logging is between the browser and the IdP. The service provider
is not involved in user authentication.
7
The IdP in turn submits the credentials to the LDAP server.
8
The LDAP server checks the directory for credentials and sends the validation status back to the IdP.
9
The IdP validates the credentials and generates a SAML response which includes a SAML Assertion.
Note
The Assertion is digitally signed by the IdP and the user is allowed access to the service
provider-protected resources. The IdP also sets its cookie here.
10
The IdP redirects the SAML response to the browser.
11
SAML SSO Deployment Guide for Cisco Unified Communications Applications, Release 15 and SUs
11
SAML-Based SSO Solution
SAML SSO Call Flow
Page 22
The browser follows the hidden form POST instruction and posts the Assertion to the ACS URL on
the service provider.
12
The service provider extracts the Assertion and validates the digital signature.
Note
The service provider uses this digital signature to establish the circle of trust with the IdP.
13
The service provider then grants access to the protected resource and provides the resource content
by replying 200 OK to the browser.
Note
The service provider is responsible for resource authorization. For example, users may be authenticated
successfully by the IdP, but still may not be able to log in to the Cisco Unified CM Administration
interface unless they have administrator role permissions, as configured on Cisco Unified
Communications Manager.
Note
The service provider sets its cookie here. If there is a subsequent request by the browser for an
additional resource, the browser includes the service provider cookie in the request. The service
provider checks whether a session already exists with the browser. If a sesMicrosoft Teamssion
exists, the web browser returns with the resource content.
14
Java Requirements for SAML SSO Login to RTMT via Okta
If you have SAML SSO configured with Okta as the identity Provider, and you want to use SSO to log in to
the Cisco Unified Real-Time Monitoring Tool, you must be running a minimum Java version of 8.221. This
requirement applies to 12.5(x) releases of Cisco Unified Communications Manager and the IM and Presence
Service.
SAML SSO Deployment Guide for Cisco Unified Communications Applications, Release 15 and SUs
12
SAML-Based SSO Solution
Java Requirements for SAML SSO Login to RTMT via Okta
Page 23
C H A P T E R 3
SAML SSO Requirements for Identity Providers
• Requirements for Identity Providers, on page 13
• SAML Agreement Types, on page 14
• Metadata Exchange, on page 15
• SAML Assertions, on page 17
• SAML OAuth Authentication Flow, on page 19
Requirements for Identity Providers
This section provides an outline of the requirements that Identity Providers must meet in order to deploy
SAML SSO services for Cisco Collaboration applications.
Identity Providers must adhere to the following guidelines:
• Support is for SAML 2.0 only.
• Supports Service-Provider initiated SSO only.
• Set the NameID Format attribute to urn:oasis:names:tc:SAML:2.0:nameid-format:transient
• Configure a claim on the IdP to include the uid attribute name with a value that is mapped to LDAP
attributes (for example SAMAccountName).
• Cisco Unified Communications Manager uses ACS url index in the Authentication Request. The IdP
must be able the index to the ACS url in the Service Provider metadata. This is compliant with SAML
standards.
• It's not supported to have multiple certificates in the Signing and Encryption portion of the SAML
Assertion. See CSCvq78479.
When configuring SAML SSO, make sure to deploy the following in your Cisco Collaboration Deployment:
• Network Time Protocol—Deploy NTP in your environment so that the times in your Cisco Collaboration
Deployment and your Identity Provider are synced. Make sure that the time difference between the IdP
and the Cisco Collaboration deployment does not exceed 3 seconds.
• DNS—Your Cisco Collaboration applications and your Identity Provider must be able to resolve each
other’s addresses.
• LDAP—You must have an LDAP Directory sync configured in your Cisco Collaboration deployment.
However, we recommend that you disable LDAP authentication.
SAML SSO Deployment Guide for Cisco Unified Communications Applications, Release 15 and SUs
13

Page 24
• Certificates—You must exchange metadata files between your Cisco Collaboration deployment and the
Identity Provider. The metadata contains the certificates that are required to create a trust relationship
between your Collaboration deployment and the Identity Provider. You can use either a tomcat certificate
or a system-generated self-signed certificate to establish trust.
SAML Agreement Types
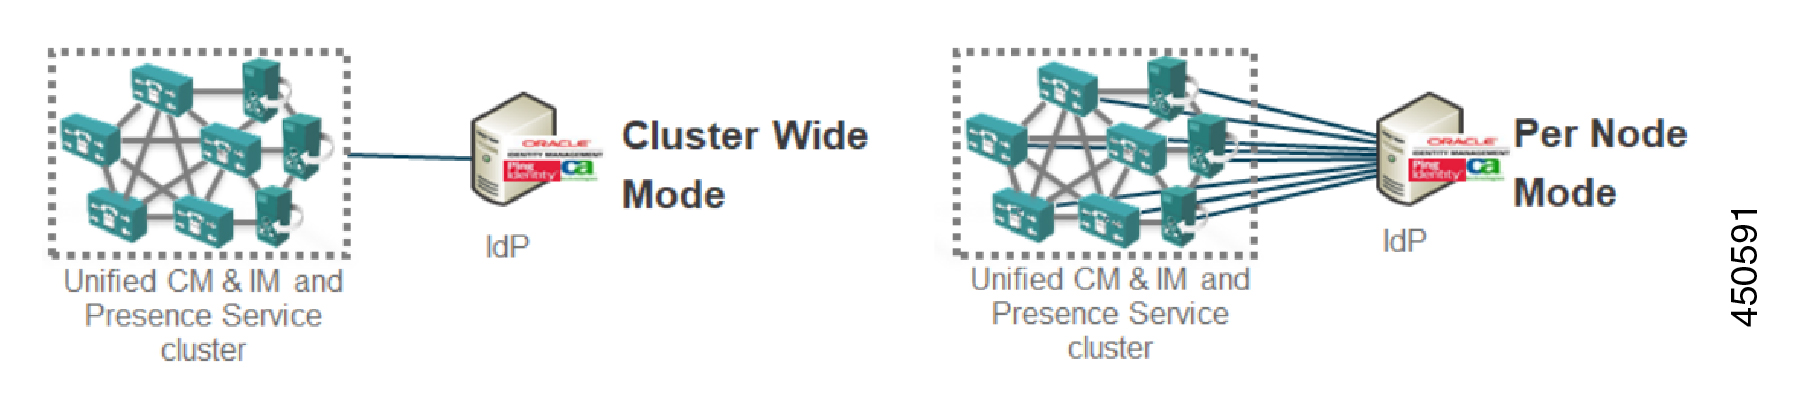
Cisco Unified Communications Manager supports two types of SAML metadata agreements:
• Cluster Wide—With this deployment, a single metadata agreement must be configured, which covers
the entire cluster.
• Per Node—With this deployment, you must configure multiple metadata agreements, with a separate
agreement for each cluster node. Each cluster node has a separate metadata exchange with the Identity
Provider.
Figure 2: Two types of SAML metadata agreements in Cisco Unified Communications Manger
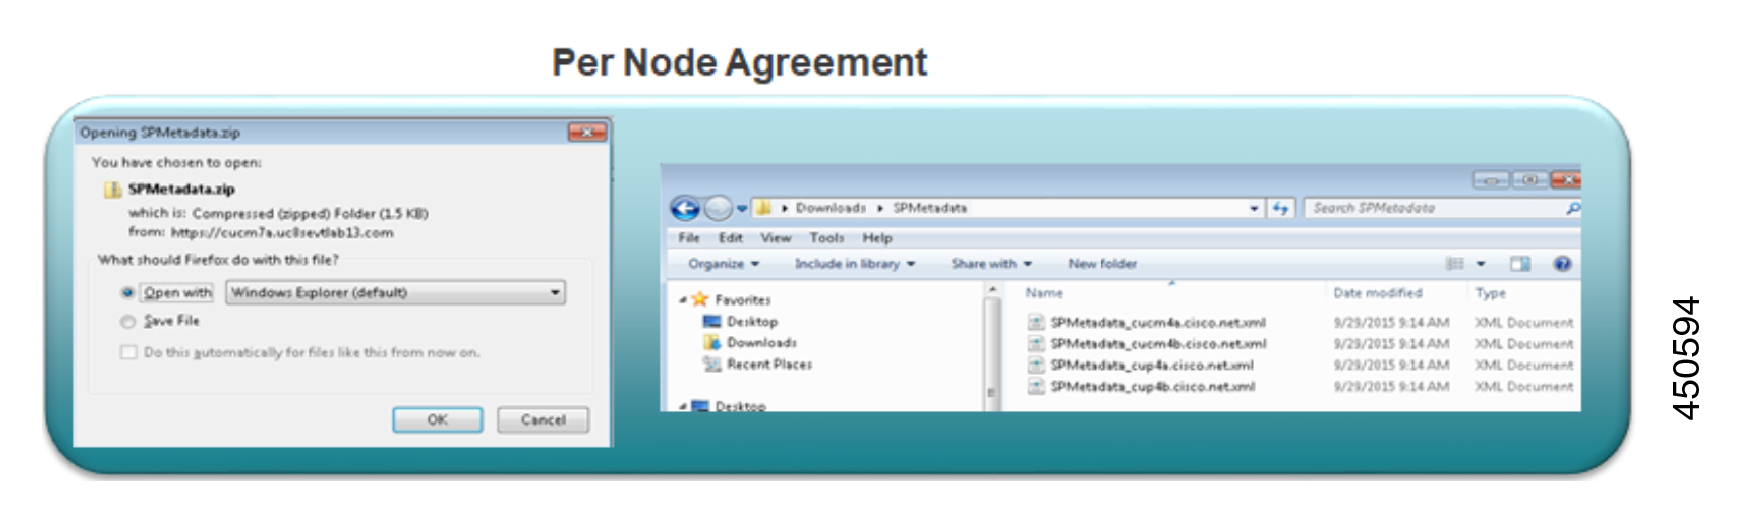
The following image illustrates the contents of a metadata zip file that was generated on Cisco Unified
Communications Manager using a per node agreement. In this example, the IM and Presence Service is
deployed using a Standard Deployment (non-centralized) so the zip file contains separate metadata xml files
for each Unified Communications Manager and IM and Presence Service cluster node.
Figure 3: UC Metadata File Downloaded from Cisco Unified Communications Manger
If you have a Centralized Deployment for the IM and Presence Service, your IM and Presence deployment
is in a separate cluster from your telephony cluster. With Cluster Wide agreements, you must generate metadata
separately for your telephony cluster, and for your IM and Presence cluster.
Note
SAML SSO Deployment Guide for Cisco Unified Communications Applications, Release 15 and SUs
14
SAML SSO Requirements for Identity Providers
SAML Agreement Types

Page 25
Metadata Exchange
As a part of the process for setting up SAML SSO, you must exchange metadata files between your UC
deployment and the Identity Provider.
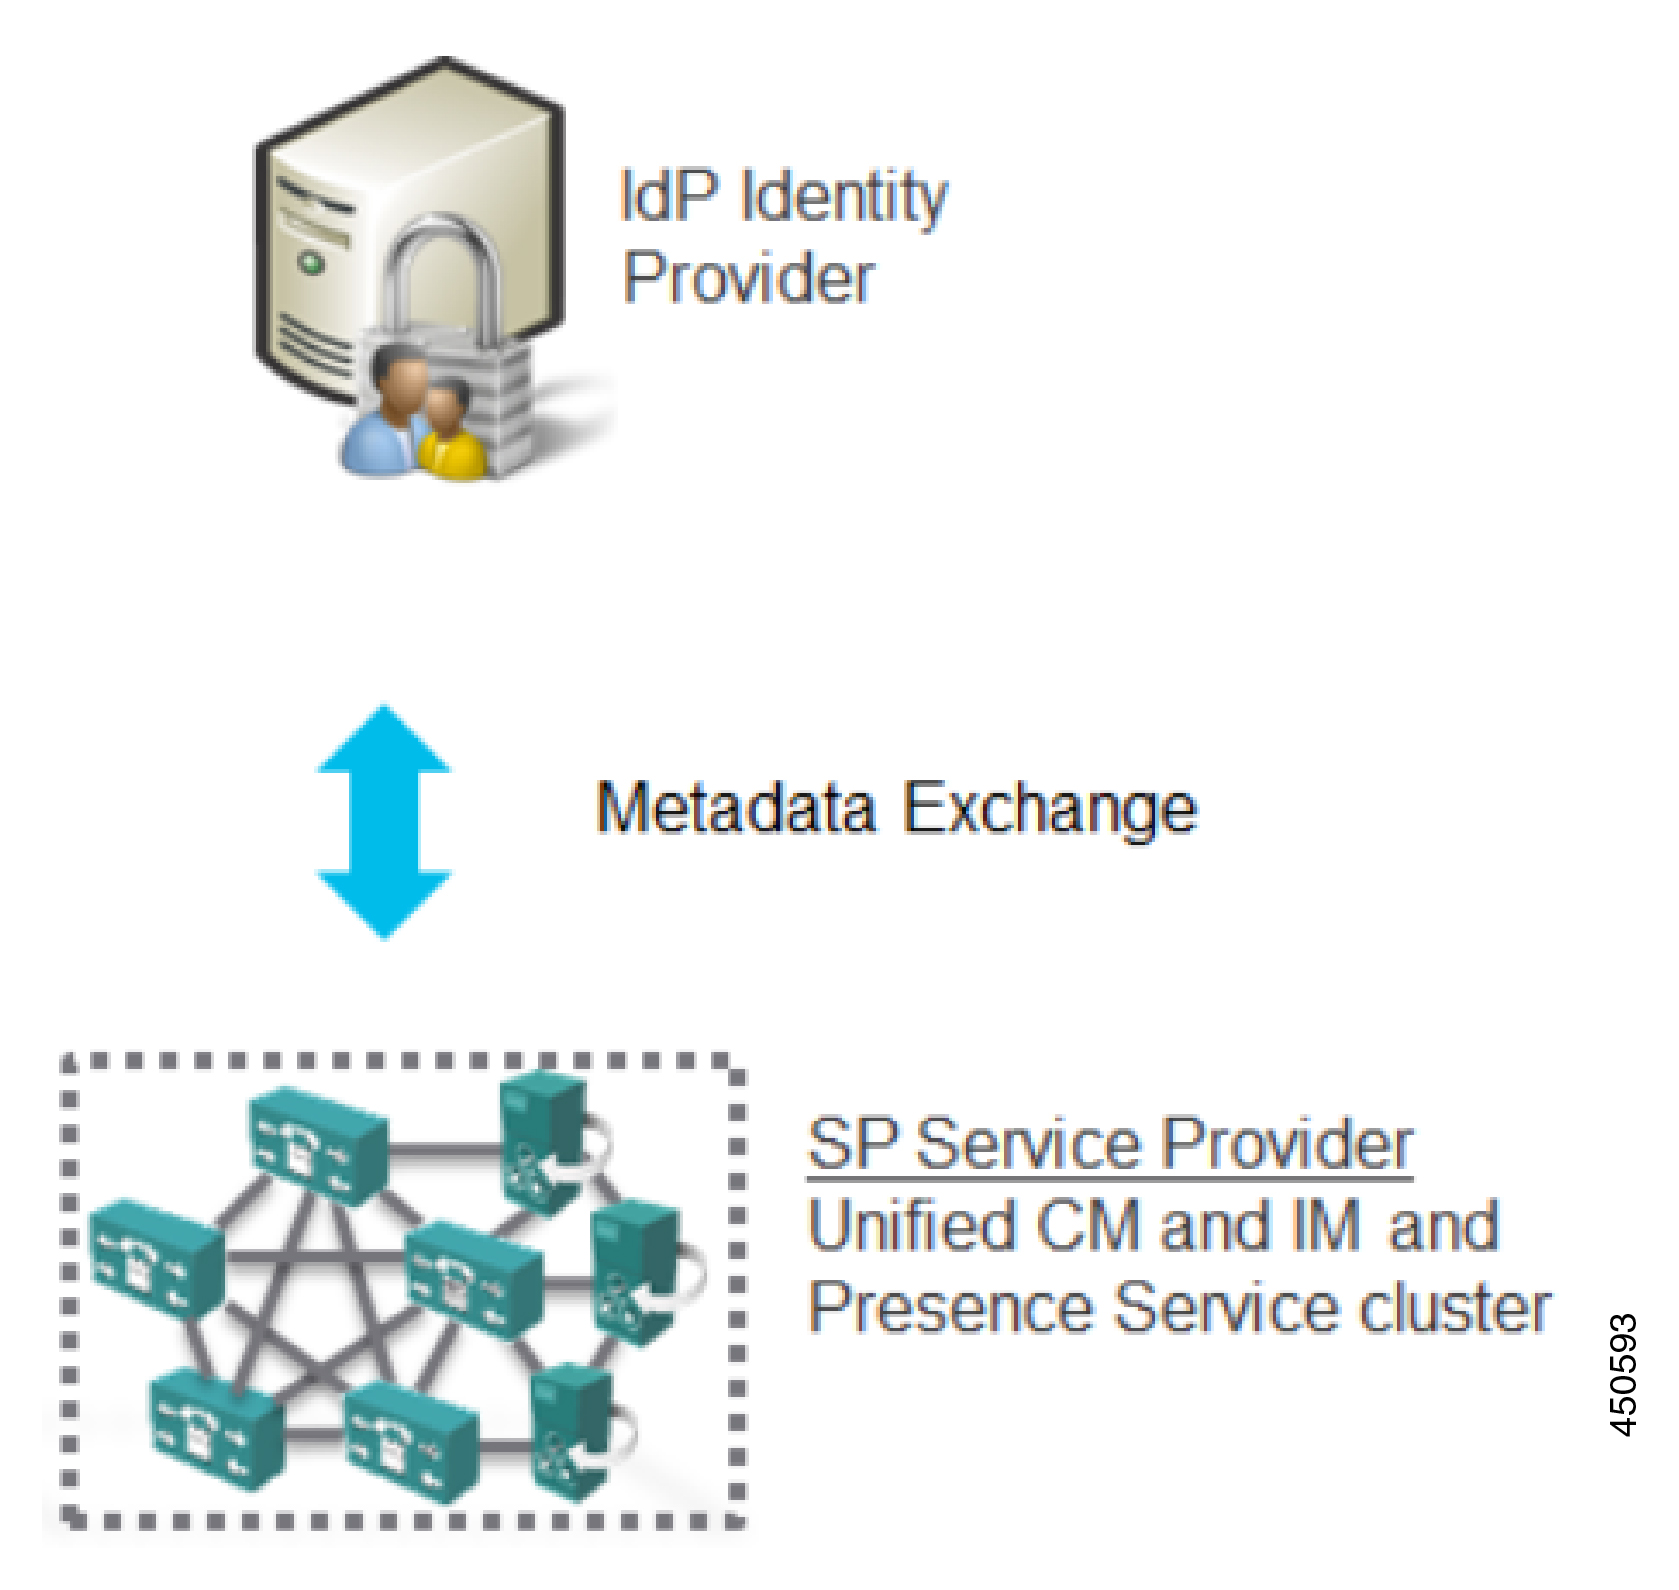
Figure 4: SAML Metadata Exchange
Following is an example of a UC metadata file that was generated from the Service Provider (Cisco Unified
Communications Manager).
Metadata File from Service Provider (Cisco Unified Communications Manager)
<?xml version="1.0" encoding="UTF-8"?>
<!--With Single Cluster agreement the entityID is always the publisher FQDN-->
<md:EntityDescriptor xmlns:md="urn:oasis:names:tc:SAML:2.0:metadata"
ID="cucm0a.identitylab20.ciscolabs.com" entity ID="cucm0a.identitylab20.ciscolabs.com">
<!--We don't require AuthN or signed Assertions but comply to what the IdP requests-->
<md:SPSSODescriptor AuthnRequestsSigned="false" WantAssertionsSigned="false"
protocolSupportEnumeration="urn:oasis:names:tc:SAML:2.0:protocol">
<md:KeyDescriptor use="signing">
<ds:KeyInfo xmlns:ds="http://www.w3.org/2000/09/xmldsig#">
ds:X509Data
ds:X509CertificateMIIDzzCCA........</ds:X509Certificate>
</ds:X509Data>
</ds:KeyInfo>
</md:KeyDescriptor>
<!--Certificate for Signing and/or Encryption-->
<md:KeyDescriptor use="encryption">
<ds:KeyInfo xmlns:ds="http://www.w3.org/2000/09/xmldsig#">
ds:X509Data
ds:X509CertificateMIIDzzCCA........</ds:X509Certificate>
</ds:X509Data>
</ds:KeyInfo>
</md:KeyDescriptor>
<!--We only support name-id format transient-->
md:NameIDFormaturn:oasis:names:tc:SAML:2.0:nameid-format:transient</md:NameIDFormat>
<!--ACS URL for the Client to POST the answer from the IdP, two per node in the
cluster-->
SAML SSO Deployment Guide for Cisco Unified Communications Applications, Release 15 and SUs
15
SAML SSO Requirements for Identity Providers
Metadata Exchange
Page 26
<md:AssertionConsumerService Binding="urn:oasis:names:tc:SAML:2.0:bindings:HTTP-POST"
Location="https://cucm0a.identitylab20.ciscolabs.com:8443/ssosp/saml/SSO/alias/cucm0a.identitylab20.ciscolabs.com"
index="0"/>
<md:AssertionConsumerService
Binding="urn:oasis:names:tc:SAML:2.0:bindings:HTTP-Redirect"
Location="https://cucm0a.identitylab20.ciscolabs.com:8443/ssosp/saml/SSO/alias/cucm0a.identitylab20.ciscolabs.com"
index="1"/>
</md:SPSSODescriptor>
</md:EntityDescriptor>
Following is an example of a metadata file that was generated from an Identity Provide (Active Directory
Federation Service)
Metadata File from Identity Provider (Active Directory Federation Service)
<?xml version="1.0"?
<!--entityID=IdP Entity ID-->
<EntityDescriptor xmlns="urn:oasis:names:tc:SAML:2.0:metadata"
ID="_b12fe1b5-6866-40cc-94be-9d9d8cb71916"
entityID="http://WIN-2019SSO.cisco-dod.com/adfs/services/trust">
<ds:Signature xmlns:ds="http://www.w3.org/2000/09/xmldsig#">
ds:SignedInfo
<ds:CanonicalizationMethod Algorithm="http://www.w3.org/2001/10/xml-exc-c14n#"/>
<ds:SignatureMethod Algorithm="http://www.w3.org/2001/04/xmldsig-more#rsa-sha256"/>
<ds:Reference URI="#_b12fe1b5-6866-40cc-94be-9d9d8cb71916">
ds:Transforms
<ds:Transform
Algorithm="http://www.w3.org/2000/09/xmldsig#enveloped-signature"/>
<ds:Transform Algorithm="http://www.w3.org/2001/10/xml-exc-c14n#"/>
</ds:Transforms>
<!--Sign the metadata provided to the SP for extra security-->
<ds:DigestMethod Algorithm="http://www.w3.org/2001/04/xmlenc#sha256"/>
ds:DigestValueVAcIv2uw6zG8YVVWP0IDYMZ/e7CN9o4oR8XBGiysujY=</ds:DigestValue>
</ds:Reference>
</ds:SignedInfo>
ds:SignatureValue44RAgZ17YfwLdcRodZPcZ5PH05sLVbkDx4uAYq+EC4K+ZhiTs8aUZQ/.........
</ds:SignatureValue>
<KeyInfo xmlns="http://www.w3.org/2000/09/xmldsig#">
<X509Data>
<IDPSSODescriptor
protocolSupportEnumeration="http://docs.oasis-open.org/ws-sx/ws-trust/200512
http://schemas.xmlsoap.org/ws/2005/02/trust
http://docs.oasis-open.org/wsfed/federation/200706"
ServiceDisplayName="administrator.cisco-dod.com">
<KeyDescriptor use="encryption">
<KeyInfo xmlns="http://www.w3.org/2000/09/xmldsig#">
<X509Data>
<X509Certificate>MIIGHzCCBQegAwIBAgITHAAADUerWbVHyqoM..........
</X509Certificate>
</X509Data>
</KeyInfo>
</KeyDescriptor>
<KeyDescriptor use="signing">
<KeyInfo xmlns="http://www.w3.org/2000/09/xmldsig#">
<X509Data>
<!--Cert for signing and/or encrypting the SAML Assertion-->
<X509Certificate>MIIC7jCCAdagAwIBAgIQJH7di/..........</ds:X509Certificate>
</KeyInfo>
</KeyDescriptor>
<!--Single Sign On Service details for HTTP-Redirect and HTTP-POST-->
<SingleSignOnService Binding="urn:oasis:names:tc:SAML:2.0:bindings:HTTP-Redirect"
Location="https://win-2019sso.cisco-dod.com/adfs/ls/"/
<SingleSignOnService Binding="urn:oasis:names:tc:SAML:2.0:bindings:HTTP-POST"
SAML SSO Deployment Guide for Cisco Unified Communications Applications, Release 15 and SUs
16
SAML SSO Requirements for Identity Providers
Metadata Exchange
Page 27
Location="https://win-2019sso.cisco-dod.com/adfs/ls/"/>
<!--NameID format offer for this agreement-->
<NameIDFormat>urn:oasis:names:tc:SAML:1.1:nameid-format:emailAddress</NameIDFormat>
<NameIDFormat>urn:oasis:names:tc:SAML:2.0:nameid-format:persistent</NameIDFormat>
<NameIDFormat>urn:oasis:names:tc:SAML:2.0:nameid-format:transient</NameIDFormat>
<AssertionConsumerService Binding="urn:oasis:names:tc:SAML:2.0:bindings:HTTP-POST"
Location="https://win-2019sso.cisco-dod.com/adfs/ls/" index="0" isDefault="true"/>
<AssertionConsumerService Binding="urn:oasis:names:tc:SAML:2.0:bindings:HTTP-Artifact"
Location="https://win-2019sso.cisco-dod.com/adfs/ls/" index="1"/>
<AssertionConsumerService Binding="urn:oasis:names:tc:SAML:2.0:bindings:HTTP-Redirect"
Location="https://win-2019sso.cisco-dod.com/adfs/ls/" index="2"/>
</IDPSSODescriptor>
</EntityDescriptor>
SAML Assertions
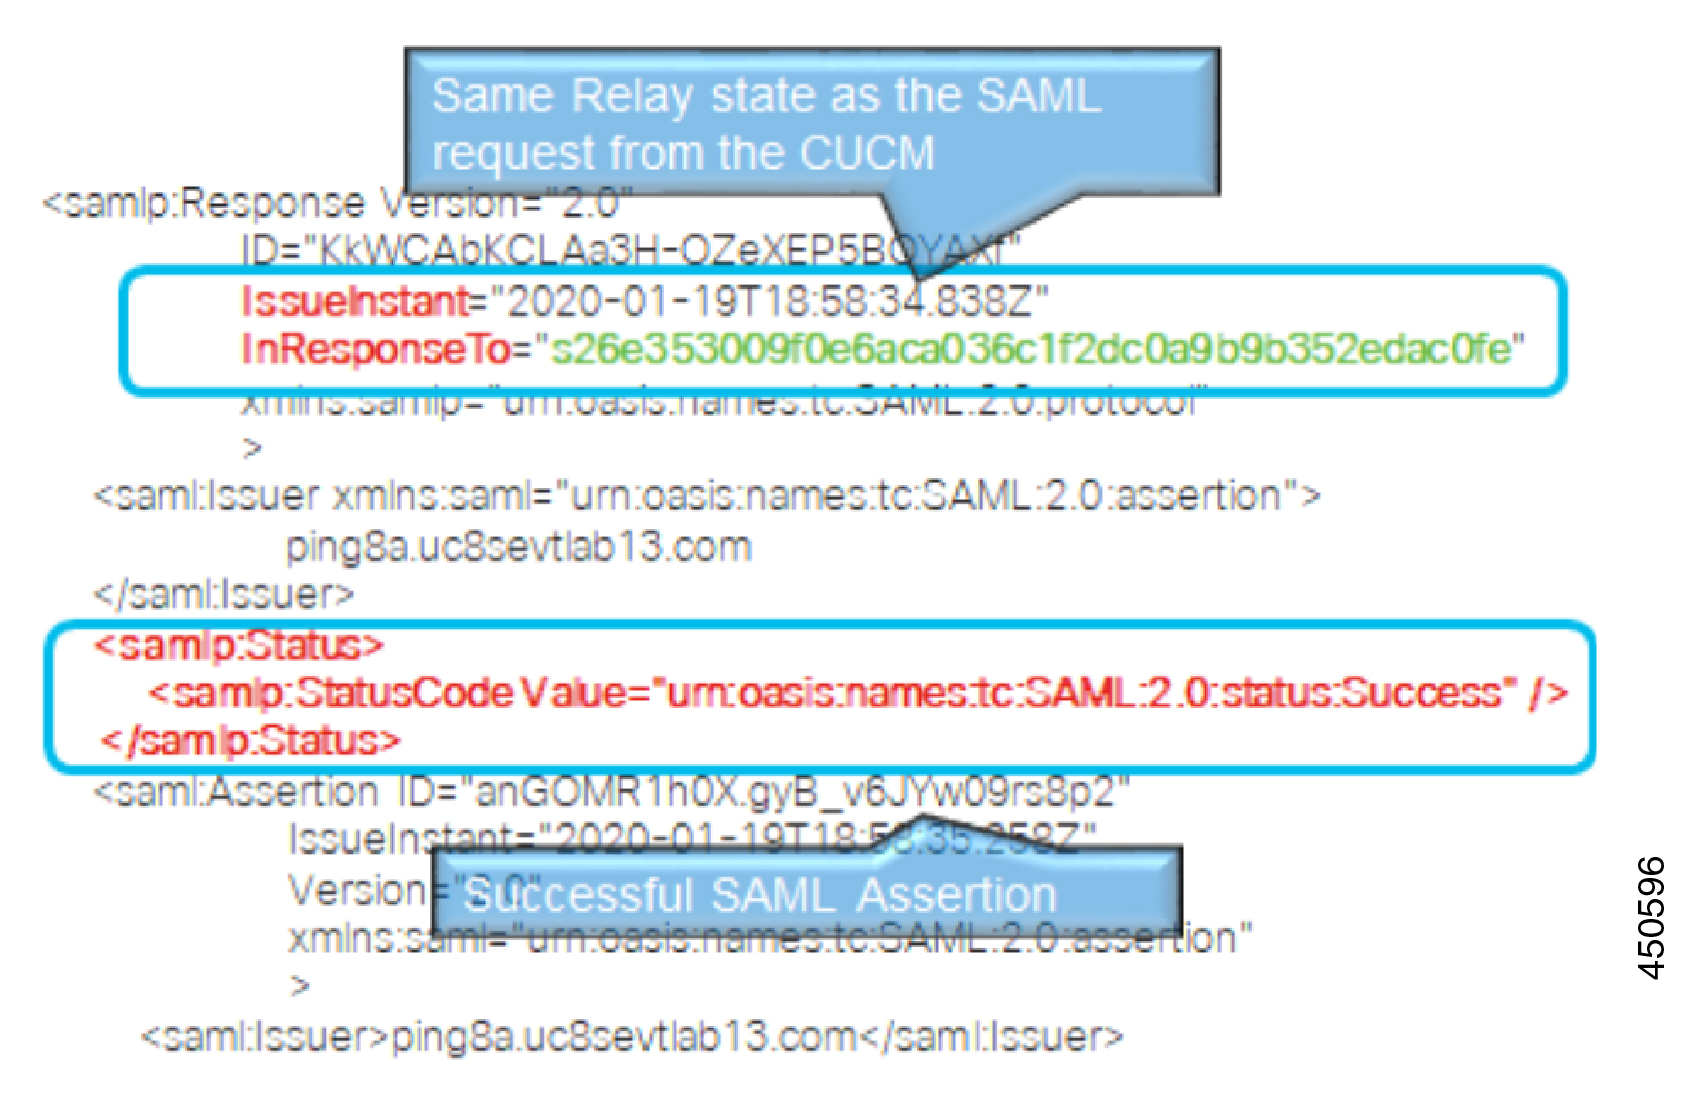
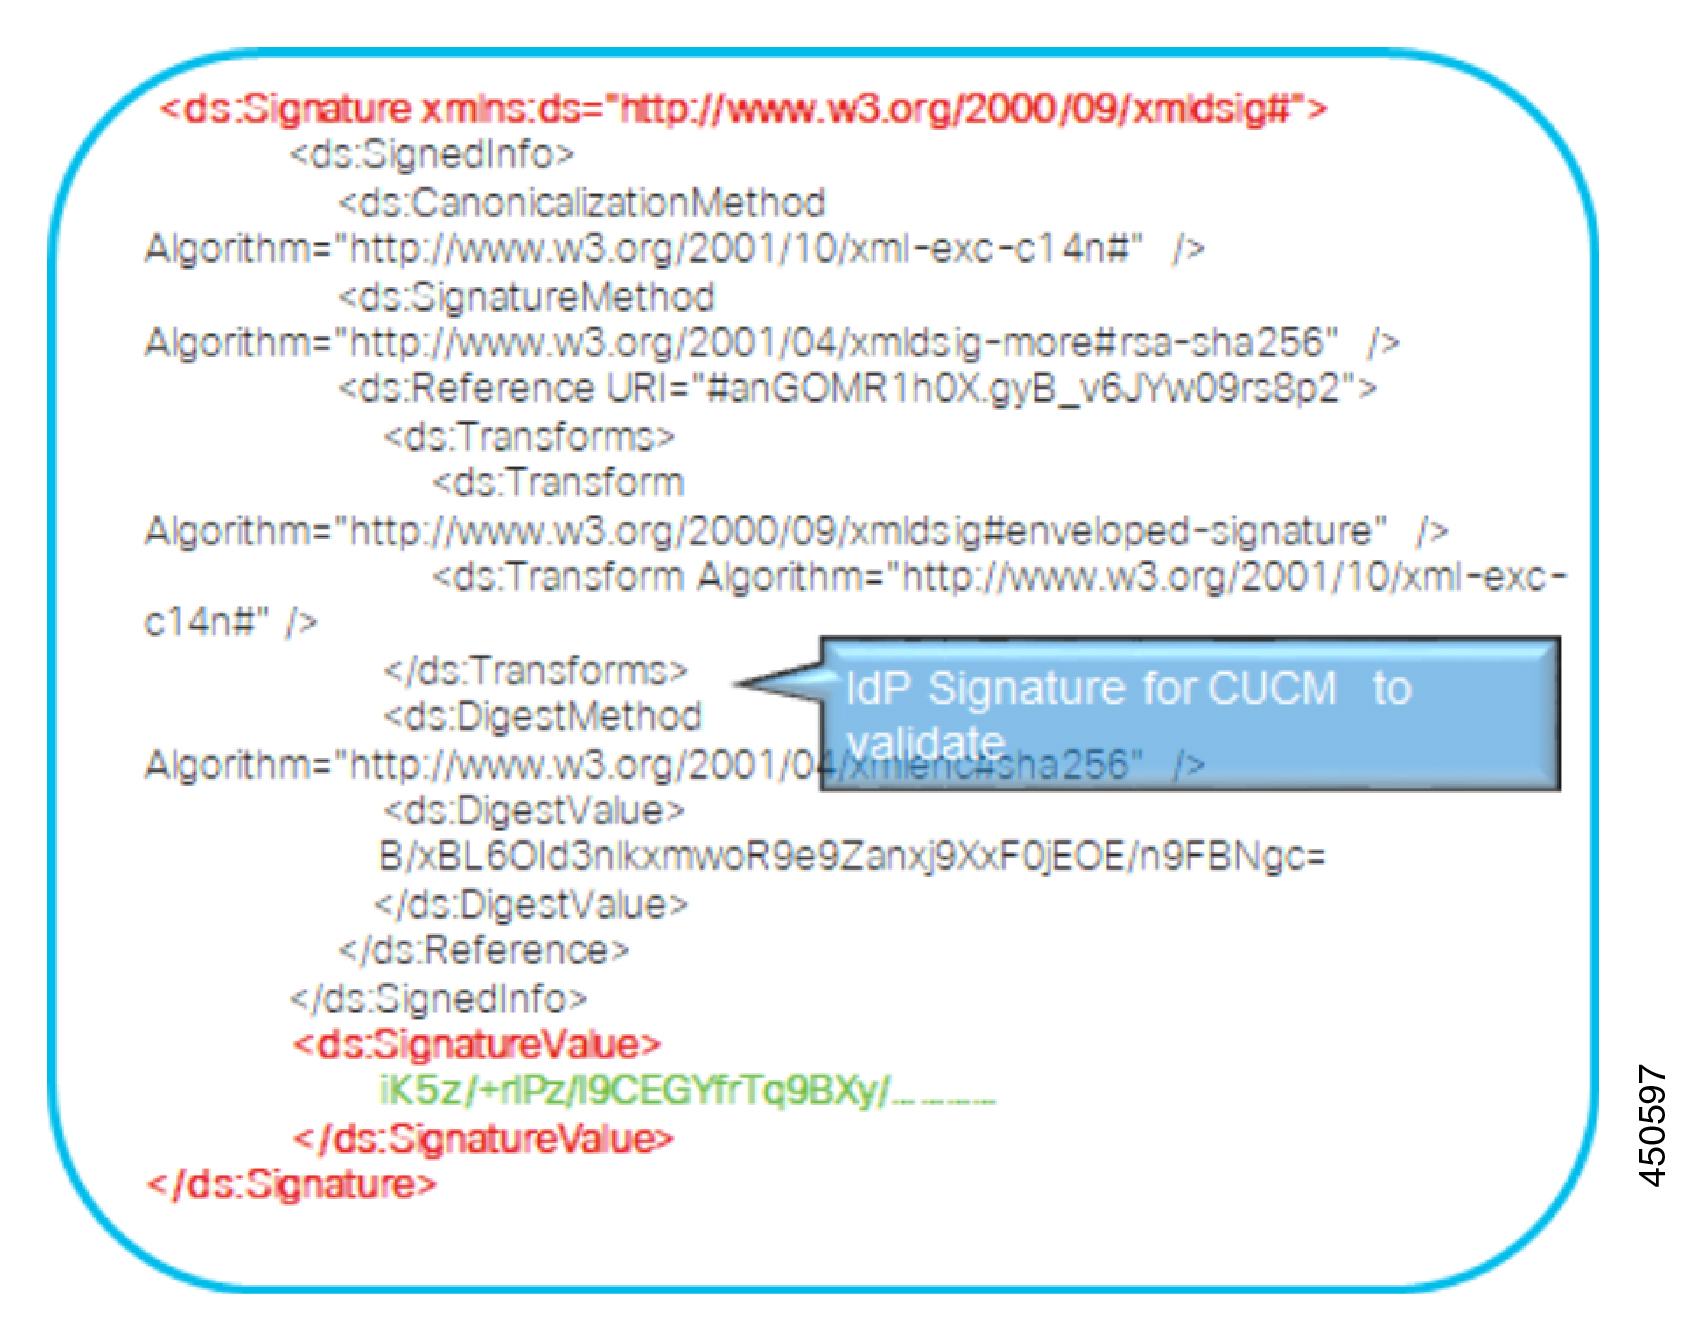
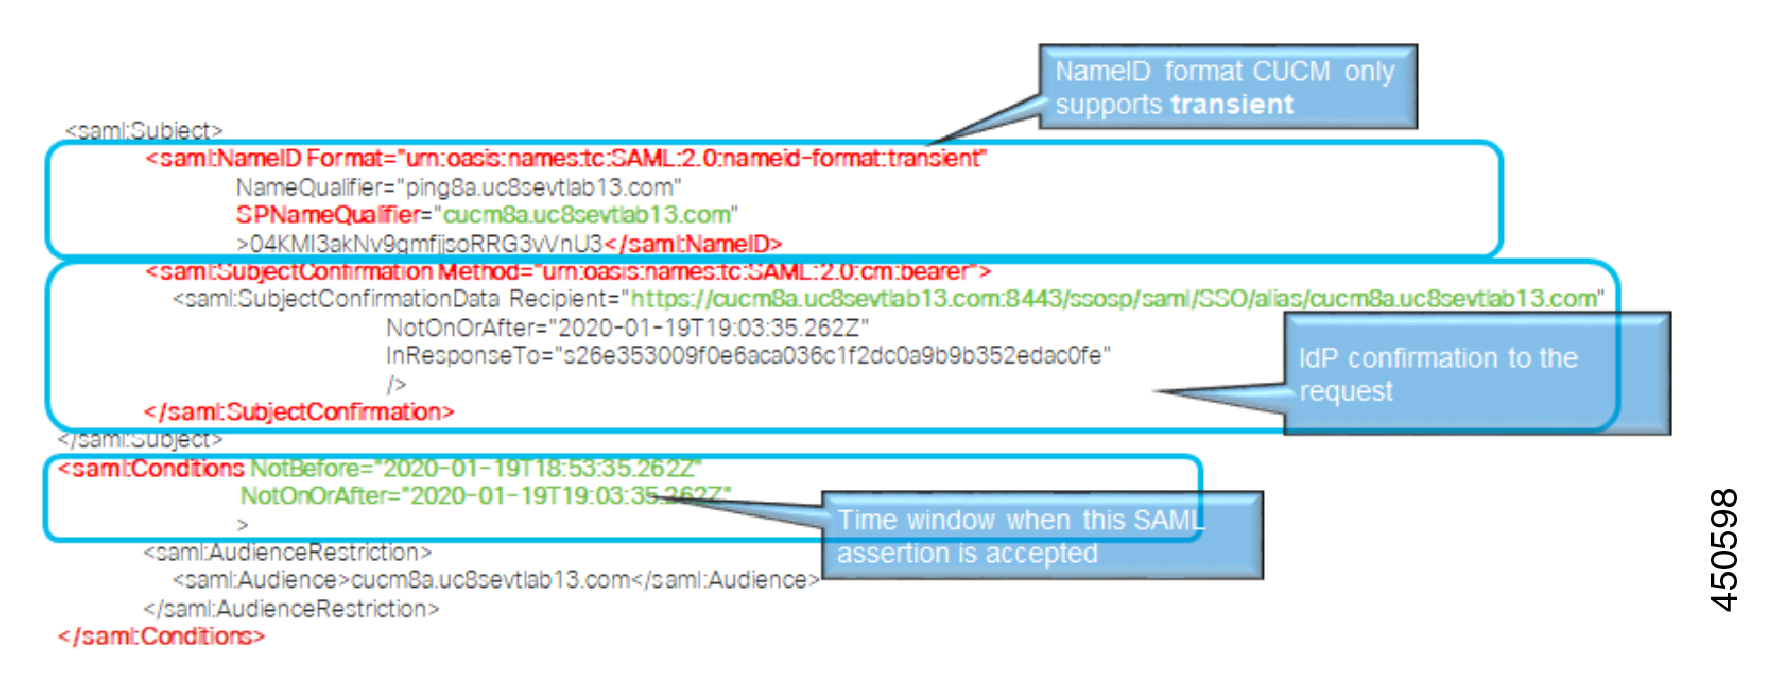
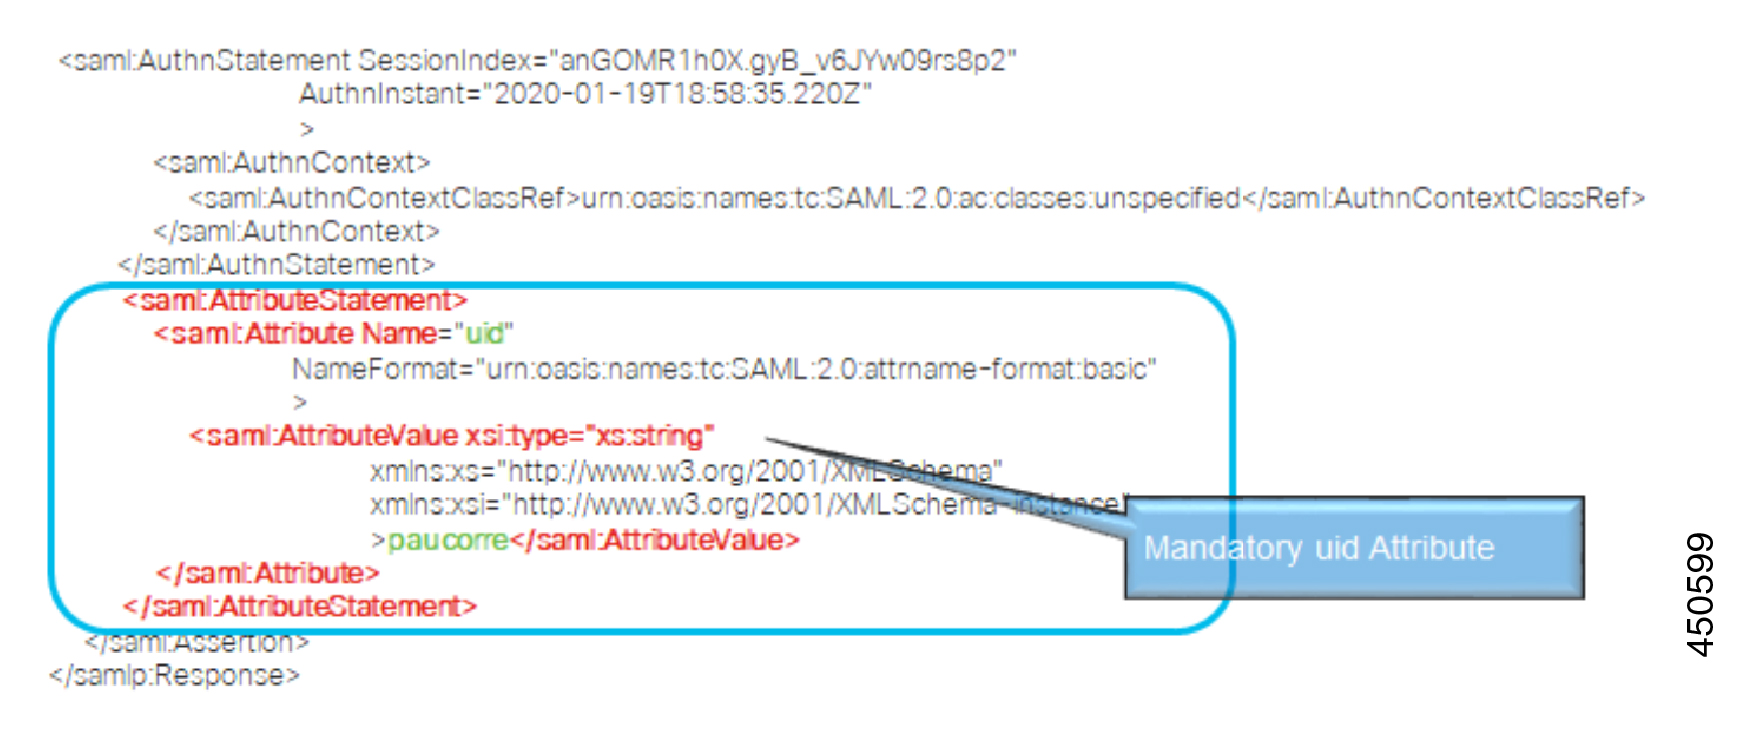
Following is an example of the SAML Assertion that is sent from the Identity Provider to Cisco Unified
Communications Manager:
SAML SSO Deployment Guide for Cisco Unified Communications Applications, Release 15 and SUs
17
SAML SSO Requirements for Identity Providers
SAML Assertions
Page 28
Figure 5: SAML Assertion Example
SAML SSO Deployment Guide for Cisco Unified Communications Applications, Release 15 and SUs
18
SAML SSO Requirements for Identity Providers
SAML Assertions
Page 29
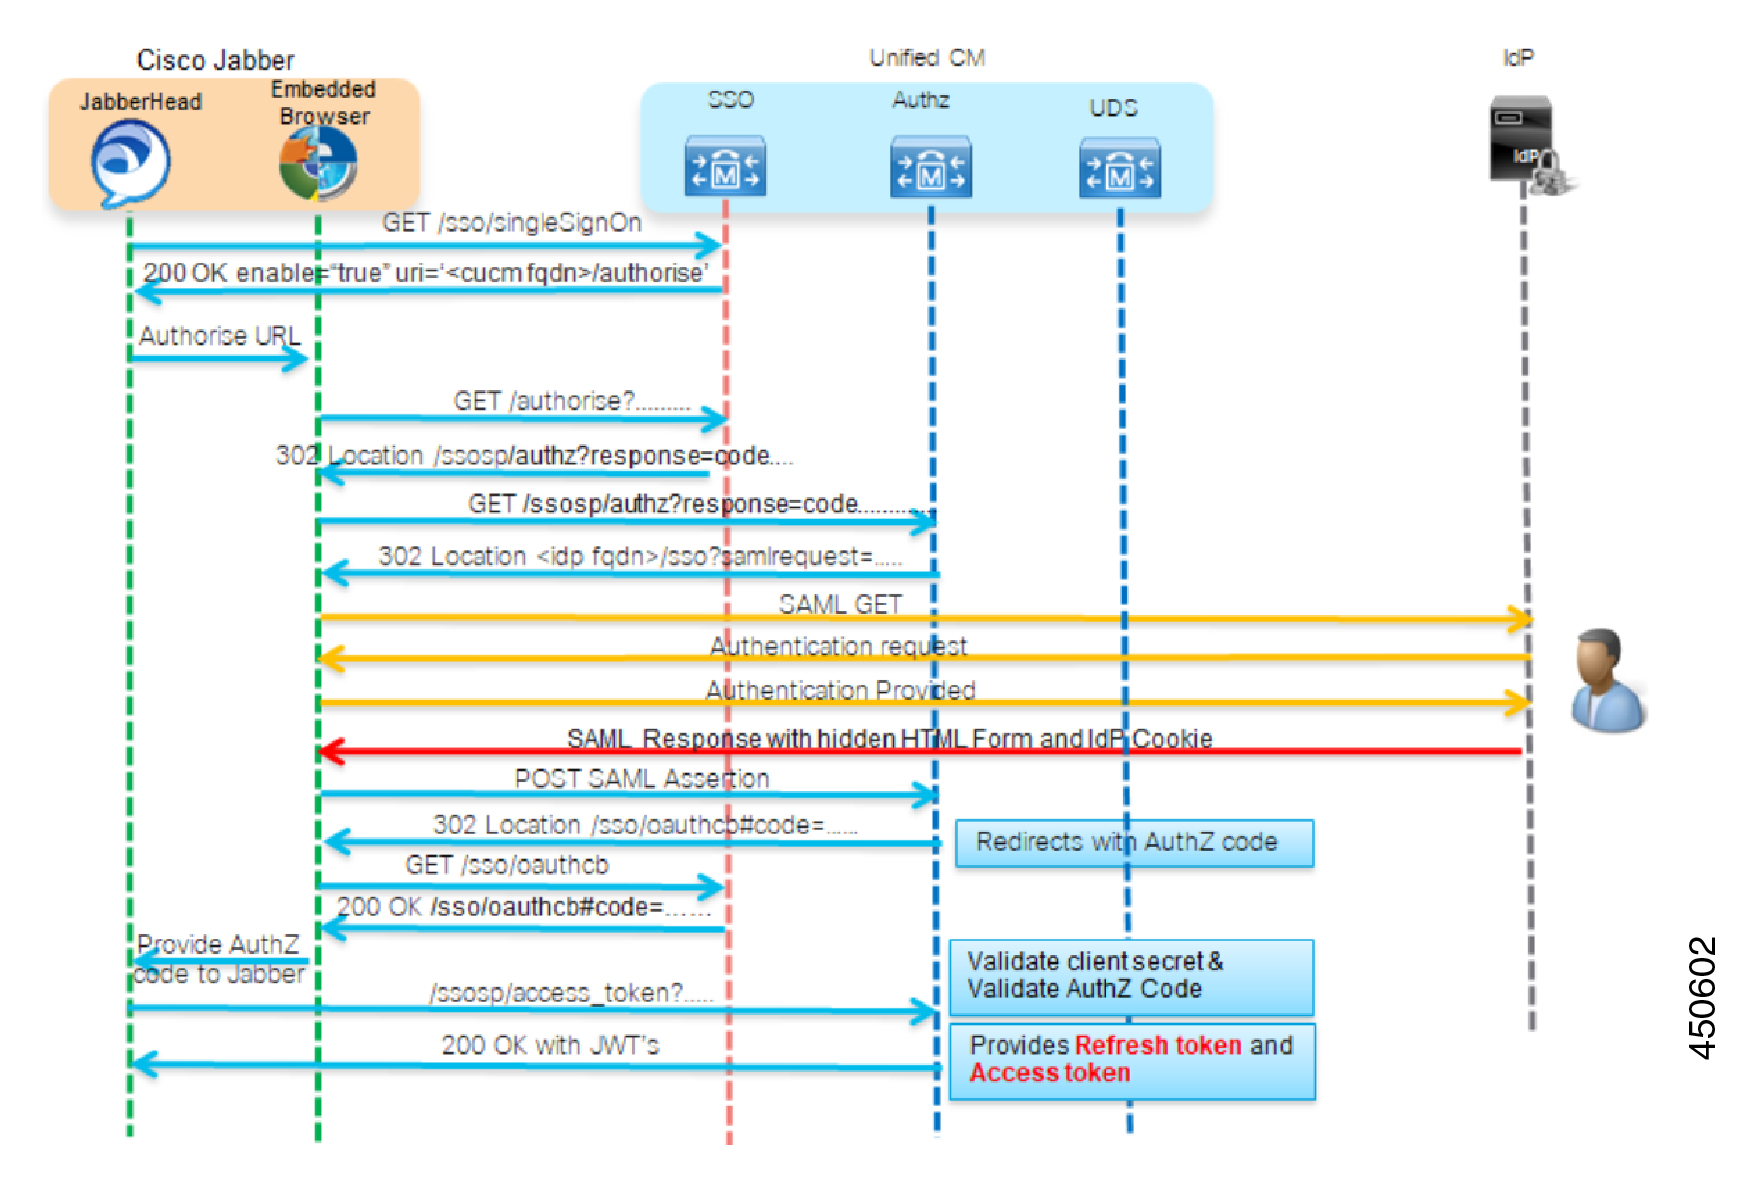
SAML OAuth Authentication Flow
Following is an example of the authentication flow for an OAuth authentication request with the Identity
Provider.
SAML SSO Deployment Guide for Cisco Unified Communications Applications, Release 15 and SUs
19
SAML SSO Requirements for Identity Providers
SAML OAuth Authentication Flow
Page 30
Figure 6: OAuth Authentication Flow
SAML SSO Deployment Guide for Cisco Unified Communications Applications, Release 15 and SUs
20
SAML SSO Requirements for Identity Providers
SAML OAuth Authentication Flow
Page 31
C H A P T E R 4
SAML SSO Configuration
• SAML-Based SSO Prerequisites, on page 21
• SAML SSO Configuration Task Flow, on page 25
• SAML SSO Additional Tasks, on page 30
• SAML SSO Deployment Interactions and Restrictions, on page 35
SAML-Based SSO Prerequisites
The following system setup is required for SAML-Based SSO configuration:
• NTP Setup
• DNS Setup
• Directory Setup
NTP Setup
In SAML SSO, Network Time Protocol (NTP) enables clock synchronization between the Unified
Communications applications and IdP. SAML is a time sensitive protocol and the IdP determines the time-based
validity of a SAML assertion. If the IdP and the Unified Communications applications clocks are not
synchronized, the assertion becomes invalid and stops the SAML SSO feature. The maximum allowed time
difference between the IdP and the Unified Communications applications is 3 seconds.
For SAML SSO to work, you must install the correct NTP setup and make sure that the time difference between
the IdP and the Unified Communications applications does not exceed 3 seconds.
Note
For information on adding an NTP server in order to synchronize clocks, see the "Core Settings for Device
Pools" chapter of the System Configuration Guide for Cisco Unified Communications Manager.
DNS Setup
Domain Name System (DNS) enables the mapping of host names and network services to IP addresses within
a network or networks. DNS server(s) deployed within a network provide a database that maps network
services to hostnames and, in turn, hostnames to IP addresses. Devices on the network can query the DNS
SAML SSO Deployment Guide for Cisco Unified Communications Applications, Release 15 and SUs
21


Page 32
server and receive IP addresses for other devices in the network, thereby facilitating communication between
network devices.
Unified Communications applications can use DNS to resolve fully qualified domain names to IP addresses.
The service providers and the IdP must be resolvable by the browser. For example, when the administrator
enters the service provider hostname (http://www.cucm.com/ccmadmin) in the browser, the browser
must resolve the hostname. When the service provider redirects the browser to IdP
(http://www.idp.com/saml) for SAML SSO, the browser must also resolve the IdP hostname. Moreover,
when the IdP redirects back to the service provider ACS URL, the browser must resolve that as well.
Directory Setup
LDAP directory synchronization is a prerequisite and a mandatory step to enable SAML SSO across various
Unified Communications applications. Synchronization of Unified Communications applications with an
LDAP directory allows the administrator to provision users easily by mapping Unified Communications
applications data fields to directory attributes.
To enable SAML SSO, the LDAP server must be trusted by the IdP server and supported by Unified
Communications applications.
Note
For more information, see the "Directory Integration and Identity Management" chapter of the Cisco
Collaboration System Solution Reference Network Designs at:
https://www.cisco.com/c/en/us/support/unified-communications/unified-communications-system/
products-implementation-design-guides-list.html
Certificate Management and Validation
Cisco strongly recommends that server certificates are signed for SAML SSO and that multiserver certificates
are used where product support is available.
Important
• Common Names (CN) and Subject Alternative Names (SAN) are references to the IP address or Fully
Qualified Domain Name (FQDN) of the address that is requested. For instance, if you enter
https://www.cisco.com, then the CN or SAN must have “www.cisco.com” in the header.
• If the Unified Communications Manager is already in Mixed/Secure Mode and there are changes made
to the certificates, then the CTL certificate must be updated using the secure USB token. Otherwise the
Cisco Jabber client will not be able to acquire telephony capability. The CTL token update requires a
Unified Communications Manager restart.
Note
In SAML SSO, each entity participating in the SAML message exchange, including the user's web browser,
must establish a seamless secure HTTPS connections to the required entities. Cisco strongly recommends that
signed certificates issued by a trusted Certificate Authority be configured on each UC product participating
in the SAML SSO deployment.
SAML SSO Deployment Guide for Cisco Unified Communications Applications, Release 15 and SUs
22
SAML SSO Configuration
Directory Setup


Page 33
Unified Communications applications use certificate validation to establish secure connections with servers.
Certificates are used between end points to build a trust/authentication and encryption of data. This confirms
that the endpoints communicate with the intended device and have the option to encrypt the data between the
two endpoints.
When attempting to establish secure connections, servers present Unified Communications clients with
certificates. If the client cannot validate a certificate, it prompts the user to confirm if they want to accept the
certificate.
Certificates Signed by a Certificate Authority
Cisco recommends using server certificates that are signed by one of the following types of Certificate Authority
(CA):
• Public CA - A third-party company verifies the server identity and issues a trusted certificate.
• Private CA - You create and manage a local CA and issue trusted certificates.
The signing process varies for each product and can vary between server versions. It is beyond the scope of
this document to provide detailed steps for every version of each server. Refer the appropriate server
documentation for detailed instructions on how to get certificates signed by a CA.
However, the following steps provide a high-level overview of the procedure:
Procedure
Step 1
Generate a Certificate Signing Request (CSR) on each product that can present a certificate to the client.
Step 2
Submit each CSR to the CA.
Step 3
Upload the certificates that the CA issues to each server.
Every server certificate should have an associated root certificate present in the trust store on client computers.
Cisco UC applications validate the certificates that servers present against the root certificates in the trust
store.
If you get server certificates signed by a public CA, the public CA should already have a root certificate
present in the trust store on the client computer. In this case, you do not need to import root certificates on
the client computers.
You should import root certificates if the certificates are signed by a CA that does not already exist in the
trust store, such as a private CA.
In SAML SSO, the IdP and service providers must have CA signed certificates with the correct domains in
the CN or SAN. If the correct CA certificates are not validated, the browser issues a pop up warning.
For example, when the administrator points the browser to https://www.cucm.com/ccmadmin; the
Unified Communications Manager portal presents a CA certificate to the browser. When the browser is
redirected to https://www.idp.com/saml , the IdP presents a CA certificate. The browser will check
that the certificate presented by the servers contains CN or SAN fields for that domain, and that the certificate
is signed by a trusted CA.
Alternatively, if the customer has their own private CA, then that CA must be installed as a root trust anchor
on the computers that the administrator is launching their browser from.
SAML SSO Deployment Guide for Cisco Unified Communications Applications, Release 15 and SUs
23
SAML SSO Configuration
Certificates Signed by a Certificate Authority
Page 34
Configure Multiserver SAN Certificates
Each Cisco product has its own process for generating multiserver SAN certificates. For information about
the Cisco products that support multiserver SAN certificates see the relevant guide.
Related Topics
Release Notes for Cisco Unified Communications Manager, Release 10.5(1)
Cisco Unified Communications Operating System Administration Guide for Cisco Unity Connection
Release 10.x
Cisco Prime Collaboration
Deploy Certificate Issuer for Microsoft Edge Interoperability
An interoperability issue exists within SAML SSO deployments where the Microsoft Edge Browser is deployed.
If the Edge Browser is deployed on an SSO-enabled machine, the Edge browser does not recognize the
certificate issuer of the Unified Communications Manager certificate and does not provide access.
Use this procedure to fix this issue via the Group Policy Object (GPO) and Active Directory whereby you
can push the certificate issuer of the Unified Communications Manager certificate to the Trusted Root
Certification of local machines that use the Edge browser.
The "certificate issuer" depends on how your certificates are set up. For example, for third-party CA certificates,
You may need to push the CA certificate only if the CA itself signs the Unified Communications Manager
certificate. However, if an intermediate CA signs the Unified Communications Manager certificate, you may
need to push the complete certificate chain, which will include the root certificate, intermediate certificate,
and any leaf certificates.
Note
Before you begin
Membership in the local Administrators group, or equivalent, of the local machine is the minimum required
to complete this procedure
Procedure
Step 1
In Active Directory, Open Group Policy Management Console.
Step 2
Find an existing GPO or create a new GPO to contain the certificate settings. The GPO must be associated with the
domain, site, or organizational unit whose users you want affected by the policy.
Step 3
Right-click the GPO, and select Edit.
The Group Policy Management Editor opens, and displays the current contents of the policy object.
Step 4
In the navigation pane, open Computer Configuration > Windows Settings > Security Settings > Public Key Policies >
Trusted Publishers.
Step 5
Click the Action menu, and click Import.
Step 6
Follow the instructions in the Certificate Import Wizard to find and import the certificate.
SAML SSO Deployment Guide for Cisco Unified Communications Applications, Release 15 and SUs
24
SAML SSO Configuration
Configure Multiserver SAN Certificates

Page 35
Step 7
If the certificate is self-signed, and cannot be traced back to a certificate that is in the Trusted Root Certification
Authorities certificate store, then you must also copy the certificate to that store. In the navigation pane, click Trusted
Root Certification Authorities, and then repeat steps 5 and 6 to install a copy of the certificate to that store.
For additional information on Managing Trusted Root Certificates in Active Directory, see
https://technet.microsoft.com/en-us/library/cc754841(v=ws.11).aspx.
Note
SAML SSO Configuration Task Flow
Complete these tasks to configure SAML SSO in your Cisco Collaboration environment. This process includes
procedures for the following applications:
• Cisco Unified Communications Manager
• IM and Presence Service
• Cisco Unity Connection
• Cisco Expressway (with MRA Deployments)
Procedure
Purpose
Command or Action
In your Cisco Collaboration environment, initiate the SSO
configuration and export UC metadata.
Initiate SSO Configuration on Collaboration Applications,
on page 25
Step 1
On your Identity Provider:
Configure SAML SSO on Identity Provider, on page 28
Step 2
• Upload the UC metadata
• Configure SAML SSO agreements
• Export an IdP metadata file
Import IdP metadata into your Cisco Collaboration
environment and complete the configuration.
Enable SAML SSO for Cisco Collaboration Applications,
on page 28
Step 3
Initiate SSO Configuration on Collaboration Applications
In your Cisco Collaboration environment, begin the SAML SSO configuration and export UC metadata for
upload into your Identity Provider. Depending on the applications for which you are configuring SAML SSO,
and the options chosen, you may have multiple download files.
SAML SSO Deployment Guide for Cisco Unified Communications Applications, Release 15 and SUs
25
SAML SSO Configuration
SAML SSO Configuration Task Flow

Page 36
Before you begin
Make sure that you plan beforehand what type of SAML SSO agreement you want (cluster wide or per node),
along with the certificate type.
Procedure
Step 1
On Cisco Unified Communications Manager, export a UC metadata file:
a)
From Cisco Unified CM Administration, choose System > SAML Single Sign On.
b) Select an SSO Mode option: Cluster wide or Per Node.
c)
Select a Certificate option: System generated self-signed certificate or a Cisco Tomcat certificate.
d) Click Export All Metadata and save the metadata file to a secure location.
With cluster wide agreements, you will receive a single metadata file. With per node agreements, the zip file download
contains a separate XML files for each cluster node. If you have IM and Presence Service deployed in a Standard
deployment,
Step 2
IM and Presence Service—If you have a Centralized Deployment for the IM and Presence Service, repeat step 1 on the
standalone Unified CM publisher node that is a part of your IM and Presence central cluster.
Note
With IM and Presence Service Standard Deployments you can skip this task because the the metadata file that you
downloaded from Unified Communications Manager in the previous step includes metadata for the IM and Presence
Service cluster.
Step 3
On Cisco Unity Connection, export a metadata file:
a)
From Cisco Unity Connection Administration, choose System Settings > SAML Single Sign On.
b) Select the SSO Mode option: Cluster wide or Per node.
c)
Click Export All Metadata.
Step 4
On Cisco Expressway-C, export a metadata file:
a)
On the Expressway-C primary peer, go to Configuration > Unified Communications > Configuration
b) In the MRA Access Control section, choose either of the following options for the Authentication path:
• SAML SSO authentication
• SAML SSO and UCM/LDAP—Allows either method.
c)
Choose a SAML Metadata option: Cluster or Peer
• Cluster—Single metadata file for cluster
• Peer—Separate metadata files per node.
d) Click Export SAML data.
• For Cluster agreements, click Generate Certificate and then Download the certificate.
• For Peer agreements, Download All.
e)
Save in a secure location.
SAML SSO Deployment Guide for Cisco Unified Communications Applications, Release 15 and SUs
26
SAML SSO Configuration
Initiate SSO Configuration on Collaboration Applications
Page 37
At the completion of this procedure, you will have metadata files for each of your Collaboration applications.
The number of metadata files depends on your configuration and deployment type.
Metadata Download Example
Refer to the following for an example of the number of file downloads you can expect from your Cisco
Collaboration deployment. Assume that you are configuring SSO for the following applications:
• A five-node Cisco Unified Communications Manager cluster
• A three-node IM and Presence Service cluster
• A two-node Cisco Unity Connection cluster
• A three-node Expressway-C cluster accompanied with a 3-node Expressway-E cluster (MRA deployment)
The following table provides a breakdown of the total download files that you can expect depending on
whether you are uisng cluster-wide agreements, and whether the IM and Presence Service is in a Standard
Deployment or Centralized Deployment.
Table 2: Expected Metadata Downloads
Total Files Downloaded when IM and
Presence is in Centralized Deployment*
Total Files Downloaded when IM and
Presence is in Standard Deployment
Agreement Type
Four metadata XML files representing
following clusters:
• Unfiied Communications Manager
cluster
• IM and Presence Service cluster
• Unity Connection cluster
• Expressway-C cluster
Three metadata XML files representing
following clusters:
• Unfiied Communications Manager
and IM and Presence Service cluster
• Unity Connection cluster
• Expressway-C cluster
Cluster wide
Four zip files containing 14 metadata XML
files:
• One zip file with five XML files for
Unified CM nodes
• One zip file with three XML files for
IM and Presence nodes and an extra
XML file for the standalone Unified
CM publisher node that is in the IM
and Presence central cluster
• One zip file with two XML files for
Unity Connection nodes
• One zip file with three XML files for
Expressway-C nodes
Three zip files containing 13 metadata
XML files:
• One zip file with eight XML files for
Unified CM and IM and Presence
nodes
• One zip file with two XML files for
Unity Connection nodes
• One zip file with three XML files for
Expressway-C nodes
Per node
SAML SSO Deployment Guide for Cisco Unified Communications Applications, Release 15 and SUs
27
SAML SSO Configuration
Metadata Download Example
Page 38
With Standard Deployments, the IM and Presence Service is in the same cluster as Cisco Unified
Communications Manager. Metadata for the IM and Presence Service is included in the metadata download
from Cisco Unified Communications Manager.
With Centralized Deployments, the IM and Presence Service is in a different cluster from the Cisco Unified
Communications Manager telephony cluster and metadata for the IM and Presence Service must be exported
separately using the standalone, non-telephony Unified CM publisher node that is within the IM and Presence
central cluster.
Note
Configure SAML SSO on Identity Provider
On the Identity Provider, you need to:
• Import the UC metadata files that you downloaded from your Cisco Collaboration environment
• Configure SAML SSO agreements to your Cisco Collaboration applications
• Export an Identity Provider metadata file that you will later import into your Cisco Collaboration
applications
Cisco provides the following Idp-specific configuration examples as a guide for you to use:
• Microsoft Active Directory Federation Services 2.0
• Microsoft Active Directory Federation Services 3.0
• Microsoft Active Directory Federation Services 4.0
• Microsoft Entra ID
• Okta
• Open AM
• PingFederate
The above links are examples only. Refer to your IdP documentation for official documentation.
Note
Enable SAML SSO for Cisco Collaboration Applications
Before you begin
Import the Identity Provider metadata into your Cisco Collaboration applications and complete the SAML
SSO configuration.
This Note is applicable from Release 14SU2 onwards.
Important
SAML SSO Deployment Guide for Cisco Unified Communications Applications, Release 15 and SUs
28
SAML SSO Configuration
Configure SAML SSO on Identity Provider


Page 39
While configuring the domain, we recommend you to see the section “Configuration” in the Change CUCM
Server Definition from IP Address or Hostname to FQDN Format to avoid connection failures and metadata
mismatch warning messages, which appears post SAML SSO enabling. This was introduced during the
BCFIPS feature.
Note
Procedure
Step 1
On Cisco Unified Communications Manager, complete the SSO configuration:
a)
Restart the Cisco Tomcat server before enabling SAML SSO.
b) From Cisco Unified CM Administration, choose System > SAML Single Sign On.
c)
Click Enable SAML SSO.
d) Click Continue and follow the prompts.
Note
You can enable or disable SAML SSO only if the DB services are up and running across all the nodes in the cluster.
To check the DB status, run the utils service list administrative command (A Cisco DB) that retrieves the list of all
services.
e)
Cluster wide agreements only. Click Test for Multi-server tomcat certificates.
f)
Click Next
g) Browse to select your IdP metadata file. After you have opened the file, click Import IdP Metadata.
h) Click Next.
i)
Select an LDAP-synchronized whom has Standard CCM Super User permissions and Run SSO test.
j)
Sign in with the user's credentials.
k) Click Finish to complete the SAML SSO setup.
l)
Restart the Cisco Tomcat server.
m) Per node agreements only. Repeat this process on each Unified Communications Manager node.
Note
If FIPS or ESM is enabled on the Unified Communications Manager, you need to set the SSO signing algorithm to
sha256.
Run this command on admin CLI on all the nodes of Unified CM.
utils sso set signing-algorithm sha256
Step 2
IM and Presence Service—If you have a Centralized Deployment of the IM and Presence Service, repeat the previous
step on the standalone Unified CM publisher node that is a part of the IM and Presence central cluster.
Step 3
On Cisco Unity Connection, complete the SAML SSO configuration:
a)
Restart the Cisco Tomcat server before enabling SAML SSO.
b) In Cisco Unity Connection Administration, go to System Settings > SAML Single Sign On.
c)
Click Enable SAML Single Sign On.
d) Click Continue and follow the prompts.
e)
Import the IdP metadata file into Cisco Unity Connection.
f)
Test the SSO Connection.
g) Restart the Cisco Tomcat server.
SAML SSO Deployment Guide for Cisco Unified Communications Applications, Release 15 and SUs
29
SAML SSO Configuration
Enable SAML SSO for Cisco Collaboration Applications

Page 40
h) Per node agreements only. Repeat this process for each cluster node.
Step 4
On the Expressway-C primary peer, complete the SAML SSO configuration:
a)
Go to Configuration > Unified Communications > Identity providers.
b) Click Import new IdP from SAML.
c)
Use Import SAML file control to locate the IdP metadata file.
d) Set the Digest to the required SHA hash algorithm.
e)
Click Upload.
Note
You can change the signing algorithm after you have imported the metadata, by going to Configuration > Unified
Communications > Identity Providers (IdP) locating your IdP row then, in the Actions column, clicking Configure
Digest).
f)
Verify that the IdP appears in the list of Identity Providers.
g) Click Associate Domains in the IdP row.
h) Check the domains that you want to assign to this Identity Provider.
i)
Click Save.
Note
If you are deploying Cisco Expressway with Active Directory Federation Services (ADFS) for SAML SSO, refer to
Additional Expressway Configuration for ADFS, on page 30 for additional Expressway settings.
SAML SSO Additional Tasks
You can perform the following additional tasks to enable SAML SSO setup as per the requirement.
Restart Cisco Tomcat Service
Before and after enabling or disabling SAML Single Sign-On, restart the Cisco Tomcat service on all Unified
CM and IM and Presence Service cluster nodes where Single Sign-On is running.
Procedure
Step 1
Log in to the Command Line Interface.
Step 2
Run the utils service restart Cisco Tomcat CLI command.
Step 3
Repeat this procedure on all cluster nodes where Single Sign-On is enabled.
Additional Expressway Configuration for ADFS
If you are deploying SAML SSO for Expressway with Active Directory Federation Services, complete these
additional Expressway configurations:
SAML SSO Deployment Guide for Cisco Unified Communications Applications, Release 15 and SUs
30
SAML SSO Configuration
SAML SSO Additional Tasks
Page 41
Procedure
Step 1
In Windows PowerShell®, run the following command for each Expressway-E's <EntityName> once per Relying Party
Trust created on ADFS:
Set-ADFSRelyingPartyTrust -TargetName "<EntityName>" -SAMLResponseSignatureMessageAndAssertion where
<EntityName> must be a display name for the Relying Party Trust of Expressway-E as set in ADFS.
Step 2
In ADFS, add a Claim Rule for Each Relying Party :
a)
Open the Edit Claims Rule dialog, and create a new claim rule that sends AD attributes as claims.
b) Select the AD attribute to match the one that identifies OAuth users to the internal systems, typically email or
SAMAccountName.
c)
Enter uid as the Outgoing Claim Type.
Configure SSO Login Behavior for Cisco Jabber on iOS
Procedure
Step 1
From Cisco Unified CM Administration, choose System > Enterprise Parameters.
Step 2
To configure the opt-in control, in the SSO Configuration section, choose the Use Native Browser option for the SSO
Login Behavior for iOS parameter:
Note
The SSO Login Behavior for iOS parameter includes the following options:
• Use Embedded Browser—If you enable this option, Cisco Jabber uses the embedded browser for SSO authentication.
Use this option to allow iOS devices prior to version 9 to use SSO without cross-launching into the native Apple
Safari browser. This option is enabled by default.
• Use Native Browser—If you enable this option, Cisco Jabber uses the Apple Safari framework on an iOS device
to perform certificate-based authentication with an Identity Provider (IdP) in the MDM deployment.
Note
We don't recommend to configure this option, except in a controlled MDM deployment, because using a native
browser is not as secure as the using the embedded browser.
Step 3
Click Save.
Access the Recovery URL
Use the recovery URL to bypass SAML Single Sign-On and log in to the Cisco Unified Communications
Manager Administration and Cisco Unified CM IM and Presence Service interfaces for troubleshooting. For
SAML SSO Deployment Guide for Cisco Unified Communications Applications, Release 15 and SUs
31
SAML SSO Configuration
Configure SSO Login Behavior for Cisco Jabber on iOS
Page 42
example, enable the recovery URL before you change the domain or hostname of a server. Logging in to the
recovery URL facilitates an update of the server metadata.
The recovery URL does not work for end users (LDAP or local) trying to log in to the Self Care portal.
Note
Before you begin
• Only application users with administrative privileges can access the recovery URL.
• If SAML SSO is enabled, the recovery URL is enabled by default. You can enable and disable the
recovery URL from the CLI. For more information about the CLI commands to enable and disable the
recovery URL, see the Command Line Interface Guide for Cisco Unified Communications Solutions.
Procedure
In your browser, enter https://hostname:8443/ssosp/local/login.
Update Server Metadata After a Domain or Hostname Change
After a domain or hostname change, SAML Single Sign-On is not functional until you perform this procedure.
If you are unable to log in to the SAML Single Sign-On window even after performing this procedure, clear
the browser cache and try logging in again.
Note
Before you begin
If the recovery URL is disabled, it does not appear for you to bypass the Single Sign-On link. To enable the
recovery URL, log in to the CLI and execute the following command: utils sso recovery-url enable.
Procedure
Step 1
In the address bar of your web browser, enter the following URL:
https://<Unified CM-server-name>
where <Unified CM-server-name> is the hostname or IP address of the server.
Step 2
Click Recovery URL to bypass Single Sign-On (SSO).
Step 3
Enter the credentials of an application user with an administrator role and click Login.
Step 4
From Cisco Unified CM Administration, choose System > SAML Single Sign-On.
Step 5
Click Export Metadata to download the server metadata.
SAML SSO Deployment Guide for Cisco Unified Communications Applications, Release 15 and SUs
32
SAML SSO Configuration
Update Server Metadata After a Domain or Hostname Change

Page 43
Step 6
Upload the server metadata file to the IdP.
Step 7
Click Run Test.
Step 8
Enter a valid User ID and password.
Step 9
After you see the success message, close the browser window.
Update IdP Metadata
Use this procedure to update the IdP Metadata Trust file on all the servers in the cluster.
Before you begin
If the recovery URL is disabled, it doesn’t appear for you to bypass the Single Sign-On link. To enable the
recovery URL, log in to the CLI and execute the following command: utils sso recovery-url enable.
Procedure
Step 1
In the address bar of your web browser, enter the following URL:
https://<Unified CM-server-name>
Where <Unified CM-server-name> is the hostname or IP address of the server.
Step 2
Click Recovery URL to bypass Single Sign-On (SSO).
Step 3
Enter the credentials of an application user with an administrator role and click Login.
Step 4
From Cisco Unified CM Administration, choose System > SAML Single Sign-On.
Step 5
Click Update IdP Metadata File to import the IdP Metadata trust file.
Step 6
Click Browse to select the IdP Metadata trust file and click Import IdP Metadata to import the file to collaboration
servers.
Step 7
Click Next.
Step 8
Select an LDAP-synchronized who has Standard CCM Super User permissions to verify whether the metadata file is
configured appropriately and Run SSO Test.
Step 9
Sign in with the valid user's credentials.
Step 10
Click Finish to enable the SAML SSO setup on all the servers in the cluster.
Note
When the applications are updated, there will be a short delay. The "Cisco Tomcat", "Cisco SSOSP Tomcat" and "Cisco
UDS Tomcat" services restart on all nodes in the cluster if the SSO mode is "cluster-wide". Otherwise, the services
restart on the particular node where IDP metadata is updated.
Manually Provision Server Metadata
To provision a single connection in your Identity Provider for multiple UC applications, you must manually
provision the server metadata while configuring the Circle of Trust between the Identity Provider and the
SAML SSO Deployment Guide for Cisco Unified Communications Applications, Release 15 and SUs
33
SAML SSO Configuration
Update IdP Metadata
Page 44
Service Provider. For more information about configuring the Circle of Trust, see the IdP product
documentation.
The general URL syntax is as follows:
https://<SP FQDN>:8443/ssosp/saml/SSO/alias/<SP FQDN>
Procedure
To provision the server metadata manually, use the Assertion Customer Service (ACS) URL.
Example:
Sample ACS URL: <md:AssertionConsumerService
Binding="urn:oasis:names:tc:SAML:2.0:bindings:HTTP-POST"
Location="https://cucm.ucsso.cisco.com:8443/ssosp/saml/SSO/alias/cucm.ucsso.cisco.com"
index="0"/>
Reconfigure OpenAM SSO to SAML SSO Following an Upgrade
As of Release 11.0(1), Unified Communications Manager no longer offers the OpenAM SSO solution. If you
have upgraded from an earlier release with the Open AM SSO solution configured, you must reconfigure your
system to use the SAML SSO solution using one of the supported IdPs. Use the configurations that are
documented in this guide to reconfigure your system to use SAML SSO.
Do not confuse the OpenAM SSO solution with a SAML SSO solution that uses OpenAM for the identity
provider as they are different solutions. When you reconfigure your system to use SAML SSO, you can use
any of the IdPs that are listed in this document.
Note
Re-Provisioning Cluster After Network Migration
For SSO login to work properly, ensure that you re-provision the cluster post network migration.
This procedure is applicable only for Network migration clusters with SSO enabled. This procedure is not
applicable for Simple migration.
Note
Before you begin
• Only application users with administrative privileges can access the recovery URL.
• If SAML SSO is enabled, the recovery URL is enabled by default. You can enable and disable the
recovery URL from the CLI. For more information about the CLI commands to enable and disable the
recovery URL, see the Command Line Interface Guide for Cisco Unified Communications Solutions.
SAML SSO Deployment Guide for Cisco Unified Communications Applications, Release 15 and SUs
34
SAML SSO Configuration
Reconfigure OpenAM SSO to SAML SSO Following an Upgrade

Page 45
Procedure
Step 1
In the address bar of your web browser, enter the following URL: https://<Unified CM-server-name>, where <Unified
CM-server-name> is the hostname or IP address of the server.
Step 2
Click Recovery URL to bypass Single Sign-On (SSO).
Step 3
Enter the credentials of an application user with an administrator role and click Login.
Step 4
From Cisco Unified CM Administration, choose System > SAML Single Sign-On.
Step 5
Click Export All Metadata to download the server metadata for upload into your Identity Provider.
Step 6
Click Update IdP Metadata File to import the IdP Metadata trust file.
Step 7
Click Browse to select the IdP Metadata trust file and click Import IdP Metadata to import the file to collaboration
servers. Click Next.
Step 8
Select an LDAP-synchronized who has Standard CCM Super User permissions to verify whether the metadata file is
configured appropriately and click Run Test.
Step 9
Click Finish to enable the SAML SSO setup on all the servers in the cluster.
When the applications are updated, there will be a short delay. The "Cisco SSOSP Tomcat" and "Cisco UDS Tomcat"
services restart on all nodes in the cluster if the SSO mode is 'cluster-wide'.
SAML SSO Deployment Interactions and Restrictions
Feature Interaction
Feature
If you regenerate the Tomcat Certificates, generate a new metadata file
on the Service Provider and upload that metadata file to the IdP.
Tomcat Certificate Regeneration
The metadata file regenerates if you perform one of the following:
• Change Self-Signed Certificates to Tomcat Certificates and
vice-versa.
• Regenerate Tomcat Certificates to ITL Recovery Certificates.
Cisco Unified Communications Manager downloads the regenerated
metadata file and uploads to the IdP.
Metadata Regeneration
SAML SSO Deployment Guide for Cisco Unified Communications Applications, Release 15 and SUs
35
SAML SSO Configuration
SAML SSO Deployment Interactions and Restrictions
Page 46
SAML SSO Deployment Guide for Cisco Unified Communications Applications, Release 15 and SUs
36
SAML SSO Configuration
SAML SSO Deployment Interactions and Restrictions
Page 47
C H A P T E R 5
End User SAML SSO
• End User SAML SSO Configuration, on page 37
End User SAML SSO Configuration
End user or federated SSO is a standard that allows products to meet customer compliance requirements,
reduce the total cost of ownership, and improve end user experience. The foundation for this support in the
collaboration products has been introduced in the 10.0 and 10.5 releases. This allows administrators to configure
the infrastructure in preparation for end user clients such as Cisco Unity Connection and Cisco Jabber, which
is rolling out support for users with release 10.5 in the second half of 2014.
Once an Administrator enables this feature for users it will allow users in a Cisco collaboration application
to log in to supported applications with their corporate username and password. If the Cisco application is
accessed by way of a browser the user can use the same corporate username and password to log in. If the
user has already logged in to another corporate application in that same browser they should be able to access
the application without having to provide a username and password. All of these features are available within
the customer network or accessible by way of a VPN.
The supported products are:
More Information
Supports End User SAML SSO from
Release...
Product
Click here
10.5
Cisco Unified Communications
Manager
Click here
10.5
IM and Presence Service
Click here
10.5
Cisco Unity Connection
Click here
Cloud
WebEx Meeting Center
Click here
Cloud
WebEx Connect and Messenger
Click here
1.5 and 2.0
Cisco WebEx Meetings Server
The supported end user clients are:
SAML SSO Deployment Guide for Cisco Unified Communications Applications, Release 15 and SUs
37

Page 48
More Information
Release
Product
Click here
Available with all releases
WebEx IOS
Click here
Available with all releases
WebEx Android
Click here
Available with all releases
WebEx Connect
Click here
Available with all releases
WebEx Messenger
Available in the second half of 2014
10.5
Jabber for Windows
Available in the second half of 2014
10.5
Jabber IOS
Available in the second half of 2014
10.5
Jabber for Android
Available in the second half of 2014
10.5
Jabber for Mac
• When deploying Cisco Jabber with Cisco WebEx Meeting Server, Unified Communications Manager
and the WebEx Meeting Server must be in the same domain.
• When Cisco Jabber is running with SSO on a Mac, Jabber cannot automatically set a cookie once
authorized for Jabber services. Mac behavior, by default, only allows cookies for sites the user navigates
to. Each time Jabber needs to check for authentication it has to go to the IdP.
• The SAML Assertion must include the email address for WebEx; the SAML Schemas should be aligned
to cover that.
• To trigger OAuth timer expiration correctly, ensure that the OAuthTokenExpiry value on Unified
Communications Manager is greater than the WebsessionApp expiry value on Tomcat.
Note
SAML SSO Deployment Guide for Cisco Unified Communications Applications, Release 15 and SUs
38
End User SAML SSO
End User SAML SSO Configuration

Page 49
C H A P T E R 6
SAML-Based SLO
• Support for SAML-Based Single Logout (SLO), on page 39
Support for SAML-Based Single Logout (SLO)
Unified CM supports SAML-based Single Logout (SLO). The SLO allows you to log out simultaneously
from all sessions of a browser that you have signed in using Single Sign-on (SSO).
• SLO does not log out all the running sessions at the same time for:
• different browsers with the same user login credentials
• the same UC product being active on different nodes in the cluster
• SLO logs out only one of the active UC product or node sessions at a time that runs on the same browser
and IdP. To successfully log out from all the UC applications or nodes under the same browser session,
ensure that you close the browser to complete the log out process.
Note
Cisco Tomcat and Cisco SSOSP Tomcat services must be restarted if you are altering the IdP metadata and
using root access to replace the idp.xml on the server. You need not restart any services if you are configuring
SLO while enabling SSO. Also, if you are altering the IdP metadata and using the update IdP metadata option
on the SAML SSO page to replace the idp.xml on the server.
The following IdPs (Identity Providers) support Single Logout:
• OpenAM 10.0.1
• F5 BIG-IP 11.6.0
• Okta 2017.38
• Microsoft Active Directory Federation Services idPs 2.0 (AD FS 2.0). To Log out using Microsoft Active
Directory Federation Services idPs 2.0, configure the logout URL in the idp.xml file.
SAML SSO Deployment Guide for Cisco Unified Communications Applications, Release 15 and SUs
39


Page 50
The PingFederate 6.10.0.4 IdP does not support Single Logout.
For more information on sample IdPs configuration on SLO, see Configuration Examples and TechNotes.
Note
Example Configuration of SAML-Based Single Logout with ADFS 2.0
This procedure is only an example configuration using Microsoft ADFS 2.0. We strongly recommend that
you refer to your IdP documentation for official documentation in case they are any new IdP configuration
changes or enhancements.
Attention
If SAML SSO mode is enabled with Microsoft ADFS 2.0 configuration on your system, then after a successful
upgrade to Unified CM Release 14 or above, ensure that you perform the following procedure:
Procedure
Step 1
For configuration at the Microsoft ADFS 2.0 side, ensure the following points:
a)
Select Relying Party Trust. From the Properties, select Endpoints.
b) Select Add SAML.
c)
Choose SAML Logout as Endpoint and Binding as Post.
d) Configure the URL <url>/adfs/ls/?wa=wsignout1.0.
e)
Select Save and Restart ADFS 2.0 service.
Step 2
To log out using Microsoft ADFS 2.0, configure the logout URL in the idp.xml file. Follow the mentioned steps on your
product server:
a)
Search for Location in <SingleLogoutService> tag of idp.xml file.
b) Update the URL as <url>/adfs/ls/?wa=wsignout1.0.
Step 3
From the SAML Single Sign-On page, click Update IdP Metadata File to reimport the updated IdP metadata on Unified
Communications Manager server.
Step 4
Click Run SSO Test.
After successful authentication, the following message is displayed:
SSO Metadata Test Succeesful
Step 5
Click Finish to complete the SAML SSO setup.
This step completes enabling SSO on all the servers in this cluster and all the web applications participating in SAML
SSO are restarted. It may take one to two minutes for the web applications to restart.
SAML SSO Deployment Guide for Cisco Unified Communications Applications, Release 15 and SUs
40
SAML-Based SLO
Example Configuration of SAML-Based Single Logout with ADFS 2.0