Document Metadata
Format: PDF
Title: Cisco Unified Communications Self Care Portal User Guide, Release 15
Author: Jayasree N
Creator: DITA Open Toolkit
Page 1
Cisco Unified Communications Self Care Portal User Guide, Release
15
First Published: 2023-12-18
Americas Headquarters
Cisco Systems, Inc.
170 West Tasman Drive
San Jose, CA 95134-1706
USA
http://www.cisco.com
Tel: 408 526-4000
800 553-NETS (6387)
Fax: 408 527-0883


Page 2
THE SPECIFICATIONS AND INFORMATION REGARDING THE PRODUCTS IN THIS MANUAL ARE SUBJECT TO CHANGE WITHOUT NOTICE. ALL STATEMENTS,
INFORMATION, AND RECOMMENDATIONS IN THIS MANUAL ARE BELIEVED TO BE ACCURATE BUT ARE PRESENTED WITHOUT WARRANTY OF ANY KIND,
EXPRESS OR IMPLIED. USERS MUST TAKE FULL RESPONSIBILITY FOR THEIR APPLICATION OF ANY PRODUCTS.
THE SOFTWARE LICENSE AND LIMITED WARRANTY FOR THE ACCOMPANYING PRODUCT ARE SET FORTH IN THE INFORMATION PACKET THAT SHIPPED WITH
THE PRODUCT AND ARE INCORPORATED HEREIN BY THIS REFERENCE. IF YOU ARE UNABLE TO LOCATE THE SOFTWARE LICENSE OR LIMITED WARRANTY,
CONTACT YOUR CISCO REPRESENTATIVE FOR A COPY.
The following information is for FCC compliance of Class A devices: This equipment has been tested and found to comply with the limits for a Class A digital device, pursuant to part 15
of the FCC rules. These limits are designed to provide reasonable protection against harmful interference when the equipment is operated in a commercial environment. This equipment
generates, uses, and can radiate radio-frequency energy and, if not installed and used in accordance with the instruction manual, may cause harmful interference to radio communications.
Operation of this equipment in a residential area is likely to cause harmful interference, in which case users will be required to correct the interference at their own expense.
The following information is for FCC compliance of Class B devices: This equipment has been tested and found to comply with the limits for a Class B digital device, pursuant to part 15 of
the FCC rules. These limits are designed to provide reasonable protection against harmful interference in a residential installation. This equipment generates, uses and can radiate radio
frequency energy and, if not installed and used in accordance with the instructions, may cause harmful interference to radio communications. However, there is no guarantee that interference
will not occur in a particular installation. If the equipment causes interference to radio or television reception, which can be determined by turning the equipment off and on, users are
encouraged to try to correct the interference by using one or more of the following measures:
• Reorient or relocate the receiving antenna.
• Increase the separation between the equipment and receiver.
• Connect the equipment into an outlet on a circuit different from that to which the receiver is connected.
• Consult the dealer or an experienced radio/TV technician for help.
Modifications to this product not authorized by Cisco could void the FCC approval and negate your authority to operate the product.
The Cisco implementation of TCP header compression is an adaptation of a program developed by the University of California, Berkeley (UCB) as part of UCB’s public domain version of
the UNIX operating system. All rights reserved. Copyright © 1981, Regents of the University of California.
NOTWITHSTANDING ANY OTHER WARRANTY HEREIN, ALL DOCUMENT FILES AND SOFTWARE OF THESE SUPPLIERS ARE PROVIDED "AS IS" WITH ALL FAULTS.
CISCO AND THE ABOVE-NAMED SUPPLIERS DISCLAIM ALL WARRANTIES, EXPRESSED OR IMPLIED, INCLUDING, WITHOUT LIMITATION, THOSE OF
MERCHANTABILITY, FITNESS FOR A PARTICULAR PURPOSE AND NONINFRINGEMENT OR ARISING FROM A COURSE OF DEALING, USAGE, OR TRADE PRACTICE.
IN NO EVENT SHALL CISCO OR ITS SUPPLIERS BE LIABLE FOR ANY INDIRECT, SPECIAL, CONSEQUENTIAL, OR INCIDENTAL DAMAGES, INCLUDING, WITHOUT
LIMITATION, LOST PROFITS OR LOSS OR DAMAGE TO DATA ARISING OUT OF THE USE OR INABILITY TO USE THIS MANUAL, EVEN IF CISCO OR ITS SUPPLIERS
HAVE BEEN ADVISED OF THE POSSIBILITY OF SUCH DAMAGES.
Any Internet Protocol (IP) addresses and phone numbers used in this document are not intended to be actual addresses and phone numbers. Any examples, command display output, network
topology diagrams, and other figures included in the document are shown for illustrative purposes only. Any use of actual IP addresses or phone numbers in illustrative content is unintentional
and coincidental.
All printed copies and duplicate soft copies of this document are considered uncontrolled. See the current online version for the latest version.
Cisco has more than 200 offices worldwide. Addresses and phone numbers are listed on the Cisco website at www.cisco.com/go/offices.
Cisco and the Cisco logo are trademarks or registered trademarks of Cisco and/or its affiliates in the U.S. and other countries. To view a list of Cisco trademarks, go to this URL:
https://www.cisco.com/c/en/us/about/legal/trademarks.html. Third-party trademarks mentioned are the property of their respective owners. The use of the word partner does not imply a
partnership relationship between Cisco and any other company. (1721R)
© 2023 Cisco Systems, Inc. All rights reserved.
Page 3
C O N T E N T S
About Cisco Unified Communications Self Care Portal
1
C H A P T E R 1
Overview of Self Care Portal
1
Know Your Self Care Portal Interface
1
Company Phones and Additional Phones
2
Self Care Portal Buttons and Icons
3
Get Started
5
C H A P T E R 2
Launch Self Care Portal
5
Set Your Preferred Language
6
Change Your Phone Display Name
6
Add Your Additional Phones to Self Care Portal
6
Activate Your Phone
7
Set Up Phone Services
7
Change Your Portal Password
8
Change Your Phone Services PIN
8
Schedule a Meeting Using an Access Code
9
Download the Required Plug-ins
9
Download Your Phone User Manual
9
Sign out From Self Care Portal
10
Phone Feature Configuration
11
C H A P T E R 3
Create Speed-Dial Numbers
11
Set Speed Dial Numbers with Pauses
12
Set Up Your Voicemail Notifications
12
Set Voicemail Preferences
13
Set up Login Time Limit for Extension Mobility
13
Cisco Unified Communications Self Care Portal User Guide, Release 15
iii

Page 4
Save Your Recent Calls
14
Add People to Your Phone Contacts
15
Forward Your Phone Calls
15
Handle Work Calls From Any Phone
17
Transfer Your Work Calls to Your Personal Phone
18
Instant Message and Presence Status
21
C H A P T E R 4
Let Others Know That You're Busy
21
Share Your Work Status
21
Cisco Unified Communications Self Care Portal User Guide, Release 15
iv
Contents
Page 5
C H A P T E R 1
About Cisco Unified Communications Self Care
Portal
• Overview of Self Care Portal, on page 1
• Know Your Self Care Portal Interface, on page 1
• Company Phones and Additional Phones , on page 2
• Self Care Portal Buttons and Icons, on page 3
Overview of Self Care Portal
This document describes how to use Unified Communications Self Care Portal to customize and configure
your phone features and settings. You can use Self Care Portal to manage your phone settings, such as speed
dial numbers, ring settings, voicemail notifications, call history, call forwarding, and phone contacts.
Your network administrator controls the access to Self Care Portal and provides you with your login credentials.
You can only configure features that are supported on your phone or that your administrator has made available
to you. For example, if your phone doesn't support Do Not Disturb, you can't find that feature in Self Care
Portal.
Know Your Self Care Portal Interface
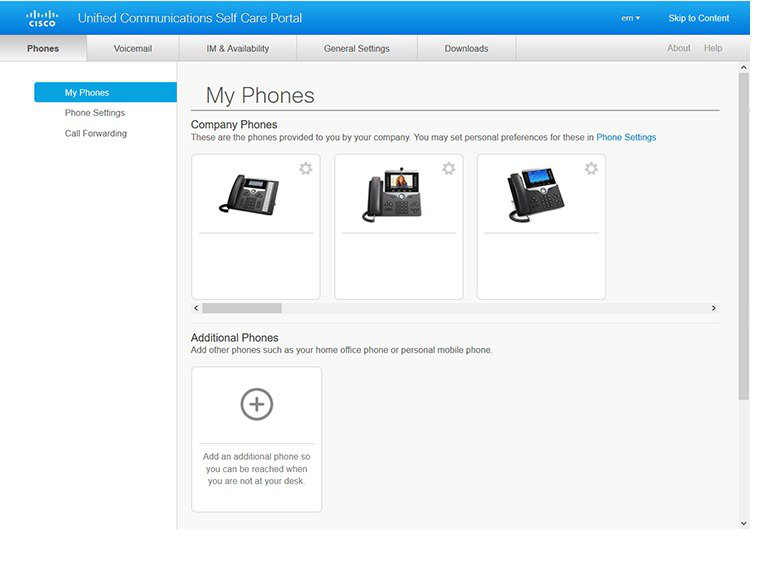
Self Care Portal is a web-based graphical user interface (GUI). It has a home page with five tabs—Phones,
Voicemail, IM & Availability, General Settings, and Downloads. You can use these tabs to configure and
customize your phone features.
The following image shows the Self Care Portal home page.
Cisco Unified Communications Self Care Portal User Guide, Release 15
1

Page 6
Figure 1: Self Care Portal Interface
The following table lists the functions of each tab:
Function
Tabs
Set up speed dial numbers, ring settings, call history, and call forwarding settings.
Phones
Set up your voicemail settings.
Voicemail
Set up instant messages and availability status.
IM & Availability
Set up or change your password, PIN, conference access code, and display name.
General Settings
Download plugins for your phones.
Downloads
Company Phones and Additional Phones
There are two types of phones that you can add to Self Care Portal. They are:
• Company Phones—Cisco IP Phones provided by your company. You can configure features for an
improved experience.
• Additional Phones—Your personal or mobile phones. You can add these phones to Self Care Portal and
use it to handle your work calls. You can't configure any features on them.
Cisco Unified Communications Self Care Portal User Guide, Release 15
2
About Cisco Unified Communications Self Care Portal
Company Phones and Additional Phones
Page 7
To view these phones in Self Care Portal, go to Unified Communications Self Care Portal > My Phones.
Self Care Portal Buttons and Icons
The Self Care Portal has buttons and icons to add, modify, or delete your phone settings.
Description
Name
Icon
Add a new item, such as a new phone, a new service, or a new speed
dial number.
Add New
Delete a setting, feature, or function.
Delete
Edit an existing setting.
Edit Setting
Share an updated setting with your other phones.
Linked
Unshare an updated setting with your other phones.
Unlinked
Edit a phone setting, update the name and description of your additional
phone, and download a phone manual.
Settings
Cisco Unified Communications Self Care Portal User Guide, Release 15
3
About Cisco Unified Communications Self Care Portal
Self Care Portal Buttons and Icons


Page 8
Cisco Unified Communications Self Care Portal User Guide, Release 15
4
About Cisco Unified Communications Self Care Portal
Self Care Portal Buttons and Icons
Page 9
C H A P T E R 2
Get Started
• Launch Self Care Portal, on page 5
• Set Your Preferred Language , on page 6
• Change Your Phone Display Name , on page 6
• Add Your Additional Phones to Self Care Portal, on page 6
• Activate Your Phone, on page 7
• Set Up Phone Services , on page 7
• Change Your Portal Password, on page 8
• Change Your Phone Services PIN , on page 8
• Schedule a Meeting Using an Access Code, on page 9
• Download the Required Plug-ins, on page 9
• Download Your Phone User Manual, on page 9
• Sign out From Self Care Portal, on page 10
Launch Self Care Portal
Launch the Self Care Portal to configure and customize your phone settings.
Before you begin
Make sure that your network administrator has enabled Self Care access and provided you with the following
details:
• The Self Care Portal URL
• Your username and password
Procedure
Step 1
Enter the Self Care Portal URL in the web browser address bar: For example,
https://<server_name:portnumber>/ucmuser. Note that the address format may vary depending on how
the administrator configures the server.
Step 2
Enter your username and password and click Sign In.
Cisco Unified Communications Self Care Portal User Guide, Release 15
5

Page 10
Cisco Jabber users can access the portal directly from the Jabber client interface by selecting the Self Care
Portal option within the Settings menu.
Note
Set Your Preferred Language
By default, your Cisco IP Phone and Jabber applications display their content in English. If you're comfortable
using a different language other than English, you can set that language as your display language.
Procedure
Step 1
From Unified Communications Self Care Portal, choose General Settings > Language.
Step 2
From the Display Language drop-down list, choose your preferred language, and click Save.
Change Your Phone Display Name
You can modify the description for each of your Cisco IP Phones. This makes it easier if you have multiple
phones.
Procedure
Step 1
From Unified Communications Self Care Portal, choose Phones > My Phones.
Step 2
Hover over the name of your phone, click the Settings
icon, and choose Edit.
Step 3
Enter the new name of the phone in the Description field, and then click Save.
Add Your Additional Phones to Self Care Portal
You can add your additional phones, such as your mobile or home office phones to Self Care Portal. These
phones allow you to handle your work calls when you're away from your desk or office.
Procedure
Step 1
From Unified Communications Self Care Portal, choose Phones > My Phones.
Step 2
Click the Add New
icon.
Step 3
Enter the phone number and description in the respective fields.
Cisco Unified Communications Self Care Portal User Guide, Release 15
6
Get Started
Set Your Preferred Language



Page 11
• If you want to enable single number reach (answer your calls from any other device or phones) on your
new phone, check the Enable Single Number Reach check box.
• If you've added your mobile phone as your new phone, check the Enable Move to Mobile check box.
• If you want to enable the Cisco Jabber features on your new phone, check the Enable Extend and
Connect check box.
Step 4
Click Save.
Activate Your Phone
You need to activate your phone with an activation code before you can use it. Your administrator configures
a 16-digit activation code. This activation code is valid for one week.
If your phone is not active, you see the Ready to Activate message on your phone in the Self Care Portal.
Note
Procedure
Step 1
From Unified Communications Self Care Portal, choose Phones > My Phones.
Step 2
Choose your phone, and click View Activation Code.
The Activation Code pop-up displays the activation code and barcode.
Step 3
Use one of the options to activate your phone:
• Enter the 16-digit activation code on your new phone.
• If your phone has a video camera, you can use the camera to scan the barcode.
Step 4
Click Save.
Set Up Phone Services
You can add phone services such as directory, weather forecasts, or visual voicemail on Self Care Portal, if
your Cisco IP Phones or Jabber applications support them.
Procedure
Step 1
From Unified Communications Self Care Portal, choose Phones > Phones Settings > Services.
Step 2
Choose your phone and click Add New Services.
Cisco Unified Communications Self Care Portal User Guide, Release 15
7
Get Started
Activate Your Phone

Page 12
Step 3
Choose the required services from the Services drop-down list, enter the display name in the Display Name
field, and click Save.
Change Your Portal Password
You can change your password anytime. We recommend that you change your default password so that your
login remains secure.
You can't generate a new password if you have forgotten it. To generate a new password, contact your network
administrator.
Note
Procedure
Step 1
From Unified Communications Self Care Portal, choose General Settings > Client/Portal Password.
Step 2
Enter your new password in the New Password field, re-enter it in the Confirm New Password field, and
then click Save.
Change Your Phone Services PIN
You can use a phone services PIN to configure new phones, enable conference calls, and use mobile connect.
The PIN includes numbers without any spaces, letters, or special characters.
The PIN that you enter must meet the credential policy defined in Unified Communications Manager. For
example, if the credential policy specifies a minimum PIN length of 7 digits, the PIN that you enter should
be at least 7 digits long and cannot exceed 128 digits. For more information, contact your system administrator.
Note
Procedure
Step 1
From Unified Communications Self Care Portal, choose General Settings > Phone Services PIN.
Step 2
Enter the PIN in the New Phone PIN field, re-enter it in the Confirm New Phone PIN field, and then click
Save.
Cisco Unified Communications Self Care Portal User Guide, Release 15
8
Get Started
Change Your Portal Password

Page 13
Schedule a Meeting Using an Access Code
You can use the Self Care Portal to schedule a meeting with your coworkers. If you prefer, you can use an
access code to control who attends your meeting. An access code is a unique number, between three to ten
digits, without any spaces, letters, or special characters.
Procedure
Step 1
From Unified Communications Self Care Portal, choose General Settings > Conference.
Step 2
Enter the meeting number in the Meeting Number field.
Step 3
Enter the access code in the Attendees Access Code field, and then click Save.
Download the Required Plug-ins
You can download the available plug-ins if you want to extend the functionality of your Cisco IP Phones or
Jabber application.
Procedure
Step 1
From Unified Communications Self Care Portal, choose Downloads.
Step 2
Choose the plug-in that you want to download and click the Download button.
Download Your Phone User Manual
You can download your phone's user manual from the Self Care Portal. If you find that it’s not the latest
version, go to cisco.com to download the latest version.
Procedure
Step 1
From Unified Communications Self Care Portal, choose Phones > My Phones.
Step 2
Hover over your additional phone, click the Settings
icon, and choose Download Manual.
Cisco Unified Communications Self Care Portal User Guide, Release 15
9
Get Started
Schedule a Meeting Using an Access Code

Page 14
Sign out From Self Care Portal
After you've configured and customized your settings, you can sign out from Self Care Portal. Before you
sign out, make sure that you've saved your settings.
From Unified Communications Self Care Portal, click your display name, and choose Sign Out. Your
display name appears at the top right corner of the home page. If you haven't configured your display name,
your user ID appears on the screen.
Cisco Unified Communications Self Care Portal User Guide, Release 15
10
Get Started
Sign out From Self Care Portal
Page 15
C H A P T E R 3
Phone Feature Configuration
• Create Speed-Dial Numbers , on page 11
• Set Up Your Voicemail Notifications, on page 12
• Set up Login Time Limit for Extension Mobility, on page 13
• Save Your Recent Calls, on page 14
• Add People to Your Phone Contacts, on page 15
• Forward Your Phone Calls, on page 15
• Handle Work Calls From Any Phone , on page 17
• Transfer Your Work Calls to Your Personal Phone, on page 18
Create Speed-Dial Numbers
You can create speed-dials for the people whom you call frequently, so that you can reach out to them with
the press of a button. You can set up to 199 speed-dial numbers. Speed-dial numbers configured from Cisco
IP Phone do not appear in Self Care Portal.
Procedure
Step 1
From Unified Communications Self Care Portal, choose Phones > Phone Settings > Speed Dial Numbers.
Step 2
Choose your phone and click Add New Speed Dial.
Step 3
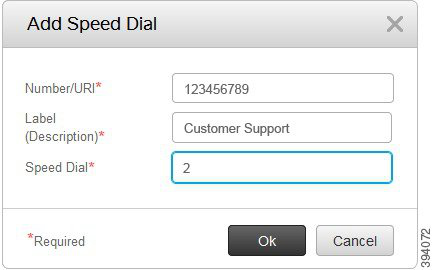
Enter the required field details such as Number/URI, Label (description) and Speed Dial, and then click Ok.
Cisco Unified Communications Self Care Portal User Guide, Release 15
11

Page 16
Set Speed Dial Numbers with Pauses
You can set pauses in a speed dial. This allows you to make calls to destinations that require Forced
Authorization Code (FAC), Client Matter Code (CMC), dialing pause, or additional digits (such as a user
extension, meeting access number, or voice mail password without manual intervention. When you press the
speed dial the phone establishes a call and sends other digits to the destination along with the dialing pauses.
To include pauses in a speed dial, you have to specify a comma (,) in the speed dial string. Each comma
indicates a pause of two seconds.
For example— you want to set up a speed dial that includes codes such as Forced Authorization Code (FAC)
and Client Matter Code (CMC), followed by IVR prompts where:
• The called number is 91886543.
• The FAC code is 8787.
• The CMC code is 5656.
• The IVR response is 987989#. You need to enter this response four seconds after the call connects.
In this case, you can set 91886543,8787,5656,987989# as the speed dial.
Set Up Your Voicemail Notifications
You receive a notification when someone leaves a message on your phone. The notification options are waiting
light, screen prompt, and stutter tone. You can set the same or different notification options for your messages.
Cisco Unified Communications Self Care Portal User Guide, Release 15
12
Phone Feature Configuration
Set Speed Dial Numbers with Pauses
Page 17
Procedure
Step 1
From Unified Communications Self Care Portal, choose Phones > Phone Settings > Voicemail Notification
Settings.
Step 2
Choose your phone number and check any of the notification options check boxes to enable them.
• Turn on message waiting light—A red light blinks near the message icon button on your phone screen
when you receive a voicemail message.
• Display screen prompt—A voicemail icon appears on your phone screen when you receive a voicemail
message.
• Play stutter tone when on a call—You hear a dial tone when you pick up your phone or when you are
on a call. The dial tone indicates that there is a voicemail message.
Step 3
Click Save.
Set Voicemail Preferences
You can set preferences for your voicemail such as the device on which you want to set the voicemail or your
preferred language and so on.
Procedure
Step 1
From Unified Communications Self Care Portal, choose Voicemail.
Step 2
Click Dial Voicemail Preferences IVR.
Cisco Web Dialer dials the Voicemail Preferences IVR, where you can set up voicemail preferences for your
phones.
Set up Login Time Limit for Extension Mobility
Cisco Extension Mobility allows you to use different Cisco IP Phones as your own phone and personalize
your settings and speed dials, by a simple login process. You can set up a time limit for this login process.
Cisco Unified Communications Self Care Portal User Guide, Release 15
13
Phone Feature Configuration
Set Voicemail Preferences

Page 18
Procedure
Step 1
From Unified Communications Self Care Portal, choose General Settings > Extension Mobility.
• Click the Use system default Maximum Login Time radio button, if you want to retain the default
maximum login time limit.
• Click the No Maximum Login Time radio button, if you do not want to set the maximum login time
limit.
• Click the Automatically log me out radio button, enter the hours and minutes in the respective fields,
if you want to customize the login time limit.
Step 2
Click Save.
Save Your Recent Calls
If you've missed any of your recent incoming calls and want to check who's called you recently, you can go
to the call history and view them.
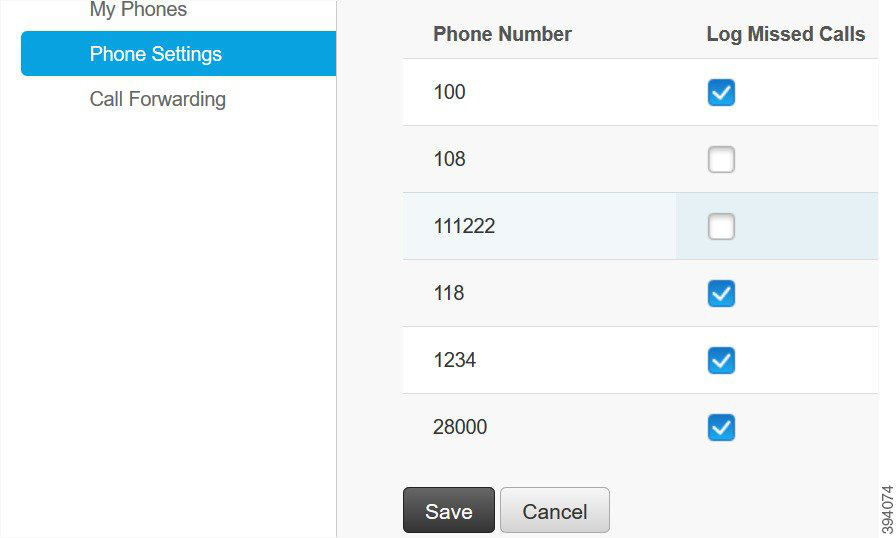
By default, all your missed calls are saved in the call history. If you don't want to save your recent missed
calls, uncheck the Log Missed Calls check box.
Note
Procedure
Step 1
From Unified Communications Self Care Portal, choose Phones > Phone Settings > Call History.
Step 2
Choose your phone number and check the Log Missed Calls check box.
Step 3
Click Save.
Cisco Unified Communications Self Care Portal User Guide, Release 15
14
Phone Feature Configuration
Save Your Recent Calls

Page 19
Add People to Your Phone Contacts
You can save your coworker's phone number and email address to your contact list. From your phone, you
can browse or search for your coworker's number and make calls directly without having to type the number
each time.
The contact list is unique to each phone. You can't share the contact list with your other phones.
Note
Procedure
Step 1
From Unified Communications Self Care Portal, choose Phones > Phone Setting > Phone Contacts.
Step 2
Click Create New Contact.
Step 3
Enter the required field details for Contact Information and Contact Methods, and then click Save.
You can click the edit icon
to modify the contact name or click the delete icon
to remove
the contact name from your phone list.
Note
Forward Your Phone Calls
When you're away from your phone or desk, you can forward calls from your Cisco IP Phone to another phone
or to a voicemail account.
Call Forward All (CFA) allows a phone user to forward all calls to a directory number. You can configure
CFA for internal and external calls and can forward calls to a voicemail system or a dialed destination number
by configuring the calling search space (CSS). includes a secondary Calling Search Space configuration field
for CFA. The secondary CSS for CFA combines with the existing CSS for CFA to allow support of the
alternate CSS system configuration. When you activate CFA, only the primary and secondary CSS for CFA
are used to validate the CFA destination and redirect the call to the CFA destination. If these fields are empty,
the null CSS is used. Only the CSS fields that are configured in the primary CSS for CFA and secondary CSS
for CFA fields are used. If CFA is activated from the phone, the CFA destination is validated by using the
CSS for CFA and the secondary CSS for CFA, and the CFA destination gets written to the database. When
a CFA is activated, the CFA destination always gets validated against the CSS for CFA and the secondary
CSS for CFA.
prevents CFA activation on the phone when a CFA loop is identified. For example, identifies a call forward
loop when the user presses the CFwdALL softkey on the phone with directory number 1000 and enters 1001
as the CFA destination, and 1001 has forwarded all calls to directory number 1002, which has forwarded all
calls to directory number 1003, which has forwarded all calls to 1000. In this case, identifies that a loop has
occurred and prevents CFA activation on the phone with directory number 1000.
Cisco Unified Communications Self Care Portal User Guide, Release 15
15
Phone Feature Configuration
Add People to Your Phone Contacts



Page 20
If the same directory number exists in different partitions, for example, directory number 1000 exists in
partitions 1 and 2, allows the CFA activation on the phone.
Tip
CFA loops do not affect call processing because supports CFA loop breakout, which ensures that if a CFA
loop is identified, the call goes through the entire forwarding chain, breaks out of the Call Forward All loop,
and the loop is completed as expected, even if CFNA, CFB, or other forwarding options are configured along
with CFA for one of the directory numbers in the forwarding chain.
For example, the user for the phone with directory number 1000 forwards all calls to directory number 1001,
which has forwarded all calls to directory number 1002, which has forwarded all calls to directory number
1000, which creates a CFA loop. In addition, directory number 1002 has configured CFNA to directory number
1004. The user at the phone with directory number 1003 calls directory number 1000, which forwards to 1001,
which forwards to 1002. identifies a CFA loop, and the call, which breaks out of the loop, tries to connect to
directory number 1002. If the No Answer Ring Duration timer expires before the user for the phone with
directory number 1002 answers the call, forwards the call to directory number 1004.
For a single call, may identify multiple CFA loops and attempt to connect the call after each loop is identified.
The forward does not work from self care portal unless css is already configured correctly to reach this number
from line web page , and the "forwarded to ###" always comes up.
Note
Procedure
Step 1
From Unified Communications Self Care Portal, choose Phones > Call Forwarding.
Step 2
Choose your phone number and do the following:
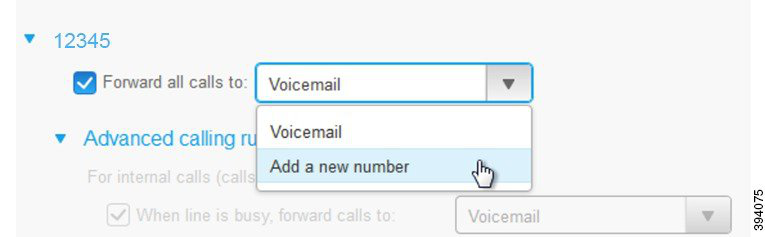
• To forward calls to a voicemail account, check the Forward all calls to: check box, and choose Voicemail
from the drop-down list.
• To forward calls to another phone number, check the Forward all calls to: check box, and choose Add
a new number from the drop-down list, and enter the phone number in the text box.
Cisco Unified Communications Self Care Portal User Guide, Release 15
16
Phone Feature Configuration
Forward Your Phone Calls


Page 21
Step 3
To forward your internal or external calls, click Advanced calling rules and choose either Voicemail or Add
a new number from the drop-down list, and then click Save.
To delete or remove a Call Forwarding setting, do the following:
• To delete the Call Forward All settting, uncheck the Forward all calls to: check box and
click Save.
• To delete an advanced call forwarding setting, expand the Advanced calling rules area,
uncheck the check box for the setting that you want to delete, and click Save.
Note
Handle Work Calls From Any Phone
You can answer your work calls from your personal mobile phone or home office phone. You can add these
phones as additional phones in the Self Care Portal. If someone dials your company phone, your additional
phones also ring.
You can also set the time interval when you want someone to reach out to you on your phones.
Procedure
Step 1
From Unified Communications Self Care Portal, choose Phones > My Phones.
Step 2
Click the Add New
icon.
Step 3
Enter the phone number and description in the respective fields.
Step 4
Check the Enable Single Number Reach check box and the Enable Move to Mobile check box.
Step 5
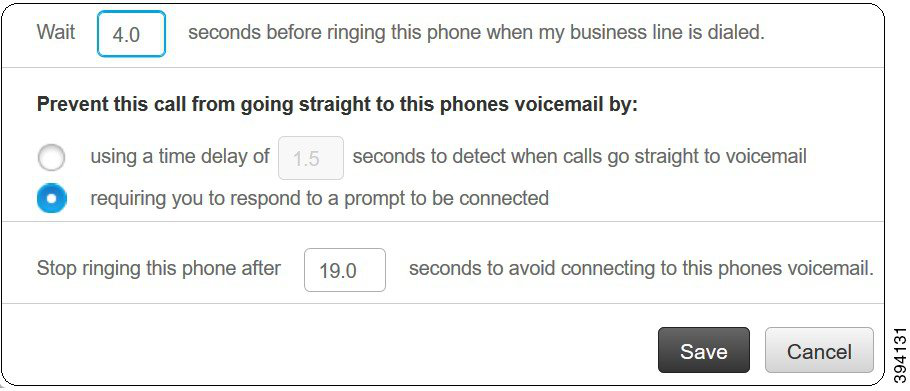
Click Advanced call timing and choose any of the options if you want to set up a time interval for the call
transfer.
Cisco Unified Communications Self Care Portal User Guide, Release 15
17
Phone Feature Configuration
Handle Work Calls From Any Phone

Page 22
• Wait ( ) seconds before ringing this phone when my business line is dialed—Allows you to set the
time interval for your desk phone to ring before trying to contact you at the new number.
• Prevent this call from going straight to this phones voice mail by
• Using a time delay of ( )seconds to detect when calls go straight to voicemail—Allows you to
set up a time interval before allowing the call to reach your phone's voicemail
• Requiring you to respond to a prompt to be connected—Your call is on hold and prompts you
to enter a digit on your phone to answer the call rather than send it to your phone's voicemail.
• Stop ringing this phone after ( ) seconds to avoid connecting to this phones voicemail—Allows you
to set up a ring time interval for your phone to stop ringing, so that the calls are not moved to your phone's
voicemail.
Step 6
Click Save.
Transfer Your Work Calls to Your Personal Phone
You can use your mobile phone to handle calls that are associated with your desk phone number. These mobile
phones are added as additional phones in the Self Care Portal. This allows you to attend to your work calls
when you are away from your desk.
Cisco Unified Communications Self Care Portal User Guide, Release 15
18
Phone Feature Configuration
Transfer Your Work Calls to Your Personal Phone
Page 23
Procedure
Step 1
From Unified Communications Self Care Portal, choose Phones > My Phones.
Step 2
Hover over your additional phone, click the Settings
icon, and choose Edit.
Step 3
In the Edit Additional Phone dialog box, check the Enable Move To Mobile check box, and then click
Save.
Cisco Unified Communications Self Care Portal User Guide, Release 15
19
Phone Feature Configuration
Transfer Your Work Calls to Your Personal Phone

Page 24
Cisco Unified Communications Self Care Portal User Guide, Release 15
20
Phone Feature Configuration
Transfer Your Work Calls to Your Personal Phone
Page 25
C H A P T E R 4
Instant Message and Presence Status
• Let Others Know That You're Busy, on page 21
• Share Your Work Status, on page 21
Let Others Know That You're Busy
When you’re busy with work and don't want to receive any calls, set your status to Do Not Disturb. Your
phone doesn't ring when other people try to dial your number.
You can set Do Not Disturb status only on your company-provided phones.
Note
Procedure
Step 1
From Unified Communications Self Care Portal, choose IM & Availability > Do Not Disturb.
Step 2
Check the Turn on check box and click Save.
Share Your Work Status
You can turn on your instant message and presence status, so that your coworkers are aware of your work
status. For example, if you're away, online, offline, or in a meeting, the status appears accordingly.
Procedure
Step 1
From Unified Communications Self Care Portal, choose IM & Availability > Status Policy.
Step 2
Check the Automatically update status when there is a meeting on my calendar check box, click Status
Policy, and click Save.
Cisco Unified Communications Self Care Portal User Guide, Release 15
21


Page 26
Cisco Unified Communications Self Care Portal User Guide, Release 15
22
Instant Message and Presence Status
Share Your Work Status