Document Metadata
Format: PDF 1.7
Title: Troubleshoot Common Issues with Certificate Renewal in CUCM
Producer: iText® Core 7.2.5 (AGPL version), pdfHTML 4.0.5 (AGPL version) ©2000-2023 iText Group NV
Creation Date: D:20260416120204-07'00'
Mod Date: D:20260416121507-07'00'
Page 1
Troubleshoot Common Issues with Certificate
Renewal in CUCM
Introduction
This document describes common issues after regenerate certificates in Cisco Unified Communications
Manager (CUCM) and how to resolve them.
Prerequisites
Requirements
Cisco recommends that you have knowledge of these topics:
CUCM certificate renewal process
•
CUCM GUI interface
•
Expressway servers
•
Device registration with CUCM process
•
Certificate Authority Proxy Function
•
Security Guide for Cisco Unified Communications Manager
•
Components Used
The information in this document is based on these software and hardware versions:
CUCM version 15
•
The information in this document was created from the devices in a specific lab environment. All of the
devices used in this document started with a cleared (default) configuration. If your network is live, ensure
that you understand the potential impact of any command.
Business Impact
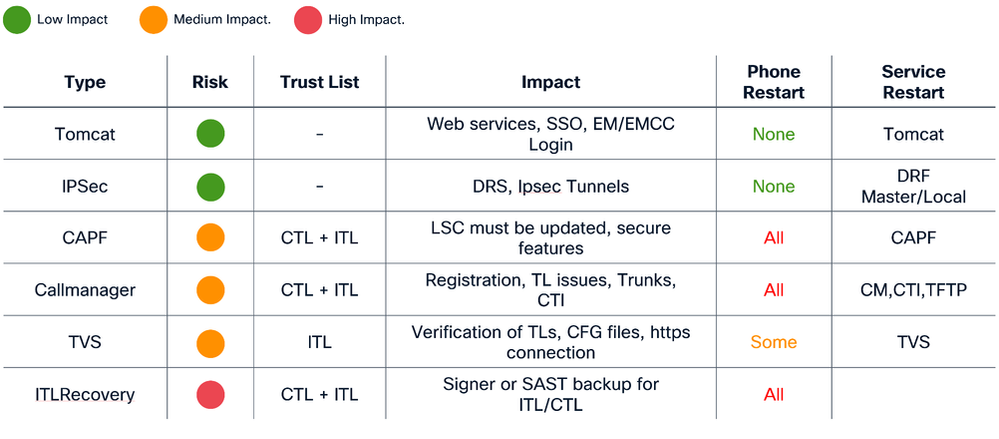
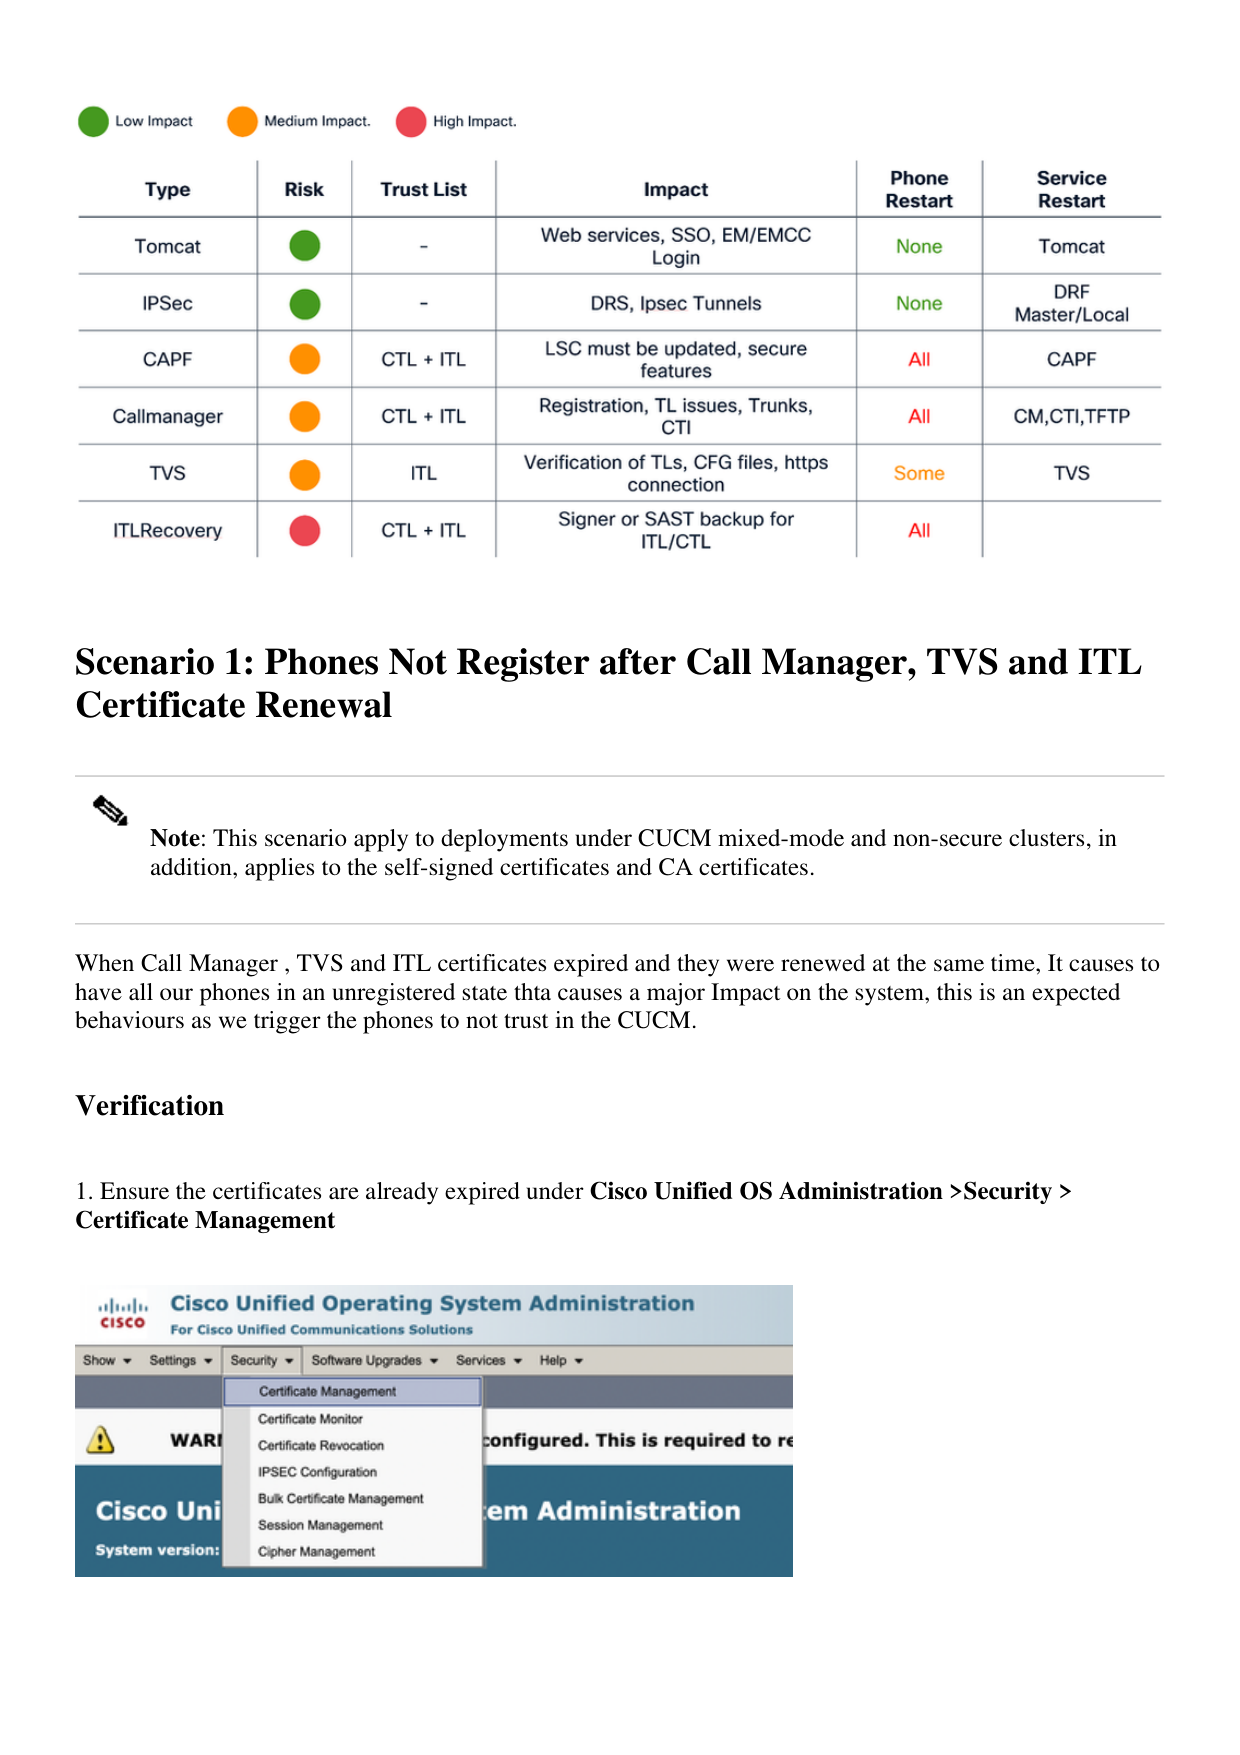
This table displays the business impact of each certificate renewal in your operation. Review the information
carefully. Renew required certificates after hours or in quiet periods, based on the risk level of each
certificate.
Page 2
Scenario 1: Phones Not Register after Call Manager, TVS and ITL
Certificate Renewal
Note: This scenario apply to deployments under CUCM mixed-mode and non-secure clusters, in
addition, applies to the self-signed certificates and CA certificates.
When Call Manager , TVS and ITL certificates expired and they were renewed at the same time, It causes to
have all our phones in an unregistered state thta causes a major Impact on the system, this is an expected
behaviours as we trigger the phones to not trust in the CUCM.
Verification
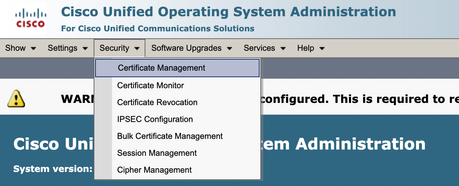
- Ensure the certificates are already expired under Cisco Unified OS Administration >Security >
Certificate Management
Page 3
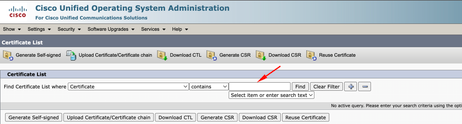
- Search by Callmanager, TVS or ITL under the filter at the top of the page and use the contains or begins
with options:
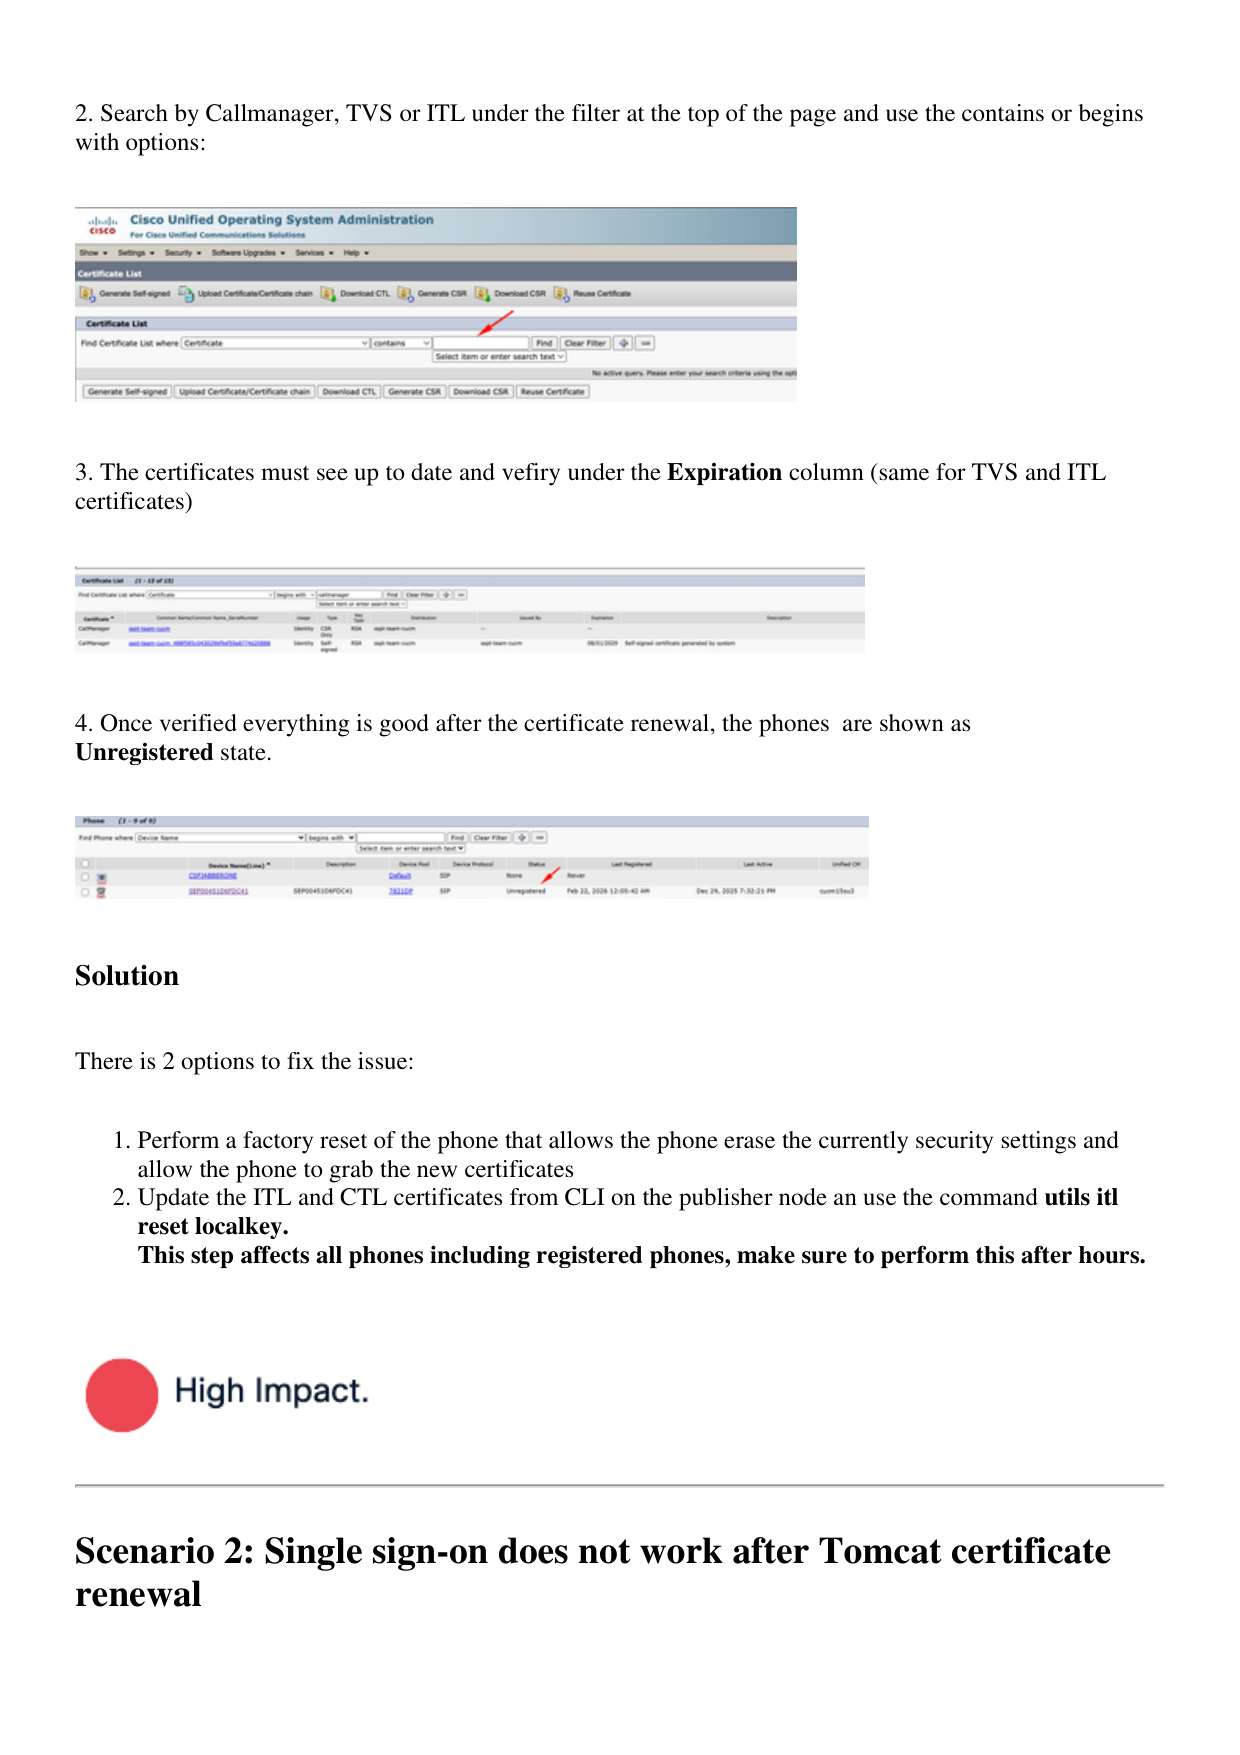
- The certificates must see up to date and vefiry under the Expiration column (same for TVS and ITL
certificates)
- Once verified everything is good after the certificate renewal, the phones are shown as
Unregistered state.
Solution
There is 2 options to fix the issue:
Perform a factory reset of the phone that allows the phone erase the currently security settings and
allow the phone to grab the new certificates
Update the ITL and CTL certificates from CLI on the publisher node an use the command utils itl
reset localkey.
This step affects all phones including registered phones, make sure to perform this after hours.
2.
Scenario 2: Single sign-on does not work after Tomcat certificate
renewal
Page 4
Note: This scenario can apply to deployments that uses cluster-wide or per-node agreement for
single sign-on configuration
Login within CUCM with Single Sign-on (SSO) it displays an error message ¨Error while processing saml
response¨ or ¨Error while processing saml response Failed to decrypt the secret key¨
Verification
Ensure all nodes contains a valid tomcat certificate if self-signed or contains the new multi-san tomcat
certificate associated.
1.
Use set samltrace level debug in all CUCM nodes via CLI in order to activate SSO logs on debug
level
2.
Recreate the issue by login again to CUCM and use SSO method.
3.
Collect Tomcat SSO logs after the incident, and verify you get this message:
2026-01-10 06:06:31,274 ERROR [http-nio-81-exec-157] cpi.sso.saml.sp.security.authenticatio
com.sun.identity.saml2.common.SAML2Exception: Failed to decrypt the secret key.
at com.sun.identity.saml2.xmlenc.FMEncProvider.getEncryptionKey(FMEncProvider.
at com.sun.identity.saml2.xmlenc.FMEncProvider.decrypt(FMEncProvider.java:607)
at com.sun.identity.saml2.assertion.impl.EncryptedAssertionImpl.decrypt(Encryp
...
•
4.
Solution
Export of CUCM metadata after Tomcat certificate renewal and import to the Idendity Provider Server to
ensure they have the new tomcat certificate for this communication.
Procedure to renew tomcat with SSO deployment enabled:
Caution: Techinical Assistance Center (TAC) recommends the next steps in order to prevent any
issue after the renew of Tomcat certificate, recommend to perform this procedure after hours.
Page 5
- Disable SSO in all CUCM nodes
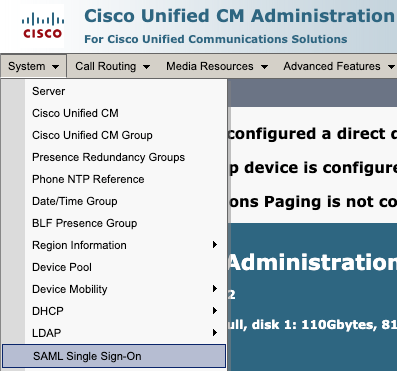
Access to CM administration > System > SAML Single Sign-on
•
Select Disable SAML SSO
•
This process needs to be performed in all the rest of the nodes via GUI if per-node agreement is used.
•
- Renew Tomcat certificate in CUCM cluster
Page 6
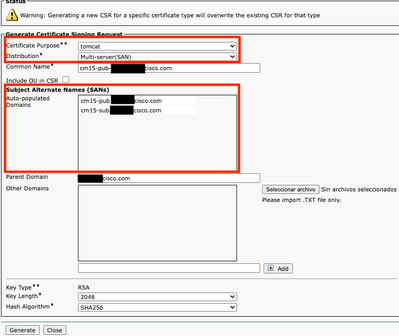
Overall procedure to renew Tomcat multi-san certificate in CUCM cluster:
Navigate to OS administration > Security > Certificate management.
•
Select Generate CSR
•
Select Tomcat in Certificate Porpuse.
•
Select Multi-SAN in Distribution.
•
Ensure all nodes in the cluster are listed under Auto-populated Domains.
•
Select Generate. Ensure CSR is created in all the nodes in the cluster.
•
Download the generated CSR from CUCM publisher and sign it with a Certificate Authority (CA)
server.
•
Go to OS administration > Security > Certificate management. Select Upload
certificate/Certificate chain.
•
Upload CA certificates as Tomcat-trust.
•
Repeat step 6 and now upload the Tomcat signed certificate as Tomcat.
•
Once completed and verified all nodes have the new tomcat certificate applied, restart Tomcat service
through CLI in all the nodes in the cluster with this command utils service restart Cisco Tomcat.
•
Page 7
For more information refer to the this documentation:
Regenerate Tomcat self-signed certificate
•
Regenerate Tomcat CA-signed certificate.
•
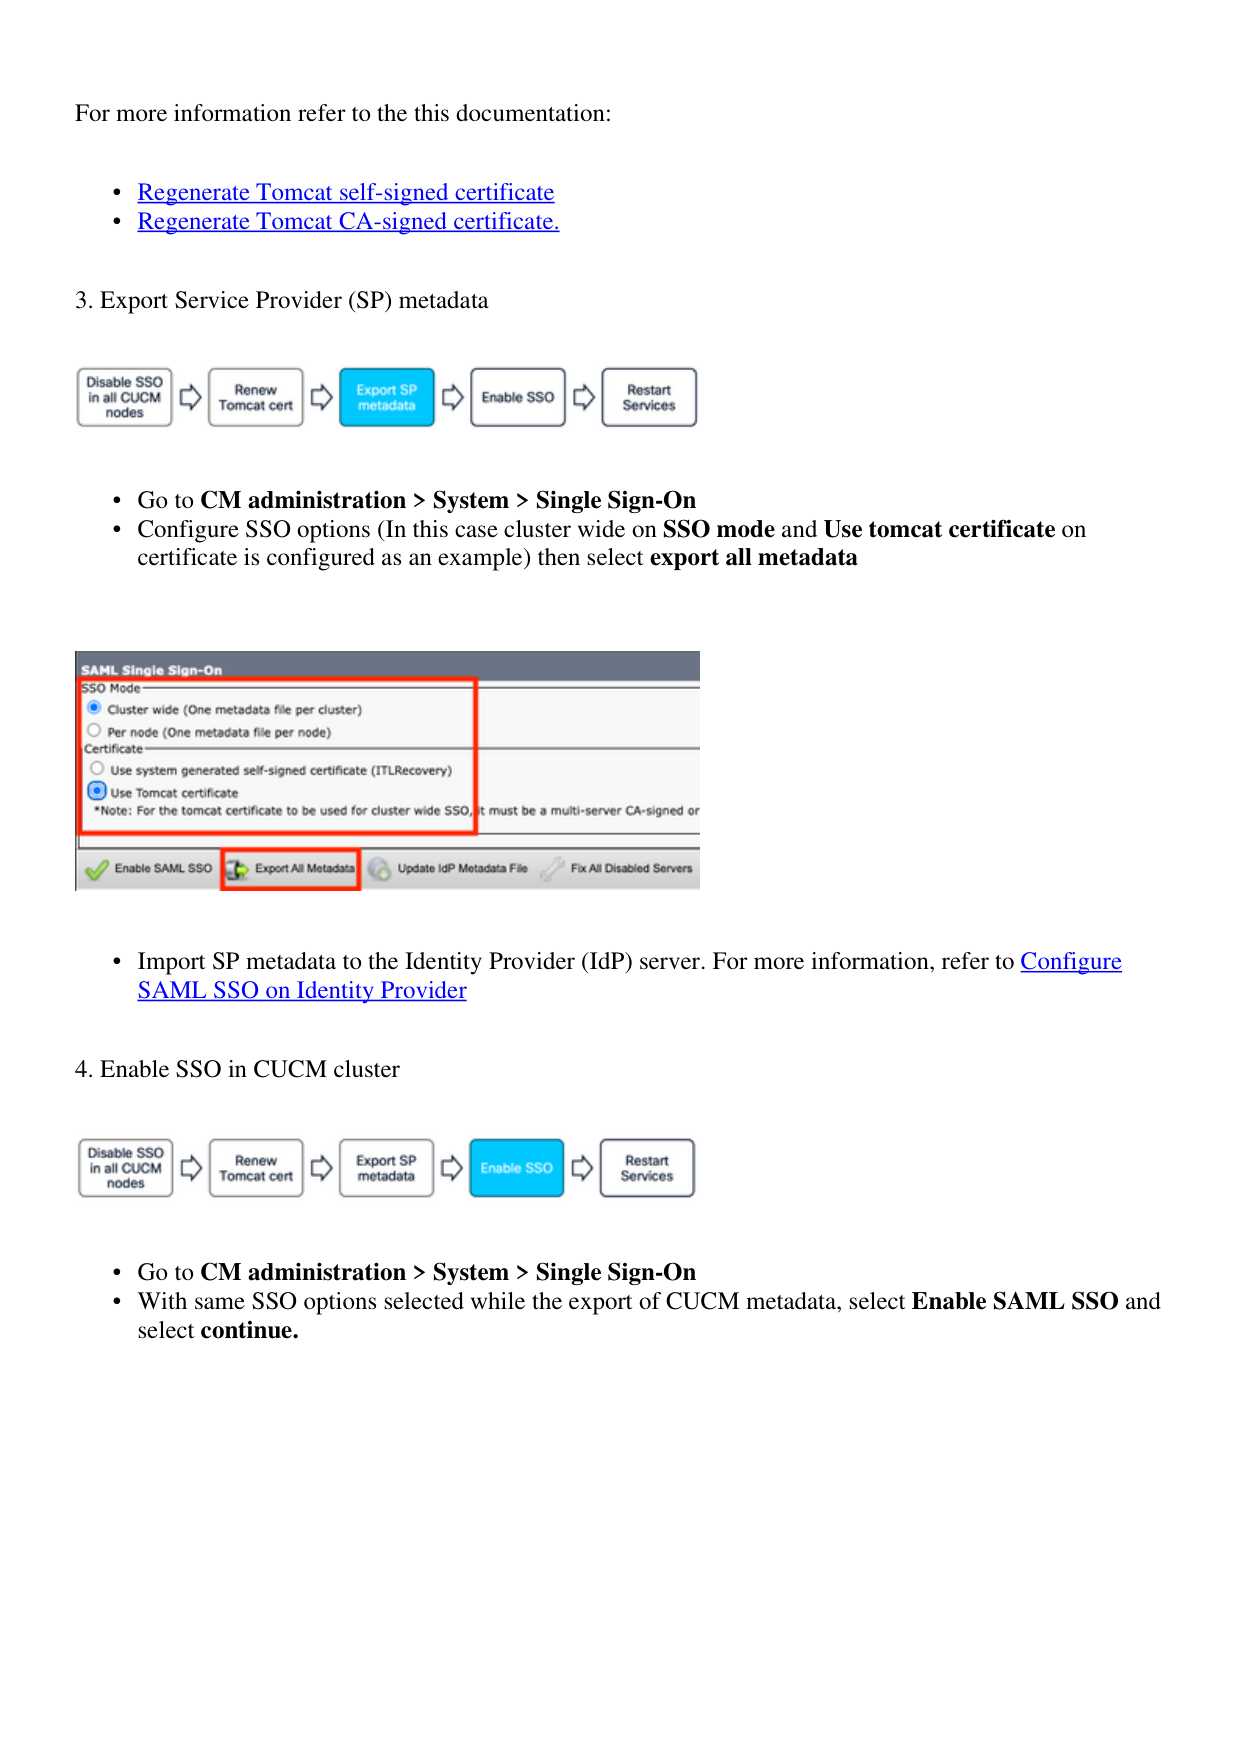
3. Export Service Provider (SP) metadata
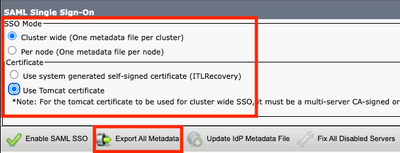
Go to CM administration > System > Single Sign-On
•
Configure SSO options (In this case cluster wide on SSO mode and Use tomcat certificate on
certificate is configured as an example) then select export all metadata
•
Import SP metadata to the Identity Provider (IdP) server. For more information, refer to Configure
SAML SSO on Identity Provider
•
4. Enable SSO in CUCM cluster
Go to CM administration > System > Single Sign-On
•
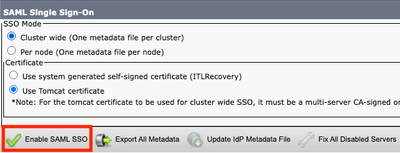
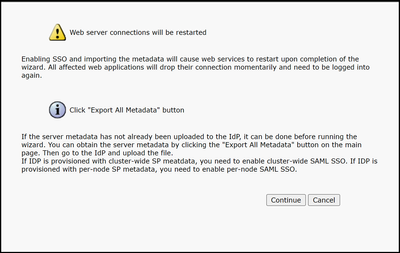
With same SSO options selected while the export of CUCM metadata, select Enable SAML SSO and
select continue.
•
Page 8
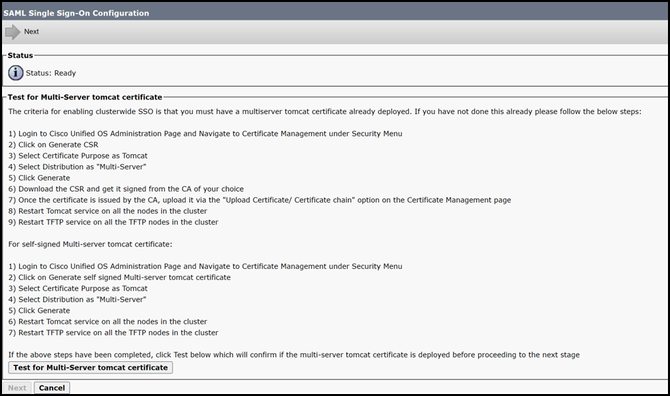
If cluster-wide, this step is available to check multi-san certificate in all the nodes, select Test for
multi-server tomcat certificate. once completed, select Next.
•
Page 9
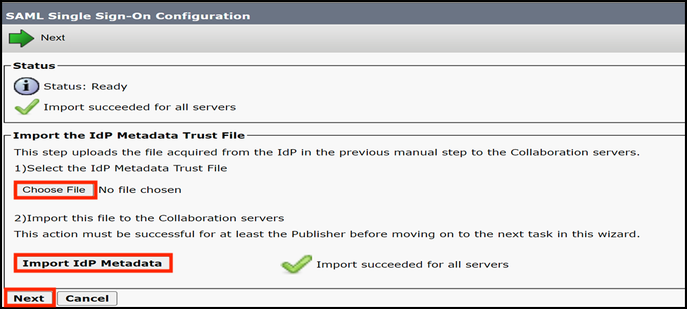
Upload IdP metadata, select Import IdP Metadata and once complete, select Next
•
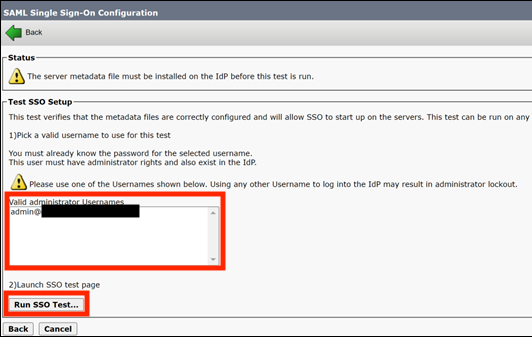
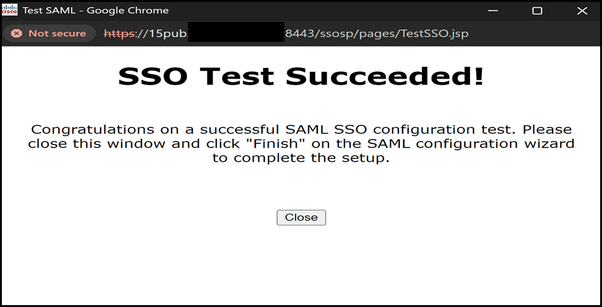
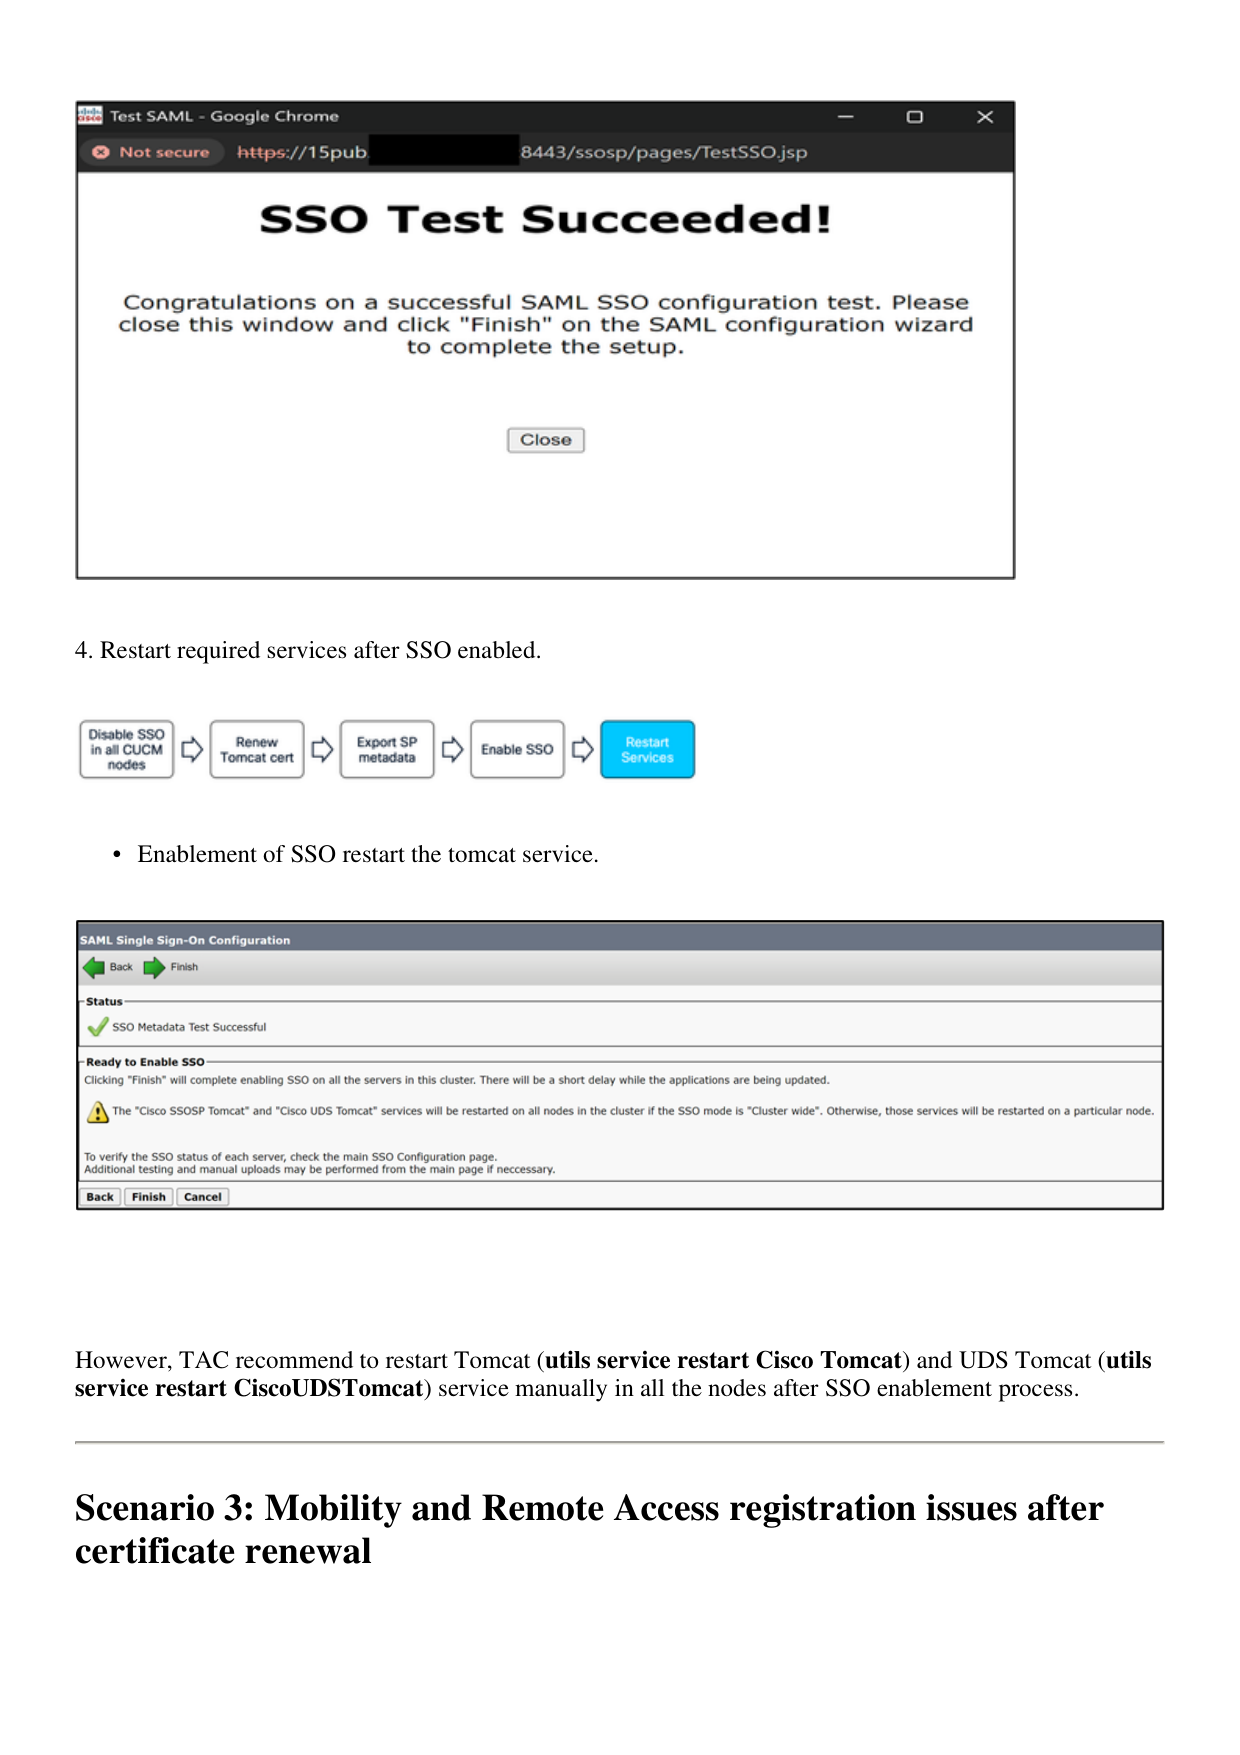
On Test SSO Setup select an user with Standard CCM Super Users group assigned, and select Run
SSO Test until get success.
•
Page 10
- Restart required services after SSO enabled.
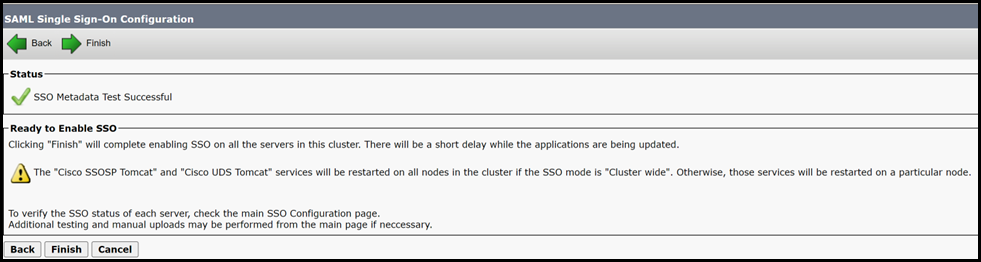
Enablement of SSO restart the tomcat service.
•
However, TAC recommend to restart Tomcat (utils service restart Cisco Tomcat) and UDS Tomcat (utils
service restart CiscoUDSTomcat) service manually in all the nodes after SSO enablement process.
Scenario 3: Mobility and Remote Access registration issues after
certificate renewal
Page 11
Webex app unable to register with CUCM via Mobility and Remote Access (MRA) after Call manager,
Tomcat and Expressway C certificates renew on mixed-mode deployments.
Verification
CUCM Call manager and Tomcat certificate are CA signed certificates.
1.
CUCM and Expressway deployment runs on mixed-mode (TLS).
2.
inspect Expressway-C logs shows "SSL routines:ssl3_read_bytes:tlsv1 alert unknown ca".
<#root>
2026-01-29T14:01:16.974-05:00 exp-c traffic_server[2030]: UTCTime="2026-01-29 19:01:16,974" Module
HTTPMSG:
|GET /CSFmarcoalh.cnf.xml HTTP/1.1
Host: expc.cisco.com:6972
Accept: */*
Cookie:<CONCEALED>
User-Agent: WebEx/0.0.0.0
TrackingID: fxxxxxxx-86f6-4030-8259-0b768c07723e
Client-ip: xxx.xxx.xxx.xxx
X-Forwarded-For: xxx.xxx.xxx.xxx, 127.0.0.1
Via: https/1.1 vcs[0fxxxxxx-c853-xxxx-aa16-0a290bf56fc8] (ATS), http/1.1 vcs[5xxxxxxx-7feb-4xxx-9
|
2026-01-29T14:01:16.974-05:00 exp-c traffic_server[2030]:[ET_NET 1]ERROR:SSL connection failed for
SSL routines:ssl3_read_bytes:tlsv1 alert unknown ca
3.
Solution
Export and import certificates between CUCM and Expressway-C to ensure trust relation.
Caution: TAC recommend to perform this after hours as this procedure requires services restart.
Business Impact is
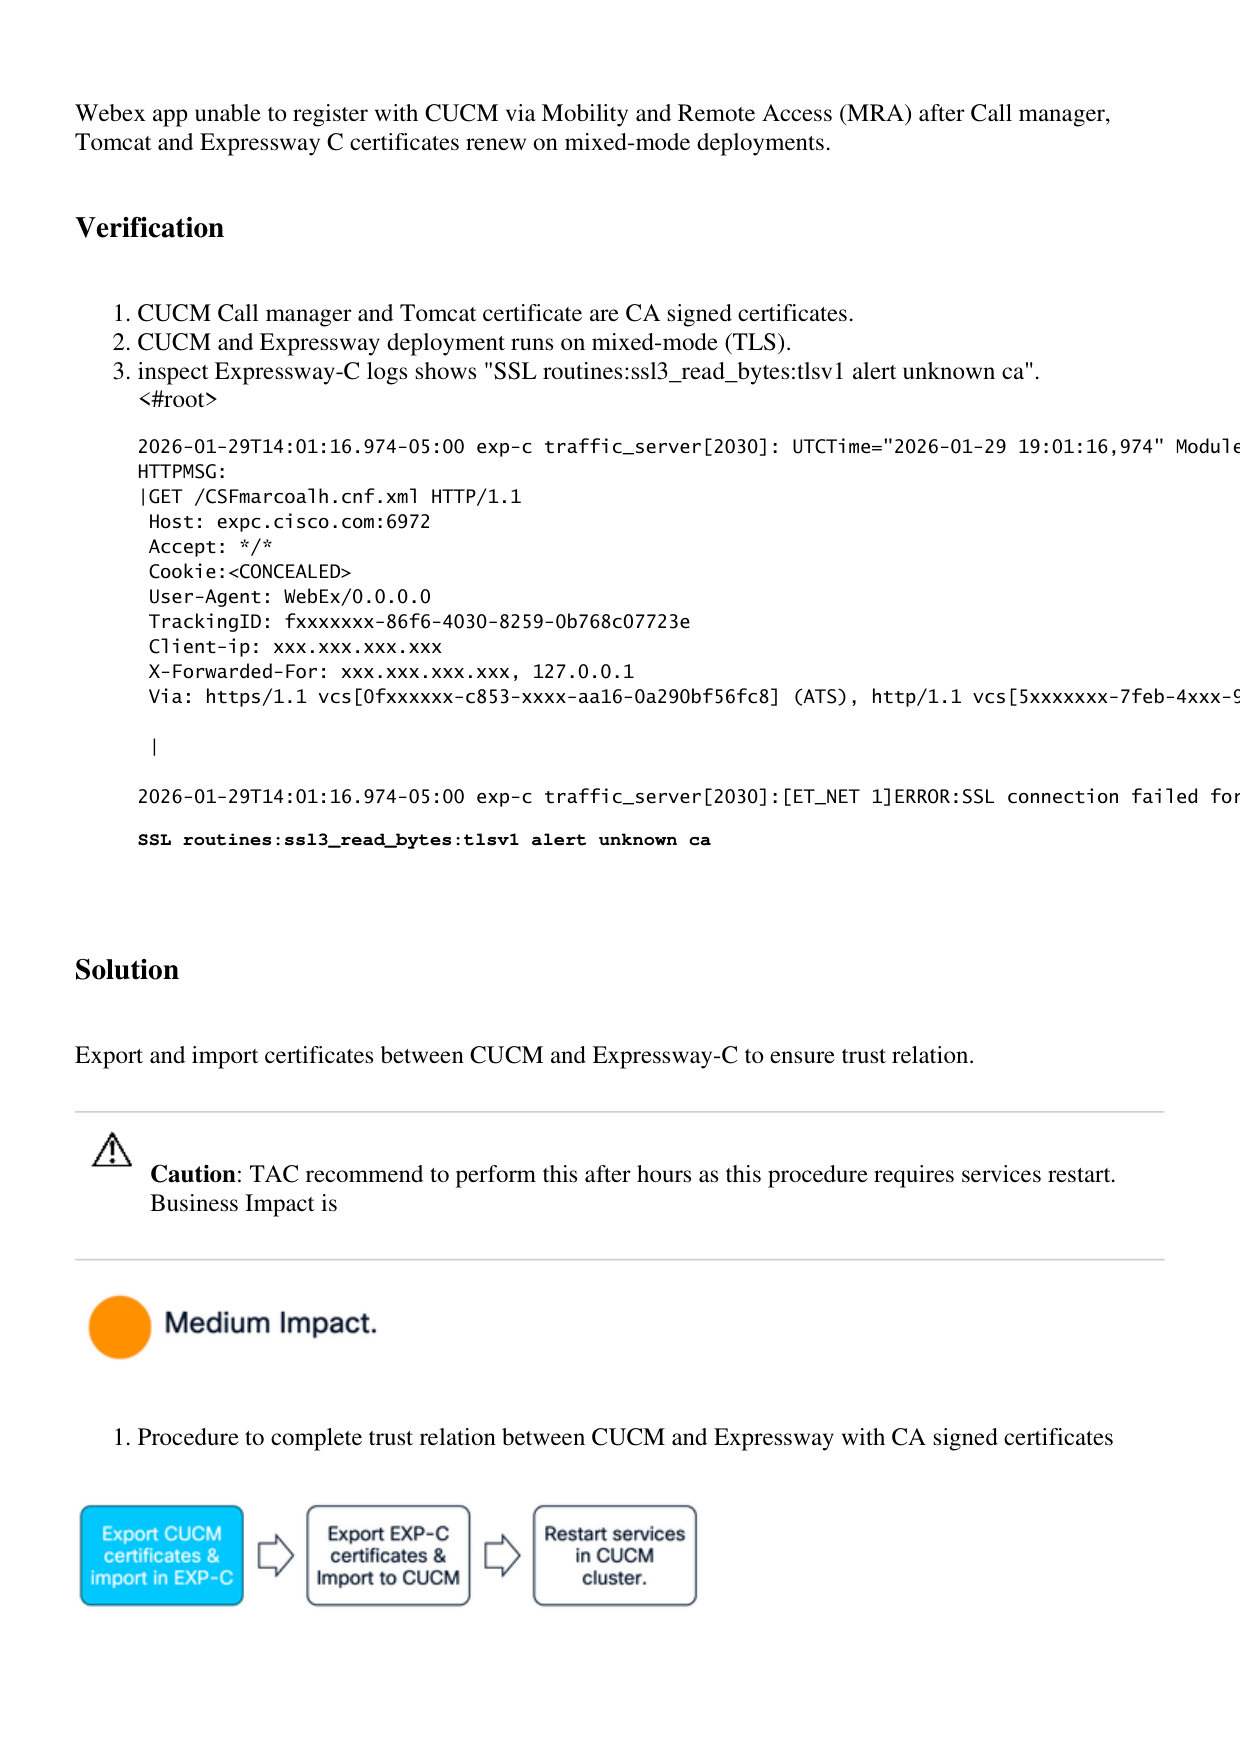
Procedure to complete trust relation between CUCM and Expressway with CA signed certificates
1.
Page 12
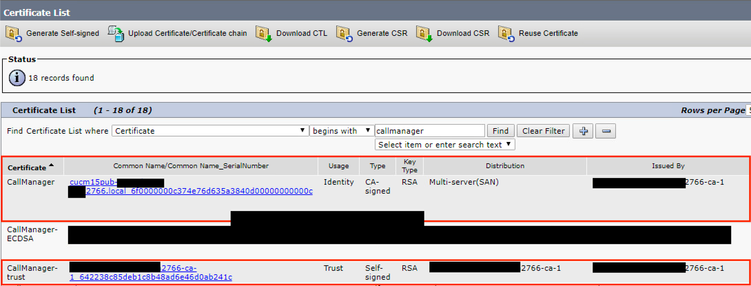
Navigate to OS administration > Security > Certificate management and download the root CA
certificate and intermediate (if any) that signs Call Manager and Tomcat certificate.
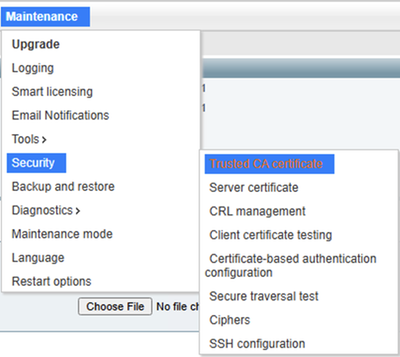
Then navigate to Expressway-C > Maintenance > Security > Trusted CA certificate and upload the CA
certificate of Call Manager and Tomcat certificate.

Page 13
Note: In scenarios with Call Manager and Tomcat certificate as self-signed, download the actual
Call Manager and Tomcat certificate and upload it to Expressway.
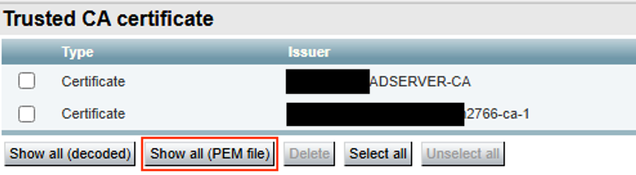
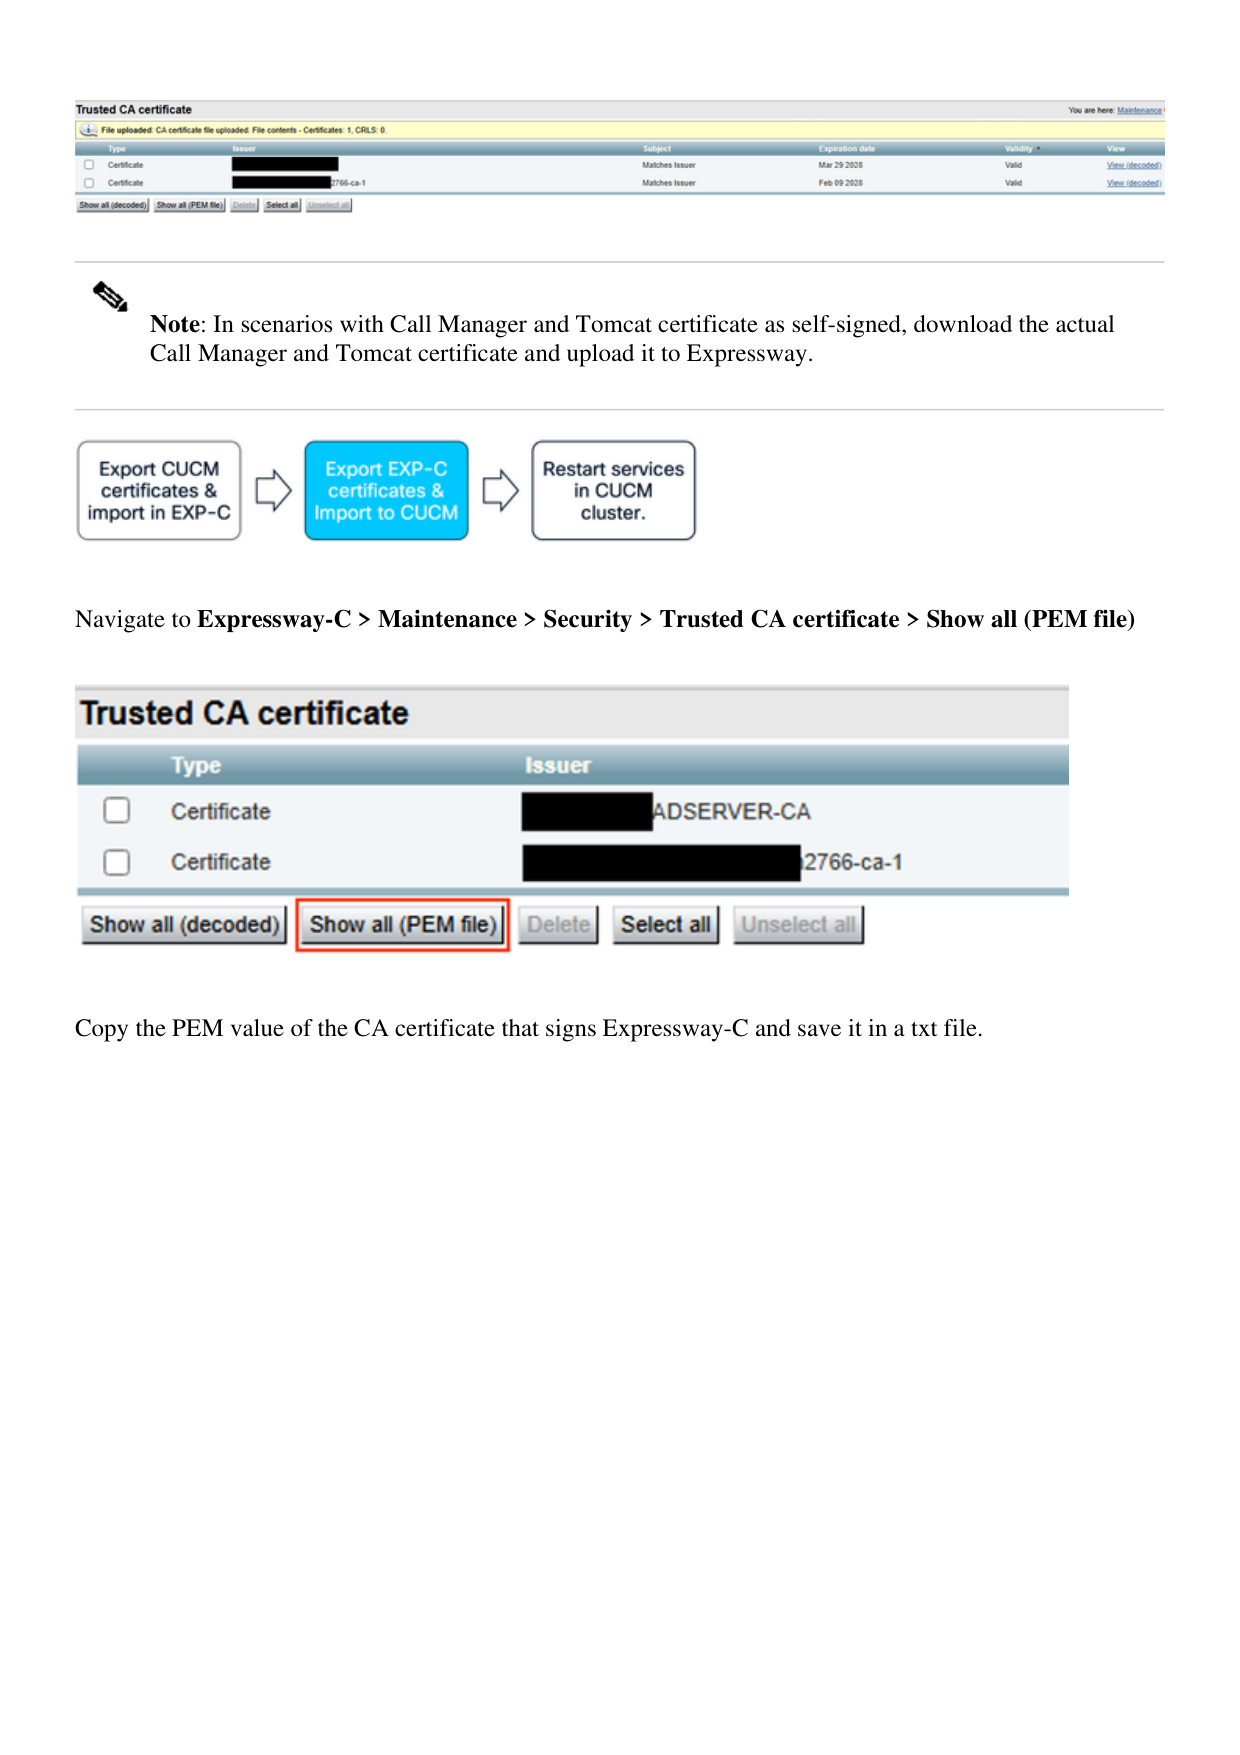
Navigate to Expressway-C > Maintenance > Security > Trusted CA certificate > Show all (PEM file)
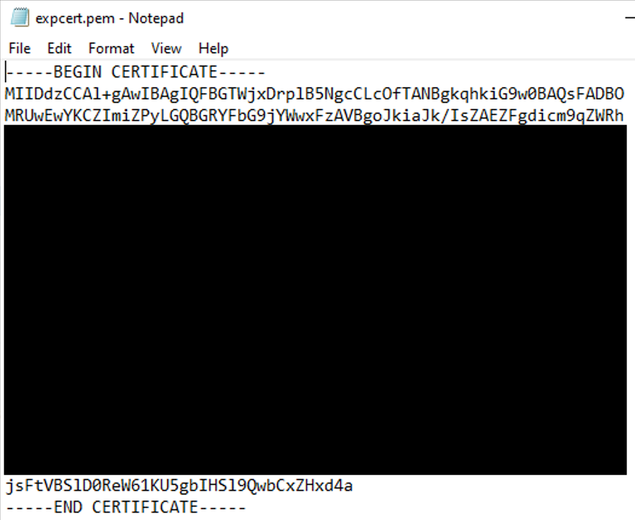
Copy the PEM value of the CA certificate that signs Expressway-C and save it in a txt file.
Page 14
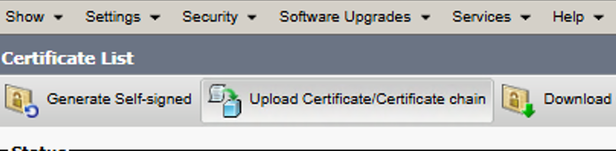
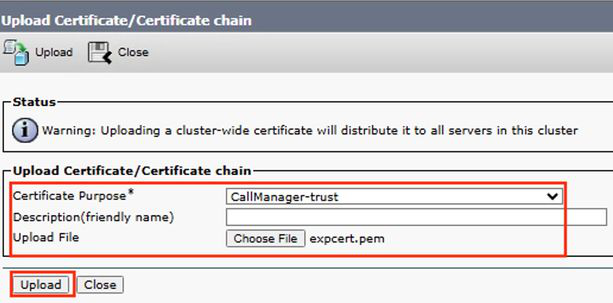
Navigate to OS administration > Security > Certificate management and select Upload
Certificate/Certificate Chain and upload the expressway-C CA cert as Tomcat-trust and Call Manager-
trust
Page 15
Restart required services in CUCM cluster:
Navigate to Cisco Unified Serviceability > Tools > Control Center - Feature Services and
restart Cisco CallManager service in all the nodes that runs it.
•
Navigate to Cisco Unified Serviceability > Tools > Control Center - Feature Services and
restart Cisco TFTP service in all the nodes that runs it.
•
Restart Tomcat service in all the nodes in the cluster via CLI with the command utils service restart
Cisco Tomcat.
•
Restart Cisco HAproxy service in all the nodes in the cluster via CLI with the command utils service
restart Cisco HAProxy.
•
Scenario 4: Renew of Certificate Authority Proxy Function
certificate cause
Scenario 4.1: 802.1x authentication failed
Phone do not authenticate with ASA after regenerate Certificate Authority Proxy Function(CAPF)
certificate on CUCM publisher.
Verification
Page 16
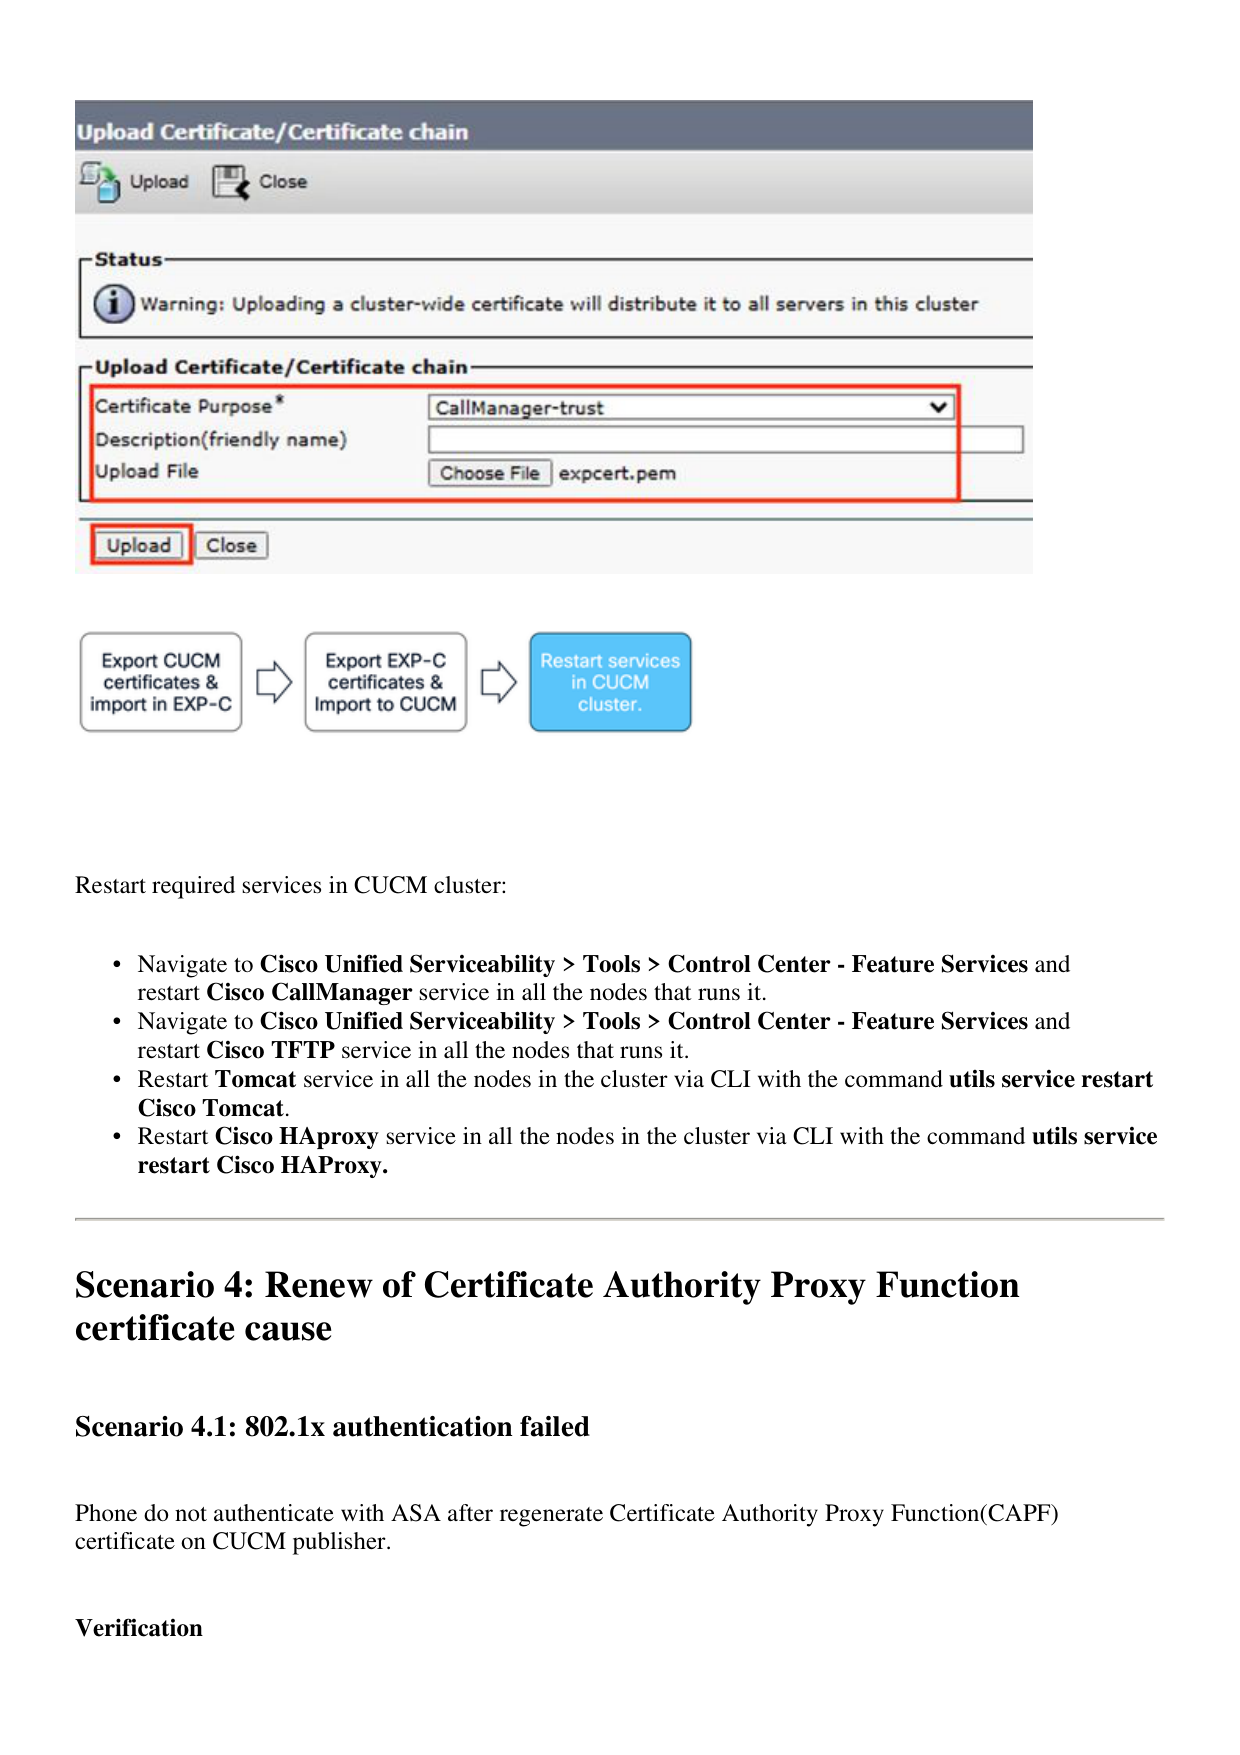
Phone status messages shows "802.1x Authentication: Failed"
1.
Inspect phone logs of affected server and find "SSL_ERROR_WANT_READ"
2.
4592 NOT Feb 17 11:01:25.041733 (349-349) PAE: -Secure Connection Handshake in progress - status SSL_ERR
4593 NOT Feb 17 11:01:25.041826 (349-349) PAE: -EV_REQUEST_REC, ST_AUTHENTICATING->ST_AUTHENTICATING
++ EAP-Failure
4594 NOT Feb 17 11:01:25.041898 (349-349) PAE: -send EAP-Resp/TLS - id 9
4595 NOT Feb 17 11:01:25.042032 (349-349) PAE: -authWhile timer set: 30 sec
4596 NOT Feb 17 11:01:27.061822 (349-349) PAE: -[0001-0] 08-cc-a7-1c-bb-ae vid=0xfff=4095 static=0 pri=0
4597 NOT Feb 17 11:01:27.061950 (349-349) PAE: -port=0
4598 NOT Feb 17 11:01:27.062009 (349-349) PAE: -cprCdpGetPort address: 8:CC:A7:1C:BB:AE Phyport=0 app
4599 NOT Feb 17 11:01:27.062068 (349-349) PAE: - >>>>>>>>>>>>> port obtained = 0 for mac macAddress 08:c
4600 NOT Feb 17 11:01:27.062134 (349-349) PAE: -rcvd EAP-Failure
4601 NOT Feb 17 11:01:27.062189 (349-349) PAE: -EV_FAILURE, ST_AUTHENTICATING->ST_HELD
4602 WRN Feb 17 11:01:27.062462 (349-349) PAE: -802.1X auth FAILED
4603 NOT Feb 17 11:01:27.062550 (349-349) PAE: -paeInfoToInetd: PAE info sent to NETSD
4604 NOT Feb 17 11:01:27.062717 (1786-1880) JAVA-Calling handleNetSDEvent
4605 WRN Feb 17 11:01:27.062953 (1786-1880) JAVA-Thread-11|cip.sec.Security:? - Security: Received a pro
4606 DEB Feb 17 11:01:27.063039 (1786-1880) JAVA-openQue(): que->/tmp/pae_msg_que, key->0x101019ab
4607 DEB Feb 17 11:01:27.063069 (1786-1880) JAVA-openQue(): que->/tmp/pae_rsp_que, key->0x10101c4c
4608 DEB Feb 17 11:01:27.063091 (1786-1880) JAVA-getpaeinfo: send pae info message paeCmd.mtype=1880, pa
4609 DEB Feb 17 11:01:27.063121 (1786-1880) JAVA-getpaeinfo: recv pae info resp ret=-1, errno=No message
4610 NOT Feb 17 11:01:27.063306 (349-349) PAE: -paeInfoToInetd: Netsd event NETSD_EV_PAE sent to NETSD
4611 NOT Feb 17 11:01:27.063370 (349-349) PAE: - PAE RE-AUTH, not sending SEC_DOWN Netsd event for CDP
4612 NOT Feb 17 11:01:27.063423 (349-349) PAE: -paeSetLastSupStatus: LastSupStatus 0
4613 NOT Feb 17 11:01:27.063475 (349-349) PAE: -heldWhile timer set: 60 sec
4614 NOT Feb 17 11:01:27.064074 (349-349) PAE: -paeNetsdRcvMsg(349): PAE event: status: FAIL : Resource
Solution
Download the CAPF certificate from CUCM publisher and upload to the authentication server, bypass
802.1x to allow registration and install LSC certificate on affected phones.
Scenario 4.2: Phones not register with CUCM that uses security profile on TLS mode.
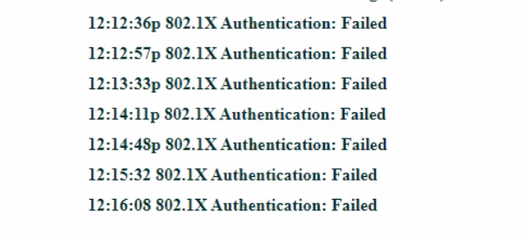
Phones show "Phone is registering" after regenerate CAPF certificate on CUCM publisher.
Page 17
Verification
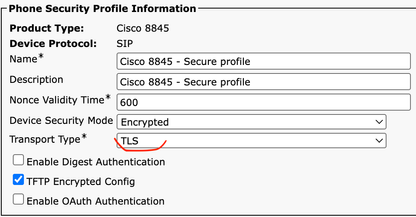
Affected Phones contains security profile with TLS mode enabled.
1.
Affected phones have LSC certificated installed.
2.
Ensure CAPF certificate is up to date.
3.
Login to CUCM publisher and use the command show ctl that shows old CAPF certificate serial
number.
4.
Then change the phone security profile to non secure.
5.
Solution
Regenerate CTL file on CUCM and restart required services to ensure phones gets the new CTL file with
CAPF file.
Caution: TAC recommend to perform this after hours as this procedure requires services restart.
Business Impact is
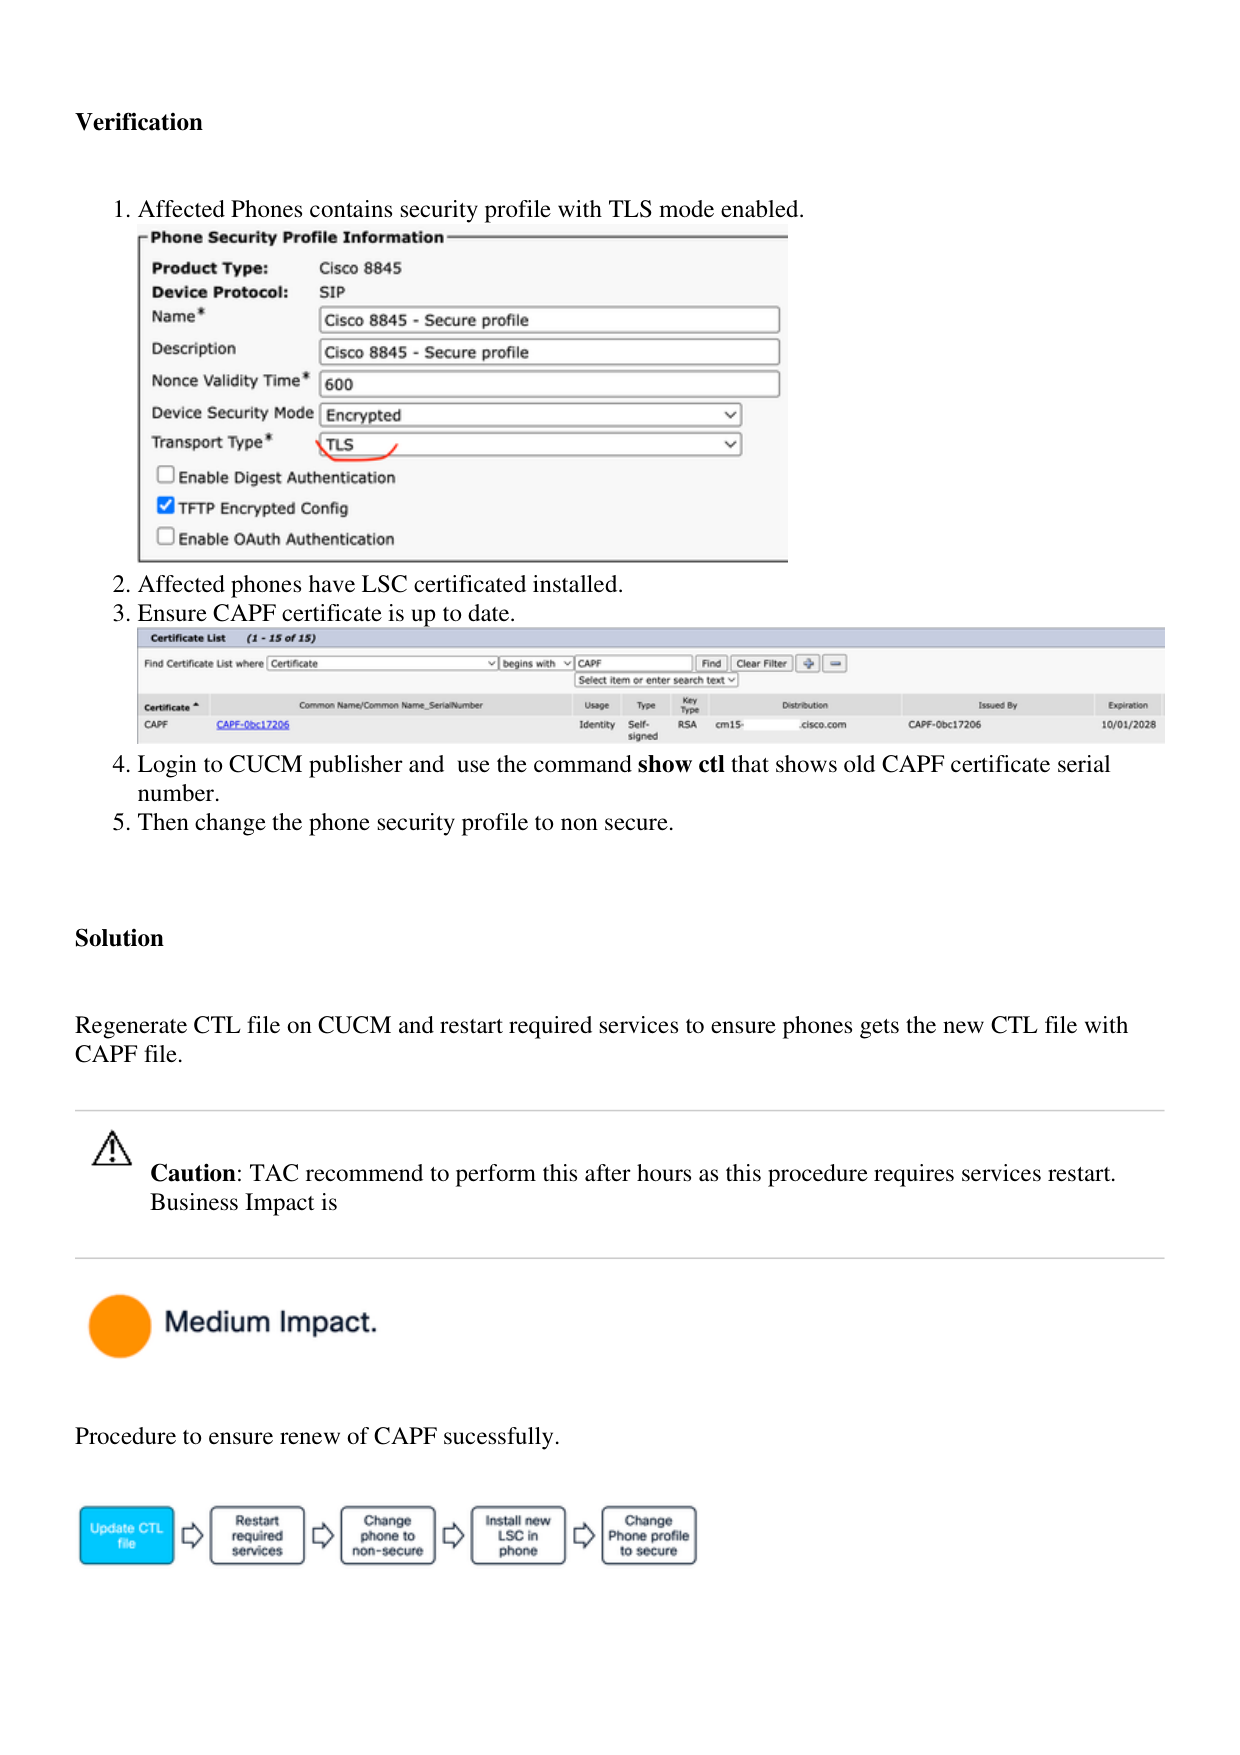
Procedure to ensure renew of CAPF sucessfully.
Page 18
Update CTL file after CAPF regeneration. Log into the CLI of the Publisher and enter the command utils
ctl update CTLFile.
Navigate to Cisco Unified Serviceability > Tools > Control Center - Feature Services in CUCM
publisher and restart CAPF service.
1.
Navigate to Cisco Unified Serviceability > Tools > Control Center - Network Services and
restart Cisco Trust Verification Service in all the nodes that runs it.
2.
Navigate to Cisco Unified Serviceability > Tools > Control Center - Feature Services and
restart Cisco TFTP Service in all the nodes that runs it
3.
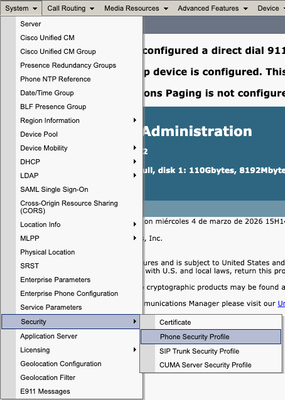
Navigate to CM administration > System > Security > Phone Security Profile.
•

Page 19
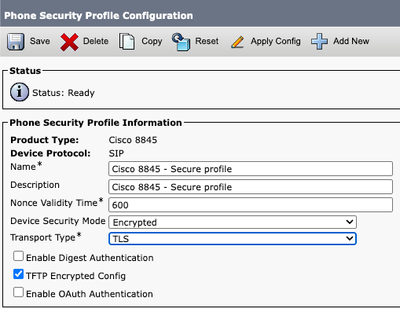
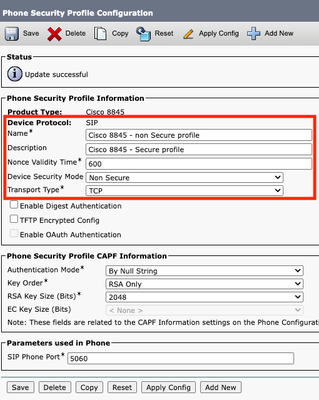
Copy the current phone security profile assigned to the required phones.
•
Change Name and Device Security Mode to Non Secure and select Save and Apply Config to apply
this change to all the required phones.
•
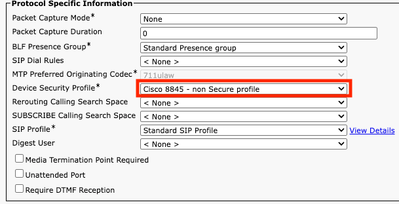
Apply the created Device Security Profile to required phones configuration, select Save and Apply
Config.
•

Page 20
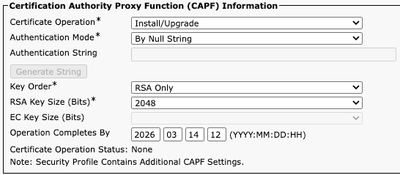
Use CAPF information section in device configuration of affected phones to install LSC certificate in the
required phones.
In CAPF information, select Install/Upgrade in Certificate Operation.
•
Select Save and Apply Config.
•
Wait until Certificate Operation Status shows Operation completed.
•
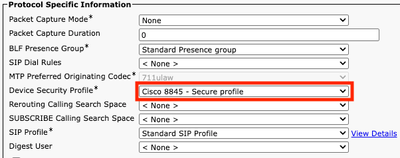
In Protocol Specific Information section on Phone Configuration, select the Security profile with TLS
enabled that was created.
Page 21
Related Information
https://www.cisco.com/c/en/us/support/docs/unified-communications/unified-communications-
manager-callmanager/214231-certificate-regeneration-process-for-cis.html
•
https://www.cisco.com/c/en/us/support/docs/unified-communications/unified-communications-
manager-callmanager/217138-regeneration-of-cucm-ca-signed-certifica.html
•
https://www.cisco.com/c/en/us/support/docs/content-networking/certificates/213295-how-to-install-
an-lsc-on-a-cisco-ip-phon.html
•
https://www.cisco.com/c/en/us/td/docs/voice\_ip\_comm/expressway/config\_guide/X15-
2/mra/exwy_b_mra-deployment-guide-x152.html
•