Document Metadata
Format: PDF 1.7
Title: Troubleshoot Full Common Partition in CUCM
Producer: iText® Core 7.2.5 (AGPL version), pdfHTML 4.0.5 (AGPL version) ©2000-2023 iText Group NV
Creation Date: D:20260324164542-05'00'
Mod Date: D:20260324161506-07'00'
Page 1
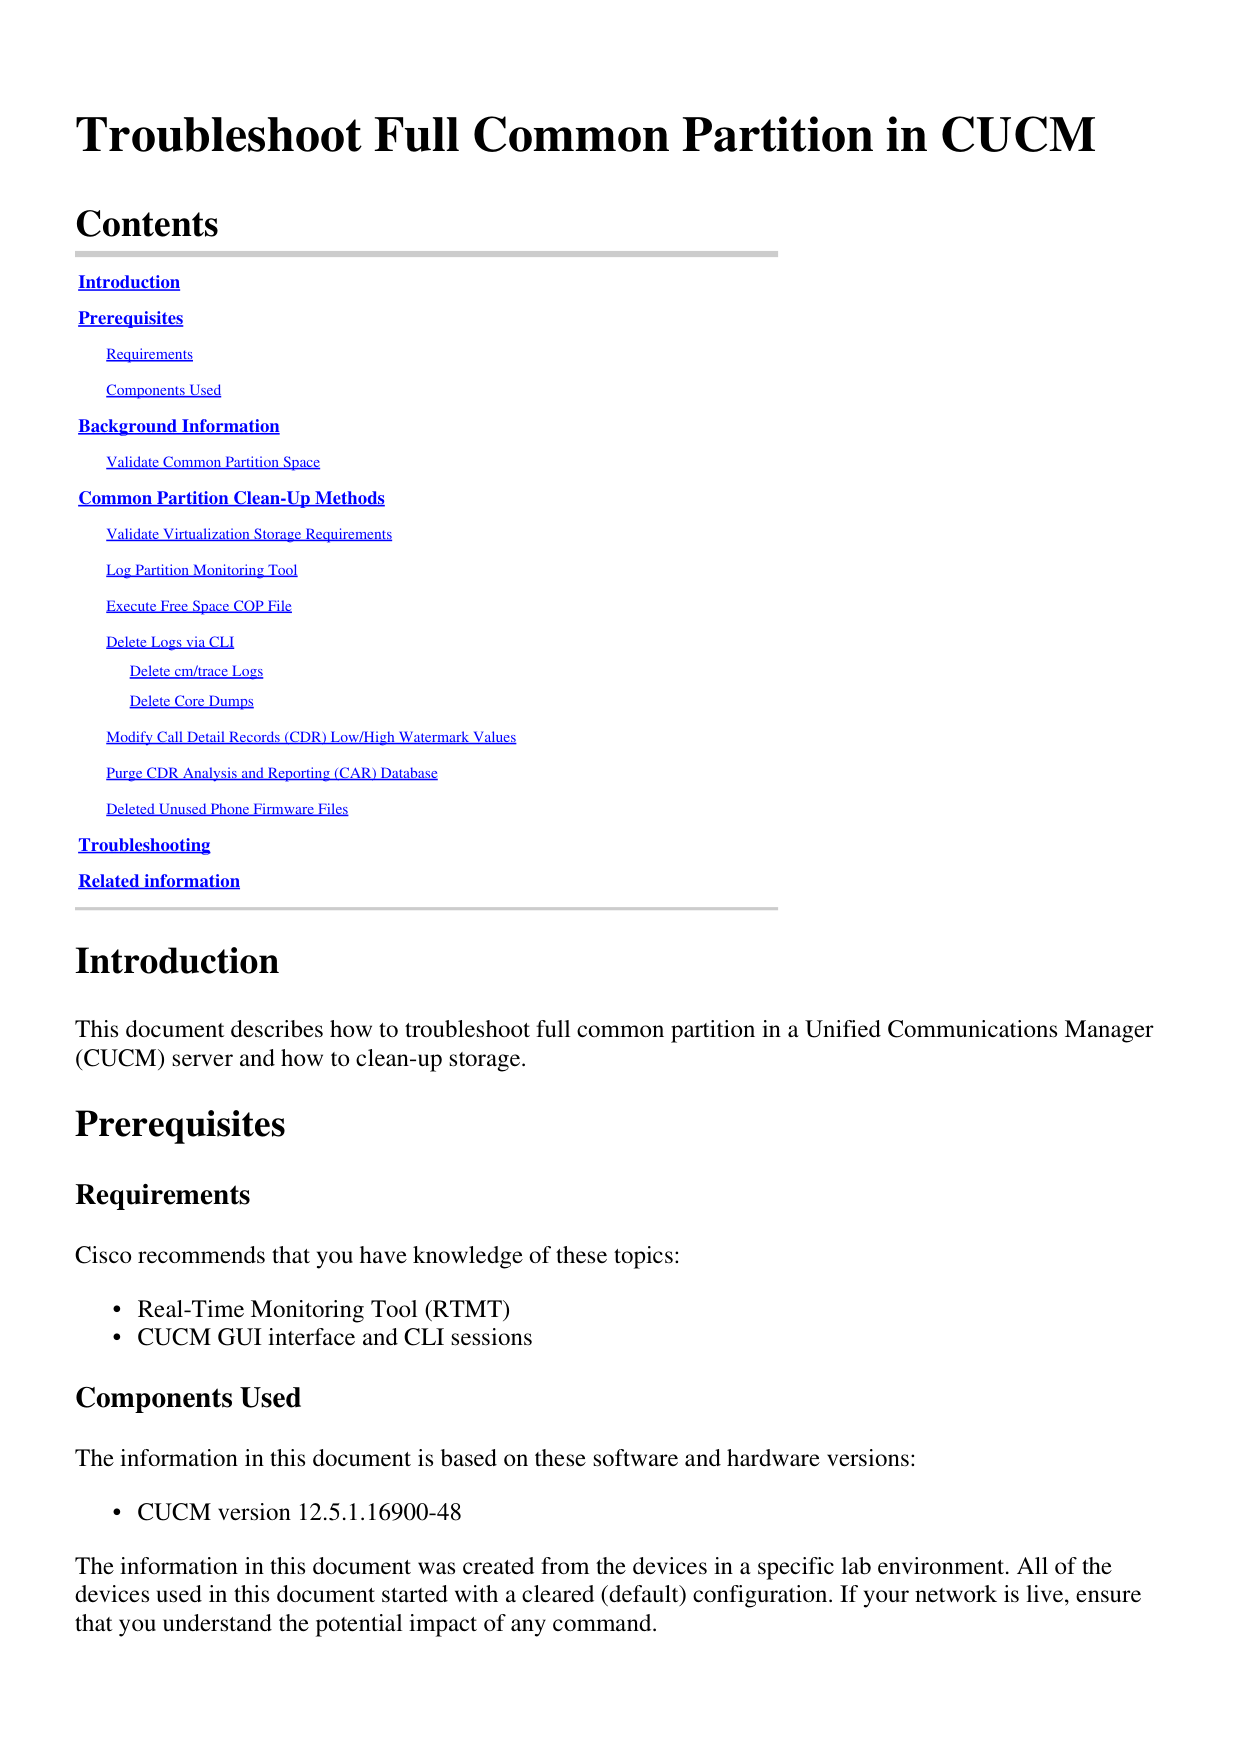
Troubleshoot Full Common Partition in CUCM
Contents
Introduction
Prerequisites
Requirements
Components Used
Background Information
Validate Common Partition Space
Common Partition Clean-Up Methods
Validate Virtualization Storage Requirements
Log Partition Monitoring Tool
Execute Free Space COP File
Delete Logs via CLI
Delete cm/trace Logs
Delete Core Dumps
Modify Call Detail Records (CDR) Low/High Watermark Values
Purge CDR Analysis and Reporting (CAR) Database
Deleted Unused Phone Firmware Files
Troubleshooting
Related information
Introduction
This document describes how to troubleshoot full common partition in a Unified Communications Manager
(CUCM) server and how to clean-up storage.
Prerequisites
Requirements
Cisco recommends that you have knowledge of these topics:
Real-Time Monitoring Tool (RTMT)
•
CUCM GUI interface and CLI sessions
•
Components Used
The information in this document is based on these software and hardware versions:
CUCM version 12.5.1.16900-48
•
The information in this document was created from the devices in a specific lab environment. All of the
devices used in this document started with a cleared (default) configuration. If your network is live, ensure
that you understand the potential impact of any command.
Page 2
Background Information
CUCM has three main disk partitions:
Disk/active: contains the current CUCM version and its configuration.
•
Disk/inactive: contains the previous version in case you need to switch after an upgrade for any
reason.
•
Disk/logging: this is also called common partition which holds all the enabled log/trace files and also
used to store temporarily the upgrade ISO file during upgrade.
•
Common partition clean-up is required in two scenarios:
Log rotate is broken and logs do not get deleted leading to the logging (/common) partition to grow
without bound. This can cause performance issues as the inability to logging affects the execution of
different commands.
1.
CUCM upgrade requires more space under common partition. Pre-Upgrade Readiness COP File
validates different aspects of your cluster before the upgrade is performed, one of the modules is the
Disk Space Check as CUCM upgrade requires at least 25GB of free space in the common partition.
2.
Validate Common Partition Space
The useful commands to start troubleshooting Common Partition space issue are:
show status
•
show tech runtime disk
•
show hardware
•
show diskusage common sort
•
utils core active list
•
utils core inactive list
•
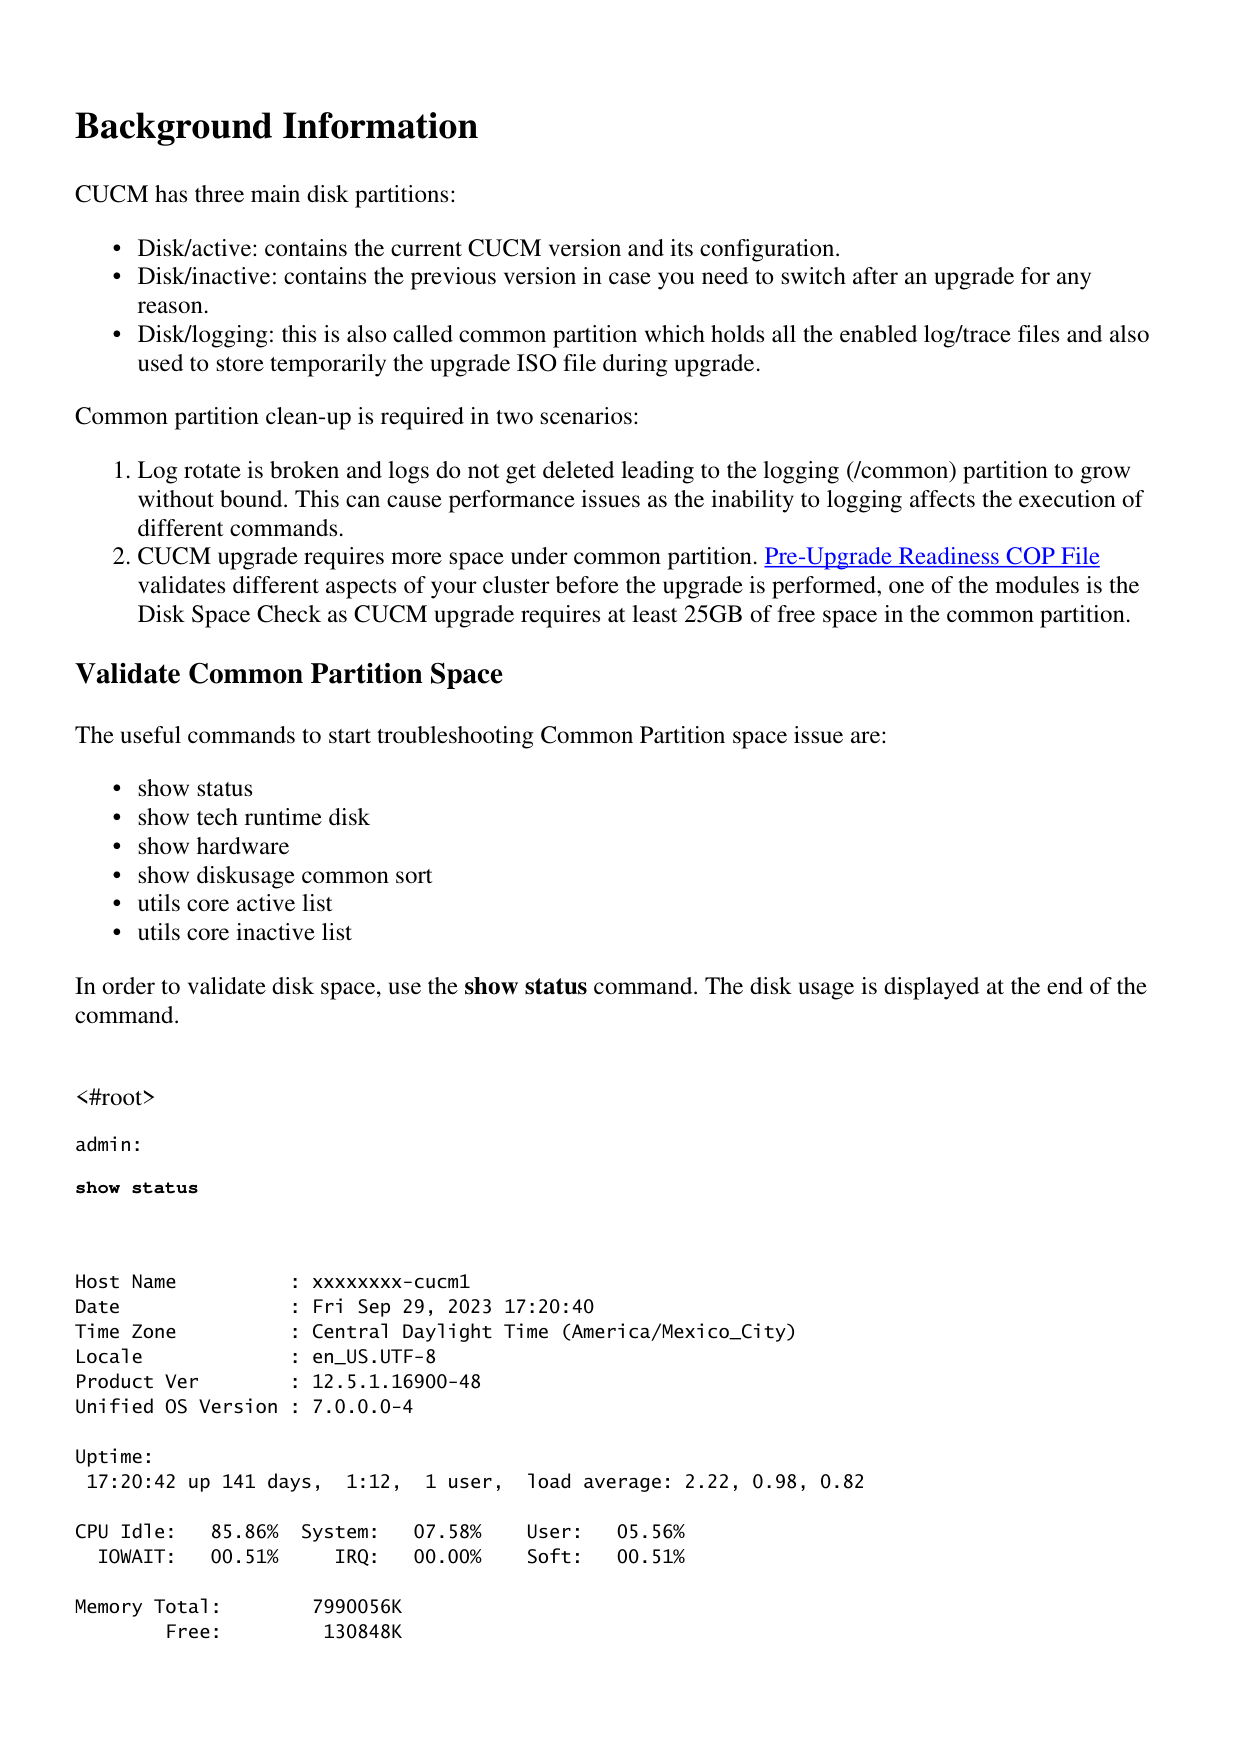
In order to validate disk space, use the show status command. The disk usage is displayed at the end of the
command.
<#root>
admin:
show status
Host Name : xxxxxxxx-cucm1
Date : Fri Sep 29, 2023 17:20:40
Time Zone : Central Daylight Time (America/Mexico_City)
Locale : en_US.UTF-8
Product Ver : 12.5.1.16900-48
Unified OS Version : 7.0.0.0-4
Uptime:
17:20:42 up 141 days, 1:12, 1 user, load average: 2.22, 0.98, 0.82
CPU Idle: 85.86% System: 07.58% User: 05.56%
IOWAIT: 00.51% IRQ: 00.00% Soft: 00.51%
Memory Total: 7990056K
Free: 130848K
Page 3
Used: 3963172K
Cached: 3232656K
Shared: 484376K
Buffers: 3896036K
Total Free Used
Disk/active 19805412K 6240536K 13345948K (69%)
Disk/inactive 19805412K 6601928K 12984556K (67%)
Disk/logging 69234984K 5315340K 60379628K (92%) <--- Used common partition space
Another command to validate storage is show tech runtime disk, with this command, you can validate the
Filesystem for each partition. The Disk/active partition is mounted to /, the Disk/inactive partition is
mounted to /partB, and the Disk/logging partition is mounted to /common.
<#root>
admin:
show tech runtime disk
-------------------- show platform runtime --------------------
The disk usage:
Filesystem Size Used Avail Use% Mounted on
devtmpfs 3.8G 0 3.8G 0% /dev
tmpfs 3.9G 85M 3.8G 3% /dev/shm
tmpfs 3.9G 402M 3.5G 11% /run
tmpfs 3.9G 0 3.9G 0% /sys/fs/cgroup
/dev/sda2 19G 13G 6.0G 69% / <--- Active partition
/dev/sda1 19G 13G 6.3G 67% /partB <--- Inactive partition
/dev/sda3 240M 9.5M 214M 5% /grub
/dev/sda6 67G 58G 5.1G 92% /common <--- Logging partition
none 128M 0 128M 0% /var/log/ramfs/cm/trace/ccm/sdi
none 128M 1.6M 127M 2% /var/log/ramfs/cm/trace/ccm/sdl
Page 4
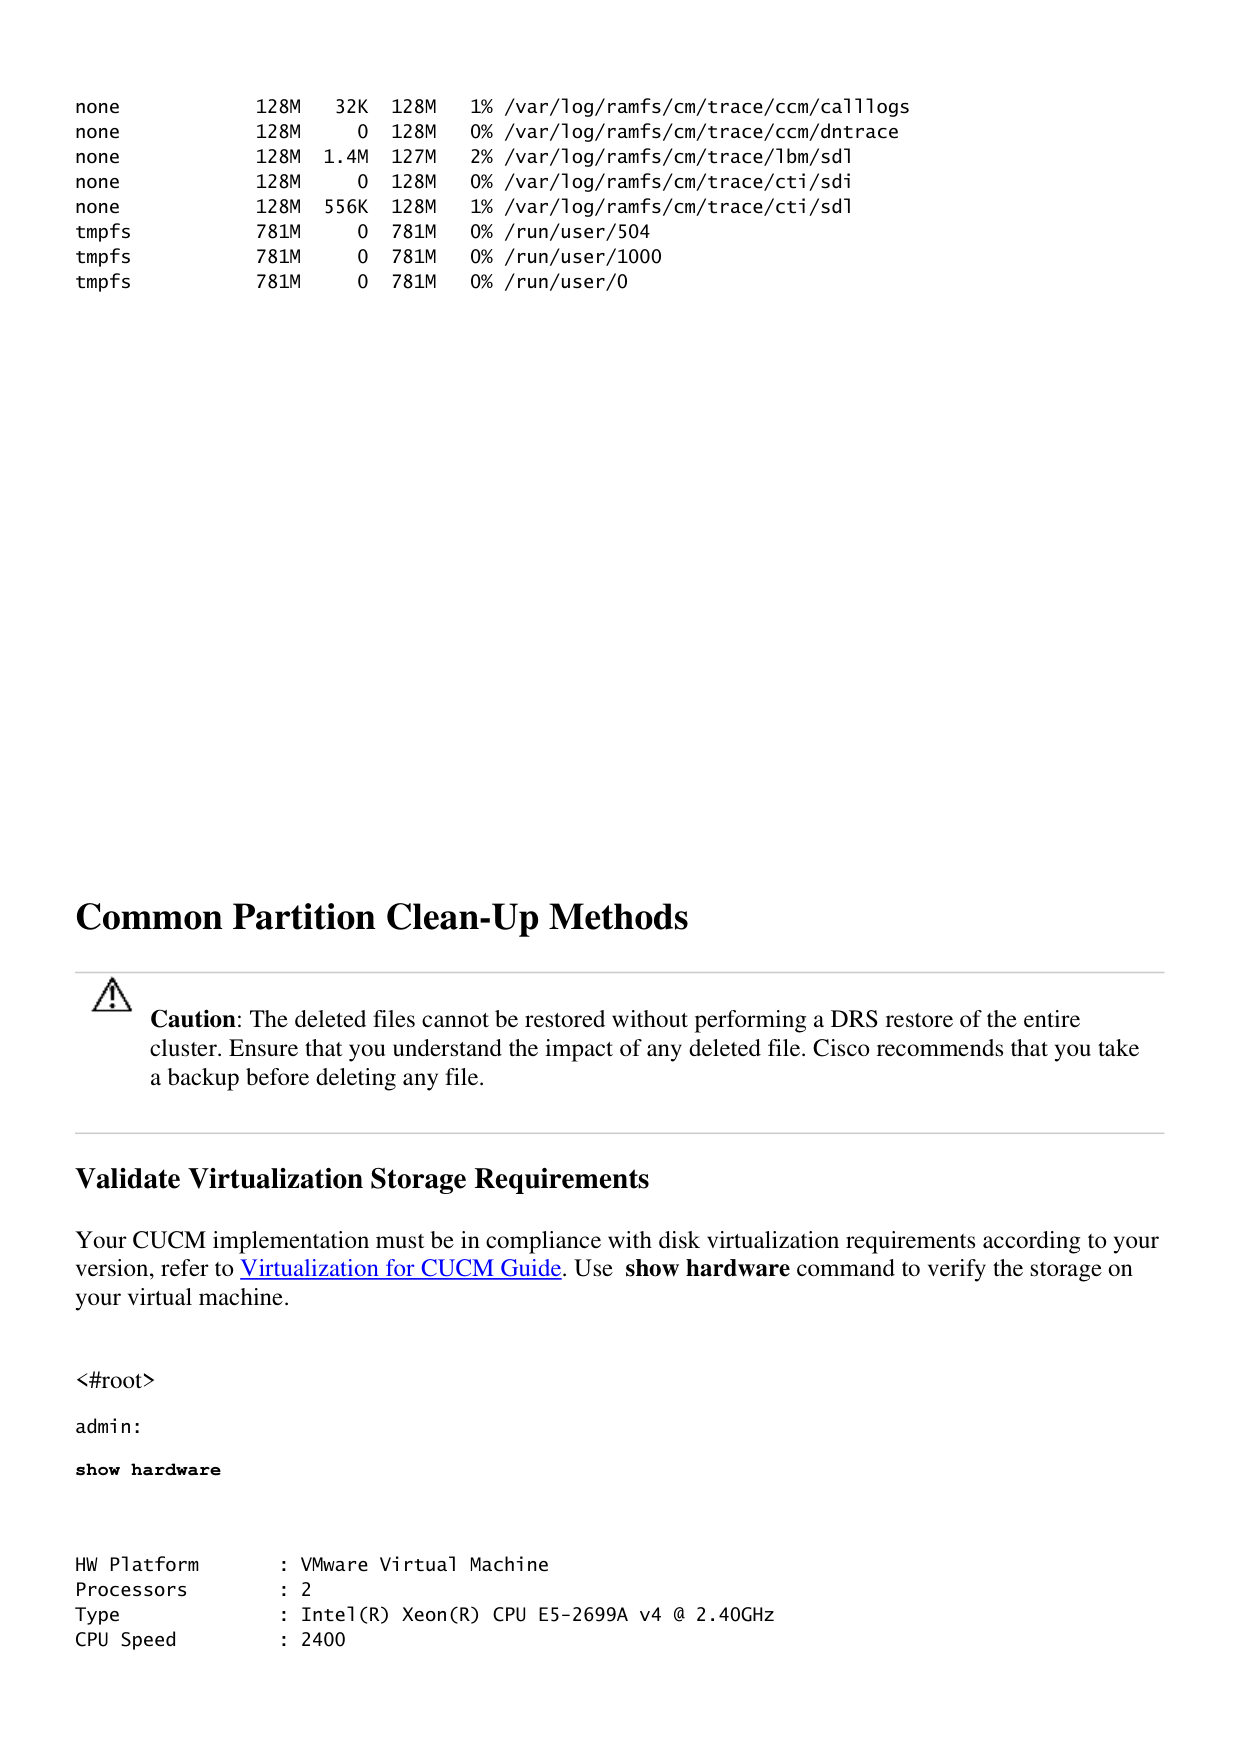
none 128M 32K 128M 1% /var/log/ramfs/cm/trace/ccm/calllogs
none 128M 0 128M 0% /var/log/ramfs/cm/trace/ccm/dntrace
none 128M 1.4M 127M 2% /var/log/ramfs/cm/trace/lbm/sdl
none 128M 0 128M 0% /var/log/ramfs/cm/trace/cti/sdi
none 128M 556K 128M 1% /var/log/ramfs/cm/trace/cti/sdl
tmpfs 781M 0 781M 0% /run/user/504
tmpfs 781M 0 781M 0% /run/user/1000
tmpfs 781M 0 781M 0% /run/user/0
Common Partition Clean-Up Methods
Caution: The deleted files cannot be restored without performing a DRS restore of the entire
cluster. Ensure that you understand the impact of any deleted file. Cisco recommends that you take
a backup before deleting any file.
Validate Virtualization Storage Requirements
Your CUCM implementation must be in compliance with disk virtualization requirements according to your
version, refer to Virtualization for CUCM Guide. Use show hardware command to verify the storage on
your virtual machine.
<#root>
admin:
show hardware
HW Platform : VMware Virtual Machine
Processors : 2
Type : Intel(R) Xeon(R) CPU E5-2699A v4 @ 2.40GHz
CPU Speed : 2400
Page 5
Memory : 8192 MBytes
Object ID : 1.3.6.1.4.1.9.1.1348
OS Version : UCOS 7.0.0.0-4.i386
Serial Number : VMware-42 16 9b c5 f6 08 da f9-36 d7 72 7c 01 41 52 62
RAID Version :
No RAID controller information is available
BIOS Information :
PhoenixTechnologiesLTD 6.00 11/12/2020
RAID Details :
No RAID information is available
Physical device information
Number of Disks : 1 <--- # of vdisks
Hard Disk #1
Size (in GB) : 110 <--- disk size
Partition Details :
Disk /dev/sda: 14359 cylinders, 255 heads, 63 sectors/track
Units: sectors of 512 bytes, counting from 0
Device Boot Start End #sectors Id System
/dev/sda1 * 2048 40511487 40509440 83 Linux
/dev/sda2 40511488 81020927 40509440 83 Linux
/dev/sda3 81020928 81545215 524288 83 Linux
/dev/sda4 81545216 230686719 149141504 5 Extended
/dev/sda5 81547264 89739263 8192000 82 Linux swap / Solaris
/dev/sda6 89741312 230686719 140945408 83 Linux
Page 6
Note: Adding vDisk is not supported as it would require re-partitioning by the application. If the
storage configuration is not aligned with the requirements, you must rebuild the VM with the
correct OVA template.
Log Partition Monitoring Tool
Log Partition Monitoring Tool (LPM) uses configured thresholds to monitor the disk usage of the log
partition on a server every 5 minutes. There are two alerts you can configure on RTMT to modify this
thresholds:
LogPartitionLowWaterMarkExceeded (% disk space)—When the disk usage is higher than the
percentage that you specify, LPM sends out an alarm message to syslog and an alert to RTMT Alert
central. To save the log files and regain disk space, you can use trace and log central option in RTMT.
1.
LogPartitionHighWaterMarkExceeded (% disk space)—When the disk usage is higher than the
percentage that you specify, LPM sends an alarm message to syslog and an alert to RTMT Alert
central. When this threshold value is reach the older log files are purged, and this creates additional
disk space in the logging partition.
2.
To purge files, please refer to Adjust WaterMark in RTMT of Call Manager Procedure Guide.
Execute Free Space COP File
If common partition space is not enough after adjusting High/Low WaterMark values, proceed to install the
latest Cisco Free Common Space COP file.
Warning: You must install the patch during a maintenance window because the installation during
normal business hours temporarily impacts the system performance. Ensure that you install the
patch when there is no other CLI or GUI activity on the system because the patch terminates all
CLI and GUI sessions and restarts the Tomcat service.
Download latest Cisco Free Common Space COP file from Software Download. Review ReadMe file
to understand the impact of running this COP file.
1.
In order to install COP file, navigate to Cisco Unified OS Administration > Software Upgrades >
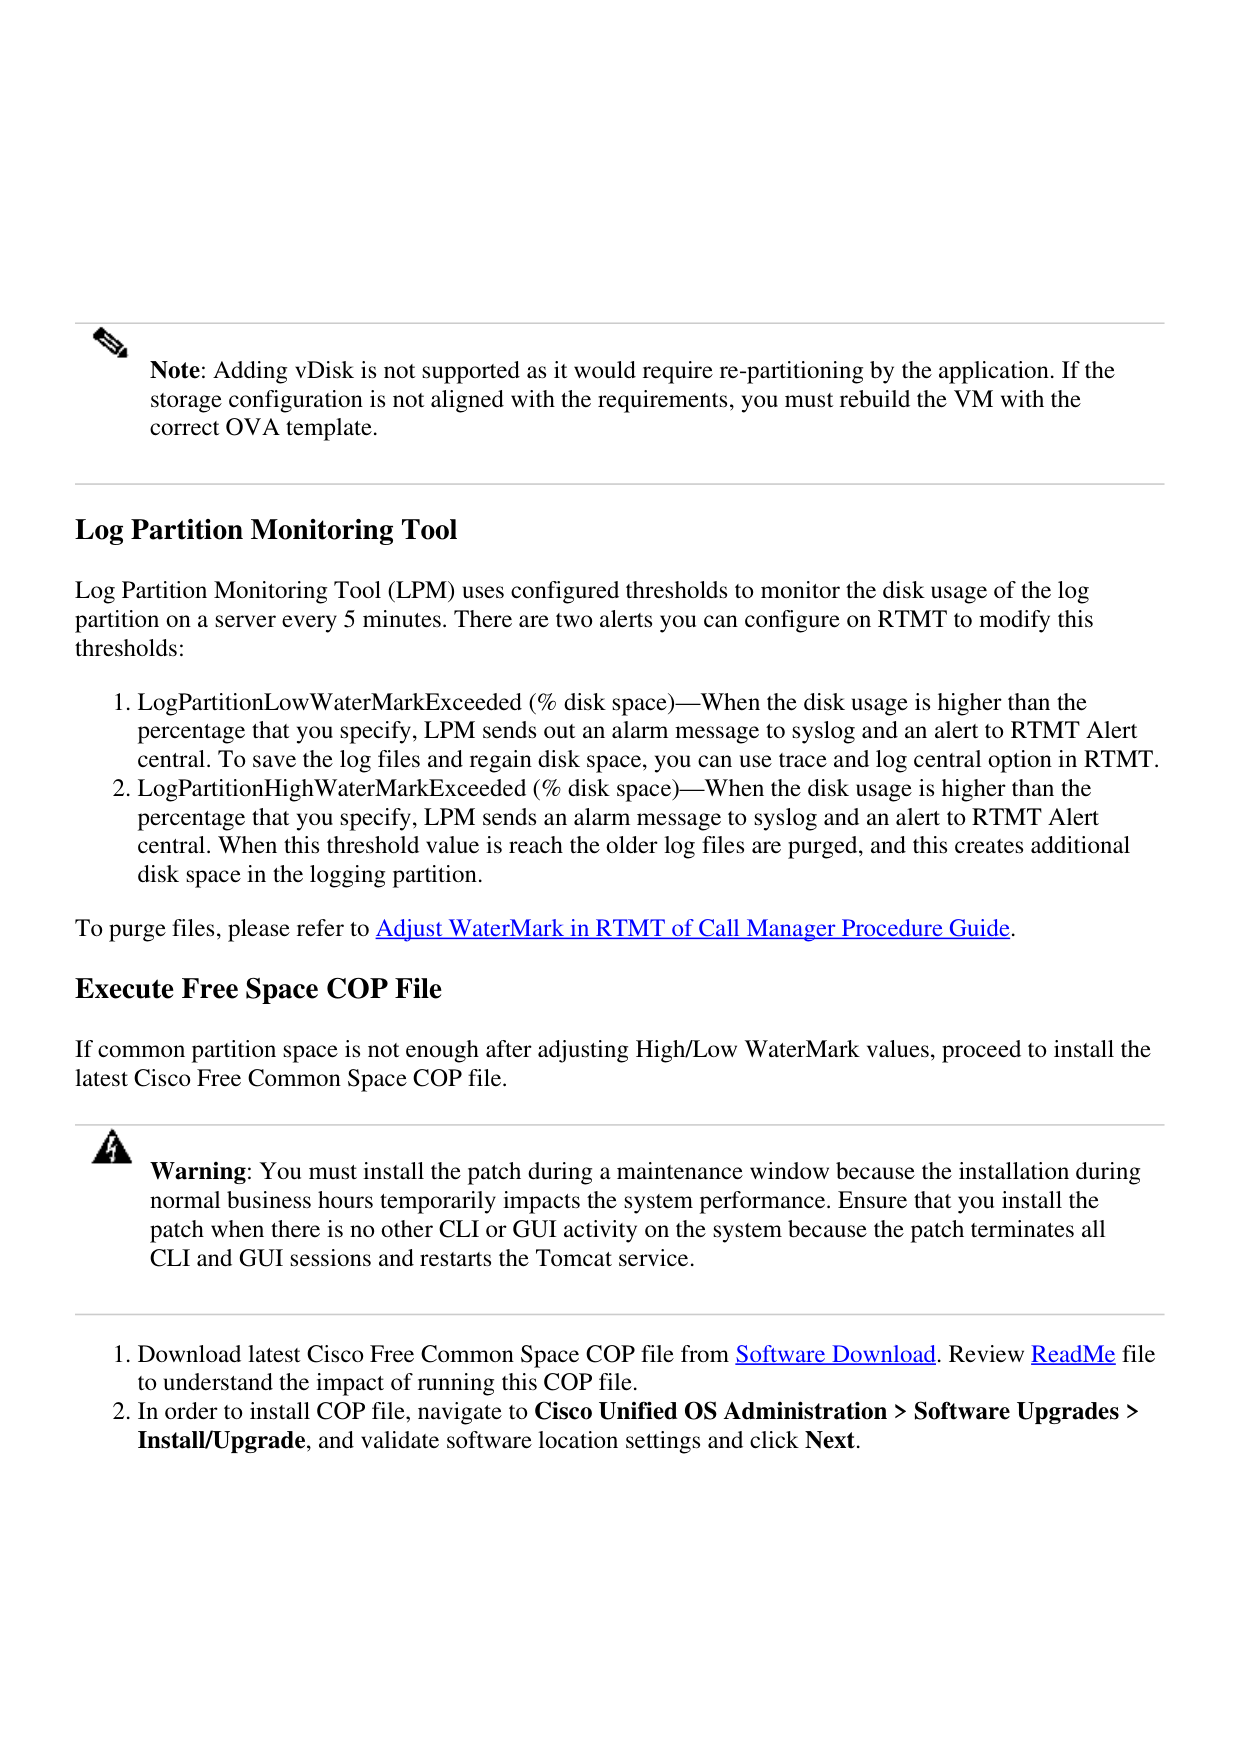
Install/Upgrade, and validate software location settings and click Next.
2.
Page 7
Install/Upgrade Software Location Screen
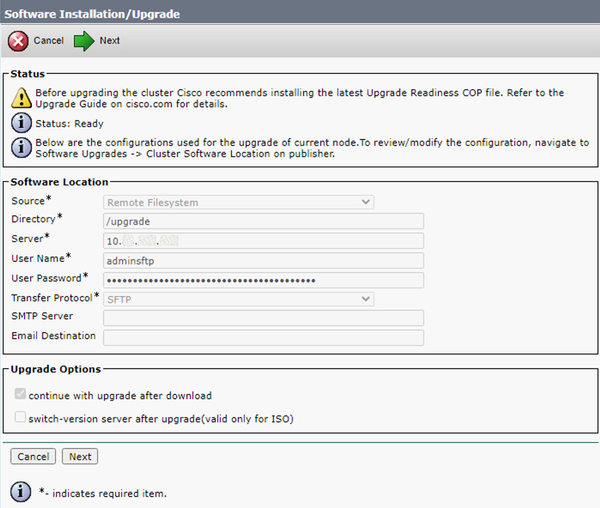
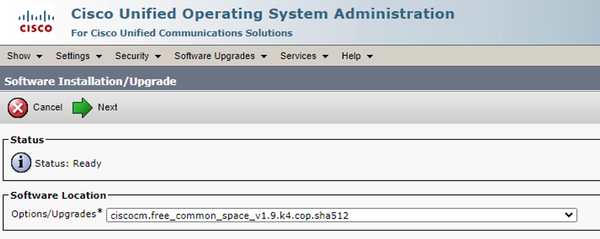
Select free common space COP file and click Next.
3.
Software File Selection Screen
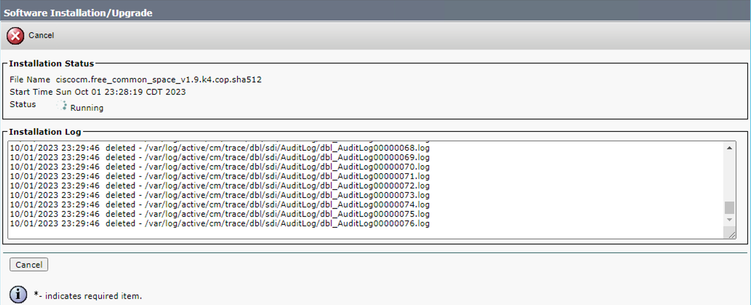
COP file starts execution and frees common partition space.
4.
Page 8
COP File Installation in Progress Screen
Delete Logs via CLI
When logging partition is full (100%) COP installation is going to fail. For this scenario, it is possible to
delete logs manually from CLI. Run the show diskusage common sort command to identify huge files
that are be consuming a lot of space.
<#root>
admin:
show diskusage common sort
This command can take significantly long time,
and can also effect the system wide IOWAIT on your system.
Continue (y/n)?y
Filesystem 1K-blocks Used Available Use% Mounted on
/dev/sda6 69234984 60388736 5306232 92% /common
60305892 /common/
60239612 /common/log
37020784 /common/log/taos-log-b
23209092 /common/log/taos-log-a
13585228 /common/log/taos-log-b/cm
9506060 /common/log/taos-log-b/car_db
9506016 /common/log/taos-log-a/car_db
9379480 /common/log/taos-log-b/cm/trace
8764376 /common/log/taos-log-a/cm
6222036 /common/log/taos-log-b/car_db/cardbspace
6222004 /common/log/taos-log-a/car_db/cardbspace
5998244 /common/log/taos-log-b/tomcat
5281404 /common/log/taos-log-a/cm/trace
4458320 /common/log/taos-log-b/tomcat/logs
4159960 /common/log/taos-log-b/core
4159952 /common/log/taos-log-b/core/core.jvm.core
2923152 /common/log/taos-log-b/cm/trace/dbl
2921840 /common/log/taos-log-b/cm/trace/dbl/sdi
2002008 /common/log/taos-log-b/car_db/cartempdbs
2002004 /common/log/taos-log-a/car_db/cartempdbs
1935008 /common/log/taos-log-b/cm/bin
Page 9
1932000 /common/log/taos-log-a/cm/bin
1928508 /common/log/taos-log-a/cm/trace/ccm
1928424 /common/log/taos-log-a/cm/trace/ccm/sdl
1806628 /common/log/taos-log-b/cm/tftpdata
Delete cm/trace Logs
These are save commands to delete the log files from cm/trace path, run one at a time:
file delete activelog cm/trace/ccm/sdl/* noconfirm
•
file delete activelog cm/trace/cti/sdl/* noconfirm
•
file delete activelog cm/trace//// noconfirm
•
file delete activelog cm/trace///* noconfirm
•
file delete activelog cm/trace// noconfirm
•
file delete activelog cm/trace/* noconfirm
•
file delete inactivelog cm/trace//// noconfirm
•
file delete inactivelog cm/trace///* noconfirm
•
file delete inactivelog cm/trace// noconfirm
•
file delete inactivelog cm/trace/* noconfirm
•
file delete activelog cm/log/ris/csv/*
•
file delete activelog tomcat/logs/ccmservice/log4j/*
•
file delete activelog /platform/snmp/*/*
•
Delete Core Dumps
Core dumps usually use a lot of space in disk. Identify them using utils core active list and utils core
Page 10
inactive list commands.
<#root>
admin:
utils core active list
Size Date Core File Name
2023-03-02 22:03:11 core.jvm.core
admin:
admin:
utils core inactive list
Size Date Core File Name
292616 KB 2022-02-20 00:02:37 core.62556.6.ccm.1645336926
According to the partition, delete Core dumps with file delete activelog core/filename or file delete
inactivelog core/filename and confirm no more Cores are listed.
<#root>
admin:
file delete activelog core/core.jvm.core
Delete the File core/core.jvm.core?
Enter "y" followed by return to continue: y
files: found = 1, deleted = 1
admin:
admin:
file delete inactivelog core/core.62556.6.ccm.1645336926
Delete the File core/core.62556.6.ccm.1645336926?
Enter "y" followed by return to continue: y
files: found = 1, deleted = 1
admin:
admin:
utils core active list
No core files found
admin:
utils core inactive list
Page 11
No core files found
Modify Call Detail Records (CDR) Low/High Watermark Values
The File Manager component of the CDR Repository Manager runs hourly. When the File Manager runs, it
deletes files with dates outside the configured preservation duration. It also checks whether the disk usage
has exceeded the high water mark. If so, the system deletes the processed CDR files until the low water
mark is reached, starting with the oldest files.
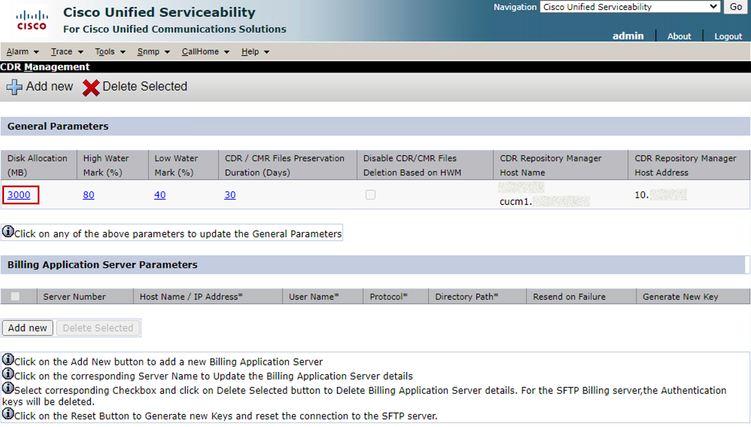
Navigate to Cisco Unified Serviceability > Tools > CDR Management and click the first value
under General Parameters section.
1.
CDR Management Screen
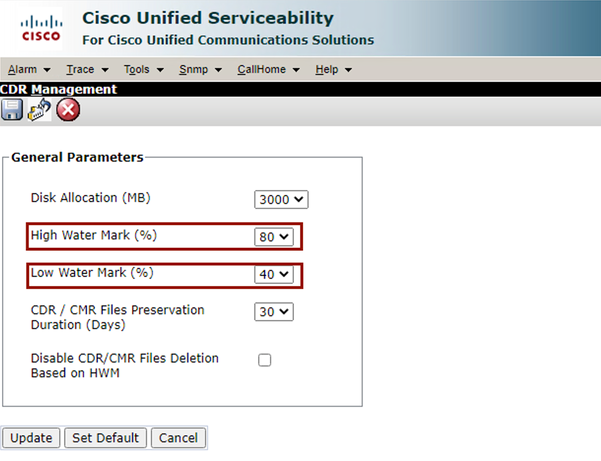
Modify High Water Mark (%) and Low Water Mark (%).
2.
Page 12
CDR Management Modify General Parameters Screen
Purge CDR Analysis and Reporting (CAR) Database
If CAR Database is using a lot of space, you can perform the purge of the database and release logging
space. To do this:
Access to CAR web page, navigate to Cisco Unified Serviceability > Tools > CDR Analysis and
Reporting.
1.
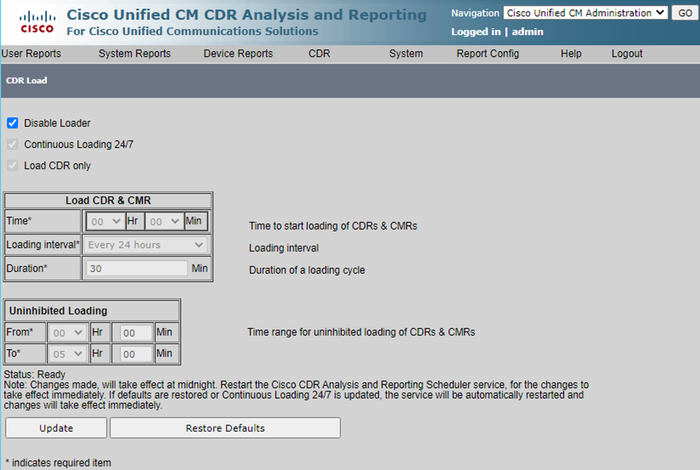
Disable loader, navigate to System > Scheduler > CDR Load, check the Disable Loader check box
and click the Update.
2.
Page 13
Disable Loader Screen
For the changes to take effect, navigate to Cisco Unified Serviceability > Tools > Control Center -
Network Services > Cisco CAR Scheduler and restart service.
3.
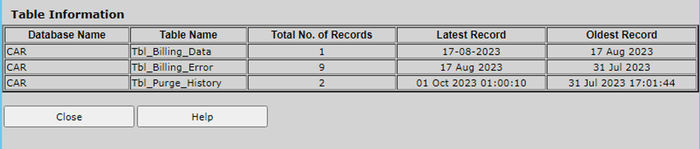
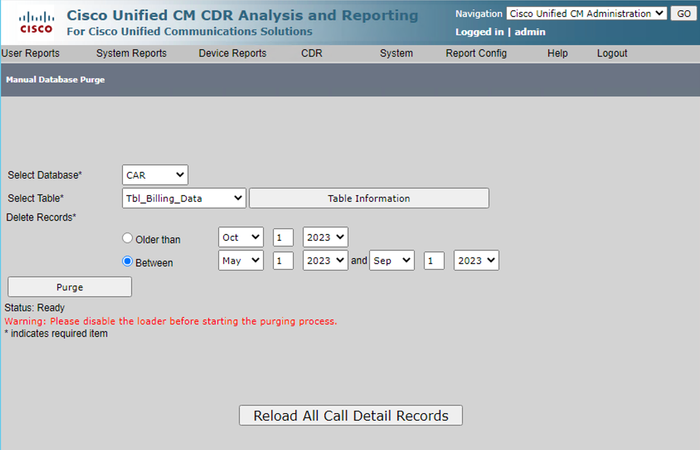
In order to purge CAR DB navigate to System > Database > Manual Purge, click Table
Information to validate the oldest records for each type of table.
4.
CAR Table Information Screen
Click Close, and select the date range to purge files of the selected table.
5.
Page 14
Manual Database Purge Screen
Deleted Unused Phone Firmware Files
For upgrade scenarios, if there is not enough space in the common partition, delete the old/unused firmware
from TFTP. To do this:
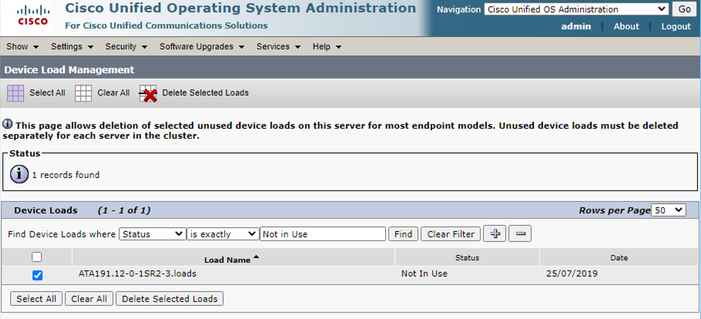
Navigate to Cisco Unified OS Administration > Software Upgrades > Device Load Management.
1.
Apply a filter Find Device Loads where > Status > is exactly > Not In Use > Find.
2.
Delete all the device loads with the status Not In Use.
3.
Page 15
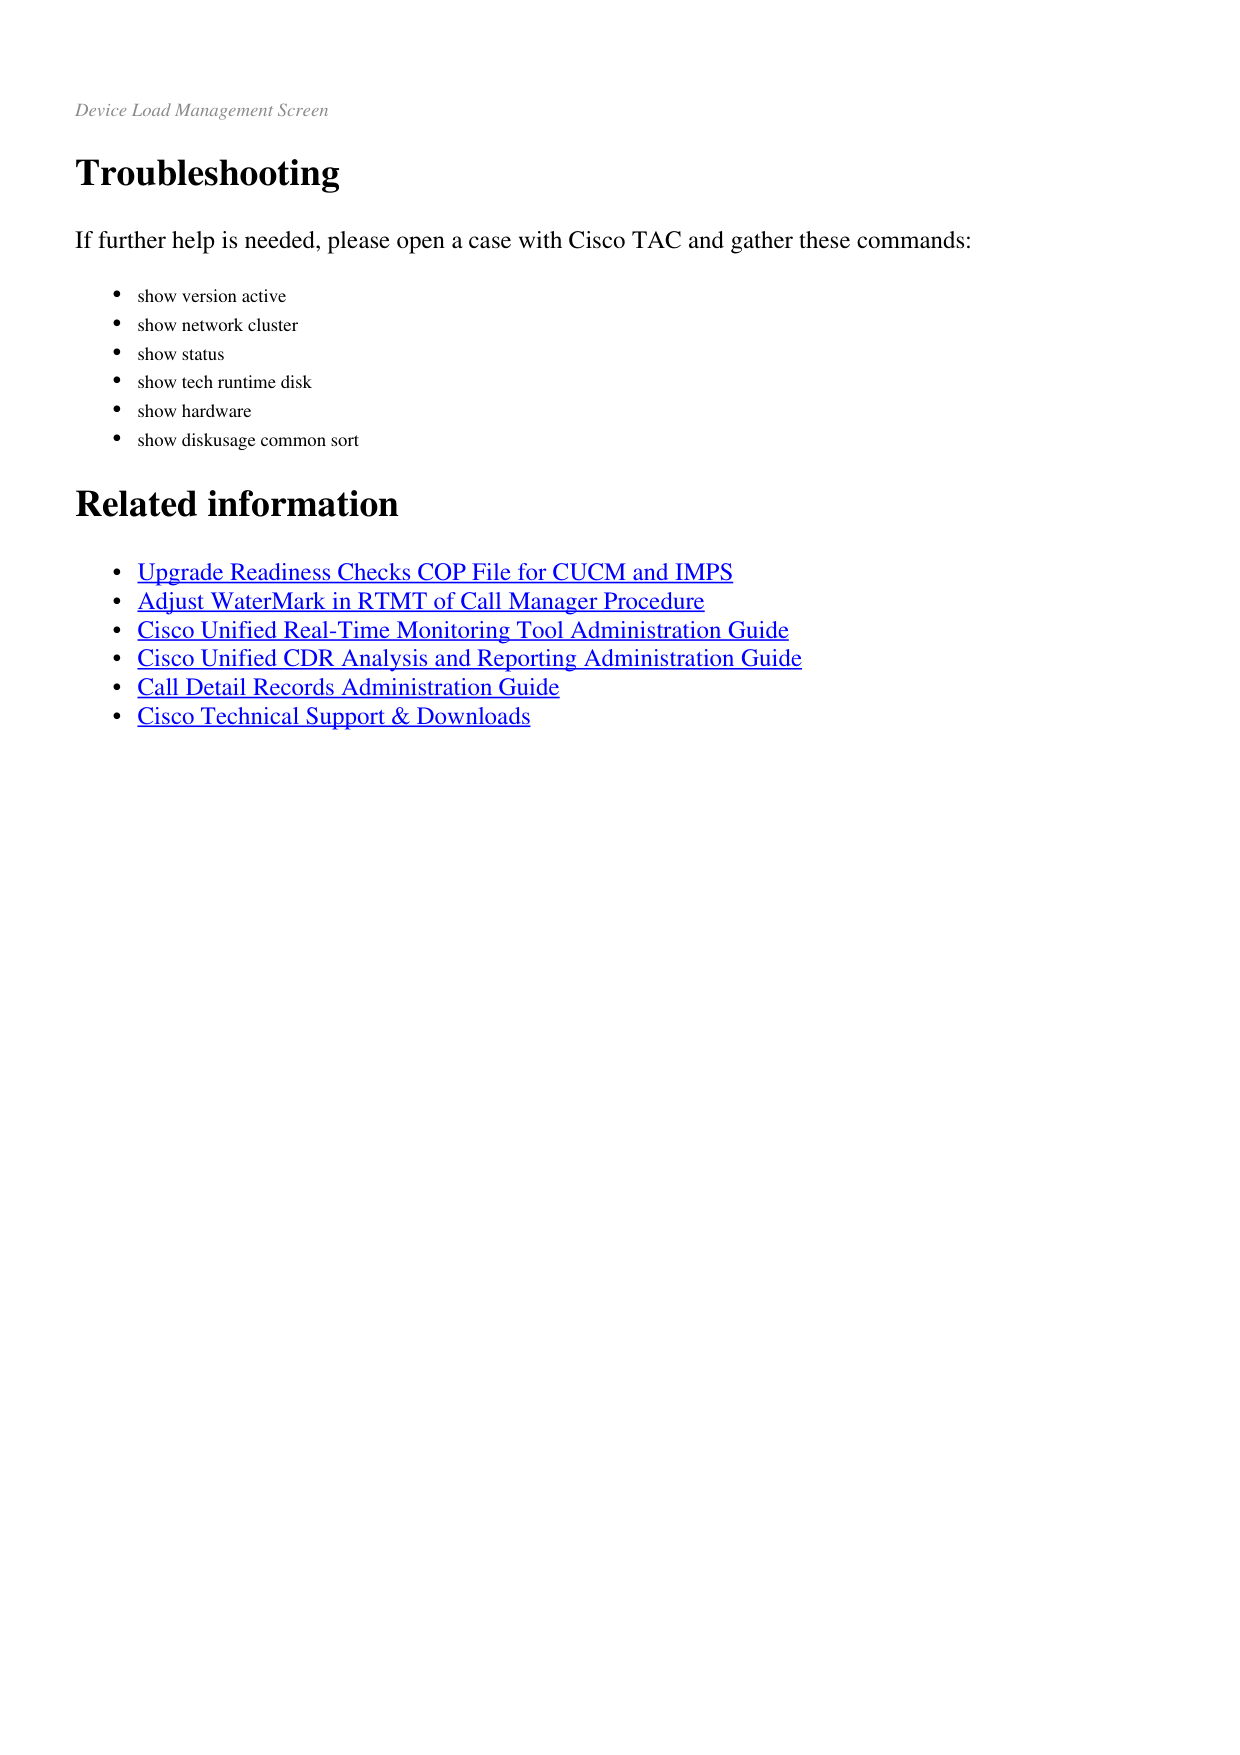
Device Load Management Screen
Troubleshooting
If further help is needed, please open a case with Cisco TAC and gather these commands:
show version active
•
show network cluster
•
show status
•
show tech runtime disk
•
show hardware
•
show diskusage common sort
•
Related information
Upgrade Readiness Checks COP File for CUCM and IMPS
•
Adjust WaterMark in RTMT of Call Manager Procedure
•
Cisco Unified Real-Time Monitoring Tool Administration Guide
•
Cisco Unified CDR Analysis and Reporting Administration Guide
•
Call Detail Records Administration Guide
•
Cisco Technical Support & Downloads
•