Document Metadata
Format: PDF
Title: Programmability Configuration Guide, Cisco IOS XE Amsterdam 17.3.x
Author: Unknown
Creator: DITA Open Toolkit
Page 1
Programmability Configuration Guide, Cisco IOS XE Amsterdam 17.3.x
First Published: 2020-07-31
Americas Headquarters
Cisco Systems, Inc.
170 West Tasman Drive
San Jose, CA 95134-1706
USA
http://www.cisco.com
Tel: 408 526-4000
800 553-NETS (6387)
Fax: 408 527-0883


Page 2
THE SPECIFICATIONS AND INFORMATION REGARDING THE PRODUCTS IN THIS MANUAL ARE SUBJECT TO CHANGE WITHOUT NOTICE. ALL STATEMENTS,
INFORMATION, AND RECOMMENDATIONS IN THIS MANUAL ARE BELIEVED TO BE ACCURATE BUT ARE PRESENTED WITHOUT WARRANTY OF ANY KIND,
EXPRESS OR IMPLIED. USERS MUST TAKE FULL RESPONSIBILITY FOR THEIR APPLICATION OF ANY PRODUCTS.
THE SOFTWARE LICENSE AND LIMITED WARRANTY FOR THE ACCOMPANYING PRODUCT ARE SET FORTH IN THE INFORMATION PACKET THAT SHIPPED WITH
THE PRODUCT AND ARE INCORPORATED HEREIN BY THIS REFERENCE. IF YOU ARE UNABLE TO LOCATE THE SOFTWARE LICENSE OR LIMITED WARRANTY,
CONTACT YOUR CISCO REPRESENTATIVE FOR A COPY.
The Cisco implementation of TCP header compression is an adaptation of a program developed by the University of California, Berkeley (UCB) as part of UCB's public domain version of
the UNIX operating system. All rights reserved. Copyright © 1981, Regents of the University of California.
NOTWITHSTANDING ANY OTHER WARRANTY HEREIN, ALL DOCUMENT FILES AND SOFTWARE OF THESE SUPPLIERS ARE PROVIDED “AS IS" WITH ALL FAULTS.
CISCO AND THE ABOVE-NAMED SUPPLIERS DISCLAIM ALL WARRANTIES, EXPRESSED OR IMPLIED, INCLUDING, WITHOUT LIMITATION, THOSE OF
MERCHANTABILITY, FITNESS FOR A PARTICULAR PURPOSE AND NONINFRINGEMENT OR ARISING FROM A COURSE OF DEALING, USAGE, OR TRADE PRACTICE.
IN NO EVENT SHALL CISCO OR ITS SUPPLIERS BE LIABLE FOR ANY INDIRECT, SPECIAL, CONSEQUENTIAL, OR INCIDENTAL DAMAGES, INCLUDING, WITHOUT
LIMITATION, LOST PROFITS OR LOSS OR DAMAGE TO DATA ARISING OUT OF THE USE OR INABILITY TO USE THIS MANUAL, EVEN IF CISCO OR ITS SUPPLIERS
HAVE BEEN ADVISED OF THE POSSIBILITY OF SUCH DAMAGES.
Any Internet Protocol (IP) addresses and phone numbers used in this document are not intended to be actual addresses and phone numbers. Any examples, command display output, network
topology diagrams, and other figures included in the document are shown for illustrative purposes only. Any use of actual IP addresses or phone numbers in illustrative content is unintentional
and coincidental.
All printed copies and duplicate soft copies of this document are considered uncontrolled. See the current online version for the latest version.
Cisco has more than 200 offices worldwide. Addresses and phone numbers are listed on the Cisco website at www.cisco.com/go/offices.
Cisco and the Cisco logo are trademarks or registered trademarks of Cisco and/or its affiliates in the U.S. and other countries. To view a list of Cisco trademarks, go to this URL:
https://www.cisco.com/c/en/us/about/legal/trademarks.html. Third-party trademarks mentioned are the property of their respective owners. The use of the word partner does not imply a
partnership relationship between Cisco and any other company. (1721R)
© 2020 Cisco Systems, Inc. All rights reserved.
Page 3
C O N T E N T S
Full Cisco Trademarks with Software License
?
New and Changed Information
1
C H A P T E R 1
New and Changed Information
1
Provisioning
27
P A R T I
Zero-Touch Provisioning
29
C H A P T E R 2
Restrictions for Zero-Touch Provisioning
29
Information About Zero-Touch Provisioning
29
Zero-Touch Provisioning Overview
29
DHCP Server Configuration for Zero-Touch Provisioning
30
DHCPv6 Support
30
Sample Zero-Touch Provisioning Configurations
31
Sample DHCP Server Configuration on a Management Port Using TFTP Copy
31
Sample DHCP Server Configuration on a Management Port Using HTTP Copy
32
Sample DHCP Server Configuration on an In-Band Port Using TFTP Copy
32
Sample DHCP Server Configuration on an In-Band Port Using HTTP Copy
32
Sample DHCP Server Configuration on a Linux Ubuntu Device
33
Sample DHCPv6 Server Configuration on a Management Port Using TFTP Copy
33
Sample Python Provisioning Script
34
Boot Log for Cisco 4000 Series Integrated Services Routers
34
Boot Log for Cisco Catalyst 9000 Series Switches
36
Feature Information for Zero-Touch Provisioning
60
iPXE
65
C H A P T E R 3
Programmability Configuration Guide, Cisco IOS XE Amsterdam 17.3.x
iii

Page 4
Information About iPXE
65
About iPXE
65
iPXE Overview
66
IPv6 iPXE Network Boot
68
IPv6 Address Assignment in Rommon Mode
70
Supported ROMMON Variables
71
iPXE-Supported DHCP Options
71
DHCPv6 Unique Identifiers
73
How to Configure iPXE
73
Configuring iPXE
73
Configuring Device Boot
74
Configuration Examples for iPXE
75
Example: iPXE Configuration
75
Sample iPXE Boot Logs
76
Sample DHCPv6 Server Configuration for iPXE
76
Troubleshooting Tips for iPXE
78
Additional References for iPXE
79
Feature Information for iPXE
79
Shells and Scripting
81
P A R T I I
Guest Shell
83
C H A P T E R 4
Restrictions for Guest Shell
83
Information About the Guest Shell
83
Guest Shell Overview
83
Guest Shell Software Requirements
84
Guest Shell Security
84
Hardware Requirements for the Guest Shell
85
Guest Shell Storage Requirements
85
Enabling and Running the Guest Shell
86
Disabling and Destroying the Guest Shell
86
Accessing Guest Shell on a Device
86
Accessing Guest Shell Through the Management Port
87
Day Zero Guest Shell Provisioning Using Front-Panel Port or Fiber Uplink
87
Programmability Configuration Guide, Cisco IOS XE Amsterdam 17.3.x
iv
Contents
Page 5
Stacking with Guest Shell
87
Cisco IOx Overview
88
IOx Tracing and Logging Overview
88
IOXMAN Structure
88
Logging and Tracing System Flow
89
Logging and Tracing of Messages
91
How to Enable the Guest Shell
92
Managing IOx
92
Managing the Guest Shell
94
Managing the Guest Shell Using Application Hosting
95
Configuring the AppGigabitEthernet Interface for Guest Shell
96
Enabling Guest Shell on the Management Interface
99
Accessing the Python Interpreter
100
Configuration Examples for the Guest Shell
101
Example: Managing the Guest Shell
101
Sample VirtualPortGroup Configuration
102
Example: Configuring the AppGigabitEthernet Interface for Guest Shell
103
Example: Enabling Guest Shell on the Management Interface
104
Example: Guest Shell Usage
104
Example: Guest Shell Networking Configuration
104
Sample DNS Configuration for Guest Shell
105
Example: Configuring Proxy Environment Variables
105
Example: Configuring Yum and PIP for Proxy Settings
105
Additional References for Guest Shell
106
Feature Information for Guest Shell
107
Python API
111
C H A P T E R 5
Using Python
111
Cisco Python Module
111
Cisco Python Module to Execute IOS CLI Commands
113
CLI Python Module
117
C H A P T E R 6
Information About Python CLI Module
117
About Python
117
Programmability Configuration Guide, Cisco IOS XE Amsterdam 17.3.x
v
Contents
Page 6
Python Scripts Overview
117
Interactive Python Prompt
117
Python Script
118
Supported Python Versions
119
Updating the Cisco CLI Python Module
120
Additional References for the CLI Python Module
121
Feature Information for the CLI Python Module
121
EEM Python Module
123
C H A P T E R 7
Prerequisites for the EEM Python Module
123
Information About EEM Python Module
123
Python Scripting in EEM
123
EEM Python Package
123
Python-Supported EEM Actions
124
EEM Variables
125
EEM CLI Library Command Extensions
125
How to Configure the EEM Python Policy
126
Registering a Python Policy
126
Running Python Scripts as Part of EEM Applet Actions
128
Adding a Python Script in an EEM Applet
129
Additional References EEM Python Module
131
Feature Information for EEM Python Module
132
Model-Driven Programmability
135
P A R T I I I
NETCONF Protocol
137
C H A P T E R 8
Information About the NETCONF Protocol
137
Introduction to Data Models - Programmatic and Standards-Based Configuration
137
NETCONF
138
Restrictions for the NETCONF Protocol
138
NETCONF RESTCONF IPv6 Support
138
NETCONF Global Session Lock
139
NETCONF Kill Session
139
NETCONF-YANG SSH Server Support
140
Programmability Configuration Guide, Cisco IOS XE Amsterdam 17.3.x
vi
Contents
Page 7
Candidate Configuration Support
140
NETCONF Operations on Candidate
140
Confirmed Candidate Configuration Commit
142
Candidate Support Configuration
143
How to Configure the NETCONF Protocol
144
Providing Privilege Access to Use NETCONF
144
Configuring NETCONF-YANG
145
Configuring NETCONF Options
146
Configuring SNMP
146
Configuring the SSH Server to Perform RSA-Based User Authentication
148
Verifying the NETCONF Protocol Configuration
149
Additional References for NETCONF Protocol
152
Feature Information for NETCONF Protocol
152
RESTCONF Protocol
161
C H A P T E R 9
Prerequisites for the RESTCONF Protocol
161
Restrictions for the RESTCONF Protocol
161
Information About the RESTCONF Protocol
162
Overview of RESTCONF
162
HTTPs Methods
162
RESTCONF Root Resource
162
RESTCONF API Resource
163
Methods
164
RESTCONF YANG-Patch Support
164
How to Configure the RESTCONF Protocol
168
Authentication of NETCONF/RESTCONF Using AAA
168
Enabling Cisco IOS HTTP Services for RESTCONF
170
Verifying RESTCONF Configuration
171
Configuration Examples for the RESTCONF Protocol
173
Example: Configuring the RESTCONF Protocol
173
Additional References for the RESTCONF Protocol
176
Feature Information for the RESTCONF Protocol
176
NETCONF and RESTCONF Service-Level ACLs
179
C H A P T E R 1 0
Programmability Configuration Guide, Cisco IOS XE Amsterdam 17.3.x
vii
Contents
Page 8
Information About NETCONF and RESTCONF Service-Level ACLs
179
Overview of NETCONF and RESTCONF Service-Level ACLs
179
How to Configure NETCONF and RESTCONF Service-Level ACLs
179
Configuring an ACL for a NETCONF-YANG Session
179
Configuring an ACL for a RESTCONF Session
181
Configuration Examples for NETCONF and RESTCONF Service-Level ACLs
182
Example: Configuring an ACL for a NETCONF Session
182
Example: Configuring an ACL for a RESTCONF Session
183
Additional References for NETCONF and RESTCONF Service-Level ACLs
183
Feature Information for NETCONF and RESTCONF Service-Level ACLs
184
gNMI Protocol
185
C H A P T E R 1 1
Restrictions for the gNMI Protocol
185
Information About the gNMI Protocol
186
About GNMI
186
JSON IETF Encoding for YANG Data Trees
186
gNMI GET Request
187
gNMI SetRequest
190
gNMI Namespace
191
gNMI Wildcards
193
gNMI Configuration Persistence
196
gNMI Username and Password Authentication
196
gNMI Error Messages
196
How to Enable the gNMI Protocol
196
Creating Certs with OpenSSL on Linux
197
Installing Certs on a Device Through the CLI
197
Enabling gNMI in Insecure Mode
198
Enabling gNMI in Secure Mode
199
Connecting the gNMI Client
201
Configuration Examples for the gNMI Protocol
202
Example: Enabling gNMI in Insecure Mode
202
Example: Enabling gNMI in Secure Mode
202
Additional References for the gNMI Protocol
203
Feature Information for the gNMI Protocol
203
Programmability Configuration Guide, Cisco IOS XE Amsterdam 17.3.x
viii
Contents
Page 9
gRPC Network Operations Interface
209
C H A P T E R 1 2
Information About the gRPC Network Operations Interface
209
gNOI Protocol
209
Certificate Management Service
209
Install RPC
210
Rotate RPC
212
Revoke RPC
213
GetCertificate RPC
214
CanGenerateCSR RPC
215
Mutual Authentication
216
Bootstrapping with Certificate Service
216
Additional References for the gRPC Network Operations Interface
216
Feature Information for the gRPC Network Operations Interface
217
Model Based AAA
219
C H A P T E R 1 3
Model Based AAA
219
Prerequisites for Model Based AAA
219
Initial Operation
219
Group Membership
220
NACM Privilege Level Dependencies
221
NACM Configuration Management and Persistance
221
Resetting the NACM Configuration
221
Sample NACM Configuration
221
Additional References for Model Based AAA
225
Feature Information for Model-Based AAA
225
Model-Driven Telemetry
227
C H A P T E R 1 4
Model-Driven Telemetry
227
Prerequisites for Model-Driven Telemetry
227
Restrictions for Model-Driven Telemetry
230
Information About Model-Driven Telemetry
231
Model-Driven Telemetry Overview
231
Telemetry Roles
231
Programmability Configuration Guide, Cisco IOS XE Amsterdam 17.3.x
ix
Contents
Page 10
Subscription Overview
232
Subscription Monitoring
245
Streams
247
Transport Protocol
250
High Availability in Telemetry
251
Sample Model-Driven Telemetry RPCs
252
Managing Configured Subscriptions
252
Receiving a Response Code
255
Receiving Subscription Push Updates for NETCONF Dial-In
255
Retrieving Subscription Details
255
Additional References for Model-Driven Telemetry
258
Feature Information for Model-Driven Telemetry
259
In-Service Model Update
267
C H A P T E R 1 5
Restrictions for In-Service Model Update
267
Information About In-Service Model Update
267
Overview of In-Service Model Updates
267
Compatibility of In-Service Model Update Packages
267
Update Package Naming Conventions
268
Installing the Update Package
268
Deactivating the Update Package
269
Rollback of the Update Package
269
How to Manage In-Service Model Update
270
Managing the Update Package
270
Configuration Examples for In-Service Model Updates
271
Example: Managing an Update Package
271
Feature Information for In-Service Model Update
275
Application Hosting
277
P A R T I V
Application Hosting
279
C H A P T E R 1 6
Restrictions for Application Hosting
279
Information About Application Hosting
280
Need for Application Hosting
280
Programmability Configuration Guide, Cisco IOS XE Amsterdam 17.3.x
x
Contents
Page 11
Cisco IOx Overview
280
Application Hosting Overview
281
Application Hosting on Front-Panel Trunk and VLAN Ports
281
Application Hosting on Cisco Catalyst 9300 Series Switches
282
Application Hosting on Cisco Catalyst 9400 Series Switches
282
Application Hosting on Cisco Catalyst 9500 Series Switches
282
Application Hosting on Cisco Catalyst 9600 Series Switches
283
ThousandEyes Enterprise Agent Overview
283
Prerequisites for the ThousandEyes Enterprise Agent
283
Resources Required for the ThousandEyes Enterprise Agent
284
ThousandEyes Enterprise Agent Download
284
Native Docker Container: Application Auto-Restart
285
Application Auto-Restart Scenarios
285
Application Auto-Restart on Different Platforms
286
Supported Network Types
287
Virtual Network Interface Card
288
High Availability
288
How to Configure Application Hosting
289
Enabling Cisco IOx
289
Configuring Application Hosting on Front-Panel VLAN Ports
290
Configuring Application Hosting on Front-Panel Trunk Ports
291
Starting an Application in Configuration Mode
293
Lifecycle of an Application
294
Configuring Docker Run Time Options
295
Configuring a Static IP Address in a Container
296
Configuring Application Hosting on the Management Port
298
Manually Configuring the IP Address for an Application
299
Overriding App Resource Configuration
300
Installing the ThousandEyes Enterprise Agent
301
Configuring AppHosting for the ThousandEyes Enterprise Agent
301
Configuring AppGigabitEthernet Interface for the ThousandEyes Enterprise Agent
303
Installing the ThousandEyes Enterprise Agent
304
Verifying the Application-Hosting Configuration
305
Configuration Examples for Application Hosting
309
Programmability Configuration Guide, Cisco IOS XE Amsterdam 17.3.x
xi
Contents
Page 12
Example: Enabling Cisco IOx
309
Example: Configuring Application Hosting on Front-Panel VLAN Ports
309
Example: Configuring Application Hosting on Front-Panel Trunk Ports
310
Example: Installing an Application from disk0:
310
Example: Starting an Application
310
Example: Lifecycle for an Application
311
Example: Configuring Docker Run Time Options
311
Example: Configuring a Static IP Address in a Container
311
Example: Configuring Application Hosting on the Management Port
312
Example: Overriding App Resource Configuration
312
Example: Installing ThousandEyes Enterprise Agent
312
Sample Configuration for ThousandEyes Enterprise Agent
313
Additional References
316
Feature Information for Application Hosting
317
OpenFlow
321
P A R T V
OpenFlow
323
C H A P T E R 1 7
Prerequisites for OpenFlow
323
Restrictions for OpenFlow
323
Information About OpenFlow
323
OpenFlow Overview
324
OpenFlow Controller
324
Flow Management
324
OpenFlow Pipeline
325
Supported Match Fields and Actions
325
OpenFlow Scale Information
327
Flow Operations
327
OpenFlow Table Pipeline
328
OpenFlow Power over Ethernet
328
How to Configure OpenFlow
328
Enabling OpenFlow Mode on a Device
328
Configuring OpenFlow
330
Configuring an Interface in OpenFlow Mode
331
Programmability Configuration Guide, Cisco IOS XE Amsterdam 17.3.x
xii
Contents
Page 13
Verifying OpenFlow
333
Configuration Examples for OpenFlow
335
Example: Enabling OpenFlow on a Device
335
Example: Configuring OpenFlow
336
Additional References
336
Feature Information for OpenFlow
337
Programmability Configuration Guide, Cisco IOS XE Amsterdam 17.3.x
xiii
Contents
Page 14
Programmability Configuration Guide, Cisco IOS XE Amsterdam 17.3.x
xiv
Contents
Page 15
C H A P T E R 1
New and Changed Information
This chapter provides release-specific information about all features.
• New and Changed Information, on page 1
New and Changed Information
This table summarizes the new and changed features, the supported platforms, and links to features.
Table 1: New and Changed Feature Information
Release & Platform
Feature
Provisioning
Programmability Configuration Guide, Cisco IOS XE Amsterdam 17.3.x
1

Page 16
Release & Platform
Feature
Zero-Touch Provisioning
Programmability Configuration Guide, Cisco IOS XE Amsterdam 17.3.x
2
New and Changed Information
New and Changed Information
Page 17
Release & Platform
Feature
Cisco IOS XE Everest 16.5.1a
• Cisco Catalyst 3650 Series Switches
• Cisco Catalyst 3850 Series Switches
• Cisco Catalyst 9300 Series Switches
• Cisco Catalyst 9500 Series Switches
Cisco IOS XE Everest 16.5.1b
• Cisco 4000 Series Integrated Services Routers
Cisco IOS XE Everest 16.6.2
• Cisco Catalyst 9400 Series Switches
Cisco IOS XE Fuji 16.7.1
• Cisco ASR 1000 Aggregation Services Routers (ASR1001-X,
ASR1001-HX, ASR1002-X, ASR1002-HX)
Cisco IOS XE Fuji 16.8.1a
• Cisco Catalyst 9500-High Performance Series Switches
Cisco IOS XE Fuji 16.8.2
• Cisco ASR 1000 Series Aggregation Services Routers
(ASR1004, ASR1006, ASR1006-X, ASR1009-X, ASR1013)
Cisco IOS XE Gibraltar 16.12.1
• Cisco Catalyst 9200 Series Switches
Note
This feature is not supported on C9200L SKUs.
• Cisco Catalyst 9300L SKUs
• Cisco Catalyst 9600 Series Switches
• Cisco Catalyst 9800-40 Wireless Controllers
• Cisco Catalyst 9800-80 Wireless Controllers
Cisco IOS XE Amsterdam 17.2.1
• Cisco Cloud Services Router 1000V Series
• Cisco C1100 Terminal Services Gateway (Supported only on
C1100TGX-1N24P32A)
Cisco IOS XE Amsterdam 17.3.1
• Cisco Catalyst 8200 Series Edge Platforms
Programmability Configuration Guide, Cisco IOS XE Amsterdam 17.3.x
3
New and Changed Information
New and Changed Information
Page 18
Release & Platform
Feature
Cisco Catalyst 8300 Series Edge Platforms
•
Cisco IOS XE Fuji 16.8.1
• Cisco 4000 Series Integrated Services Routers
• Cisco Catalyst 3650 Series Switches
• Cisco Catalyst 3850 Series Switches
• Cisco Catalyst 9300 Series Switches
• Cisco Catalyst 9500 Series Switches
Cisco IOS XE Fuji 16.8.1a
• Cisco Catalyst 9500-High Performance Series Switches
Zero Touch Provisioning: HTTP
Download
Cisco IOS XE Fuji 16.9.1
• Cisco Catalyst 9300 Series Switches
• Cisco Catalyst 9500 Series Switches
Cisco IOS XE Amsterdam 17.3.2a
• Cisco Catalyst 9800-40 Wireless Controllers
• Cisco Catalyst 9800-80 Wireless Controllers
DHCPv6 Support for Zero-Touch
Provisioning
Cisco IOS XE Denali 16.3.2 and Cisco IOS XE Everest 16.5.1a
• Cisco Catalyst 3650 Series Switches
• Cisco Catalyst 3650 Series Switches
Cisco IOS XE Everest 16.6.1
• Cisco Catalyst 9300 Series Switches
• Cisco Catalyst 9500 Series Switches
Cisco IOS XE Everest 16.6.2
• Cisco Catalyst 9400 Series Switches
Cisco IOS XE Fuji 16.8.1a
• Cisco Catalyst 9500-High Performance Series Switches
Cisco IOS XE Fuji 16.9.2
• Cisco Catalyst 9200 Series Switches
Cisco IOS XE Gibraltar 16.11.1
• Cisco Catalyst 9600 Series Switches
iPXE
Programmability Configuration Guide, Cisco IOS XE Amsterdam 17.3.x
4
New and Changed Information
New and Changed Information
Page 19
Release & Platform
Feature
Shells and Scripting
Cisco IOS XE Everest 16.5.1a
• Cisco Catalyst 3650 Series Switches
• Cisco Catalyst 3850 Series Switches
• Cisco Catalyst 9300 Series Switches
• Cisco Catalyst 9500 Series Switches
Cisco IOS XE Everest 16.5.1b
• Cisco 4000 Series Integrated Services Routers
Cisco IOS XE Everest 16.6.2
• Cisco Catalyst 9400 Series Switches
Cisco IOS XE Fuji 16.7.1
• Cisco ASR 1000 Aggregation Services Routers (ASR1001-X,
ASR1001-HX, ASR1002-X, ASR1002-HX)
• Cisco Cloud Services Router 1000V Series
Cisco IOS XE Fuji 16.8.1
• Cisco Catalyst 9500-High Performance Series Switches
Cisco IOS XE Fuji 16.9.1
• Cisco 1000 Series Integrated Services Routers
Cisco IOS XE Gibraltar 16.11.1b
• Cisco Catalyst 9800-40 Wireless Controllers
• Cisco Catalyst 9800-80 Wireless Controllers
Cisco IOS XE Gibraltar 16.12.1
• Cisco Catalyst 9200 Series Switches
Note
This feature is not supported on C9200L SKUs.
• Cisco Catalyst 9300L SKUs
• Cisco Catalyst 9600 Series Switches
Cisco IOS XE Amsterdam 17.3.1
• Cisco Catalyst 8200 Series Edge Platforms
• Cisco Catalyst 8300 Series Edge Platforms
Guest Shell
Programmability Configuration Guide, Cisco IOS XE Amsterdam 17.3.x
5
New and Changed Information
New and Changed Information
Page 20
Release & Platform
Feature
Cisco IOS XE Amsterdam 17.1.1
• Cisco 1000 Series Integrated Services Routers
• Cisco ASR 1000 Aggregation Services Routers
(ASR1000-RP1, ASR1000-RP2, ASR1000-RP3, ASR1001-X,
ASR1001-HX, ASR1002-X, ASR1002-HX)
• Cisco Catalyst 9300 Series Switches
• Cisco Catalyst 9400 Series Switches
• Cisco Catalyst 9500 Series Switches
• Cisco Catalyst 9600 Series Switches
• Cisco ISR 4000 Series Integrated Services Routers
Python 3 Support in Guest Shell
Cisco IOS XE Everest 16.5.1a
• Cisco Catalyst 3650 Series Switches
• Cisco Catalyst 3850 Series Switches
• Cisco Catalyst 9300 Series Switches
• Cisco Catalyst 9500 Series Switches
Cisco IOS XE Everest 16.5.1b
• Cisco 4000 Series Integrated Services Routers
Cisco IOS XE Everest 16.6.2
• Cisco Catalyst 9400 Series Switches
Cisco IOS XE Fuji 16.7.1
• Cisco ASR 1000 Aggregation Services Routers (ASR1001-X,
ASR1001-HX, ASR1002-X, ASR1002-HX)
• Cisco Cloud Services Router 1000V Series
Cisco IOS XE Fuji 16.8.1a
• Cisco Catalyst 9500-High Performance Series Switches
Python APIs
Programmability Configuration Guide, Cisco IOS XE Amsterdam 17.3.x
6
New and Changed Information
New and Changed Information
Page 21
Release & Platform
Feature
Cisco IOS XE Everest 16.5.1a
• Cisco Catalyst 3650 Series Switches
• Cisco Catalyst 3850 Series Switches
• Cisco Catalyst 9300 Series Switches
• Cisco Catalyst 9500 Series Switches
Cisco IOS XE Everest 16.5.1b
• Cisco 4000 Series Integrated Services Routers
Cisco IOS XE Everest 16.6.2
• Cisco Catalyst 9400 Series Switches
Cisco IOS XE Fuji 16.7.1
• Cisco ASR 1000 Aggregation Services Routers (ASR1001-X,
ASR1001-HX, ASR1002-X, ASR1002-HX)
• Cisco Cloud Services Router 1000V Series
Cisco IOS XE Fuji 16.8.1
• Cisco 4000 Series Integrated Services Router models with a
minimum of 4 GB RAM.
• Cisco ASR 1000 Series Aggregation Services Routers
(ASR1004, ASR1006, ASR1006-X, ASR1009-X, ASR1013)
Cisco IOS XE Fuji 16.8.1a
• Cisco Catalyst 9500-High Performance Series Switches
Python CLI Module
Programmability Configuration Guide, Cisco IOS XE Amsterdam 17.3.x
7
New and Changed Information
New and Changed Information
Page 22
Release & Platform
Feature
Cisco IOS XE Everest 16.5.1a
• Cisco Catalyst 3650 Series Switches
• Cisco Catalyst 3850 Series Switches
• Cisco Catalyst 9300 Series Switches
• Cisco Catalyst 9500 Series Switches
Cisco IOS XE Everest 16.5.1b
• Cisco 4000 Series Integrated Services Routers
Cisco IOS XE Everest 16.6.2.
• Cisco Catalyst 9400 Series Switches
Cisco IOS XE Fuji 16.7.1
• Cisco ASR 1000 Aggregation Services Routers (ASR1001-X,
ASR1001-HX, ASR1002-X, ASR1002-HX)
• Cisco Cloud Services Router 1000V Series
Cisco IOS XE Fuji 16.8.1a
• Cisco Catalyst 9500-High Performance Series Switches
EEM Python Module
Model-Driven Programmability
Programmability Configuration Guide, Cisco IOS XE Amsterdam 17.3.x
8
New and Changed Information
New and Changed Information
Page 23
Release & Platform
Feature
NETCONF Protocol
Programmability Configuration Guide, Cisco IOS XE Amsterdam 17.3.x
9
New and Changed Information
New and Changed Information
Page 24
Release & Platform
Feature
Cisco IOS XE Denali 16.3.1
• Cisco 4000 Series Integrated Services Routers
• Cisco ASR 1000 Series Aggregation Services Routers
• Cisco Cloud Services Router 1000V Series
Cisco IOS XE Everest 16.5.1a
• Cisco Catalyst 3650 Series Switches
• Cisco Catalyst 3850 Series Switches
Cisco IOS XE Everest 16.6.2
• Cisco Catalyst 9300 Series Switches
• Cisco Catalyst 9400 Series Switches
• Cisco Catalyst 9500 Series Switches
Cisco IOS XE Fuji 16.8.1a
• Cisco 1000 Series Integrated Services Routers
• Cisco ASR 900 Series Aggregation Services Routers
• Cisco ASR 920 Series Aggregation Services Routers
• Cisco Catalyst 9500-High Performance Series Switches
• Cisco cBR-8 Converged Broadband Router
• Cisco Network Convergence System 4200 Series
Cisco IOS XE Fuji 16.9.2
• Cisco Catalyst 9200 and 9200L Series Switches
• Cisco Catalyst 9300L SKUs
Cisco IOS XE Gibraltar 16.10.1
• Cisco Catalyst 9800-40 Wireless Controllers
• Cisco Catalyst 9800-80 Wireless Controllers
• Cisco Network Convergence System 520 Series
Cisco IOS XE Gibraltar 16.11.1
• Cisco Catalyst 9600 Series Switches
Cisco IOS XE Gibraltar 16.12.1
• Cisco Catalyst 9800-L Wireless Controllers
Programmability Configuration Guide, Cisco IOS XE Amsterdam 17.3.x
10
New and Changed Information
New and Changed Information
Page 25
Release & Platform
Feature
Cisco IOS XE Amsterdam 17.3.1
• Cisco Catalyst 8200 Series Edge Platforms
• Cisco Catalyst 8300 Series Edge Platforms
Cisco IOS XE Fuji 16.8.1a
• Cisco 4000 Series Integrated Services Routers
• Cisco ASR 1000 Series Aggregation Services Routers
• Cisco ASR 900 Series Aggregation Services Routers
• Cisco Catalyst 3650 Series Switches
• Cisco Catalyst 3850 Series Switches
• Cisco Catalyst 9300 Series Switches
• Cisco Catalyst 9400 Series Switches
• Cisco Catalyst 9500 Series Switches
• Cisco cBR-8 Converged Broadband Router
• Cisco Cloud Services Router 1000V Series
Cisco IOS XE Gibraltar 16.11.1
• Cisco Catalyst 9500-High Performance Series Switches
NETCONF and RESTCONF IPv6
Support
Cisco IOS XE Fuji 16.8.1a
• Cisco 1100 Series Integrated Services Routers
• Cisco 4000 Series Integrated Services Routers
• Cisco ASR 1000 Series Aggregation Services Routers
• Cisco ASR 900 Series Aggregation Services Routers
• Cisco Catalyst 3650 Series Switches
• Cisco Catalyst 3850 Series Switches
• Cisco Catalyst 9300 Series Switches
• Cisco Catalyst 9400 Series Switches
• Cisco Catalyst 9500 Series Switches
• Cisco cBR-8 Converged Broadband Router
• Cisco Cloud Services Router 1000v Series
NETCONF Global Lock and Kill
Session
Programmability Configuration Guide, Cisco IOS XE Amsterdam 17.3.x
11
New and Changed Information
New and Changed Information
Page 26
Release & Platform
Feature
Cisco IOS XE Gibraltar 16.12.1
• Cisco 1000 Series Integrated Services Routers
• Cisco 4000 Series Integrated Services Routers
• Cisco ASR 900 Series Aggregation Services Routers
• Cisco ASR 920 Series Aggregation Services Routers
• Cisco ASR 1000 Aggregation Services Routers
• Cisco Catalyst 3650 Series Switches
• Cisco Catalyst 3850 Series Switches
• Cisco Catalyst 9200 Series Switches
• Cisco Catalyst 9300 Series Switches
• Cisco Catalyst 9400 Series Switches
• Cisco Catalyst 9500 Series Switches
• Cisco Catalyst 9600 Series Switches
• Cisco Catalyst 9800 Series Wireless Controllers
• Cisco cBR-8 Converged Broadband Router
• Cisco Cloud Services Router 1000V Series
• Cisco Network Convergence System 520 Series
• Cisco Network Convergence System 4200 Series
NETCONF-YANG SSH Server Support
Programmability Configuration Guide, Cisco IOS XE Amsterdam 17.3.x
12
New and Changed Information
New and Changed Information
Page 27
Release & Platform
Feature
Cisco IOS XE Everest 16.6.1
• Cisco 4000 Series Integrated Services Router
• Cisco ASR 1000 Aggregation Services Routers
• Cisco Cloud Services Router 1000V Series
Cisco IOS XE Fuji 16.8.1a
• Cisco 1000 Series Integrated Services Routers
• Cisco ASR 900 Series Aggregation Services Routers
• Cisco ASR 920 Series Aggregation Services Router
• Cisco Catalyst 3650 Series Switches
• Cisco Catalyst 3850 Series Switches
• Cisco Catalyst 9300 Series Switches
• Cisco Catalyst 9400 Series Switches
• Cisco Catalyst 9500 and 9500-High Performance Series
Switches
• Cisco cBR-8 Converged Broadband Router
• Cisco Network Convergence System 4200 Series
Cisco IOS XE Fuji 16.9.2
• Cisco Catalyst 9200 Series Switches
Cisco IOS XE Gibraltar 16.11.1
• Cisco Catalyst 9600 Series Switches
• Cisco Catalyst 9800-CL Wireless Controllers
• Cisco Catalyst 9800-40 Wireless Controllers
• Cisco Catalyst 9800-80 Wireless Controllers
• Cisco Network Convergence System 520 Series
Cisco IOS XE Gibraltar 16.12.1
• Cisco Catalyst 9800-L Wireless Controllers
Cisco IOS XE Amsterdam 17.3.1
• Cisco Catalyst 8200 Series Edge Platforms
• Cisco Catalyst 8300 Series Edge Platforms
RESTCONF Protocol
Programmability Configuration Guide, Cisco IOS XE Amsterdam 17.3.x
13
New and Changed Information
New and Changed Information
Page 28
Release & Platform
Feature
Cisco IOS XE Amsterdam 17.1.1
• Cisco 1000 Series Integrated Services Routers
• Cisco 4000 Series Integrated Services Routers
• Cisco ASR 900 Series Aggregation Services Routers
• Cisco ASR 1000 Aggregation Services Routers
(ASR1000-RP2, ASR1000-RP3, ASR1001-HX, ASR1001-X,
ASR1002-HX, ASR1002-X)
• Cisco Catalyst 9200 Series Switches
• Cisco Catalyst 9300 Series Switches
• Cisco Catalyst 9400 Series Switches
• Cisco Catalyst 9500 Series Switches
• Cisco cBR-8 Converged Broadband Router
• Cisco Cloud Services Router 1000V Series
• Cisco Network Convergence System 520 Series
• Cisco Network Convergence System 4200 Series
RESTCONF YANG-Patch Support
Cisco IOS XE Gibraltar 16.11.1
• Cisco ASR 900 Series Aggregation Services Routers
• Cisco ASR 920 Series Aggregated Services Routers
• Cisco Catalyst 3650 Series Switches
• Cisco Catalyst 3850 Series Switches
• Cisco Catalyst 9200 Series Switches
• Cisco Catalyst 9300 Series Switches
• Cisco Catalyst 9400 Series Switches
• Cisco Catalyst 9500 Series Switches
• Cisco Catalyst IE3200 Rugged Series
• Cisco Catalyst IE3300 Rugged Series
• Cisco Catalyst IE3400 Rugged Series
• Cisco Embedded Services 3300 Series Switches
• Cisco IR1101 Integrated Services Router Rugged
• Cisco Network Convergence System 4200 Series
• Cisco Network Convergence System 520 Series
NETCONF and RESTCONF
Service-Level ACLs
Programmability Configuration Guide, Cisco IOS XE Amsterdam 17.3.x
14
New and Changed Information
New and Changed Information
Page 29
Release & Platform
Feature
Cisco IOS XE Fuji 16.8.1a
• Cisco Catalyst 9300 Series Switches
• Cisco Catalyst 9400 Series Switches
• Cisco Catalyst 9500 Series Switches
Cisco IOS XE Gibraltar 16.10.1
• Cisco Catalyst 9500-High Performance Series Switches
Cisco IOS XE Gibraltar 16.11.1
• Cisco Catalyst 9600 Series Switches
Cisco IOS XE Gibraltar 16.12.1
• Cisco Catalyst 9200 and 9200L Series Switches
• Cisco Catalyst 9300L SKUs
• Cisco cBR-8 Converged Broadband Router
Cisco IOS XE Amsterdam 17.1.1
• Cisco ASR 900 Series Aggregation Services Routers
• Cisco ASR 920 Series Aggregation Services Router
• Cisco Network Convergence System 520 Series
• Cisco Network Convergence System 4200 Series
Cisco IOS XE Amsterdam 17.2.1r
• Cisco ASR 1000 Series Aggregation Services Routers
gNMI Protocol
Programmability Configuration Guide, Cisco IOS XE Amsterdam 17.3.x
15
New and Changed Information
New and Changed Information
Page 30
Release & Platform
Feature
Cisco IOS XE Gibraltar 16.12.1
• Cisco Catalyst 9200 Series Switches
• Cisco Catalyst 9300 Series Switches
• Cisco Catalyst 9400 Series Switches
• Cisco Catalyst 9500 Series Switches
• Cisco Catalyst 9600 Series Switches
• Cisco Catalyst IE3200 Rugged Series
• Cisco Catalyst IE3200 Rugged Series
• Cisco Catalyst IE3300 Rugged Series
• Cisco Catalyst IE3400 Rugged Series
• Cisco Embedded Service 3300 Series Switches
gNMI Username and Password
Authentication
Cisco IOS XE Amsterdam 17.3.1
• Cisco Catalyst 9200 Series Switches
• Cisco Catalyst 9300 Series Switches
• Cisco Catalyst 9400 Series Switches
• Cisco Catalyst 9500 Series Switches
• Cisco Catalyst 9600 Series Switches
gRPC Network Operations Interface:
gNOI Certificate Management & gNOI
Bootstrapping with Certificate Service
Programmability Configuration Guide, Cisco IOS XE Amsterdam 17.3.x
16
New and Changed Information
New and Changed Information
Page 31
Release & Platform
Feature
Cisco IOS XE Fuji 16.8.1
• Cisco 1000 Series Integrated Services Routers
• Cisco 4000 Series Integrated Services Routers
• Cisco ASR 1000 Series Aggregation Services Routers
• Cisco ASR 900 Series Aggregation Services Routers
• Cisco ASR 920 Series Aggregation Services Routers
• Cisco Cloud Services Router 1000v Series
• Cisco Network Convergence System 4200
Cisco IOS XE Fuji 16.8.1a
• Cisco Catalyst 3650 Series Switches
• Cisco Catalyst 3850 Series Switches
• Cisco Catalyst 9300 Series Switches
• Cisco Catalyst 9400 Series Switches
• Cisco Catalyst 9500 Series Switches
Model-Based AAA
Programmability Configuration Guide, Cisco IOS XE Amsterdam 17.3.x
17
New and Changed Information
New and Changed Information
Page 32
Release & Platform
Feature
Model-Driven Telemetry NETCONF
Dial-In
Programmability Configuration Guide, Cisco IOS XE Amsterdam 17.3.x
18
New and Changed Information
New and Changed Information
Page 33
Release & Platform
Feature
Cisco IOS XE Everest 16.6.1
• Cisco Catalyst 3650 Series Switches
• Cisco Catalyst 3850 Series Switches
• Cisco Catalyst 9300 Series Switches
• Cisco Catalyst 9500 Series Switches
Cisco IOS XE Everest 16.6.2
• Cisco Catalyst 9400 Series Switches
Cisco IOS XE Fuji 16.7.1
• Cisco 4000 Series Integrated Services Routers
• Cisco ASR 1000 Aggregation Services Routers (ASR1001-HX,
ASR1001-X, ASR1002-HX, ASR1002-X
Cisco IOS XE Fuji 16.8.1
• Cisco 1000 Series Integrated Services Routers
• Cisco ASR 1000 RP2 and RP3 Series Aggregation Services
Routers
Cisco IOS XE Fuji 16.8.1a
• Cisco Catalyst 9500-High Performance Series Switches
Cisco IOS XE Fuji 16.9.1
• Cisco ASR 900 Series Aggregation Services Routers
• Cisco ASR 920 Series Aggregation Services Router
• Cisco cBR-8 Converged Broadband Router
• Cisco Network Convergence System 4200 Series
Cisco IOS XE Fuji 16.9.2
• Cisco Catalyst 9200 and 9200L Series Switches
• Cisco Catalyst 9300L SKUs
Cisco IOS XE Gibraltar 16.10.1
• Cisco Cloud Services Router 1000v
• Cisco Network Convergence System 520 Series
Cisco IOS XE Gibraltar 16.11.1
• Cisco Catalyst 9600 Series Switches
Programmability Configuration Guide, Cisco IOS XE Amsterdam 17.3.x
19
New and Changed Information
New and Changed Information
Page 34
Release & Platform
Feature
Cisco IOS XE Amsterdam 17.3.1
• Cisco Catalyst 8200 Series Edge Platforms
• Cisco Catalyst 8300 Series Edge Platforms
Cisco IOS XE Gibraltar 16.10.1
• Cisco 1000 Series Integrated Services Routers
• Cisco 4000 Series Integrated Services Routers
• Cisco ASR 1000 Series Aggregation Services Routers
• Cisco ASR 900 Series Aggregation Services Routers
• Cisco ASR 920 Series Aggregated Services Router
• Cisco Catalyst 9200 and 9200L Series Switches
• Cisco Catalyst 9300 and 9300L Series Switches
• Cisco Catalyst 9400 Series Switches
• Cisco Catalyst 9500 and 9500-High Performance Series
Switches
• Cisco cBR-8 Converged Broadband Router
• Cisco Cloud Services Router 1000V Series
• Cisco Network Convergence System 520 Series
• Cisco Network Convergence System 4200 Series
Cisco IOS XE Gibraltar 16.11.1
• Cisco Catalyst 9600 Series Switches
Cisco IOS XE Amsterdam 17.3.1
• Cisco Catalyst 8200 Series Edge Platforms
• Cisco Catalyst 8300 Series Edge Platforms
Model-Driven Telemetry gRPC
Dial-out
Programmability Configuration Guide, Cisco IOS XE Amsterdam 17.3.x
20
New and Changed Information
New and Changed Information
Page 35
Release & Platform
Feature
Cisco IOS XE Gibraltar 16.12.1
• Cisco Catalyst 9200 and 9200L Series Switches
• Cisco Catalyst 9300 and 9300L Series Switches
• Cisco Catalyst 9400 Series Switches
• Cisco Catalyst 9500 and 9500-High Performance Series
Switches
• Cisco Catalyst 9600 Series Switches
• Cisco cBR-8 Converged Broadband Router
Cisco IOS XE Amsterdam 17.1.1
• Cisco ASR 900 Series Aggregation Services Routers
• Cisco ASR 920 Series Aggregated Services Router
• Cisco Network Convergence System 520 Series
• Cisco Network Convergence System 4200 Series
Cisco IOS XE Amsterdam 17.2.1
• Cisco ASR 1000 Series Aggregation Services Routers
Cisco IOS XE Amsterdam 17.3.1
• Cisco ASR 1000 Series Aggregation Services Routers
Model-Driven Telemetry gNMI Dial-In
Programmability Configuration Guide, Cisco IOS XE Amsterdam 17.3.x
21
New and Changed Information
New and Changed Information
Page 36
Release & Platform
Feature
Cisco IOS XE Amsterdam 17.1.1
• Cisco 1000 Series Integrated Services Routers
• Cisco 4000 Series Integrated Services Routers
• Cisco ASR 900 Series Aggregation Services Routers
• Cisco ASR 1000 Series Aggregation Services Routers
ASR1000-RP1, ASR1000-RP2, ASR1000-RP3, ASR1001-HX,
ASR1001-X, ASR1002-HX, ASR1002-X)
• Cisco Catalyst 9200 Series Switches
• Cisco Catalyst 9300 Series Switches
• Cisco Catalyst 9400 Series Switches
• Cisco Catalyst 9500 and 9500-High Performance Series
Switches
• Cisco Catalyst 9600 Series Switches
• Cisco cBR-8 Converged Broadband Router
• Cisco Cloud Services Router 1000V Series
• Cisco Catalyst IE3200 Rugged Series
• Cisco Catalyst IE3300 Rugged Series
• Cisco Catalyst IE3400 Rugged Series
• Cisco IR1101 Integrated Services Router Rugged
• Cisco Network Convergence System 520 Series
• Cisco Network Convergence System 4200 Series
TLS for gRPC Dial-Out
Cisco IOS XE Amsterdam 17.2.1
• Cisco 4000 Series Integrated Services Routers
• Cisco Catalyst 9200 Series Switches
• Cisco Catalyst 9300 Series Switches
• Cisco Catalyst 9400 Series Switches
• Cisco Catalyst 9500 Series Switches
TLDP On-Change Notifications
Programmability Configuration Guide, Cisco IOS XE Amsterdam 17.3.x
22
New and Changed Information
New and Changed Information
Page 37
Release & Platform
Feature
Cisco IOS XE Gibraltar 16.11.1
• Cisco ASR 900 Series Aggregation Services Routers
• Cisco ASR 920 Series Aggregated Services Routers
• Cisco Catalyst 3650 Series Switches
• Cisco Catalyst 3850 Series Switches
• Cisco Catalyst 9200 Series Switches
• Cisco Catalyst 9300 Series Switches
• Cisco Catalyst 9400 Series Switches
• Cisco Catalyst 9500 Series Switches
• Cisco IR1101 Integrated Services Router Rugged
• Cisco Network Convergence System 4200 Series
• Cisco Network Convergence System 520 Series
Cisco IOS XE Gibraltar 16.11.1a
• Cisco 1000 Series Integrated Services Routers
• Cisco 4000 Series Integrated Services Routers
• Cisco ASR 1000 Series Aggregation Services Routers
• Cisco ASR 900 Series Aggregation Services Routers
• Cisco ASR 920 Series Aggregation Services Routers
• Cisco Cloud Services Router 1000V Series
Kill Telemetry Subscription
Programmability Configuration Guide, Cisco IOS XE Amsterdam 17.3.x
23
New and Changed Information
New and Changed Information
Page 38
Release & Platform
Feature
Cisco IOS XE Everest 16.5.1a
• Cisco Catalyst 9300 Series Switches
• Cisco Catalyst 9500 Series Switches
Cisco IOS XE Everest 16.5.1b
• Cisco 4000 Series Integrated Services Routers
Cisco IOS XE Everest 16.6.1
• Cisco Catalyst 3650 Series Switches
• Cisco Catalyst 3850 Series Switches
Cisco IOS XE Everest 16.6.2
• Cisco Catalyst 9400 Series Switches
Cisco IOS XE Fuji 16.7.1
• Cisco ASR 1000 Aggregation Services Routers
Cisco IOS XE Fuji 16.8.1a
• Cisco Catalyst 9500-High Performance Series Switches.
In-Service Model Updates
Application Hosting
Cisco IOS XE Gibraltar 16.12.1
• Cisco Catalyst 9300 Series Switches
Cisco IOS XE Amsterdam 17.1.1
• Cisco Catalyst 9400 Series Switches
Cisco IOS XE Amsterdam 17.2.1
• Cisco Catalyst 9500-High Performance Series Switches
• Cisco Catalyst 9600 Series Switches
Application Hosting
Cisco IOS XE Gibraltar 16.12.1
• Cisco Catalyst 9300 Series Switches
Cisco IOS XE Amsterdam 17.1.1
• Cisco Catalyst 9400 Series Switches
Note
Cisco Catalyst 9410R Switch does not support front-panel
application-hosting.
Application Hosting: Front-Panel
Network Port Access
Programmability Configuration Guide, Cisco IOS XE Amsterdam 17.3.x
24
New and Changed Information
New and Changed Information
Page 39
Release & Platform
Feature
Cisco IOS XE Gibraltar 16.12.1
• Cisco Catalyst 9300 Series Switches
Cisco IOS XE Amsterdam 17.1.1
• Cisco Catalyst 9400 Series Switches
Note
Cisco Catalyst 9410R Switch does not support front-panel
application-hosting.
Application Hosting: Front-Panel USB
Port Access
Cisco IOS XE Amsterdam 17.3.3
• Cisco Catalyst 9300 and 9300-L Series Switches
Application Hosting: ThousandEyes
Integration
Cisco IOS XE Amsterdam 17.2.1
• Cisco Catalyst 9300 Series Switches
Native Docker Container: Application
Auto-Restart
OpenFlow
Cisco IOS XE Fuji 16.9.1
• Cisco Catalyst 9300 Series Switches
• Cisco Catalyst 9400 Series Switches
• Cisco Catalyst 9500 Series Switches and Cisco Catalyst
9500-High Performance Series Switches
OpenFlow
Cisco IOS XE Gibraltar 16.12.1
• Catalyst 9300 Series Switches
• Catalyst 9400 Series Switches
OpenFlow Power over Ethernet
Programmability Configuration Guide, Cisco IOS XE Amsterdam 17.3.x
25
New and Changed Information
New and Changed Information
Page 40
Programmability Configuration Guide, Cisco IOS XE Amsterdam 17.3.x
26
New and Changed Information
New and Changed Information
Page 41
P A R T I
Provisioning
• Zero-Touch Provisioning, on page 29
• iPXE, on page 65

Page 42
Page 43
C H A P T E R 2
Zero-Touch Provisioning
To address network provisioning challenges, Cisco introduces a zero-touch provisioning model. This module
describes the Zero-Touch Provisioning feature.
The Zero-Touch Provisioning feature is enabled automatically; no configuration is required.
Note
• Restrictions for Zero-Touch Provisioning, on page 29
• Information About Zero-Touch Provisioning, on page 29
• Sample Zero-Touch Provisioning Configurations, on page 31
• Feature Information for Zero-Touch Provisioning, on page 60
Restrictions for Zero-Touch Provisioning
Zero-Touch Provisioning is not supported on Cisco Catalyst 9200L SKUs.
Information About Zero-Touch Provisioning
Zero-Touch Provisioning Overview
Zero-Touch Provisioning provides open bootstrap interfaces to automate network device provisioning in
heterogeneous network environments.
When a device that supports Zero-Touch Provisioning boots up, and does not find the startup configuration
(during initial installation), the device enters the Zero-Touch Provisioning mode. The device searches for a
Dynamic Host Control Protocol (DHCP) server, bootstraps itself with its interface IP address, gateway, and
Domain Name System (DNS) server IP address, and enables Guest Shell. The device then obtains the IP
address or URL of an HTTP/TFTP server, and downloads the Python script from an HTTP/TFTP server to
configure the device.
Guest Shell provides the environment for the Python script to run. Guest Shell executes the downloaded
Python script and applies an initial configuration to the device.
After initial provisioning is complete, Guest Shell remains enabled. For more information, see the Guest Shell
chapter.
Programmability Configuration Guide, Cisco IOS XE Amsterdam 17.3.x
29


Page 44
In case Zero-Touch Provisioning fails, the device falls back to AutoInstall to load configuration files. For
more information, see Using AutoInstall and Setup.
Note
DHCP Server Configuration for Zero-Touch Provisioning
In ZTP, a DHCP server must be running on the same network as the new device that is being provisioned.
ZTP is supported on both management ports and in-band ports.
When the new device is switched on, it retrieves the IP address information of the HTTP or TFTP server
where the Python script resides, and the folder path of the Python script from the DHCP server. For more
information on Python Scripts, see the Python API chapter.
The DHCP server responds to DHCP discovery events with the following options:
• Option 150: (Optional) Contains a list of IP addresses that point to the HTTP or TFTP server in the
management network that hosts the Python scripts to be run.
• Option 67: Contains the Python script file path in the HTTP/TFTP server.
After receiving these DHCP options, the device connects to the HTTP or TFTP server, and downloads the
Python script. At this point, because the device does not have a route to reach the HTTP or TFTP server, it
uses the default route provided by the DHCP server.
DHCP Client Behavior
From Cisco IOS XE Amsterdam 17.2.1 release onwards, the device product identification (PID), Cisco
Network Plug and Play (PnP), the serial number, and the MAC address is set in the DHCP client options.
These client options can be used as variables at the DHCP server. The DHCP client options can be used to
identify the device and send a unique Python file through option 67 or boot filename.
Table 2: DHCP Client Options
DHCPv6
DHCPv4
Device Information
16/toggles
124
Product ID
16/toggles
61/toggles
Serial number
1
61/toggles
MAC address
15
60
Cisco Network PnP
DHCPv6 Support
In Cisco IOS XE Fuji 16.9.1, Dynamic Host Control Protocol Version 6 (DHCPv6) support is added to the
Zero-touch provisioning feature. DHCPv6 is enabled by default, and will work on any device that boots
without a startup configuration.
Programmability Configuration Guide, Cisco IOS XE Amsterdam 17.3.x
30
Provisioning
DHCP Server Configuration for Zero-Touch Provisioning

Page 45
DHCPv6 is only supported on Catalyst 9300 and 9500 Series Switches.
Note
DHCPv6 is supported by both TFTP and HTTP download of Python scripts. If the HTTP or TFTP download
of Python scripts fail, the device will revert to the start (without any configuration). For both DHCPv4, and
DHCPv6 to work, the correct HTTP file path must be available in the DHCP configuration.
There can be scenarios where the same interface can have both IPv4 and IPv6 addresses, or two different
interfaces in the network - one can receive IPv4 traffic and the other IPv6 traffic. We recommend that you
use either the DHCPv4 or DHCPv6 option in your deployment.
The following is a sample DHCPv4: /etc/dhcp/dhcpd.conf:
host <hostname> {
hardware ethernet xx:xx:xx:xx:xx:xx;
option dhcp-client-identifier "xxxxxxxxxxxxxx";
option host-name "<hostname>".
option log-servers x.x.x.x;
fixed-address x.x.x.x;
if option vendor-class-identifier = "..." {
option vendor-class-identifier "...";
if exists user-class and option user-class = "iPXE" {
filename "http://x.x.x.x/…/<image>";
} else {
filename "http://x.x.x.x/…/<script-name>";
}
}
}
The following is a sample ISC DHCPv6 server configuration:
option dhcp6.bootfile-url
"http://[2001:DB8::21]/sample_day0_script.py";
Sample Zero-Touch Provisioning Configurations
Sample DHCP Server Configuration on a Management Port Using TFTP Copy
The following is a sample DHCP server configuration using TFTP copy, when connected via the management
port on a device:
Device> enable
Device# configure terminal
Device(config)# ip dhcp excluded-address 10.1.1.1
Device(config)# ip dhcp excluded-address vrf Mgmt-vrf 10.1.1.1 10.1.1.10
Device(config)# ip dhcp pool pnp_device_pool
Device(config-dhcp)# vrf Mgmt-vrf
Device(config-dhcp)# network 10.1.1.0 255.255.255.0
Device(config-dhcp)# default-router 10.1.1.1
Device(config-dhcp)# option 150 ip 203.0.113.254
Device(config-dhcp)# option 67 ascii /sample_python_dir/python_script.py
Device(config-dhcp)# exit
Device(config)# interface gigabitethernet 1/0/2
Device(config-if)# no ip dhcp client request tftp-server-address
Programmability Configuration Guide, Cisco IOS XE Amsterdam 17.3.x
31
Provisioning
Sample Zero-Touch Provisioning Configurations

Page 46
Device(config-if)# end
Sample DHCP Server Configuration on a Management Port Using HTTP Copy
The following is a sample DHCP server configuration using HTTP copy, when connected via the
management port on a device:
Device> enable
Device# configure terminal
Device(config)# ip dhcp pool pnp_device_pool
Device(config-dhcp)# vrf Mgmt-vrf
Device(config-dhcp)# network 10.1.1.0 255.255.255.0
Device(config-dhcp)# default-router 10.1.1.1
Device(config-dhcp)# option 67 ascii http://198.51.100.1:8000/sample_python_2.py
Device(config-dhcp)# end
Sample DHCP Server Configuration on an In-Band Port Using TFTP Copy
The following is a sample DHCP server configuration using TFTP copy, when connected via the in-band port
on a device:
Device> enable
Device# configure terminal
Device(config)# ip dhcp excluded-address 10.1.1.1
Device(config)# ip dhcp pool pnp_device_pool
Device(config-dhcp)# network 10.1.1.0 255.255.255.0
Device(config-dhcp)# default-router 10.1.1.1
Device(config-dhcp)# option 150 ip 203.0.113.254
Device(config-dhcp)# option 67 ascii /sample_python_dir/python_script.py
Device(config-dhcp)# exit
Device(config)# interface gigabitethernet 1/0/2
Device(config-if)# no ip dhcp client request tftp-server-address
Device(config-if)# end
Sample DHCP Server Configuration on an In-Band Port Using HTTP Copy
The following is a sample DHCP server configuration using HTTP copy, when connected via the
in-band port on a device:
Device> enable
Device# configure terminal
Device(config)# ip dhcp excluded-address 10.1.1.1
Device(config)# ip dhcp pool pnp_device_pool
Device(config-dhcp)# network 10.1.1.0 255.255.255.0
Device(config-dhcp)# default-router 10.1.1.1
Device(config-dhcp)# option 67 ascii http://192.0.2.1:8000/sample_python_2.py
Device(config-dhcp)# end
Programmability Configuration Guide, Cisco IOS XE Amsterdam 17.3.x
32
Provisioning
Sample DHCP Server Configuration on a Management Port Using HTTP Copy
Page 47
Sample DHCP Server Configuration on a Linux Ubuntu Device
The following sample DHCP server configuration displays that the server is either connected to the management
port or in-band port on a device, and a Python script is copied from a TFTP server.
root@ubuntu-server:/etc/dhcp# more dhcpd.conf
subnet 10.1.1.0 netmask 255.255.255.0 {
range 10.1.1.2
10.1.1.255;
host 3850 {
fixed-address
10.1.1.246 ;
hardware ethernet
CC:D8:C1:85:6F:00;
option bootfile-name !<opt 67>
" /python_dir/python_script.py";
option tftp-server-name !<opt 150>
"203.0.113.254";
}
}
The following sample DHCP configuration shows that a Python script is copied from an HTTP server to the
device:
Day0_with_mgmt_port_http
subnet 192.168.1.0 netmask 255.255.255.0 {
range 192.168.1.2 192.168.1.255;
host C2-3850 {
fixed-address
192.168.1.246 ;
hardware ethernet
CC:D8:C1:85:6F:00;
option bootfile-name
"http://192.168.1.46/sample_python_2.py";
}
}
Once the DHCP server is running, boot a management-network connected device, and the rest of the
configuration is automatic.
Sample DHCPv6 Server Configuration on a Management Port Using TFTP Copy
The following is a sample DHCPv6 server configuration using TFTP copy, when connected via the
management port on a device:
Device> enable
Device# configure terminal
Device(config)# ipv6 dhcp pool ztp
Device(config-dhcpv6)# address prefix 2001:DB8::1/64
Device(config-dhcpv6)# domain-name cisco.com
Device(config-dhcpv6)# bootfile-url tftp://[2001:db8::46]/sample_day0_script.py
Device(config-dhcpv6)# exit
Device(config)# interface vlan 20
Device(config-if)# ipv6 dhcp server ztp
Device(config-if)# end
Programmability Configuration Guide, Cisco IOS XE Amsterdam 17.3.x
33
Provisioning
Sample DHCP Server Configuration on a Linux Ubuntu Device
Page 48
Sample Python Provisioning Script
The following is a sample Python script can be used from either an HTTP or a TFTP server:
print "\n\n *** Sample ZTP Day0 Python Script *** \n\n"
Importing cli module
import cli
print "\n\n *** Executing show platform
*** \n\n"
cli_command = "show platform"
cli.executep(cli_command)
print "\n\n *** Executing show version *** \n\n"
cli_command = "show version"
cli.executep(cli_command)
print "\n\n *** Configuring a Loopback Interface *** \n\n"
cli.configurep(["interface loop 100", "ip address 10.10.10.10 255.255.255.255", "end"])
print "\n\n *** Executing show ip interface brief
*** \n\n"
cli_command = "sh ip int brief"
cli.executep(cli_command)
print "\n\n *** ZTP Day0 Python Script Execution Complete *** \n\n"
Boot Log for Cisco 4000 Series Integrated Services Routers
The following sample Zero-Touch Provisioning boot log displays that Guest Shell is successfully enabled,
the Python script is downloaded to the Guest Shell, and the Guest Shell executes the downloaded Python
script and configures the device for Day Zero.
% failed to initialize nvram
! <This message indicates that the startup configuration
is absent on the device. This is the first indication that the Day Zero work flow is
going to start.>
This product contains cryptographic features and is subject to United
States and local country laws governing import, export, transfer and
use. Delivery of Cisco cryptographic products does not imply
third-party authority to import, export, distribute or use encryption.
Importers, exporters, distributors and users are responsible for
compliance with U.S. and local country laws. By using this product you
agree to comply with applicable laws and regulations. If you are unable
to comply with U.S. and local laws, return this product immediately.
A summary of U.S. laws governing Cisco cryptographic products may be found at:
http://www.cisco.com/wwl/export/crypto/tool/stqrg.html
If you require further assistance please contact us by sending email to
export@cisco.com.
cisco ISR4451-X/K9 (2RU) processor with 7941237K/6147K bytes of memory.
Processor board ID FJC1950D091
4 Gigabit Ethernet interfaces
Programmability Configuration Guide, Cisco IOS XE Amsterdam 17.3.x
34
Provisioning
Sample Python Provisioning Script
Page 49
32768K bytes of non-volatile configuration memory.
16777216K bytes of physical memory.
7341807K bytes of flash memory at bootflash:.
0K bytes of WebUI ODM Files at webui:.
%INIT: waited 0 seconds for NVRAM to be available
--- System Configuration Dialog ---
Would you like to enter the initial configuration dialog? [yes/no]: %
!!<DO NOT TOUCH. This is Zero-Touch Provisioning>>
Generating 2048 bit RSA keys, keys will be non-exportable...
[OK] (elapsed time was 1 seconds)
The process for the command is not responding or is otherwise unavailable
The process for the command is not responding or is otherwise unavailable
The process for the command is not responding or is otherwise unavailable
The process for the command is not responding or is otherwise unavailable
The process for the command is not responding or is otherwise unavailable
The process for the command is not responding or is otherwise unavailable
The process for the command is not responding or is otherwise unavailable
The process for the command is not responding or is otherwise unavailable
The process for the command is not responding or is otherwise unavailable
The process for the command is not responding or is otherwise unavailable
Guestshell enabled successfully
*** Sample ZTP Day0 Python Script ***
*** Configuring a Loopback Interface ***
Line 1 SUCCESS: interface loop 100
Line 2 SUCCESS: ip address 10.10.10.10 255.255.255.255
Line 3 SUCCESS: end
*** Executing show ip interface brief
Interface
IP-Address
OK? Method Status
Protocol
GigabitEthernet0/0/0
unassigned
YES unset
down
down
GigabitEthernet0/0/1
unassigned
YES unset
down
down
GigabitEthernet0/0/2
unassigned
YES unset
down
down
GigabitEthernet0/0/3
192.168.1.246
YES DHCP
up
up
GigabitEthernet0
192.168.1.246
YES DHCP
up
up
Loopback100
10.10.10.10
YES TFTP
up
up
*** ZTP Day0 Python Script Execution Complete ***
Press RETURN to get started!
The Day Zero provisioning is complete, and the IOS prompt is accessible.
Programmability Configuration Guide, Cisco IOS XE Amsterdam 17.3.x
35
Provisioning
Boot Log for Cisco 4000 Series Integrated Services Routers
Page 50
Boot Log for Cisco Catalyst 9000 Series Switches
The following sections displays sample Zero-Touch Provisioning boot logs. These logs shows that Guest
Shell is successfully enabled, the Python script is downloaded to the Guest Shell, and the Guest Shell executes
the downloaded Python script and configures the device for Day Zero.
% Checking backup nvram
% No config present. Using default config
FIPS: Flash Key Check : Begin
FIPS: Flash Key Check : End, Not Found, FIPS Mode Not Enabled
! <This message indicates that the startup configuration
is absent on the device. This is the first indication that the Day Zero
work flow is
going to start.>
Cisco IOS XE Everest 16.6.x to Cisco IOS XE Fuji 16.8.x
This section displays the sample boot logs before the .py script is run:
Press RETURN to get started!
The process for the command is not responding or is otherwise unavailable
The process for the command is not responding or is otherwise unavailable
The process for the command is not responding or is otherwise unavailable
The process for the command is not responding or is otherwise unavailable
The process for the command is not responding or is otherwise unavailable
*** Sample ZTP Day0 Python Script ***
...
*** ZTP Day0 Python Script Execution Complete ***
The section shows how to configure the device for Day Zero provisioning:
Initializing Hardware...
System Bootstrap, Version 17.2.1r[FC1], RELEASE SOFTWARE (P)
Compiled Thu 02/20/2020 23:47:51.50 by rel
Current ROMMON image : Primary
Last reset cause
: SoftwareReload
C9300-48UXM platform with 8388608 Kbytes of main memory
Preparing to autoboot. [Press Ctrl-C to interrupt]
0
boot: attempting to boot from [flash:cat9k_iosxe.16.06.05.SPA.bin]
boot: reading file cat9k_iosxe.16.06.05.SPA.bin
##################################################################################################
Both links down, not waiting for other switches
Switch number is 1
Programmability Configuration Guide, Cisco IOS XE Amsterdam 17.3.x
36
Provisioning
Boot Log for Cisco Catalyst 9000 Series Switches
Page 51
Restricted Rights Legend
Use, duplication, or disclosure by the Government is
subject to restrictions as set forth in subparagraph
(c) of the Commercial Computer Software - Restricted
Rights clause at FAR sec. 52.227-19 and subparagraph
(c) (1) (ii) of the Rights in Technical Data and Computer
Software clause at DFARS sec. 252.227-7013.
cisco Systems, Inc.
170 West Tasman Drive
San Jose, California 95134-1706
Cisco IOS Software [Everest], Catalyst L3 Switch Software (CAT9K_IOSXE),
Version 16.6.5, RELEASE SOFTWARE (fc3)
Technical Support: http://www.cisco.com/techsupport
Copyright (c) 1986-2018 by Cisco Systems, Inc.
Compiled Mon 10-Dec-18 12:52 by mcpre
Cisco IOS-XE software, Copyright (c) 2005-2018 by cisco Systems, Inc.
All rights reserved.
Certain components of Cisco IOS-XE software are
licensed under the GNU General Public License ("GPL") Version 2.0.
The
software code licensed under GPL Version 2.0 is free software that comes
with ABSOLUTELY NO WARRANTY.
You can redistribute and/or modify such
GPL code under the terms of GPL Version 2.0.
For more details, see the
documentation or "License Notice" file accompanying the IOS-XE software,
or the applicable URL provided on the flyer accompanying the IOS-XE
software.
% Checking backup nvram
% No config present. Using default config
FIPS: Flash Key Check : Begin
FIPS: Flash Key Check : End, Not Found, FIPS Mode Not Enabled
This product contains cryptographic features and is subject to United
States and local country laws governing import, export, transfer and
use. Delivery of Cisco cryptographic products does not imply
third-party authority to import, export, distribute or use encryption.
Importers, exporters, distributors and users are responsible for
compliance with U.S. and local country laws. By using this product you
agree to comply with applicable laws and regulations. If you are unable
to comply with U.S. and local laws, return this product immediately.
A summary of U.S. laws governing Cisco cryptographic products may be found at:
http://www.cisco.com/wwl/export/crypto/tool/stqrg.html
If you require further assistance please contact us by sending email to
export@cisco.com.
cisco C9300-48UXM (X86) processor with 1392780K/6147K bytes of memory.
Processor board ID FCW2144L045
2048K bytes of non-volatile configuration memory.
8388608K bytes of physical memory.
1638400K bytes of Crash Files at crashinfo:.
11264000K bytes of Flash at flash:.
0K bytes of WebUI ODM Files at webui:.
Programmability Configuration Guide, Cisco IOS XE Amsterdam 17.3.x
37
Provisioning
Boot Log for Cisco Catalyst 9000 Series Switches
Page 52
Base Ethernet MAC Address
: ec:1d:8b:0a:68:00
Motherboard Assembly Number
: 73-17959-06
Motherboard Serial Number
: FOC21418FPQ
Model Revision Number
: B0
Motherboard Revision Number
: A0
Model Number
: C9300-48UXM
System Serial Number
: FCW2144L045
%INIT: waited 0 seconds for NVRAM to be available
SETUP: new interface Vlan1 placed in "shutdown" state
Press RETURN to get started!
*Sep
4 20:35:07.330: %SMART_LIC-6-AGENT_READY: Smart Agent for Licensing is initialized
*Sep
4 20:35:07.493: %IOSXE_RP_NV-3-NV_ACCESS_FAIL: Initial read of NVRAM contents failed
*Sep
4 20:35:07.551: %IOSXE_RP_NV-3-BACKUP_NV_ACCESS_FAIL: Initial read of backup NVRAM
contents failed
*Sep
4 20:35:10.932: dev_pluggable_optics_selftest attribute table internally inconsistent
@ 0x1D4
*Sep
4 20:35:13.406: %CRYPTO-4-AUDITWARN: Encryption audit check could not be performed
*Sep
4 20:35:13.480: %SPANTREE-5-EXTENDED_SYSID: Extended SysId enabled for type vlan
*Sep
4 20:35:13.715: %LINK-3-UPDOWN: Interface Lsmpi18/3, changed state to up
*Sep
4 20:35:13.724: %LINK-3-UPDOWN: Interface EOBC18/1, changed state to up
*Sep
4 20:35:13.724: %LINEPROTO-5-UPDOWN: Line protocol on Interface LI-Null0, changed
state to up
*Sep
4 20:35:13.724: %LINK-3-UPDOWN: Interface GigabitEthernet0/0, changed state to down
*Sep
4 20:35:13.725: %LINK-3-UPDOWN: Interface LIIN18/2, changed state to up
*Sep
4 20:35:13.749: WCM-PKI-SHIM: buffer allocation failed for SUDI support check
*Sep
4 20:35:13.749: PKI/SSL unable to send Sudi support to WCM
*Sep
4 20:35:14.622: %IOSXE_MGMTVRF-6-CREATE_SUCCESS_INFO: Management vrf Mgmt-vrf created
with ID 1,
ipv4 table-id 0x1, ipv6 table-id 0x1E000001
*Sep
4 20:34:42.022: %STACKMGR-6-STACK_LINK_CHANGE: Switch 1 R0/0: stack_mgr:
Stack port
1 on Switch 1 is nocable
*Sep
4 20:34:42.022: %STACKMGR-6-STACK_LINK_CHANGE: Switch 1 R0/0: stack_mgr:
Stack port
2 on Switch 1 is down
*Sep
4 20:34:42.022: %STACKMGR-6-STACK_LINK_CHANGE: Switch 1 R0/0: stack_mgr:
Stack port
2 on Switch 1 is nocable
*Sep
4 20:34:42.022: %STACKMGR-6-SWITCH_ADDED: Switch 1 R0/0: stack_mgr:
Switch 1 has
been added to the stack.
*Sep
4 20:34:42.022: %STACKMGR-6-SWITCH_ADDED: Switch 1 R0/0: stack_mgr:
Switch 1 has
been added to the stack.
*Sep
4 20:34:42.022: %STACKMGR-6-SWITCH_ADDED: Switch 1 R0/0: stack_mgr:
Switch 1 has
been added to the stack.
*Sep
4 20:34:42.022: %STACKMGR-6-ACTIVE_ELECTED: Switch 1 R0/0: stack_mgr:
Switch 1 has
been elected ACTIVE.
*Sep
4 20:35:14.728: %LINEPROTO-5-UPDOWN: Line protocol on Interface Lsmpi18/3, changed
state to up
*Sep
4 20:35:14.728: %LINEPROTO-5-UPDOWN: Line protocol on Interface EOBC18/1, changed
state to up
*Sep
4 20:35:15.506: %HMANRP-6-HMAN_IOS_CHANNEL_INFO: HMAN-IOS channel event for switch
1: EMP_RELAY: Channel UP!
*Sep
4 20:35:15.510: %LINEPROTO-5-UPDOWN: Line protocol on Interface Vlan1, changed state
to down
*Sep
4 20:35:34.501: %LINK-5-CHANGED: Interface Vlan1, changed state to administratively
down
*Sep
4 20:35:34.717: %SYS-5-RESTART: System restarted --
Cisco IOS Software [Everest], Catalyst L3 Switch Software (CAT9K_IOSXE), Version 16.6.5,
RELEASE SOFTWARE (fc3)
Programmability Configuration Guide, Cisco IOS XE Amsterdam 17.3.x
38
Provisioning
Boot Log for Cisco Catalyst 9000 Series Switches
Page 53
Technical Support: http://www.cisco.com/techsupport
Copyright (c) 1986-2018 by Cisco Systems, Inc.
Compiled Mon 10-Dec-18 12:52 by mcpre
*Sep
4 20:35:34.796: %LINK-3-UPDOWN: Interface GigabitEthernet0/0, changed state to up
*Sep
4 20:35:35.266: %SYS-6-BOOTTIME: Time taken to reboot after reload =
283 seconds
*Sep
4 20:35:35.796: %LINEPROTO-5-UPDOWN: Line protocol on Interface GigabitEthernet0/0,
changed state to up
*Sep
4 20:35:36.607: %LINK-3-UPDOWN: Interface GigabitEthernet1/1/1, changed state to down
*Sep
4 20:35:36.607: %LINK-3-UPDOWN: Interface GigabitEthernet1/1/2, changed state to down
*Sep
4 20:35:36.607: %LINK-3-UPDOWN: Interface GigabitEthernet1/1/3, changed state to down
*Sep
4 20:35:36.608: %LINK-3-UPDOWN: Interface GigabitEthernet1/1/4, changed state to down
*Sep
4 20:35:36.608: %LINK-3-UPDOWN: Interface TenGigabitEthernet1/1/1, changed state to
down
*Sep
4 20:35:36.608: %LINK-3-UPDOWN: Interface TenGigabitEthernet1/1/2, changed state to
down
*Sep
4 20:35:36.608: %LINK-3-UPDOWN: Interface TenGigabitEthernet1/1/3, changed state to
down
*Sep
4 20:35:36.608: %LINK-3-UPDOWN: Interface TenGigabitEthernet1/1/4, changed state to
down
*Sep
4 20:35:36.608: %LINK-3-UPDOWN: Interface TenGigabitEthernet1/1/5, changed state to
down
*Sep
4 20:35:36.609: %LINK-3-UPDOWN: Interface TenGigabitEthernet1/1/6, changed state to
down
*Sep
4 20:35:36.609: %LINK-3-UPDOWN: Interface TenGigabitEthernet1/1/7, changed state to
down
*Sep
4 20:35:36.609: %LINK-3-UPDOWN: Interface TenGigabitEthernet1/1/8, changed state to
down
*Sep
4 20:35:36.609: %LINK-3-UPDOWN: Interface FortyGigabitEthernet1/1/1, changed state
to down
*Sep
4 20:35:36.609: %LINK-3-UPDOWN: Interface FortyGigabitEthernet1/1/2, changed state
to down
*Sep
4 20:35:37.607: %LINEPROTO-5-UPDOWN: Line protocol on Interface GigabitEthernet1/1/1,
changed state to down
*Sep
4 20:35:37.608: %LINEPROTO-5-UPDOWN: Line protocol on Interface GigabitEthernet1/1/2,
changed state to down
*Sep
4 20:35:37.608: %LINEPROTO-5-UPDOWN: Line protocol on Interface GigabitEthernet1/1/3,
changed state to down
*Sep
4 20:35:37.609: %LINEPROTO-5-UPDOWN: Line protocol on Interface GigabitEthernet1/1/4,
changed state to down
*Sep
4 20:35:37.609: %LINEPROTO-5-UPDOWN: Line protocol on Interface TenGigabitEthernet1/1/1,
changed state to down
*Sep
4 20:35:37.609: %LINEPROTO-5-UPDOWN: Line protocol on Interface TenGigabitEthernet1/1/2,
changed state to down
*Sep
4 20:35:37.609: %LINEPROTO-5-UPDOWN: Line protocol on Interface TenGigabitEthernet1/1/3,
changed state to down
*Sep
4 20:35:37.609: %LINEPROTO-5-UPDOWN: Line protocol on Interface TenGigabitEthernet1/1/4,
changed state to down
*Sep
4 20:35:37.609: %LINEPROTO-5-UPDOWN: Line protocol on Interface TenGigabitEthernet1/1/5,
changed state to down
*Sep
4 20:35:37.609: %LINEPROTO-5-UPDOWN: Line protocol on Interface TenGigabitEthernet1/1/6,
changed state to down
*Sep
4 20:35:43.511: AUTOINSTALL: Obtain tftp server address (opt 150) 159.14.27.2
*Sep
4 20:35:43.511: PNPA: Setting autoinstall complete to true for 159.14.27.2
*Sep
4 20:35:57.673: %PLATFORM_PM-6-FRULINK_INSERTED: 8x10G uplink module inserted in the
switch 1 slot 1
*Sep
4 20:36:19.562: [IOX DEBUG] Guestshell start API is being invoked
*Sep
4 20:36:19.562: [IOX DEBUG] provided idb is mgmt interface
*Sep
4 20:36:19.562: [IOX DEBUG] Setting up guestshell to use mgmt-intf
*Sep
4 20:36:19.562: [IOX DEBUG] Setting up chasfs for iox related activity
*Sep
4 20:36:19.562: [IOX DEBUG] Setting up for iox pre-clean activity if needed
Programmability Configuration Guide, Cisco IOS XE Amsterdam 17.3.x
39
Provisioning
Boot Log for Cisco Catalyst 9000 Series Switches
Page 54
*Sep
4 20:36:19.562: [IOX DEBUG] Waiting for iox pre-clean setup to take affect
*Sep
4 20:36:19.562: [IOX DEBUG] Waited for 1 sec(s) for iox pre-clean setup to take affect
*Sep
4 20:36:19.562: [IOX DEBUG] Auto-configuring iox feature
*Sep
4 20:36:19.563: [IOX DEBUG] Waiting for CAF and ioxman to be up, in that order
*Sep
4 20:36:20.076: %UICFGEXP-6-SERVER_NOTIFIED_START: Switch 1 R0/0: psd:
Server iox
has been notified to start
*Sep
4 20:36:23.564: [IOX DEBUG] Waiting for another 5 secs
*Sep
4 20:36:28.564: [IOX DEBUG] Waiting for another 5 secs
The process for the command is not responding or is otherwise unavailable
*Sep
4 20:36:33.564: [IOX DEBUG] Waiting for another 5 secs
The process for the command is not responding or is otherwise unavailable
*Sep
4 20:36:34.564: [IOX DEBUG] Waited for 16 sec(s) for CAF and ioxman to come up
*Sep
4 20:36:34.564: [IOX DEBUG] Validating if CAF and ioxman are running
*Sep
4 20:36:34.564: [IOX DEBUG] CAF and ioxman are up and running
*Sep
4 20:36:34.564: [IOX DEBUG] Building the simple mgmt-intf enable command string
*Sep
4 20:36:34.564: [IOX DEBUG] Enable command is: request platform software iox-manager
app-hosting guestshell enable
*Sep
4 20:36:34.564: [IOX DEBUG] Issuing guestshell enable command and waiting for it to
be up
The process for the command is not responding or is otherwise unavailable
The process for the command is not responding or is otherwise unavailable
The process for the command is not responding or is otherwise unavailable
The process for the command is not responding or is otherwise unavailable
*Sep
4 20:36:38.578: [IOX DEBUG] Waiting for another 5 secs
The process for the command is not responding or is otherwise unavailable
*Sep
4 20:36:39.416: %LINK-3-UPDOWN: Interface TenGigabitEthernet1/0/48, changed state to
up
*Sep
4 20:36:40.416: %LINEPROTO-5-UPDOWN: Line protocol on Interface
TenGigabitEthernet1/0/48,
changed state to upThe process for the command is not responding or is otherwise
unavailable
The process for the command is not responding or is otherwise unavailable
The process for the command is not responding or is otherwise unavailable
*Sep
4 20:36:43.586: [IOX DEBUG] Waiting for another 5 secs
Guestshell enabled successfully
*Sep
4 20:37:45.321: [IOX DEBUG] Checking for guestshell mount path
*Sep
4 20:37:45.321: [IOX DEBUG] Validating if guestshell is ready for use
*Sep
4 20:37:45.321: [IOX DEBUG] Guestshell enabled successfully
*** Sample ZTP Day0 Python Script ***
Programmability Configuration Guide, Cisco IOS XE Amsterdam 17.3.x
40
Provisioning
Boot Log for Cisco Catalyst 9000 Series Switches
Page 55
*** Executing show platform
Switch
Ports
Model
Serial No.
MAC address
Hw Ver.
Sw Ver.
1
62
C9300-48UXM
FCW2144L045
ec1d.8b0a.6800
V01
16.6.5
Switch/Stack Mac Address : ec1d.8b0a.6800 - Local Mac Address
Mac persistency wait time: Indefinite
Current
Switch#
Role
Priority
State
*1
Active
1
Ready
*** Executing show version ***
Cisco IOS XE Software, Version 16.06.05
Cisco IOS Software [Everest], Catalyst L3 Switch Software (CAT9K_IOSXE), Version 16.6.5,
RELEASE SOFTWARE (fc3)
Technical Support: http://www.cisco.com/techsupport
Copyright (c) 1986-2018 by Cisco Systems, Inc.
Compiled Mon 10-Dec-18 12:52 by mcpre
Cisco IOS-XE software, Copyright (c) 2005-2018 by cisco Systems, Inc.
All rights reserved.
Certain components of Cisco IOS-XE software are
licensed under the GNU General Public License ("GPL") Version 2.0.
The
software code licensed under GPL Version 2.0 is free software that comes
with ABSOLUTELY NO WARRANTY.
You can redistribute and/or modify such
GPL code under the terms of GPL Version 2.0.
For more details, see the
documentation or "License Notice" file accompanying the IOS-XE software,
or the applicable URL provided on the flyer accompanying the IOS-XE
software.
ROM: IOS-XE ROMMON
BOOTLDR: System Bootstrap, Version 17.2.1r[FC1], RELEASE SOFTWARE (P)
Switch uptime is 2 minutes
Uptime for this control processor is 4 minutes
System returned to ROM by Reload Command
System image file is "flash:cat9k_iosxe.16.06.05.SPA.bin"
Last reload reason: Reload Command
This product contains cryptographic features and is subject to United
States and local country laws governing import, export, transfer and
use. Delivery of Cisco cryptographic products does not imply
third-party authority to import, export, distribute or use encryption.
Importers, exporters, distributors and users are responsible for
compliance with U.S. and local country laws. By using this product you
agree to comply with applicable laws and regulations. If you are unable
to comply with U.S. and local laws, return this product immediately.
A summary of U.S. laws governing Cisco cryptographic products may be found at:
http://www.cisco.com/wwl/export/crypto/tool/stqrg.html
If you require further assistance please contact us by sending email to
export@cisco.com.
Technology Package License Information:
Technology-package
Technology-package
Current
Type
Next reboot
network-advantage
Permanent
network-advantage
cisco C9300-48UXM (X86) processor with 1392780K/6147K bytes of memory.
Processor board ID FCW2144L045
36 Ethernet interfaces
1 Virtual Ethernet interface
4 Gigabit Ethernet interfaces
Programmability Configuration Guide, Cisco IOS XE Amsterdam 17.3.x
41
Provisioning
Boot Log for Cisco Catalyst 9000 Series Switches
Page 56
20 Ten Gigabit Ethernet interfaces
2 Forty Gigabit Ethernet interfaces
2048K bytes of non-volatile configuration memory.
8388608K bytes of physical memory.
1638400K bytes of Crash Files at crashinfo:.
11264000K bytes of Flash at flash:.
0K bytes of WebUI ODM Files at webui:.
Base Ethernet MAC Address
: ec:1d:8b:0a:68:00
Motherboard Assembly Number
: 73-17959-06
Motherboard Serial Number
: FOC21418FPQ
Model Revision Number
: B0
Motherboard Revision Number
: A0
Model Number
: C9300-48UXM
System Serial Number
: FCW2144L045
Switch Ports Model
SW Version
SW Image
Mode
1 62
C9300-48UXM
16.6.5
CAT9K_IOSXE
BUNDLE
Configuration register is 0x102
*** Configuring a Loopback Interface ***
Line 1 SUCCESS: interface loop 100
Line 2 SUCCESS: ip address 10.10.10.10 255.255.255.255
Line 3 SUCCESS: end
*** Executing show ip interface brief
Interface
IP-Address
OK? Method Status
Protocol
Vlan1
unassigned
YES unset
administratively down down
GigabitEthernet0/0
10.127.128.3
YES DHCP
up
up
Tw1/0/1
unassigned
YES unset
down
down
Tw1/0/2
unassigned
YES unset
down
down
Tw1/0/3
unassigned
YES unset
down
down
Tw1/0/4
unassigned
YES unset
down
down
Tw1/0/5
unassigned
YES unset
down
down
Tw1/0/6
unassigned
YES unset
down
down
Tw1/0/7
unassigned
YES unset
down
down
Tw1/0/8
unassigned
YES unset
down
down
Tw1/0/9
unassigned
YES unset
down
down
Tw1/0/10
unassigned
YES unset
down
down
Tw1/0/11
unassigned
YES unset
down
down
Tw1/0/12
unassigned
YES unset
down
down
Tw1/0/13
unassigned
YES unset
down
down
Tw1/0/14
unassigned
YES unset
down
down
Tw1/0/15
unassigned
YES unset
down
down
Tw1/0/16
unassigned
YES unset
down
down
Tw1/0/17
unassigned
YES unset
down
down
Tw1/0/18
unassigned
YES unset
down
down
Tw1/0/19
unassigned
YES unset
down
down
Tw1/0/20
unassigned
YES unset
down
down
Tw1/0/21
unassigned
YES unset
down
down
Tw1/0/22
unassigned
YES unset
down
down
Tw1/0/23
unassigned
YES unset
down
down
Tw1/0/24
unassigned
YES unset
down
down
Tw1/0/25
unassigned
YES unset
down
down
Tw1/0/26
unassigned
YES unset
down
down
Tw1/0/27
unassigned
YES unset
down
down
Tw1/0/28
unassigned
YES unset
down
down
Tw1/0/29
unassigned
YES unset
down
down
Tw1/0/30
unassigned
YES unset
down
down
Programmability Configuration Guide, Cisco IOS XE Amsterdam 17.3.x
42
Provisioning
Boot Log for Cisco Catalyst 9000 Series Switches
Page 57
Tw1/0/31
unassigned
YES unset
down
down
Tw1/0/32
unassigned
YES unset
down
down
Tw1/0/33
unassigned
YES unset
down
down
Tw1/0/34
unassigned
YES unset
down
down
Tw1/0/35
unassigned
YES unset
down
down
Tw1/0/36
unassigned
YES unset
down
down
Te1/0/37
unassigned
YES unset
down
down
Te1/0/38
unassigned
YES unset
down
down
Te1/0/39
unassigned
YES unset
down
down
Te1/0/40
unassigned
YES unset
down
down
Te1/0/41
unassigned
YES unset
down
down
Te1/0/42
unassigned
YES unset
down
down
Te1/0/43
unassigned
YES unset
down
down
Te1/0/44
unassigned
YES unset
down
down
Te1/0/45
unassigned
YES unset
down
down
Te1/0/46
unassigned
YES unset
down
down
Te1/0/47
unassigned
YES unset
down
down
Te1/0/48
unassigned
YES unset
up
up
GigabitEthernet1/1/1
unassigned
YES unset
down
down
GigabitEthernet1/1/2
unassigned
YES unset
down
down
GigabitEthernet1/1/3
unassigned
YES unset
down
down
GigabitEthernet1/1/4
unassigned
YES unset
down
down
Te1/1/1
unassigned
YES unset
down
down
Te1/1/2
unassigned
YES unset
down
down
Te1/1/3
unassigned
YES unset
down
down
Te1/1/4
unassigned
YES unset
down
down
Te1/1/5
unassigned
YES unset
down
down
Te1/1/6
unassigned
YES unset
down
down
Te1/1/7
unassigned
YES unset
down
down
Te1/1/8
unassigned
YES unset
down
down
Fo1/1/1
unassigned
YES unset
down
down
Fo1/1/2
unassigned
YES unset
down
down
Loopback100
10.10.10.10
YES TFTP
up
up
*** Configuring username, password, SSH
Line 1 SUCCESS: username cisco privilege 15 password cisco
Line 2 SUCCESS: ip domain name domain
Line 3 SUCCESS: line vty 0 15
Line 4 SUCCESS: login local
Line 5 SUCCESS: transport input all
Line 6 SUCCESS: end
*** ZTP Day0 Python Script Execution Complete ***
Cisco IOS XE Fuji 16.9.x to Cisco IOS XE Gibraltar 16.11.x
This section displays the sample boot logs before the .py script is run:
--- System Configuration Dialog ---
Would you like to enter the initial configuration dialog? [yes/no]: The process for the
command is not
responding or is otherwise unavailable
The process for the command is not responding or is otherwise unavailable
The process for the command is not responding or is otherwise unavailable
The process for the command is not responding or is otherwise unavailable
The process for the command is not responding or is otherwise unavailable
The process for the command is not responding or is otherwise unavailable
Programmability Configuration Guide, Cisco IOS XE Amsterdam 17.3.x
43
Provisioning
Boot Log for Cisco Catalyst 9000 Series Switches
Page 58
guestshell installed successfully
Current state is: DEPLOYED
guestshell activated successfully
Current state is: ACTIVATED
guestshell started successfully
Current state is: RUNNING
Guestshell enabled successfully
The section shows how to configure the device for Day Zero provisioning:
Both links down, not waiting for other switches
Switch number is 1
Restricted Rights Legend
Use, duplication, or disclosure by the Government is
subject to restrictions as set forth in subparagraph
(c) of the Commercial Computer Software - Restricted
Rights clause at FAR sec. 52.227-19 and subparagraph
(c) (1) (ii) of the Rights in Technical Data and Computer
Software clause at DFARS sec. 252.227-7013.
Cisco Systems, Inc.
170 West Tasman Drive
San Jose, California 95134-1706
Cisco IOS Software [Fuji], Catalyst L3 Switch Software (CAT9K_IOSXE), Version 16.9.4, RELEASE
SOFTWARE (fc2)
Technical Support: http://www.cisco.com/techsupport
Copyright (c) 1986-2019 by Cisco Systems, Inc.
Compiled Thu 22-Aug-19 18:14 by mcpre
PLEASE READ THE FOLLOWING TERMS CAREFULLY. INSTALLING THE LICENSE OR
LICENSE KEY PROVIDED FOR ANY CISCO SOFTWARE PRODUCT, PRODUCT FEATURE,
AND/OR SUBSEQUENTLY PROVIDED SOFTWARE FEATURES (COLLECTIVELY, THE
"SOFTWARE"), AND/OR USING SUCH SOFTWARE CONSTITUTES YOUR FULL
ACCEPTANCE OF THE FOLLOWING TERMS. YOU MUST NOT PROCEED FURTHER IF YOU
ARE NOT WILLING TO BE BOUND BY ALL THE TERMS SET FORTH HEREIN.
Your use of the Software is subject to the Cisco End User License Agreement
(EULA) and any relevant supplemental terms (SEULA) found at
http://www.cisco.com/c/en/us/about/legal/cloud-and-software/software-terms.html.
You hereby acknowledge and agree that certain Software and/or features are
licensed for a particular term, that the license to such Software and/or
features is valid only for the applicable term and that such Software and/or
features may be shut down or otherwise terminated by Cisco after expiration
of the applicable license term (e.g., 90-day trial period). Cisco reserves
the right to terminate any such Software feature electronically or by any
other means available. While Cisco may provide alerts, it is your sole
responsibility to monitor your usage of any such term Software feature to
ensure that your systems and networks are prepared for a shutdown of the
Software feature.
% Checking backup nvram
% No config present. Using default config
Programmability Configuration Guide, Cisco IOS XE Amsterdam 17.3.x
44
Provisioning
Boot Log for Cisco Catalyst 9000 Series Switches
Page 59
FIPS: Flash Key Check : Key Not Found, FIPS Mode Not Enabled
cisco C9300-48UXM (X86) processor with 1419044K/6147K bytes of memory.
Processor board ID FCW2144L045
2048K bytes of non-volatile configuration memory.
8388608K bytes of physical memory.
1638400K bytes of Crash Files at crashinfo:.
11264000K bytes of Flash at flash:.
0K bytes of WebUI ODM Files at webui:.
Base Ethernet MAC Address
: ec:1d:8b:0a:68:00
Motherboard Assembly Number
: 73-17959-06
Motherboard Serial Number
: FOC21418FPQ
Model Revision Number
: B0
Motherboard Revision Number
: A0
Model Number
: C9300-48UXM
System Serial Number
: FCW2144L045
%INIT: waited 0 seconds for NVRAM to be available
--- System Configuration Dialog ---
Would you like to enter the initial configuration dialog? [yes/no]: The process for the
command is not
responding or is otherwise unavailable
The process for the command is not responding or is otherwise unavailable
The process for the command is not responding or is otherwise unavailable
The process for the command is not responding or is otherwise unavailable
The process for the command is not responding or is otherwise unavailable
The process for the command is not responding or is otherwise unavailable
The process for the command is not responding or is otherwise unavailable
The process for the command is not responding or is otherwise unavailable
The process for the command is not responding or is otherwise unavailable
The process for the command is not responding or is otherwise unavailable
The process for the command is not responding or is otherwise unavailable
The process for the command is not responding or is otherwise unavailable
The process for the command is not responding or is otherwise unavailable
The process for the command is not responding or is otherwise unavailable
The process for the command is not responding or is otherwise unavailable
The process for the command is not responding or is otherwise unavailable
The process for the command is not responding or is otherwise unavailable
The process for the command is not responding or is otherwise unavailable
The process for the command is not responding or is otherwise unavailable
The process for the command is not responding or is otherwise unavailable
The process for the command is not responding or is otherwise unavailable
The process for the command is not responding or is otherwise unavailable
The process for the command is not responding or is otherwise unavailable
The process for the command is not responding or is otherwise unavailable
The process for the command is not responding or is otherwise unavailable
The process for the command is not responding or is otherwise unavailable
The process for the command is not responding or is otherwise unavailable
The process for the command is not responding or is otherwise unavailable
The process for the command is not responding or is otherwise unavailable
The process for the command is not responding or is otherwise unavailable
The process for the command is not responding or is otherwise unavailable
The process for the command is not responding or is otherwise unavailable
The process for the command is not responding or is otherwise unavailable
The process for the command is not responding or is otherwise unavailable
The process for the command is not responding or is otherwise unavailable
The process for the command is not responding or is otherwise unavailable
The process for the command is not responding or is otherwise unavailable
The process for the command is not responding or is otherwise unavailable
The process for the command is not responding or is otherwise unavailable
Programmability Configuration Guide, Cisco IOS XE Amsterdam 17.3.x
45
Provisioning
Boot Log for Cisco Catalyst 9000 Series Switches
Page 60
The process for the command is not responding or is otherwise unavailable
The process for the command is not responding or is otherwise unavailable
The process for the command is not responding or is otherwise unavailable
The process for the command is not responding or is otherwise unavailable
The process for the command is not responding or is otherwise unavailable
The process for the command is not responding or is otherwise unavailable
The process for the command is not responding or is otherwise unavailable
The process for the command is not responding or is otherwise unavailable
The process for the command is not responding or is otherwise unavailable
The process for the command is not responding or is otherwise unavailable
The process for the command is not responding or is otherwise unavailable
The process for the command is not responding or is otherwise unavailable
The process for the command is not responding or is otherwise unavailable
The process for the command is not responding or is otherwise unavailable
The process for the command is not responding or is otherwise unavailable
The process for the command is not responding or is otherwise unavailable
The process for the command is not responding or is otherwise unavailable
guestshell installed successfully
Current state is: DEPLOYED
guestshell activated successfully
Current state is: ACTIVATED
guestshell started successfully
Current state is: RUNNING
Guestshell enabled successfully
HTTP server statistics:
Accepted connections total: 0
*** Sample ZTP Day0 Python Script ***
*** Executing show platform
Switch
Ports
Model
Serial No.
MAC address
Hw Ver.
Sw Ver.
1
64
C9300-48UXM
FCW2144L045
ec1d.8b0a.6800
V01
16.9.4
Switch/Stack Mac Address : ec1d.8b0a.6800 - Local Mac Address
Mac persistency wait time: Indefinite
Current
Switch#
Role
Priority
State
*1
Active
1
Ready
*** Executing show version ***
Cisco IOS XE Software, Version 16.09.04
Cisco IOS Software [Fuji], Catalyst L3 Switch Software (CAT9K_IOSXE), Version 16.9.4, RELEASE
SOFTWARE (fc2)
Technical Support: http://www.cisco.com/techsupport
Copyright (c) 1986-2019 by Cisco Systems, Inc.
Compiled Thu 22-Aug-19 18:14 by mcpre
Cisco IOS-XE software, Copyright (c) 2005-2019 by cisco Systems, Inc.
All rights reserved.
Certain components of Cisco IOS-XE software are
licensed under the GNU General Public License ("GPL") Version 2.0.
The
software code licensed under GPL Version 2.0 is free software that comes
with ABSOLUTELY NO WARRANTY.
You can redistribute and/or modify such
GPL code under the terms of GPL Version 2.0.
For more details, see the
Programmability Configuration Guide, Cisco IOS XE Amsterdam 17.3.x
46
Provisioning
Boot Log for Cisco Catalyst 9000 Series Switches
Page 61
documentation or "License Notice" file accompanying the IOS-XE software,
or the applicable URL provided on the flyer accompanying the IOS-XE
software.
ROM: IOS-XE ROMMON
BOOTLDR: System Bootstrap, Version 17.2.1r[FC1], RELEASE SOFTWARE (P)
Switch uptime is 4 minutes
Uptime for this control processor is 5 minutes
System returned to ROM by Reload Command
System image file is "flash:cat9k_iosxe.16.09.04.SPA.bin"
Last reload reason: Reload Command
This product contains cryptographic features and is subject to United
States and local country laws governing import, export, transfer and
use. Delivery of Cisco cryptographic products does not imply
third-party authority to import, export, distribute or use encryption.
Importers, exporters, distributors and users are responsible for
compliance with U.S. and local country laws. By using this product you
agree to comply with applicable laws and regulations. If you are unable
to comply with U.S. and local laws, return this product immediately.
A summary of U.S. laws governing Cisco cryptographic products may be found at:
http://www.cisco.com/wwl/export/crypto/tool/stqrg.html
If you require further assistance please contact us by sending email to
export@cisco.com.
Technology Package License Information:
Technology-package
Technology-package
Current
Type
Next reboot
network-advantage
Smart License
network-advantage
None
Subscription Smart License
None
Smart Licensing Status: UNREGISTERED/EVAL EXPIRED
cisco C9300-48UXM (X86) processor with 1419044K/6147K bytes of memory.
Processor board ID FCW2144L045
36 Ethernet interfaces
1 Virtual Ethernet interface
4 Gigabit Ethernet interfaces
20 Ten Gigabit Ethernet interfaces
2 TwentyFive Gigabit Ethernet interfaces
2 Forty Gigabit Ethernet interfaces
2048K bytes of non-volatile configuration memory.
8388608K bytes of physical memory.
1638400K bytes of Crash Files at crashinfo:.
11264000K bytes of Flash at flash:.
0K bytes of WebUI ODM Files at webui:.
Base Ethernet MAC Address
: ec:1d:8b:0a:68:00
Motherboard Assembly Number
: 73-17959-06
Motherboard Serial Number
: FOC21418FPQ
Model Revision Number
: B0
Motherboard Revision Number
: A0
Model Number
: C9300-48UXM
System Serial Number
: FCW2144L045
Switch Ports Model
SW Version
SW Image
Mode
1 64
C9300-48UXM
16.9.4
CAT9K_IOSXE
BUNDLE
Configuration register is 0x102
*** Configuring a Loopback Interface ***
Line 1 SUCCESS: interface loop 100
Line 2 SUCCESS: ip address 10.10.10.10 255.255.255.255
Line 3 SUCCESS: end
Programmability Configuration Guide, Cisco IOS XE Amsterdam 17.3.x
47
Provisioning
Boot Log for Cisco Catalyst 9000 Series Switches
Page 62
*** Executing show ip interface brief
Any interface listed with OK? value "NO" does not have a valid configuration
Interface
IP-Address
OK? Method Status
Protocol
Vlan1
unassigned
NO
unset
up
up
GigabitEthernet0/0
10.127.128.5
YES DHCP
up
up
Tw1/0/1
unassigned
YES unset
down
down
Tw1/0/2
unassigned
YES unset
down
down
Tw1/0/3
unassigned
YES unset
down
down
Tw1/0/4
unassigned
YES unset
down
down
Tw1/0/5
unassigned
YES unset
down
down
Tw1/0/6
unassigned
YES unset
down
down
Tw1/0/7
unassigned
YES unset
down
down
Tw1/0/8
unassigned
YES unset
down
down
Tw1/0/9
unassigned
YES unset
down
down
Tw1/0/10
unassigned
YES unset
down
down
Tw1/0/11
unassigned
YES unset
down
down
Tw1/0/12
unassigned
YES unset
down
down
Tw1/0/13
unassigned
YES unset
down
down
Tw1/0/14
unassigned
YES unset
down
down
Tw1/0/15
unassigned
YES unset
down
down
Tw1/0/16
unassigned
YES unset
down
down
Tw1/0/17
unassigned
YES unset
down
down
Tw1/0/18
unassigned
YES unset
down
down
Tw1/0/19
unassigned
YES unset
down
down
Tw1/0/20
unassigned
YES unset
down
down
Tw1/0/21
unassigned
YES unset
down
down
Tw1/0/22
unassigned
YES unset
down
down
Tw1/0/23
unassigned
YES unset
down
down
Tw1/0/24
unassigned
YES unset
down
down
Tw1/0/25
unassigned
YES unset
down
down
Tw1/0/26
unassigned
YES unset
down
down
Tw1/0/27
unassigned
YES unset
down
down
Tw1/0/28
unassigned
YES unset
down
down
Tw1/0/29
unassigned
YES unset
down
down
Tw1/0/30
unassigned
YES unset
down
down
Tw1/0/31
unassigned
YES unset
down
down
Tw1/0/32
unassigned
YES unset
down
down
Tw1/0/33
unassigned
YES unset
down
down
Tw1/0/34
unassigned
YES unset
down
down
Tw1/0/35
unassigned
YES unset
down
down
Tw1/0/36
unassigned
YES unset
down
down
Te1/0/37
unassigned
YES unset
down
down
Te1/0/38
unassigned
YES unset
down
down
Te1/0/39
unassigned
YES unset
down
down
Te1/0/40
unassigned
YES unset
down
down
Te1/0/41
unassigned
YES unset
down
down
Te1/0/42
unassigned
YES unset
down
down
Te1/0/43
unassigned
YES unset
down
down
Te1/0/44
unassigned
YES unset
down
down
Te1/0/45
unassigned
YES unset
down
down
Te1/0/46
unassigned
YES unset
down
down
Te1/0/47
unassigned
YES unset
down
down
Te1/0/48
unassigned
YES unset
up
up
GigabitEthernet1/1/1
unassigned
YES unset
down
down
GigabitEthernet1/1/2
unassigned
YES unset
down
down
GigabitEthernet1/1/3
unassigned
YES unset
down
down
GigabitEthernet1/1/4
unassigned
YES unset
down
down
Te1/1/1
unassigned
YES unset
down
down
Te1/1/2
unassigned
YES unset
down
down
Te1/1/3
unassigned
YES unset
down
down
Te1/1/4
unassigned
YES unset
down
down
Te1/1/5
unassigned
YES unset
down
down
Programmability Configuration Guide, Cisco IOS XE Amsterdam 17.3.x
48
Provisioning
Boot Log for Cisco Catalyst 9000 Series Switches
Page 63
Te1/1/6
unassigned
YES unset
down
down
Te1/1/7
unassigned
YES unset
down
down
Te1/1/8
unassigned
YES unset
down
down
Fo1/1/1
unassigned
YES unset
down
down
Fo1/1/2
unassigned
YES unset
down
down
TwentyFiveGigE1/1/1
unassigned
YES unset
down
down
TwentyFiveGigE1/1/2
unassigned
YES unset
down
down
Loopback100
10.10.10.10
YES TFTP
up
up
*** Configuring username, password, SSH
Line 1 SUCCESS: username cisco privilege 15 password cisco
**CLI Line # 1:
WARNING: Command has been added to the configuration using a type 0 password.
However, type 0 passwords will soon be deprecated. Migrate to a supported password type
Line 2 SUCCESS: ip domain name domain
Line 3 SUCCESS: line vty 0 15
Line 4 SUCCESS: login local
Line 5 SUCCESS: transport input all
Line 6 SUCCESS: end
*** ZTP Day0 Python Script Execution Complete ***
Press RETURN to get started!
Cisco IOS XE Gibraltar 16.12.x to Cisco IOS XE Amsterdam 17.1.x
This section displays the sample boot logs before the .py script is run:
--- System Configuration Dialog ---
Would you like to enter the initial configuration dialog? [yes/no]: day0guestshell installed
successfully
Current state is: DEPLOYED
day0guestshell activated successfully
Current state is: ACTIVATED
day0guestshell started successfully
Current state is: RUNNING
Guestshell enabled successfully
*** Sample ZTP Day0 Python Script ***
...
*** ZTP Day0 Python Script Execution Complete ***
Guestshell destroyed successfully
The section shows how to configure the device for Day Zero provisioning:
Programmability Configuration Guide, Cisco IOS XE Amsterdam 17.3.x
49
Provisioning
Boot Log for Cisco Catalyst 9000 Series Switches
Page 64
Both links down, not waiting for other switches
Switch number is 1
Restricted Rights Legend
Use, duplication, or disclosure by the Government is
subject to restrictions as set forth in subparagraph
(c) of the Commercial Computer Software - Restricted
Rights clause at FAR sec. 52.227-19 and subparagraph
(c) (1) (ii) of the Rights in Technical Data and Computer
Software clause at DFARS sec. 252.227-7013.
Cisco Systems, Inc.
170 West Tasman Drive
San Jose, California 95134-1706
Cisco IOS Software [Gibraltar], Catalyst L3 Switch Software (CAT9K_IOSXE), Version 16.12.3a,
RELEASE SOFTWARE (fc1)
Technical Support: http://www.cisco.com/techsupport
Copyright (c) 1986-2020 by Cisco Systems, Inc.
Compiled Tue 28-Apr-20 09:37 by mcpre
This software version supports only Smart Licensing as the software licensing mechanism.
PLEASE READ THE FOLLOWING TERMS CAREFULLY. INSTALLING THE LICENSE OR
LICENSE KEY PROVIDED FOR ANY CISCO SOFTWARE PRODUCT, PRODUCT FEATURE,
AND/OR SUBSEQUENTLY PROVIDED SOFTWARE FEATURES (COLLECTIVELY, THE
"SOFTWARE"), AND/OR USING SUCH SOFTWARE CONSTITUTES YOUR FULL
ACCEPTANCE OF THE FOLLOWING TERMS. YOU MUST NOT PROCEED FURTHER IF YOU
ARE NOT WILLING TO BE BOUND BY ALL THE TERMS SET FORTH HEREIN.
Your use of the Software is subject to the Cisco End User License Agreement
(EULA) and any relevant supplemental terms (SEULA) found at
http://www.cisco.com/c/en/us/about/legal/cloud-and-software/software-terms.html.
You hereby acknowledge and agree that certain Software and/or features are
licensed for a particular term, that the license to such Software and/or
features is valid only for the applicable term and that such Software and/or
features may be shut down or otherwise terminated by Cisco after expiration
of the applicable license term (e.g., 90-day trial period). Cisco reserves
the right to terminate any such Software feature electronically or by any
other means available. While Cisco may provide alerts, it is your sole
responsibility to monitor your usage of any such term Software feature to
ensure that your systems and networks are prepared for a shutdown of the
Software feature.
% Checking backup nvram
% No config present. Using default config
FIPS: Flash Key Check : Key Not Found, FIPS Mode Not Enabled
All TCP AO KDF Tests Pass
cisco C9300-48UXM (X86) processor with 1343703K/6147K bytes of memory.
Processor board ID FCW2144L045
2048K bytes of non-volatile configuration memory.
8388608K bytes of physical memory.
1638400K bytes of Crash Files at crashinfo:.
Programmability Configuration Guide, Cisco IOS XE Amsterdam 17.3.x
50
Provisioning
Boot Log for Cisco Catalyst 9000 Series Switches
Page 65
11264000K bytes of Flash at flash:.
0K bytes of WebUI ODM Files at webui:.
Base Ethernet MAC Address
: ec:1d:8b:0a:68:00
Motherboard Assembly Number
: 73-17959-06
Motherboard Serial Number
: FOC21418FPQ
Model Revision Number
: B0
Motherboard Revision Number
: A0
Model Number
: C9300-48UXM
System Serial Number
: FCW2144L045
--- System Configuration Dialog ---
Would you like to enter the initial configuration dialog? [yes/no]: day0guestshell installed
successfully
Current state is: DEPLOYED
day0guestshell activated successfully
Current state is: ACTIVATED
day0guestshell started successfully
Current state is: RUNNING
Guestshell enabled successfully
HTTP server statistics:
Accepted connections total: 0
*** Sample ZTP Day0 Python Script ***
*** Executing show platform
Switch
Ports
Model
Serial No.
MAC address
Hw Ver.
Sw Ver.
1
65
C9300-48UXM
FCW2144L045
ec1d.8b0a.6800
V01
16.12.3a
Switch/Stack Mac Address : ec1d.8b0a.6800 - Local Mac Address
Mac persistency wait time: Indefinite
Current
Switch#
Role
Priority
State
*1
Active
1
Ready
*** Executing show version ***
Cisco IOS XE Software, Version 16.12.03a
Cisco IOS Software [Gibraltar], Catalyst L3 Switch Software (CAT9K_IOSXE), Version 16.12.3a,
RELEASE SOFTWARE (fc1)
Technical Support: http://www.cisco.com/techsupport
Copyright (c) 1986-2020 by Cisco Systems, Inc.
Compiled Tue 28-Apr-20 09:37 by mcpre
Cisco IOS-XE software, Copyright (c) 2005-2020 by cisco Systems, Inc.
All rights reserved.
Certain components of Cisco IOS-XE software are
licensed under the GNU General Public License ("GPL") Version 2.0.
The
software code licensed under GPL Version 2.0 is free software that comes
with ABSOLUTELY NO WARRANTY.
You can redistribute and/or modify such
GPL code under the terms of GPL Version 2.0.
For more details, see the
Programmability Configuration Guide, Cisco IOS XE Amsterdam 17.3.x
51
Provisioning
Boot Log for Cisco Catalyst 9000 Series Switches
Page 66
documentation or "License Notice" file accompanying the IOS-XE software,
or the applicable URL provided on the flyer accompanying the IOS-XE
software.
ROM: IOS-XE ROMMON
BOOTLDR: System Bootstrap, Version 17.2.1r[FC1], RELEASE SOFTWARE (P)
Switch uptime is 4 minutes
Uptime for this control processor is 9 minutes
System returned to ROM by Reload Command
System image file is "flash:cat9k_iosxe.16.12.03a.SPA.bin"
Last reload reason: Reload Command
This product contains cryptographic features and is subject to United
States and local country laws governing import, export, transfer and
use. Delivery of Cisco cryptographic products does not imply
third-party authority to import, export, distribute or use encryption.
Importers, exporters, distributors and users are responsible for
compliance with U.S. and local country laws. By using this product you
agree to comply with applicable laws and regulations. If you are unable
to comply with U.S. and local laws, return this product immediately.
A summary of U.S. laws governing Cisco cryptographic products may be found at:
http://www.cisco.com/wwl/export/crypto/tool/stqrg.html
If you require further assistance please contact us by sending email to
export@cisco.com.
Technology Package License Information:
Technology-package
Technology-package
Current
Type
Next reboot
network-advantage
Smart License
network-advantage
None
Subscription Smart License
None
AIR License Level: AIR DNA Advantage
Next reload AIR license Level: AIR DNA Advantage
Smart Licensing Status: UNREGISTERED/EVAL EXPIRED
cisco C9300-48UXM (X86) processor with 1343703K/6147K bytes of memory.
Processor board ID FCW2144L045
1 Virtual Ethernet interface
4 Gigabit Ethernet interfaces
36 2.5 Gigabit Ethernet interfaces
20 Ten Gigabit Ethernet interfaces
2 TwentyFive Gigabit Ethernet interfaces
2 Forty Gigabit Ethernet interfaces
2048K bytes of non-volatile configuration memory.
8388608K bytes of physical memory.
1638400K bytes of Crash Files at crashinfo:.
11264000K bytes of Flash at flash:.
0K bytes of WebUI ODM Files at webui:.
Base Ethernet MAC Address
: ec:1d:8b:0a:68:00
Motherboard Assembly Number
: 73-17959-06
Motherboard Serial Number
: FOC21418FPQ
Model Revision Number
: B0
Motherboard Revision Number
: A0
Model Number
: C9300-48UXM
System Serial Number
: FCW2144L045
Switch Ports Model
SW Version
SW Image
Mode
1 65
C9300-48UXM
16.12.3a
CAT9K_IOSXE
BUNDLE
Configuration register is 0x102
*** Configuring a Loopback Interface ***
Line 1 SUCCESS: interface loop 100
Line 2 SUCCESS: ip address 10.10.10.10 255.255.255.255
Line 3 SUCCESS: end
Programmability Configuration Guide, Cisco IOS XE Amsterdam 17.3.x
52
Provisioning
Boot Log for Cisco Catalyst 9000 Series Switches
Page 67
*** Executing show ip interface brief
Interface
IP-Address
OK? Method Status
Protocol
Vlan1
unassigned
YES unset
up
up
GigabitEthernet0/0
10.127.128.10
YES DHCP
up
up
Tw1/0/1
unassigned
YES unset
down
down
Tw1/0/2
unassigned
YES unset
down
down
Tw1/0/3
unassigned
YES unset
down
down
Tw1/0/4
unassigned
YES unset
down
down
Tw1/0/5
unassigned
YES unset
down
down
Tw1/0/6
unassigned
YES unset
down
down
Tw1/0/7
unassigned
YES unset
down
down
Tw1/0/8
unassigned
YES unset
down
down
Tw1/0/9
unassigned
YES unset
down
down
Tw1/0/10
unassigned
YES unset
down
down
Tw1/0/11
unassigned
YES unset
down
down
Tw1/0/12
unassigned
YES unset
down
down
Tw1/0/13
unassigned
YES unset
down
down
Tw1/0/14
unassigned
YES unset
down
down
Tw1/0/15
unassigned
YES unset
down
down
Tw1/0/16
unassigned
YES unset
down
down
Tw1/0/17
unassigned
YES unset
down
down
Tw1/0/18
unassigned
YES unset
down
down
Tw1/0/19
unassigned
YES unset
down
down
Tw1/0/20
unassigned
YES unset
down
down
Tw1/0/21
unassigned
YES unset
down
down
Tw1/0/22
unassigned
YES unset
down
down
Tw1/0/23
unassigned
YES unset
down
down
Tw1/0/24
unassigned
YES unset
down
down
Tw1/0/25
unassigned
YES unset
down
down
Tw1/0/26
unassigned
YES unset
down
down
Tw1/0/27
unassigned
YES unset
down
down
Tw1/0/28
unassigned
YES unset
down
down
Tw1/0/29
unassigned
YES unset
down
down
Tw1/0/30
unassigned
YES unset
down
down
Tw1/0/31
unassigned
YES unset
down
down
Tw1/0/32
unassigned
YES unset
down
down
Tw1/0/33
unassigned
YES unset
down
down
Tw1/0/34
unassigned
YES unset
down
down
Tw1/0/35
unassigned
YES unset
down
down
Tw1/0/36
unassigned
YES unset
down
down
Te1/0/37
unassigned
YES unset
down
down
Te1/0/38
unassigned
YES unset
down
down
Te1/0/39
unassigned
YES unset
down
down
Te1/0/40
unassigned
YES unset
down
down
Te1/0/41
unassigned
YES unset
down
down
Te1/0/42
unassigned
YES unset
down
down
Te1/0/43
unassigned
YES unset
down
down
Te1/0/44
unassigned
YES unset
down
down
Te1/0/45
unassigned
YES unset
down
down
Te1/0/46
unassigned
YES unset
down
down
Te1/0/47
unassigned
YES unset
down
down
Te1/0/48
unassigned
YES unset
up
up
GigabitEthernet1/1/1
unassigned
YES unset
down
down
GigabitEthernet1/1/2
unassigned
YES unset
down
down
GigabitEthernet1/1/3
unassigned
YES unset
down
down
GigabitEthernet1/1/4
unassigned
YES unset
down
down
Te1/1/1
unassigned
YES unset
down
down
Te1/1/2
unassigned
YES unset
down
down
Te1/1/3
unassigned
YES unset
down
down
Te1/1/4
unassigned
YES unset
down
down
Programmability Configuration Guide, Cisco IOS XE Amsterdam 17.3.x
53
Provisioning
Boot Log for Cisco Catalyst 9000 Series Switches
Page 68
Te1/1/5
unassigned
YES unset
down
down
Te1/1/6
unassigned
YES unset
down
down
Te1/1/7
unassigned
YES unset
down
down
Te1/1/8
unassigned
YES unset
down
down
Fo1/1/1
unassigned
YES unset
down
down
Fo1/1/2
unassigned
YES unset
down
down
TwentyFiveGigE1/1/1
unassigned
YES unset
down
down
TwentyFiveGigE1/1/2
unassigned
YES unset
down
down
Ap1/0/1
unassigned
YES unset
up
up
Loopback100
10.10.10.10
YES TFTP
up
up
*** Configuring username, password, SSH
Line 1 SUCCESS: username cisco privilege 15 password cisco
**CLI Line # 1:
WARNING: Command has been added to the configuration using a type 0 password.
However, type 0 passwords will soon be deprecated. Migrate to a supported password type
Line 2 SUCCESS: ip domain name domain
Line 3 SUCCESS: line vty 0 15
Line 4 SUCCESS: login local
Line 5 SUCCESS: transport input all
Line 6 SUCCESS: end
*** ZTP Day0 Python Script Execution Complete ***
Guestshell destroyed successfully
Press RETURN to get started!
Cisco IOS XE Amsterdam 17.2.x and Later Releases
This section displays the sample boot logs before the .py script is run:
--- System Configuration Dialog ---
Would you like to enter the initial configuration dialog? [yes/no]:
Acquired IPv4 address 10.127.128.8 on Interface GigabitEthernet0/0
Received following DHCPv4 options:
bootfile
: test.py
tftp-server-ip
: 159.14.27.2
OK to enter CLI now...
pnp-discovery can be monitored without entering enable mode
Entering enable mode will stop pnp-discovery
Attempting bootfile tftp://159.14.27.2/test.py
day0guestshell activated successfully
Current state is: ACTIVATED
day0guestshell started successfully
Current state is: RUNNING
Guestshell enabled successfully
Programmability Configuration Guide, Cisco IOS XE Amsterdam 17.3.x
54
Provisioning
Boot Log for Cisco Catalyst 9000 Series Switches
Page 69
*** Sample ZTP Day0 Python Script ***
...
*** ZTP Day0 Python Script Execution Complete ***
Guestshell destroyed successfully
The section shows how to configure the device for Day Zero provisioning:
Both links down, not waiting for other switches
Switch number is 1
Restricted Rights Legend
Use, duplication, or disclosure by the Government is
subject to restrictions as set forth in subparagraph
(c) of the Commercial Computer Software - Restricted
Rights clause at FAR sec. 52.227-19 and subparagraph
(c) (1) (ii) of the Rights in Technical Data and Computer
Software clause at DFARS sec. 252.227-7013.
Cisco Systems, Inc.
170 West Tasman Drive
San Jose, California 95134-1706
Cisco IOS Software [Amsterdam], Catalyst L3 Switch Software (CAT9K_IOSXE), Version 17.2.1,
RELEASE SOFTWARE (fc4)
Technical Support: http://www.cisco.com/techsupport
Copyright (c) 1986-2020 by Cisco Systems, Inc.
Compiled Thu 26-Mar-20 03:29 by mcpre
This software version supports only Smart Licensing as the software licensing mechanism.
PLEASE READ THE FOLLOWING TERMS CAREFULLY. INSTALLING THE LICENSE OR
LICENSE KEY PROVIDED FOR ANY CISCO SOFTWARE PRODUCT, PRODUCT FEATURE,
AND/OR SUBSEQUENTLY PROVIDED SOFTWARE FEATURES (COLLECTIVELY, THE
"SOFTWARE"), AND/OR USING SUCH SOFTWARE CONSTITUTES YOUR FULL
ACCEPTANCE OF THE FOLLOWING TERMS. YOU MUST NOT PROCEED FURTHER IF YOU
ARE NOT WILLING TO BE BOUND BY ALL THE TERMS SET FORTH HEREIN.
Your use of the Software is subject to the Cisco End User License Agreement
(EULA) and any relevant supplemental terms (SEULA) found at
http://www.cisco.com/c/en/us/about/legal/cloud-and-software/software-terms.html.
You hereby acknowledge and agree that certain Software and/or features are
licensed for a particular term, that the license to such Software and/or
features is valid only for the applicable term and that such Software and/or
features may be shut down or otherwise terminated by Cisco after expiration
of the applicable license term (e.g., 90-day trial period). Cisco reserves
the right to terminate any such Software feature electronically or by any
other means available. While Cisco may provide alerts, it is your sole
responsibility to monitor your usage of any such term Software feature to
ensure that your systems and networks are prepared for a shutdown of the
Software feature.
% Checking backup nvram
Programmability Configuration Guide, Cisco IOS XE Amsterdam 17.3.x
55
Provisioning
Boot Log for Cisco Catalyst 9000 Series Switches
Page 70
% No config present. Using default config
FIPS: Flash Key Check : Key Not Found, FIPS Mode Not Enabled
All TCP AO KDF Tests Pass
cisco C9300-48UXM (X86) processor with 1338934K/6147K bytes of memory.
Processor board ID FCW2144L045
2048K bytes of non-volatile configuration memory.
8388608K bytes of physical memory.
1638400K bytes of Crash Files at crashinfo:.
11264000K bytes of Flash at flash:.
Base Ethernet MAC Address
: ec:1d:8b:0a:68:00
Motherboard Assembly Number
: 73-17959-06
Motherboard Serial Number
: FOC21418FPQ
Model Revision Number
: B0
Motherboard Revision Number
: A0
Model Number
: C9300-48UXM
System Serial Number
: FCW2144L045
CLEI Code Number
:
No startup-config, starting autoinstall/pnp/ztp...
Autoinstall will terminate if any input is detected on console
Autoinstall trying DHCPv4 on GigabitEthernet0/0
Autoinstall trying DHCPv6 on GigabitEthernet0/0
--- System Configuration Dialog ---
Would you like to enter the initial configuration dialog? [yes/no]:
Acquired IPv4 address 10.127.128.8 on Interface GigabitEthernet0/0
Received following DHCPv4 options:
bootfile
: test.py
tftp-server-ip
: 159.14.27.2
OK to enter CLI now...
pnp-discovery can be monitored without entering enable mode
Entering enable mode will stop pnp-discovery
Attempting bootfile tftp://159.14.27.2/test.py
day0guestshell activated successfully
Current state is: ACTIVATED
day0guestshell started successfully
Current state is: RUNNING
Guestshell enabled successfully
*** Sample ZTP Day0 Python Script ***
*** Executing show platform
Switch
Ports
Model
Serial No.
MAC address
Hw Ver.
Sw Ver.
1
65
C9300-48UXM
FCW2144L045
ec1d.8b0a.6800
V01
17.02.01
Programmability Configuration Guide, Cisco IOS XE Amsterdam 17.3.x
56
Provisioning
Boot Log for Cisco Catalyst 9000 Series Switches
Page 71
Switch/Stack Mac Address : ec1d.8b0a.6800 - Local Mac Address
Mac persistency wait time: Indefinite
Current
Switch#
Role
Priority
State
*1
Active
1
Ready
*** Executing show version ***
Cisco IOS XE Software, Version 17.02.01
Cisco IOS Software [Amsterdam], Catalyst L3 Switch Software (CAT9K_IOSXE), Version 17.2.1,
RELEASE SOFTWARE (fc4)
Technical Support: http://www.cisco.com/techsupport
Copyright (c) 1986-2020 by Cisco Systems, Inc.
Compiled Thu 26-Mar-20 03:29 by mcpre
Cisco IOS-XE software, Copyright (c) 2005-2020 by cisco Systems, Inc.
All rights reserved.
Certain components of Cisco IOS-XE software are
licensed under the GNU General Public License ("GPL") Version 2.0.
The
software code licensed under GPL Version 2.0 is free software that comes
with ABSOLUTELY NO WARRANTY.
You can redistribute and/or modify such
GPL code under the terms of GPL Version 2.0.
For more details, see the
documentation or "License Notice" file accompanying the IOS-XE software,
or the applicable URL provided on the flyer accompanying the IOS-XE
software.
ROM: IOS-XE ROMMON
BOOTLDR: System Bootstrap, Version 17.2.1r[FC1], RELEASE SOFTWARE (P)
Switch uptime is 2 minutes
Uptime for this control processor is 8 minutes
System returned to ROM by Reload Command
System image file is "flash:cat9k_iosxe.17.02.01.SPA.bin"
Last reload reason: Reload Command
This product contains cryptographic features and is subject to United
States and local country laws governing import, export, transfer and
use. Delivery of Cisco cryptographic products does not imply
third-party authority to import, export, distribute or use encryption.
Importers, exporters, distributors and users are responsible for
compliance with U.S. and local country laws. By using this product you
agree to comply with applicable laws and regulations. If you are unable
to comply with U.S. and local laws, return this product immediately.
A summary of U.S. laws governing Cisco cryptographic products may be found at:
http://www.cisco.com/wwl/export/crypto/tool/stqrg.html
If you require further assistance please contact us by sending email to
export@cisco.com.
Technology Package License Information:
Technology-package
Technology-package
Current
Type
Next reboot
network-advantage
Smart License
network-advantage
None
Subscription Smart License
None
AIR License Level: AIR DNA Advantage
Next reload AIR license Level: AIR DNA Advantage
Smart Licensing Status: UNREGISTERED/EVAL EXPIRED
cisco C9300-48UXM (X86) processor with 1338934K/6147K bytes of memory.
Processor board ID FCW2144L045
1 Virtual Ethernet interface
4 Gigabit Ethernet interfaces
36 2.5 Gigabit Ethernet interfaces
20 Ten Gigabit Ethernet interfaces
2 TwentyFive Gigabit Ethernet interfaces
2 Forty Gigabit Ethernet interfaces
Programmability Configuration Guide, Cisco IOS XE Amsterdam 17.3.x
57
Provisioning
Boot Log for Cisco Catalyst 9000 Series Switches
Page 72
2048K bytes of non-volatile configuration memory.
8388608K bytes of physical memory.
1638400K bytes of Crash Files at crashinfo:.
11264000K bytes of Flash at flash:.
Base Ethernet MAC Address
: ec:1d:8b:0a:68:00
Motherboard Assembly Number
: 73-17959-06
Motherboard Serial Number
: FOC21418FPQ
Model Revision Number
: B0
Motherboard Revision Number
: A0
Model Number
: C9300-48UXM
System Serial Number
: FCW2144L045
CLEI Code Number
:
Switch Ports Model
SW Version
SW Image
Mode
1 65
C9300-48UXM
17.02.01
CAT9K_IOSXE
BUNDLE
Configuration register is 0x102
*** Configuring a Loopback Interface ***
Line 1 SUCCESS: interface loop 100
Line 2 SUCCESS: ip address 10.10.10.10 255.255.255.255
Line 3 SUCCESS: end
*** Executing show ip interface brief
Interface
IP-Address
OK? Method Status
Protocol
Vlan1
unassigned
YES unset
up
up
GigabitEthernet0/0
10.127.128.8
YES DHCP
up
up
Tw1/0/1
unassigned
YES unset
down
down
Tw1/0/2
unassigned
YES unset
down
down
Tw1/0/3
unassigned
YES unset
down
down
Tw1/0/4
unassigned
YES unset
down
down
Tw1/0/5
unassigned
YES unset
down
down
Tw1/0/6
unassigned
YES unset
down
down
Tw1/0/7
unassigned
YES unset
down
down
Tw1/0/8
unassigned
YES unset
down
down
Tw1/0/9
unassigned
YES unset
down
down
Tw1/0/10
unassigned
YES unset
down
down
Tw1/0/11
unassigned
YES unset
down
down
Tw1/0/12
unassigned
YES unset
down
down
Tw1/0/13
unassigned
YES unset
down
down
Tw1/0/14
unassigned
YES unset
down
down
Tw1/0/15
unassigned
YES unset
down
down
Tw1/0/16
unassigned
YES unset
down
down
Tw1/0/17
unassigned
YES unset
down
down
Tw1/0/18
unassigned
YES unset
down
down
Tw1/0/19
unassigned
YES unset
down
down
Tw1/0/20
unassigned
YES unset
down
down
Tw1/0/21
unassigned
YES unset
down
down
Tw1/0/22
unassigned
YES unset
down
down
Tw1/0/23
unassigned
YES unset
down
down
Tw1/0/24
unassigned
YES unset
down
down
Tw1/0/25
unassigned
YES unset
down
down
Tw1/0/26
unassigned
YES unset
down
down
Tw1/0/27
unassigned
YES unset
down
down
Tw1/0/28
unassigned
YES unset
down
down
Tw1/0/29
unassigned
YES unset
down
down
Tw1/0/30
unassigned
YES unset
down
down
Tw1/0/31
unassigned
YES unset
down
down
Tw1/0/32
unassigned
YES unset
down
down
Programmability Configuration Guide, Cisco IOS XE Amsterdam 17.3.x
58
Provisioning
Boot Log for Cisco Catalyst 9000 Series Switches
Page 73
Tw1/0/33
unassigned
YES unset
down
down
Tw1/0/34
unassigned
YES unset
down
down
Tw1/0/35
unassigned
YES unset
down
down
Tw1/0/36
unassigned
YES unset
down
down
Te1/0/37
unassigned
YES unset
down
down
Te1/0/38
unassigned
YES unset
down
down
Te1/0/39
unassigned
YES unset
down
down
Te1/0/40
unassigned
YES unset
down
down
Te1/0/41
unassigned
YES unset
down
down
Te1/0/42
unassigned
YES unset
down
down
Te1/0/43
unassigned
YES unset
down
down
Te1/0/44
unassigned
YES unset
down
down
Te1/0/45
unassigned
YES unset
down
down
Te1/0/46
unassigned
YES unset
down
down
Te1/0/47
unassigned
YES unset
down
down
Te1/0/48
unassigned
YES unset
up
up
GigabitEthernet1/1/1
unassigned
YES unset
down
down
GigabitEthernet1/1/2
unassigned
YES unset
down
down
GigabitEthernet1/1/3
unassigned
YES unset
down
down
GigabitEthernet1/1/4
unassigned
YES unset
down
down
Te1/1/1
unassigned
YES unset
down
down
Te1/1/2
unassigned
YES unset
down
down
Te1/1/3
unassigned
YES unset
down
down
Te1/1/4
unassigned
YES unset
down
down
Te1/1/5
unassigned
YES unset
down
down
Te1/1/6
unassigned
YES unset
down
down
Te1/1/7
unassigned
YES unset
down
down
Te1/1/8
unassigned
YES unset
down
down
Fo1/1/1
unassigned
YES unset
down
down
Fo1/1/2
unassigned
YES unset
down
down
TwentyFiveGigE1/1/1
unassigned
YES unset
down
down
TwentyFiveGigE1/1/2
unassigned
YES unset
down
down
Ap1/0/1
unassigned
YES unset
up
up
Loopback100
10.10.10.10
YES TFTP
up
up
*** Configuring username, password, SSH
Line 1 SUCCESS: username cisco privilege 15 password cisco
**CLI Line # 1:
WARNING: Command has been added to the configuration using a type 0 password.
However, type 0 passwords will soon be deprecated. Migrate to a supported password type
Line 2 SUCCESS: ip domain name domain
Line 3 SUCCESS: line vty 0 15
Line 4 SUCCESS: login local
Line 5 SUCCESS: transport input all
Line 6 SUCCESS: end
*** ZTP Day0 Python Script Execution Complete ***
Guestshell destroyed successfully
Script execution success!
Press RETURN to get started!
Programmability Configuration Guide, Cisco IOS XE Amsterdam 17.3.x
59
Provisioning
Boot Log for Cisco Catalyst 9000 Series Switches
Page 74
Feature Information for Zero-Touch Provisioning
The following table provides release information about the feature or features described in this module. This
table lists only the software release that introduced support for a given feature in a given software release
train. Unless noted otherwise, subsequent releases of that software release train also support that feature.
Use Cisco Feature Navigator to find information about platform support and Cisco software image support.
To access Cisco Feature Navigator, go to www.cisco.com/go/cfn. An account on Cisco.com is not required.
Programmability Configuration Guide, Cisco IOS XE Amsterdam 17.3.x
60
Provisioning
Feature Information for Zero-Touch Provisioning
Page 75
Table 3: Feature Information for Zero-Touch Provisioning
Feature Information
Release
Feature Name
Cisco IOS XE Everest
16.5.1a
Cisco IOS XE Everest
16.5.1b
Cisco IOS XE Fuji 16.7.1
Cisco IOS XE Fuji 16.8.2
Cisco IOS XE Gibraltar
16.12.1
Cisco IOS XE Amsterdam
17.2.1
Cisco IOS XE Amsterdam
17.3.1
Zero-Touch Provisioning
Programmability Configuration Guide, Cisco IOS XE Amsterdam 17.3.x
61
Provisioning
Feature Information for Zero-Touch Provisioning
Page 76
Feature Information
Release
Feature Name
To address network provisioning challenges,
Cisco introduces a zero-touch provisioning
model.
In Cisco IOS XE Everest 16.5.1a, this feature
was implemented on the following platforms:
• Cisco Catalyst 3650 Series Switches
• Cisco Catalyst 3850 Series Switches
• Cisco Catalyst 9300 Series Switches
• Cisco Catalyst 9500 Series Switches
In Cisco IOS XE Everest 16.5.1b, this feature
was implemented on the following platform:
• Cisco 4000 Series Integrated Services
Router models with a minimum of 8 GB
RAM to support Guest Shell.
In Cisco IOS XE Fuji 16.7.1, this feature was
implemented on the following platform:
• Cisco ASR 1000 Aggregation Services
Routers (ASR1001-X, ASR1001-HX,
ASR1002-X, ASR1002-HX)
In Cisco IOS XE Fuji 16.8.2, this feature was
implemented on the following platform:
• Cisco ASR 1000 Series Aggregation
Services Routers (ASR1004, ASR1006,
ASR1006-X, ASR1009-X, ASR1013)
In Cisco IOS XE Gibraltar 16.12.1, this feature
was implemented on the following platforms:
• Cisco Catalyst 9200 Series Switches
This feature is not supported on C9200L
SKUs.
• Cisco Catalyst 9300L SKUs
• Cisco Catalyst 9600 Series Switches
• Cisco Catalyst 9800-40 Wireless
Controllers
• Cisco Catalyst 9800-80 Wireless
Controllers
In Cisco IOS XE Amsterdam 17.2.1, this
feature was implemented on the following
Programmability Configuration Guide, Cisco IOS XE Amsterdam 17.3.x
62
Provisioning
Feature Information for Zero-Touch Provisioning
Page 77
Feature Information
Release
Feature Name
platform:
• Cisco Cloud Services Router 1000V
Series
• Cisco C1100 Terminal Services Gateway
(Supported only on
C1100TGX-1N24P32A)
In Cisco IOS XE Amsterdam 17.3.1, this
feature was implemented on the following
platforms:
• Cisco Catalyst 8200 Series Edge
Platforms
• Cisco Catalyst 8300 Series Edge
Platforms
• Cisco Catalyst 8500 and 8500L Series
Edge Platforms
Zero-Touch Provisioning supports HTTP and
TFTP file download.
In Cisco IOS XE Everest 16.8.1, this feature
was implemented on the following platforms:
• Cisco 4000 Series Integrated Services
Routers
• Cisco Catalyst 3650 Series Switches
• Cisco Catalyst 3850 Series Switches
• Cisco Catalyst 9300 Series Switches
• Cisco Catalyst 9500 Series Switches
In Cisco IOS XE Fuji 16.8.1a, this feature was
implemented on Cisco Catalyst 9500-High
Performance Series Switches
Cisco IOS XE Fuji 16.8.1
Cisco IOS XE Fuji 16.8.1a
Zero-Touch Provisioning:
HTTP Download
Programmability Configuration Guide, Cisco IOS XE Amsterdam 17.3.x
63
Provisioning
Feature Information for Zero-Touch Provisioning
Page 78
Feature Information
Release
Feature Name
In Cisco IOS XE Fuji 16.9.1, this feature was
implemented on the following platforms
• Cisco Catalyst 9300 Series Switches
• Cisco Catalyst 9500 Series Switches
In Cisco IOS XE Amsterdam 17.3.2a, this
feature was implemented on the following
platforms:
• Cisco Catalyst 9800-40 Wireless
Controllers
• Cisco Catalyst 9800-80 Wireless
Controllers
Cisco IOS XE Fuji 16.9.1
Cisco IOS XE Amsterdam
17.3.2a
DHCPv6 Support for
Zero-Touch Provisioning
Programmability Configuration Guide, Cisco IOS XE Amsterdam 17.3.x
64
Provisioning
Feature Information for Zero-Touch Provisioning
Page 79
C H A P T E R 3
iPXE
iPXE is an enhanced version of the Pre-boot eXecution Environment (PXE), which is an open standard for
network booting. This module describes the iPXE feature and how to configure it.
• Information About iPXE, on page 65
• How to Configure iPXE, on page 73
• Configuration Examples for iPXE, on page 75
• Troubleshooting Tips for iPXE, on page 78
• Additional References for iPXE, on page 79
• Feature Information for iPXE, on page 79
Information About iPXE
About iPXE
iPXE is an enhanced version of the Pre-boot eXecution Environment (PXE), which is an open standard for
network booting.
iPXE netboot provides:
• IPv4 and IPv6 protocols
• FTP/HTTP/TFTP boot image download
• Embedded scripts into the image
• Stateless and stateful address auto-configuration (SLAAC) using Dynamic Host Configuration Protocol
Version 4 (DHCPv4) and/or DHCPv6, boot URI, and parameters for DHCPv6 options depending on the
IPv6 router advertisement.
Netboot Requirements
The following are the primary requirements for netbooting:
• DHCP server with proper configuration.
• Boot image available on the FTP/HTTP/TFTP server.
• Device configured to boot from a network-based source.
Programmability Configuration Guide, Cisco IOS XE Amsterdam 17.3.x
65

Page 80
iPXE Overview
Network bootloaders support booting from a network-based source. The bootloaders boot an image located
on an HTTP, FTP, or TFTP server. A network boot source is detected automatically by using an iPXE-like
solution.
iPXE enables network boot for a device that is offline. The following are the three types of boot modes:
• iPXE Timeout—Boots through iPXE network boot. Configures a timeout in seconds for iPXE network
boot by using the IPXE_TIMEOUT rommon variable. Use the boot ipxe timeout command to configure
iPXE timeout. When the timeout expires, device boot is activated.
• iPXE Forever—Boots through iPXE network boot. The device sends DHCP requests forever, when the
boot ipxe forever command is configured. This is an iPXE-only boot (which means that the bootloader
will not fall back to a device boot or a command prompt, because it will send DHCP requests forever
until it receives a valid DHCP response.)
• Device—Boots using the local device BOOT line configured on it. When device boot is configured, the
configured IPXE_TIMEOUT rommon variable is ignored. You can activate device boot as specified
below:
• If BOOTMODE=ipxe-forever, device boot is not activated without user intervention (this is possible
only if ENABLE_BREAK=yes).
• If BOOTMODE=ipxe-timeout, device boot is activated when the specified IPXE_TIMEOUT variable
(in seconds) has elapsed.
• If BOOTMODE=device, device boot is activated. This is the default active mode.
• Device boot can also be activated through the CLI.
Device boot is the default boot mode.
Note
Manual boot is another term used in this document. Manual boot is a flag that determines whether to do a
rommon reload or not. When the device is in rommon mode, you have to manually issue the boot command.
If manual boot is set to YES, the rommon or device prompt is activated. If manual boot is set to NO, the
autoboot variable is executed; this means that the value set in the BOOT variable is followed.
Note
The following section describes how an iPXE bootloader works:
Programmability Configuration Guide, Cisco IOS XE Amsterdam 17.3.x
66
Provisioning
iPXE Overview

Page 81
Figure 1: iPXE Bootloader Workflow
1.
Bootloader sends a DHCP discover message, and when the server replies, the Bootloader sends a DHCP
request.
2.
The DHCP response includes the IP address and boot file name. The boot file name indicates that the boot
image is to be retrieved from a TFTP server (tftp://server/filename), FTP server
(ftp://userid:password@server/filename), or an HTTP server (http://server/filename).
3.
Bootloader downloads and boots the image from the network source.
4.
If no DHCP response is received, the bootloader keeps sending DHCP requests forever or for a specified
period of time, based on the boot mode configured. When a timeout occurs, the bootloader reverts to a
device-based boot. The device sends DHCP requests forever only if the configured boot mode is
ipxe-forever. If the ipxe-timeout boot mode command is configured, DHCP requests are sent for the
specified amount of time, and when the timeout expires, device boot mode is activated.
Because the current iPXE implementation works only via the management port (GigabitEthernet0/0), DHCP
requests sent through the front panel ports are not supported.
Note
When using a static network configuration to network boot, ROMMON uses the following environment
variables (and all of them are required):
• BOOT—URLs separated by semicolon (;) to boot from.
• IP_ADDRESS—Statically assigned IP address of a device.
• DEFAULT_GATEWAY—Default gateway of the device.
• IP_SUBNET_MASK—IPv4 or IPv6 prefix information.
IPv4—Subnet mask of the device in the format WWW.XXX.YYY.ZZZ eg. 255.255.255.0.
Programmability Configuration Guide, Cisco IOS XE Amsterdam 17.3.x
67
Provisioning
iPXE Overview

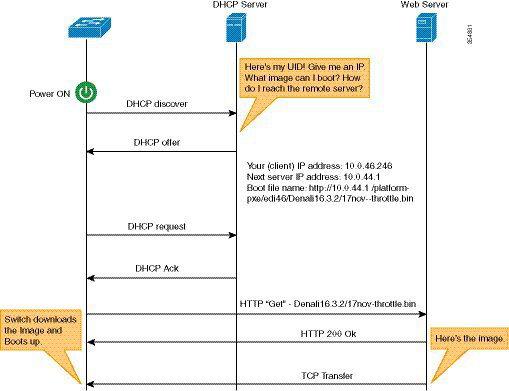
Page 82
IPv6—Subnet prefix length of the device in the format NNN eg. 64 or 112.
When manual boot is disabled, the bootloader determines whether to execute a device boot or a network boot
based on the configured value of the rommon iPXE variable. Irrespective of whether manual boot is enabled
or disabled, the bootloader uses the BOOTMODE variable to determine whether to do a device boot or a
network boot. Manual boot means that the user has configured the boot manual switch command. When
manual boot is disabled, and when the device reloads, the boot process starts automatically.
When iPXE is disabled, the contents of the existing BOOT variable are used to determine how to boot the
device. The BOOT variable may contain a network-based uniform resource identifier (URI) (for example,
http://, ftp://, tftp://), and a network boot is initiated; however DHCP is not used to get the network image
path. The static network configuration is taken from the IP_ADDRESS, DEFAULT_GATEWAY, and
IP_SUBNET_MASK variables. The BOOT variable may also contain a device filesystem-based path, in
which case, a device filesystem-based boot is initiated.
The DHCP server used for booting can identify a device through the Product ID (PID) (available in DHCP
Option 60), chassis serial number (available in DHCP option 61), or the MAC address of the device. The
show inventory and show switch commands also display these values on the device.
The following is sample output from the show inventory command:
Device# show inventory
NAME:“c38xx Stack”, DESCR:“c38xx Stack”
PID:WS-3850-12X-48U-L, VID:V01 ,
SN: F0C1911V01A
NAME:“Switch 1”, DESCR:“WS-C3850-12X48U-L”
PID:WS-C3850-12X48U-L, VID:V01 , SN:F0C1911V01A
NAME:”Switch1 -Power Supply B”, DESCR:“Switch1 -Power Supply B”
PID:PWR-C1-1100WAC, VID:V01, SN:LIT1847146Q
The following is sample output from the show switch command:
Device# show switch
Switch/Stack Mac Address : 046c.9d01.7d80 - Local Mac Address
Mac persistency wait time: Indefinite
H/W
Current
Switch#
Role
Mac Address
Priority Version
State
1
Member
046c.9d1e.1a00
1
Ready
2
Standby
046c.9d01.7d80
1
Ready
*3
Active
f8b7.e24e.9a00
1
P2B
Ready
The following rommon variables should be configured for iPXE:
• BOOTMODE = ipxe-forever | ipxe-timeout | device
• IPXE_TIMEOUT = seconds
IPv6 iPXE Network Boot
This illustration displays how IPv6 iPXE network boot works on a Cisco device:
Programmability Configuration Guide, Cisco IOS XE Amsterdam 17.3.x
68
Provisioning
IPv6 iPXE Network Boot
Page 83
The four elements in the above illustration are described below:
• IPv6 Booting Device—The device that is booting through iPXE boot.
• Supporting Device—A Cisco device that is configured with an IPv6 address to generate Router
Advertisement (RA) messages.
In this illustration, the IPv6 booting device, the supporting device, and the DHCP
server are on the same subnet. However; if the supporting device and the DHCP
server are on different subnets, then there must be a relay agent in the network.
Note
• DHCP server—Any DHCP server.
• Web server—Any web server.
This section describes the IPv6 iPXE boot process:
1.
The device sends a router solicitation Internet Control Message Protocol IPv6 (ICMPv6) type 133 packet
to the IPv6 device on the local subnet.
2.
The IPv6 device on the local subnet replies with a router advertisement (RA) message, ICMPv6 type 134
packet. The device that sent the router solicitation message, gets the default router and prefix information
for Stateless Address AutoConfiguration (SLAAC) address completion from the RA packet.
Programmability Configuration Guide, Cisco IOS XE Amsterdam 17.3.x
69
Provisioning
IPv6 iPXE Network Boot

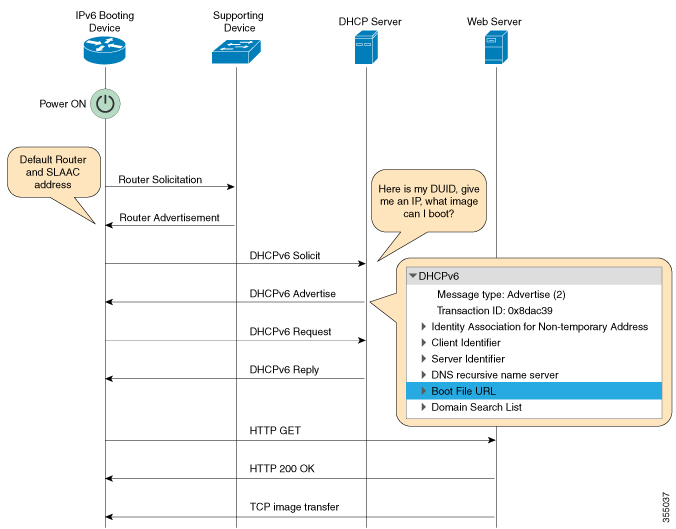
Page 84
The device sends a DHCPv6 solicit message to the multicast group address of ff02::1:2 for all DHCP
agents.
The following sample displays the fields in a DHCPv6 solicit packet during iPXE boot:
DHCPv6
Message type: Solicit (1)
Transaction ID: 0x36f5f1
Client Identifier
Vendor Class
Identity Association for Non-Temporary Address
Option Request
User Class
Vendor-specific Information
The DHCPv6 solicit message contains the following information:
• DHCP Unique Identifier (DUID)—Identifies the client. iPXE supports DUID-EN. EN stands for
Enterprise Number, and this DUID is based on the vendor-assigned unique identifier.
• DHCP and DHCPv6 Options
4.
If the DHCPv6 server is configured, it responds with a DHCPv6 advertise packet that contains the 128
Bit IPv6 address, the boot file Uniform Resource Identifier (URI), the Domain Name System (DNS) server
and domain search list, and the client and server IDs. The client ID contains the DUID of the client (In
this illustration, the IPv6 Booting Device), and the Server ID contains the DUID of the DHCPv6 server.
5.
The client then sends a DHCPv6 request packet to the multicast group address ff02::1:2, requesting for
advertised parameters.
6.
The server responds with a unicast DHCPv6 reply to the Link Local (FE80::) IPv6 address of the client.
The following sample displays the fields in a DHCPv6 reply packet:
DHCPv6
Message type: Reply (7)
Transaction ID: 0x790950
Identity Association for Non-Temporary Address
Client Identifier
Server Identifier
DNS recursive name server
Boot File URL
Domain Search List
7.
The device then sends an HTTP GET request to the web server.
8.
If the requested image is available at the specified path, the web server responds with an OK for the HTTP
GET request.
9.
The TCP image transfer copies the image, and the device boots up.
IPv6 Address Assignment in Rommon Mode
The DHCP client uses the following order-of-precedence to decide which IPv6 address to use in rommon
mode:
1.
DHCP Server-assigned address
Programmability Configuration Guide, Cisco IOS XE Amsterdam 17.3.x
70
Provisioning
IPv6 Address Assignment in Rommon Mode
Page 85
Stateless Address Auto-Configuration (SLAAC) address
3.
Link-local address
4.
Site-local address
The device uses the DHCP server-assigned address to boot an image. If the DHCPv6 server fails to assign an
address, the device tries to use the SLAAC address. If both the DHCP server-assigned address and the SLAAC
address are not available, the device uses the link-local address. However, the remote FTP/HTTP/TFTP servers
must be on the same local subnet as that of the device for the image copy to succeed.
If the first three addresses are not available, the device uses the automatically generated site-local address.
Supported ROMMON Variables
The following ROMMON variables are supported in Cisco IOS XE Fuji 16.8.1:
• BAUD: Changes the device console BAUD rate to one of the Cisco standard baud rate; such as 1200,
2400, 4800, 9600, 19200, 38400, 57600, and 115200). Any invalid value will be rejected. If the BAUD
variable is not set, the default will be 9600. The corresponding CLI command is
• ENABLE_BREAK: Enables a rommon break. The default value is NO.
• MANUAL_BOOT: If manual boot is set to 1, the rommon or device prompt is activated. If manual boot
is set to 0, the device is reloaded; but rommon mode is not activated.
• SWITCH_IGNORE_STARTUP_CFG: If the value is 1, it causes the device to ignore the startup
configuration. If the value is not set, the value is treated as zero. This is a read-only variable, and can
only be modified by IOS.
iPXE-Supported DHCP Options
iPXE boot supports the following DHCPv4 and DHCPv6 options in rommon mode.
Catalyst 9000 Series Switches support DHCP Option 60, Option 77, DHCPv6 Options 1, Option 15, and
Option 16. DHCP Option 61 is only supported on Catalyst 9300 and 9500 Series Switches.
Note
• DHCP Option 60—Vendor Class Identifier. This option is populated with the value of the ROMMON
environment variable MODEL_NUM.
• DHCP Option 61—Client Identifier. This option is populated with the value of theROMMON environment
variable SYSTEM_SERIAL_NUM.
This option is not supported on Catalyst 9400 Series Switches.
Note
• DHCP Option 77—User Class Option. This option is added to a DHCP Discover packet, and contains
the value equal to the string iPXE. This option helps to isolate iPXE DHCP clients looking for an image
to boot from a DHCP server.
Programmability Configuration Guide, Cisco IOS XE Amsterdam 17.3.x
71
Provisioning
Supported ROMMON Variables

Page 86
The following is sample DHCPv4 configuration from the ISC DHCP Server that displays the use of
Option 77. The if condition in this sample implies that if Option 77 exists, and is equal to the string iPXE,
then advertise the Boot File URI for the image.
host Switch2 {
fixed-address 192.168.1.20 ;
hardware ethernet CC:D8:C1:85:6F:11 ;
#user-class = length of string + ASCII code for iPXE
if exists user-class and option user-class = 04:68:50:58:45 {
filename "http://192.168.1.146/test-image.bin"
}
}
• DHCPv6 Option 1—Client Identifier Option. This option is populated with the value of the ROMMON
environment variable SYSTEM_SERIAL_NUM as specified in RFC 3315. The recommended format
for the ROMMON environment variable is MAC_ADDR.
• DHCPv6 Option 15—User Class Option. This option is the IPv6 User Class option in a DHCPv6 solicit
message, and is populated with the string, iPXE. The following sample shows Option 15 defined in the
ISC DHCP server:
option dhcp6.user-class code 15 = string ;
The following is a sample DHCP Server configuration that uses the DHCPv6 Option 15:
#Client-specific parameters
host switch1 {
#assigning a fixed IPv6 address
fixed-address6 2001:DB8::CAFE ;
#Client DUID in hexadecimal format contains: DUID-type"2" + "EN=9" + "Chassis
serial number"
host-identifier option dhcp6.client-id
00:02:00:00:00:09:46:4F:43:31:38:33:
31:58:31:41:53;
#User class 00:04:69:50:58:45 is len 4 + "iPXE"
if option dhcp6.user-class = 00:04:69:50:58:45 {
option dhcp6.bootfile-url
"http://[2001:DB8::461/platform-pxe/edi46/test-image.bin";
}
}
• DHCPv6 Option 16—Vendor Class Option. Contains the device product ID (PID). The PID can be
determined from the output of the show inventory command or from the MODEL_NUM rommon
variable. Option 16 is not a default option in the ISC DHCP Server and can be defined as follows:
option dhcp6.vendor-class-data code 16 = string;
The following sample configuration illustrates the use of DHCPv6 Option 16:
Source: dhcpd6ConfigPD
host host1-ipxe6-auto-host1 {
fixed-address6 2001:DB8::1234;
host-identifier option dhcp6.client-id 00:02:00:00:00:09:46:4F:
43:31:38:33:31:58:31:41:53;
if option dhcp6.vendor-class-data = 00:00:00:09:00:0E:57:53:2D:
43:33:38:35:30:2D:32:34:50:2D:4D {
option dhcp6.bootfile-url
Programmability Configuration Guide, Cisco IOS XE Amsterdam 17.3.x
72
Provisioning
iPXE-Supported DHCP Options
Page 87
"http://[2001:DB8::46]/platform-pxe/host1/17jan-polaris.bin";
The table below describes the significant fields shown in the display.
Table 4: Sample Output Field Descriptions
Description
Field
DHCP Unique Identifier (DUID) to identify the
client.
dhcp6.client-id
DHCPv6 Option 15, the User Class option
dhcp6.user-class
DHCPv6 Option 16, the Vendor Class option that
contains the switch Product ID (PID).
dhcp6.vendor-class-data
DHCPv6 Option 6 to request for the Boot File URI
dhcp6.bootfile-url
DHCPv6 Unique Identifiers
There are three types of DHCPv6 Identifiers (DUIDs) defined by RFC 3315; these are:
• DUID-LLT—DUID Link Layer address plus time, this is the link layer address of the network interface
connected to the DHCP device plus the time stamp at which it is generated.
• DUID-EN—EN stands for Enterprise Number, this DUID is based on vendor-assigned unique ID.
• DUID-LL—DUID formed using the Link Layer address of any network interface that is permanently
connected to the DHCP (client/server) device.
Cisco devices that support this feature use the DUID-EN (DUID Type 2) to identify the DHCP client (that is
the device in the DHCPv6 Solicit packet). Catalyst 9000 Series Switches support not only DUID-EN, but also
DUID-LL (DUID Type 3). DUID-EN is the preferred type; however, if switches are unable to create it, then
DUID-LL is constructed and used.
How to Configure iPXE
Configuring iPXE
SUMMARY STEPS
1.
enable
2. configure terminal
3.
boot ipxe forever [switch number]
•
• boot ipxe timeout seconds [switch number]
4. boot system {switch switch-number | all} {flash: | ftp: | http: | usbflash0 | tftp:}
5. end
Programmability Configuration Guide, Cisco IOS XE Amsterdam 17.3.x
73
Provisioning
DHCPv6 Unique Identifiers
Page 88
DETAILED STEPS
Procedure
Purpose
Command or Action
Enables privileged EXEC mode.
enable
Step 1
Example:
• Enter your password if prompted.
Device> enable
Enters global configuration mode.
configure terminal
Example:
Step 2
Device# configure terminal
Configures the BOOTMODE rommon variable.
Step 3
• boot ipxe forever [switch number]
• boot ipxe timeout seconds [switch number]
• The forever keyword configures the BOOTMODE
rommon variable as IPXE-FOREVER.
Example:
Device(config)# boot ipxe forever switch 2
• The timeout keyword configures the BOOTMODE
rommon variable as IPXE-TIMEOUT.
Example:
Device(config)# boot ipxe timeout 30 switch 2
Boots an image from the specified location.
boot system {switch switch-number | all} {flash: | ftp: |
http: | usbflash0 | tftp:}
Step 4
• You can either use an IPv4 or an IPv6 address for the
remote FTP/HTTP/TFTP servers.
Example:
Device(config)# boot system switch 1
http://192.0.2.42/image-filename
• You must enter the IPv6 address inside the square
brackets (as per RFC 2732); if not the device will not
boot.
or
Device(config)# boot system switch 1
http://[2001:db8::1]/image-filename
Exits global configuration mode and returns to privileged
EXEC mode.
end
Example:
Step 5
Device(config)# end
Configuring Device Boot
You can either use the no boot ipxe or the default boot ipxe command to configure device boot.
SUMMARY STEPS
1.
enable
2. configure terminal
3.
no boot ipxe
•
• default boot ipxe
4. end
Programmability Configuration Guide, Cisco IOS XE Amsterdam 17.3.x
74
Provisioning
Configuring Device Boot
Page 89
DETAILED STEPS
Procedure
Purpose
Command or Action
Enables privileged EXEC mode.
enable
Step 1
Example:
• Enter your password if prompted.
Device> enable
Enters global configuration mode.
configure terminal
Example:
Step 2
Device# configure terminal
Configures device boot. The default bot mode is device
boot.
Step 3
• no boot ipxe
• default boot ipxe
Enables default configuration on the device.
Example:
Device(config)# no boot ipxe
Example:
Device(config)# default boot ipxe
Exits global configuration mode and returns to privileged
EXEC mode.
end
Example:
Step 4
Device(config)# end
Configuration Examples for iPXE
Example: iPXE Configuration
The following example shows that iPXE is configured to send DHCP requests forever until the device
boots with an image:
Device# configure terminal
Device(config)# boot ipxe forever switch 2
Device(config)# end
The following example shows how to configure the boot mode to ipxe-timeout. The configured
timeout is 200 seconds. If an iPXE boot failure occurs after the configured timeout expires, the
configured device boot is activated. In this example, the configured device boot is
http://[2001:db8::1]/image-filename.
Device# configure terminal
Device(config)# boot ipxe timeout 200 switch 2
Device(config)# boot system http://[2001:db8::1]/image-filename
Device(config)# end
Programmability Configuration Guide, Cisco IOS XE Amsterdam 17.3.x
75
Provisioning
Configuration Examples for iPXE
Page 90
Sample iPXE Boot Logs
The following are sample boot logs from a device in rommon mode. Here, manual boot using the
ipxe-timeout command is configured:
switch: boot
pxemode:(ipxe-timeout) 60s timeout
00267.887 ipxe_get_booturl: Get URL from DHCP; timeout 60s
00267.953 ipxe_get_booturl: trying DHCPv6 (#1) for 10s
IPv4:
ip addr 192.168.1.246
netmask 255.255.255.0
gateway 192.168.1.46
IPv6:
link-local addr fe80::ced8:c1ff:fe85:6f00
site-local addr fec0::ced8:c1ff:fe85:6f00
DHCP addr 2001:db8::cafe
router addr fe80::f29e:63ff:fe42:4756
SLAAC addr 2001:db8::ced8:c1ff:fe85:6f00 /64
Common:
macaddr cc:d8:c1:85:6f:00
dns 2001:db8::46
bootfile
http://[2001:DB8::461/platform-pxe/edi46/17jan-dev.bin--13103--2017-Feb28--13-54-50
domain cisco.com
00269.321 ipxe_get_booturl: got URL
(http://[2001:DB8::461/platform-pxe/edi46/17jan-dev.bin--13103--2017-Feb-28--13-54-50)
Reading full image into memory ….….….….….….….….….….….….….….….….….….….….…...
Bundle Image
––––––––––––––––––––––––––––––––––––––––––––––-
Kernel Address
: 0x5377a7e4
Kernel Size
: 0x365e3c/3563068
Initramfs Address : 0x53ae0620
Initramfs Size
: 0x13a76f0/20608752
Compression Format: mzip
Sample DHCPv6 Server Configuration for iPXE
The following is a sample DHCPv6 server configuration taken from an Internet Systems Consortium
(ISC) DHCP Server for reference. The lines preceded by the character #, are comments that explain
the configuration that follows.
Default-least-time 600;
max-lease-time-7200;
log-facility local7;
#Global configuration
#domain search list
option dhcp6.domain-search "cisco.com" ;
#User-defined options:new-name code new-code = definition ;
option dhcp6.user-class code 15 = string ;
option dhcp6.vendor-class-data code 16 = string;
Programmability Configuration Guide, Cisco IOS XE Amsterdam 17.3.x
76
Provisioning
Sample iPXE Boot Logs
Page 91
subnet6 2001:db8::/64 {
#subnet range for clients requiring an address
range6 2001:db8:0000:0000::/64;
#DNS server options
option dhcp6.name-servers 2001:db8::46;
}
#Client-specific parameters
host switch1 {
#assigning a fixed IPv6 address
fixed-address6 2001:DB8::CAFE ;
#Client DUID in hexadecimal that contains: DUID-type "2" + "EN=9" + "Chassis serial
number"
host-identifier option dhcp6.client-id 00:02:00:00:00:09:46:4F:43:31:38:33:
31:58:31:41:53;
option dhcp6.bootfile-url "http://[2001:DB8::461/platform-pxe/edi46/test-image.bin";
}
For more information on DHCP server commands, see the ISC DHCP Server website.
In this sample configuration, the dhcp6.client-id option identifies the switch, and it is followed by
the Enterprise Client DUID. The client DUID can be broken down for understanding as 00:02 +
00:00:00:09 + chassis serial number in hexadecimal format, where 2 refers to the Enterprise Client
DUID Type, 9 refers to the reserved code for Cisco’s Enterprise DUID, followed by the ASCII code
for the Chassis serial number in hexadecimal format. The chassis serial number for the switch in this
sample is FOC1831X1AS.
The Boot File URI is advertised to the switch only using the specified DUID.
The DHCPv6 Vendor Class Option 16 can also be used to identify the switch on the DHCP Server.
To define Option 16 as a user-defined option, configure the following:
option dhcp6.vendor-class-data code 16 = string;
The following is a sample DHCP server configuration that identifies the switch based on the DHCPv6
Vendor Class Option 16 that is formed by using the switch Product ID:
Source: dhcp6ConfigPID
host edi-46-ipxe6-auto-edi46 {
fixed-address6 2001:DB8::1234;
host-identifier option dhcp6.client-id 00:02:00:00:00:09:
46:4F:43:31:38:33:31:58:31:58:31:41:53;
if option dhcp6.vendor-class-data = 00:00:00:09:00:0E:57:
53:2D:43:33:38:35:30:2D:32:34:50:2D:4C {
option dhcp6.bootfile-url "http://[2001:DB8::461/platform-pxe/edi46/17jan-dev.bin";
}
}
In this sample configuration, the dhcp6.vendor-class-data option refers to the DHCPv6 Option 16.
In the dhcp6.vendor-class-data, 00:00:00:09 is Cisco’s Enterprise DUID, 0E is the length of the PID,
and the rest is the PID in hexadecimal format. The PID can also be found from the output of the
show inventory command or from the CFG_MODEL_NUM rommon variable. The PID used in
this sample configuration is WS-C3850-24P-L.
DHCPv6 options and DUIDs in the server configuration must be specified in the hexadecimal format,
as per the ISC DHCP server guidelines.
Programmability Configuration Guide, Cisco IOS XE Amsterdam 17.3.x
77
Provisioning
Sample DHCPv6 Server Configuration for iPXE
Page 92
Troubleshooting Tips for iPXE
This section provides troubleshooting tips.
• When iPXE boot is enabled on power up, the device first attempts to send a DHCPv6 Solicit message,
followed by a DHCPv4 Discover message. If boot mode is ipxe-forever the device keeps iterating
between the two forever.
• If the boot-mode is iPXE timeout, the device first sends a DHCPv6 Solicit message, and then a DHCPv4
Discover message, and the device falls back to device boot after the timeout expires.
• To interrupt iPXE boot, send a serial break to the console.
When using a UNIX telnet client, type CTRL-] and then send break. When you are using a different
TELNET client, or you are directly attached to a serial port, sending a break may be triggered by a
different keystroke or command.
• If the DHCP server responds with an image, but the DNS server cannot resolve the hostname, enable
DNS debugs.
We recommend the use of ISC DHCP server. This feature has not been verified
on IOS DHCP.
Note
• To test the HTTP server connectivity, use HTTP copy to copy a small sample file from your HTTP server
to your device. For example, at the rommon prompt, enter copy http://192.168.1.1/test null: (the flash
is normally locked and you need to use the null device for testing) or http://[2001:db8::99]/test.
• When manual boot is enabled, and boot mode is ipxe-timeout, the device will not automatically boot on
power up. Issue the boot command in rommon mode. To automate the boot process on power up, disable
manual boot.
• Use the net6-show command to display the current IPv6 parameters, including IPv6 addresses and the
default router in rommon mode
On Catalyst 9000 Series Switches, use the net-show show command.
Note
• Use the net-dhcp or the net6-dhcp commands based on your configuration, The net-dhcp command is
a test command for DHCPv4 and the net6-dhcp command is for DHCPv6.
On Catalyst 9000 Series Switches, use the net-dhcp -6 command for DHCPv6.
Note
• Use the dig command to resolve names.
On Catalyst 9000 Series Switches, use the dns-lookup commmand to resolve
names.
Note
Programmability Configuration Guide, Cisco IOS XE Amsterdam 17.3.x
78
Provisioning
Troubleshooting Tips for iPXE

Page 93
• Enable HTTP debug logs to view the HTTP response code from the web server.
• If Stateless Address Auto-Configuration (SLAAC) addresses are not generated, there is no router that is
providing IPv6 RA messages. iPXE boot for IPv6 can still work but only with link or site-local addresses.
Additional References for iPXE
Related Documents
Document Title
Related Topic
Programmability Command Reference, Cisco IOS XE Everest
16.6.1
Programmability commands
Standards and RFCs
Title
Standard/RFC
Dynamic Host Configuration Protocol for IPv6 (DHCPv6)
RFC 3315
Uniform Resource Identifier (URI): Generic Syntax
RFC 3986
Technical Assistance
Link
Description
http://www.cisco.com/support
The Cisco Support website provides extensive online resources, including
documentation and tools for troubleshooting and resolving technical issues
with Cisco products and technologies.
To receive security and technical information about your products, you can
subscribe to various services, such as the Product Alert Tool (accessed from
Field Notices), the Cisco Technical Services Newsletter, and Really Simple
Syndication (RSS) Feeds.
Access to most tools on the Cisco Support website requires a Cisco.com user
ID and password.
Feature Information for iPXE
The following table provides release information about the feature or features described in this module. This
table lists only the software release that introduced support for a given feature in a given software release
train. Unless noted otherwise, subsequent releases of that software release train also support that feature.
Use Cisco Feature Navigator to find information about platform support and Cisco software image support.
To access Cisco Feature Navigator, go to www.cisco.com/go/cfn. An account on Cisco.com is not required.
Programmability Configuration Guide, Cisco IOS XE Amsterdam 17.3.x
79
Provisioning
Additional References for iPXE
Page 94
Table 5: Feature Information for iPXE
Feature Information
Release
Feature Name
Network Bootloaders support booting from an
IPv4/IPv6 device-based or network-based
source. A network boot source must be
detected automatically by using an iPXE-like
solution.
This feature was implemented on the following
platforms:
• Catalyst 3650 Series Switches
• Catalyst 3850 Series Switches
Cisco IOS XE Denali 16.5.1a
iPXE
In Cisco IOS XE Denali 16.6.1, this feature
was implemented on the following platforms:
• Catalyst 9300 Series Switches
• Catalyst 9500 Series Switches
Cisco IOS XE Denali 16.6.1
In Cisco IOS XE Everest 16.6.2, this feature
was implemented on Cisco Catalyst 9400
Series Switches.
Cisco IOS XE Everest 16.6.2
In Cisco IOS XE Fuji 16.9.2, this feature was
implemented on the following platforms.
• Cisco Catalyst 9200 Series Switches
• Cisco Catalyst 9300L SKUs
Cisco IOS XE Fuji 16.9.2
In Cisco IOS XE Gibraltar 16.11.1, this feature
was implemented on Cisco Catalyst 9600
Series Switches.
Cisco IOS XE Gibraltar 16.11.1
IPXE supports the IPv6 protocol.
This feature was implemented on the following
platforms:
• Catalyst 9300 Series Switches
• Catalyst 9400 Series Switches
• Catalyst 9500 Series Switches
Cisco IOS XE 16.8.1a
IPXE IPv6 Support
Programmability Configuration Guide, Cisco IOS XE Amsterdam 17.3.x
80
Provisioning
Feature Information for iPXE
Page 95
P A R T II
Shells and Scripting
• Guest Shell, on page 83
• Python API, on page 111
• CLI Python Module, on page 117
• EEM Python Module, on page 123

Page 96
Page 97
C H A P T E R 4
Guest Shell
Guestshell is a virtualized Linux-based environment, designed to run custom Linux applications, including
Python for automated control and management of Cisco devices. It also includes the automated provisioning
(Day zero) of systems. This container shell provides a secure environment, decoupled from the host device,
in which users can install scripts or software packages and run them.
This module describes Guest Shell and how to enable it.
• Restrictions for Guest Shell, on page 83
• Information About the Guest Shell, on page 83
• How to Enable the Guest Shell, on page 92
• Configuration Examples for the Guest Shell, on page 101
• Additional References for Guest Shell, on page 106
• Feature Information for Guest Shell, on page 107
Restrictions for Guest Shell
Guest Shell is not supported on Cisco Catalyst 9200L SKUs.
Information About the Guest Shell
Guest Shell Overview
The Guest Shell is a virtualized Linux-based environment, designed to run custom Linux applications, including
Python for automated control and management of Cisco devices. Using the Guest Shell, you can also install,
update, and operate third-party Linux applications. The guest shell is bundled with the system image and can
be installed using the guestshell enable Cisco IOS command.
The Guest Shell environment is intended for tools, Linux utilities, and manageability rather than networking.
Guest Shell shares the kernel with the host (Cisco switches and routers) system. Users can access the Linux
shell of Guest Shell and update scripts and software packages in the container rootfs. However, users within
the Guest Shell cannot modify the host file system and processes.
Guest Shell container is managed using IOx. IOx is Cisco's Application Hosting Infrastructure for Cisco IOS
XE devices. IOx enables hosting of applications and services developed by Cisco, partners, and third-party
developers in network edge devices, seamlessly across diverse and disparate hardware platforms.
Programmability Configuration Guide, Cisco IOS XE Amsterdam 17.3.x
83

Page 98
Guest Shell Software Requirements
The Guest Shell container allows users to run their scripts and apps on the system. The Guest Shell container
on Intel x86 platforms will be a Linux container (LXC) with a CentOS 8.0 minimal rootfs. You can install
other Python libraries such as, Python Version 3.0 during runtime using the Yum utility in CentOS 8.0. You
can also install or update python packages using PIP.
Table 6: Guest Shell Software Requirements
Guest Shell (LXC Container)
Cisco IOS XE
Operating System
All supported Cisco IOS XE platforms
Platform
• CentOS 7 supported in Cisco IOS XE Amsterdam 17.2.1
and previous releases.
• CentOS 8 supported in Cisco IOS XE Amsterdam 17.3.1
and later releases.
Note
CentOS supports only Python 3.6.
Guest Shell Environment
Supported till Cisco IOS XE Amsterdam 17.3.1
Python 2.7
Supported in Cisco IOS XE Amsterdam 17.1.1 and later
releases.
In Cisco IOS XE Amsterdam 17.1.1 and Cisco IOS XE
Amsterdam 17.2.1, Python V2 is the default. However, in
Cisco IOS XE Amsterdam 17.3.1 and later releases, Python
V3 is the default.
Note
Cisco Catalyst 9200 Series Switches support Python version
3 in Cisco IOS XE Amsterdam 17.3.1 and later releases.
Python 3.6
• Cisco Embedded Event Manager
• Cisco IOS XE CLIs
Pre-installed Custom Python Libraries
SSH, Yum install, and Python PIP install
Supported Rootfs
Not supported
GNU C Compiler
Supported
RPM Install
x86 and ARM
Architecture
Guest Shell Security
Cisco provides security to ensure that users or apps in the Guest Shell do not compromise the host system.
Guest Shell is isolated from the host kernel, and it runs as an unprivileged container.
Programmability Configuration Guide, Cisco IOS XE Amsterdam 17.3.x
84
Shells and Scripting
Guest Shell Software Requirements
Page 99
Hardware Requirements for the Guest Shell
This section provides information about the hardware requirements for supported platforms which have
variable memory configurations.
Table 7: Guest Shell Resource Requirements
Minimum Memory
Platforms
4 GB
Cisco 1000 Series Integrated Services Routers
4 GB
Cisco Cloud Services Router 1000V Series
8 GB DRAM (In Cisco IOS XE Fuji 16.8.1 and
previous releases.)
4GB DRAM (In Cisco IOS XE Fuji 16.8.1 and later
releases.)
Cisco ISR 4000 Series Integrated Services Routers
All other platforms are shipped with sufficient resources to support Guest Shell.
Virtual-service installed applications and the Guest Shell container cannot co-exist.
Note
Guest Shell Storage Requirements
Cisco Catalyst 9300 Series Switches and Cisco Catalyst 9500 Series Switches require 1100 MB free hard disk
space for Guest Shell to install successfully.
On Cisco 4000 Series Integrated Services Routers, the Guest Shell is installed on the Network Interface
Module (NIM)-Solid State Drive (SSD) (hard disk), if available. If the hard disk drive is available, there is
no option to select bootflash to install Guest Shell. Cisco 4000 Series Integrated Services Routers require
1100 MB free hard disk (NIM-SSD) space for Guest Shell to install successfully.
For Cisco 4000 Series Integrated Services Routers and Cisco ASR 1000 Series Aggregation Services Routers
(when an optional hard disk has been added to that router) you can only do resource resizing if you have
installed the Guest Shell on the hard disk and inserted the hard disk into the router.
A Guest Shell installed via bootflash does not allow you to do resource resizing using application hosting
configuration commands.
Note
During Guest Shell installation, if enough hard disk space is not available, an error message is displayed.
The following is a sample error message on an Cisco ISR 4000 Series Integrated Services Router
% Error:guestshell_setup.sh returned error:255, message:
Not enough storage for installing guestshell. Need 1100 MB free space.
Bootflash or hard disk space can be used to store additional data by Guest Shell. On Cisco 4000 Series
Integrated Services Routers, Guest Shell has 800 MB of storage space available. Because Guest Shell accesses
the bootflash, it can use the entire space available.
Programmability Configuration Guide, Cisco IOS XE Amsterdam 17.3.x
85
Shells and Scripting
Hardware Requirements for the Guest Shell

Page 100
Table 8: Resources Available to Guest Shell and Guest Shell Lite
Minimum/Maximum
Default
Resource
1/100%
1%
Note
1% is not standard; 800 CPU units/
total system CPU units.
CPU
256/256 MB
512/512 MB (Cisco Cloud Services
Router 1000V Series)
256 MB
512 MB (Cisco Cloud Services
Router 1000V Series)
Memory
Enabling and Running the Guest Shell
The guestshell enable command installs Guest Shell. This command is also used to reactivate Guest Shell,
if it is disabled.
When Guest Shell is enabled and the system is reloaded, Guest Shell remains enabled.
IOx must be configured before the guestshell enable command is used.
Note
The guestshell run bash command opens the Guest Shell bash prompt. Guest Shell must already be enabled
for this command to work.
If the following message is displayed on the console, it means that IOx is not enabled; check the output of
the show iox-service command to view the status of IOx.
The process for the command is not responding or is otherwise unavailable
Note
For more information on how to enable Guest Shell, see the "Configuring the AppGigabitEthernet Interface
for Guest Shell" and "Enabling Guest Shell on the Management Interface" sections.
Disabling and Destroying the Guest Shell
The guestshell disable command shuts down and disables Guest Shell. When Guest Shell is disabled and the
system is reloaded, Guest Shell remains disabled.
The guestshell destroy command removes the rootfs from the flash filesystem. All files, data, installed Linux
applications and custom Python tools and utilities are deleted, and are not recoverable.
Accessing Guest Shell on a Device
Network administrators can use Cisco IOS commands to manage files and utilities in the Guest Shell.
During the Guest Shell installation, SSH access is setup with a key-based authentication. The access to the
Guest Shell is restricted to the user with the highest privilege (15) in Cisco IOS. This user is granted access
into the Linux container as the guestshell Linux user, who is a sudoer, and can perform all root operations.
Programmability Configuration Guide, Cisco IOS XE Amsterdam 17.3.x
86
Shells and Scripting
Enabling and Running the Guest Shell

Page 101
Commands executed through the Guest Shell are executed with the same privilege that a user has when logged
into the Cisco IOS terminal.
At the Guest Shell prompt, you can execute standard Linux commands.
Accessing Guest Shell Through the Management Port
By default, Guest Shell allows applications to access the management network. Users cannot change the
management VRF networking configurations from inside the Guest Shell.
For platforms without a management port, a VirtualPortGroup can be associated with Guest Shell in the Cisco
IOS configuration. For more information, see the Sample VirtualPortGroup Configuration section.
Note
Cisco Catalyst 9200 Series Switches, Cisco Catalyst 9300 Series Switches, and Cisco Catalyst 9400 Series
Switches support the AppGigabitEthernet interface and management interface (mgmt-if) to access Guest
Shell.
Cisco Catalyst 9500 and 9500 High-Performance Series Switches and Cisco Catalyst 9600 Series Switches
do not support AppGigabitEthernet interfaces.
Cisco Catalyst 9200L SKUs do not support Guest Shell.
Note
Day Zero Guest Shell Provisioning Using Front-Panel Port or Fiber Uplink
On Day Zero, when the device has no management connectivity, and the only connectivity is either through
the front-panel port or fibre uplink port, Guest Shell is internally configured to use the available port. The
AppGigabitEthernet interface connects Guest Shell to the server.
When Guest Shell is connected to the server, the device downloads the configuration script, and configures
the device. This configuration also includes downloading, setting, and starting of the virtual machine (VM).
After the day zero configuration is complete, based on your configuration the system may reboot. Ensure that
the system boots with only the user-specific configuration.
Guest Shell Connectivity Using the USB Port
The device uses a serial adapter to connect to multiple other devices. This serial adapter is connected through
the USB port that is present on the front panel of the device.
The VM controls the serial adapter, and if there are any changes to the connected devices that are attached to
the USB interface while VM is running, the VM is notified.
Stacking with Guest Shell
When Guest Shell is installed, a directory is automatically created in the flash filesystem. This directory is
synchronized across stack members. During a switchover, only contents of the this directory are synchronized
across all stack members. To preserve data during high availability switchover, place data in this directory.
During a high availability switchover, the new active device creates its own Guest Shell installation and
restores Guest Shell to the synchronized state; the old filesystem is not maintained. Guestshell state is internally
synchronized across all stack members.
Programmability Configuration Guide, Cisco IOS XE Amsterdam 17.3.x
87
Shells and Scripting
Accessing Guest Shell Through the Management Port

Page 102
Cisco IOx Overview
Cisco IOx (IOs + linuX) is an end-to-end application framework that provides application-hosting capabilities
for different application types on Cisco network platforms. The Cisco Guest Shell, a special container
deployment, is one such application, that is useful in system deployment.
Cisco IOx facilitates the life cycle management of applications and data exchange by providing a set of services
that helps developers to package prebuilt applications, and host them on a target device. IOx life cycle
management includes distribution, deployment, hosting, starting, stopping (management), and monitoring of
applications and data. IOx services also include application distribution and management tools that help users
discover and deploy applications to the IOx framework.
Cisco IOx application hosting provides the following features:
• Hides network heterogeneity.
• Cisco IOx application programming interfaces (APIs) remotely manage the life cycle of applications
hosted on a device.
• Centralized application life cycle management.
• Cloud-based developer experience.
IOx Tracing and Logging Overview
IOx tracing and logging feature allows guest application to run separately on the host device that can help
reporting the logging and tracing of the data to the host. The tracing data is saved into IOx tracelog, and the
logging data is saved into the Cisco IOS syslog on the host device.
You can redirect the tracing data to the appropriate storage device on the host device which can help in
debugging of guest application.
IOXMAN Structure
Each guest application, a system LXC or a KVM instance is configured with its own syslogd and logfiles
stored within a visible file system and are not accessible to the host device. To support logging data to the
Cisco IOS syslog and tracing data to IOx tracelog on the host, two serial devices, /dev/ttyS2 and /dev/ttyS3,
are designated on the guest application for delivering data to the host as shown in the following figure.
Programmability Configuration Guide, Cisco IOS XE Amsterdam 17.3.x
88
Shells and Scripting
Cisco IOx Overview
Page 103
Figure 2: IOXMAN Structure
IOXMAN is a process to establish the tracing infrastructure to provide logging or tracing services for the
guest application, except Libvirt that emulates serial devices. IOXMAN is based on the lifecycle of the guest
application to enable and disable tracing service, to send logging data to the Cisco IOS syslog, to save tracing
data to IOx tracelog, and to maintain IOx tracelog for each guest application.
Logging and Tracing System Flow
The following sections describes how the IOx logging and tracing works:
LXC Logging
1.
Guest OS enables /dev/ttyS2 on the guest application.
2.
Guest application writes data to /dev/ttyS2.
3.
Libvirt emulates /dev/ttyS2 to /dev/pts/x on the host.
Programmability Configuration Guide, Cisco IOS XE Amsterdam 17.3.x
89
Shells and Scripting
Logging and Tracing System Flow
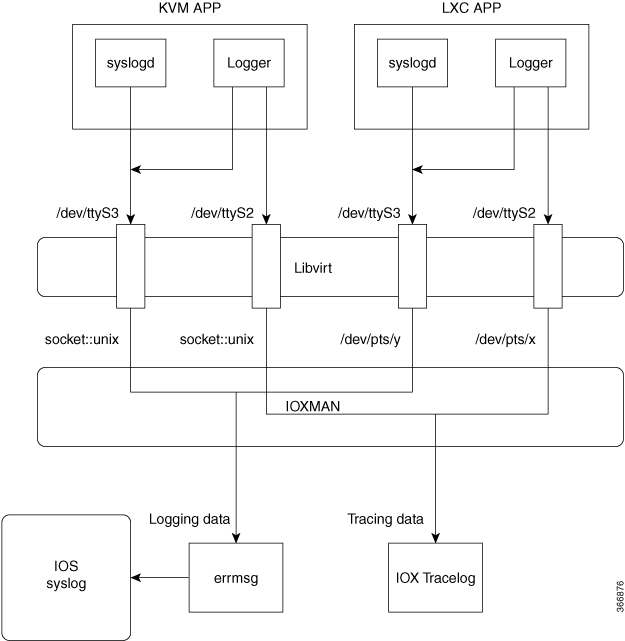
Page 104
IOXMAN gets the emulated serial device, /dev/pts/x from the XML file.
5.
IOXMAN listens and reads available data from /dev/pts/x, sets the severity for the message, filters, parses
and queues the message.
6.
Start timer to send the message to /dev/log device on the host using errmsg.
7.
Data is saved to the Cisco IOS syslog.
KVM Logging
1.
Guest OS enables /dev/ttyS2 on the guest application.
2.
Guest application writes data to /dev/ttyS2.
3.
Libvirt emulates /dev/ttyS2 to /dev/pts/x on the host.
4.
IOXMAN gets the emulated TCP path from the XML file.
5.
IOXMAN opens an UNIX socket, and connects to the remote socket.
6.
IOXMAN reads available data from the socket, sets the severity for the message, filters, parses, and queues
the message.
7.
Starts the timer to send the message to /dev/log device on the host using errmsg.
8.
Data is saved to the Cisco IOS syslog.
LXC Tracing
1.
Guest OS enables /dev/ttyS3 on the guest application.
2.
Configures syslogd to copy message to /dev/ttyS3.
3.
Guest application writes data to /dev/ttyS3.
4.
Libvirt emulates /dev/ttyS3 to /dev/pts/y on the host.
5.
IOXMAN gets the emulated serial device, /dev/pts/y from the XML file.
6.
IOXMAN listens and reads available data from /dev/pts/y, filters, parses, and saves the message to IOx
tracelog.
7.
If IOx tracelog is full, IOXMAN rotates the tracelog file to /bootflash/tracelogs.
KVM Tracing
1.
Guest OS enables /dev/ttyS3 on the guest application.
2.
Configures syslog to copy the message to /dev/ttyS3.
3.
Guest application writes data to /dev/ttyS3.
4.
Libvirt emulates /dev/ttyS3 to TCP path on the host.
5.
IOXMAN gets the emulated TCP path from the XML file.
6.
IOXMAN opens an UNIX socket, and connects to the remote socket.
Programmability Configuration Guide, Cisco IOS XE Amsterdam 17.3.x
90
Shells and Scripting
Logging and Tracing System Flow
Page 105
IOXMAN reads the available data from the socket, sets the severity level for the message, filters, parses,
and saves the message to IOx tracelog.
8.
If IOx tracelog is full, IOXMAN rotates the tracelog file to /bootflash/tracelogs.
Logging and Tracing of Messages
The following sections explains the logging and tracing of messages in to the Cisco IOS syslog.
Logging Messages in Cisco IOS Syslog
For any logging messages received from a guest application, IOXMAN sets the severity of the message to
NOTICE by default, before sending it to the Cisco IOS syslog. When a message is received by IOSd, it is
displayed on the console and saved on the syslog in the following message format:
*Apr 7 00:48:21.911: %IM-5-IOX_INST_NOTICE:ioxman: IOX SERVICE guestshell LOG: Guestshell
test
To comply with the Cisco IOS syslog, the IOXMAN does support severity levels for logging messages. To
report logging messages with severity, a guest application must append a header to the front of the message.
[a123b234,version,severity]
a123b234 is magic number.
Version:
severity support version.
Current version is 1.
Severity:
CRIT is 2
ERR is 3
WARN is 4
NOTICE is 5
INFO is 6
DEBUG is 7
The following is an example of a message log:
echo “[a123b234,1,2]Guestshell failed” > /dev/ttyS2
Perform the following steps to report logging data from a guest application to the Cisco IOS syslog:
1.
If you are using C programming, use write() to send logging data to the host.
#define SYSLOG_TEST
“syslog test”
int fd;
fd = open("/dev/ttyS2", O_WRONLY);
write(fd, SYSLOG_TEST, strlen(SYSLOG_TEST));
close(fd);
2.
If you are using a Shell console, use echo to send logging data to the host.
echo “syslog test” > /dev/ttyS2
Tracing Message to IOx Tracelog
Perform the following steps to report tracing messages from a guest application to IOx tracelog:
1.
If you are using C programming, use write() to send tracing message to the host.
Programmability Configuration Guide, Cisco IOS XE Amsterdam 17.3.x
91
Shells and Scripting
Logging and Tracing of Messages
Page 106
#define SYSLOG_TEST
“tracelog test”
int fd;
fd = open("/dev/ttyS3", O_WRONLY);
write(fd, SYSLOG_TEST, strlen(SYSLOG_TEST));
close(fd);
2.
If you are using C programming, use syslog() to send tracing message to the host.
#define SYSLOG_TEST
“tracelog test”
syslog(LOG_INFO, “%s\n”, SYSLOG_TEST);
3.
If you are using a Shell console, use echo to send tracing data to the host.
echo “tracelog test” > /dev/ttyS3
or
logger “tracelog test”
How to Enable the Guest Shell
Managing IOx
Before you begin
IOx takes upto two minutes to start. CAF, IOXman, and Libvirtd services must be running to enable Guest
Shell successfully.
SUMMARY STEPS
1.
enable
2. configure terminal
3. iox
4. exit
5. show iox-service
6. show app-hosting list
DETAILED STEPS
Procedure
Purpose
Command or Action
Enables privileged EXEC mode.
enable
Step 1
Example:
• Enter your password if prompted.
Device> enable
Enters global configuration mode.
configure terminal
Example:
Step 2
Programmability Configuration Guide, Cisco IOS XE Amsterdam 17.3.x
92
Shells and Scripting
How to Enable the Guest Shell
Page 107
Purpose
Command or Action
Device# configure terminal
Configures IOx services.
iox
Example:
Step 3
Device(config)# iox
Exits global configuration mode and returns to privileged
EXEC mode.
exit
Example:
Step 4
Device(config)# exit
Displays the status of the IOx service
show iox-service
Example:
Step 5
Device# show iox-service
Displays the list of app-hosting services enabled on the
device.
show app-hosting list
Example:
Step 6
Device# show app-hosting list
Example
The following is sample output from the show iox-service command:
Device# show iox-service
IOx Infrastructure Summary:
IOx service (CAF) 1.10.0.0 : Running
IOx service (HA)
: Running
IOx service (IOxman)
: Running
IOx service (Sec storage) : Not Running
Libvirtd
1.3.4
: Running
Dockerd
18.03.0
: Running
Application DB Sync Info
: Available
Sync Status
: Disabled
The following is sample output from the show app-hosting list command:
Device# show app-hosting list
App id
State
guestshell
RUNNING
Programmability Configuration Guide, Cisco IOS XE Amsterdam 17.3.x
93
Shells and Scripting
Managing IOx
Page 108
Managing the Guest Shell
VirtualPortGroups are supported only on routing platforms.
Note
Before you begin
IOx must be configured, and running for Guest Shell access to work. If IOx is not configured, the following
message is displayed on the device console.
iox feature is not enabled.
Removing IOx removes access to the Guest Shell, but the rootfs remains unaffected.
An application or management interface must also be configured to enable and operate Guest Shell. See
"Configuring the AppGigabitEthernet Interface for Guest Shell" and "Enabling Guest Shell on the Management
Interface" sections for more information on enabling an interface for Guest Shell.
SUMMARY STEPS
1.
enable
2. guestshell enable
3. guestshell run linux-executable
4. guestshell run bash
5. guestshell disable
6. guestshell destroy
DETAILED STEPS
Procedure
Purpose
Command or Action
Enables privileged EXEC mode.
enable
Step 1
Example:
• Enter your password if prompted.
Device> enable
Enables the Guest Shell service.
guestshell enable
Step 2
Example:
Note
• The guestshell enable command uses the management
virtual routing and forwarding (VRF) instance for
networking.
Device# guestshell enable
• When using VirtualPortGroups (VPGs) for front panel
networking, the VPG must be configured first.
• The guest IP address and the gateway IP address must
be in the same subnet.
Programmability Configuration Guide, Cisco IOS XE Amsterdam 17.3.x
94
Shells and Scripting
Managing the Guest Shell

Page 109
Purpose
Command or Action
Executes or runs a Linux program in the Guest Shell.
guestshell run linux-executable
Step 3
Example:
Note
In Cisco IOS XE Amsterdam 17.3.1 and later releases,
only Python version 3 is supported.
Device# guestshell run python
or
Device# guestshell run python3
Starts a Bash shell to access the Guest Shell.
guestshell run bash
Example:
Step 4
Device# guestshell run bash
Disables the Guest Shell service.
guestshell disable
Example:
Step 5
Device# guestshell disable
Deactivates and uninstalls the Guest Shell service.
guestshell destroy
Example:
Step 6
Device# guestshell destroy
Managing the Guest Shell Using Application Hosting
This section is applicable to Cisco routing platforms. VirtualPortGroups are not supported on Cisco Catalyst
Switching platforms.
Note
IOx must be configured, and running for Guest Shell access to work. If IOx is not configured, the following
message is displayed on the device console.
iox feature is not enabled.
Removing IOx removes access to the Guest Shell, but the rootfs remains unaffected.
Use this procedure (Managing the Guest Shell Using Application Hosting) to enable the Guest Shell in Cisco
IOS XE Fuji 16.7.1 and later releases. For Cisco IOS XE Everest 16.6.x and previous releases, use the procedure
in Managing the Guest Shell, on page 94.
Note
Device(config)# interface GigabitEthernet1
Device(config-if)# ip address dhcp
Device(config-if)# ip nat outside
Device(config-if)# exit
Device(config-if)# interface VirtualPortGroup0
Device(config-if)# ip address 192.168.35.1 255.255.255.0
Device(config-if)# ip nat inside
Programmability Configuration Guide, Cisco IOS XE Amsterdam 17.3.x
95
Shells and Scripting
Managing the Guest Shell Using Application Hosting

Page 110
Device(config-if)# exit
Device(config)# ip nat inside source list GS_NAT_ACL interface GigabitEthernet1 overload
Device(config)# ip access-list standard GS_NAT_ACL
Device(config)# permit 192.168.0.0 0.0.255.255
Device(config)# app-hosting appid guestshell
Device(config-app-hosting)# app-vnic gateway1 virtualportgroup 0 guest-interface 0
Device(config-app-hosting-gateway)# guest-ipaddress 192.168.35.2 netmask 255.255.255.0
Device(config-app-hosting-gateway)# exit
Device(config-app-hosting)# app-default-gateway 192.168.35.1 guest-interface 0
Device(config-app-hosting)# end
Device# guestshell enable
Device# guestshell run python
Figure 3: Managing the Guest Shell using Application Hosting
For front panel networking, you must configure the GigabitEthernet and VirtualPortGroup interfaces as shown
above. The Guest Shell uses a Virtualportgroup as the source interface to connect to the outside network
through NAT.
The following commands are used to configure inside NAT. They allow the Guest Shell to reach the internet;
for example, to obtain Linux software updates:
ip nat inside source list
ip access-list standard
permit
The guestshell run command in the example above, runs a python executable. You can also use the guestshell
run command to run other Linux executables; for example, see the example guestshell run bash command,
which starts a Bash shell or the guestshell disable command which shuts down and disables the Guest Shell.
If the system is later reloaded, the Guest Shell remains disabled.
Configuring the AppGigabitEthernet Interface for Guest Shell
The following task is applicable only to Catalyst switches that have the AppGigabitEthernet interface. All
other Catalyst switches use the management port.
Note
Programmability Configuration Guide, Cisco IOS XE Amsterdam 17.3.x
96
Shells and Scripting
Configuring the AppGigabitEthernet Interface for Guest Shell

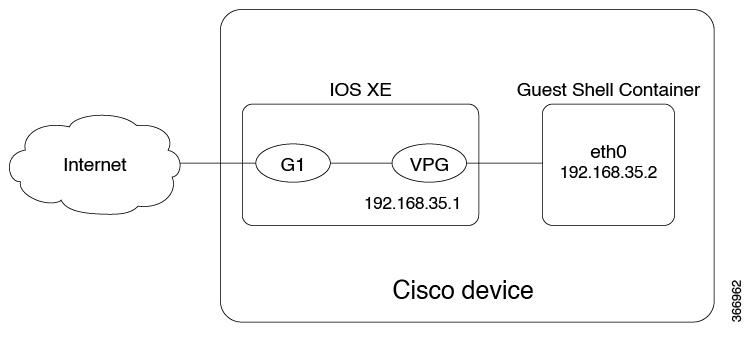
Page 111
SUMMARY STEPS
1.
enable
2.
configure terminal
3.
interface AppGigabitEthernet interface-number
4.
switchport mode trunk
5.
exit
6.
app-hosting appid name
7.
app-vnic AppGigabitEthernet trunk
8.
vlan vlan-ID guest-interface guest-interface-number
9.
guest-ipaddress ip-address netmask netmask
10.
exit
11.
exit
12.
app-default-gateway ip-address guest-interface network-interface
13.
nameserver# ip-address
14.
end
15.
guestshell enable
DETAILED STEPS
Procedure
Purpose
Command or Action
Enables privileged EXEC mode.
enable
Step 1
Example:
• Enter your password if prompted.
Device> enable
Enters global configuration mode.
configure terminal
Example:
Step 2
Device# configure terminal
Configures the AppGigabitEthernet interface and enters
interface configuration mode.
interface AppGigabitEthernet interface-number
Example:
Step 3
Device(config)# interface AppGigabitEthernet 1/0/1
Sets the interface into permanent trunking mode and
negotiates to convert the neighboring link into a trunk link.
switchport mode trunk
Example:
Step 4
Device(config-if)# switchport mode trunk
Exits interface configuration mode and returns to global
configuration mode.
exit
Example:
Step 5
Device(config-if)# exit
Configures an application and enters application-hosting
configuration mode.
app-hosting appid name
Example:
Step 6
Programmability Configuration Guide, Cisco IOS XE Amsterdam 17.3.x
97
Shells and Scripting
Configuring the AppGigabitEthernet Interface for Guest Shell
Page 112
Purpose
Command or Action
Device(config)# app-hosting appid guestshell
Configures a trunk port as the front-panel port for
application hosting, and enters application-hosting trunk
configuration mode.
app-vnic AppGigabitEthernet trunk
Example:
Device(config-app-hosting)# app-vnic
AppGigabitEthernet trunk
Step 7
Configures a VLAN guest interface and enters
application-hosting VLAN-access IP configuration mode.
vlan vlan-ID guest-interface guest-interface-number
Example:
Step 8
Device(config-config-app-hosting-trunk)# vlan 4094
guest-interface 0
(Optional) Configures a static IP address.
guest-ipaddress ip-address netmask netmask
Example:
Step 9
Device(config-config-app-hosting-vlan-access-ip)#
guest-ipaddress 192.168.2.2 netmask 255.255.255.0
Exits application-hosting VLAN-access IP configuration
mode and returns to application-hosting trunk configuration
mode
exit
Example:
Device(config-config-app-hosting-vlan-access-ip)#
exit
Step 10
Exits application-hosting trunk configuration mode and
returns to application-hosting configuration mode.
exit
Example:
Step 11
Device(config-config-app-hosting-trunk)# exit
Configures the default management gateway.
app-default-gateway ip-address guest-interface
network-interface
Step 12
Example:
Device(config-app-hosting)# app-default-gateway
192.168.2.1 guest-interface 0
Configures the Domain Name System (DNS) server.
nameserver# ip-address
Example:
Step 13
Device(config-app-hosting)# name-server0
172.16.0.1
Exits application-hosting configuration mode and returns
to privileged EXEC mode.
end
Example:
Step 14
Device(config-app-hosting)# end
Enables the Guest Shell service.
guestshell enable
Example:
Step 15
Device# guestshell enable
Programmability Configuration Guide, Cisco IOS XE Amsterdam 17.3.x
98
Shells and Scripting
Configuring the AppGigabitEthernet Interface for Guest Shell
Page 113
Enabling Guest Shell on the Management Interface
This task is applicable to Cisco Catalyst 9200 Series Switches, Cisco Catalyst 9300 Series Switches, Cisco
Catalyst 9400 Series Switches, Cisco Catalyst 9500 Series Switches, and Cisco Catalyst 9600 Series Switches.
Note
SUMMARY STEPS
1.
enable
2. configure terminal
3. app-hosting appid name
4. app-vnic management guest-interface interface-number
5. end
6. show app-hosting list
7.
guestshell enable
DETAILED STEPS
Procedure
Purpose
Command or Action
Enables privileged EXEC mode.
enable
Step 1
Example:
• Enter your password if prompted.
Device> enable
Enters global configuration mode.
configure terminal
Example:
Step 2
Device# configure terminal
Configures an application and enters application-hosting
configuration mode.
app-hosting appid name
Example:
Step 3
Device(config)# app-hosting appid guestshell
Configures the management gateway of the virtual network
interface and guest interface, and enters application-hosting
management-gateway configuration mode.
app-vnic management guest-interface interface-number
Example:
Device(config-app-hosting)# app-vnic management
guest-interface 0
Step 4
Exits application-hosting management-gateway
configuration mode and returns to privileged EXEC mode.
end
Example:
Step 5
Device(config-app-hosting-mgmt-gateway)# end
Displays the current status of the installed applications.
show app-hosting list
Step 6
Example:
Note
Programmability Configuration Guide, Cisco IOS XE Amsterdam 17.3.x
99
Shells and Scripting
Enabling Guest Shell on the Management Interface

Page 114
Purpose
Command or Action
Guest Shell is displayed in the list of applications, only if
it is installed.
Device# show app-hosting list
Enables the Guest Shell service.
guestshell enable
Example:
Step 7
Device# guestshell enable
Accessing the Python Interpreter
Python can be used interactively or Python scripts can be run in the Guest Shell. Use the guestshell run
python command to launch the Python interpreter in Guest Shell and open the Python terminal.
In releases prior to Cisco IOS XE Amsterdam 17.3.1, Python V2 is the default. Python V3 is supported in
Cisco IOS XE Amsterdam 17.1.1, and Cisco IOS XE Amsterdam 17.2.1. In Cisco IOS XE Amsterdam 17.3.1
and later releases, Python V3 is the default.
Note
In Releases Prior to Cisco IOS XE Amsterdam 17.3.1
The guestshell run command is the Cisco IOS equivalent of running Linux executables, and when running
a Python script from Cisco IOS, specify the absolute path. The following example shows how to specify the
absolute path for the command:
Guestshell run python /flash/guest-share/sample_script.py parameter1 parameter2
The following example shows how to enable Python on a Cisco Catalyst 3650 Series Switch or a Cisco Catalyst
3850 Series Switch:
Device# guestshell run python
Python 2.7.11 (default, March 16 2017, 16:50:55)
[GCC 4.7.0] on linux2
Type "help", "copyright", "credits" or "license" for more information.
The following example shows how to enable Python on a Cisco ISR 4000 Series Integrated Services Router:
Device# guestshell run python
Python 2.7.5 (default, Jun 17 2014, 18:11:42)
[GCC 4.8.2 20140120 (Red Hat 4.8.2-16)] on linux2
Type "help", "copyright", "credits" or "license" for more information.
In Cisco IOS XE Amsterdam 17.3.1 and Later Releases
The following example shows how to enable Python on Cisco Catalyst 9000 Series Switches:
Programmability Configuration Guide, Cisco IOS XE Amsterdam 17.3.x
100
Shells and Scripting
Accessing the Python Interpreter

Page 115
Device# guestshell run python3
Python 3.6.8 (default, Nov 21 2019, 22:10:21)
[GCC 8.3.1 20190507 (Red Hat 8.3.1-4)] on linux
Type "help", "copyright", "credits" or "license" for more information.>>>>>
Configuration Examples for the Guest Shell
Example: Managing the Guest Shell
In Cisco IOS XE Amsterdam 17.1.x to Cisco IOS XE Amsterdam 17.2.x
The following example shows how to enable Guest Shell. In Cisco IOS XE Amsterdam 17.1.x and
Cisco IOS XE Amsterdam 17.2.x, both Python V2.7 and Python V3.6 are supported. However,
Python V2.7 is the default in these releases.
Device> enable
Device# guestshell enable
Management Interface will be selected if configured
Please wait for completion
Guestshell enabled successfully
Device# guestshell run python
or
Device# guestshell run python3
Python 2.7.5 (default, Jun 17 2014, 18:11:42)
[GCC 4.8.2 20140120 (Red Hat 4.8.2-16)] on linux2
Type "help", "copyright", "credits" or "license" for more information.
Device# guestshell run bash
[guestshell@guestshell ~]$
Device# guestshell disable
Guestshell disabled successfully
Device# guestshell destroy
Guestshell destroyed successfully
In Cisco IOS XE Amsterdam 17.3.1 and Later Releases
The following example shows how to enable Guest Shell. In Cisco IOS XE Amsterdam 17.3.1 and
later releases, only Python V3.6 is supported.
Device> enable
Programmability Configuration Guide, Cisco IOS XE Amsterdam 17.3.x
101
Shells and Scripting
Configuration Examples for the Guest Shell
Page 116
Device# guestshell enable
Management Interface will be selected if configured
Please wait for completion
Guestshell enabled successfully
Device# guestshell run python3
Python 3.6.8 (default, Nov 21 2019, 22:10:21)
[GCC 8.3.1 20190507 (Red Hat 8.3.1-4)] on linux
Type "help", "copyright", "credits" or "license" for more information.>>>>>
Device# guestshell run bash
[guestshell@guestshell ~]$
Device# guestshell disable
Guestshell disabled successfully
Device# guestshell destroy
Guestshell destroyed successfully
Sample VirtualPortGroup Configuration
VirtualPortGroups are supported only on Cisco routing platforms.
Note
When using the VirtualPortGroup interface for Guest Shell networking, the VirtualPortGroup interface
must have a static IP address configured. The front port interface must be connected to the Internet
and Network Address Translation (NAT) must be configured between the VirtualPortGroup and the
front panel port.
The following is a sample VirtualPortGroup configuration:
Device> enable
Device# configure terminal
Device(config)# interface VirtualPortGroup 0
Device(config-if)# ip address 192.168.35.1 255.255.255.0
Device(config-if)# ip nat inside
Device(config-if)# no mop enabled
Device(config-if)# no mop sysid
Device(config-if)# exit
Device(config)# interface GigabitEthernet 0/0/3
Device(config-if)# ip address 10.0.12.19 255.255.0.0
Device(config-if)# ip nat outside
Device(config-if)# negotiation auto
Device(config-if)# exit
Device(config)# ip route 0.0.0.0 0.0.0.0 10.0.0.1
Device(config)# ip route 10.0.0.0 255.0.0.0 10.0.0.1
!Port forwarding to use ports for SSH and so on.
Device(config)# ip nat inside source static tcp 192.168.35.2 7023 10.0.12.19 7023 extendable
Programmability Configuration Guide, Cisco IOS XE Amsterdam 17.3.x
102
Shells and Scripting
Sample VirtualPortGroup Configuration

Page 117
Device(config)# ip nat outside source list NAT_ACL interface GigabitEthernet 0/0/3 overload
Device(config)# ip access-list standard NAT_ACL
Device(config-std-nacl)# permit 192.168.0.0 0.0.255.255
Device(config-std-nacl)# exit
! App-hosting configuration
Device(config)# app-hosting appid guestshell
Device(config-app-hosting)# app-vnic gateway1 virtualportgroup 0 guest-interface 0
Device(config-app-hosting-gateway)# guest-ipaddress 192.168.35.2 netmask 255.255.255.0
Device(config-app-hosting-gateway)# exit
Device(config-app-hosting)# app-resource profile custom
Device(config-app-resource-profile-custom)# cpu 1500
Device(config-app-resource-profile-custom)# memory 512
Device(config-app-resource-profile-custom)# end
Device# guestshell enable
Device# guestshell run python
Example: Configuring the AppGigabitEthernet Interface for Guest Shell
The following task is applicable only to Catalyst switches that have the AppGigabitEthernet interface.
All other Catalyst switches use the management port.
Note
The following example shows how to configure an AppGigabitEthernet interface for Guest Shell.
Here, VLAN 4094 creates a Network Address Translation (NAT) this is used for Guest Shell. VLAN
1 is an external interface.
Device> enable
Device# configure terminal
Device(config)# ip nat inside source list NAT_ACL interface vlan 1 overload
Device(config)# ip access-list standard NAT_ACL
Device(config-std-nacl)# permit 192.168.0.0 0.0.255.255
Device(config-std-nacl)# exit
Device(config)# vlan 4094
Device(config-vlan)# exit
Device(config)# interface vlan 4094
Device(config-if)# ip address 192.168.2.1 255.255.255.0
Device(config-if)# ip nat inside
Device(config-if)# exit
Device(config)# interface vlan 1
Device(config-if)# ip nat outside
Device(config-if)# exit
Device(config)# ip routing
Device(config)# ip route 0.0.0.0 0.0.0.0 209.165.201.1
Device(config)# interface AppGigabitEthernet 1/0/1
Device(config-if)# switchport mode trunk
Device(config-if)# exit
Device(config)# app-hosting appid guestshell
Device(config-app-hosting)# app-vnic AppGigEthernet trunk
Device(config-config-app-hosting-trunk)# vlan 4094 guest-interface 0
Device(config-config-app-hosting-vlan-access-ip)# guest-ipaddress 192.168.2.2 netmask
255.255.255.0
Device(config-config-app-hosting-vlan-access-ip)# exit
Programmability Configuration Guide, Cisco IOS XE Amsterdam 17.3.x
103
Shells and Scripting
Example: Configuring the AppGigabitEthernet Interface for Guest Shell

Page 118
Device(config-config-app-hosting-trunk)# exit
Device(config-app-hosting)# app-default-gateway 192.168.2.1 guest-interface 0
Device(config-app-hosting)# name-server0 172.16.0.1
Device(config-app-hosting)# name-server1 198.51.100.1
Device(config-app-hosting)# end
Device# guestshell enable
Example: Enabling Guest Shell on the Management Interface
This example is applicable to Cisco Catalyst 9200 Series Switches, Cisco Catalyst 9300 Series Switches,
Cisco Catalyst 9400 Series Switches, Cisco Catalyst 9500 Series Switches, and Cisco Catalyst 9600 Series
Switches.
Device> enable
Device# configure terminal
Device(config)# app-hosting appid guestshell
Device(config-app-hosting)# app-vnic management guest-interface 0
Device(config-app-hosting-mgmt-gateway)# end
Device# guestshell enable
Example: Guest Shell Usage
From the Guest Shell prompt, you can run Linux commands. The following example shows the usage
of some Linux commands.
[guestshell@guestshell~]$ pwd
/home/guestshell
[guestshell@guestshell~]$ whoami
guestshell
[guestshell@guestshell~]$ uname -a
Linux guestshell 5.4.85 #1 SMP Tue Dec 22 10:50:44 UTC 2020 x86_64 x86_64 x86_64 GNU/Linux
Cisco 4000 Series Integrated Services Routers use the dohost provided by CentOS Linux release
7.1.1503.
The dohost command requires the ip http server command to be configured on the device.
Note
Example: Guest Shell Networking Configuration
For Guest Shell networking, the following configurations are required.
• Configure Domain Name System (DNS)
• Configure proxy settings
Programmability Configuration Guide, Cisco IOS XE Amsterdam 17.3.x
104
Shells and Scripting
Example: Enabling Guest Shell on the Management Interface

Page 119
• Configure YUM or PIP to use proxy settings
Sample DNS Configuration for Guest Shell
The following is a sample DNS configuration for Guest Shell:
[guestshell@guestshell ~]$ cat/etc/resolv.conf
nameserver 192.0.2.1
Other Options:
[guestshell@guestshell ~]$ cat/etc/resolv.conf
domain cisco.com
search cisco.com
nameserver 192.0.2.1
search cisco.com
nameserver 198.51.100.1
nameserver 172.16.0.6
domain cisco.com
nameserver 192.0.2.1
nameserver 172.16.0.6
nameserver 192.168.255.254
Example: Configuring Proxy Environment Variables
If your network is behind a proxy, configure proxy variables in Linux. If required, add these variables
to your environment.
The following example shows how to configure your proxy variables:
[guestshell@guestshell ~]$cat /bootflash/proxy_vars.sh
export http_proxy=http://proxy.example.com:80/
export https_proxy=http://proxy.example.com:80/
export ftp_proxy=http://proxy.example.com:80/
export no_proxy=example.com
export HTTP_PROXY=http://proxy.example.com:80/
export HTTPS_PROXY=http://proxy.example.com:80/
export FTP_PROXY=http://proxy.example.com:80/
guestshell ~] source /bootflash/proxy_vars.sh
Example: Configuring Yum and PIP for Proxy Settings
The following example shows how to use Yum for setting proxy environment variables:
cat /etc/yum.conf | grep proxy
[guestshell@guestshell~]$ cat/bootflash/yum.conf | grep proxy
Programmability Configuration Guide, Cisco IOS XE Amsterdam 17.3.x
105
Shells and Scripting
Sample DNS Configuration for Guest Shell
Page 120
proxy=http://proxy.example.com:80/
PIP install picks up environment variable used for proxy settings. Use sudo with -E option for PIP
installation. If the environment variables are not set, define them explicitly in PIP commands as
shown in following example:
sudo pip --proxy http://proxy.example.com:80/install requests
sudo pip install --trusted-bost pypi.example.com --index-url
http://pypi.example.com/simple requests
The following example shows how to use PIP install for Python:
Sudo -E pip install requests
[guestshell@guestshell ~]$ python
Python 2.17.11 (default, Feb 3 2017, 19:43:44)
[GCC 4.7.0] on linux2
Type "help", "copyright", "credits" or "license" for more information
import requests
Additional References for Guest Shell
Related Documents
Document Title
Related Topic
CLI Python Module
Python module
Zero-Touch Provisioning
Zero-Touch Provisioning
MIBs
MIBs Link
MIB
To locate and download MIBs for selected platforms, Cisco IOS releases, and feature sets, use Cisco
MIB Locator found at the following URL:
http://www.cisco.com/go/mibs
Programmability Configuration Guide, Cisco IOS XE Amsterdam 17.3.x
106
Shells and Scripting
Additional References for Guest Shell
Page 121
Technical Assistance
Link
Description
http://www.cisco.com/support
The Cisco Support website provides extensive online resources, including
documentation and tools for troubleshooting and resolving technical issues
with Cisco products and technologies.
To receive security and technical information about your products, you can
subscribe to various services, such as the Product Alert Tool (accessed from
Field Notices), the Cisco Technical Services Newsletter, and Really Simple
Syndication (RSS) Feeds.
Access to most tools on the Cisco Support website requires a Cisco.com user
ID and password.
Feature Information for Guest Shell
The following table provides release information about the feature or features described in this module. This
table lists only the software release that introduced support for a given feature in a given software release
train. Unless noted otherwise, subsequent releases of that software release train also support that feature.
Use Cisco Feature Navigator to find information about platform support and Cisco software image support.
To access Cisco Feature Navigator, go to www.cisco.com/go/cfn. An account on Cisco.com is not required.
Programmability Configuration Guide, Cisco IOS XE Amsterdam 17.3.x
107
Shells and Scripting
Feature Information for Guest Shell
Page 122
Table 9: Feature Information for Guest Shell
Feature Information
Release
Feature Name
Guest Shell is a secure container
that is an embedded Linux
environment that allows customers
to develop and run Linux and
custom Python applications for
automated control and management
of Cisco switches. It also includes
the automated provisioning of
systems. This container shell
provides a secure environment,
decoupled from the host device, in
which users can install scripts or
software packages and run them.
In Cisco IOS XE Everest 16.5.1a,
this feature was implemented on
the following platforms:
• Cisco Catalyst 3650 Series
Switches
• Cisco Catalyst 3850 Series
Switches
• Cisco Catalyst 9300 Series
Switches
• Cisco Catalyst 9500 Series
Switches
In Cisco IOS Everest 16.5.1b, this
feature was implemented on the
following platforms:
• Cisco 4000 Series Integrated
Services Routers
Cisco IOS XE Everest 16.5.1a
Cisco IOS XE Everest 16.5.1b
Guest Shell
In Cisco IOS XE Everest 16.6.2,
this feature was implemented on
Cisco Catalyst 9400 Series
Switches.
Cisco IOS XE Everest 16.6.2
Cisco IOS XE Fuji 16.7.1
Programmability Configuration Guide, Cisco IOS XE Amsterdam 17.3.x
108
Shells and Scripting
Feature Information for Guest Shell
Page 123
Feature Information
Release
Feature Name
In Cisco IOS XE Fuji 16.7.1, this
feature was implemented on the
following platforms:
• Cisco ASR 1000 Series
Aggregation Services Routers
• Cisco Cloud Services Router
1000v Series
In Cisco IOS XE Fuji 16.7.1, for
Guest Shell feature, the Logging
and Tracing support was
implemented on Cisco ASR 1000
Aggregation Services Routers.
In Cisco IOS XE Fuji 16.8.1, this
feature was implemented on Cisco
Catalyst 9500-High Performance
Series Switches.
Cisco IOS XE Fuji 16.8.1
In Cisco IOS XE Fuji 16.9.1, this
feature was implemented on Cisco
1000 Series Integrated Services
Routers.
Cisco IOS XE Fuji 16.9.1
In Cisco IOS XE Gibraltar
16.11.1b, this feature was
implemented on the following
platforms:
• Cisco Catalyst 9800-40
Wireless Controllers
• Cisco Catalyst 9800-80
Wireless Controllers
Cisco IOS XE Gibraltar 16.11.1b
In Cisco IOS XE Gibraltar 16.12.1,
this feature was implemented on
the following platforms:
• Cisco Catalyst 9200 Series
Switches
Note
This feature is not supported
on C9200L SKUs.
• Cisco Catalyst 9300L SKUs
• Cisco Catalyst 9600 Series
Switches
Cisco IOS XE Gibraltar 16.12.1
Programmability Configuration Guide, Cisco IOS XE Amsterdam 17.3.x
109
Shells and Scripting
Feature Information for Guest Shell
Page 124
Feature Information
Release
Feature Name
In Cisco IOS XE Amsterdam
17.3.1, this feature was
implemented on the following
platforms:
• Cisco Catalyst 8200 Series
Edge Platforms
• Cisco Catalyst 8300 Series
Edge Platforms
• Cisco Catalyst 8500 and
8500L Series Edge Platforms
Cisco IOS XE Amsterdam 17.3.1
Python Version 3.6 is supported in
Guest Shell. Python Version 3.6 is
available on all supported
platforms.
Cisco IOS XE Amsterdam 17.1.1
Python 3 Support in Guest Shell
Programmability Configuration Guide, Cisco IOS XE Amsterdam 17.3.x
110
Shells and Scripting
Feature Information for Guest Shell
Page 125
C H A P T E R 5
Python API
Python programmabililty supports Python APIs.
• Using Python, on page 111
Using Python
Cisco Python Module
Cisco provides a Python module that provides access to run EXEC and configuration commands. You can
display the details of the Cisco Python module by entering the help() command. The help() command displays
the properties of the Cisco CLI module.
The following example displays information about the Cisco Python module:
Device# guestshell run python
Python 2.7.5 (default, Jun 17 2014, 18:11:42)
[GCC 4.8.2 20140120 (Red Hat 4.8.2-16)] on linux2
Type "help", "copyright", "credits" or "license" for more information.
from cli import cli,clip,configure,configurep, execute, executep
help(configure)
Help on function configure in module cli:
configure(configuration)
Apply a configuration (set of Cisco IOS CLI config-mode commands) to the device
and return a list of results.
configuration = '''interface gigabitEthernet 0/0
no shutdown'''
push it through the Cisco IOS CLI.
try:
results = cli.configure(configuration)
print "Success!"
except CLIConfigurationError as e:
print "Failed configurations:"
for failure in e.failed:
print failure
Args:
configuration (str or iterable): Configuration commands, separated by newlines.
Programmability Configuration Guide, Cisco IOS XE Amsterdam 17.3.x
111

Page 126
Returns:
list(ConfigResult): A list of results, one for each line.
Raises:
CLISyntaxError: If there is a syntax error in the configuration.
help(configurep)
Help on function configurep in module cli:
configurep(configuration)
Apply a configuration (set of Cisco IOS CLI config-mode commands) to the device
and prints the result.
configuration = '''interface gigabitEthernet 0/0
no shutdown'''
push it through the Cisco IOS CLI.
configurep(configuration)
Args:
configuration (str or iterable): Configuration commands, separated by newlines.
help(execute)
Help on function execute in module cli:
execute(command)
Execute Cisco IOS CLI exec-mode command and return the result.
command_output = execute("show version")
Args:
command (str): The exec-mode command to run.
Returns:
str: The output of the command.
Raises:
CLISyntaxError: If there is a syntax error in the command.
help(executep)
Help on function executep in module cli:
executep(command)
Execute Cisco IOS CLI exec-mode command and print the result.
executep("show version")
Args:
command (str): The exec-mode command to run.
help(cli)
Help on function cli in module cli:
cli(command)
Execute Cisco IOS CLI command(s) and return the result.
A single command or a delimited batch of commands may be run. The
delimiter is a space and a semicolon, " ;". Configuration commands must be
in fully qualified form.
output = cli("show version")
output = cli("show version ; show ip interface brief")
Programmability Configuration Guide, Cisco IOS XE Amsterdam 17.3.x
112
Shells and Scripting
Cisco Python Module
Page 127
output = cli("configure terminal ; interface gigabitEthernet 0/0 ; no shutdown")
Args:
command (str): The exec or config CLI command(s) to be run.
Returns:
string: CLI output for show commands and an empty string for
configuration commands.
Raises:
errors.cli_syntax_error: if the command is not valid.
errors.cli_exec_error: if the execution of command is not successful.
help(clip)
Help on function clip in module cli:
clip(command)
Execute Cisco IOS CLI command(s) and print the result.
A single command or a delimited batch of commands may be run. The
delimiter is a space and a semicolon, " ;". Configuration commands must be
in fully qualified form.
clip("show version")
clip("show version ; show ip interface brief")
clip("configure terminal ; interface gigabitEthernet 0/0 ; no shutdown")
Args:
command (str): The exec or config CLI command(s) to be run.
Cisco Python Module to Execute IOS CLI Commands
Guest Shell must be enabled for Python to run. For more information, see the Guest Shell chapter.
Note
The Python programming language uses six functions that can execute CLI commands. These functions are
available from the Python CLI module. To use these functions, execute the import cli command.
Arguments for these functions are strings of CLI commands. To execute a CLI command through the Python
interpreter, enter the CLI command as an argument string of one of the following six functions:
• cli.cli(command)—This function takes an IOS command as an argument, runs the command through
the IOS parser, and returns the resulting text. If this command is malformed, a Python exception is raised.
The following is sample output from the cli.cli(command) function:
import cli
cli.clip('configure terminal; interface loopback 10; ip address
10.10.10.10 255.255.255.255')
Mar 13 18:39:48.518: %LINEPROTO-5-UPDOWN: Line protocol on Interface Loopback10, changed
state to up
cli.clip('show clock')
'\n18:11:53.989 UTC Mon Mar 13 2017\n'
output=cli.cli('show clock')
print(output)
Programmability Configuration Guide, Cisco IOS XE Amsterdam 17.3.x
113
Shells and Scripting
Cisco Python Module to Execute IOS CLI Commands

Page 128
*18:12:04.705 UTC Mon Mar 13 2017
• cli.clip(command)—This function works exactly the same as the cli.cli(command) function, except
that it prints the resulting text to stdout rather than returning it. The following is sample output from the
cli.clip(command) function:
cli
cli.clip('configure terminal; interface loopback 11; ip address
10.11.11.11 255.255.255.255')
*Mar 13 18:42:35.954: %LINEPROTO-5-UPDOWN: Line protocol on Interface Loopback11, changed
state to up
*Mar 13 18:42:35.954: %LINK-3-UPDOWN: Interface Loopback11, changed state to up
cli.clip('show clock')
*18:13:35.313 UTC Mon Mar 13 2017
output=cli.clip('show clock')
*18:19:26.824 UTC Mon Mar 13 2017
print (output)
None
• cli.execute(command)—This function executes a single EXEC command and returns the output; however,
does not print the resulting text No semicolons or newlines are allowed as part of this command. Use a
Python list with a for-loop to execute this function more than once. The following is sample output from
the cli.execute(command)
function:
cli.execute("show clock")
'15:11:20.816 UTC Thu Jun 8 2017'
cli.execute('show clock'; 'show ip interface brief')
File "<stdin>", line 1
cli.execute('show clock'; 'show ip interface brief')
^
SyntaxError: invalid syntax
• cli.executep(command)—This function executes a single command and prints the resulting text to stdout
rather than returning it. The following is sample output from the cli.executep(command) function:
cli.executep('show clock')
*18:46:28.796 UTC Mon Mar 13 2017
output=cli.executep('show clock')
*18:46:36.399 UTC Mon Mar 13 2017
print(output)
None
• cli.configure(command)—This function configures the device with the configuration available in
commands. It returns a list of named tuples that contains the command and its result as shown below:
[Think: result = (bool(success), original_command, error_information)]
Programmability Configuration Guide, Cisco IOS XE Amsterdam 17.3.x
114
Shells and Scripting
Cisco Python Module to Execute IOS CLI Commands
Page 129
The command parameters can be in multiple lines and in the same format that is displayed in the output
of the show running-config command. The following is sample output from the cli.configure(command)
function:
cli.configure(["interface GigabitEthernet1/0/7", "no shutdown",
"end"])
[ConfigResult(success=True, command='interface GigabitEthernet1/0/7',
line=1, output='', notes=None), ConfigResult(success=True, command='no shutdown',
line=2, output='', notes=None), ConfigResult(success=True, command='end',
line=3, output='', notes=None)]
• cli.configurep(command)—This function works exactly the same as the cli.configure(command)
function, except that it prints the resulting text to stdout rather than returning it. The following is sample
output from the cli.configurep(command) function:
cli.configurep(["interface GigabitEthernet1/0/7", "no shutdown",
"end"])
Line 1 SUCCESS: interface GigabitEthernet1/0/7
Line 2 SUCCESS: no shut
Line 3 SUCCESS: end
Programmability Configuration Guide, Cisco IOS XE Amsterdam 17.3.x
115
Shells and Scripting
Cisco Python Module to Execute IOS CLI Commands
Page 130
Programmability Configuration Guide, Cisco IOS XE Amsterdam 17.3.x
116
Shells and Scripting
Cisco Python Module to Execute IOS CLI Commands
Page 131
C H A P T E R 6
CLI Python Module
Python Programmability provides a Python module that allows users to interact with IOS using CLIs.
• Information About Python CLI Module, on page 117
• Additional References for the CLI Python Module, on page 121
• Feature Information for the CLI Python Module, on page 121
Information About Python CLI Module
About Python
The Cisco IOS XE devices support Python Version 2.7 in both interactive and non-interactive (script) modes
within the Guest Shell. The Python scripting capability gives programmatic access to a device's CLI to perform
various tasks and Zero Touch Provisioning or Embedded Event Manager (EEM) actions.
Python Scripts Overview
Python run in a virtualized Linux-based environment, Guest Shell. For more information, see the Guest Shell
chapter. Cisco provides a Python module that allows user’s Python scripts to run IOS CLI commands on the
host device.
Interactive Python Prompt
When you execute the guestshell run python command on a device, the interactive Python prompt is opened
inside the Guest Shell. The Python interactive mode allows users to execute Python functions from the Cisco
Python CLI module to configure the device.
The following example shows how to enable the interactive Python prompt:
Device# guestshell run python
Python 2.7.5 (default, Jun 17 2014, 18:11:42)
[GCC 4.8.2 20140120 (Red Hat 4.8.2-16)] on linux2
Type "help", "copyright", "credits" or "license" for more information.
Device#
Programmability Configuration Guide, Cisco IOS XE Amsterdam 17.3.x
117

Page 132
Python Script
Python scripts can run in non-interactive mode by providing the Python script name as an argument in the
Python command. Python scripts must be accessible from within the Guest Shell. To access Python scripts
from the Guest Shell, save the scripts in bootflash/flash that is mounted within the Guest Shell.
The following sample Python script uses different CLI functions to configure and print show commands:
Device# more flash:sample_script.py
import sys
import cli
intf= sys.argv[1:]
intf = ''.join(intf[0])
print "\n\n *** Configuring interface %s with 'configurep' function
*** \n\n" %intf
cli.configurep(["interface loopback55","ip address 10.55.55.55 255.255.255.0","no
shut","end"])
print "\n\n *** Configuring interface %s with 'configure' function
*** \n\n"
cmd='interface %s,logging event link-status ,end' % intf
cli.configure(cmd.split(','))
print "\n\n *** Printing show cmd with 'executep' function
*** \n\n"
cli.executep('show ip interface brief')
print "\n\n *** Printing show cmd with 'execute' function
*** \n\n"
output= cli.execute('show run interface %s' %intf)
print (output)
print "\n\n *** Configuring interface %s with 'cli' function
*** \n\n"
cli.cli('config terminal; interface %s; spanning-tree portfast edge default' %intf)
print "\n\n *** Printing show cmd with 'clip' function
*** \n\n"
cli.clip('show run interface %s' %intf)
To run a Python script from the Guest Shell, execute the guestshell run python
/bootflash/guest-share/script.py command
at the device prompt.
The following example shows how to run a Python script from the Guest Shell:
Device# guestshell run python /bootflash/guest-share/sample_script.py loop55
*** Configuring interface loop55 with 'configurep' function
Line 1 SUCCESS: interface loopback55
Line 2 SUCCESS: ip address 10.55.55.55 255.255.255.0
Line 3 SUCCESS: no shut
Line 4 SUCCESS: end
*** Configuring interface %s with 'configure' function
*** Printing show cmd with 'executep' function
Interface
IP-Address
OK? Method Status
Protocol
Vlan1
unassigned
YES NVRAM
administratively down down
GigabitEthernet0/0
192.0.2.1
YES NVRAM
up
up
Programmability Configuration Guide, Cisco IOS XE Amsterdam 17.3.x
118
Shells and Scripting
Python Script
Page 133
GigabitEthernet1/0/1
unassigned
YES unset
down
down
GigabitEthernet1/0/2
unassigned
YES unset
down
down
GigabitEthernet1/0/3
unassigned
YES unset
down
down
:
:
:
Te1/1/4
unassigned
YES unset
down
down
Loopback55
10.55.55.55
YES TFTP
up
up
Loopback66
unassigned
YES manual up
up
*** Printing show cmd with 'execute' function
Building configuration...
Current configuration : 93 bytes
!
interface Loopback55
ip address 10.55.55.55 255.255.255.0
logging event link-status
end
*** Configuring interface %s with 'cli' function
*** Printing show cmd with 'clip' function
Building configuration...
Current configuration : 93 bytes
!
interface Loopback55
ip address 10.55.55.55 255.255.255.0
logging event link-status
end
Supported Python Versions
Guest Shell is pre-installed with Python Version 2.7. Guest Shell is a virtualized Linux-based environment,
designed to run custom Linux applications, including Python applications for automated control and
management of Cisco devices. Platforms with Montavista CGE7 support Python Version 2.7.11, and platforms
with CentOS 7 support Python Version 2.7.5.
The following table provides information about Python versions and the supported platforms:
Table 10: Python Version Support
Platform
Python Version
All supported platforms except for Cisco Catalyst
3650 Series Switches and Cisco Catalyst 3850 Series
Switches.
Python Version 2.7.5
• Cisco Catalyst 3650 Series Switches
• Cisco Catalyst 3850 Series Switches
Python Version 2.7.11
Programmability Configuration Guide, Cisco IOS XE Amsterdam 17.3.x
119
Shells and Scripting
Supported Python Versions
Page 134
Platform
Python Version
Supported in Cisco IOS XE Amsterdam 17.1.1 and
later releases.
In Cisco IOS XE Amsterdam 17.1.1 and Cisco IOS
XE Amsterdam 17.2.1, Python V2 is the default.
However, in Cisco IOS XE Amsterdam 17.3.1 and
later releases, Python V3 is the default.
Note
Cisco Catalyst 9200 Series Switches do not support
Python Version 3.6 in Cisco IOS XE Amsterdam
17.1.1 and Cisco IOS XE Amsterdam 17.2.1. Cisco
Catalyst 9200 Series Switches support Python V3 in
Cisco IOS XE Amsterdam 17.3.1 and later releases.
Note
Not supported by Cisco Catalyst 3650 Series
Switches and Cisco Catalyst 3850 Series Switches.
Python Version 3.6
Platforms with CentOS 7 support the installation of Redhat Package Manager (RPM) from the open source
repository.
Updating the Cisco CLI Python Module
The Cisco CLI Python module and EEM module are pre-installed on devices. However, when you update the
Python version by using either Yum or prepackaged binaries, the Cisco-provided CLI module must also be
updated.
When you update to Python Version 3 on a device that already has Python Version 2, both versions of Python
exist on the device. Use one of the following IOS commands to run Python:
• The guestshell run python2 command enables Python Version 2.
• The guestshell run python3 command enables Python Version 3.
• The guestshell run python command enables Python Version 2.
Note
Use one of the following methods to update the Python version:
• Standalone tarball installation
• PIP install for the CLI module
Programmability Configuration Guide, Cisco IOS XE Amsterdam 17.3.x
120
Shells and Scripting
Updating the Cisco CLI Python Module

Page 135
Additional References for the CLI Python Module
Related Documents
Document Title
Related Topic
Guest Shell
Guest Shell
Python Scripting in EEM
EEM Python Module
Technical Assistance
Link
Description
http://www.cisco.com/support
The Cisco Support website provides extensive online resources, including
documentation and tools for troubleshooting and resolving technical issues
with Cisco products and technologies.
To receive security and technical information about your products, you can
subscribe to various services, such as the Product Alert Tool (accessed from
Field Notices), the Cisco Technical Services Newsletter, and Really Simple
Syndication (RSS) Feeds.
Access to most tools on the Cisco Support website requires a Cisco.com user
ID and password.
Feature Information for the CLI Python Module
The following table provides release information about the feature or features described in this module. This
table lists only the software release that introduced support for a given feature in a given software release
train. Unless noted otherwise, subsequent releases of that software release train also support that feature.
Use Cisco Feature Navigator to find information about platform support and Cisco software image support.
To access Cisco Feature Navigator, go to www.cisco.com/go/cfn. An account on Cisco.com is not required.
Programmability Configuration Guide, Cisco IOS XE Amsterdam 17.3.x
121
Shells and Scripting
Additional References for the CLI Python Module
Page 136
Table 11: Feature Information for the CLI Python Module
Feature Information
Release
Feature Name
Python programmabilty provides a Python
module that allows users to interact with IOS
using CLIs.
In Cisco IOS XE Everest 16.5.1a, this feature
was implemented on the following platforms:
• Cisco Catalyst 3650 Series Switches
• Cisco Catalyst 3850 Series Switches
• Cisco Catalyst 9300 Series Switches
• Cisco Catalyst 9500 Series Switches
In Cisco IOS XE Everest 16.5.1b, this feature
was implemented on the following platforms:
• Cisco 4000 Series Integrated Services
Routers
Cisco IOS XE Everest
16.5.1a
CLI Python Module
This feature was implemented on Cisco
Catalyst 9400 Series Switches.
Cisco IOS XE Everest 16.6.2
This feature was implemented on the
following platforms:
• Cisco ASR 1000 Aggregation Services
Routers
• Cisco CSR 1000v Series Cloud Services
Routers
Cisco IOS XE Fuji 16.7.1
Programmability Configuration Guide, Cisco IOS XE Amsterdam 17.3.x
122
Shells and Scripting
Feature Information for the CLI Python Module
Page 137
C H A P T E R 7
EEM Python Module
Embedded Event Manager (EEM) policies support Python scripts. Python scripts can be executed as part of
EEM actions in EEM applets.
• Prerequisites for the EEM Python Module, on page 123
• Information About EEM Python Module, on page 123
• How to Configure the EEM Python Policy, on page 126
• Additional References EEM Python Module, on page 131
• Feature Information for EEM Python Module, on page 132
Prerequisites for the EEM Python Module
Guest Shell must be working within the container. Guest Shell is not enabled by default. For more information
see the Guest Shell feature.
Information About EEM Python Module
Python Scripting in EEM
Embedded Event Manager (EEM) policies support Python scripts. You can register Python scripts as EEM
policies, and execute the registered Python scripts when a corresponding event occurs. The EEM Python script
has the same event specification syntax as the EEM TCL policy.
Configured EEM policies run within the Guest Shell. Guest Shell is a virtualized Linux-based environment,
designed to run custom Linux applications, including Python for automated control and management of Cisco
devices. The Guest Shell container provides a Python interpreter.
EEM Python Package
The EEM Python package can be imported to Python scripts for running EEM-specific extensions.
Programmability Configuration Guide, Cisco IOS XE Amsterdam 17.3.x
123

Page 138
The EEM Python package is available only within the EEM Python script (The package can be registered
with EEM, and has the EEM event specification in the first line of the script.) and not in the standard Python
script (which is run using the Python script name).
Note
The Python package includes the following application programming interfaces (APIs):
• Action APIs—Perform EEM actions and have default parameters.
• CLI-execution APIs—Run IOS commands, and return the output. The following are the list of
CLI-execution APIs:
• eem_cli_open()
• eem_cli_exec()
• eem_cli_read()
• eem_cli_read_line()
• eem_cli_run()
• eem_cli_run_interactive()
• eem_cli_read_pattern()
• eem_cli_write()
• eem_cli_close()
• Environment variables-accessing APIs—Get the list of built-in or user-defined variables. The following
are the environment variables-accessing APIs:
• eem_event_reqinfo ()-Returns the built-in variables list.
• eem_user_variables()-Returns the current value of an argument.
Python-Supported EEM Actions
The Python package (is available only within the EEM script, and not available for the standard Python script)
supports the following EEM actions:
• Syslog message printing
• Send SNMP traps
• Reload the box
• Switchover to the standby device
• Run a policy
• Track Object read
• Track Object Set
• Cisco Networking Services event generation
Programmability Configuration Guide, Cisco IOS XE Amsterdam 17.3.x
124
Shells and Scripting
Python-Supported EEM Actions

Page 139
The EEM Python package exposes the interfaces for executing EEM actions. You can use the Python script
to call these actions, and they are forwarded from the Python package via Cisco Plug N Play (PnP) to the
action handler.
EEM Variables
An EEM policy can have the following types of variables:
• Event-specific built-in variables—A set of predefinied variables that are populated with details about
the event that triggered the policy. The eem_event_reqinfo () API returns the builtin variables list. These
variables can be stored in the local machine and used as local variables. Changes to local variables do
not reflect in builtin variables.
• User-defined variables—Variables that can be defined and used in policies. The value of these variables
can be referred in the Python script. While executing the script, ensure that the latest value of the variable
is available. The eem_user_variables() API returns the current value of the argument that is provided in
the API.
EEM CLI Library Command Extensions
The following CLI library commands are available within EEM for the Python script to work:
• eem_cli_close()—Closes the EXEC process and releases the VTY and the specified channel handler
connected to the command.
• eem_cli_exec—Writes the command to the specified channel handler to execute the command. Then
reads the output of the command from the channel and returns the output.
• eem_cli_open—Allocates a VTY, creates an EXEC CLI session, and connects the VTY to a channel
handler. Returns an array including the channel handler.
• eem_cli_read()—Reads the command output from the specified CLI channel handler until the pattern of
the device prompt occurs in the contents read. Returns all the contents read up to the match.
• eem_cli_read_line()—Reads one line of the command output from the specified CLI channel handler.
Returns the line read.
• eem_cli_read_pattern()—Reads the command output from the specified CLI channel handler until the
pattern that is to be matched occurs in the contents read. Returns all the contents read up to the match.
• eem_cli_run()—Iterates over the items in the clist and assumes that each one is a command to be executed
in the enable mode. On success, returns the output of all executed commands and on failure, returns
error.
• eem_cli_run_interactive()—Provides a sublist to the clist which has three items. On success, returns the
output of all executed commands and on failure, returns the error. Also uses arrays when possible as a
way of making things easier to read later by keeping expect and reply separated.
• eem_cli_write()—Writes the command that is to be executed to the specified CLI channel handler. The
CLI channel handler executes the command.
Programmability Configuration Guide, Cisco IOS XE Amsterdam 17.3.x
125
Shells and Scripting
EEM Variables
Page 140
How to Configure the EEM Python Policy
For the Python script to work, you must enable the Guest Shell. For more information, see the Guest Shell
chapter.
Registering a Python Policy
SUMMARY STEPS
1.
enable
2. configure terminal
3. event manager directory user policy path
4. event manager policy policy-filename
5. exit
6. show event manager policy registered
7.
show event manager history events
DETAILED STEPS
Procedure
Purpose
Command or Action
Enables privileged EXEC mode.
enable
Step 1
Example:
• Enter your password if prompted.
Device> enable
Enters global configuration mode.
configure terminal
Example:
Step 2
Device# configure terminal
Specifies a directory to use for storing user library files or
user-defined EEM policies.
event manager directory user policy path
Example:
Step 3
Note
Device(config)# event manager directory user policy
flash:/user_library
You must have a policy in the specified path. For example,
in this step, the eem_script.py policy is available in the
flash:/user_library folder or path.
Registers a policy with EEM.
event manager policy policy-filename
Step 4
Example:
• The policy is parsed based on the file extension. If the
file extension is .py, the policy is registered as Python
policy.
Device(config)# event manager policy eem_script.py
• EEM schedules and runs policies on the basis of an
event specification that is contained within the policy
itself. When the event manager policy command is
Programmability Configuration Guide, Cisco IOS XE Amsterdam 17.3.x
126
Shells and Scripting
How to Configure the EEM Python Policy
Page 141
Purpose
Command or Action
invoked, EEM examines the policy and registers it to
be run when the specified event occurs.
Exits global configuration mode and returns to privileged
EXEC mode.
exit
Example:
Step 5
Device(config)# exit
Displays the registered EEM policies.
show event manager policy registered
Example:
Step 6
Device# show event manager policy registered
Displays EEM events that have been triggered.
show event manager history events
Example:
Step 7
Device# show event manager history events
Example
The following is sample output from the show event manager policy registered command:
Device# show event manager policy registered
No.
Class
Type
Event Type
Trap
Time Registered
Name
1
script
user
multiple
Off
Tue Aug 2 22:12:15 2016
multi_1.py
1: syslog: pattern {COUNTER}
2: none: policyname {multi_1.py} sync {yes}
trigger delay 10.000
correlate event 1 or event 2
attribute tag 1 occurs 1
nice 0 queue-priority normal maxrun 100.000 scheduler rp_primary Secu none
2
script
user
multiple
Off
Tue Aug 2 22:12:20 2016
multi_2.py
1: syslog: pattern {COUNTER}
2: none: policyname {multi_2.py} sync {yes}
trigger
correlate event 1 or event 2
nice 0 queue-priority normal maxrun 100.000 scheduler rp_primary Secu none
3
script
user
multiple
Off
Tue Aug 2 22:13:31 2016
multi.tcl
1: syslog: pattern {COUNTER}
2: none: policyname {multi.tcl} sync {yes}
trigger
correlate event 1 or event 2
attribute tag 1 occurs 1
nice 0 queue-priority normal maxrun 100.000 scheduler rp_primary Secu none
Programmability Configuration Guide, Cisco IOS XE Amsterdam 17.3.x
127
Shells and Scripting
Registering a Python Policy
Page 142
Running Python Scripts as Part of EEM Applet Actions
Python Script: eem_script.py
An EEM applet can include a Python script with an action command. In this example, an user is
trying to run a standard Python script as part of the EEM action, however; EEM Python package is
not available in the standard Python script. The standard Python script in IOS has a package named
from cli import cli,clip and this package can be used to execute IOS commands.
import sys
from cli import cli,clip,execute,executep,configure,configurep
intf= sys.argv[1:]
intf = ''.join(intf[0])
print ('This script is going to unshut interface %s and then print show ip interface
brief'%intf)
if intf == 'loopback55':
configurep(["interface loopback55","no shutdown","end"])
else :
cmd='int %s,no shut ,end' % intf
configurep(cmd.split(','))
executep('show ip interface brief')
This following is sample output from the guestshell run python3 command.
Device#
guestshell run python3 /flash/eem_script.py loop55
This script is going to unshut interface loop55 and then print show ip interface brief
Line 1 SUCCESS: int loop55
Line 2 SUCCESS: no shut
Line 3 SUCCESS: end
Interface IP-Address OK? Method Status Protocol
Vlan1 unassigned YES NVRAM administratively down down
GigabitEthernet0/0 5.30.15.37 YES NVRAM up up
GigabitEthernet1/0/1 unassigned YES unset down down
GigabitEthernet1/0/2 unassigned YES unset down down
GigabitEthernet1/0/3 unassigned YES unset down down
GigabitEthernet1/0/4 unassigned YES unset up up
GigabitEthernet1/0/5 unassigned YES unset down down
GigabitEthernet1/0/6 unassigned YES unset down down
GigabitEthernet1/0/7 unassigned YES unset down down
GigabitEthernet1/0/8 unassigned YES unset down down
GigabitEthernet1/0/9 unassigned YES unset down down
GigabitEthernet1/0/10 unassigned YES unset down down
GigabitEthernet1/0/11 unassigned YES unset down down
GigabitEthernet1/0/12 unassigned YES unset down down
GigabitEthernet1/0/13 unassigned YES unset down down
GigabitEthernet1/0/14 unassigned YES unset down down
GigabitEthernet1/0/15 unassigned YES unset down down
GigabitEthernet1/0/16 unassigned YES unset down down
GigabitEthernet1/0/17 unassigned YES unset down down
GigabitEthernet1/0/18 unassigned YES unset down down
GigabitEthernet1/0/19 unassigned YES unset down down
GigabitEthernet1/0/20 unassigned YES unset down down
GigabitEthernet1/0/21 unassigned YES unset down down
GigabitEthernet1/0/22 unassigned YES unset down down
Programmability Configuration Guide, Cisco IOS XE Amsterdam 17.3.x
128
Shells and Scripting
Running Python Scripts as Part of EEM Applet Actions
Page 143
GigabitEthernet1/0/23 unassigned YES unset up up
GigabitEthernet1/0/24 unassigned YES unset down down
GigabitEthernet1/1/1 unassigned YES unset down down
GigabitEthernet1/1/2 unassigned YES unset down down
GigabitEthernet1/1/3 unassigned YES unset down down
GigabitEthernet1/1/4 unassigned YES unset down down
Te1/1/1 unassigned YES unset down down
Te1/1/2 unassigned YES unset down down
Te1/1/3 unassigned YES unset down down
Te1/1/4 unassigned YES unset down down
Loopback55 10.55.55.55 YES manual up up
Device#
Jun 7 12:51:20.549: %LINEPROTO-5-UPDOWN: Line protocol on Interface Loopback55,
changed state to up
Jun 7 12:51:20.549: %LINK-3-UPDOWN: Interface Loopback55, changed state to up
The following is a sample script for printing messages to the syslog. This script must be stored in a
file, copied to the file system on the device, and registered using the event manager policy file.
::cisco::eem::event_register_syslog tag "1"
pattern
COUNTER
maxrun 200
import eem
import time
eem.action_syslog("SAMPLE SYSLOG MESSAGE","6","TEST")
The following is sample script to print EEM environment variables. This script must be stored in a
file, copied to the file system on the device, and registered using the event manager policy file.
::cisco::eem::event_register_syslog tag "1"
pattern
COUNTER
maxrun 200
import eem
import time
c = eem.env_reqinfo()
print "EEM Environment Variables"
for k,v in c.iteritems():
print "KEY : " + k + str(" ---> ") + v
print "Built in Variables"
for i,j in a.iteritems() :
print "KEY : " + i + str(" ---> ") + j
Adding a Python Script in an EEM Applet
SUMMARY STEPS
1.
enable
2. configure terminal
3. event manager applet applet-name
4. event [tag event-tag] syslog pattern regular-expression
5. action label cli command cli-string
Programmability Configuration Guide, Cisco IOS XE Amsterdam 17.3.x
129
Shells and Scripting
Adding a Python Script in an EEM Applet
Page 144
- action label cli command cli-string [ pattern pattern-string ]
end
8. show event manager policy active
9. show event manager history events
DETAILED STEPS
Procedure
Purpose
Command or Action
Enables privileged EXEC mode.
enable
Step 1
Example:
• Enter your password if prompted.
Device> enable
Enters global configuration mode.
configure terminal
Example:
Step 2
Device# configure terminal
Registers an applet with the Embedded Event Manager
(EEM) and enters applet configuration mode.
event manager applet applet-name
Example:
Step 3
Device(config)# event manager applet
interface_Shutdown
Specifies a regular expression to perform the syslog message
pattern match.
event [tag event-tag] syslog pattern regular-expression
Example:
Step 4
Device(config-applet)# event syslog pattern
"Interface Loopback55,
changed state to administratively down"
Specifies the IOS command to be executed when an EEM
applet is triggered.
action label cli command cli-string
Example:
Step 5
Device(config-applet)# action 0.0 cli command "en"
Specifies the action to be specified with the pattern
keyword.
action label cli command cli-string [ pattern pattern-string
]
Step 6
Example:
• Specify a regular expression pattern string that will
match the next solicited prompt.
Device(config-applet)# action 1.0 cli command
"guestshell run python3 /bootflash/eem_script.py
loop55"
Exits applet configuration mode and returns to privileged
EXEC mode.
end
Example:
Step 7
Device(config-applet)# end
Displays EEM policies that are executing.
show event manager policy active
Example:
Step 8
Programmability Configuration Guide, Cisco IOS XE Amsterdam 17.3.x
130
Shells and Scripting
Adding a Python Script in an EEM Applet
Page 145
Purpose
Command or Action
Device# show event manager policy active
Displays the EEM events that have been triggered.
show event manager history events
Example:
Step 9
Device# show event manager history events
What to do next
The following example shows how to trigger the Python script configured in the task:
Device(config)# interface loopback 55
Device(config-if)# shutdown
Device(config-if)# end
Device#
Mar 13 10:53:22.358 EDT: %SYS-5-CONFIG_I: Configured from console by console
Mar 13 10:53:24.156 EDT: %LINK-5-CHANGED:
Line protocol on Interface Loopback55, changed
state to down
Mar 13 10:53:27.319 EDT: %LINK-3-UPDOWN:
Interface Loopback55, changed state to
administratively down
Enter configuration commands, one per line.
End with CNTL/Z.
Mar 13 10:53:35.38 EDT:
%LINEPROTO-5-UPDOWN: Line protocol on Interface Loopback55, changed
state to up
*Mar 13 10:53:35.39 EDT %LINK-3-UPDOWN: Interface Loopback55, changed state to up
+++ 10:54:33 edi37(default) exec +++
show ip interface br
Interface
IP-Address
OK? Method Status
Protocol
GigabitEthernet0/0/0
unassigned
YES unset
down
down
GigabitEthernet0/0/1
unassigned
YES unset
down
down
GigabitEthernet0/0/2
10.1.1.31
YES DHCP
up
up
GigabitEthernet0/0/3
unassigned
YES unset
down
down
GigabitEthernet0
192.0.2.1
YES manual up
up
Loopback55
198.51.100.1
YES manual up
up
Loopback66
172.16.0.1
YES manual up
up
Loopback77
192.168.0.1
YES manual up
up
Loopback88
203.0.113.1
YES manual up
up
Additional References EEM Python Module
Related Documents
Document Title
Related Topic
Embedded Event Manager Configuration Guide
EEM configuration
Embedded Event Manager Command Reference
EEM commands
Guest Shell
Guest Shell configuration
Programmability Configuration Guide, Cisco IOS XE Amsterdam 17.3.x
131
Shells and Scripting
Additional References EEM Python Module
Page 146
Technical Assistance
Link
Description
http://www.cisco.com/support
The Cisco Support website provides extensive online resources, including
documentation and tools for troubleshooting and resolving technical issues
with Cisco products and technologies.
To receive security and technical information about your products, you can
subscribe to various services, such as the Product Alert Tool (accessed from
Field Notices), the Cisco Technical Services Newsletter, and Really Simple
Syndication (RSS) Feeds.
Access to most tools on the Cisco Support website requires a Cisco.com user
ID and password.
Feature Information for EEM Python Module
The following table provides release information about the feature or features described in this module. This
table lists only the software release that introduced support for a given feature in a given software release
train. Unless noted otherwise, subsequent releases of that software release train also support that feature.
Use Cisco Feature Navigator to find information about platform support and Cisco software image support.
To access Cisco Feature Navigator, go to www.cisco.com/go/cfn. An account on Cisco.com is not required.
Programmability Configuration Guide, Cisco IOS XE Amsterdam 17.3.x
132
Shells and Scripting
Feature Information for EEM Python Module
Page 147
Table 12: Feature Information for EEM Python Module
Feature Information
Release
Feature Name
This feature supports Python scripts as EEM
policies.
No new commands were introduced.
In Cisco IOS XE Everest 16.5.1a, this feature
was implemented on the following platforms:
• Cisco Catalyst 3650 Series Switches
• Cisco Catalyst 3850 Series Switches
• Cisco Catalyst 9300 Series Switches
•
In Cisco IOS XE Everest 16.5.1b, this feature
was implemented on the following platforms:
• Cisco ISR 4000 Series Integrated Service
Routers
Cisco IOS XE Everest
16.5.1a
Cisco IOS XE Everest
16.5.1b
EEM Python Module
In Cisco IOS XE Everest 16.6.2, this feature
was implemented on Cisco Catalyst 9400
Series Switches.
Cisco IOS XE Everest 16.6.2
In Cisco IOS XE Fuji 16.8.1a, this feature was
implemented on Cisco Catalyst 9500-High
Performance Series Switches
Cisco IOS XE Fuji 16.8.1a
Programmability Configuration Guide, Cisco IOS XE Amsterdam 17.3.x
133
Shells and Scripting
Feature Information for EEM Python Module
Page 148
Programmability Configuration Guide, Cisco IOS XE Amsterdam 17.3.x
134
Shells and Scripting
Feature Information for EEM Python Module
Page 149
P A R T III
Model-Driven Programmability
• NETCONF Protocol, on page 137
• RESTCONF Protocol, on page 161
• NETCONF and RESTCONF Service-Level ACLs, on page 179
• gNMI Protocol, on page 185
• gRPC Network Operations Interface, on page 209
• Model Based AAA, on page 219
• Model-Driven Telemetry, on page 227
• In-Service Model Update, on page 267

Page 150
Page 151
C H A P T E R 8
NETCONF Protocol
• Information About the NETCONF Protocol, on page 137
• How to Configure the NETCONF Protocol, on page 144
• Verifying the NETCONF Protocol Configuration, on page 149
• Additional References for NETCONF Protocol, on page 152
• Feature Information for NETCONF Protocol, on page 152
Information About the NETCONF Protocol
Introduction to Data Models - Programmatic and Standards-Based
Configuration
The traditional way of managing network devices is by using Command Line Interfaces (CLIs) for
configurational (configuration commands) and operational data (show commands). For network management,
Simple Network Management Protocol (SNMP) is widely used, especially for exchanging management
information between various network devices. Although CLIs and SNMP are heavily used, they have several
restrictions. CLIs are highly proprietary, and human intervention is required to understand and interpret their
text-based specification. SNMP does not distinguish between configurational and operational data.
The solution lies in adopting a programmatic and standards-based way of writing configurations to any network
device, replacing the process of manual configuration. Network devices running on Cisco IOS XE support
the automation of configuration for multiple devices across the network using data models. Data models are
developed in a standard, industry-defined language, that can define configuration and state information of a
network.
Cisco IOS XE supports the Yet Another Next Generation (YANG) data modeling language. YANG can be
used with the Network Configuration Protocol (NETCONF) to provide the desired solution of automated and
programmable network operations. NETCONF (RFC 6241) is an XML-based protocol that client applications
use to request information from and make configuration changes to the device. YANG is primarily used to
model the configuration and state data used by NETCONF operations.
In Cisco IOS XE, model-based interfaces interoperate with existing device CLI, Syslog, and SNMP interfaces.
These interfaces are optionally exposed northbound from network devices. YANG is used to model each
protocol based on RFC 6020.
Programmability Configuration Guide, Cisco IOS XE Amsterdam 17.3.x
137

Page 152
To access Cisco YANG models in a developer-friendly way, clone the GitHub repository, and navigate to
the vendor/cisco subdirectory. Models for various releases of IOS-XE, IOS-XR, and NX-OS platforms are
available here.
Note
NETCONF
NETCONF provides a mechanism to install, manipulate, and delete the configuration of network devices.
It uses an Extensible Markup Language (XML)-based data encoding for the configuration data as well as the
protocol messages.
NETCONF uses a simple Remote Procedure Call (RPC) based mechanism to facilitate communication between
a client and a server. The client can be a script or application running as part of a network manager. The server
is typically a network device (switch or router). It uses Secure Shell (SSH) as the transport layer across network
devices. It uses SSH port number 830 as the default port. The port number is a configurable option.
NETCONF also supports capability discovery and model downloads. Supported models are discovered using
the ietf-netconf-monitoring model. Revision dates for each model are shown in the capabilities response.
Data models are available for optional download from a device using the get-schema RPC. You can use these
YANG models to understand or export the data model. For more details on NETCONF, see RFC 6241.
In releases prior to Cisco IOS XE Fuji 16.8.1, an operational data manager (based on polling) was enabled
separately. In Cisco IOS XE Fuji 16.8.1 and later releases, operational data works on platforms running
NETCONF (similar to how configuration data works), and is enabled by default. For more information on
the components that are enabled for operational data queries or streaming, see the GitHub respository, to view
*-oper in the naming convention.
Restrictions for the NETCONF Protocol
• The NETCONF feature is not supported on a device running dual IOSd configuration or software
redundancy.
• If RP addresses from the NETCONF datastore are removed using the no ip pim rp-address command,
there could be inconsistencies in the datastore, due to parser limitations. To remove RP address entries
from the NETCONF datastore, use the RPC.
NETCONF RESTCONF IPv6 Support
Data model interfaces (DMIs) support the use of IPv6 protocol. DMI IPv6 support helps client applications
to communicate with services that use IPv6 addresses. External facing interfaces will provide dual-stack
support; both IPv4 and IPv6.
DMIs are a set of services that facilitate the management of network elements. Application layer protocols
such as, NETCONF and RESTCONF access these DMIs over a network.
If IPv6 addresses are not configured, external-facing applications will continue to listen on IPv6 sockets; but
these sockets will be unreachable.
Programmability Configuration Guide, Cisco IOS XE Amsterdam 17.3.x
138
Model-Driven Programmability
NETCONF

Page 153
NETCONF Global Session Lock
The NETCONF protocol provides a set of operations to manage device configurations and retrieve device
state information. NETCONF supports a global lock, and the ability to kill non-responsive sessions are
introduced in NETCONF.
To ensure consistency and prevent conflicting configurations through multiple simultaneous sessions, the
owner of the session can lock the NETCONF session. The NETCONF lock RPC locks the configuration
parser and the running configuration database. All other NETCONF sessions (that do not own the lock) cannot
perform edit operations; but can perform read operations. These locks are intended to be short-lived and allow
the owner to make changes without interaction with other NETCONF clients, non-NETCONF clients (such
as, SNMP and CLI scripts), and human users.
A global lock held by an active session is revoked when the associated session is killed. The lock gives the
session holding the lock exclusive write access to the configuration. When a configuration change is denied
due to a global lock, the error message will specify that a NETCONF global lock is the reason the configuration
change has been denied.
The <lock> operation takes a mandatory parameter, <target> that is the name of the configuration datastore
that is to be locked. When a lock is active, the <edit-config> and <copy-config> operations are not allowed.
If the clear configuration lock command is specified while a NETCONF global lock is being held, a full
synchronization of the configuration is scheduled and a warning syslog message is produced. This command
clears only the parser configuration lock.
The following is a sample RPC that shows the <lock> operation:
<rpc message-id="101"
xmlns="urn:ietf:params:xml:ns:netconf:base:1.0">
<lock>
<target>
<running/>
</target>
</lock>
</rpc>
NETCONF Kill Session
During a session conflict or client misuse of the global lock, NETCONF sessions can be monitored via the
show netconf-yang sessions command, and non-responsive sessions can be cleared using the clear
netconf-yang session command. The clear netconf-yang session command clears both the NETCONF lock
and the configuration lock.
A <kill-session> request will force a NETCONF session to terminate. When a NETCONF entity receives a
<kill-session> request for an open session, it stops all operations in process, releases all locks and resources
associated with the session, and closes any associated connections.
A <kill-session> request requires the session-ID of the NETCONF session that is to be terminated. If the value
of the session-ID is equal to the current session ID, an invalid-value error is returned. If a NETCONF session
is terminated while its transaction is still in progress, the data model infrastructure will request a rollback,
apply it to the network element, and trigger a synchronization of all YANG models.
If a session kill fails, and a global lock is held, enter the clear configuration lock command via the console
or vty. At this point, the data models can be stopped and restarted.
Programmability Configuration Guide, Cisco IOS XE Amsterdam 17.3.x
139
Model-Driven Programmability
NETCONF Global Session Lock
Page 154
NETCONF-YANG SSH Server Support
NETCONF-YANG uses the IOS Secure Shell (SSH) Rivest, Shamir, and Adleman (RSA) public keys to
authenticate users as an alternative to password-based authentication.
For public-key authentication to work on NETCONF-YANG, the IOS SSH server must be configured. To
authenticate users to the SSH server, use one of the RSA keys configured by using the ip ssh pubkey-chain
and user commands.
NACM is a group-based access control mechanism. When users are authenticated, they are automatically
placed in an NACM privilege group based on their configured privilege level. Users can also be manually
placed in other user-defined groups. The default privilege level is 1. There are 16 privilege levels, PRIV00
to PRIV15.
If a user authenticates via the public-key; but does not have a corresponding Authentication, Authorization,
and Accounting (AAA) configuration, this user is rejected. If a user authenticates via a public-key; but the
AAA configuration for NETCONF is using a AAA source other than the local, this user is also rejected. Local
and TACACS+ AAA authorization are supported.
Token-based RESTCONF authentication is not supported. SSH user certificates are not supported.
Candidate Configuration Support
The Candidate Configuration feature enables support for candidate capability by implementing RFC 6241
with a simple commit option.
The candidate datastore provides a temporary work space in which a copy of the device's running configuration
is stored. You can create and modify the running configuration before committing the running configuration
to the device. Candidate capability is indicated by the following NETCONF capability:
urn:ietf:params:netconf:capability:candidate:1.0. This NETCONF capability indicates that the device supports
the candidate datastore.
This is a shared data store which enables the user to create, add, delete and make changes to the device
configuration without affecting the running configuration on the device. A commit operation pushes the
configuration from the candidate to the running configuration on the device. When the candidate data store
is enabled, the running data store is not writable through NETCONF sessions, and all configurations get
committed only through the candidate. In other words, the writable-running NETCONF capability is not
enabled with the candidate configuration.
It must be kept in mind that candidate datastore is a shared data store. Multiple NETCONF sessions can
modify it contents simultaneously. Therefore, it is important to lock the datastore before modifying its contents,
to prevent conflicting commits that can eventually lead to the loss of any configuration changes.
Note
NETCONF Operations on Candidate
The following operations can be performed on the candidate data store.
The information in this section has been referenced from section 8.3.4 of RFC 6241. Please refer to the RFC
for more details and the exact RPCs.
Note
Programmability Configuration Guide, Cisco IOS XE Amsterdam 17.3.x
140
Model-Driven Programmability
NETCONF-YANG SSH Server Support

Page 155
Lock
A <lock> RPC is used to lock the target data store. This prevents others users from modifying the configuration
in the locked data store. Both candidate and running data can be locked through the lock operation.
Locking the candidate datastore does not affect the Cisco IOS config lock or the running configuration lock
and vice versa.
Note
Commit
A <commit> RPC, copies the candidate configuration to the device’s running configuration. A commit operation
must be performed after you have updated the candidate configuration to push the configuration to the device.
If either the running or the candidate datastore is locked by another NETCONF session, the <commit> RPC
will fail with an RPC error reply. The <error-tag> should be <in-use> and <error-info> should have the session
ID of the NETCONF session holding the lock. You can also lock the running configuration by using the global
lock by entering the conf t lock mode, but, the commit operation will fail with an RPC error reply, with
error-tag value <in-use> and the session-id will be “0”.
Edit-config
The candidate configuration can be used as a target for the edit-config operation to modify a configuration.
You can change the candidate configuration without affecting the running configuration on the device.
Discard
To remove the changes made to the candidate configuration, perform a discard operation to revert the candidate
configuration to running configuration.
If contents of the candidate datastore are modified by NETCONF session A, and session B tries to lock the
candidate datastore, the lock fails. NETCONF session B must perform a <discard> operation to remove any
outstanding configuration changes on the candidate datastore from other NETCONF sessions before locking
a candidate.
Unlock
After working on candidate configuration, such as, lock, edit-config, or commit operations, you can unlock
the datastore, by specifying candidate as target in the unlock RPC. The candidate datastore is now available
for all operations in other sessions.
If a failure occurs with outstanding changes to the candidate datastore, it can be challenging to recover the
configuration, and may create problems for other sessions. To avoid any issues, outstanding changes must be
discarded when the lock is released—either implicitly on “NETCONF session failure” or explicitly by using
the unlock operation.
Get-config, Copy-config, Validate
The candidate datastore can be used as a source or target for any of the get-config, copy-config or validate
config operations. If you do not want to commit the changes in the candidate datastore to the device; but only
to validate the configuration, you ca nuse the <validate> RPC followed by a discard operation.
Programmability Configuration Guide, Cisco IOS XE Amsterdam 17.3.x
141
Model-Driven Programmability
NETCONF Operations on Candidate

Page 156
Modifying the Candidate Datastore
The following diagram explains the recommended best practice when modifying the device configuration
through candidate datastore:
Figure 4: Modifying Candidate Datastore Steps
1.
Lock the running datastore.
2.
Lock the candidate datastore.
3.
Make modifications to the candidate configuration through edit-config RPCs with the target candidate.
4.
Commit the candidate configuration to the running configuration.
5.
Unlock the candidate and running datastores.
Confirmed Candidate Configuration Commit
The candidate configuration supports the confirmed commit capability. This implementation is as specified
in RFC 6241 for the confirmed commit capability which, when issued, sets the running configuration to the
current contents of the candidate configuration and starts a confirmed commit timer. The confirmed commit
operation will be rolled back if the commit is not issued within the timeout period. The default timeout period
is 600 seconds or 10 minutes.
When you commit the candidate configuration, you can require an explicit confirmation for the commit to
become permanent. The confirmed commit operation is useful for verifying that a configuration change works
correctly and does not prevent management access to the device. If the change prevents access or causes other
errors, the automatic rollback to the previous configuration restores access after the rollback deadline passes.
If the commit is not confirmed within the specified amount of time,by default, the device automatically
retrieves and commits (rolls back to) the previously committed configuration.
RESTCONF does not support confirmed commit.
Note
In a NETCONF session, to commit the candidate configuration and to explicitly confirm the commit to become
permanent, a client application encloses the empty <confirmed/> tag in the <commit> and <rpc> tag elements:
<rpc>
<commit>
<confirmed/>
</commit>
</rpc>
The following sample RPC shows how to change the default rollback timer:
Programmability Configuration Guide, Cisco IOS XE Amsterdam 17.3.x
142
Model-Driven Programmability
Confirmed Candidate Configuration Commit

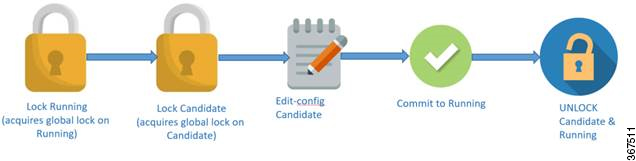
Page 157
<rpc>
<commit>
<confirmed/>
<confirm-timeout>nnn</confirm-timeout> !nnn is the rollback-delay in seconds.
</commit>
</rpc>
The following sample RPC shows that the NETCONF server confirms that the candidate configuration is
committed temporarily:
<rpc-reply xmlns="URN" xmlns:nc="URL">
<ok/>
</rpc-reply>
If the NETCONF server cannot commit the candidate configuration, the <rpc-reply> element will enclose an
<rpc-error> element explaining the reason for the failure. The most common causes are semantic or syntactic
errors in the candidate configuration.
To delay the rollback to a time later than the current rollback timer, the client application sends a <confirmed/>
tag inside a <commit> tag element again before the deadline passes. Optionally, it includes the
<confirm-timeout> element to specify how long to delay the next rollback. The client application can delay
the rollback indefinitely by sending the <confirmed/> tag repeatedly.
To commit the configuration permanently, the client application sends the <commit/> tag enclosed in an <rpc>
tag element before the rollback deadline passes. The rollback is canceled and the candidate configuration is
committed immediately. If the candidate configuration is the same as the temporarily committed configuration,
the temporarily committed configuration is recommitted.
If another application uses the <kill-session/> tag element to terminate this application’s session while a
confirmed commit is pending (this application has committed changes but not yet confirmed them), the
NETCONF server that is using this session restores the configuration to its state before the confirmed commit
instruction was issued.
The candidate datastore is disabled by using the no netconf-yang feature candidate-datastore command.
Because the candidate datastore confirmed commit is enabled when the candidate datastore is enabled, the
confirmed commit is disabled when the candidate datastore is disabled. All sessions in progress are terminated,
and the confd program is restarted.
Candidate Support Configuration
The candidate datastore functionality can be enabled by using the netconf-yang feature candidate-datastore
command. When the datastore state changes from running to candidate or back, a warning message is displayed,
notifying the user that a restart of NETCONF or RESTCONF will occur in order for the change to take effect.
If the selection of the candidate or running datastore is specified in the configuration when a NETCONF-YANG
or RESTCONF confd process starts, a warning message appears as shown below:
Device(config)# netconf-yang feature candidate-datastore
netconf-yang initialization in progress - datastore transition not allowed, please try again
after 30 seconds
If the selection of the candidate or running datastore is made after the NETCONF-YANG or RESTCONF
confd process starts, the following apply:
Programmability Configuration Guide, Cisco IOS XE Amsterdam 17.3.x
143
Model-Driven Programmability
Candidate Support Configuration
Page 158
• If the netconf-yang feature candidate-datastore command is configured, the command enables the
candidate datastore and prints the following warning:
“netconf-yang and/or restconf is transitioning from running to candidate netconf-yang
and/or restconf will now be restarted,
and any sessions in progress will be terminated”.
• If the netconf-yang feature candidate-datastore command is removed, the command disables the
candidate datastore, enables the running datastore and prints the following warning:
netconf-yang and/or restconf is transitioning from candidate to running netconf-yang
and/or restconf will now be restarted,
and any sessions in progress will be terminated”.
• When NETCONF-YANG or RESTCONF are restarted, sessions in progress will be lost.
How to Configure the NETCONF Protocol
NETCONF-YANG uses the primary trustpoint of a device. If a trustpoint does not exist, when
NETCONF-YANG is configured, it creates a self-signed trustpoint. For more information, see the Public Key
Infrastructure Configuration Guide, Cisco IOS XE Gibraltar 16.10.x.
Providing Privilege Access to Use NETCONF
To start working with NETCONF APIs, you must be a user with privilege level 15.
SUMMARY STEPS
1.
enable
2. configure terminal
3. username name privilege level
password password
4. aaa new-model
5. aaa authentication login default local
6. aaa authorization exec default local
7.
end
DETAILED STEPS
Procedure
Purpose
Command or Action
Enables privileged EXEC mode.
enable
Step 1
Example:
Enter your password if prompted.
Device# enable
Enters global configuration mode.
configure terminal
Example:
Step 2
Device# configure terminal
Programmability Configuration Guide, Cisco IOS XE Amsterdam 17.3.x
144
Model-Driven Programmability
How to Configure the NETCONF Protocol
Page 159
Purpose
Command or Action
Establishes a user name-based authentication system.
Configure the following keywords:
username name privilege level
password password
Example:
Step 3
• privilege level: Sets the privilege level for the user.
For the NETCONF protocol, it must be 15.
Device(config)# username example-name privilege 15
password example_password
• password password: Sets a password to access the
CLI view.
(Optional) Enables authorisation, authentication, and
accounting (AAA).
aaa new-model
Example:
Step 4
If the aaa new-model command is configured, AAA
authentication and authorization is required.
Device(config)# aaa new-model
Sets the login authentication to use the local username
database.
aaa authentication login default local
Example:
Step 5
Note
Device(config)# aaa authentication login default
local
Only the default AAA authentication login method is
supported for the NETCONF protocol.
• For a remote AAA server, replace local with your
AAA server.
The default keyword applies the local user database
authentication to all ports.
Configures user AAA authorization, check the local
database, and allows the user to run an EXEC shell.
aaa authorization exec default local
Example:
Step 6
Note
Device(config)# aaa authorization exec default
local
Only the default AAA authorization method is supported
for the NETCONF protocol.
• For a remote AAA server, replace local with your
AAA server.
• The default keyword applies the local user database
authentication to all ports.
Exits global configuration mode and returns to privileged
EXEC mode.
end
Example:
Step 7
Device(config)# end
Configuring NETCONF-YANG
If the legacy NETCONF protocol is enabled on your device, the RFC-compliant NETCONF protocol does
not work. Disable the legacy NETCONF protocol by using the no netconf legacy command.
Programmability Configuration Guide, Cisco IOS XE Amsterdam 17.3.x
145
Model-Driven Programmability
Configuring NETCONF-YANG
Page 160
SUMMARY STEPS
1.
enable
2. configure terminal
3. netconf-yang
4. netconf-yang feature candidate-datastore
5. exit
DETAILED STEPS
Procedure
Purpose
Command or Action
Enables privileged EXEC mode.
enable
Step 1
Example:
• Enter your password if prompted.
Device> enable
Enters global configuration mode.
configure terminal
Example:
Step 2
Device# configure terminal
Enables the NETCONF interface on your network device.
netconf-yang
Step 3
Example:
Note
After the initial enablement through the CLI, network
devices can be managed subsequently through a model
Device (config)# netconf-yang
based interface. The complete activation of model-based
interface processes may require up to 90 seconds.
Enables candidate datastore.
netconf-yang feature candidate-datastore
Example:
Step 4
Device(config)# netconf-yang feature
candidate-datastore
Exits global configuration mode.
exit
Example:
Step 5
Device (config)# exit
Configuring NETCONF Options
Configuring SNMP
Enable the SNMP Server in IOS to enable NETCONF to access SNMP MIB data using YANG models
generated from supported MIBs, and to enable supported SNMP traps in IOS to receive NETCONF notifications
from the supported traps.
Perform the following steps:
Programmability Configuration Guide, Cisco IOS XE Amsterdam 17.3.x
146
Model-Driven Programmability
Configuring NETCONF Options
Page 161
SUMMARY STEPS
1.
Enable SNMP features in IOS.
2. After NETCONF-YANG starts, enable SNMP Trap support by sending the following RPC <edit-config>
message to the NETCONF-YANG port.
3. Send the following RPC message to the NETCONF-YANG port to save the running configuration to the
startup configuration.
DETAILED STEPS
Procedure
Step 1
Enable SNMP features in IOS.
Example:
configure terminal
logging history debugging
logging snmp-trap emergencies
logging snmp-trap alerts
logging snmp-trap critical
logging snmp-trap errors
logging snmp-trap warnings
logging snmp-trap notifications
logging snmp-trap informational
logging snmp-trap debugging
!
snmp-server community public RW
snmp-server trap link ietf
snmp-server enable traps snmp authentication linkdown linkup
snmp-server enable traps syslog
snmp-server manager
exit
Step 2
After NETCONF-YANG starts, enable SNMP Trap support by sending the following RPC <edit-config> message to the
NETCONF-YANG port.
Example:
<?xml version="1.0" encoding="utf-8"?>
<rpc xmlns="urn:ietf:params:xml:ns:netconf:base:1.0" message-id="">
<edit-config>
<target>
<running/>
</target>
<config>
<netconf-yang xmlns="http://cisco.com/yang/cisco-self-mgmt">
<cisco-ia xmlns="http://cisco.com/yang/cisco-ia">
<snmp-trap-control>
<trap-list>
<trap-oid>1.3.6.1.4.1.9.9.41.2.0.1</trap-oid>
</trap-list>
<trap-list>
<trap-oid>1.3.6.1.6.3.1.1.5.3</trap-oid>
</trap-list>
<trap-list>
<trap-oid>1.3.6.1.6.3.1.1.5.4</trap-oid>
</trap-list>
</snmp-trap-control>
</cisco-ia>
Programmability Configuration Guide, Cisco IOS XE Amsterdam 17.3.x
147
Model-Driven Programmability
Configuring SNMP
Page 162
</netconf-yang>
</config>
</edit-config>
</rpc>
Step 3
Send the following RPC message to the NETCONF-YANG port to save the running configuration to the startup
configuration.
Example:
<?xml version="1.0" encoding="utf-8"?>
<rpc xmlns="urn:ietf:params:xml:ns:netconf:base:1.0" message-id="">
<cisco-ia:save-config xmlns:cisco-ia="http://cisco.com/yang/cisco-ia"/>
</rpc>
Configuring the SSH Server to Perform RSA-Based User Authentication
Perform this task to configure the SSH public key for NETCONF-YANG to authenticate users.
SUMMARY STEPS
1.
enable
2. configure terminal
3. ip ssh pubkey-chain
4. username username
5. key-string
6. end
DETAILED STEPS
Procedure
Purpose
Command or Action
Enables privileged EXEC mode.
enable
Step 1
Example:
• Enter your password if prompted.
Device> enable
Enters global configuration mode.
configure terminal
Example:
Step 2
Device# configure terminal
Configures SSH-RSA keys for user and server
authentication on the SSH server and enters public-key
configuration mode.
ip ssh pubkey-chain
Example:
Device(config)# ip ssh pubkey-chain
Step 3
• The user authentication is successful if the RSA public
key stored on the server is verified with the public or
the private key pair stored on the client.
Programmability Configuration Guide, Cisco IOS XE Amsterdam 17.3.x
148
Model-Driven Programmability
Configuring the SSH Server to Perform RSA-Based User Authentication
Page 163
Purpose
Command or Action
Configures the SSH username and enters public-key user
configuration mode.
username username
Example:
Step 4
Device(conf-ssh-pubkey)# username user1
Specifies the RSA public key of the remote peer and enters
public-key data configuration mode.
key-string
Example:
Step 5
Note
Device(conf-ssh-pubkey-user)# key-string
You can obtain the public key value from an open SSH
client; that is, from the .ssh/id_rsa.pub file.
Exits public-key data configuration mode and returns to
privileged EXEC mode.
end
Example:
Step 6
• Use no hostname command to return to the default
host.
Device(conf-ssh-pubkey-data)# end
Verifying the NETCONF Protocol Configuration
Use the following commands to verify your NETCONF configuration.
SUMMARY STEPS
1.
show netconf-yang datastores
2. show netconf-yang sessions
3. show netconf-yang sessions detail
4. show netconf-yang statistics
5. show platform software yang-management process
DETAILED STEPS
Procedure
Step 1
show netconf-yang datastores
Displays information about NETCONF-YANG datastores.
Example:
Device# show netconf-yang datastores
Device# show netconf-yang datastores
Datastore Name : running
Globally Locked By Session : 42
Globally Locked Time : 2018-01-15T14:25:14-05:00
Step 2
show netconf-yang sessions
Programmability Configuration Guide, Cisco IOS XE Amsterdam 17.3.x
149
Model-Driven Programmability
Verifying the NETCONF Protocol Configuration
Page 164
Displays information about NETCONF-YANG sessions.
Example:
Device# show netconf-yang sessions
R: Global-lock on running datastore
C: Global-lock on candidate datastore
S: Global-lock on startup datastore
Number of sessions : 10
session-id transport username source-host global-lock
40 netconf-ssh admin 10.85.70.224 None
42 netconf-ssh admin 10.85.70.224 None
44 netconf-ssh admin 10.85.70.224 None
46 netconf-ssh admin 10.85.70.224 None
48 netconf-ssh admin 10.85.70.224 None
50 netconf-ssh admin 10.85.70.224 None
52 netconf-ssh admin 10.85.70.224 None
54 netconf-ssh admin 10.85.70.224 None
56 netconf-ssh admin 10.85.70.224 None
58 netconf-ssh admin 10.85.70.224 None
Step 3
show netconf-yang sessions detail
Displays detailed information about NETCONF-YANG sessions.
Example:
Device# show netconf-yang sessions detail
R: Global-lock on running datastore
C: Global-lock on candidate datastore
S: Global-lock on startup datastore
Number of sessions
: 1
session-id
: 19
transport
: netconf-ssh
username
: admin
source-host
: 2001:db8::1
login-time
: 2018-10-26T12:37:22+00:00
in-rpcs
: 0
in-bad-rpcs
: 0
out-rpc-errors
: 0
out-notifications
: 0
global-lock
: None
Step 4
show netconf-yang statistics
Displays information about NETCONF-YANG statistics.
Example:
Device# show netconf-yang statistics
netconf-start-time : 2018-01-15T12:51:14-05:00
in-rpcs : 0
in-bad-rpcs : 0
out-rpc-errors : 0
out-notifications : 0
in-sessions : 10
dropped-sessions : 0
Programmability Configuration Guide, Cisco IOS XE Amsterdam 17.3.x
150
Model-Driven Programmability
Verifying the NETCONF Protocol Configuration
Page 165
in-bad-hellos : 0
Step 5
show platform software yang-management process
Displays the status of the software processes required to support NETCONF-YANG.
Example:
Device# show platform software yang-management process
confd
: Running
nesd
: Running
syncfd
: Running
ncsshd
: Running
dmiauthd
: Running
vtyserverutild
: Running
opdatamgrd
: Running
nginx
: Running
ndbmand
: Running
Note
The process nginx runs if ip http secure-server or ip http server is configured on the device. This process is not required
to be in the running state for NETCONF to function properly. However, the nginx process is required for RESTCONF.
Table 13: show platform software yang-management process Field Descriptions
Description
Field
Configuration daemon
confd
Network element synchronizer daemon
nesd
Sync from daemon
syncfd
NETCONF Secure Shell (SSH) daemon
ncsshd
Device management inteface (DMI) authentication daemon
dmiauthd
VTY server util daemon
vtyserverutild
Operational Data Manager daemon
opdatamgrd
NGINX web server
nginx
NETCONF database manager
ndbmand
Programmability Configuration Guide, Cisco IOS XE Amsterdam 17.3.x
151
Model-Driven Programmability
Verifying the NETCONF Protocol Configuration
Page 166
Additional References for NETCONF Protocol
Related Documents
Document Title
Related Topic
To access Cisco YANG models in a developer-friendly way,
please clone the GitHub repository, and navigate to the
vendor/cisco subdirectory. Models for various releases of
IOS-XE, IOS-XR, and NX-OS platforms are available here.
YANG data models for various release of
IOS-XE, IOS-XR, and NX-OS platforms
Standards and RFCs
Title
Standard/RFC
YANG - A Data Modeling Language for the Network Configuration
Protocol (NETCONF)
RFC 6020
Network Configuration Protocol (NETCONF)
RFC 6241
Network Configuration Protocol (NETCONF) Access Control Model
RFC 6536
RESTCONF Protocol
RFC 8040
Technical Assistance
Link
Description
http://www.cisco.com/support
The Cisco Support website provides extensive online resources,
including documentation and tools for troubleshooting and resolving
technical issues with Cisco products and technologies.
To receive security and technical information about your products,
you can subscribe to various services, such as the Product Alert Tool
(accessed from Field Notices), the Cisco Technical Services
Newsletter, and Really Simple Syndication (RSS) Feeds.
Access to most tools on the Cisco Support website requires a
Cisco.com user ID and password.
Feature Information for NETCONF Protocol
The following table provides release information about the feature or features described in this module. This
table lists only the software release that introduced support for a given feature in a given software release
train. Unless noted otherwise, subsequent releases of that software release train also support that feature.
Use Cisco Feature Navigator to find information about platform support and Cisco software image support.
To access Cisco Feature Navigator, go to www.cisco.com/go/cfn. An account on Cisco.com is not required.
Programmability Configuration Guide, Cisco IOS XE Amsterdam 17.3.x
152
Model-Driven Programmability
Additional References for NETCONF Protocol
Page 167
Table 14: Feature Information for NETCONF Protocol
Feature Information
Release
Feature Name
The NETCONF Protocol feature facilitates a
programmatic and standards-based way of
writing configurations and reading operational
data from network devices.
The following command was introduced:
netconf-yang.
This feature was implemented on the
following platforms:
• Cisco 4000 Series Integrated Services
Routers
• Cisco ASR 1000 Series Aggregation
Services Routers
• Cisco Cloud Services Router 1000V
Series
Cisco IOS XE Denali 16.3.1
NETCONF Protocol
This feature was implemented on the
following platforms:
• Cisco Catalyst 3650 Series Switches
• Cisco Catalyst 3850 Series Switches
Cisco IOS XE Everest
16.5.1a
This feature was implemented on the
following platforms:
• Cisco Catalyst 9300 Series Switches
• Cisco Catalyst 9400 Series Switches
• Cisco Catalyst 9500 Series Switches
Cisco IOS XE Everest 16.6.2
Cisco IOS XE Fuji 16.8.1a
Programmability Configuration Guide, Cisco IOS XE Amsterdam 17.3.x
153
Model-Driven Programmability
Feature Information for NETCONF Protocol
Page 168
Feature Information
Release
Feature Name
In Cisco IOS XE Fuji 16.8.1a, this feature was
implemented on the following platforms:
• Cisco 1000 Series Integrated Services
Routers
• Cisco ASR 900 Series Aggregation
Services Routers
• Cisco ASR 920 Series Aggregation
Services Routers
• Cisco Catalyst 9500-High Performance
Series Switches
• Cisco CBR-8 Series Routers
• Cisco Network Convergence System
4200 Series
This feature was implemented on the
following platforms:
• Cisco Catalyst 9200 and 9200L Series
Switches
• Cisco Catalyst 9300L SKUs
Cisco IOS XE Fuji 16.9.2
In Cisco IOS XE Gibraltar 16.10.1, this feature
was implemented on the following platforms:
• Cisco Catalyst 9800-40 Wireless
Controllers
• Cisco Catalyst 9800-80 Wireless
Controllers
• Cisco Network Convergence System 520
Series
Cisco IOS XE Gibraltar
16.10.1
In Cisco IOS XE Gibraltar 16.11.1, this feature
was implemented on Cisco Catalyst 9600
Series Switches.
Cisco IOS XE Gibraltar
16.11.1
In Cisco IOS XE Gibraltar 16.12.1, this feature
was implemented on Cisco Catalyst 9800-L
Wireless Controllers.
Cisco IOS XE Gibraltar
16.12.1
Cisco IOS XE Amsterdam
17.3.1
Programmability Configuration Guide, Cisco IOS XE Amsterdam 17.3.x
154
Model-Driven Programmability
Feature Information for NETCONF Protocol
Page 169
Feature Information
Release
Feature Name
In Cisco IOS XE Amsterdam 17.3.1, this
feature was implemented on the following
platforms:
• Cisco Catalyst 8200 Series Edge
Platforms
• Cisco Catalyst 8300 Series Edge
Platforms
• Cisco Catalyst 8500 and 8500L Series
Edge Platforms
IPv6 support for the NETCONF and
RESTCONF protocols. This feature was
implemented on the following platforms:
• Cisco 4000 Series Integrated Services
Routers
• Cisco ASR 1000 Series Aggregation
Services Routers
• Cisco ASR 900 Series Aggregation
Services Routers
• Cisco Catalyst 3650 Series Switches
• Cisco Catalyst 3850 Series Switches
• Cisco Catalyst 9300 Series Switches
• Cisco Catalyst 9400 Series Switches
• Cisco Catalyst 9500 Series Switches
• Cisco CBR-8 Series Routers
• Cisco Cloud Services Router 1000V
Series
Cisco IOS XE Fuji 16.8.1a
NETCONF and RESTCONF
IPv6 Support
In Cisco IOS XE Gibraltar 16.11.1, this feature
was implemented on Cisco Catalyst
9500-High Performance Series Switches.
Cisco IOS XE Gibraltar
16.11.1
Programmability Configuration Guide, Cisco IOS XE Amsterdam 17.3.x
155
Model-Driven Programmability
Feature Information for NETCONF Protocol
Page 170
Feature Information
Release
Feature Name
The NETCONF protocol supports a global
lock, and the ability to kill non-responsive
sessions. This feature is implemented on the
following platforms:
• Cisco 1100 Series Integrated Services
Routers
• Cisco 4000 Series Integrated Services
Routers
• Cisco ASR 1000 Series Aggregation
Services Routers
• Cisco ASR 900 Series Aggregation
Services Routers
• Cisco Catalyst 3650 Series Switches
• Cisco Catalyst 3850 Series Switches
• Cisco Catalyst 9300 Series Switches
• Cisco Catalyst 9400 Series Switches
• Cisco Catalyst 9500 Series Switches
• Cisco CBR-8 Series Routers
• Cisco Cloud Services Router 1000v
Series
Cisco IOS XE Fuji 16.8.1a
NETCONF Global Lock and
Kill Session
Programmability Configuration Guide, Cisco IOS XE Amsterdam 17.3.x
156
Model-Driven Programmability
Feature Information for NETCONF Protocol
Page 171
Feature Information
Release
Feature Name
The Candidate Config Support feature enables
support for candidate capability by
implementing RFC 6241 with a simple commit
option.
This feature was implemented on the
following platforms:
• Cisco 4000 Series Integrated Services
Routers
• Cisco ASR 1000 Series Aggregation
Services Routers
• Cisco ASR 900 Series Aggregation
Services Routers
• Cisco Catalyst 3650 Series Switches
• Cisco Catalyst 3850 Series Switches
• Cisco Catalyst 9300 Series Switches
• Cisco Catalyst 9400 Series Switches
• Cisco Catalyst 9500 Series Switches
• Cisco CBR-8 Series Routers
• Cisco Cloud Services Router 1000V
Series
The following command was introduced:
netconf-yang feature candidate-datastore.
Cisco IOS XE Fuji 16.9.1
NETCONF: Candidate
Configuration Support
Programmability Configuration Guide, Cisco IOS XE Amsterdam 17.3.x
157
Model-Driven Programmability
Feature Information for NETCONF Protocol
Page 172
Feature Information
Release
Feature Name
The candidate configuration supports the
confirmed commit capability.
This feature was implemented on the
following platforms:
• Cisco 1000 Series Integrated Services
Routers
• Cisco 4000 Series Integrated Services
Routers
• Cisco ASR 1000 Series Aggregation
Services Routers
• Cisco ASR 900 Series Aggregation
Services Routers
• Cisco Catalyst 3650 Series Switches
• Cisco Catalyst 3850 Series Switches
• Cisco Catalyst 9200 Series Switches
• Cisco Catalyst 9300 Series Switches
• Cisco Catalyst 9400 Series Switches
• Cisco Catalyst 9500 Series Switches
• Cisco cBR-8 Converged Broadband
Router
• Cisco Cloud Services Router 1000V
Series
• Cisco Network Convergence System 520
Series
• Cisco Network Convergence System
4200 Series
Cisco IOS XE Amsterdam
17.1.1
NETCONF: Candidate
Configuration Commit
Confirm
Programmability Configuration Guide, Cisco IOS XE Amsterdam 17.3.x
158
Model-Driven Programmability
Feature Information for NETCONF Protocol
Page 173
Feature Information
Release
Feature Name
This feature was implemented on the
following platforms:
• Cisco 1000 Series Integrated Services
Routers
• Cisco 4000 Series Integrated Services
Routers
• Cisco ASR 900 Series Aggregation
Services Routers
• Cisco ASR 920 Series Aggregation
Services Routers
• Cisco ASR 1000 Aggregation Services
Routers
• Cisco Catalyst 3650 Series Switches
• Cisco Catalyst 3850 Series Switches
• Cisco Catalyst 9200 Series Switches
• Cisco Catalyst 9300 Series Switches
• Cisco Catalyst 9400 Series Switches
• Cisco Catalyst 9500 Series Switches
• Cisco Catalyst 9600 Series Switches
• Cisco Catalyst 9800 Series Wireless
Controllers
• Cisco cBR-8 Converged Broadband
Router
• Cisco Cloud Services Router 1000V
Series
• Cisco Network Convergence System 520
Series
• Cisco Network Convergence System
4200 Series
Cisco IOS XE Gibraltar
16.12.1
NETCONF-YANG SSH
Server Support
Programmability Configuration Guide, Cisco IOS XE Amsterdam 17.3.x
159
Model-Driven Programmability
Feature Information for NETCONF Protocol
Page 174
Programmability Configuration Guide, Cisco IOS XE Amsterdam 17.3.x
160
Model-Driven Programmability
Feature Information for NETCONF Protocol
Page 175
C H A P T E R 9
RESTCONF Protocol
This chapter describes how to configure the HTTP-based Representational State Transfer Configuration
Protocol (RESTCONF). RESTCONF provides a programmatic interface based on standard mechanisms for
accessing configuration data, state data, data-model-specific Remote Procedure Call (RPC) operations and
events, defined in the YANG model.
• Prerequisites for the RESTCONF Protocol, on page 161
• Restrictions for the RESTCONF Protocol, on page 161
• Information About the RESTCONF Protocol, on page 162
• How to Configure the RESTCONF Protocol, on page 168
• Configuration Examples for the RESTCONF Protocol, on page 173
• Additional References for the RESTCONF Protocol, on page 176
• Feature Information for the RESTCONF Protocol, on page 176
Prerequisites for the RESTCONF Protocol
• Enable the Cisco IOS-HTTP services for RESTCONF.
Restrictions for the RESTCONF Protocol
The following restrictions apply to the RESTCONF protocol:
• Notifications and event streams
• YANG patch
• Optional query parameters, such as, filter, start-time, stop-time, replay, and action
• The RESTCONF feature is not supported on a device running dual IOSd configuration or software
redundancy.
Programmability Configuration Guide, Cisco IOS XE Amsterdam 17.3.x
161

Page 176
Information About the RESTCONF Protocol
Overview of RESTCONF
This section describes the protocols and modelling languages that enable a programmatic way of writing
configurations to a network device.
• RESTCONF—Uses structured data (XML or JSON) and YANG to provide a REST-like APIs, enabling
you to programmatically access different network devices. RESTCONF APIs use HTTPs methods.
• YANG—A data modelling language that is used to model configuration and operational features . YANG
determines the scope and the kind of functions that can be performed by NETCONF and RESTCONF
APIs.
In releases prior to Cisco IOS XE Fuji 16.8.1, an operational data manager (based on polling) was enabled
separately. In Cisco IOS XE Fuji 16.8.1 and later releases, operational data works on platforms running
NETCONF (similar to how configuration data works), and is enabled by default. For more information on
the components that are enabled for operational data queries or streaming, see the GitHub respository, and
view *-oper in the naming convention.
HTTPs Methods
The HTTPS-based RESTCONF protocol (RFC 8040), is a stateless protocol that uses secure HTTP methods
to provide CREATE, READ, UPDATE, and DELETE (CRUD) operations on a conceptual datastore containing
YANG-defined data, which is compatible with a server that implements NETCONF datastores.
The following table shows how the RESTCONF operations relate to NETCONF protocol operations:
SUPPORTED METHODS
OPTIONS
Read
GET
Update
PATCH
Create or Replace
PUT
Create or Operations (reload, default)
POST
Deletes the targeted resource
DELETE
Header metadata (no response body)
HEAD
RESTCONF Root Resource
• A RESTCONF device determines the root of the RESTCONF API through the link element:
/.well-known/host-meta resource that contains the RESTCONF attribute.
• A RESTCONF device uses the RESTCONF API root resource as the initial part of the path in the request
URI.
Programmability Configuration Guide, Cisco IOS XE Amsterdam 17.3.x
162
Model-Driven Programmability
Information About the RESTCONF Protocol
Page 177
Example:
Example returning /restconf:
The client might send the following:
GET /.well-known/host-meta HTTP/1.1
Host: example.com
Accept: application/xrd+xml
The server might respond as follows:
HTTP/1.1 200 OK
Content-Type: application/xrd+xml
Content-Length: nnn
<XRD xmlns='http://docs.oasis-open.org/ns/xri/xrd-1.0'>
<Link rel='restconf' href='/restconf'/>
</XRD>
Example of URIs:
• GigabitEthernet0/0/2 -
https://10.104.50.97/restconf/data/Cisco-IOS-XE-native:native/interface/GigabitEthernet=0%2F0%2F2
• fields=name –
https://10.104.50.97/restconf/data/Cisco-IOS-XE-native:native/interface/GigabitEthernet=0%2F0%2F2?fields=name
• depth=1 -
https://10.85.116.59/restconf/data/Cisco-IOS-XE-native:native/interface/GigabitEthernet?depth=1
• Name and IP -
https://10.85.116.59/restconf/data/Cisco-IOS-XE-native:native/interface?fields=GigabitEthernet/ip/address/primary;name
• MTU (fields) -
https://10.104.50.97/restconf/data/Cisco-IOS-XE-native:native/interface?fields=GigabitEthernet(mtu)
• MTU -
https://10.85.116.59/restconf/data/Cisco-IOS-XE-native:native/interface/GigabitEthernet=3/mtu
• Port-Channel -
https://10.85.116.59/restconf/data/Cisco-IOS-XE-native:native/interface/Port-channel
• “Char” to “Hex” conversion chart: http://www.columbia.edu/kermit/ascii.html
RESTCONF API Resource
The API resource is the top-level resource located at +restconf. It supports the following media types:
Media is the type of YANG formated RPC that is sent to the RESCONF server (XML or JSON).
Note
• Application/YANG-Data+XML OR Application/YANG-Data+JSON
• The API resource contains the RESTCONF root resource for the RESTCONF DATASTORE and
OPERATION resources. For example:
Programmability Configuration Guide, Cisco IOS XE Amsterdam 17.3.x
163
Model-Driven Programmability
RESTCONF API Resource

Page 178
The client may then retrieve the top-level API resource, using the
root resource "/restconf".
GET /restconf HTTP/1.1
Host: example.com
Accept: application/yang-data+json
The server might respond as follows:
HTTP/1.1 200 OK
Date: Thu, 26 Jan 2017 20:56:30 GMT
Server: example-server
Content-Type: application/yang-data+json
{
"ietf-restconf:restconf" : {
"data" : {},
"operations" : {},
"yang-library-version" : "2016-06-21"
}
}
For more information, refer to RFC 3986
Methods
Methods are HTTPS operations (GET/PATCH/POST/DELETE/OPTIONS/PUT) performed on a target
resource. A YANG-formated RPC invokes a particular method on a given resource that pertains to a target
YANG model residing in the RESTCONF server. The uniform resource identifier (URI) acts as a location
identification for a given resource, so that the client RESTCONF method can locate that particular resource
to take an action specified by an HTTPS method or property.
For more information, see RFC 8040 - RESTCONF Protocol
RESTCONF YANG-Patch Support
RESTCONF supports YANG-Patch media type as specified by RFC 8072. A YANG-Patch is an ordered list
of edits that are applied to the target datastore by the RESTCONF server. The YANG Patch operation is
invoked by the RESTCONF client by sending a Patch method request with a representation using either the
media type application/yang-patch+xml or application/yang-patch+json.
A YANG-Patch is identified by a unique patch-id. A patch is an ordered collection of edits and each edit is
identified by an edit-id. It has an edit operation ("create", "delete", "insert", "merge", "move", "replace", or
"remove") that is applied to the target resource.
To verify if the RESTCONF YANG-Patch is supported issue the following RESTCONF Get request:
$ curl -k -s -u admin:DMIdmi1! --location-trusted
"https://10.1.1.1/restconf/data/ietf-restconf-monitoring:restconf-state/capabilities" -X
GET
<capabilities xmlns="urn:ietf:params:xml:ns:yang:ietf-restconf-monitoring"
xmlns:rcmon="urn:ietf:params:xml:ns:yang:ietf-restconf-monitoring">
<capability>urn:ietf:params:restconf:capability:defaults:1.0?basic-mode=explicit</capability>
<capability>urn:ietf:params:restconf:capability:depth:1.0</capability>
<capability>urn:ietf:params:restconf:capability:fields:1.0</capability>
<capability>urn:ietf:params:restconf:capability:with-defaults:1.0</capability>
Programmability Configuration Guide, Cisco IOS XE Amsterdam 17.3.x
164
Model-Driven Programmability
Methods
Page 179
<capability>urn:ietf:params:restconf:capability:filter:1.0</capability>
<capability>urn:ietf:params:restconf:capability:replay:1.0</capability>
<capability>urn:ietf:params:restconf:capability:yang-patch:1.0</capability>
<capability>http://tail-f.com/ns/restconf/collection/1.0</capability>
<capability>http://tail-f.com/ns/restconf/query-api/1.0</capability>
</capabilities>
This section provides a few RESTCONF YANG-Patch examples.
Add Resource Error
While trying to edit a file, the first edit already exists and an error is reported. The rest of the edits are not
attempted because the first edit failed. XML encoding is used in this example
The following example show an add resource request from the RESTCONF client:
<yang-patch xmlns="urn:ietf:params:xml:ns:yang:ietf-yang-patch">
<patch-id>add-hostname-patch</patch-id>
<edit>
<edit-id>edit1</edit-id>
<operation>create</operation>
<target>/hostname</target>
<value>
<hostname
xmlns="http://cisco.com/ns/yang/Cisco-IOS-XE-native">Cat9K-test</hostname>
</value>
</edit>
<edit>
<edit-id>edit2</edit-id>
<operation>create</operation>
<target>/interface/Loopback=1</target>
<value>
<interface xmlns="http://cisco.com/ns/yang/Cisco-IOS-XE-native">
<Loopback>
<name>1</name>
</Loopback>
</interface>
</value>
</edit>
</yang-patch>
The following examples shows a JSON response from the RESTCONF server:
Device:/nobackup/folder1/confd_6313/bin $ curl -k -s -u admin:DMIdmi1! --location-trusted
"https://10.1.1.1/restconf/data/Cisco-IOS-XE-native:native" -X PATCH -H "Accept:
application/yang-data+json" -d
'@yang_patch_create_hostname' -H "Content-type: application/yang-patch+xml"
{
"ietf-yang-patch:yang-patch-status": {
"patch-id": "add-hostname-patch",
"edit-status": {
"edit": [
{
"edit-id": "edit1",
"errors": {
"error": [
{
"error-type": "application",
"error-tag": "data-exists",
"error-path": "/Cisco-IOS-XE-native:native/hostname",
Programmability Configuration Guide, Cisco IOS XE Amsterdam 17.3.x
165
Model-Driven Programmability
RESTCONF YANG-Patch Support
Page 180
"error-message": "object already exists: /ios:native/ios:hostname"
}
]
}
}
]
}
}
}
The following example shows an XML response from the RESTCONF server:
Device:/nobackup/folder1/confd_6313/bin $ curl -k -s -u admin:DMIdmi1! --location-trusted
"https://10.1.1.1/restconf/data/Cisco-IOS-XE-native:native" -X PATCH -H "Accept:
application/yang-data+xml" -d
'@yang_patch_create_hostname' -H "Content-type: application/yang-patch+xml"
<yang-patch-status xmlns="urn:ietf:params:xml:ns:yang:ietf-yang-patch">
<patch-id>add-hostname-patch</patch-id>
<edit-status>
<edit>
<edit-id>edit1</edit-id>
<errors>
<error>
<error-type>application</error-type>
<error-tag>data-exists</error-tag>
<error-path
xmlns:ios="http://cisco.com/ns/yang/Cisco-IOS-XE-native">/ios:native/ios:hostname</error-path>
<error-message>object already exists: /ios:native/ios:hostname</error-message>
</error>
</errors>
</edit>
</edit-status>
</yang-patch-status>device:/nobackup/folder1/confd_6313/bin $
Add Resource Success
The following example shows an edit request:
<yang-patch xmlns="urn:ietf:params:xml:ns:yang:ietf-yang-patch">
<patch-id>add-Loopback-patch</patch-id>
<edit>
<edit-id>edit1</edit-id>
<operation>create</operation>
<target>/Loopback=1</target>
<value>
<Loopback xmlns="http://cisco.com/ns/yang/Cisco-IOS-XE-native">
<name>1</name>
</Loopback
</value>
</edit>
</yang-patch>
The following example shows that the edit request is successful:
Device:/nobackup/folder1/confd_6313/bin $ curl -k -s -u admin:DMIdmi1! --location-trusted
"https://10.1.1.1/restconf/data/Cisco-IOS-XE-native:native/interface" -X PATCH -H "Accept:
application/yang-data+json"
-d '@yang_patch_create_Loopback_interface' -H "Content-type: application/yang-patch+xml"
Device:/nobackup/folder1/confd_6313/bin
{
"ietf-yang-patch:yang-patch-status": {
Programmability Configuration Guide, Cisco IOS XE Amsterdam 17.3.x
166
Model-Driven Programmability
RESTCONF YANG-Patch Support
Page 181
"patch-id": "add-Loopback-patch",
“ok" : [null]
}
}
Insert List Entry
The following example shows that the Loopback 1 is inserted after Loopback 0:
<yang-patch xmlns="urn:ietf:params:xml:ns:yang:ietf-yang-patch">
<patch-id>insert-Loopback-patch</patch-id>
<edit>
<edit-id>edit1</edit-id>
<operation>insert</operation>
<target>/Loopback=1</target>
<point>/Loopback=0</point>
<where>after</where>
<value>
<Loopback xmlns="http://cisco.com/ns/yang/Cisco-IOS-XE-native">
<name>1</name>
</Loopback>
</value>
</edit>
</yang-patch>
The following example shows that the insert list request is successful:
Device:/nobackup/folder1/confd_6313/bin $ curl -k -s -u admin:DMIdmi1! --location-trusted
"https://10.1.1.1/restconf/data/Cisco-IOS-XE-native:native/interface" -X PATCH -H "Accept:
application/yang-data+json" -d
'@yang_patch_create_Loopback_interface' -H "Content-type: application/yang-patch+xml"
Device:/nobackup/folder1/confd_6313/bin
{
"ietf-yang-patch:yang-patch-status": {
"patch-id": "insert-Loopback-patch",
“ok" : [null]
}
}
Move List Entry
The following example shows Loopback 1 is moved before Loopback 0:
<yang-patch xmlns="urn:ietf:params:xml:ns:yang:ietf-yang-patch">
<patch-id>move-Loopback-patch</patch-id>
<edit>
<edit-id>edit1</edit-id>
<operation>move</operation>
<target>/Loopback=1</target>
<point>/Loopback=0</point>
<where>before</where>
<value>
<Loopback xmlns="http://cisco.com/ns/yang/Cisco-IOS-XE-native">
<name>1</name>
</Loopback>
</value>
</edit>
</yang-patch>
The following example shows that the move request is successful:
Programmability Configuration Guide, Cisco IOS XE Amsterdam 17.3.x
167
Model-Driven Programmability
RESTCONF YANG-Patch Support
Page 182
Device:/nobackup/folder1/confd_6313/bin $ curl -k -s -u admin:DMIdmi1! --location-trusted
"https://10.1.1.1/restconf/data/Cisco-IOS-XE-native:native/interface" -X PATCH -H "Accept:
application/yang-data+json" -d
'@yang_patch_create_Loopback_interface' -H "Content-type: application/yang-patch+xml"
Device:/nobackup/folder1/confd_6313/bin
{
"ietf-yang-patch:yang-patch-status": {
"patch-id": "move-Loopback-patch",
“ok" : [null]
}
}
How to Configure the RESTCONF Protocol
Authentication of NETCONF/RESTCONF Using AAA
Before you begin
NETCONF and RESTCONF connections must be authenticated using authentication, authorization, and
accounting (AAA). As a result, RADIUS or TACACS+ users defined with privilege level 15 access are
allowed access into the system.
SUMMARY STEPS
1.
enable
2.
configure terminal
3.
aaa new-model
4.
aaa group server radius server-name
5.
server-private ip-address key key-name
6.
ip vrf forwarding vrf-name
7.
exit
8.
aaa authentication login default group group-name local
9.
aaa authentication login list-name none
10.
aaa authorization exec default group group-name local
11.
aaa session-id common
12.
line console number
13.
login authentication authentication-list
14.
end
DETAILED STEPS
Procedure
Purpose
Command or Action
Enables privileged EXEC mode
enable
Step 1
Programmability Configuration Guide, Cisco IOS XE Amsterdam 17.3.x
168
Model-Driven Programmability
How to Configure the RESTCONF Protocol
Page 183
Purpose
Command or Action
Example:
• Enter your password if prompted.
Device> enable
Enters global configuration mode.
configure terminal
Example:
Step 2
Device# configure terminal
Enables AAA.
aaa new-model
Example:
Step 3
Device(config)# aaa new-model
Adds the RADIUS server and enters server group RADIUS
configuration mode.
aaa group server radius server-name
Example:
Step 4
• The server-name argument specifies the RADIUS
server group name.
Device(config)# aaa group server radius ISE
Configures a IP address and encryption key for a private
RADIUS server.
server-private ip-address key key-name
Example:
Step 5
Device(config-sg-radius)# server-private
172.25.73.76 key Cisco123
Configures the virtual routing and forwarding (VRF)
reference of a AAA RADIUS or TACACS+ server group.
ip vrf forwarding vrf-name
Example:
Step 6
Device(config-sg-radius)# ip vrf forwarding
Mgmt-intf
Exits server group RADIUS configuration mode and
returns to global configuration mode.
exit
Example:
Step 7
Device(config-sg-radius)# exit
Sets the specified group name as the default local AAA
authentication during login.
aaa authentication login default group group-name local
Example:
Step 8
Device(config)# aaa authentication login default
group ISE local
Specifies that no authentication is required while logging
into a system.
aaa authentication login list-name none
Example:
Step 9
Device(config)# aaa authentication login NOAUTH
none
Runs authorization to determine if an user is allowed to
run an EXEC shell.
aaa authorization exec default group group-name local
Example:
Step 10
Device(config)# aaa authorization exec default
group ISE local
Programmability Configuration Guide, Cisco IOS XE Amsterdam 17.3.x
169
Model-Driven Programmability
Authentication of NETCONF/RESTCONF Using AAA
Page 184
Purpose
Command or Action
Ensures that session identification (ID) information that
is sent out for a given call will be made identical.
aaa session-id common
Example:
Step 11
Device(config)# aaa session-id common
Identifies a specific line for configuration and enter line
configuration mode.
line console number
Example:
Step 12
Device(config)# line console 0
Enables AAA authentication for logins.
login authentication authentication-list
Example:
Step 13
Device(config-line)# login authentication NOAUTH
Exits line configuration mode and returns to privileged
EXEC mode.
end
Example:
Step 14
Device(config-line)# end
Enabling Cisco IOS HTTP Services for RESTCONF
Perform this task to use the RESTCONF interface.
SUMMARY STEPS
1.
enable
2. configure terminal
3. restconf
4. ip http secure-server
5. end
DETAILED STEPS
Procedure
Purpose
Command or Action
Enables privileged EXEC mode.
enable
Step 1
Example:
• Enter your password if prompted.
Device> enable
Enters global configuration mode.
configure terminal
Example:
Step 2
Device# configure terminal
Enables the RESTCONF interface on your network device.
restconf
Example:
Step 3
Programmability Configuration Guide, Cisco IOS XE Amsterdam 17.3.x
170
Model-Driven Programmability
Enabling Cisco IOS HTTP Services for RESTCONF
Page 185
Purpose
Command or Action
Device(config)# restconf
Enables a secure HTTP (HTTPS) server.
ip http secure-server
Example:
Step 4
Device(config)# ip http secure-server
Exits global configuration mode and enters privileged EXEC
mode
end
Example:
Step 5
Device(config)# end
Verifying RESTCONF Configuration
When a device boots up with the startup configuration, the nginx process will be running. However; DMI
proceses are not enabled.
The following sample output from the show platform software yang-management process monitor command
shows that the nginx process is running:
Device# show platform software yang-management process monitor
COMMAND
PID S
VSZ
RSS %CPU %MEM
ELAPSED
nginx
27026 S 332356 18428
0.0
0.4
01:34
nginx
27032 S 337852 13600
0.0
0.3
01:34
NGINX is an internal webserver that acts as a proxy webserver. It provides Transport Layer Security
(TLS)-based HTTPS. RESTCONF request sent via HTTPS is first received by the NGINX proxy web serve,r
and the request is transferred to the confd web server for further syntax/semantics check.
The following sample output from the show platform software yang-management process command shows
the status of the all processes when a device is booted with the startup-configuration:
Device# show platform software yang-management process
confd
: Not Running
nesd
: Not Running
syncfd
: Not Running
ncsshd
: Not Running
dmiauthd
: Not Running
nginx
: Running
ndbmand
: Not Running
pubd
: Not Running
The nginx process gets restrated and DMI process are started, when the restconf command is configured.
The following sample output from the show platform software yang-management process command shows
that the nginx process and DMI processes are up and running:
Device# show platform software yang-management process
confd
: Running
nesd
: Running
syncfd
: Running
ncsshd
: Not Running ! NETCONF-YANG is not configured, hence ncsshd process is
Programmability Configuration Guide, Cisco IOS XE Amsterdam 17.3.x
171
Model-Driven Programmability
Verifying RESTCONF Configuration
Page 186
in not running.
dmiauthd
: Running
vtyserverutild
: Running
opdatamgrd
: Running
nginx
: Running ! nginx process is up due to the HTTP configuration, and it is
restarted when RESTCONF is enabled.
ndbmand
: Running
The following sample output from the show platform software yang-management process monitor command
displays detailed information about all processes:
Device#show platform software yang-management process monitor
COMMAND
PID S
VSZ
RSS %CPU %MEM
ELAPSED
confd
28728 S 860396 168496 42.2
4.2
00:12
confd-startup.s 28448 S
19664
4496
0.2
0.1
00:12
dmiauthd
29499 S 275356 23340
0.2
0.5
00:10
ndbmand
29321 S 567232 65564
2.1
1.6
00:11
nesd
29029 S 189952 14224
0.1
0.3
00:11
nginx
29711 S 332288 18420
0.6
0.4
00:09
nginx
29717 S 337636 12216
0.0
0.3
00:09
pubd
28237 S 631848 68624
2.1
1.7
00:13
syncfd
28776 S 189656 16744
0.2
0.4
00:12
After AAA and the RESTCONF interface is configured, and nginx process and relevant DMI processes are
running; the device is ready to receive RESTCONF requests.
Use the show netconf-yang sessions command to view the status of NETCONF/RESTCONF sessions:
Device# show netconf-yang sessions
R: Global-lock on running datastore
C: Global-lock on candidate datastore
S: Global-lock on startup datastore
Number of sessions : 1
session-id
transport
username
source-host
global-lock
19
netconf-ssh
admin
2001:db8::1
None
Use the show netconf-yang sessions detail command to view detailed information about
NETCONF/RESTCONF sessions:
Device# show netconf-yang sessions detail
R: Global-lock on running datastore
C: Global-lock on candidate datastore
S: Global-lock on startup datastore
Number of sessions
: 1
session-id
: 19
transport
: netconf-ssh
username
: admin
source-host
: 2001:db8::1
login-time
: 2018-10-26T12:37:22+00:00
in-rpcs
: 0
in-bad-rpcs
: 0
out-rpc-errors
: 0
Programmability Configuration Guide, Cisco IOS XE Amsterdam 17.3.x
172
Model-Driven Programmability
Verifying RESTCONF Configuration
Page 187
out-notifications
: 0
global-lock
: None
Configuration Examples for the RESTCONF Protocol
Example: Configuring the RESTCONF Protocol
RESTCONF Requests (HTTPS Verbs):
The following is a sample RESTCONF request that shows the HTTPS verbs allowed on a targeted resource.
In this example, the logging monitor command is used..
root:~# curl -i -k -X "OPTIONS"
"https://10.85.116.30:443/restconf/data/Cisco-IOS-XE-native:native/logging/monitor/severity"
\
-H 'Accept: application/yang-data+json' \
-u 'admin:admin'
HTTP/1.1 200 OK
Server: nginx
Date: Mon, 23 Apr 2018 15:27:57 GMT
Content-Type: text/html
Content-Length: 0
Connection: keep-alive
Allow: DELETE, GET, HEAD, PATCH, POST, PUT, OPTIONS
Allowed methods
Cache-Control: private, no-cache, must-revalidate, proxy-revalidate
Accept-Patch: application/yang-data+xml, application/yang-data+json
Pragma: no-cache
root:~#
POST (Create) Request
The POST operation creates a configuration which is not present in the targeted device.
Ensure that the logging monitor command is not availabel in the running configuration.
Note
The following sample POST request uses the logging monitor alerts command.
Device:~# curl -i -k -X "POST"
"https://10.85.116.30:443/restconf/data/Cisco-IOS-XE-native:native/logging/monitor" \
-H 'Content-Type: application/yang-data+json' \
-H 'Accept: application/yang-data+json' \
-u 'admin:admin' \
-d $'{
"severity": "alerts"
}'
HTTP/1.1 201 Created
Server: nginx
Date: Mon, 23 Apr 2018 14:53:51 GMT
Content-Type: text/html
Content-Length: 0
Programmability Configuration Guide, Cisco IOS XE Amsterdam 17.3.x
173
Model-Driven Programmability
Configuration Examples for the RESTCONF Protocol

Page 188
Location:
https://10.85.116.30/restconf/data/Cisco-IOS-XE-native:native/logging/monitor/severity
Connection: keep-alive
Last-Modified: Mon, 23 Apr 2018 14:53:51 GMT
Cache-Control: private, no-cache, must-revalidate, proxy-revalidate
Etag: 1524-495231-97239
Pragma: no-cache
Device:~#
PUT: (Create or Replace) Request:
If the specified command is not present on the device, the POST request creates it ; however, if it is
already present in the running configuration, the command will be replaced by this request.
The following sample PUT request uses the logging monitor warnings command.
Device:~# curl -i -k -X "PUT"
"https://10.85.116.30:443/restconf/data/Cisco-IOS-XE-native:native/logging/monitor/severity"
\
-H 'Content-Type: application/yang-data+json' \
-H 'Accept: application/yang-data+json' \
-u 'admin:admin' \
-d $'{
"severity": "warnings"
}'
HTTP/1.1 204 No Content
Server: nginx
Date: Mon, 23 Apr 2018 14:58:36 GMT
Content-Type: text/html
Content-Length: 0
Connection: keep-alive
Last-Modified: Mon, 23 Apr 2018 14:57:46 GMT
Cache-Control: private, no-cache, must-revalidate, proxy-revalidate
Etag: 1524-495466-326956
Pragma: no-cache
Device:~#
PATCH: (Update) Request
The following sample PATCH request uses the logging monitor informational command.
Device:~# curl -i -k -X "PATCH"
"https://10.85.116.30:443/restconf/data/Cisco-IOS-XE-native:native" \
-H 'Content-Type: application/yang-data+json' \
-H 'Accept: application/yang-data+json' \
-u 'admin:admin' \
-d $'{
"native": {
"logging": {
"monitor": {
"severity": "informational"
}
}
}
}'
HTTP/1.1 204 No Content
Server: nginx
Date: Mon, 23 Apr 2018 15:07:56 GMT
Content-Type: text/html
Programmability Configuration Guide, Cisco IOS XE Amsterdam 17.3.x
174
Model-Driven Programmability
Example: Configuring the RESTCONF Protocol
Page 189
Content-Length: 0
Connection: keep-alive
Last-Modified: Mon, 23 Apr 2018 15:07:56 GMT
Cache-Control: private, no-cache, must-revalidate, proxy-revalidate
Etag: 1524-496076-273016
Pragma: no-cache
Device:~#
GET Request (To Read)
The following sample GET request uses the logging monitor informational command.
Device:~# curl -i -k -X "GET"
"https://10.85.116.30:443/restconf/data/Cisco-IOS-XE-native:native/logging/monitor/severity"
\
-H 'Accept: application/yang-data+json' \
-u 'admin:admin'
HTTP/1.1 200 OK
Server: nginx
Date: Mon, 23 Apr 2018 15:10:59 GMT
Content-Type: application/yang-data+json
Transfer-Encoding: chunked
Connection: keep-alive
Cache-Control: private, no-cache, must-revalidate, proxy-revalidate
Pragma: no-cache
{
"Cisco-IOS-XE-native:severity": "informational"
}
Device:~#
DELETE Request (To Delete the Configuration)
Device:~# curl -i -k -X "DELETE"
"https://10.85.116.30:443/restconf/data/Cisco-IOS-XE-native:native/logging/monitor/severity"
\
-H 'Content-Type: application/yang-data+json' \
-H 'Accept: application/yang-data+json' \
-u 'admin:admin'
HTTP/1.1 204 No Content
Server: nginx
Date: Mon, 23 Apr 2018 15:26:05 GMT
Content-Type: text/html
Content-Length: 0
Connection: keep-alive
Last-Modified: Mon, 23 Apr 2018 15:26:05 GMT
Cache-Control: private, no-cache, must-revalidate, proxy-revalidate
Etag: 1524-497165-473206
Pragma: no-cache
linux_host:~#
Programmability Configuration Guide, Cisco IOS XE Amsterdam 17.3.x
175
Model-Driven Programmability
Example: Configuring the RESTCONF Protocol
Page 190
Additional References for the RESTCONF Protocol
Related Documents
Document Title
Related Topic
To access Cisco YANG models in a developer-friendly way, please
clone the GitHub repository, and navigate to the vendor/cisco
subdirectory. Models for various releases of IOS-XE, IOS-XR,
and NX-OS platforms are available here.
YANG data models for various releases
of IOS XE, IOS XR, and NX-OS
platforms
Standards and RFCs
Title
Standard/RFC
YANG - A Data Modeling Language for the Network Configuration Protocol (NETCONF)
RFC 6020
RESTCONF Protocol
RFC 8040
YANG Patch Media Type
RFC 8072
Technical Assistance
Link
Description
https://www.cisco.com/c/en/us/support/index.html
The Cisco Support website provides extensive online
resources, including documentation and tools for
troubleshooting and resolving technical issues with Cisco
products and technologies.
To receive security and technical information about your
products, you can subscribe to various services, such as
the Product Alert Tool (accessed from Field Notices), the
Cisco Technical Services Newsletter, and Really Simple
Syndication (RSS) Feeds.
Access to most tools on the Cisco Support website
requires a Cisco.com user ID and password.
Feature Information for the RESTCONF Protocol
The following table provides release information about the feature or features described in this module. This
table lists only the software release that introduced support for a given feature in a given software release
train. Unless noted otherwise, subsequent releases of that software release train also support that feature.
Use Cisco Feature Navigator to find information about platform support and Cisco software image support.
To access Cisco Feature Navigator, go to https://cfnng.cisco.com/. An account on Cisco.com is not required.
Programmability Configuration Guide, Cisco IOS XE Amsterdam 17.3.x
176
Model-Driven Programmability
Additional References for the RESTCONF Protocol
Page 191
Table 15: Feature Information for the RESTCONF Protocol
Feature Information
Releases
Feature
Name
RESTCONF provides a programmatic interface based on standard
mechanisms for accessing configuration data, state data,
data-model-specific RPC operations and event notifications defined in
the YANG model.
This feature was introduced on the following platforms:
• Cisco 4000 Series Integrated Services Router
• Cisco ASR 1000 Aggregation Services Routers
• Cisco Cloud Services Router 1000V Series
The following commands were introduced or modified: ip http server
and restconf
Cisco IOS XE
Everest 16.6.1
RESTCONF
Protocol
In Cisco IOS XE Fuji 16.8.1a, this feature was implemented on the
following platforms:
• Cisco 1000 Series Integrated Services Routers
• Cisco ASR 900 Series Aggregation Services Routers
• Cisco ASR 920 Series Aggregation Services Router
• Cisco Catalyst 3650 Series Switches
• Cisco Catalyst 3850 Series Switches
• Cisco Catalyst 9300 Series Switches
• Cisco Catalyst 9400 Series Switches
• Cisco Catalyst 9500 and 9500-High Performance Series Switches
• Cisco cBR-8 Converged Broadband Router
• Cisco Network Convergence System 4200 Series
Cisco IOS XE Fuji
16.8.1a
In Cisco IOS XE Fuji 16.9.2, this feature was implemented on the
following platforms:
• Cisco Catalyst 9200 and 9200L Series Switches
• Cisco Catalyst 9300L SKUs
Cisco IOS XE Fuji
16.9.2
Cisco IOS XE
Gibraltar 16.11.1
Programmability Configuration Guide, Cisco IOS XE Amsterdam 17.3.x
177
Model-Driven Programmability
Feature Information for the RESTCONF Protocol
Page 192
Feature Information
Releases
Feature
Name
In Cisco IOS XE Gibraltar 16.11.1, this feature was implemented on the
following platforms:
• Cisco Catalyst 9600 Series Switches
• Cisco Catalyst 9800-CL Wireless Controllers
• Cisco Catalyst 9800-40 Wireless Controllers
• Cisco Catalyst 9800-80 Wireless Controllers
• Cisco Network Convergence System 520 Series
In Cisco IOS XE Gibraltar 16.12.1, this feature was implemented on
Cisco Catalyst 9800-L Wireless Controllers.
Cisco IOS XE
Gibraltar 16.12.1
In Cisco IOS XE Amsterdam 17.3.1, this feature was implemented on
the following platforms:
• Cisco Catalyst 8200 Series Edge Platforms
• Cisco Catalyst 8300 Series Edge Platforms
• Cisco Catalyst 8500 and 8500L Series Edge Platforms
Cisco IOS XE
Amsterdam 17.3.1
RESTCONF supports YANG-Patch media type as specified by RFC
8072.
This feature was implemented on the following platforms:
• Cisco 1000 Series Integrated Services Routers
• Cisco 4000 Series Integrated Services Routers
• Cisco ASR 900 Series Aggregation Services Routers
• Cisco ASR 1000 Aggregation Services Routers (ASR1000-RP2,
ASR1000-RP3, ASR1001-HX, ASR1001-X, ASR1002-HX,
ASR1002-X)
• Cisco Catalyst 9200 Series Switches
• Cisco Catalyst 9300 Series Switches
• Cisco Catalyst 9400 Series Switches
• Cisco Catalyst 9500 Series Switches
• Cisco cBR-8 Converged Broadband Router
• Cisco Cloud Services Router 1000V Series
• Cisco Network Convergence System 520 Series
• Cisco Network Convergence System 4200 Series
Cisco IOS XE
Amsterdam 17.1.1
RESTCONF
YANG-Patch
Support
Programmability Configuration Guide, Cisco IOS XE Amsterdam 17.3.x
178
Model-Driven Programmability
Feature Information for the RESTCONF Protocol
Page 193
C H A P T E R 10
NETCONF and RESTCONF Service-Level ACLs
This module describes the service-levels ACLs supported on NETCONF and RESTCONF, and how to
configure it.
• Information About NETCONF and RESTCONF Service-Level ACLs, on page 179
• How to Configure NETCONF and RESTCONF Service-Level ACLs, on page 179
• Configuration Examples for NETCONF and RESTCONF Service-Level ACLs, on page 182
• Additional References for NETCONF and RESTCONF Service-Level ACLs, on page 183
• Feature Information for NETCONF and RESTCONF Service-Level ACLs, on page 184
InformationAboutNETCONFandRESTCONFService-LevelACLs
Overview of NETCONF and RESTCONF Service-Level ACLs
You can configure an IPv4 or IPv6 access control list (ACL) for NETCONF and RESTCONF sessions. Clients
that do not conform to the configured ACLs are not allowed to access the NETCONF or RESTCONF
subsystems. When service-level ACLs are configured, NETCONF-YANG and RESTCONF connection
requests are filtered based on the source IP address.
If no service-level ACLs are configured, all NETCONF-YANG and RESTCONF connection requests are
permitted into the subsystems.
ACL logs are not supported on service-level ACLs.
Only named ACLs are supported; numbered ACLs are not supported.
Note
How to Configure NETCONF and RESTCONF Service-Level ACLs
Configuring an ACL for a NETCONF-YANG Session
You can either configure an IP access-list or an IPv6 access list for your NETCONF-YANG session.
Programmability Configuration Guide, Cisco IOS XE Amsterdam 17.3.x
179


Page 194
SUMMARY STEPS
1.
enable
2. configure terminal
3.
ip access-list {standard | extended} access-list-name
•
• ipv6 access-list access-list-name
4. permit {host-address | host-name | any} [wildcard]
5. deny {host-address | host-name | any} [wildcard]
6. exit
7.
netconf-yang ssh {{ipv4 | ipv6 }access-list name access-list-name} | port port-number}
8. end
DETAILED STEPS
Procedure
Purpose
Command or Action
Enables privileged EXEC mode.
enable
Step 1
Example:
• Enter your password if prompted.
Device> enable
Enters global configuration mode.
configure terminal
Example:
Step 2
Device# configure terminal
Step 3
• Specifies a standard IP access list and enters standard
access-list configuration mode.
• ip access-list {standard | extended} access-list-name
• ipv6 access-list access-list-name
• Specifies an IPv6 access list and enters IPv6 access-list
configuration mode.
Example:
Device(config)# ip access-list standard acl1_permit
Device(config)# ipv6 access-list ipv6-acl1_permit
Sets conditions in an IP/IPv6 access list that will permit
packets.
permit {host-address | host-name | any} [wildcard]
Example:
Step 4
Device(config-std-nacl)# permit 192.168.255.0
0.0.0.255
Sets conditions in an IP or IPv6 access list that will deny
packets.
deny {host-address | host-name | any} [wildcard]
Example:
Step 5
Device(config-std-nacl)# deny any
Exits standard access-list configuration mode and returns
to global configuration mode.
exit
Example:
Step 6
Device(config-std-nacl)# exit
Programmability Configuration Guide, Cisco IOS XE Amsterdam 17.3.x
180
Model-Driven Programmability
Configuring an ACL for a NETCONF-YANG Session
Page 195
Purpose
Command or Action
Configures an ACL for the NETCONF-YANG session.
netconf-yang ssh {{ipv4 | ipv6 }access-list name
access-list-name} | port port-number}
Step 7
Example:
Device(config)# netconf-yang ssh ipv4 access-list
name acl1_permit
Exits global configuration mode and returns to privileged
EXEC mode.
end
Example:
Step 8
Device(config)# end
Configuring an ACL for a RESTCONF Session
You can either configure an IP access list or an IPv6 access list for your RESTCONF session.
SUMMARY STEPS
1.
enable
2. configure terminal
3.
ip access-list {standard | extended} access-list-name
•
• ipv6 access-list access-list-name
4. permit {protocol-number | ipv6-source-address | ipv6-source-prefix | protocol}any
5. deny {protocol-number | ipv6-source-address | ipv6-source-prefix | protocol}any any
6. exit
7.
restconf {ipv4 | ipv6 }access-list name access-list-name
8. end
DETAILED STEPS
Procedure
Purpose
Command or Action
Enables privileged EXEC mode.
enable
Step 1
Example:
• Enter your password if prompted.
Device> enable
Enters global configuration mode.
configure terminal
Example:
Step 2
Device# configure terminal
Step 3
• Specifies a standard IP access list and enters standard
access-list configuration mode.
• ip access-list {standard | extended} access-list-name
• ipv6 access-list access-list-name
• Specifes an IPv6 access list and enters IPv6 access list
configuration mode.
Example:
Programmability Configuration Guide, Cisco IOS XE Amsterdam 17.3.x
181
Model-Driven Programmability
Configuring an ACL for a RESTCONF Session
Page 196
Purpose
Command or Action
Device(config)# ip access-list standard acl1_permit
Device(config)# ipv6 access-list ipv6-acl1_permit
Sets conditions in an IPv6 access list that will permit
packets.
permit {protocol-number | ipv6-source-address |
ipv6-source-prefix | protocol}any
Example:
Step 4
Device(config-ipv6-acl)# permit ipv6 2001:db8::1/32
any
Sets conditions in an IPv6 access list that will deny packets.
deny {protocol-number | ipv6-source-address |
ipv6-source-prefix | protocol}any any
Step 5
Example:
Device(config-ipv6-acl)# deny ipv6 any any
Exits IPv6 access list configuration mode and returns to
global configuration mode.
exit
Example:
Step 6
Device(config-ipv6-acl)# exit
Configures an ACL for the RESTCONF session.
restconf {ipv4 | ipv6 }access-list name access-list-name
Example:
Step 7
Device(config)# restconf ipv6 access-list name
ipv6-acl1_permit
Exits global configuration mode and returns to privileged
EXEC mode.
end
Example:
Step 8
Device(config)# end
Configuration Examples for NETCONF and RESTCONF
Service-Level ACLs
Example: Configuring an ACL for a NETCONF Session
Device# enable
Device# configure terminal
Device(config)# ip access-list standard acl1_permit
Device(config-std-nacl)# permit 192.168.255.0 0.0.0.255
Device(config-std-nacl)# deny any
Device(config-std-nacl)# exit
Device(config)# netconf-yang ssh ipv4 access-list name acl1_permit
Device(config)# end
Programmability Configuration Guide, Cisco IOS XE Amsterdam 17.3.x
182
Model-Driven Programmability
Configuration Examples for NETCONF and RESTCONF Service-Level ACLs
Page 197
Example: Configuring an ACL for a RESTCONF Session
Device# enable
Device# configure terminal
Device(config)# ipv6 access-list ipv6-acl1_permit
Device(config-ipv6-acl)# permit ipv6 2001:db8::1/32 any
Device(config-ipv6-acl)# deny ipv6 any any
Device(config-ipv6-acl)# exit
Device(config)# restconf ipv6 access-list name ipv6-acl1_permit
Device(config)# end
Additional References for NETCONF and RESTCONF
Service-Level ACLs
Related Documents
Document Title
Related Topic
NETCONF Protocol
NETCONF-YANG
RESTCONF Protocol
RESTCONF
Programmability Command Reference
Programmability commands
Technical Assistance
Link
Description
http://www.cisco.com/support
The Cisco Support website provides extensive online resources, including
documentation and tools for troubleshooting and resolving technical issues
with Cisco products and technologies.
To receive security and technical information about your products, you can
subscribe to various services, such as the Product Alert Tool (accessed from
Field Notices), the Cisco Technical Services Newsletter, and Really Simple
Syndication (RSS) Feeds.
Access to most tools on the Cisco Support website requires a Cisco.com user
ID and password.
Programmability Configuration Guide, Cisco IOS XE Amsterdam 17.3.x
183
Model-Driven Programmability
Example: Configuring an ACL for a RESTCONF Session
Page 198
Feature Information for NETCONF and RESTCONF Service-Level
ACLs
The following table provides release information about the feature or features described in this module. This
table lists only the software release that introduced support for a given feature in a given software release
train. Unless noted otherwise, subsequent releases of that software release train also support that feature.
Use Cisco Feature Navigator to find information about platform support and Cisco software image support.
To access Cisco Feature Navigator, go to www.cisco.com/go/cfn. An account on Cisco.com is not required.
Table 16: Feature Information for NETCONF and RESTCONF Service-Level ACLs
Feature Information
Releases
Feature Name
You can configure an access control list (ACL) for NETCONF and
RESTCONF sessions. Clients that do not conform to the configured ACL
are not allowed to access the NETCONF or RESTCONF subsystems.
The following commands were introduced or modified: netconf-yang
ssh access-list and restconf access-list
• Cisco ASR 900 Series Aggregation Services Routers
• Cisco ASR 920 Series Aggregated Services Routers (RSP2)
• Cisco Catalyst 3650 Series Switches
• Cisco Catalyst 3850 Series Switches
• Cisco Catalyst 9200 Series Switches
• Cisco Catalyst 9300 Series Switches
• Cisco Catalyst 9400 Series Switches
• Cisco Catalyst 9500 Series Switches
• Cisco Catalyst IE 3200, 3300, 3400 Rugged Series
• Cisco Embedded Services 3300 Series Switches
• Cisco IR1101 Integrated Services Router Rugged
• Cisco Network Convergence System 4200 Series
• Cisco Network Convergence System 520 Series
Cisco IOS XE
Everest
16.11.1
NETCONF and
RESTCONF
Service-Level
ACLs
Programmability Configuration Guide, Cisco IOS XE Amsterdam 17.3.x
184
Model-Driven Programmability
Feature Information for NETCONF and RESTCONF Service-Level ACLs
Page 199
C H A P T E R 11
gNMI Protocol
This feature describes the model-driven configuration and retrieval of operational data using the gRPC Network
Management Interface (gNMI) Capabilities, Get, Set and Subscribe remote procedure calls (RPCs). gNMI
version 0.4.0 is supported.
• Restrictions for the gNMI Protocol, on page 185
• Information About the gNMI Protocol, on page 186
• How to Enable the gNMI Protocol, on page 196
• Configuration Examples for the gNMI Protocol, on page 202
• Additional References for the gNMI Protocol, on page 203
• Feature Information for the gNMI Protocol, on page 203
Restrictions for the gNMI Protocol
The following restrictions apply to the feature:
• JSON, BYTES, PROTO, and ASCI encoding options are not supported.
JSON IETF keys must contain a YANG-prefix where the namespace of the following elements differs
from the parent. This means that the routed-vlan derived from augmentation in openconfig-vlan.yang
must be entered as oc-vlan:routed-vlan because it is different from the namespace of the parent nodes
(parent nodes have the prefix, oc-if)
• GetRequest:
• Operational data filtering is not supported.
• Use models are not supported. These are a set of model data messages indicating the schema definition
modules that define the data elements that must be returned in response to a Get RPC call.
• GetResponse:
• Alias is not supported. It is a string that provides an alias for a prefix specified within the notification
message.
• Delete is not supported. It is a set of paths that are to be removed from a data tree.
Programmability Configuration Guide, Cisco IOS XE Amsterdam 17.3.x
185

Page 200
Information About the gNMI Protocol
About GNMI
gNMI is gRPC Network Management Interface developed by Google. gNMI provides the mechanism to
install, manipulate, and delete the configuration of network devices, and also to view operational data. The
content provided through gNMI can be modeled using YANG.
gRPC is a remote procedure call developed by Google for low-latency, scalable distributions with mobile
clients communicating to a cloud server. gRPC carries gNMI, and provides the means to formulate and transmit
data and operation requests.
When a gNMI service failure occurs, the gNMI broker (GNMIB) will indicate an operational change of state
from up to down, and all RPCs will return a service unavailable message until the database is up and running.
Upon recovery, the GNMIB will indicate a change of operation state from down to up, and resume normal
handling of RPCs.
gNMI supports <subscribe> RPC services. For more information, see the Model-Driven Telemetry chapter.
JSON IETF Encoding for YANG Data Trees
RFC 7951 defines JavaScript Object Notation (JSON) encoding for YANG data trees and their subtrees. gNMI
uses JSON for encoding data in its content layer.
The JSON type indicates that the value is encoded as a JSON string. JSON_IETF-encoded data must conform
to the rules for JSON serialisation described in RFC 7951. Both the client and target must support JSON
encoding.
Instances of YANG data nodes (leafs, containers, leaf-lists, lists, anydata nodes, and anyxml nodes) are
encoded as members of a JSON object or name/value pairs. Encoding rules are identical for all types of data
trees, such as configuration data, state data, parameters of RPC operations, actions, and notifications.
Every data node instance is encoded as a name/value pair where the name is formed from the data node
identifier. The value depends on the category of the data node.
The leaf Data Node
A leaf node has a value, but no children, in a data tree. A leaf instance is encoded as a name/value pair. This
value can be a string, number, literal true or false, or the special array [null], depending on the type of the
leaf. In the case that the data item at the specified path is a leaf node (which means it has no children, and an
associated value) the value of that leaf is encoded directly. (A bare JSON value is included; it does not require
a JSON object.)
The following example shows a leaf node definition:
leaf foo {
type uint8;
}
The following is a valid JSON-encoded instance:
"foo": 123
Programmability Configuration Guide, Cisco IOS XE Amsterdam 17.3.x
186
Model-Driven Programmability
Information About the gNMI Protocol
Page 201
gNMI GET Request
The gNMI Get RPC specifies how to retrieve one or more of the configuration attributes, state attributes,
derived state attributes, or all attributes associated with a supported mode from a date tree. A GetRequest is
sent from a client to the target to retrieve values from the data tree. A GetResponse is sent in response to a
GetRequest.
GetRequest JSON Structure
The following is a sample GetRequest JSON structure. Both the GetRequest and GetResponse are displayed.
GetRequest
The following is a path for the
openconfig-interfaces model
++++++++ Sending get request: ++++++++
path {
elem {
name: "interfaces"
}
elem {
name: "interface"
key {
key: "name"
value: "Loopback111"
}
}
}
GetResponse
encoding: JSON_IETF
++++++++ Received get response: ++++++++
notification {
timestamp: 1521699434792345469
update {
path {
elem {
name: "interfaces"
}
elem {
name: "interface"
key {
key: "name"
value: ""Loopback111""
}
}
}
val {
json_ietf_val: "{\n\t"openconfig-interfaces:name":\t
"Loopback111",\n\t
"openconfig-interfaces:config":\t{\n\t\t
"openconfig-interfaces:type":\t"ianaift:
softwareLoopback",\n\t\t
"openconfig-interfaces:name":\t"Loopback111",\n\t\t
"openconfig-interfaces:enabled":\t"true"\n\t},\n\t
"openconfig-interfaces:state":\t{\n\t\t
"openconfig-interfaces:type":\t"ianaift:
softwareLoopback",\n\t\t
"openconfig-interfaces:name":\t"Loopback111",\n\t\t
Programmability Configuration Guide, Cisco IOS XE Amsterdam 17.3.x
187
Model-Driven Programmability
gNMI GET Request
Page 202
"openconfig-interfaces:enabled":\t"true",\n\t\t
"openconfig-interfaces:ifindex":\t52,\n\t\t
"openconfig-interfaces:admin-status":\t"UP",\n\t\t
"openconfig-interfaces:oper-status":\t"UP",\n\t\t
"openconfig-interfaces:last-change":\t2018,\n\t\t
"openconfig-interfaces:counters":\t{\n\t\t\t
"openconfig-interfaces:in-octets":\t0,\n\t\t\t
"openconfig-interfaces:in-unicast-pkts":\t0,\n\t\t\t
"openconfig-interfaces:in-broadcast-pkts":\t0,\n\t\t\t
"openconfig-interfaces:in-multicast-pkts":\t0,\n\t\t\t
"openconfig-interfaces:in-discards":\t0,\n\t\t\t
"openconfig-interfaces:in-errors":\t0,\n\t\t\t
"openconfig-interfaces:in-unknown-protos":\t0,\n\t\t\t
"openconfig-interfaces:out-octets":\t0,\n\t\t\t
"openconfig-interfaces:out-unicast-pkts":\t0,\n\t\t\t
"openconfig-interfaces:out-broadcast-pkts":\t0,\n\t\t\t
"openconfig-interfaces:out-multicast-pkts":\t0,\n\t\t\t
"openconfig-interfaces:out-discards":\t0,\n\t\t\t
"openconfig-interfaces:out-errors":\t0,\n\t\t\t
"openconfig-interfaces:last-clear":\t2018\n\t\t},\n\t\t
"openconfig-platform:hardware-port":\t
"Loopback111"\n\t},\n\t
"openconfig-interfaces:subinterfaces":\t{\n\t\t
"openconfig-interfaces:index":\t0,\n\t\t
"openconfig-interfaces:config":\t{\n\t\t\t
"openconfig-interfaces:index":\t0,\n\t\t\t
"openconfig-interfaces:name":\t"Loopback111",\n\t\t\t
"openconfig-interfaces:enabled":\t"true"\n\t\t},\n\t\t
"openconfig-interfaces:state":\t{\n\t\t\t
"openconfig-interfaces:index":\t0,\n\t\t\t
"openconfig-interfaces:name":\t"Loopback111.0",\n\t\t\t
"openconfig-interfaces:enabled":\t"true",\n\t\t\t
"openconfig-interfaces:admin-status":\t"UP",\n\t\t\t
"openconfig-interfaces:oper-status":\t"UP",\n\t\t\t
"openconfig-interfaces:last-change":\t2018,\n\t\t\t
"openconfig-interfaces:counters":\t{\n\t\t\t\t
"openconfig-interfaces:in-octets":\t0,\n\t\t\t\t
"openconfig-interfaces:in-unicast-pkts":\t0,\n\t\t\t\t
"openconfig-interfaces:in-broadcast-pkts":\t0,\n\t\t\t\t
"openconfig-interfaces:in-multicast-pkts":\t0,\n\t\t\t\t
"openconfig-interfaces:in-discards":\t0,\n\t\t\t\t
"openconfig-interfaces:in-errors":\t0,\n\t\t\t\t
"openconfig-interfaces:out-octets":\t0,\n\t\t\t\t
"openconfig-interfaces:out-unicast-pkts":\t0,\n\t\t\t\t
"openconfig-interfaces:out-broadcast-pkts":\t0,\n\t\t\t\t
"openconfig-interfaces:out-multicast-pkts":\t0,\n\t\t\t\t
"openconfig-interfaces:out-discards":\t0,\n\t\t\t\t
"openconfig-interfaces:out-errors":\t0,\n\t\t\t\t
"openconfig-interfaces:last-clear":
t2018\n\t\t\t}\n\t\t},\n\t\t
"openconfig-if-ip:ipv6":\t{\n\t\t\t
"openconfig-if-ip:config":\t"false",\n\t\t\t
"openconfig-if-ip:state":\t"false"\n\t\t}\n\t}\n}"
}
}
}
Programmability Configuration Guide, Cisco IOS XE Amsterdam 17.3.x
188
Model-Driven Programmability
gNMI GET Request
Page 203
GetRequest on a Leaf Value
The following is a sample GetRequest on a Leaf value. Both the GetRequest and the corresponding GetResponse
are displayed.
GetRequest
++++++++ Sending get request: ++++++++
path {
elem {
name: "interfaces"
}
elem {
name: "interface"
key {
key: "name"
value: "Loopback111"
}
}
elem {
name: "state"
}
elem {
name: "oper-status"
}
}
GetResponse
encoding: JSON_IETF
++++++++ Received get response: ++++++++
notification {
timestamp: 1521699326012374332
update {
path {
elem {
name: "interfaces"
}
elem {
name: "interface"
key {
key: "name"
value: ""Loopback111""
}
}
elem {
name: "state"
}
elem {
name: "oper-status"
}
}
val {
json_ietf_val: ""UP""
}
}
}
Programmability Configuration Guide, Cisco IOS XE Amsterdam 17.3.x
189
Model-Driven Programmability
gNMI GET Request
Page 204
gNMI SetRequest
The Set RPC specifies how to set one or more configurable attributes associated with a supported model. A
SetRequest is sent from a client to a target to update the values in the data tree.
SetRequests also support JSON keys, and must contain a YANG-prefix, in which the namespace of the element
differs from parent.
For example, the routed-vlan element derived from augmentation in openconfig-vlan.yang must be entered
as oc-vlan:routed-vlan, because it is different from the namespace of the parent node (The parent node prefix
is oc-if.).
The total set of deletes, replace, and updates contained in any one SetRequest is treated as a single transaction.
If any subordinate element of the transaction fails; the entire transaction is disallowed and rolled back. A
SetResponse is sent back for a SetRequest.
Table 17: Example of a SetRequest JSON Structure
SetResponse
SetRequest
++++++++ Received set response: ++++++++
response {
path {
elem {
name: "interfaces"
}
elem {
name: "interface"
key {
key: "name"
value: "Loopback111"
}
}
elem {
name: "config"
}
}
op: UPDATE
}
timestamp: 1521699342123890045
++++++++ Sending set request: ++++++++
update {
path {
elem {
name: "interfaces"
}
elem {
name: "interface"
key {
key: "name"
value: "Loopback111"
}
}
elem {
name: "config"
}
}
val {
json_ietf_val:
"{"openconfig-interfaces:enabled":"false"}"
}
}
Programmability Configuration Guide, Cisco IOS XE Amsterdam 17.3.x
190
Model-Driven Programmability
gNMI SetRequest
Page 205
Table 18: Example of a SetRequest on Leaf Value
SetResponse
SetRequest
++++++++ Received set response: ++++++++
response {
path {
elem {
name: "interfaces"
}
elem {
name: "interface"
key {
key: "name"
value: "Loopback111"
}
}
elem {
name: "config"
}
elem {
name: "description"
}
}
op: UPDATE
}
timestamp: 1521699342123890045
++++++++ Sending set request: ++++++++
update {
path {
elem {
name: "interfaces"
}
elem {
name: "interface"
key {
key: "name"
value: "Loopback111"
}
}
elem {
name: "config"
}
elem {
name: "description"
}
}
val {
json_ietf_val: ""UPDATE DESCRIPTION""
}
}
gNMI Namespace
A namespace specifies the path prefixing to be used in the origin field of a message.
This section describes the namespaces used in Cisco IOS XE Gibraltar 16.10.1 and later releases:
• RFC 7951-specified namespaces: Path prefixes use the YANG module name as defined in RFC 7951.
The RFC 7951-specified value prefixing uses the YANG module name.
Value prefixing is not affected by the selected path prefix namespace. The following example shows an
RFC 7951-specified value prefix:
val {
json_ietf_val:"{
"openconfig-interfaces:config": {
“openconfig-interfaces:description":
“DESCRIPTION”
}
}"
}
An RFC 7951-specified namespace prefixing also uses the YANG module name. For example, the
openconfig path to a loopback interface will be
/openconfig-interfaces:interfaces/interface[name=Loopback111]/
The following example shows a gNMI path with RFC7951 namespacing:
path {
origin: “rfc7951"
elem {
Programmability Configuration Guide, Cisco IOS XE Amsterdam 17.3.x
191
Model-Driven Programmability
gNMI Namespace
Page 206
name: "openconfig-interface:interfaces"
}
elem {
name: "interface"
key {
key: "name"
value: "Loopback111"
}
}
}
• Openconfig: No path prefixes are used. These can only be used with a path to an openconfig model.
The behavior of the Openconfig namespace prefixing is the same when no origin or namespace is provided.
For example, the openconfig path to a loopback interface will be
/interfaces/interface[name=Loopback111]/
The following example shows a gNMI path with an Openconfig namespacing:
path {
origin: “openconfig"
elem {
name: "interfaces"
}
elem {
name: "interface"
key {
key: "name"
value: "Loopback111"
}
}
}
• Blank: Same as the openconfig prefix. This is the default.
The following example shows a gNMI path with a blank Openconfig namespacing:
path {
elem {
name: "interfaces"
}
elem {
name: "interface"
key {
key: "name"
value: "Loopback111"
}
}
}
This section describes the path prefixing used in releases prior to Cisco IOS XE Gibraltar 16.10.1.
Here, path prefixing uses the YANG module prefix as defined in the YANG module definition. For example,
the openconfig path to a loopback interface will be
/oc-if:interfaces/interface[name=Loopback111]/
The following example shows a gNMI Path with with legacy namespacing:
path {
origin: “legacy"
elem {
name: "oc-if:interfaces"
}
Programmability Configuration Guide, Cisco IOS XE Amsterdam 17.3.x
192
Model-Driven Programmability
gNMI Namespace
Page 207
elem {
name: "interface"
key {
key: "name"
value: "Loopback111"
}
}
}
gNMI Wildcards
The gNMI protocol supports wildcards for Get paths. This is the ability to use a wildcards in a path to match
multiple elements. These wildcards indicate all elements in a given subtree in the schema.
An elem is an element, and it is a value between / characters in an xPath. An elem is also available in a gNMI
path. For example, the position of a wildcard relative to elem names implies that the wildcard stands for an
interface, and is interpreted as all interfaces.
There are two types of wildcards; implicit and explicit, and both are supported. Get paths support all types
and combinations of path wildcards.
• Implicit wildcards: These expand a list of elements in an element tree. Implicit wildcard occurs when a
key value is not provided for elements of a list.
The following is a sample path implicit wildcard. This wildcard will return the descriptions of all interfaces
on a device:
path {
elem {
name: "interfaces"
}
elem {
name: "interface"
}
elem {
name: "config"
}
elem {
name: "description"
}
}
• Explicit wildcards: Provides the same functionality by
• Specifying an asterisk () for either the path element name or key name.
The following sample shows a path asterisk wildcard as the key name. This wildcard returns the
description for all interfaces on a device.
path {
elem {
name: "interfaces"
}
elem {
name: "interface"
key {
key: "name"
value: ""
}
}
elem {
name: “config"
Programmability Configuration Guide, Cisco IOS XE Amsterdam 17.3.x
193
Model-Driven Programmability
gNMI Wildcards
Page 208
}
elem {
name: "description"
}
}
The following sample shows a path asterisk wildcard as the path name. This wildcard will return
the description for all elements that are available in the Loopback111 interface.
path {
elem {
name: "interfaces"
}
elem {
name: "interface"
key {
key: "name"
value: "Loopback111"
}
}
elem {
name: "*"
}
elem {
name: "description"
}
}
• Specifying an ellipsis (...) or a blank entry as element names. These wildcards can expand to multiple
elements in a path.
The following sample shows a path ellipsis wildcard. This wildcard returns all description fields
available under /interfaces.
path {
elem {
name: "interfaces"
}
elem {
name: "..."
}
elem {
name: "description"
}
}
The following is a sample GetRequest with an implicit wildcard. This GetRequest will return the oper-status
of all interfaces on a device.
path {
elem {
name: "interfaces"
}
elem {
name: "interface"
}
elem {
name: "state"
}
elem {
name: "oper-status"
}
Programmability Configuration Guide, Cisco IOS XE Amsterdam 17.3.x
194
Model-Driven Programmability
gNMI Wildcards
Page 209
},
type: 0,
encoding: 4
The following is a sample GetResponse with an implicit wildcard:
notification {
timestamp: 1520627877608777450
update {
path {
elem {
name: "interfaces"
}
elem {
name: "interface"
key {
key: "name"
value: ""FortyGigabitEthernet1/1/1""
}
}
elem {
name: "state"
}
elem {
name: "oper-status"
}
}
val {
json_ietf_val: ""LOWER_LAYER_DOWN""
}
},
<snip>
…
</snip>
update {
path {
elem {
name: "interfaces"
}
elem {
name: "interface"
key {
key: "name"
value: ""Vlan1""
}
}
elem {
name: "state"
}
elem {
name: "oper-status"
}
}
val {
json_ietf_val: ""DOWN""
}
}
}
Programmability Configuration Guide, Cisco IOS XE Amsterdam 17.3.x
195
Model-Driven Programmability
gNMI Wildcards
Page 210
gNMI Configuration Persistence
The gNMI Configuration Persistence feature ensures that all successful configuration changes made through
the gNMI SetRequest RPC persists across device restarts. Prior to this feature, the gNMI configuration was
stored in the running configuration of a device. And the changes were saved by issuing the write memory
command, or the SaveConfig NETCONF RPC.
All changes in the running configuration, even if the data was modified by processes other than gNMI, the
data is saved to the startup configuration, when the SetRequest RPC is issued.
This feature is enabled by default and cannot be disabled.
gNMI Username and Password Authentication
User credentials, the username and password provide authorization as metadata in each gNMI RPC. The
following is a sample gNMI Capabilities RPC that use the username and password:
metadata = [('username','admin'), ('password','lab')]
cap_request = gnmi_pb2.CapabilityRequest()
pass metadata to the gnmi_pb2_grpc.gNMIStub object
secure_stub.Capabilities(cap_request, metadata=metadata)
gNMI Error Messages
When errors occur, gNMI returns descriptive error messages. The following section displays some gNMI
error messages.
The following sample error message is displayed when the path is invalid:
gNMI Error Response:
<_Rendezvous of RPC that terminated with (StatusCode.TERMINATED,
An error occurred while parsing provided xpath: unknown tag:
“someinvalidxpath" Additional information: badly formatted or nonexistent path)>
The following sample error message is displayed for an unimplemented error:
gNMI Error Response:
<_Rendezvous of RPC that terminated with (StatusCode.UNIMPLEMENTED,
Requested encoding "ASCII" not supported)>
The following sample error message is displayed when the data element is empty:
gNMI Error Response:
<_Rendezvous of RPC that terminated with (StatusCode.NOT_FOUND,
Empty set returned for path "/oc-if:interfaces/noinfohere")>
How to Enable the gNMI Protocol
Perform the following steps to enable the gNMI protocol:
Programmability Configuration Guide, Cisco IOS XE Amsterdam 17.3.x
196
Model-Driven Programmability
gNMI Configuration Persistence
Page 211
Create a set of certs for the gNMI client and device signed by a Certificate Authority (CA).
a.
Create Certs with OpenSSL on Linux.
b.
Install Certs on a device.
c.
Configure gNMI on the device.
d. Verify whether gNMI is enabled and running.
2.
Connect the gNMI client using client and root certificates configured in previous steps.
Creating Certs with OpenSSL on Linux
Certs and trustpoint are only required for secure gNMI servers.
The following example shows how to create Certs with OpenSSL on a Linux machine:
Setting up a CA
openssl genrsa -out rootCA.key 2048
openssl req -subj /C=/ST=/L=/O=/CN=rootCA -x509 -new -nodes -key rootCA.key -sha256 -out
rootCA.pem
Setting up device cert and key
openssl genrsa -out device.key 2048
openssl req -subj /C=/ST=/L=/O=/CN=<hostnameFQDN> -new -key device.key -out device.csr
openssl x509 -req -in device.csr -CA rootCA.pem -CAkey rootCA.key -CAcreateserial -out
device.crt -sha256
Encrpyt device key - needed for input to IOS
openssl rsa -des3 -in device.key -out device.des3.key -passout pass:<password - remember
this for later>
Setting up client cert and key
openssl genrsa -out client.key 2048
openssl req -subj /C=/ST=/L=/O=/CN=gnmi_client -new -key client.key -out client.csr
openssl x509 -req -in client.csr -CA rootCA.pem -CAkey rootCA.key -CAcreateserial -out
client.crt -sha256
Installing Certs on a Device Through the CLI
The following example show how to install certs on a device:
Send:
Device# configure terminal
Device(config)# crypto pki import trustpoint1 pem terminal password password1
Receive:
% Enter PEM-formatted CA certificate.
% End with a blank line or "quit" on a line by itself.
Send:
Contents of rootCA.pem, followed by newline + 'quit' + newline:
-----BEGIN CERTIFICATE-----
<snip>
-----END CERTIFICATE-----
quit
Receive:
Programmability Configuration Guide, Cisco IOS XE Amsterdam 17.3.x
197
Model-Driven Programmability
Creating Certs with OpenSSL on Linux
Page 212
% Enter PEM-formatted encrypted private General Purpose key.
% End with "quit" on a line by itself.
Send:
Contents of device.des3.key, followed by newline + 'quit' + newline:
-----BEGIN RSA PRIVATE KEY-----
Proc-Type: 4,ENCRYPTED
DEK-Info: DES-EDE3-CBC,D954FF9E43F1BA20
<snip>
-----END RSA PRIVATE KEY-----
quit
Receive:
% Enter PEM-formatted General Purpose certificate.
% End with a blank line or "quit" on a line by itself.
Send:
Contents of device.crt, followed by newline + 'quit' + newline:
-----BEGIN CERTIFICATE-----
<snip>
-----END CERTIFICATE-----
quit
Receive:
% PEM files import succeeded.
Device(config)#
Send:
Device(config)# crypto pki trustpoint trustpoint1
Device(ca-trustpoint)# revocation-check none
Device(ca-trustpoint)# end
Device#
Enabling gNMI in Insecure Mode
This task is applicable in Cisco IOS XE Amsterdam 17.3.1 and later releases.
Note
In a Day Zero setup, first enable the device in insecure mode, then disable it, and enable the secure mode. To
stop gNxI in insecure mode, use the no gnxi server command.
gNxI insecure and secure servers can run simultaneously on a device.
Note
The gnxi commands apply to both gNMI and gRPC Network Operations Interface (gNOI) services. gNxI
tools are a collection of tools for Network Management that use the gNMI and gNOI protocols.
Note
SUMMARY STEPS
1.
enable
2. configure terminal
Programmability Configuration Guide, Cisco IOS XE Amsterdam 17.3.x
198
Model-Driven Programmability
Enabling gNMI in Insecure Mode

Page 213
- gnxi
- gnxi server
- gnxi port port-number
- end
show gnxi state
DETAILED STEPS
Procedure
Purpose
Command or Action
Enables privileged EXEC mode.
enable
Step 1
Example:
• Enter your password if prompted.
Device> enable
Enters global configuration mode.
configure terminal
Example:
Step 2
Device# configure terminal
Starts the gNxI process.
gnxi
Example:
Step 3
Device(config)# gnxi
Enables the gNxI server in insecure mode.
gnxi server
Example:
Step 4
Device(config)# gnxi server
Sets the gNxI port to listen to.
gnxi port port-number
Step 5
Example:
• The default insecure gNxI port is 50052.
(Optional) Device(config)# gnxi port 50000
Exits global configuration mode and returns to privileged
EXEC mode.
end
Example:
Step 6
Device(config)# end
Displays the status of gNxI interfaces.
show gnxi state
Example:
Step 7
Device# show gnxi state
Enabling gNMI in Secure Mode
This task is applicable in Cisco IOS XE Amsterdam 17.3.1 and later releases.
Note
Programmability Configuration Guide, Cisco IOS XE Amsterdam 17.3.x
199
Model-Driven Programmability
Enabling gNMI in Secure Mode

Page 214
To stop gNxI in secure mode, use the no gnxi secure-server command.
gNxI insecure and secure servers can simultaneously run on a device.
Note
The gnxi commands apply to both gNMI and gRPC Network Operations Interface (gNOI) services. gNxI
tools are a collection of tools for Network Management that use the gNMI and gNOI protocols.
Note
SUMMARY STEPS
1.
enable
2. configure terminal
3. gnxi
4. gnxi secure-trustpoint trustpoint-name
5. gnxi secure-server
6. gnxi secure-client-auth
7.
gnxi secure-port
8. end
9. show gnxi state
DETAILED STEPS
Procedure
Purpose
Command or Action
Enables privileged EXEC mode.
enable
Step 1
Example:
• Enter your password if prompted.
Device> enable
Enters global configuration mode.
configure terminal
Example:
Step 2
Device# configure terminal
Starts the gNxI process.
gnxi
Example:
Step 3
Device(config)# gnxi
Specifies the trustpoint and cert set that gNxI uses for
authentication.
gnxi secure-trustpoint trustpoint-name
Example:
Step 4
Device(config)# gnxi secure-trustpoint trustpoint1
Enables the gNxI server in secure mode.
gnxi secure-server
Example:
Step 5
Programmability Configuration Guide, Cisco IOS XE Amsterdam 17.3.x
200
Model-Driven Programmability
Enabling gNMI in Secure Mode

Page 215
Purpose
Command or Action
Device(config)# gnxi secure-server
(Optional) The gNxI process authenticates the client
certificate against the root certificate.
gnxi secure-client-auth
Example:
Step 6
Device(config)# gnxi secure-client-auth
(Optional) Sets the gNxI port to listen to.
gnxi secure-port
Step 7
Example:
• The default secure gNxI port is 9339.
Device(config)# gnxi secure-port
Exits global configuration mode and returns to privileged
EXEC mode.
end
Example:
Step 8
Device(config)# end
Displays the status of gNxI servers.
show gnxi state
Example:
Step 9
Device# show gnxi state
Example
The following is sample output from the show gnxi state command:
Device# show gnxi state
State
Status
Enabled
Up
Connecting the gNMI Client
The gNMI client is connected by using the client and root certificates that are previously configured.
The following example shows how to connect the gNMI client using Python:
gRPC Must be compiled in local dir under path below:
import sys
sys.path.insert(0, "reference/rpc/gnmi/")
import grpc
import gnmi_pb2
import gnmi_pb2_grpc
gnmi_dir = '/path/to/where/openssl/creds/were/generated/'
Certs must be read in as bytes
with open(gnmi_dir + 'rootCA.pem', 'rb') as f:
ca_cert = f.read()
with open(gnmi_dir + 'client.crt', 'rb') as f:
client_cert = f.read()
with open(gnmi_dir + 'client.key', 'rb') as f:
client_key = f.read()
Programmability Configuration Guide, Cisco IOS XE Amsterdam 17.3.x
201
Model-Driven Programmability
Connecting the gNMI Client
Page 216
Create credentials object
credentials = grpc.ssl_channel_credentials(root_certificates=ca_cert,
private_key=client_key, certificate_chain=client_cert)
Create a secure channel:
Default port is 9339, can be changed on ios device with 'gnxi secure-port ####'
port = 9339
host = <HOSTNAME FQDN>
secure_channel = grpc.secure_channel("%s:%d" % (host, port), credentials)
Create secure stub:
secure_stub = gnmi_pb2_grpc.gNMIStub(secure_channel)
Done! Let's test to make sure it works:
secure_stub.Capabilities(gnmi_pb2.CapabilityRequest())
supported_models {
<snip>
}
supported_encodings: <snip>
gNMI_version: "0.4.0"
Configuration Examples for the gNMI Protocol
Example: Enabling gNMI in Insecure Mode
This example is applicable in Cisco IOS XE Amsterdam 17.3.1 and later releases.
Note
The following example shows how to enable the gNxI server in insecure mode:
Device> enable
Device# configure terminal
Device(config)# gnxi
Device(config)# gnxi server
Device(config)# gnxi port 50000 <The default port is 50052.>
Device(config)# end
Device#
Example: Enabling gNMI in Secure Mode
This example is applicable in Cisco IOS XE Amsterdam 17.3.1 and later releases.
Note
The following example shows how to enable the gNxI server in secure mode:
Device> enable
Device# configure terminal
Programmability Configuration Guide, Cisco IOS XE Amsterdam 17.3.x
202
Model-Driven Programmability
Configuration Examples for the gNMI Protocol

Page 217
Device(config)# gnxi
Device(config)# gnxi secure-trustpoint trustpoint1
Device(config)# gnxi secure-server
Device(config)# gnxi secure-client-auth
Device(config)# gnxi secure-port 50001 <The default port is 9339.>
Device(config)# end
Device#
Additional References for the gNMI Protocol
Related Documents
Document Title
Related Topic
https://developer.cisco.com/site/ios-xe/
DevNet
https://github.com/openconfig/reference/blob/master/rpc/gnmi/gnmi-specification.md
gNMI
https://github.com/openconfig/reference/blob/master/rpc/gnmi/gnmi-path-conventions.md
gNMI path
encoding
Standards and RFCs
Title
Standard/RFC
JSON Encoding of Data Modeled with YANG
RFC 7951
Technical Assistance
Link
Description
http://www.cisco.com/support
The Cisco Support website provides extensive online resources, including
documentation and tools for troubleshooting and resolving technical issues
with Cisco products and technologies.
To receive security and technical information about your products, you can
subscribe to various services, such as the Product Alert Tool (accessed from
Field Notices), the Cisco Technical Services Newsletter, and Really Simple
Syndication (RSS) Feeds.
Access to most tools on the Cisco Support website requires a Cisco.com user
ID and password.
Feature Information for the gNMI Protocol
The following table provides release information about the feature or features described in this module. This
table lists only the software release that introduced support for a given feature in a given software release
train. Unless noted otherwise, subsequent releases of that software release train also support that feature.
Programmability Configuration Guide, Cisco IOS XE Amsterdam 17.3.x
203
Model-Driven Programmability
Additional References for the gNMI Protocol
Page 218
Use Cisco Feature Navigator to find information about platform support and Cisco software image support.
To access Cisco Feature Navigator, go to www.cisco.com/go/cfn. An account on Cisco.com is not required.
Programmability Configuration Guide, Cisco IOS XE Amsterdam 17.3.x
204
Model-Driven Programmability
Feature Information for the gNMI Protocol
Page 219
Table 19: Feature Information for the gNMI Protocol
Feature Information
Release
Feature Name
This feature describes the model-driven
configuration and retrieval of operational data
using the gNMI capabilities, GET and SET
RPCs.
This feature was implemented on the
following platforms:
• Cisco Catalyst 9300 Series Switches
• Cisco Catalyst 9400 Series Switches
• Cisco Catalyst 9500 Series Switches
Cisco IOS XE Fuji 16.8.1a
gNMI Protocol
In Cisco IOS XE Gibraltar 16.10.1, this feature
was implemented on Cisco Catalyst
9500-High Performance Series Switches.
Cisco IOS XE Gibraltar
16.10.1
In Cisco IOS XE Gibraltar 16.11.1, this feature
was implemented on Cisco Catalyst 9600
Series Switches.
Cisco IOS XE Gibraltar
16.11.1
In Cisco IOS XE Gibraltar 16.12.1, this feature
was implemented on the following platforms:
• Cisco Catalyst 9200 and 9200L Series
Switches
• Cisco Catalyst 9300L SKUs
• Cisco cBR-8 Converged Broadband
Router
Cisco IOS XE Gibraltar
16.12.1
In Cisco IOS XE Amsterdam 17.1.1, this
feature was implemented on the following
platforms:
• Cisco ASR 900 Series Aggregation
Services Routers
• Cisco ASR 920 Series Aggregation
Services Router
• Cisco Network Convergence System 520
Series
• Cisco Network Convergence System
4200 Series
Cisco IOS XE Amsterdam
17.1.1
In Cisco IOS XE Amsterdam 17.2.1r, this
feature was implemented on Cisco ASR 1000
Series Aggregation Services Routers.
Cisco IOS XE Amsterdam
17.2.1r
Programmability Configuration Guide, Cisco IOS XE Amsterdam 17.3.x
205
Model-Driven Programmability
Feature Information for the gNMI Protocol
Page 220
Feature Information
Release
Feature Name
In Cisco IOS XE Cupertino 17.8.1, this feature
was implemented on the following platforms:
• Cisco Catalyst 9800-CL Wireless
Controllers
• Cisco Catalyst 9800-40 Wireless
Controllers
• Cisco Catalyst 9800-80 Wireless
Controllers
Cisco IOS XE Cupertino
17.8.1
gNMI IPv6 Support is enabled in Cisco IOS
XE Dublin 17.10.1.
• Cisco Catalyst 9200 and 9200L Series
Switches
• Cisco Catalyst 9300, 9300L, and 9300X
Series Switches
• Cisco Catalyst 9400 Series Switches
• Cisco Catalyst 9500 and 9500
High-Performance Series Switches
• Cisco Catalyst 9600 Series Switches
Cisco IOS XE Dublin 17.10.1
gNMI IPv6 Support
The Username and Password Authentication
feature was added to the gNMI protocol. This
feature is supported on all IOS XE platforms
that support gNMI.
Cisco IOS XE Gibraltar
16.12.1
gNMI Username and
Password Authentication
All successful configuration changes made
through the gNMI SetRequest RPC persists
across device restarts. This feature was
implemented on the following platforms:
• Cisco Catalyst 9200 Series Switches
• Cisco Catalyst 9300 Series Switches
• Cisco Catalyst 9400 Series Switches
• Cisco Catalyst 9500 Series Switches
• Cisco Catalyst 9600 Series Switches
Cisco IOS XE Amsterdam
17.3.1
gNMI Configuration
Persistence
Programmability Configuration Guide, Cisco IOS XE Amsterdam 17.3.x
206
Model-Driven Programmability
Feature Information for the gNMI Protocol
Page 221
Feature Information
Release
Feature Name
The gNOI Certificate Management Service
provides RPCs to install, rotate, get certificate,
revoke certificate, and generate certificate
signing request. This feature was implemented
on the following platforms:
• Cisco Catalyst 9200 Series Switches
• Cisco Catalyst 9300 Series Switches
• Cisco Catalyst 9400 Series Switches
• Cisco Catalyst 9500 Series Switches
• Cisco Catalyst 9600 Series Switches
Cisco IOS XE Amsterdam
17.3.1
gNOI Certificate Management
gNMI protocol supports PROTO encoding.
The gnmi.proto file represents the blueprint
for generating a complete set of client and
server-side procedures that represents the
framework for the gNMI protocol.
This feature was implemented on the
following platforms:
• Cisco Catalyst 9200, 9200L, and 9200X
Series Switches
• Cisco Catalyst 9300, 9300L, and 9300X
Series Switches
• Cisco Catalyst 9400 and 9400X Series
Switches
• Cisco Catalyst 9500, 9500-High
Performance, and 9500X Series Switches
• Cisco Catalyst 9600 Series Switches
Cisco IOS XE Dublin 17.11.1
PROTO Encoding
Programmability Configuration Guide, Cisco IOS XE Amsterdam 17.3.x
207
Model-Driven Programmability
Feature Information for the gNMI Protocol
Page 222
Programmability Configuration Guide, Cisco IOS XE Amsterdam 17.3.x
208
Model-Driven Programmability
Feature Information for the gNMI Protocol
Page 223
C H A P T E R 12
gRPC Network Operations Interface
The Google Remote Procedure Call (gRPC) Network Operations Interface (gNOI) is a suite of microservices,
each corresponding to a set of operations. This module describes the supported gNOI services.
• Information About the gRPC Network Operations Interface, on page 209
• Additional References for the gRPC Network Operations Interface, on page 216
• Feature Information for the gRPC Network Operations Interface, on page 217
Information About the gRPC Network Operations Interface
gNOI Protocol
gNOI defines a set of gRPC-based microservices for executing operational commands on network devices.
The gNMI service defines operations for configuration management, operational state retrieval, and bulk data
collection through streaming telemetry. gNOI only allows the adoption of services that a device supports.
gNOI supports the OS installation service.
gNOI can be used with or without user authentication. User authentication is disabled by default. Use the gnxi
secure-password-auth command to enable user authentication. For information about enabling user
authentication through the OpenConfig model, see https://github.com/YangModels/yang/blob/master/vendor/
cisco/xe/1751/openconfig-system-management.yang.
The gNOI protocol supports the following operations:
• Certificate Management
• Bootstrapping
Certificate Management Service
The Certificate Management Service primarily exports two main RPCs, Install and Rotate, that are used for
the installation of new certificates, and the rotation of existing certificates on a device, respectively.
The following RPCs are supported by the Certificate Management Service:
• Install: Installs a certificate. All certificates are uniquely identified by a certificate ID. The certificate ID
is a string.
Programmability Configuration Guide, Cisco IOS XE Amsterdam 17.3.x
209

Page 224
• Rotate: Rotates an existing certificate.
• RevokeCertificates: Revokes one or more certificates.
• GetCertificates: Queries all certificates.
• CanGenerateCSR: Queries whether the device can generate a Certificate Signing Request (CSR).
Trustpoints and certificates created through the RPCs mentioned above persist across switchovers and device
reboots.
The following is a sample Certificate Management Service definition:
service CertificateManagement {
rpc Install(stream InstallCertificateRequest)
returns (stream InstallCertificateResponse);
rpc Rotate(stream RotateCertificateRequest)
returns (stream RotateCertificateResponse);
rpc RevokeCertificates(RevokeCertificateRequest)
returns (RevokeCertificateResponse);
rpc GetCertificates(GetCertificateRequest)
returns (GetCertificateResponse);
rpc CanGenerateCSR(CanGenerateCSRRequest)
returns (CanGenerateCSRResponse);
}
Install RPC
The Install RPC adds a new certificate to a device by creating a new CSR request. The new certificate is
associated with a new certificate ID on the device. If the device has a pre-existing certificate with the given
certificate ID, the operation fails.
The Install RPC is a bidirectional streaming RPC. It has an input (InstallCertificateRequest) and an output
(IntsallCertificateResponse) both of which are streaming. If the stream is broken, or any steps in the process
fail, the device rolls back the changes.
The following is an example of the Install RPC definition and messages:
rpc Install(stream InstallCertificateRequest)
returns (stream InstallCertificateResponse);
// Request messages to install new certificates on the target.
message InstallCertificateRequest {
// Request Messages.
oneof install_request {
GenerateCSRRequest generate_csr = 1;
LoadCertificateRequest load_certificate = 2;
}
}
// Request to generate the CSR.
message GenerateCSRRequest {
// Parameters for creating a CSR.
CSRParams csr_params = 1;
// The certificate id with which this CSR will be associated. The target
// configuration should bind an entity which wants to use a certificate to
// the certificate_id it should use.
Programmability Configuration Guide, Cisco IOS XE Amsterdam 17.3.x
210
Model-Driven Programmability
Install RPC
Page 225
string certificate_id = 2;
}
// Parameters to be used when generating a Certificate Signing Request.
message CSRParams {
// The type of certificate which will be associated for this CSR.
CertificateType type = 1;
// Minimum size of the key to be used by the target when generating a
// public/private key pair.
uint32 min_key_size = 2;
// If provided, the target must use the provided key type. If the target
// cannot use the algorithm specified in the key_type, it should cancel the
// stream with an Unimplemented error.
KeyType key_type = 3;
// --- common set of parameters applicable for any type of certificate --- //
string common_name = 4;
// e.g "device.corp.google.com"
string country = 5;
// e.g "US"
string state = 6;
// e.g "CA"
string city = 7;
// e.g "Mountain View"
string organization = 8;
// e.g "Google"
string organizational_unit = 9;
// e.g "Security"
string ip_address = 10;
string email_id = 11;
}
// A certificate.
message Certificate {
// Type of certificate.
CertificateType type = 1;
// Actual certificate.
// The exact encoding depends upon the type of certificate.
// for X509, this should be a PEM encoded Certificate.
bytes certificate = 2;
}
message LoadCertificateRequest {
// The certificate to be Loaded on the target.
Certificate certificate = 1;
// The key pair to be used with the certificate. This is provided in the event
// that the target cannot generate a CSR (and the corresponding public/private
// keys).
KeyPair key_pair = 2;
// Certificate Id of the above certificate. This is to be provided only when
// there is an externally generated key pair.
string certificate_id = 3;
// Optional pool of CA certificates to be used for authenticating the client.
repeated Certificate ca_certificate = 4;
}
// A message representing a pair of public/private keys.
message KeyPair {
bytes private_key = 1;
bytes public_key = 2;
}
// Response Messages from the target for the InstallCertificateRequest.
message InstallCertificateResponse {
// Response messages.
oneof install_response {
Programmability Configuration Guide, Cisco IOS XE Amsterdam 17.3.x
211
Model-Driven Programmability
Install RPC
Page 226
GenerateCSRResponse generated_csr = 1;
LoadCertificateResponse load_certificate = 2;
}
}
// GenerateCSRResponse contains the CSR associated with the Certificate ID
// supplied in the GenerateCSRRequest. When a Certificate is subsequently
// installed on the target in the same streaming RPC session, it must be
// associated to that Certificate ID.
//
// An Unimplemented error will be returned if the target cannot generate a CSR
// as per the request. In this case, the caller must generate its own key pair.
message GenerateCSRResponse {
CSR csr = 1;
}
// A Certificate Signing Request.
message CSR {
// Type of certificate.
CertificateType type = 1;
// Bytes representing the CSR.
// The exact encoding depends upon the type of certificate requested.
// for X509: This should be the PEM encoded CSR.
bytes csr = 2;
}
After the target device is up and gNOI is in default state, the controller (a third-party implementation) uses
the Install RPC to install a certificate that is signed by a Certificate Authority (CA). The certificate is uniquely
identified by a certificate ID. This ID is used as the trustpoint name in the Public Key Infrastructure (PKI)
configuration. The installation will fail, if you try to install a certificate that has an existing certificate ID.
The following section describes how a CSR is generated by a device:
1.
The device generates a self-signed certificate through the Install RPC. The controller does not require a
copy of this certificate because in encrypted mode (or gNMI default state) the controller does not validate
the certificate presented by the target device. This is the default state.
2.
The controller requests the device to generate a CSR, sends the CSR to the CA, and gets the signed
certificate back from the CA.
3.
The signed certificate is installed into the device along with the CA certificates used to sign the certificate.
The CA certificate is present in the ca_certificates bundle, and is required by the PKI to install the device
certificate.
4.
The gNMI or the gNOI service restarts using the newly installed certificate that is now in the provisioned
state.
Rotate RPC
The Rotate RPC renews an existing certificate; a certificate that is already installed. If a certificate is not
already installed, the Rotate RPC fails. A certificate that is not in use can be rotated, but the client cannot test
it.
The following is a sample Rotate RPC definition:
rpc Rotate(stream RotateCertificateRequest)
returns (stream RotateCertificateResponse);
// Request messages to rotate existing certificates on the target.
Programmability Configuration Guide, Cisco IOS XE Amsterdam 17.3.x
212
Model-Driven Programmability
Rotate RPC
Page 227
message RotateCertificateRequest {
// Request Messages.
oneof rotate_request {
GenerateCSRRequest generate_csr = 1;
LoadCertificateRequest load_certificate = 2;
FinalizeRequest finalize_rotation = 3;
}
}
// A Finalize message is sent to the target to confirm the Rotation of
// the certificate and that the certificate should not be rolled back when
// the RPC concludes. The certificate must be rolled back if the target returns
// an error after receiving a Finalize message.
message FinalizeRequest {
}
message RotateCertificateResponse {
// Response messages.
oneof rotate_response {
GenerateCSRResponse generated_csr = 1;
LoadCertificateResponse load_certificate = 2;
}
}
The Rotate RPC differs from the Install RPC in the following ways:
• PKI has to save or cache the old certificate and the CA certificate when installing a new certificate (for
the purpose of rollback).
• The controller creates a new connection to test whether the renewed certificate works, and in case of
success, finalizes the certificate rotation.
Revoke RPC
This RPC is used to revoke one or more certificates, each uniquely identified by a certificate ID. Revocation
of a certificate results in the corresponding trustpoint to be removed from the Cisco IOS XE configuration.
If the corresponding trustpoints are currently in use, or if the trustpoints do not exist, revocation of the
certificates may fail.
A RevokeCertificate RPC may have certificates revoked successfully or unsuccessfully. On the target device,
revocation is a simple delete operation; the actual revocation with the CA is done by the client. If the client
revokes a certificate that is in use, new connections fail, but the existing connections are unaffected.
The following is a sample RevokeCertificate RPC:
// An RPC to revoke specific certificates.
// If a certificate is not present on the target, the request should silently
// succeed. Revoking a certificate should render the existing certificate
// unusable by any endpoints.
rpc RevokeCertificates(RevokeCertificatesRequest)
returns (RevokeCertificatesResponse);
message RevokeCertificatesRequest {
// Certificates to revoke.
repeated string certificate_id = 1;
}
message RevokeCertificatesResponse {
// List of certificates successfully revoked.
Programmability Configuration Guide, Cisco IOS XE Amsterdam 17.3.x
213
Model-Driven Programmability
Revoke RPC
Page 228
repeated string revoked_certificate_id = 1;
// List of errors why certain certificates could not be revoked.
repeated CertificateRevocationError certificate_revocation_error = 2;
}
// An error message indicating why a certificate id could not be revoked.
message CertificateRevocationError {
string certificate_id = 1;
string error_message = 2;
}
GetCertificate RPC
This RPC queries all certificate IDs.
The response to the query contains the following information:
• Certificate information for all the certificates that are identified by a certificate ID.
• The list of endpoints, for example, tunnels, daemons, and so on, that use this certificate.
Endpoints are not supported.
Note
Responses do not contain the ca_certificate bundle.
Note
The following is a sample GetCertificate RPC:
// An RPC to get the certificates on the target.
rpc GetCertificates(GetCertificatesRequest) returns (GetCertificatesResponse);
// The request to query all the certificates on the target.
message GetCertificatesRequest {
}
// Response from the target about the certificates that exist on the target what
// what is using them.
message GetCertificatesResponse {
repeated CertificateInfo certificate_info = 1;
}
message CertificateInfo {
string certificate_id = 1;
Certificate certificate = 2;
// List of endpoints using this certificate.
repeated Endpoint endpoints = 3;
// System modification time when the certificate was installed/rotated in
// nanoseconds since epoch.
int64 modification_time = 4;
}
Programmability Configuration Guide, Cisco IOS XE Amsterdam 17.3.x
214
Model-Driven Programmability
GetCertificate RPC

Page 229
// An endpoint represents an entity on the target which can use a certificate.
message Endpoint {
// Type of endpoint that can use a cert. This list is to be extended based on
// conversation with vendors.
enum Type {
EP_UNSPECIFIED = 0;
EP_IPSEC_TUNNEL = 1;
EP_DAEMON = 2;
}
Type type = 1;
// Human readable identifier for an endpoint.
string endpoint = 2;
}
CanGenerateCSR RPC
This RPC queries whether a device can generate a CSR for a specific key type, certificate type, and key size.
The supported key type is Rivest, Shamir, and Adelman (RSA), and the supported certificate type is X.509.
When this RPC request is made for installing a completely new certificate as part of the Install RPC, the device
must ensure that the certificate ID is new and no entities on the device are bound to this certificate ID. If any
existing certificate matches the certificate ID, this request fails.
When this RPC request is made for rotating an existing certificate as part of the Rotate RPC, the device must
ensure that the certificate ID is already available. If certificate rotation proceeds to load the certificate, it must
associate the new certificate with the previously created certificate ID.
The following is a sample CanGenerateCSR RPC:
// An RPC to ask a target if it can generate a Certificate.
rpc CanGenerateCSR(CanGenerateCSRRequest) returns (CanGenerateCSRResponse);
// A request to ask the target if it can generate key pairs.
message CanGenerateCSRRequest {
KeyType key_type = 1;
CertificateType certificate_type = 2;
uint32 key_size = 3;
}
// Algorithm to be used for generation the key pair.
enum KeyType {
// 1 - 500, for known types.
// 501 and onwards for private use.
KT_UNKNOWN = 0;
KT_RSA = 1;
}
// Types of certificates.
enum CertificateType {
// 1 - 500 for public use.
// 501 onwards for private use.
CT_UNKNOWN = 0;
CT_X509 = 1;
}
// Response from the target about whether it can generate a CSR with the given
// parameters.
message CanGenerateCSRResponse {
bool can_generate = 4;
Programmability Configuration Guide, Cisco IOS XE Amsterdam 17.3.x
215
Model-Driven Programmability
CanGenerateCSR RPC
Page 230
}
Mutual Authentication
Mutual authentication is a two-way authentication; two parties authenticate each other at the same time. To
enable mutual-authentication, use the gnmi-yang secure-peer-verify-trustpoint command. If this command
is not enabled, the authentication service validates the gNMI client against all the existing trustpoints and the
contents of the trustpool.
Rotation of the CA certificates for mutual authentication requires the client to present a new bundle to the
target device, and the old bundle to be removed. However, the CA certificates reside in a trustpool, and cannot
be selectively deleted from the trustpool.
Bootstrapping with Certificate Service
After installing gNOI certificates, bootstrapping is used to configure or operate a target device. When a target
device does not have any pre-existing certificates, bootstrapping allows the installing of certificates by using
the gNOI Certificate Management Service. After the certificate installation, the device is capable of establishing
secure gNOI or gNMI connections. This process assumes a pre-existing secure environment.
To enable gNMI bootstrapping, use the gnxi secure-init command.
The gNOI Certificate Management Service must be installed before bootstapping.
Note
The gNOI Certificate Management Service has two states. These states are supported by both the gNOI service
and the gNMI service.
• Default/Encrypted: gNOI and gNMI on the device use a self-signed (default) certificate that the client
does not verify; the certificate does not require authentication. In this state, only the gNOI certificate
service is enabled on the target device.
• Provisioned: gNOI and gNMI on the device use an installed certificate that is verified by the client, and
the client presents its certificate, which the device verifies against its certificate store. The device verifies
the client certificate only if mutual authentication is enabled.
Additional References for the gRPC Network Operations
Interface
Related Documents
Document Title
Related Topic
https://developer.cisco.com/site/ios-xe/
DevNet
https://github.com/openconfig/gnoi
gNOI
Programmability Configuration Guide, Cisco IOS XE Amsterdam 17.3.x
216
Model-Driven Programmability
Mutual Authentication

Page 231
Technical Assistance
Link
Description
http://www.cisco.com/support
The Cisco Support website provides extensive online resources, including
documentation and tools for troubleshooting and resolving technical issues
with Cisco products and technologies.
To receive security and technical information about your products, you can
subscribe to various services, such as the Product Alert Tool (accessed from
Field Notices), the Cisco Technical Services Newsletter, and Really Simple
Syndication (RSS) Feeds.
Access to most tools on the Cisco Support website requires a Cisco.com user
ID and password.
Feature Information for the gRPC Network Operations Interface
The following table provides release information about the feature or features described in this module. This
table lists only the software release that introduced support for a given feature in a given software release
train. Unless noted otherwise, subsequent releases of that software release train also support that feature.
Use Cisco Feature Navigator to find information about platform support and Cisco software image support.
To access Cisco Feature Navigator, go to www.cisco.com/go/cfn. An account on Cisco.com is not required.
Table 20: Feature Information for the gRPC Network Operations Interface
Feature Information
Release
Feature Name
The gNOI Certificate Management Service
provides RPCs to install, rotate, get certificate,
revoke certificate, and generate certificate
signing request.
In Cisco IOS XE Amsterdam 17.3.1, this
feature was implemented on the following
platforms:
• Cisco Catalyst 9200 Series Switches
• Cisco Catalyst 9300 Series Switches
• Cisco Catalyst 9400 Series Switches
• Cisco Catalyst 9500 Series Switches
• Cisco Catalyst 9600 Series Switches
Cisco IOS XE Amsterdam
17.3.1
gNOI Certificate Management
Programmability Configuration Guide, Cisco IOS XE Amsterdam 17.3.x
217
Model-Driven Programmability
Feature Information for the gRPC Network Operations Interface
Page 232
Feature Information
Release
Feature Name
After installing gNOI certificates,
bootstrapping is used to configure or operate
a target device. gNMI bootstrapping is enabled
by using the gnxi-secure-init command and
disabled by using the
secure-allow-self-signed-trustpoint
command.
In Cisco IOS XE Amsterdam 17.3.1, this
feature was implemented on the following
platforms:
• Cisco Catalyst 9200 Series Switches
• Cisco Catalyst 9300 Series Switches
• Cisco Catalyst 9400 Series Switches
• Cisco Catalyst 9500 Series Switches
• Cisco Catalyst 9600 Series Switches
Cisco IOS XE Amsterdam
17.3.1
gNOI Bootstrapping with
Certificate Service
Programmability Configuration Guide, Cisco IOS XE Amsterdam 17.3.x
218
Model-Driven Programmability
Feature Information for the gRPC Network Operations Interface
Page 233
C H A P T E R 13
Model Based AAA
The NETCONF and RESTCONF interfaces implement the NETCONF Access Control Model (NACM).
NACM is a form of role-based access control (RBAC) specified in RFC 6536.
• Model Based AAA, on page 219
• Additional References for Model Based AAA, on page 225
• Feature Information for Model-Based AAA, on page 225
Model Based AAA
Prerequisites for Model Based AAA
Working with the model based AAA feature requires prior understanding of the following :
• NETCONF-YANG
• NETCONF-YANG kill-session
• RFC 6536: Network Configuration Protocol (NETCONF) Access Control Model
Initial Operation
Upon enabling the NETCONF and/or RESTCONF services, a device that has no prior configuration of the
/nacm subtree will deny read, write, and execute access to all operations and data other than the users of
privilege level 15. This is described in the following configuration of the /nacm subtree:
<nacm xmlns="urn:ietf:params:xml:ns:yang:ietf-netconf-acm">
<enable-nacm>true</enable-nacm>
<read-default>deny</read-default>
<write-default>deny</write-default>
<exec-default>deny</exec-default>
<enable-external-groups>true</enable-external-groups>
<rule-list>
<name>admin</name>
<group>PRIV15</group>
<rule>
<name>permit-all</name>
<module-name></module-name>
<access-operations></access-operations>
<action>permit</action>
Programmability Configuration Guide, Cisco IOS XE Amsterdam 17.3.x
219

Page 234
</rule>
</rule-list>
</nacm>
Group Membership
The group membership of a user can come from two sources- first, from the privilege level of the user as
configured on the AAA server used for authorization, and second, from those configured in the /nacm/groups
subtree. The names of the groups that correspond to each privilege level are as follows:
NACM group name
Privilege level
PRIV00
0
PRIV01
1
PRIV02
2
PRIV03
3
PRIV04
4
PRIV05
5
PRIV06
6
PRIV07
7
PRIV08
8
PRIV09
9
PRIV10
10
PRIV11
11
PRIV12
12
PRIV13
13
PRIV14
14
PRIV15
15
Traditional IOS command authorization, such as those based on privilege level, does not apply to NETCONF
or RESTCONF.
Note
Access granted to a NACM group based on a privilege level do not inherently apply to NACM groups with
higher privilege level. For example, rules that apply to PRIV10 do not automatically apply to PRIV11, PRIV12,
PRIV13, PRIV14, and PRIV15 as well.
Note
Programmability Configuration Guide, Cisco IOS XE Amsterdam 17.3.x
220
Model-Driven Programmability
Group Membership

Page 235
NACM Privilege Level Dependencies
If the AAA configuration is configured with no aaa new-model, the privilege level locally configured for
the user is used. If the AAA configuration is configured with aaa new-model, the privilege level is determined
by the AAA servers associated with the method list aaa authorization exec default.
NACM Configuration Management and Persistance
The NACM configuration can be modified using NETCONF or RESTCONF. In order for a user to be able
to acccess the NCAM configuration, they must have explicit permission to do so, that is, through a NACM
rule. Configuration under the /nacm subtree persists when the copy running-config startup-config EXEC
command is issued, or the cisco-ia:save-config RPC is issued.
<rpc message-id="101" xmlns="urn:ietf:params:xml:ns:netconf:base:1.0">
<save-config xmlns="http://cisco.com/yang/cisco-ia"/>
</rpc>
The NACM rules that apply to a NETCONF session are those that are configured in the /nacm subtree at the
time of session establishment. Modifying the /nacm subtree has no effect on NETCONF sessions as they are
already established. The <kill-session> RPC or the clear netconf-yang session EXEC command can be used
to forcibly end an unwanted NETCONF session. See NETCONF Kill Session, on page 139.
Note
Care should be taken when crafting rules to deny access to certain data as the same data may be exposed
through multiple YANG modules and data node paths. For example, interface configuration is exposed through
both Cisco-IOS-XE-native and ietf-interface. Rules that may apply to one representation of the same
underlying data may not apply to other representations of that data.
Note
Resetting the NACM Configuration
Use the following command to reset the /nacm subtree configuration to the initial configuration (see Initial
Operation).
Router#request platform software yang-management nacm reset-config
Sample NACM Configuration
The examples in this section are for illustrative purposes only.
Note
The following is a sample for groups configuration.
<nacm xmlns="urn:ietf:params:xml:ns:yang:ietf-netconf-acm">
<groups>
<group>
<name>administrators</name>
<user-name>admin</user-name>
<user-name>root</user-name>
Programmability Configuration Guide, Cisco IOS XE Amsterdam 17.3.x
221
Model-Driven Programmability
NACM Privilege Level Dependencies

Page 236
</group>
<group>
<name>limited-permission</name>
<user-name>alice</user-name>
<user-name>bob</user-name>
</group>
</groups>
</nacm>
Table 21: Description of the Configuration Paramenters for Groups Configuration
Description
Parameter
Group name
<name>administrators</name>
User name
<user-name>admin</user-name>
User name
<user-name>root</user-name>
The following is a sample for creating module rules.
<nacm xmlns="urn:ietf:params:xml:ns:yang:ietf-netconf-acm">
<rule-list>
<name>only-ietf-interfaces</name>
<group>limited-permission</group>
<rule>
<name>deny-native</name>
<module-name>Cisco-IOS-XE-native</module-name>
<access-operations></access-operations>
<action>deny</action>
</rule>
<rule>
<name>allow-ietf-interfaces</name>
<module-name>ietf-interfaces</module-name>
<access-operations></access-operations>
<action>permit</action>
</rule>
</rule-list>
</nacm>
Table 22: Description of the Configuration Paramenters for Creating Module Rules
Description
Parameter
Unique rule-list name
<name>only-ietf-interfaces</name>
Groups that rule-list applies to
<group>limited-permission</group>
Unique rule name
<name>deny-native</name>
Name of the YANG module
<module-name>Cisco-IOS-XE-native</module-name>
CRUDx operation types
<access-operations>*</access-operations>
Permit/deny
<action>deny</action>
The following is a sample for creating protocol operation rules.
Programmability Configuration Guide, Cisco IOS XE Amsterdam 17.3.x
222
Model-Driven Programmability
Sample NACM Configuration
Page 237
<nacm xmlns="urn:ietf:params:xml:ns:yang:ietf-netconf-acm">
<rule-list>
<name>only-get</name>
<group>limited-permission</group>
<rule>
<name>deny-edit-config</name>
<module-name>ietf-netconf</module-name>
<rpc-name>edit-config</rpc-name>
<access-operations>exec</access-operations>
<action>deny</action>
</rule>
<rule>
<name>allow-get</name>
<module-name>ietf-netconf</module-name>
<rpc-name>get</rpc-name>
<access-operations>exec</access-operations>
<action>permit</action>
</rule>
</rule-list>
</nacm>
Table 23: Description of the Configuration Paramenters for Creating Protocol Operation Rules
Description
Parameter
Unique rule-list name
<name>only-get</name>
Groups that rule-list applies to
<group>limited-permission</group>
Unique rule name
<name>deny-edit-config</name>
Name of module containing the RPC
<module-name>ietf-netconf</module-name>
Name of the RPC
<rpc-name>edit-config</rpc-name>
Execute permission for the RPC
<access-operations>exec</access-operations>
Permit/deny
<action>deny</action>
The following is a sample for creating data node rules.
<nacm xmlns="urn:ietf:params:xml:ns:yang:ietf-netconf-acm">
<rule-list>
<name>hide-enable-passwords</name>
<group>limited-permission</group>
<rule>
<name>deny-enable-passwords</name>
<path xmlns:ios="http://cisco.com/ns/yang/Cisco-IOS-XE-native>/ios:native/enable
</path>
<access-operations>*</access-operations>
<action>deny</action>
</rule>
</rule-list>
</nacm>
Programmability Configuration Guide, Cisco IOS XE Amsterdam 17.3.x
223
Model-Driven Programmability
Sample NACM Configuration
Page 238
Table 24: Description of the Configuration Paramenters for Creating Data Node Rules
Description
Parameter
Unique rule-list name
<name>hide-enable-passwords</name>
Groups that rule-list applies to
<group>limited-permission</group>
Unique rule name
<name>deny-enable-passwords</name>
Path to the data node being granted/denied
<path
xmlns:ios="http://cisco.com/ns/yang/Cisco-IOS-XE-native>/ios:native/enable</path>
CRUDx operation types
<access-operations></access-operations>
Permit/deny
<action>deny</action>
The following is an example NACM configuration that permits all groups to use the standard NETCONF
RPCs <get> and <get-config>, the schema download RPC <get-schema>, and read-only access to the data in
the module ietf-interfaces:
<nacm xmlns="urn:ietf:params:xml:ns:yang:ietf-netconf-acm">
<rule-list>
<name>readonly-protocol</name>
<group></group>
<rule>
<name>get-permit</name>
<module-name>ietf-netconf</module-name>
<rpc-name>get</rpc-name>
<access-operations>exec</access-operations>
<action>permit</action>
</rule>
<rule>
<name>get-config-permit</name>
<module-name>ietf-netconf</module-name>
<rpc-name>get-config</rpc-name>
<access-operations>exec</access-operations>
<action>permit</action>
</rule>
<rule>
<name>get-schema-permit</name>
<module-name>ietf-netconf-monitoring</module-name>
<rpc-name>get-schema</rpc-name>
<access-operations>exec</access-operations>
<action>permit</action>
</rule>
</rule-list>
<rule-list>
<name>readonly-data</name>
<group>*</group>
<rule>
<name>ietf-interfaces-permit</name>
<module-name>ietf-interfaces</module-name>
<access-operations>read</access-operations>
<action>permit</action>
</rule>
</rule-list>
</nacm>
Programmability Configuration Guide, Cisco IOS XE Amsterdam 17.3.x
224
Model-Driven Programmability
Sample NACM Configuration
Page 239
Additional References for Model Based AAA
Related Documents
Document Title
Related Topic
To access Cisco YANG models in a developer-friendly way,
please clone the GitHub repository, and navigate to the
vendor/cisco subdirectory. Models for various releases of
IOS-XE, IOS-XR, and NX-OS platforms are available here.
YANG data models for various release of
IOS-XE, IOS-XR, and NX-OS platforms
Standards and RFCs
Title
Standard/RFC
YANG - A Data Modeling Language for the Network Configuration
Protocol (NETCONF)
RFC 6020
Network Configuration Protocol (NETCONF)
RFC 6241
Network Configuration Protocol (NETCONF) Access Control Model
RFC 6536
Technical Assistance
Link
Description
http://www.cisco.com/support
The Cisco Support website provides extensive online resources,
including documentation and tools for troubleshooting and resolving
technical issues with Cisco products and technologies.
To receive security and technical information about your products,
you can subscribe to various services, such as the Product Alert Tool
(accessed from Field Notices), the Cisco Technical Services
Newsletter, and Really Simple Syndication (RSS) Feeds.
Access to most tools on the Cisco Support website requires a
Cisco.com user ID and password.
Feature Information for Model-Based AAA
The following table provides release information about the feature or features described in this module. This
table lists only the software release that introduced support for a given feature in a given software release
train. Unless noted otherwise, subsequent releases of that software release train also support that feature.
Use Cisco Feature Navigator to find information about platform support and Cisco software image support.
To access Cisco Feature Navigator, go to www.cisco.com/go/cfn. An account on Cisco.com is not required.
Programmability Configuration Guide, Cisco IOS XE Amsterdam 17.3.x
225
Model-Driven Programmability
Additional References for Model Based AAA
Page 240
Table 25: Feature Information for Programmability: Data Models
Feature Information
Release
Feature Name
This feature was implemented on the
following platforms:
• Cisco ASR 900 Series Aggregated
Services Routers
• Cisco ASR 920 Series Aggregated
Services Routers
• Cisco ASR 1000 Series Aggregated
Services Routers
• Cisco CSR 1000v Switches
• Cisco ISR 1100 Series Integrated
Services Routers
• Cisco ISR 4000 Series Integrated
Services Routers
• Cisco NCS 4200 Series
Cisco IOS XE Fuji 16.8.1
Model-Based AAA
This feature was implemented on the
following platforms:
• Cisco Catalyst 3650 Series Switches
• Cisco Catalyst 3850 Series Switches
• Cisco Catalyst 9300 Series Switches
• Cisco Catalyst 9400 Series Switches
• Cisco Catalyst 9500 Series Switches
Cisco IOS XE Fuji 16.8.1a
Programmability Configuration Guide, Cisco IOS XE Amsterdam 17.3.x
226
Model-Driven Programmability
Feature Information for Model-Based AAA
Page 241
C H A P T E R 14
Model-Driven Telemetry
• Model-Driven Telemetry, on page 227
Model-Driven Telemetry
Model-driven telemetry provides a mechanism to stream YANG-modelled data to a data collector. This module
describes model-driven telemetry and provides sample telemetry remote procedure calls (RPCs).
Prerequisites for Model-Driven Telemetry
• Knowledge of YANG is needed to understand and define the data that is required when using telemetry.
• Knowledge of XML, XML namespaces, and XML XPath.
• Knowledge of standards and principles defined by the IETF telemetry specifications.
• The urn:ietf:params:netconf:capability:notification:1.1 capability must be listed in hello messages. This
capability is advertised only on devices that support IETF telemetry.
• NETCONF-YANG must be configured and running on the device.
NETCONF-YANG must be configured for telemetry to work, even if NETCONF
is not used. For more information on configuring NETCONF-YANG, see the
NETCONF Protocol module.
Note
Verify that the following processes are running, by using the show platform software yang-management
process command:
Device# show platform software yang-management process
confd : Running
nesd : Running
syncfd : Running
ncsshd : Running
dmiauthd : Running
nginx : Running
ndbmand : Running
pubd : Running
Programmability Configuration Guide, Cisco IOS XE Amsterdam 17.3.x
227


Page 242
gnmib : Running
The process pubd is the model-driven telemetry process, and if it is not running,
model-driven telemetry will not work.
Note
The following table provides details about each of the Device Management Interface (DMI) processes.
Table 26: Field Descriptions
Primary Role
Device Management Interface Process Name
Configuration daemon.
confd
Network element synchronizer daemon.
nesd
Sync daemon (maintains synchronization between
the running state and corresponding models).
syncfd
NETCONF Secure Shell (SSH) daemon.
ncsshd
DMI authentication daemon.
dmiauthd
NGINX web server. Acts as a web server for
RESTCONF.
nginx
NETCONF database manager.
ndbmand
Publication manager and publisher used for
model-driven telemetry.
pubd
GNMI protocol server.
gnmib
NETCONF-Specific Prerequisites
• Knowledge of NETCONF and how to use it, including:
• Establishing a NETCONF session.
• Sending and receiving hello and capabilities messages.
• Sending and receiving YANG XML RPCs over the established NETCONF session. For more
information, see the Configure NETCONF/YANG and Validate Example for Cisco IOS XE 16.x
Platforms document.
Enabling and Validating NETCONF
The NETCONF functionality can be verified by creating an SSH connection to the device using a valid
username and password and receiving a hello message, which contains the capability of the device:
Device:~ USER1$ ssh -s cisco1@172.16.167.175 -p 830 netconf
cisco1@172.16.167.175's password: cisco1
Programmability Configuration Guide, Cisco IOS XE Amsterdam 17.3.x
228
Model-Driven Programmability
Prerequisites for Model-Driven Telemetry

Page 243
<?xml version="1.0" encoding="UTF-8"?>
<hello xmlns="urn:ietf:params:xml:ns:netconf:base:1.0">
<capabilities>
<capability>urn:ietf:params:netconf:base:1.0</capability>
<capability>urn:ietf:params:netconf:base:1.1</capability>
<capability>urn:ietf:params:netconf:capability:writable-running:1.0</capability>
<capability>urn:ietf:params:netconf:capability:xpath:1.0</capability>
<capability>urn:ietf:params:netconf:capability:validate:1.0</capability>
<capability>urn:ietf:params:netconf:capability:validate:1.1</capability>
<capability>urn:ietf:params:netconf:capability:rollback-on-error:1.0</capability
.
.
.
</capabilities>
<session-id>2870</session-id></hello>]]>]]>
Use < ^C > to exit
NETCONF is ready to use, when a successful reply is received in response to your hello message.
RESTCONF-Specific Prerequisites
• Knowledge of RESTCONF and how to use it (when creating a subscription using RESTCONF).
• RESTCONF must be configured on the device.
• RESTCONF must send correctly-formed Uniform Resource Identifiers (URIs) that adhere to RESTCONF
RFC 8040.
Enabling and Validating RESTCONF
Validate RESTCONF using appropriate credentials and the following URI:
Operation: GET
Headers:
" Accept: application/yang-data.collection+json, application/yang-data+json,
application/yang-data.errors+json
" Content-Type: application/yang-data+json
Returned Output (omitted for breverity):
{
"ietf-restconf:data": {
"ietf-yang-library:modules-state": {
"module": [
{
"name": "ATM-FORUM-TC-MIB",
"revision": "",
"schema":
"https://10.85.116.28:443/restconf/tailf/modules/ATM-FORUM-TC-MIB",
"namespace": "urn:ietf:params:xml:ns:yang:smiv2:ATM-FORUM-TC-MIB"
},
{
"name": "ATM-MIB",
"revision": "1998-10-19",
"schema":
"https://10.85.116.28:443/restconf/tailf/modules/ATM-MIB/1998-10-19",
"namespace": "urn:ietf:params:xml:ns:yang:smiv2:ATM-MIB"
},
{
"name": "ATM-TC-MIB",
"revision": "1998-10-19",
"schema": "https://10.85.116.28:443/restconf/tailf/
..
Programmability Configuration Guide, Cisco IOS XE Amsterdam 17.3.x
229
Model-Driven Programmability
Prerequisites for Model-Driven Telemetry
Page 244
<snip>
..
}
RESTCONF is validated successfully when you receive the above reply with all device capabilities.
gRPC-Specific Prerequisites
• Set up a gRPC collector that understands key-value Google Protocol Buffers (GPB) encoding.
Restrictions for Model-Driven Telemetry
• Automatic hierarchy in selections is not supported for on-change subscriptions when using the yang-push
stream. This means that when selecting a list, child lists of the list are not automatically included. For
example, the subscriber must manually create a subscription for each child list.
This restriction also applies to periodic subscriptions, if subscribed to the elements in the list below:
• Cisco-IOS-XE-wireless-access-point-oper
• Cisco-IOS-XE-wireless-ap-global-oper
• Cisco-IOS-XE-wireless-awips-oper
• Cisco-IOS-XE-wireless-client-global-oper
• Cisco-IOS-XE-wireless-client-oper
• Cisco-IOS-XE-wireless-general-cfg
• Cisco-IOS-XE-wireless-general-oper
• Cisco-IOS-XE-wireless-mesh-cfg
• Cisco-IOS-XE-wireless-mesh-oper
• Cisco-IOS-XE-wireless-mobility-oper
• Cisco-IOS-XE-wireless-rfid-oper
• Cisco-IOS-XE-wireless-rrm-emul-oper
• Cisco-IOS-XE-wireless-rrm-global-oper
• Cisco-IOS-XE-wireless-rrm-oper
• Cisco-IOS-XE-wireless-site-cfg
• bootcamp-test-autonomous
• openconfig-access-points
• openconfig-ap-manager
• openconfig-lacp
• openconfig-platform-psu
• Checking the authorization of data access is not supported. All the data requested by a subscriber is sent.
Programmability Configuration Guide, Cisco IOS XE Amsterdam 17.3.x
230
Model-Driven Programmability
Restrictions for Model-Driven Telemetry
Page 245
• Subtree filters are not supported. If subtree filters are specified, the subscription is marked as invalid.
• Defining multiple receivers within subscription parameters is not supported; only the first receiver
destination is attempted. Other defined receivers are ignored.
• On Cisco Catalyst 9800 Wireless Controllers, the value of tx-retries and excessive-retries fields in the
/client-oper-data/traffic-stats/ XPath will always display zero. To view the total number of times a clients
tries to resend a packet, use the data-retries field of the XPath.
gRPC-Specific Restrictions
• Transport Layer Security-based (TLS-based) authentication between a device and a receiver is not
supported.
TLS-based authentication is supported in Cisco IOS XE Amsterdam 17.1.1 and later releases.
yang-push-Specific Restriction
• Subscription quality of service (QoS) is not supported.
Information About Model-Driven Telemetry
The following sections provide information about the various aspects of model-driven telemetry.
Model-Driven Telemetry Overview
Telemetry is an automated communications process by which measurements and other data are collected at
remote or inaccessible points and transmitted to the receiving equipment for monitoring. Model-driven
telemetry provides a mechanism to stream YANG-modeled data to a data collector.
Applications can subscribe to specific data items they need, by using standards-based YANG data models
over NETCONF, RESTCONF, or gRPC Network Management Interface (gNMI) protocols. Subscriptions
can also be created by using CLIs if it is a configured subscription.
Structured data is published at a defined cadence, or on-change, based upon the subscription criteria and data
type.
Telemetry Roles
In systems that use telemetry, different roles are involved. In this document the following telemetry roles are
described:
• Publisher: Network element that sends the telemetry data.
• Receiver: Receives the telemetry data. This is also called the collector.
• Controller: Network element that creates subscriptions but does not receive the telemetry data. The
telemetry data associated with the subscriptions, it creates goes to receivers. This is also called the
management agent or management entity.
• Subscriber: Network element that creates subscriptions. Technically, while this does not have to be the
receiver too, in this document, both are the same.
Programmability Configuration Guide, Cisco IOS XE Amsterdam 17.3.x
231
Model-Driven Programmability
Information About Model-Driven Telemetry
Page 246
Subscription Overview
Subscriptions are items that create associations between telemetry roles, and define the data that is sent between
them.
Specifically, a subscription is used to define the set of data that is requested as part of the telemetry data; when
the data is required, how the data is to be formatted, and, when not implicit, who (which receivers) should
receive the data.
Even though the maximum number of supported subscriptions is platform-dependent, currently 100
subscriptions are supported. The subscriptions can be either configured or dynamic, and use any combination
of transport protocols. If too many subscriptions are operating at the same time to allow all the valid configured
subscriptions to be active, the removal of an active subscription will cause one of the inactive but valid
configured subscriptions to be attempted. Periodic triggered subscriptions (100 centiseconds is the default
minimum) and on-change triggered subscriptions are supported.
NETCONF and other northbound programmable interfaces (such as RESTCONF or gNMI) are supported to
configure subscriptions.
Two types of subscriptions are used in telemetry on Cisco IOS XE systems: dynamic and configured
subscriptions.
Because dynamic subscriptions are created by clients (the subscriber) that connect into the publisher, they are
considered dial-in. Configured subscriptions cause the publisher to initiate connections to receivers, and as a
result, they are considered dial-out.
Dial-In and Dial-Out Model-Driven Telemetry
The two flavors of model-driven telemetry are, dial-in and dial-out.
Table 27: Dial-in and Dial-Out Model-Driven Telemetry
Dial-Out (Static or Configured)
Dial-In (Dynamic)
Telemetry updates are sent to the specified receiver
or collector.
Telemetry updates are sent to the initiator or
subscriber.
Subscription is created as part of the running
configuration; it remains as the device configuration
till the configuration is removed.
Life of the subscription is tied to the connection
(session) that created it, and over which telemetry
updates are sent. No change is observed in the running
configuration.
Dial-out subscriptions are created as part of the device
configuration, and they automatically reconnect to the
receiver after a stateful switchover.
Dial-in subscriptions need to be reinitiated after a
reload, because established connections or sessions
are killed during stateful switchover.
Subscription ID is fixed and configured on the device
as part of the configuration.
Subscription ID is dynamically generated upon
successful establishment of a subscription.
Data Source Specifications
Sources of telemetry data in a subscription are specified by the use of a stream and a filter. The term stream
refers to a related set of events. RFC 5277 defines an event stream as a set of event notifications matching
some forwarding criteria.
Normally, the set of events from a stream are filtered. Different filter types are used for different stream types.
Programmability Configuration Guide, Cisco IOS XE Amsterdam 17.3.x
232
Model-Driven Programmability
Subscription Overview
Page 247
Cisco IOS XE supports two streams: yang-push and yang-notif-native.
Update Notifications
As part of a subscription, you can specify when data is required. However this is stream-dependent. Some
streams support making data available only when there a change happens, or after an event within the stream.
Other streams make data available when there is a change or at a defined time period.
The result of the when specification is a series of update notifications that carry the telemetry data of interest.
How the data is sent is dependent on the protocol used for the connection between the publisher and the
receiver.
Subscription Identifiers
Subscriptions are identified by a 32-bit positive integer value. The IDs for configured subscriptions is set by
the controller, and for dynamic subscriptions is set by the publisher.
Controllers must limit the values they use for configured subscriptions in the range 0 to 2147483647 to avoid
collisions with the dynamic subscriptions created on the publisher. The dynamic subscription ID space is
global, meaning that the subscription IDs for independently-created dynamic subscriptions do not overlap.
Subscription Management
Any form of management operation can be used to create, delete, and modify configured subscriptions. This
includes both CLIs and network protocol management operations.
All subscriptions, both configured and dynamic, can be displayed using show commands and network protocol
management operations.
The following table describes the supported streams and encodings along with the combinations that are
supported. While streams-as-inputs is intended to be independent of the protocols-as-outputs, not all
combinations are supported.
Table 28: Supported Combination of Protocols
gNMI
gRPC
NETCONF
Transport
Protocol
Dial-Out
Dial-In
Dial-Out
Dial-In
Dial-Out
Dial-In
Stream
No
Yes
Yes
No
No
Yes
yang-push
No
No
Yes
No
No
Yes
yang-notif-native
No
JSON_IETF
Key-value
Google
Protocol
Buffers
(kvGPB)
No
No
XML
Encodings
RPC Support in Telemetry
You can send and receive YANG XML remote procedure calls (RPCs) in established NETCONF sessions.
The <establish-subscription> and <delete-subscription> RPCs are supported for telemetry.
Programmability Configuration Guide, Cisco IOS XE Amsterdam 17.3.x
233
Model-Driven Programmability
Update Notifications
Page 248
When an <establish-subscription> RPC is sent, the RPC reply from a publisher contains an <rpc-reply>
message with a <subscription-result> element containing a result string.
The following table displays the response and reason for the response in an <rpc-reply> message:
Cause
RPC
Result String
Success
<establish-subscription>
ok
<delete-subscription>
The specified subscription does not
exist.
<delete-subscription>
error-no-such-subscription
The requested subscription is not
supported.
<establish-subscription>
error-no-such-option
A subscription cannot be created
because of the following reasons:
<establish-subscription>
error-insufficient-resources
• There are too many
subscriptions.
• The amount of data requested
is too large.
• The interval for a periodic
subscription is too small.
Some other error.
<establish-subscription>
error-other
Service gNMI
The gNMI specification identifies a single top-level service named gNMI that contains high-level RPCs. The
following is a service definition that contains the subscribe service RPC:
service gNMI{
.
.
.
rpc Subscribe(stream SubscribeRequest)
returns (stream SubscribeResponse);
The <subscribe RPC> is used by a management agent to request a dynamic subscription. This RPC contains
a set of messages. The following section describes the messages supported by the <subscribe RPC>
SubscribeRequest Message
This message is sent by a client to request updates from the target for a specified set of paths. The following
is a message definition:
message SubscribeRequest {
oneof request {
SubscriptionList subscribe = 1;
PollRequest poll = 3;
AliasList aliases = 4;
Programmability Configuration Guide, Cisco IOS XE Amsterdam 17.3.x
234
Model-Driven Programmability
Service gNMI
Page 249
}
Repeated gNMI_ext.Extensions = 5;
}
Only request.subscribe is supported.
Note
SubscribeResponse Message
This message is carried from the target to the client over an established <subscribe RPC>. The following is
a message definition:
message SubscribeResponse {
oneof response {
Notification update = 1;
Bool sync_response = 3;
Error error = 4 [deprecated=true];
}
}
Only Notification update is supported.
Note
SubscriptionList Message
This message is used to indicate a set of paths for which common subscription behavior are required. Within
the specification of the SubscriptionList message, the client can identify one or more subscriptions to a given
prefix in the model. The following is a SubscriptionList message defintion:
message SubscriptionList {
Path prefix = 1;
repeated Subscription subscription = 2;
bool use_aliases = 3;
QOSMarking qos = 4;
enum Mode {
STREAM = 0;
ONCE = 1;
POLL = 2;
}
Mode mode = 5;
bool allow_aggregation = 6;
repeated ModelData use_models = 7;
Encoding encoding = 8; // only JSON_IETF supported in R16.12
Bool updates_only = 9;
}
Path prefix (only explicit element names), Subscription subscription, Mode mode STREAM, and Encoding
encoding IETF_JSON are supported.
Note
Programmability Configuration Guide, Cisco IOS XE Amsterdam 17.3.x
235
Model-Driven Programmability
Service gNMI

Page 250
Prefix Message
A valid subscription list may or may not contain a filled in prefix, composed of the shared (across all requested
subscriptions) portion of the xPath.
message Path {
repeated string element
= 1; [ deprecated ]
string origin = 2;
repeated PathElem elem = 3;
optional string target = 4;
}
Origin (supported values are “” and “openconfig”), elem (supported element name is prefix-free), and target
are supported.
Note
Subscription Message
This message generically describes a set of data that is to be subscribed to by a client. It contains a path,and
attributes used to govern the notification behaviors. The following is a Subscription message definition:
message Subscription {
Path path = 1;
SubscriptionMode mode = 2;
uint64 sample_interval = 3;
bool suppress_redundant = 4;
uint64 heartbeat_interval = 5;
}
Path path, SubscriptionMode mode, Uint64 sample_interval, and Uint64 heartbeat_interval (only if the value
is set to 0) are supported.
Note
Path Message
A valid subscription contains a filled in path, which when added to the prefix associated with the subscription
list constitutes a full qualified path. The following is a Path message definition:
message Path {
repeated string element
= 1; [ deprecated ]
string origin = 2;
repeated PathElem elem = 3;
optional string target = 4;
}
Programmability Configuration Guide, Cisco IOS XE Amsterdam 17.3.x
236
Model-Driven Programmability
Service gNMI

Page 251
Origin (supported values are “” and “openconfig”), elem (supported element name is prefix-free), and target
are supported.
Note
SubscriptionMode Message
This message informs the target about how to trigger notifications updates. The following is a SubscriptionMode
message definition:
enum SubscriptionMode {
TARGET_DEFINED = 0;
ON_CHANGE
= 1;
SAMPLE
= 2;
}
Only SAMPLE is supported.
Note
Notifications Message
This message delivers telemetry data from the subscription target to the collector. The following is a
Notifications message definition:
message Notification {
int64 timestamp = 1;
Path prefix = 2;
string alias = 3;
repeated Update update = 4;
repeated Path delete = 5;
bool atomic = 6;
}
Timestamp, prefix, and update are supported.
Note
Dynamic Subscription Management
This section describes how to create and delete dynamic subscriptions.
Creating Dynamic Subscriptions for NETCONF Dial-In
Dynamic subscriptions are created by subscribers who connect to the publisher and call for subscription
creation using a mechanism within that connection, usually, an RPC. The lifetime of the subscription is limited
to the lifetime of the connection between the subscriber and the publisher, and telemetry data is sent only to
that subscriber. These subscriptions do not persist if either the publisher or the subscriber is rebooted. You
can create dynamic subscriptions by using the in-band <establish-subscription> RPC. The
<establish-subscription> RPC is sent from an IETF telemetry subscriber to the network device. The stream,
xpath-filter, and period fields in the RPC are mandatory.
Programmability Configuration Guide, Cisco IOS XE Amsterdam 17.3.x
237
Model-Driven Programmability
Dynamic Subscription Management

Page 252
RPCs that are used to create and delete dynamic subscriptions using NETCONF are defined in Custom
Subscription to Event Notifications draft-ietf-netconf-subscribed-notifications-03 and Subscribing to YANG
datastore push updates draft-ietf-netconf-yang-push-07.
Periodic Dynamic Subscriptions
The following is a sample periodic subscription for NETCONF Dial-In:
<rpc message-id="101" xmlns="urn:ietf:params:xml:ns:netconf:base:1.0">
<establish-subscription
xmlns="urn:ietf:params:xml:ns:yang:ietf-event-notifications"
xmlns:yp="urn:ietf:params:xml:ns:yang:ietf-yang-push">
<stream>yp:yang-push</stream>
yp:xpath-filter/mdt-oper:mdt-oper-data/mdt-subscriptions</yp:xpath-filter>
yp:period1000</yp:period>
</establish-subscription>
</rpc>
On-Change Dynamic Subscription
The following is a sample on-change dynamic subscription over NETCONF:
<establish-subscription xmlns="urn:ietf:params:xml:ns:yang:ietf-event-notifications"
xmlns:yp="urn:ietf:params:xml:ns:yang:ietf-yang-push">
<stream>yp:yang-push</stream>
yp:xpath-filter/cdp-ios-xe-oper:cdp-neighbor-details/cdp-neighbor-detail</yp:xpath-filter>
yp:dampening-period0</yp:dampening-period>
</establish-subscription>
Deleting Dynamic Subscriptions
You can delete dynamic subscriptions by using the in-band <delete subscription> RPC, the clear telemetry
ietf subscription command, and the <kill-subscription> RPC along with disconnecting the transport session.
For gNMI each subscription in the SubscribeRequest.subscribe.subscription a separate dynamic subscription
ID is generated. Killing any of these subscription IDs, either through the <kill-subscription> RPC or clear
CLI, will cause all subscriptions specified in the subscribe request to be killed.
Introduced in Cisco IOS XE Gibraltar 16.10.1, the <delete-subscription> RPC can be issued only by a
subscriber, and it deletes only the subscriptions owned by that subscriber.
In Cisco IOS XE Gibraltar 16.11.1 and later releases, you can use the clear telemetry ietf subscription
command to delete a dynamic subscription. Introduced in Cisco IOS XE Gibraltar 16.11.1, the
<kill-subscription> RPC deletes dynamic subscription, the same way as the clear telemetry ietf subscription
command.
A subscription is also deleted when the parent NETCONF session is torn down or disconnected. If the network
connection is interrupted, it may take some time for the SSH or NETCONF session to timeout, and for
subsequent subscriptions to be removed.
The <kill-subscription> RPC is similar to the <delete-subscription> RPC. However, the <kill-subscription>
RPC uses the identifier element that contains the ID of the subscription to be deleted, instead of the
Programmability Configuration Guide, Cisco IOS XE Amsterdam 17.3.x
238
Model-Driven Programmability
Deleting Dynamic Subscriptions
Page 253
subscription-id element. The transport session used by the target subscription also differs from the one used
by the <delete-subscription> RPC.
Deleting Subscriptions Using the CLI
The following sample output shows all the available subscriptions:
Device# show telemetry ietf subscription all
Telemetry subscription brief
ID
Type
State
Filter type
2147483648
Dynamic
Valid
xpath
2147483649
Dynamic
Valid
xpath
The following example shows how to delete a dynamic subscription:
Device# clear telemetry ietf subscription 2147483648
Deleting Subscriptions Using NETCONF <delete-Subscription> RPC
The following example shows how to delete a subscription using NETCONF:
<rpc message-id="101" xmlns="urn:ietf:params:xml:ns:netconf:base:1.0">
<delete-subscription xmlns="urn:ietf:params:xml:ns:yang:ietf-event-notifications"
xmlns:netconf="urn:ietf:params:xml:ns:netconf:base:1.0">
<subscription-id>2147483650</subscription-id>
</delete-subscription>
</rpc>
Deleting Subscriptions Using NETCONF <kill-Subscription> RPC
The following examples show how to delete subscriptions using the <kill-subscription> RPC:
<get>
<filter>
<mdt-oper-data xmlns="http://cisco.com/ns/yang/Cisco-IOS-XE-mdt-oper">
<mdt-subscriptions/>
</mdt-oper-data>
</filter>
</get>
- Enter a NETCONF operation, end with an empty line
<?xml version="1.0" encoding="UTF-8"?>
<rpc-reply xmlns="urn:ietf:params:xml:ns:netconf:base:1.0" message-id="2">
<data>
<mdt-oper-data xmlns="http://cisco.com/ns/yang/Cisco-IOS-XE-mdt-oper">
<mdt-subscriptions>
<subscription-id>2147483652</subscription-id>
<base>
…
</base>
<type>sub-type-dynamic</type>
<state>sub-state-valid</state>
<comments/>
<mdt-receivers>
Programmability Configuration Guide, Cisco IOS XE Amsterdam 17.3.x
239
Model-Driven Programmability
Deleting Dynamic Subscriptions
Page 254
…
</mdt-receivers>
<last-state-change-time>2018-12-13T21:16:48.848241+00:00</last-state-change-time>
</mdt-subscriptions>
<mdt-subscriptions>
<subscription-id>2147483653</subscription-id>
<base>
…
</base>
<type>sub-type-dynamic</type>
<state>sub-state-valid</state>
<comments/>
<mdt-receivers>
…
</mdt-receivers>
<last-state-change-time>2018-12-13T21:16:51.319279+00:00</last-state-change-time>
</mdt-subscriptions>
<mdt-subscriptions>
<subscription-id>2147483654</subscription-id>
<base>
…
</base>
<type>sub-type-dynamic</type>
<state>sub-state-valid</state>
<comments/>
<mdt-receivers>
…
</mdt-receivers>
<last-state-change-time>2018-12-13T21:16:55.302809+00:00</last-state-change-time>
</mdt-subscriptions>
<mdt-subscriptions>
<subscription-id>2147483655</subscription-id>
<base>
…
</base>
<type>sub-type-dynamic</type>
<state>sub-state-valid</state>
<comments/>
<mdt-receivers>
…
</mdt-receivers>
<last-state-change-time>2018-12-13T21:16:57.440936+00:00</last-state-change-time>
</mdt-subscriptions>
</mdt-oper-data>
</data>
</rpc-reply>
<kill-subscription xmlns="urn:ietf:params:xml:ns:yang:ietf-event-notifications"
xmlns:yp="urn:ietf:params:xml:ns:yang:ietf-yang-push">
<identifier>2147483653</identifier>
</kill-subscription>
- Enter a NETCONF operation, end with an empty line
<?xml version="1.0" encoding="UTF-8"?>
<rpc-reply xmlns="urn:ietf:params:xml:ns:netconf:base:1.0" message-id="2">
<subscription-result xmlns="urn:ietf:params:xml:ns:yang:ietf-event-notifications"
xmlns:notif-bis="urn:ietf:params:xml:ns:yang:ietf-event-notifications">notif-bis:ok</subscription-result>
</rpc-reply>
<get>
<filter>
<mdt-oper-data xmlns="http://cisco.com/ns/yang/Cisco-IOS-XE-mdt-oper">
<mdt-subscriptions/>
</mdt-oper-data>
Programmability Configuration Guide, Cisco IOS XE Amsterdam 17.3.x
240
Model-Driven Programmability
Deleting Dynamic Subscriptions
Page 255
</filter>
</get>
- Enter a NETCONF operation, end with an empty line
<?xml version="1.0" encoding="UTF-8"?>
<rpc-reply xmlns="urn:ietf:params:xml:ns:netconf:base:1.0" message-id="2">
<data>
<mdt-oper-data xmlns="http://cisco.com/ns/yang/Cisco-IOS-XE-mdt-oper">
<mdt-subscriptions>
<subscription-id>2147483652</subscription-id>
<base>
…
</base>
<type>sub-type-dynamic</type>
<state>sub-state-valid</state>
<comments/>
<mdt-receivers>
…
</mdt-receivers>
<last-state-change-time>2018-12-13T21:16:48.848241+00:00</last-state-change-time>
</mdt-subscriptions>
<mdt-subscriptions>
<subscription-id>2147483654</subscription-id>
<base>
…
</base>
<type>sub-type-dynamic</type>
<state>sub-state-valid</state>
<comments/>
<mdt-receivers>
…
</mdt-receivers>
<last-state-change-time>2018-12-13T21:16:55.302809+00:00</last-state-change-time>
</mdt-subscriptions>
<mdt-subscriptions>
<subscription-id>2147483655</subscription-id>
<base>
…
</base>
<type>sub-type-dynamic</type>
<state>sub-state-valid</state>
<comments/>
<mdt-receivers>
…
</mdt-receivers>
<last-state-change-time>2018-12-13T21:16:57.440936+00:00</last-state-change-time>
</mdt-subscriptions>
</mdt-oper-data>
</data>
</rpc-reply>
Configured Subscription Management
This section describes how to create, modifiy, and delete configured subscriptions.
Creating Configured Subscriptions
Configured subscriptions are created by management operations on the publisher by controllers, and explicitly
include the specification of the receiver of the telemetry data defined by a subscription. These subscriptions
persist across reboots of the publisher.
Programmability Configuration Guide, Cisco IOS XE Amsterdam 17.3.x
241
Model-Driven Programmability
Configured Subscription Management
Page 256
Configured subscriptions can be configured with multiple receivers, however; only the first valid receiver is
used. Connection to other receivers is not attempted, if a receiver is already connected, or is in the process of
being connected. If that receiver is deleted, another receiver is connected.
Configured dial-out subscriptions are configured on the device by the following methods:
• Using configuration CLIs to change to device configuration through console/VTY.
• Using NETCONF/RESTCONF to configure the desired subscription.
This section displays sample RPCs to create configured subscriptions.
Periodic Subscription
The following example shows how to configure gRPC as the transport protocol for configured subscriptions
using the CLI:
telemetry ietf subscription 101
encoding encode-kvgpb
filter xpath /memory-ios-xe-oper:memory-statistics/memory-statistic
stream yang-push
update-policy periodic 6000
source-vrf Mgmt-intf
receiver ip address 10.28.35.45 57555 protocol grpc-tcp
The following sample RPC shows how to create a periodic subscription using NETCONF that sends telemetry
updates to the receiver every 60 seconds:
<rpc message-id="101" xmlns="urn:ietf:params:xml:ns:netconf:base:1.0"><edit-config>
<target>
<running/>
</target>
<config xmlns:xc="urn:ietf:params:xml:ns:netconf:base:1.0">
<mdt-config-data xmlns="http://cisco.com/ns/yang/Cisco-IOS-XE-mdt-cfg">
<mdt-subscription>
<subscription-id>200</subscription-id>
<base>
<stream>yang-push</stream>
<encoding>encode-kvgpb</encoding>
<period>6000</period>
<xpath>/memory-ios-xe-oper:memory-statistics/memory-statistic</xpath>
</base>
<mdt-receivers>
<address>10.22.23.48</address>
<port>57555</port>
<protocol>grpc-tcp</protocol>
</mdt-receivers>
</mdt-subscription>
</mdt-config-data>
</config>
</edit-config>
</rpc>
The following sample RPC creates a periodic subscription using RESTCONF:
URI:https://10.85.116.28:443/restconf/data/Cisco-IOS-XE-mdt-cfg:mdt-config-data
Headers:
application/yang-data.collection+json, application/yang-data+json,
application/yang-data.errors+json
Content-Type:
application/yang-data+json
Programmability Configuration Guide, Cisco IOS XE Amsterdam 17.3.x
242
Model-Driven Programmability
Creating Configured Subscriptions
Page 257
BODY:
{
"mdt-config-data": {
"mdt-subscription":[
{
"subscription-id": "102",
"base": {
"stream": "yang-push",
"encoding": "encode-kvgpb",
"period": "6000",
"xpath": "/memory-ios-xe-oper:memory-statistics/memory-statistic"
}
"mdt-receivers": {
"address": "10.22.23.48"
"port": "57555"
}
}
]
}
}
On-Change Subscription
The following sample RPC shows how to create an on-change subscription using NETCONF that sends
updates only when there is a change in the target database:
<rpc message-id="101" xmlns="urn:ietf:params:xml:ns:netconf:base:1.0"><edit-config>
<target>
<running/>
</target>
<config xmlns:xc="urn:ietf:params:xml:ns:netconf:base:1.0">
<mdt-config-data xmlns="http://cisco.com/ns/yang/Cisco-IOS-XE-mdt-cfg">
<mdt-subscription>
<subscription-id>200</subscription-id>
<base>
<stream>yang-push</stream>
<encoding>encode-kvgpb</encoding>
<no-synch-on-start>false</no-synch-on-start>
<xpath>/cdp-ios-xe-oper:cdp-neighbor-details/cdp-neighbor-detail</xpath>
</base>
<mdt-receivers>
<address>10.22.23.48</address>
<port>57555</port>
<protocol>grpc-tcp</protocol>
</mdt-receivers>
</mdt-subscription>
</mdt-config-data>
</config>
</edit-config>
</rpc>
The following sample RPC shows how to create an on-change subscription using RESTCONF:
URI:
https://10.85.116.28:443/restconf/data/Cisco-IOS-XE-mdt-cfg:mdt-config-data
Headers:
application/yang-data.collection+json, application/yang-data+json,
application/yang-data.errors+json
Content-Type:
application/yang-data+json
BODY:
{
"mdt-config-data": {
"mdt-subscription":[
Programmability Configuration Guide, Cisco IOS XE Amsterdam 17.3.x
243
Model-Driven Programmability
Creating Configured Subscriptions
Page 258
{
"subscription-id": "102",
"base": {
"stream": "yang-push",
"encoding": "encode-kvgpb",
"dampening period": "0",
"xpath": "/cdp-ios-xe-oper:cdp-neighbor-details/cdp
-neighbor-detail "
}
"mdt-receivers": {
"address": "10.22.23.48"
"port": "57555"
}
}
]
}
}
gNMI Dial-In Subscription
The following is a sample gNMI dial-in subscription:
subscribe: <
prefix: <>
subscription: <
path: <
origin: "openconfig"
elem: <name: "routing-policy">
mode: SAMPLE
sample_interval: 10000000000
mode: STREAM
encoding: JSON_IETF
'
subscribe: <
prefix: <>
subscription: <
path: <
origin: "legacy"
elem: <name: "oc-platform:components">
elem: <
name: "component"
key: <
key: "name"
value: "PowerSupply8/A"
elem: <name: "power-supply">
elem: <name: "state">
mode: SAMPLE
sample_interval: 10000000000
mode: STREAM
encoding: JSON_IETF
'
Modifying Configured Subscriptions
There are two ways to modify configured subscriptions:
Programmability Configuration Guide, Cisco IOS XE Amsterdam 17.3.x
244
Model-Driven Programmability
Modifying Configured Subscriptions
Page 259
• Management protocol configuration operations, such as NETCONF <edit-config> RPC
• CLI (same process as creating a subscription)
Subscription receivers are identified by the address and port number. Receivers cannot be modified. To change
the characteristics (protocol, profile, and so on) of a receiver, it must be deleted first and a new receiver created.
If a valid receiver configuration on a valid subscription is in the disconnected state, and the management wants
to force a new attempt at setting up the connection to the receiver, it must rewrite the receiver with the exact
same characteristics.
Deleting Configured Subscriptions
You can use the CLI or management operation to delete configured subscriptions. The no telemetry ietf
subscription command removes the configured subscriptions. Note that configured subscriptions cannot be
deleted using RPCs, only through the configuration interface.
Deleting Subscriptions Using the CLI
Device# configure terminal
Device(config)# no telemetry ietf subscription 101
Device(config)# end
Deleting Subscriptions Using NETCONF
The following sample RPC shows how to delete a configured subscription:
<edit-config>
<target>
<running/>
</target>
<config>
<mdt-config-data xmlns="http://cisco.com/ns/yang/Cisco-IOS-XE-mdt-cfg">
<mdt-subscription
operation="delete">
<subscription-id>102</subscription-id>
</mdt-subscription>
</mdt-config-data>
</config>
</edit-config>
Subscription Monitoring
Subscriptions of all types can be monitored by using CLIs and management protocol operations.
CLI
Use the show telemetry ietf subscription command to display information about telemetry subscriptions.
The following is sample output from the command:
Device#
show telemetry ietf subscription 2147483667 detail
Telemetry subscription detail:
Subscription ID: 2147483667
State: Valid
Stream: yang-push
Programmability Configuration Guide, Cisco IOS XE Amsterdam 17.3.x
245
Model-Driven Programmability
Deleting Configured Subscriptions
Page 260
Encoding: encode-xml
Filter:
Filter type: xpath
XPath: /mdt-oper:mdt-oper-data/mdt-subscriptions
Update policy:
Update Trigger: periodic
Period: 1000
Notes:
NETCONF
The following is a sample NETCONF message that displays information about telemetry subscriptions:
<get>
<filter>
<mdt-oper-data xmlns="http://cisco.com/ns/yang/Cisco-IOS-XE-mdt-oper">
<mdt-subscriptions/>
</mdt-oper-data>
</filter>
</get>
- Enter a NETCONF operation, end with an empty line
<?xml version="1.0" encoding="UTF-8"?>
<rpc-reply xmlns="urn:ietf:params:xml:ns:netconf:base:1.0" message-id="2">
<data>
<mdt-oper-data xmlns="http://cisco.com/ns/yang/Cisco-IOS-XE-mdt-oper">
<mdt-subscriptions>
<subscription-id>101</subscription-id>
<base>
<stream>yang-push</stream>
<encoding>encode-kvgpb</encoding>
<source-vrf>RED</source-vrf>
<period>10000</period>
<xpath>/ios:native/interface/Loopback[name="1"]</xpath>
</base>
<type>sub-type-static</type>
<state>sub-state-valid</state>
<comments/>
<mdt-receivers>
<address>5.22.22.45</address>
<port>57500</port>
<protocol>grpc-tcp</protocol>
<state>rcvr-state-connecting</state>
<comments/>
<profile/>
<last-state-change-time>1970-01-01T00:00:00+00:00</last-state-change-time>
</mdt-receivers>
<last-state-change-time>1970-01-01T00:00:00+00:00</last-state-change-time>
</mdt-subscriptions>
<mdt-subscriptions>
<subscription-id>2147483648</subscription-id>
<base>
<stream>yang-push</stream>
<encoding>encode-xml</encoding>
<source-vrf/>
<period>1000</period>
<xpath>/if:interfaces-state/interface[name="GigabitEthernet0/0"]/oper-status</xpath>
</base>
<type>sub-type-dynamic</type>
<state>sub-state-valid</state>
<comments/>
Programmability Configuration Guide, Cisco IOS XE Amsterdam 17.3.x
246
Model-Driven Programmability
Subscription Monitoring
Page 261
<mdt-receivers>
<address>5.22.22.45</address>
<port>51259</port>
<protocol>netconf</protocol>
<state>rcvr-state-connected</state>
<comments/>
<profile/>
<last-state-change-time>1970-01-01T00:00:00+00:00</last-state-change-time>
</mdt-receivers>
<last-state-change-time>1970-01-01T00:00:00+00:00</last-state-change-time>
</mdt-subscriptions>
</mdt-oper-data>
</data>
</rpc-reply>
Streams
A stream defines a set of events that can be subscribed to, and this set of events can be almost anything.
However, as per the definition of each stream, all possible events are related in some way. This section
describes the supported streams.
To view the set of streams that are supported, use management protocol operations to retrieve the streams
table from the Cisco-IOS-XE-mdt-oper module (from the YANG model Cisco-IOS-XE-mdt-oper.yang) in
the mdt-streams container.
The following example shows how to use NETCONF to retrieve supported streams:
<get>
<filter>
<mdt-oper-data xmlns="http://cisco.com/ns/yang/Cisco-IOS-XE-mdt-oper">
<mdt-streams/>
</mdt-oper-data>
</filter>
</get>
- Enter a NETCONF operation, end with an empty line
<?xml version="1.0" encoding="UTF-8"?>
<rpc-reply xmlns="urn:ietf:params:xml:ns:netconf:base:1.0" message-id="2">
<data>
<mdt-oper-data xmlns="http://cisco.com/ns/yang/Cisco-IOS-XE-mdt-oper">
<mdt-streams>
<stream>native</stream>
<stream>yang-notif-native</stream>
<stream>yang-push</stream>
</mdt-streams>
</mdt-oper-data>
</data>
</rpc-reply>
The example shows that three streams are supported: native, yang-notif-native, and yang-push. The stream
native is not available for general use and can be ignored.
Currently there are no CLIs to return the list of supported streams.
Note
Programmability Configuration Guide, Cisco IOS XE Amsterdam 17.3.x
247
Model-Driven Programmability
Streams

Page 262
The yang-push Stream
The yang-push stream is the data in configuration and operational databases that is described by a supported
YANG model. This stream supports an XPath filter to specify what data is of interest within the stream, and
where the XPath expression is based on the YANG model that defines the data of interest.
Update notifications for this stream can be sent either when data changes or during fixed periods, but not for
both, for a given subscription. Subscriptions for data that does not currently exist are permitted, and these run
as normal subscriptions.
The only target database that is supported is running.
Determining On-Change Capability
Currently, there is no indication within YANG models about the type of data that can be subscribed to, by
using an on-change subscription. Attempts to subscribe to data that cannot be subscribed to by using on-change
subscription results in a failure (dynamic) or an invalid subscription (configured). For more information on
On-Change Publication, see the section, On-Change Publication for yang-push.
IETF Draft Compliance
Telemetry using the yang-push stream is based on the IETF NETCONF working group's early drafts for
telemetry. These are:
• Custom Subscription to Event Notifications, Version 03
• Subscribing to YANG datastore push updates, Version 07
The following features that are described in the corresponding drafts are not supported:
Note
• Subtree filters
• Out-of-band notifications
• Any subscription parameter not explicitly stated as supported
X-Path Filter for yang-push
The dataset within the yang-push stream to be subscribed to should be specified by the use of an XPath filter.
The following guidelines apply to the XPath expression:
• XPath expressions can have keys to specify a single entry in a list or container. The supported key
specification syntax is
[{key name}="{key value}"]
The following is an example of an XPath expression:
filter xpath
/rt:routing-state/routing-instance[name="default"]/ribs/rib[name="ipv4-default"]/routes/route
VALID!
Compound keys are supported by the use of multiple key specifications. Key names and values must be
exact; no ranges or wildcard values are supported.
Programmability Configuration Guide, Cisco IOS XE Amsterdam 17.3.x
248
Model-Driven Programmability
The yang-push Stream

Page 263
• In XPath expressions, select multiple keys by specifying them one after another. The following is an
example of an XPath expression:
/wireless-access-point-oper:access-point-oper-data/radio-oper-data/
radio-slot-id[wtp-mac="00:11:22:33:44:55"][radio-slot-id="1"]
• XPath expressions support the use of the union operator (|) to allow a single subscription to support
multiple objects. The union operator only works for NETCONF transport and not for gRPC.
Periodic Publication for yang-push
With periodic subscriptions, the first push-update with the subscribed information is sent immediately; but it
can be delayed if the device is busy or due to network congestion. Updates are then sent at the expiry of the
configured periodic timer. For example, if the period is configured as 10 minutes, the first update is sent
immediately after the subscription is created and every 10 minutes thereafter.
The period is time, in centiseconds (1/100 of a second), between periodic push updates. A period of 1000 will
result in getting updates to the subscribed information every 10 seconds. The minimum period that can be
configured is 100, or one second. There is no default value. This value must be explicitly set in the
<establish-subscription> RPC for dynamic subscriptions and in the configuration for configured subscriptions.
Periodic updates contain a full copy of the subscribed data element or table for all supported transport protocols.
When subscribing for empty data using a periodic subscription, empty update notifications are sent at the
requested period. If data comes into existence, its values at the next period are sent as a normal update
notification.
On-Change Publication for yang-push
When creating an on-change subscription, the dampening period must be set to 0 to indicate that there is no
dampening period; no other value is supported.
With on-change subscriptions, the first push update is the entire set of subscribed to data (the initial
sychronization as defined in the IETF documents). This is not controllable. Subsequent updates are sent when
the data changes, and consist of only the changed data. However, the minimum data resolution for a change
is a row. So, if an on-change subscription is to a leaf within a row, if any item in that row changes, an update
notification is sent. The exact contents of the update notification depend on the transport protocol.
In addition, on-change subscriptions are not hierarchical. That is, when subscribing to a container that has
child containers, changes in the child container are not seen by the subscription.
Subscriptions for data that does not currently exist are permitted and run as normal subscriptions. The initial
synchronization update notification is empty and there are no further updates until data is available.
XPath expressions must specify a single object. That object can be a container, a leaf, a leaf list or a list.
The yang-notif-native Stream
The yang-notif-native stream is any YANG notification in the publisher where the underlying source of events
for the notification uses Cisco IOS XE native technology. This stream also supports an XPath filter that
specifies which notifications are of interest. Update notifications for this stream are sent only when events
that the notifications are for occur.
Since this stream supports only on-change subscriptions, the dampening interval must be specified with a
value of 0.
Programmability Configuration Guide, Cisco IOS XE Amsterdam 17.3.x
249
Model-Driven Programmability
Periodic Publication for yang-push
Page 264
XPath Filter for yang-notif-native
The dataset within the yang-notif-native stream to be subscribed to is specified by the use of an XPath filter.
The following guideline applies to the XPath expression:
• XPath expressions must specify an entire YANG notification; attribute filtering is not supported.
• The union operator (|) is not supported.
XPath Values and Corresponding Rates on Cisco Catalyst 9800 Wireless Controllers
In the Cisco-IOS-XE-wireless-mesh-rpc, following are the permitted values and corresponding rates for XPath
/exec-linktest-ap/data-rate-idx:
ewlc-mesh-linktest-rate-idx-1 1 Mbps
ewlc-mesh-linktest-rate-idx-2 2 Mbps
ewlc-mesh-linktest-rate-idx-3 5 Mbps
ewlc-mesh-linktest-rate-idx-4 6 Mbps
ewlc-mesh-linktest-rate-idx-5 9 Mbps
ewlc-mesh-linktest-rate-idx-6 11 Mbps
ewlc-mesh-linktest-rate-idx-7 12 Mbps
ewlc-mesh-linktest-rate-idx-8 18 Mbps
ewlc-mesh-linktest-rate-idx-9 24 Mbps
ewlc-mesh-linktest-rate-idx-10 36 Mbps
ewlc-mesh-linktest-rate-idx-11 48 Mbps
ewlc-mesh-linktest-rate-idx-12 54 Mbps
ewlc-mesh-linktest-rate-idx-13 108 Mbps
ewlc-mesh-linktest-rate-idx-14 m0
ewlc-mesh-linktest-rate-idx-15 m1
ewlc-mesh-linktest-rate-idx-16 m2
ewlc-mesh-linktest-rate-idx-17 m3
ewlc-mesh-linktest-rate-idx-18 m4
ewlc-mesh-linktest-rate-idx-19 m5
ewlc-mesh-linktest-rate-idx-20 m6
ewlc-mesh-linktest-rate-idx-21 m7
ewlc-mesh-linktest-rate-idx-22 m8
ewlc-mesh-linktest-rate-idx-23 m9
ewlc-mesh-linktest-rate-idx-24 m10
ewlc-mesh-linktest-rate-idx-25 m11
ewlc-mesh-linktest-rate-idx-26 m12
ewlc-mesh-linktest-rate-idx-27 m13
ewlc-mesh-linktest-rate-idx-28 m14
ewlc-mesh-linktest-rate-idx-295 m15
Transport Protocol
The protocol that is used for the connection between a publisher and a receiver decides how the data is sent.
This protocol is referred to as the transport protocol, and is independent of the management protocol for
configured subscriptions. The transport protocol affects both the encoding of the data, for example XML,
Google Protocol Buffers (GPB) and the format of the update notification itself.
The stream that is chosen may also affect the format of the update notification.
Note
Supported transport protocols are gNMI, gRPC, and NETCONF.
Programmability Configuration Guide, Cisco IOS XE Amsterdam 17.3.x
250
Model-Driven Programmability
XPath Filter for yang-notif-native

Page 265
NETCONF Protocol
The NETCONF protocol is available only for the transport of dynamic subscriptions, and can be used with
yang-push and yang-notif-native streams.
Three update notification formats are used when using NETCONF as the transport protocol:
• When the subscription uses the yang-push stream, and if it is periodic or when the initial synchronization
update notification is sent on an on-change subscription.
• When the subscription uses the yang-push stream and it is an on-change subscription, other than the
initial synchronization update notification.
• When the subscription uses the yang-notif-native stream.
The yang-push Format
When the yang-push source stream is sent over NETCONF as a transport with XML encoding, two update
notification formats are defined. These update notification formats are based on the
draft-ietf-netconf-yang-push-07. For more information, see section 3.7 of the IETF draft.
The yang-notif-native Format
When the source stream is yang-notif-native, the format of the update notification when encoded in XML
over NETCONF is as defined by RFC 7950. For more information, see section 7.16.2 of the RFC.
Unlike the formats for the yang-push stream, the subscription ID is not found in the update notification.
gRPC Protocol
The gRPC protocol is available only for the transport of configured subscriptions, and can be used with
yang-push and yang-notif-native streams. Only kvGPB encoding is supported with gRPC transport protocol.
Receiver connection retries based on gRPC protocol (exponential back-off) are supported.
For telemetry messages defined in .proto files, see: mdt_grpc_dialout.proto and telemetry.proto.
High Availability in Telemetry
Dynamic telemetry connections are established over a NETCONF session through SSH to the active switch
or a member in a switch stack, or the active route processor in a high-availability-capable device. After
switchover, you must destroy and re-establish all the sessions that use crypto, including NETCONF sessions
that carry telemetry subscriptions. You must also re-create all the dynamic subscriptions after a switchover.
gNMI dial-in subscriptions also work the same as a NETCONF session through SSH.
gRPC dial-out subscriptions are configured on the device as part of the running configuration of the active
switch or member of the stack. When switchover occurs, the existing connections to the telemetry receivers
are torn down and reconnected (as long as there is still a route to the receiver). Subscriptions need not be
reconfigured.
In the event of a device reload, subscription configurations must be synchronized to the start-up configuration
of a device. This ensures that after the device reboots, subscription configurations remain intact on the device.
When the necessary processes are up and running, the device attempts to connect to the telemetry receiver
and resume normal operations.
Note
Programmability Configuration Guide, Cisco IOS XE Amsterdam 17.3.x
251
Model-Driven Programmability
NETCONF Protocol

Page 266
Sample Model-Driven Telemetry RPCs
The following section provides a list of sample RPCs, and describes how to configure subscriptions.
Managing Configured Subscriptions
Use the show platform software ndbman switch {switch-number | active | standby} models command to
display the list of YANG models that support on-change subscription.
Currently, you can only use the gRPC protocol for managing configured subscriptions.
Note
SUMMARY STEPS
1.
enable
2.
configure terminal
3.
telemetry ietf subscription id
4.
stream yang-push
5.
filter xpath path
6.
update-policy {on-change | periodic} period
7.
encoding encode-kvgpb
8.
source-vrf vrf-id
9.
source-address source-address
10.
receiver ip address ip-address receiver-port protocol protocol profile name
11.
end
DETAILED STEPS
Procedure
Purpose
Command or Action
Enables privileged EXEC mode.
enable
Step 1
Example:
• Enter your password if prompted.
Device> enable
Enters global configuration mode.
configure terminal
Example:
Step 2
Device# configure terminal
Creates a telemetry subscription and enters
telemetry-subscription mode.
telemetry ietf subscription id
Example:
Step 3
Device(config)# telemetry ietf subscription 101
Configures a stream for the subscription.
stream yang-push
Example:
Step 4
Programmability Configuration Guide, Cisco IOS XE Amsterdam 17.3.x
252
Model-Driven Programmability
Sample Model-Driven Telemetry RPCs

Page 267
Purpose
Command or Action
Device(config-mdt-subs)# stream yang-push
Specifies the XPath filter for the subscription.
filter xpath path
Example:
Step 5
Device(config-mdt-subs)# filter xpath
/memory-ios-xe-oper:memory-statistics/memory-statistic
Configures a periodic update policy for the subscription.
update-policy {on-change | periodic} period
Example:
Step 6
Device(config-mdt-subs)# update-policy periodic
6000
Specifies kvGPB encoding.
encoding encode-kvgpb
Example:
Step 7
Device(config-mdt-subs)# encoding encode-kvgpb
Configures the source VRF instance.
source-vrf vrf-id
Example:
Step 8
Device(config-mdt-subs)# source-address Mgmt-intf
Configures the source address.
source-address source-address
Example:
Step 9
Device(config-mdt-subs)# source-vrf 192.0.2.1
Configures the receiver IP address, protocol, and profile
for notifications.
receiver ip address ip-address receiver-port protocol
protocol profile name
Example:
Step 10
Device(config-mdt-subs)# receiver ip address
10.28.35.45 57555 protocol grpc-tcp
Exits telemetry-subscription configuration mode and
returns to privileged EXEC mode.
end
Example:
Step 11
Device(config-mdt-subs)# end
Configuring On-Change gRPC Subscriptions
SUMMARY STEPS
1.
enable
2. configure terminal
3. telemetry ietf subscription id
4. stream yang-push
5. filter xpath path
6. update-policy {on-change | periodic period}
7.
encoding encode-kvgpb
8. receiver ip address ip-address receiver-port protocol protocol profile name
Programmability Configuration Guide, Cisco IOS XE Amsterdam 17.3.x
253
Model-Driven Programmability
Configuring On-Change gRPC Subscriptions
Page 268
- end
DETAILED STEPS
Procedure
Purpose
Command or Action
Enables privileged EXEC mode.
enable
Step 1
Example:
• Enter your password if prompted.
Device> enable
Enters global configuration mode.
configure terminal
Example:
Step 2
Device# configure terminal
Creates a telemetry subscription and enters
telemetry-subscription mode.
telemetry ietf subscription id
Example:
Step 3
Device(config)# telemetry ietf subscription 8
Configures a stream for the subscription.
stream yang-push
Example:
Step 4
Device(config-mdt-subs)# stream yang-push
Specifies the XPath filter for the subscription.
filter xpath path
Example:
Step 5
Device(config-mdt-subs)# filter xpath
/iosxe-oper:ios-oper-db/hwidb-table
Configures an on-change update policy for the subscription.
update-policy {on-change | periodic period}
Example:
Step 6
Device(config-mdt-subs)# update-policy on-change
Specifies kvGPB encoding.
encoding encode-kvgpb
Example:
Step 7
Device(config-mdt-subs)# encoding encode-kvgpb
Configures the receiver IP address, protocol, and profile
for notifications.
receiver ip address ip-address receiver-port protocol
protocol profile name
Example:
Step 8
Device(config-mdt-subs)# receiver ip address
10.22.22.45 45000 protocol
grpc_tls profile secure_profile
Exits telemetry-subscription configuration mode and returns
to privileged EXEC mode.
end
Example:
Step 9
Device(config-mdt-subs)# end
Programmability Configuration Guide, Cisco IOS XE Amsterdam 17.3.x
254
Model-Driven Programmability
Configuring On-Change gRPC Subscriptions
Page 269
Receiving a Response Code
When a subscription is successfully created, the device responds with a subscription result of notif-bis:ok and
a subscription ID. The following is a sample response RPC message for a dynamic subscription:
<rpc-reply xmlns="urn:ietf:params:xml:ns:netconf:base:1.0" message-id="101">
<subscription-result xmlns="urn:ietf:params:xml:ns:yang:ietf-event-notifications"
xmlns:notif-bis="urn:ietf:params:xml:ns:yang:ietf-event-notifications">notif-bis:
ok</subscription-result>
<subscription-id
xmlns="urn:ietf:params:xml:ns:yang:ietf-event-notifications">2147484201</subscription-id>
</rpc-reply>
Receiving Subscription Push Updates for NETCONF Dial-In
Subscription updates pushed from the device are in the form of an XML RPC and are sent over the same
NETCONF session on which these are created. The subscribed information element or tree is returned within
the datastore-contents-xml tag. The following is a sample RPC message that provides the subscribed
information:
<notification xmlns="urn:ietf:params:xml:ns:netconf:notification:1.0">
<eventTime>2017-05-09T21:34:51.74Z</eventTime>
<push-update xmlns="urn:ietf:params:xml:ns:yang:ietf-yang-push">
<subscription-id>2147483650</subscription-id>
<datastore-contents-xml>
<cpu-usage
xmlns="http://cisco.com/ns/yang/Cisco-IOS-XE-process-cpu-oper"><cpu-utilization>
<five-minutes>5</five-minutes></cpu-utilization></cpu-usage>
</datastore-contents-xml>
</push-update>
</notification>
If the information element to which a subscription is made is empty, or if it is dynamic, for example, a named
access list, and does not exist, the periodic update will be empty and will have a self-closing
datastore-contents-xml tag. The following is a sample RPC message in which the periodic update is empty:
<notification xmlns="urn:ietf:params:xml:ns:netconf:notification:1.0">
<eventTime>2017-05-09T21:34:09.74Z</eventTime>
<push-update xmlns="urn:ietf:params:xml:ns:yang:ietf-yang-push">
<subscription-id>2147483649</subscription-id>
<datastore-contents-xml />
</push-update>
</notification>
Retrieving Subscription Details
You can retrieve the list of current subscriptions by sending a <get> RPC to the Cisco-IOS-XE-mdt-oper
model. You can also use the show telemetry ietf subscription command to display the list of current
subscriptions.
The following is a sample <get> RPC message:
Programmability Configuration Guide, Cisco IOS XE Amsterdam 17.3.x
255
Model-Driven Programmability
Receiving a Response Code
Page 270
<rpc message-id="101" xmlns="urn:ietf:params:xml:ns:netconf:base:1.0">
<get>
<filter>
<mdt-oper-data xmlns="http://cisco.com/ns/yang/Cisco-IOS-XE-mdt-oper">
<mdt-subscriptions/>
</mdt-oper-data>
</filter>
</get>
</rpc>
The following is a sample RPC reply:
<rpc-reply xmlns="urn:ietf:params:xml:ns:netconf:base:1.0" message-id="101">
<data>
<mdt-oper-data xmlns="http://cisco.com/ns/yang/Cisco-IOS-XE-mdt-oper">
<mdt-subscriptions>
<subscription-id>2147485164</subscription-id>
<base>
<stream>yang-push</stream>
<encoding>encode-xml</encoding>
<period>100</period>
<xpath>/ios:native/router/ios-rip:rip/ios-rip:version</xpath>
</base>
<type>sub-type-dynamic</type>
<state>sub-state-valid</state>
<comments/>
<updates-in>0</updates-in>
<updates-dampened>0</updates-dampened>
<updates-dropped>0</updates-dropped>
</mdt-subscriptions>
</mdt-oper-data>
</data>
</rpc-reply>
The following is sample output from the show telemetry ietf subscription dynamic brief command:
Device# show telemetry ietf subscription dynamic brief
Telemetry subscription brief
ID
Type
State
Filter type
2147483667
Dynamic
Valid
xpath
2147483668
Dynamic
Valid
xpath
2147483669
Dynamic
Valid
xpath
The following is sample output from the show telemetry ietf subscription subscription-ID detail command:
Device# show telemetry ietf subscription 2147483667 detail
Telemetry subscription detail:
Subscription ID: 2147483667
State: Valid
Stream: yang-push
Encoding: encode-xml
Programmability Configuration Guide, Cisco IOS XE Amsterdam 17.3.x
256
Model-Driven Programmability
Retrieving Subscription Details
Page 271
Filter:
Filter type: xpath
XPath: /mdt-oper:mdt-oper-data/mdt-subscriptions
Update policy:
Update Trigger: periodic
Period: 1000
Notes:
The following is sample output from the show telemetry ietf subscription all detail command:
Device# show telemetry ietf subscription all detail
Telemetry subscription detail:
Subscription ID: 101
Type: Configured
State: Valid
Stream: yang-push
Encoding: encode-kvgpb
Filter:
Filter type: xpath
XPath: /iosxe-oper:ios-oper-db/hwidb-table
Update policy:
Update Trigger: on-change
Synch on start: Yes
Dampening period: 0
Notes:
The following sample RPC shows how to retrieve subscription details uisng RESTCONF:
Subscription details can also be retrieved through a RESTCONF GET request to the
Cisco-IOS-XE-mdt-oper database:
URI:
https://10.85.116.28:443/restconf/data/Cisco-IOS-XE-mdt-oper: mdt-oper-data/mdt-subscriptions
Headers:
application/yang-data.collection+json, application/yang-data+json,
application/yang-data.errors+json
Content-Type:
application/yang-data+json
Returned output:
{
"Cisco-IOS-XE-mdt-oper:mdt-subscriptions": [
{
"subscription-id": 101,
"base": {
"stream": "yang-push",
"encoding": "encode-kvgpb",
"source-vrf": "",
"no-synch-on-start": false,
"xpath": "/iosxe-oper:ios-oper-db/hwidb-table"
},
"type": "sub-type-static",
"state": "sub-state-valid",
"comments": "",
"updates-in": "0",
"updates-dampened": "0",
"updates-dropped": "0",
"mdt-receivers": [
{
"address": "5.28.35.35",
"port": 57555,
"protocol": "grpc-tcp",
Programmability Configuration Guide, Cisco IOS XE Amsterdam 17.3.x
257
Model-Driven Programmability
Retrieving Subscription Details
Page 272
"state": "rcvr-state-connecting",
"comments": "Connection retries in progress",
"profile": ""
}
]
}
]
}
Additional References for Model-Driven Telemetry
Standards and RFCs
Title
Standard/RFC
https://tools.ietf.org/id/
draft-ietf-netconf-subscribed-notifications-03.txt
Custom Subscription to Event Notifications
draft-ietf-netconf-subscribed-notifications-03
draft-ietf-netconf-netconf-event-notifications-01
NETCONF Support for Event Notifications
NETCONF Event Notifications
RFC 5277
Network Configuration Protocol (NETCONF)
RFC 6241
The YANG 1.1 Data Modeling Language
RFC 7950
RESTCONF Protocol
RFC 8040
Subscription to YANG Notifications for
Datastore Update
RFC 8641
draft-ietf-netconf-rfc5277bis-01
Subscribing to Event Notifications
draft-ietf-netconf-yang-push-04
Subscribing to YANG Datastore Push Updates
https://tools.ietf.org/id/
draft-ietf-netconf-yang-push-07.txt
Subscribing to YANG datastore push updates
draft-ietf-netconf-yang-push-07
Technical Assistance
Link
Description
http://www.cisco.com/support
The Cisco Support website provides extensive online resources, including
documentation and tools for troubleshooting and resolving technical issues
with Cisco products and technologies.
To receive security and technical information about your products, you can
subscribe to various services, such as the Product Alert Tool (accessed from
Field Notices), the Cisco Technical Services Newsletter, and Really Simple
Syndication (RSS) Feeds.
Access to most tools on the Cisco Support website requires a Cisco.com user
ID and password.
Programmability Configuration Guide, Cisco IOS XE Amsterdam 17.3.x
258
Model-Driven Programmability
Additional References for Model-Driven Telemetry
Page 273
Feature Information for Model-Driven Telemetry
The following table provides release information about the feature or features described in this module. This
table lists only the software release that introduced support for a given feature in a given software release
train. Unless noted otherwise, subsequent releases of that software release train also support that feature.
Use Cisco Feature Navigator to find information about platform support and Cisco software image support.
To access Cisco Feature Navigator, go to www.cisco.com/go/cfn. An account on Cisco.com is not required.
Programmability Configuration Guide, Cisco IOS XE Amsterdam 17.3.x
259
Model-Driven Programmability
Feature Information for Model-Driven Telemetry
Page 274
Table 29: Feature Information for Model-Driven Telemetry
Feature Information
Release
Feature Name
Model-driven telemetry allows
network devices to continuously
stream real time configuration and
operating state information to
subscribers.
• Cisco Catalyst 3650 Series
Switches
• Cisco Catalyst 3850 Series
Switches
• Cisco Catalyst 9300 Series
Switches
• Cisco Catalyst 9500 Series
Switches
Cisco IOS XE Everest 16.6.1
Model-Driven Telemetry
NETCONF Dial-In
• Cisco Catalyst 9400 Series
Switches
Cisco IOS XE Everest 16.6.2
• Cisco 4000 Series Integrated
Services Routers
• Cisco ASR 1000 Series
Aggregation Services Routers
(ASR1001-HX, ASR1001-X,
ASR1002-HX, ASR1002-X)
Cisco IOS XE Fuji 16.7.1
• Cisco 1000 Series Integrated
Services Routers
• Cisco ASR 1000 RP2 and RP3
Series Aggregation Services
Routers
Cisco IOS XE Fuji 16.8.1
• Cisco Catalyst 9500-High
Performance Series Switches
Cisco IOS XE Fuji 16.8.1a
• Cisco ASR 900 Series
Aggregation Services Routers
• Cisco ASR 920 Series
Aggregation Services Router
• Cisco cBR-8 Converged
Broadband Router
• Cisco Network Convergence
System 4200 Series
Cisco IOS XE Fuji 16.9.1
Programmability Configuration Guide, Cisco IOS XE Amsterdam 17.3.x
260
Model-Driven Programmability
Feature Information for Model-Driven Telemetry
Page 275
Feature Information
Release
Feature Name
Cisco IOS XE Gibraltar 16.9.2
• Cisco Catalyst 9200 and
9200L Series Switches
• Cisco Catalyst 9300L SKUs
• Cisco Cloud Services Router
1000v
• Cisco Network Convergence
System 520 Series
Cisco IOS XE Gibraltar 16.10.1
• Cisco Catalyst 9600 Series
Switches
Cisco IOS XE Gibraltar 16.11.1
Programmability Configuration Guide, Cisco IOS XE Amsterdam 17.3.x
261
Model-Driven Programmability
Feature Information for Model-Driven Telemetry
Page 276
Feature Information
Release
Feature Name
Telemetry updates that are sent to
the initiator/subscriber are called
Dial-in.
This feature was implemented on
the following platforms:
• Cisco Catalyst 9200 and
9200L Series Switches
• Cisco Catalyst 9300 and
9300L Series Switches
• Cisco Catalyst 9400 Series
Switches
• Cisco Catalyst 9500 and
9500-High Performance Series
Switches
• Cisco Catalyst 9600 Series
Switches
• Cisco cBR-8 Converged
Broadband Router
Cisco IOS XE Gibraltar 16.12.1
Model-Driven Telemetry gNMI
Dial-In
• Cisco ASR 900 Series
Aggregation Services Routers
• Cisco ASR 920 Series
Aggregated Services Router
• Cisco Network Convergence
System 520 Series
• Cisco Network Convergence
System 4200 Series
Cisco IOS XE Amsterdam 17.1.1
Cisco ASR 1000 Series
Aggregation Services Routers
Cisco IOS XE Amsterdam 17.2.1
Programmability Configuration Guide, Cisco IOS XE Amsterdam 17.3.x
262
Model-Driven Programmability
Feature Information for Model-Driven Telemetry
Page 277
Feature Information
Release
Feature Name
Configured subscriptions cause the
publisher to initiate connections to
receivers, and these connections are
considered as dial-out.
This feature was implemented on
the following platforms:
• Cisco 1000 Series Integrated
Services Routers
• Cisco 4000 Series Integrated
Services Routers
• Cisco ASR 1000 Series
Aggregation Services Routers
• Cisco ASR 900 Series
Aggregation Services Routers
• Cisco ASR 920 Series
Aggregated Services Router
• Cisco Catalyst 9200 and
9200L Series Switches
• Cisco Catalyst 9300 and
9300L Series Switches
• Cisco Catalyst 9400 Series
Switches
• Cisco Catalyst 9500 and
9500-High Performance Series
Switches
• Cisco cBR-8 Converged
Broadband Router
• Cisco Cloud Services Router
1000V Series
• Cisco Network Convergence
System 520 Series
• Cisco Network Convergence
System 4200 Series
Cisco IOS XE Gibraltar 16.10.1
Model-Driven Telemetry gRPC
Dial-Out
• Cisco Catalyst 9600 Series
Switches
Cisco IOS XE Gibraltar 16.11.1
Programmability Configuration Guide, Cisco IOS XE Amsterdam 17.3.x
263
Model-Driven Programmability
Feature Information for Model-Driven Telemetry
Page 278
Feature Information
Release
Feature Name
To delete dynamic subscriptions,
you can use the CLI and the
kill-subscription RPC.
• Cisco ASR 900 Series
Aggregation Services Routers
• Cisco ASR 920 Series
Aggregated Services Router
(RSP2)
• Cisco Catalyst 3650 Series
Switches
• Cisco Catalyst 3850 Series
Switches
• Cisco Catalyst 9200 and
9200L Series Switches
• Cisco Catalyst 9300 and
9300L Series Switches
• Cisco Catalyst 9400 Series
Switches
• Cisco Catalyst 9500 and
9500-High Performance Series
Switches
• Cisco Network Convergence
System 520 Series
• Cisco Network Convergence
System 4200 Series
Cisco IOS XE Gibraltar 16.11.1
Model-Driven Telemetry: Kill
Subscription
Programmability Configuration Guide, Cisco IOS XE Amsterdam 17.3.x
264
Model-Driven Programmability
Feature Information for Model-Driven Telemetry
Page 279
Feature Information
Release
Feature Name
Transport-Layer Security is
supported for gRPC dial-out. This
feature is supported on the
following platforms:
• Cisco 1000 Series Integrated
Services Routers
• Cisco 4000 Series Integrated
Services Routers
• Cisco ASR 1000 Series
Aggregation Services Routers
• Cisco ASR 900 Series
Aggregation Services Routers
• Cisco ASR 920 Series
Aggregated Services Router
• Cisco Catalyst 9200 and
9200L Series Switches
• Cisco Catalyst 9300 and
9300L Series Switches
• Cisco Catalyst 9400 Series
Switches
• Cisco Catalyst 9500 and
9500-High Performance Series
Switches
• Cisco Catalyst 9600 Series
Switches
• Cisco Catalyst 9800-40 Series
Wireless Controller
• Cisco Catalyst 9800-80 Series
Wireless Controller
• Cisco cBR-8 Converged
Broadband Router
• Cisco Cloud Services Router
1000V Series
• Cisco Network Convergence
System 520 Series
• Cisco Network Convergence
System 4200 Series
Cisco IOS XE Amsterdam 17.1.1
TLS for gRPC Dial-Out
Programmability Configuration Guide, Cisco IOS XE Amsterdam 17.3.x
265
Model-Driven Programmability
Feature Information for Model-Driven Telemetry
Page 280
Programmability Configuration Guide, Cisco IOS XE Amsterdam 17.3.x
266
Model-Driven Programmability
Feature Information for Model-Driven Telemetry
Page 281
C H A P T E R 15
In-Service Model Update
This module describes how to update the YANG data models on a device through an In-Service Model Update.
• Restrictions for In-Service Model Update, on page 267
• Information About In-Service Model Update, on page 267
• How to Manage In-Service Model Update, on page 270
• Configuration Examples for In-Service Model Updates, on page 271
• Feature Information for In-Service Model Update, on page 275
Restrictions for In-Service Model Update
• High availability or In-Service Software Upgrade (ISSU) is not supported. After a switchover, users must
install the Software Maintenance Update (SMU) on standby device.
Information About In-Service Model Update
Overview of In-Service Model Updates
In-Service Model Update adds new data models or extend functionality to existing data models. The In-Service
Model Update provides YANG model enhancements outside of a release cycle. The update package is a
superset of all existing models; it includes all existing models as well as updated YANG models.
The data model infrastructure implements the YANG model-defined management interfaces for Cisco IOS
XE devices. The data model infrastructure exposes the NETCONF interface northbound from Cisco IOS XE
devices. The supported data models include industry standard models such as IETF, and Cisco IOS XE
device-specific models.
The functionality provided by the In-Service Model Update is integrated into the subsequent Cisco IOS XE
software maintenance release. Data model update packages can be downloaded from the Cisco Download
Software Center.
Compatibility of In-Service Model Update Packages
An update package is built on a per release basis and is specific to a platform. This means that an update
package for Cisco ASR 1000 Series Aggregation Services Routers cannot be installed on Cisco CSR 1000V
Programmability Configuration Guide, Cisco IOS XE Amsterdam 17.3.x
267

Page 282
Series Cloud Services Routers. Similarly, an update package built for Cisco IOS XE Fuji 16.7.1 cannot be
applied on a device that runs the Cisco IOS XE Everest 16.5.2 version.
All contents of an update package will be part of future mainline or maintenance release images. The image
and platform versions are checked by the In-Service Model Update commands during the package add and
activate. If an image or platform mismatch occurs, the package install fails.
Update Package Naming Conventions
In-Service Model Updates are packaged as a .bin files. This file includes all updates for a specific release and
platform and the Readme file. These files have a release date and are updated periodically with additional
model updates.
The naming convention of the data model update package follows the format—platform type-license
level.release version.DDTS ID-file. The following is an example of a data model update file:
• isr4300-universalk9.16.05.01.CSCxxxxxxx.dmp.bin
• asr1000-universalk9.2017-08-23_17.48.0.CSCxxxxxxx.SSA.dmp.bin
The readme file provides the following information:
• Console and error messages during data model activation or deactivation
• Data model installation impact
• Side effects and possible workarounds
• Package(s) that the In-Service Model Update impacts
• Restart type
Installing the Update Package
You can install the In-Service Model Update package on a device by using the install add, install activate,
and install commit commands in privileged EXEC mode.
The install add command copies the update package from a remote location to the device. You can also use
other methods to copy the package; however, you must still enable the install add command for the installation
to work. For the install activate command to work, the package must be available in the device bootflash.
Enable the install commit command to make updates persistent over reloads.
Installing an update replaces any previously installed data models. At any time, only one update is installed
on the device. A data model package includes all updated YANG models and all existing YANG models
previously installed on the device.
The following flow chart explains how the model update package works:
Programmability Configuration Guide, Cisco IOS XE Amsterdam 17.3.x
268
Model-Driven Programmability
Update Package Naming Conventions
Page 283
Figure 5: Committing a Model Update Package
If NETCONG-YANG is enabled during package activation, NETCONF processes are restarted. All active
NETCONF sessions are killed during package activation. Failure during a package verification terminates
the activation process.
Deactivating the Update Package
You can deactivate an update package by using the install deactivate command. Enable the install commit
command to make changes persistent.
Table 30: Deactivating a Model Update Package
Command to Use
Action
Use the install remove command.
Note
Deactivate a package before removing it.
To remove a package.
Use the install deactivate command, followed by the
install commit command.
Note
The install commit command must be used to ensure
that the deactivation of the model package is
persistent across reloads. Subsequent attempts at
removal of the package will fail, if the deactivation
is not committed.
To deactivate a package
When you deactivate an update, if more than one model update package is installed, the most recently committed
model update package becomes the model package used by the device. If there are no other previously
committed model packages, then the base version of data models included with the standard image is used.
Rollback of the Update Package
Rollback provides a mechanism to move a device back to the state in which it was operating prior to an update.
After a rollback, NETCONF-YANG processes are restarted before changes are visible.
You can roll back an update to the base version, the last committed version, or a known commit ID by using
the install rollback command.
Programmability Configuration Guide, Cisco IOS XE Amsterdam 17.3.x
269
Model-Driven Programmability
Deactivating the Update Package
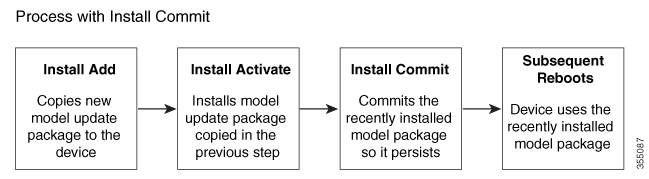
Page 284
How to Manage In-Service Model Update
Managing the Update Package
SUMMARY STEPS
1.
enable
2. install add file tftp: filename
3. install activate file bootflash: filename
4. install commit
5. install deactivate file bootflash: filename
6. install commit
7.
install rollback to {base | committed | id commit-ID}
8. install remove {file bootflash: filename | inactive}
9. show install summary
DETAILED STEPS
Procedure
Purpose
Command or Action
Enables privileged EXEC mode.
enable
Step 1
Example:
• Enter your password if prompted.
Device> enable
Copies the model update package from a remote location
(via FTP, TFTP) to the device, and performs a compatibility
check for the platform and image versions.
install add file tftp: filename
Example:
Device# install add file
tftp://172.16.0.1//tftpboot/folder1/
isr4300-universalk9.16.05.01.CSCxxxxxxx.dmp.bin
Step 2
• You can use other methods to copy the update package
from the remote location to the device, however; you
still have to execute the install add command before
the package is activated.
Device# install add file
tftp://172.16.0.1//tftpboot/folder1/
asr1000-universalk9.2017-08-23_17.48.0.CSCxxxxxxx.SSA.dmp.bin
Validates whether the update package is added through the
install add command, and restarts the NETCONF processes.
install activate file bootflash: filename
Example:
Step 3
• Perform the install add operation prior to activating
an update package.
Device# install activate file bootflash:
isr4300-universalk9.16.05.01.CSCxxxxxxx.dmp.bin
Device# install activate file bootflash:
asr1000-universalk9.2017-08-23_17.48.0.CSCxxxxxxx.SSA.dmp.bin
Makes the changes persistent over reload.
install commit
Step 4
Example:
• NETCONF processes are not restarted.
Device# install commit
Programmability Configuration Guide, Cisco IOS XE Amsterdam 17.3.x
270
Model-Driven Programmability
How to Manage In-Service Model Update
Page 285
Purpose
Command or Action
Deactivates the specified update package, and restarts the
NETCONF processes.
install deactivate file bootflash: filename
Example:
Step 5
Device# install deactivate file bootflash:
isr4300-universalk9.16.05.01.CSCxxxxxxx.dmp.bin
Device# install deactivate file bootflash:
asr1000-universalk9.2017-08-23_17.48.0.CSCxxxxxxx.SSA.dmp.bin
Makes the changes persistent over reload.
install commit
Step 6
Example:
• NETCONF processes are not restarted.
Device# install commit
Rollbacks the update to the base version, the last committed
version, or a known commit ID, and restarts NETCONF
processes.
install rollback to {base | committed | id commit-ID}
Example:
Device# install rollback to base
Step 7
• Valid values for the commit-id argument are from 1
to 4294967295.
• Older versions of data models updates are available
for use.
Removes the specified update package from the bootflash.
install remove {file bootflash: filename | inactive}
Step 8
Example:
• A package must be deactivated before it is removed.
Device# install remove file bootflash:
isr4300-universalk9.16.05.01.CSCxxxxxxx.dmp.bin
Device# install remove file bootflash:
asr1000-universalk9.2017-08-23_17.48.0.CSCxxxxxxx.SSA.dmp.bin
Displays information about the active package.
show install summary
Step 9
Example:
• The output of this command varies according to the
install commands that are configured.
Device# show install summary
Configuration Examples for In-Service Model Updates
Example: Managing an Update Package
The sample image used in the following examples are a Cisco 4000 Series Integrated Services Router
image.
The following example shows how to add a model update package file:
Device# install add file tftp://172.16.0.1//tftpboot/folder1/
isr4300-universalk9.16.05.01.CSCxxxxxxx.dmp.bin
install_add: START Sun Feb 26 05:57:04 UTC 2017
Downloading file
Programmability Configuration Guide, Cisco IOS XE Amsterdam 17.3.x
271
Model-Driven Programmability
Configuration Examples for In-Service Model Updates
Page 286
tftp://172.16.0.1//tftpboot/folder1/isr4300-universalk9.16.05.01.CSCxxxxxxx.dmp.bin
Finished downloading file
tftp://172.16.0.1//tftpboot/folder1/isr4300-universalk9.16.05.01.CSCxxxxxxx.dmp.bin
to bootflash:isr4300-universalk9.16.05.01.CSCxxxxxxx.dmp.bin
SUCCESS: install_add /bootflash/isr4300-universalk9.16.05.01.CSCxxxxxxx.dmp.bin
Sun Feb 26 05:57:22 UTC 2017
Device#
The sample image used in the following examples are a Cisco ASR1000 Series Aggregated Services
Router image.
The following example shows how to add a model update package file:
Device# install add file tftp://172.16.0.1//tftpboot/folder1/
asr1000-universalk9.2017-08-23_17.48.0.CSCxxxxxxx.SSA.dmp.bin
install_add: START Sun Feb 26 05:57:04 UTC 2017
Downloading file
tftp://172.16.0.1//tftpboot/folder1/asr1000-universalk9.2017-08-23_17.48.0.CSCxxxxxxx.SSA.dmp.bin
Finished downloading file
tftp://172.16.0.1//tftpboot/folder1/asr1000-universalk9.2017-08-23_17.48.0.CSCxxxxxxx.SSA.dmp.bin
to bootflash: asr1000-universalk9.2017-08-23_17.48.0.CSCxxxxxxx.SSA.dmp.bin
SUCCESS: install_add /bootflash/asr1000-universalk9.2017-08-23_17.48.0.CSCxxxxxxx.SSA.dmp.bin
Sun Feb 26 05:57:22 UTC 2017
Device#
The following is sample output from the show install summary command after adding an update
package file to the device:
Device# show install summary
Active Packages:
No packages
Inactive Packages:
bootflash: isr4300-universalk9.16.05.01.CSCxxxxxxx.dmp.bin
Committed Packages:
No packages
Uncommitted Packages:
No packages
Device#
The following example shows how to activate an added update package file:
Device# install activate file bootflash:
isr4300-universalk9.16.05.01.CSCxxxxxxx.dmp.bin
install_activate: START Sun Feb 26 05:58:41 UTC 2017
DMP package.
Netconf processes stopped
SUCCESS: install_activate /bootflash/isr4300-universalk9.16.05.01.CSCxxxxxxx.dmp.bin
Sun Feb 26 05:58:58 UTC 2017*Feb 26 05:58:47.655: %DMI-4-CONTROL_SOCKET_CLOSED:
SIP0: nesd: Confd control socket closed Lost connection to ConfD (45): EOF on socket to
ConfD.
*Feb 26 05:58:47.661: %DMI-4-SUB_READ_FAIL: SIP0: vtyserverutild:
Confd subscription socket read failed Lost connection to ConfD (45):
EOF on socket to ConfD.
*Feb 26 05:58:47.667: %DMI-4-CONTROL_SOCKET_CLOSED: SIP0: syncfd:
Confd control socket closed Lost connection to ConfD (45): EOF on socket to ConfD.
*Feb 26 05:59:43.269: %DMI-5-SYNC_START: SIP0: syncfd:
External change to running configuration detected.
The running configuration will be synchronized to the NETCONF running data store.
*Feb 26 05:59:44.624: %DMI-5-SYNC_COMPLETE: SIP0: syncfd:
The running configuration has been synchronized to the NETCONF running data store.
Programmability Configuration Guide, Cisco IOS XE Amsterdam 17.3.x
272
Model-Driven Programmability
Example: Managing an Update Package
Page 287
Device#
The following sample output from the show install summary command displays the status of the
model package as active and uncommitted:
Device# show install summary
Active Packages:
bootflash:isr4300-universalk9.16.05.01.CSCxxxxxxx.dmp.bin
Inactive Packages:
No packages
Committed Packages:
No packages
Uncommitted Packages:
bootflash:isr4300-universalk9.16.05.01.CSCxxxxxxx.dmp.bin
Device#
The following example shows how to execute the install commit command:
Device# install commit
install_commit: START Sun Feb 26 06:46:48 UTC 2017
SUCCESS: install_commit Sun Feb 26 06:46:52 UTC 2017
Device#
The following sample output from the show install summary command displays that the update
package is now committed, and that it will be persistent across reloads:
Device# show install summary
Active Packages:
bootflash:isr4300-universalk9.16.05.01.CSCxxxxxxx.dmp.bin
Inactive Packages:
No packages
Committed Packages:
bootflash:isr4300-universalk9.16.05.01.CSCxxxxxxx.dmp.bin
Uncommitted Packages:
No packages
Device#
The following example shows how to rollback an update package to the base package:
Device# install rollback to base
install_rollback: START Sun Feb 26 06:50:29 UTC 2017
7 install_rollback: Restarting impacted processes to take effect
7 install_rollback: restarting confd
*Feb 26 06:50:34.957: %DMI-4-CONTROL_SOCKET_CLOSED: SIP0: syncfd:
Confd control socket closed Lost connection to ConfD (45): EOF on socket to ConfD.
*Feb 26 06:50:34.962: %DMI-4-CONTROL_SOCKET_CLOSED: SIP0: nesd:
Confd control socket closed Lost connection to ConfD (45): EOF on socket to ConfD.
*Feb 26 06:50:34.963: %DMI-4-SUB_READ_FAIL: SIP0: vtyserverutild:
Confd subscription socket read failed Lost connection to ConfD (45):
EOF on socket to ConfD.Netconf processes stopped
7 install_rollback: DMP activate complete
SUCCESS: install_rollback Sun Feb 26 06:50:41 UTC 2017
*Feb 26 06:51:28.901: %DMI-5-SYNC_START: SIP0: syncfd:
External change to running configuration detected.
The running configuration will be synchronized to the NETCONF running data store.
*Feb 26 06:51:30.339: %DMI-5-SYNC_COMPLETE: SIP0: syncfd:
The running configuration has been synchronized to the NETCONF running data store.
Programmability Configuration Guide, Cisco IOS XE Amsterdam 17.3.x
273
Model-Driven Programmability
Example: Managing an Update Package
Page 288
Device#
The following is sample output from the show install package command:
Device# show install package bootflash:
isr4300-universalk9.16.05.01.CSCxxxxxxx.dmp.bin
Name: isr4300-universalk9.16.05.01.CSCxxxxxxx.dmp.bin
Version: 16.5.1.0.199.1484082952..Everest
Platform: ISR4300
Package Type: dmp
Defect ID: CSCxxxxxxx
Package State: Added
Supersedes List: {}
Smu ID: 1
Device#
The following sample NETCONF hello message verifies the new data model package version:
Getting Capabilities: (admin @ 172.16.0.1:830)
PROTOCOL netconf
<?xml version="1.0" encoding="UTF-8"?>
<hello xmlns="urn:ietf:params:xml:ns:netconf:base:1.0">
<capabilities>
<capability>urn:ietf:params:netconf:base:1.0</capability>
<capability>urn:ietf:params:netconf:base:1.1</capability>
<capability>urn:ietf:params:netconf:capability:writable-running:1.0</capability>
<capability>urn:ietf:params:netconf:capability:xpath:1.0</capability>
<capability>urn:ietf:params:netconf:capability:validate:1.0</capability>
<capability>urn:ietf:params:netconf:capability:validate:1.1</capability>
<capability>urn:ietf:params:netconf:capability:rollback-on-error:1.0</capability>
<capability>urn:ietf:params:netconf:capability:notification:1.0</capability>
<capability>urn:ietf:params:netconf:capability:interleave:1.0</capability>
<capability>http://tail-f.com/ns/netconf/actions/1.0</capability>
<capability>http://tail-f.com/ns/netconf/extensions</capability>
<capability>urn:ietf:params:netconf:capability:with-defaults:1.0?basic-mode=
explicit&also-supported=report-all-tagged</capability>
<capability>urn:ietf:params:xml:ns:yang:ietf-netconf-with-defaults?
revision=2011-06-01&module=ietf-netconf-with-defaults</capability>
<capability>http://cisco.com/ns/yang/Cisco-IOS-XE-aaa?module=
Cisco-IOS-XE-aaa&revision=2017-02-07</capability>
<<capability>http://cisco.com/ns/yang/Cisco-IOS-XE-native?module=
Cisco-IOS-XE-native&revision=2017-01-07&features=virtual-
template,punt-num,multilink,eth-evc,esmc,efp,dot1x</capability>
Device#
The following is sample output from the show install log command:
Device# show install log
[0|install_op_boot]: START Fri Feb 24 19:20:19 Universal 2017
[0|install_op_boot]: END SUCCESS Fri Feb 24 19:20:23 Universal 2017
[3|install_add]: START Sun Feb 26 05:55:31 UTC 2017
[3|install_add( FATAL)]: File path (scp) is not yet supported for this command
[4|install_add]: START Sun Feb 26 05:57:04 UTC 2017
[4|install_add]: END SUCCESS /bootflash/isr4300-universalk9.16.05.01.CSCxxxxxxx.dmp.bin
Sun Feb 26 05:57:22 UTC 2017
[5|install_activate]: START Sun Feb 26 05:58:41 UTC 2017
Device#
The sample image used in the following examples are a Cisco Catalyst 3000 Series Switch image.
Programmability Configuration Guide, Cisco IOS XE Amsterdam 17.3.x
274
Model-Driven Programmability
Example: Managing an Update Package
Page 289
The following example shows how to add a model update package file:
Device# install add file tftp://172.16.0.1//tftpboot/folder1/
cat3k_caa-universalk9.16.06.01.CSCxxxxxxx.dmp.bin
install_add: START Sat Jul 29 05:57:04 UTC 2017
Downloading file tftp://172.16.0.1//tftpboot/folder1/
cat3k_caa-universalk9.16.06.01.CSCxxxxxxx.dmp.bin
Finished downloading file tftp://172.16.0.1//tftpboot/folder1/
cat3k_caa-universalk9.16.06.01.CSCxxxxxxx.SPA.smu.bin
to bootflash:cat3k_caa-universalk9.16.06.01.CSCxxxxxxx.dmp.bin
SUCCESS: install_add /bootflash/cat3k_caa-universalk9.16.06.01.CSCxxxxxxx.dmp.bin
Sat Jul 29 05:57:22 UTC 2017
Device#
The following sample output from the show install summary command displays that the update
package is now committed, and that it will be persistent across reloads:
Device# show install summary
Active Packages:
bootflash:cat3k_caa-universalk9.16.06.01.CSCxxxxxxx.dmp.bin
Inactive Packages:
No packages
Committed Packages:
bootflash:cat3k_caa-universalk9.16.06.01.CSCxxxxxxx.dmp.bin
Uncommitted Packages:
No packages
Device#
Feature Information for In-Service Model Update
The following table provides release information about the feature or features described in this module. This
table lists only the software release that introduced support for a given feature in a given software release
train. Unless noted otherwise, subsequent releases of that software release train also support that feature.
Use Cisco Feature Navigator to find information about platform support and Cisco software image support.
To access Cisco Feature Navigator, go to www.cisco.com/go/cfn. An account on Cisco.com is not required.
Programmability Configuration Guide, Cisco IOS XE Amsterdam 17.3.x
275
Model-Driven Programmability
Feature Information for In-Service Model Update
Page 290
Table 31: Feature Information for In-Service Model Update
Feature Information
Release
Feature Name
This module describes how to update YANG
data models through In-Service Model Update.
In Cisco IOS XE Everest 16.5.1a, this feature
was implemented on the following platforms:
• Cisco Catalyst 9300 Series Switches
• Cisco Catalyst 9500 Series Switches
In Cisco IOS XE Everest 16.5.1b, this feature
was implemented on the following platforms:
• Cisco 4000 Series Integrated Services
Routers
• Cisco Cloud Services Router 1000v
• Cisco Integrated Services Virtual Routers
(ISRv)
The following commands were introduced or
updated: install (Programmability), show
install (Programmability).
Cisco IOS XE Everest
16.5.1a
Cisco IOS XE Everest
16.5.1b
In-Service Model Update
In Cisco IOS XE Everest 16.5.1b, this feature
was implemented on the following platforms:
• Cisco Catalyst 3650 Series Switches
• Cisco Catalyst 3850 Series Switches
Cisco IOS XE Everest 16.6.1
In Cisco IOS XE Fuji 16.7.x, this feature was
implemented on the following platform:
• Cisco 1000 Series Aggregated Services
Routers
Cisco IOS XE Fuji 16.7.x
In Cisco IOS XE Fuji 16.8.1a, this feature was
implemented on Cisco Catalyst 9500-High
Performance Series Switches
Cisco IOS XE Fuji 16.8.1a
Programmability Configuration Guide, Cisco IOS XE Amsterdam 17.3.x
276
Model-Driven Programmability
Feature Information for In-Service Model Update
Page 291
P A R T IV
Application Hosting
• Application Hosting, on page 279

Page 292
Page 293
C H A P T E R 16
Application Hosting
A hosted application is a software as a service (SaaS) solution, and it can be run remotely using commands.
Application hosting gives administrators a platform for leveraging their own tools and utilities.
Application hosting supports only Docker application.
Note
This module describes the Application Hosting feature and how to enable it.
• Restrictions for Application Hosting, on page 279
• Information About Application Hosting, on page 280
• How to Configure Application Hosting, on page 289
• Verifying the Application-Hosting Configuration, on page 305
• Configuration Examples for Application Hosting, on page 309
• Additional References, on page 316
• Feature Information for Application Hosting, on page 317
Restrictions for Application Hosting
• Application hosting is not virtual routing and forwarding aware (VRF-aware).
• Application hosting is not supported on Cisco Catalyst 9200, 9200CX, and 9200L platforms.
• In releases prior to Cisco IOS XE Amsterdam 17.3.3, application hosting requires dedicated storage
allocations, and is disabled on the bootflash.
In Cisco IOS XE Amsterdam 17.3.3 and later releases, application hosting is enabled on the bootflash,
however, only Cisco-signed applications are hosted.
• The front-panel Universal Serial Bus (USB) stick is not supported.
Cisco Catalyst 9300 Series Switches support only back-panel Cisco-certified USB.
• Cisco Catalyst 9500-High Performance Series Switches and Cisco Catalyst 9600 Series Switches do not
support front-panel USB for application hosting.
• Cisco Catalyst 9500 and 9500-High Performance Series Switches and Cisco Catalyst 9600 Series Switches
do not support AppGigabitEthernet interfaces.
Programmability Configuration Guide, Cisco IOS XE Amsterdam 17.3.x
279


Page 294
• Cisco Catalyst 9410R Switches do not support application-hosting in release prior to Cisco IOS XE
Bengaluru 17.5.1.
Configure the enable command on the AppGigabitEthernet interfaces to enable application hosting on
Cisco Catalyst 9410R Switches. This restriction is applicable only to Cisco Catalyst 9400 Series Supervisor
1, 1XL, and 1XL-Y 25G Modules (C9400-SUP-1, C9400-SUP-1XL, and C9400-SUP-1XL-Y).
You do not need to configure the enable command on Cisco Catalyst 9400 Series Supervisor 2 and 2XL
Modules (C9400X-SUP-2 and C9400X-SUP-2XL).
Information About Application Hosting
This section provides information about Application Hosting.
Need for Application Hosting
The move to virtual environments has given rise to the need to build applications that are reusable, portable,
and scalable. Application hosting gives administrators a platform for leveraging their own tools and utilities.
An application, hosted on a network device, can serve a variety of purposes. This ranges from automation,
configuration management monitoring, and integration with existing tool chains.
In this document, container refers to Docker applications.
Note
Cisco IOx Overview
Cisco IOx (IOs + linuX) is an end-to-end application framework that provides application-hosting capabilities
for different application types on Cisco network platforms. The Cisco Guest Shell, a special container
deployment, is one such application, that is useful in system deployment.
Cisco IOx facilitates the life cycle management of applications and data exchange by providing a set of services
that helps developers to package prebuilt applications, and host them on a target device. IOx life cycle
management includes distribution, deployment, hosting, starting, stopping (management), and monitoring of
applications and data. IOx services also include application distribution and management tools that help users
discover and deploy applications to the IOx framework.
Cisco IOx application hosting provides the following features:
• Hides network heterogeneity.
• Cisco IOx application programming interfaces (APIs) remotely manage the life cycle of applications
hosted on a device.
• Centralized application life cycle management.
• Cloud-based developer experience.
Programmability Configuration Guide, Cisco IOS XE Amsterdam 17.3.x
280
Application Hosting
Information About Application Hosting

Page 295
Application Hosting Overview
The Cisco application-hosting framework is an IOx Python process that manages virtualized and container
applications that run on devices.
Application hosting provides the following services:
• Launches designated applications in containers.
• Checks available resources (memory, CPU, and storage), and allocates and manages them.
• Provides support for console logging.
• Provides access to services through REST APIs.
• Provides a CLI endpoint.
• Provides an application-hosting infrastructure referred to as Cisco Application Framework (CAF).
• Helps setup platform-specific networking (packet-path) through management interfaces.
Data ports are supported on platforms that have AppGigabitEthernet port functionality.
The application-hosting container that is referred to as the virtualization environment is provided to run a
guest application on the host operating system. The Cisco IOS-XE virtualization services provide manageability
and networking models for running a guest application. The virtualization infrastructure allows an administrator
to define a logical interface that specifies the connectivity between the host and the guest. Cisco IOx maps
the logical interface into a Virtual Network Interface Card (vNIC) that the guest application uses.
Applications that are to be deployed in the containers are packaged as TAR files. The configuration that is
specific to these applications is also packaged as part of the TAR files.
The management interface on the device connects the application-hosting network to the Cisco IOS management
interface. The Layer 3 interface of the guest application receives the Layer 2-bridged traffic from the Cisco
IOS management interface. The management interface connects to the container interface through the
management bridge. The IP address of the application must be on the same subnet as the management interface
IP address.
On all Cisco Catalyst stack and stackwise virtual models (all software versions), Guest Shell and
AppGigabitEthernet only operate on the active switch in the stack. Therefore, the configurations for the
AppGigabitEthernet interface must be applied to the AppGigabitEthernet interface on each switch in the stack.
If the configurations are not applied to all switches, the AppGigabitEthernet interface will not work after a
switchover.
Note
Application Hosting on Front-Panel Trunk and VLAN Ports
Front-panel VLAN and trunk ports are supported for application hosting. Layer 2 traffic is delivered through
these ports to software components that run outside of the Cisco IOS daemon.
For application hosting, you can configure the front-panel port as either a trunk interface or a VLAN-specific
interface. When using as a trunk interface, the front-panel port is extended to work as a Layer 2 trunk port,
and all the traffic received by the port is available to the application. When using the port as a VLAN interface,
the application is connected to a specific VLAN network.
Programmability Configuration Guide, Cisco IOS XE Amsterdam 17.3.x
281
Application Hosting
Application Hosting Overview

Page 296
When using a back-panel USB or an M2 SATA drive for application hosting, the storage medium should be
formatted as an ext4 filesystem.
Note
Application Hosting on Cisco Catalyst 9300 Series Switches
This section describes application-hosting on Cisco Catalyst 9300 Series Switches.
For application hosting, Cisco Catalyst 9300 Series Switches support the management interface and front-panel
ports.
The USB 3.0 SSD is enabled on Cisco Catalyst 9300 Series Switches. The USB 3.0 SSD provides an extra
120 GB storage for application hosting. For more information, see the "Configuring USB 3.0 SSD" chapter
in the Interfaces and Hardware Configuration Guide.
The following two types of networking apps are supported:
• Control plane: Apps that access the management interface.
• Data plane: Apps that access the front-panel ports.
Application Hosting on Cisco Catalyst 9400 Series Switches
This section describes application-hosting on Cisco Catalyst 9400 Series Switches.
Cisco Catalyst 9400 Series Switches support the management interface and front-panel ports for application
hosting. Applications can be hosted on C9400-SSD-240GB, C9400-SSD-480GB, and C9400-SSD-960GB
solid state drives (SSDs).
Cisco Catalyst 9410R switch does not support front-panel application-hosting.
Note
These switches use the M2 SATA module for application hosting. For more information, see the "M2 SATA
Module" chapter in the Interfaces and Hardware Configuration Guide.
On Cisco Catalyst 9400 Series Switches, applications can be hosted only on active supervisors. After a
switchover, the AppGigbitEthernet interface on the newly active supervisor becomes active and can be used
for application hosting.
Application Hosting on Cisco Catalyst 9500 Series Switches
Cisco Catalyst 9500-High Performance Series Switches support only M2 SATA modules, SSD-240G,
SSD-480G, and SSD-960 (C9k-F1-SSD-240GB). Front-panel USB is not supported.
For more information, see the "M2 SATA Module" of the Interface and Hardware Components Configuration
Guide, Cisco IOS XE Amsterdam 17.2.x (Catalyst 9500 Switches).
In Cisco IOS XE Cupertino 17.7.1, Cisco Catalyst 9500X Series Switches support application hosting on
AppGigabitEthernet interfaces. Application Hosting is supported on the M2 SATA modules: SSD-240G,
SSD-480G, and SSD-960 (C9k-F1-SSD-240GB).
Programmability Configuration Guide, Cisco IOS XE Amsterdam 17.3.x
282
Application Hosting
Application Hosting on Cisco Catalyst 9300 Series Switches

Page 297
Application Hosting on Cisco Catalyst 9600 Series Switches
Cisco Catalyst 9600 Series Switches support only M2 SATA modules for application hosting; front-panel
USB is not supported. The following M2 SATA modules are supported: SSD-240G, SSD-480G, and SSD-960
(C9k-F2-SSD-240GB)
For more information, see the "M2 SATA Module" of the Interface and Hardware Components Configuration
Guide, Cisco IOS XE Amsterdam 17.2.x (Catalyst 9600 Switches).
ThousandEyes Enterprise Agent Overview
ThousandEyes Enterprise Agent is an enterprise network-monitoring tool that provides you an end-to-end
view across networks and services that impact your business. It monitors the network traffic paths across
internal, external, carrier, and Internet networks in realtime to provide network performance data. Enterprise
Agents are commonly installed in branch sites and data centers to provide a detailed understanding of WAN
and Internet connectivity.
In previous Cisco IOS XE releases, ThousandEyes was supported as a third-party Kernel-based Virtual
Machine (KVM) appliance on the SSD.
In Cisco IOS XE Amsterdam 17.3.3, a new version of the ThousandEyes Enterprise Agent is introduced. This
is an embedded Docker-based application that runs on Cisco devices using the application-hosting capability.
The Enterprise Agent is available on both the SSD and bootflash.The Enterprise Agent supports all tests except
browser tests (page load and transaction).
The ThousandEyes Enterprise Agent provides the following:
• Benchmarking the performance of networks and applications.
• Detailed hop-by-hop metrics.
• End-to-end path visualization from branch or campus to data center or cloud.
• Outage detection and resolution.
• User-experience analysis.
• Visualization of the traffic-flow pattern.
In Cisco IOS XE Amsterdam 17.3.3, ThousandEyes Enterprise Agent is supported on Cisco Catalyst 9300
and 9300L Series Switches.
Prerequisites for the ThousandEyes Enterprise Agent
• The ThousandEyes Enterprise Agent image available at the ThousandEyes site must be signed by same
certificate authority (CA) that is used by www.cisco.com for HTTPS downloads; without an username
or a password.
• Installation of the Enterprise Agent requires Internet connectivity; or a proxy server is required. For more
information, see the ThousandEyes documentation at: https://docs.thousandeyes.com/
product-documentation/enterprise-agents.
• The Enterprise Agent application can only be used after the user’s license privileges are validated.
• Only Docker-based applications are supported.
• 1:1 stack mode is a must for Thousand Eyes Stateful Switchover (SSO) support.
Programmability Configuration Guide, Cisco IOS XE Amsterdam 17.3.x
283
Application Hosting
Application Hosting on Cisco Catalyst 9600 Series Switches
Page 298
1:1 mode is when the active and standby roles are assigned to specific devices in a stack. This overrides
the traditional N+1 role selection algorithm, where any device in the stack can be the active or the standby.
Resources Required for the ThousandEyes Enterprise Agent
This table describes the required resources for installing the ThousandEyes Enterprise Agent:
Table 32: Resources Required for the ThousandEyes Enterprise Agent
Supported Release
Maximum Resource
App Mode
App Media
Cisco IOS XE Amsterdam
17.3.3
• Cisco Catalyst 9300
and 9300L Series
Switches
• CPU: 2 vCPU
• Memory: 2G RAM
• Storage: No limit on
SSD
Embedded
SSD
Note
Only 120G SSD is
supported in Cisco IOS
XE Amsterdam 17.3.3.
Cisco IOS XE Amsterdam
17.3.3
• Cisco Catalyst 9300
and 9300L Series
Switches
• CPU: 2 vCPU
• Memory: 2G RAM
• Storage: 1G for
persistent logging by
applications, out of
the 4G partition in
the flash file system.
The storage is shared
with the IOx
metadata.
Embedded
Flash
ThousandEyes Enterprise Agent Download
BrownField and GreenField are two types of ThousandEyes Enterprise Agents. For existing devices, you can
download the Brownfield version from the ThousandEyes website. However, new devices are shipped with
the Greenfield application loaded in the bootflash.
This table lists the download options available for the agents.
Table 33: ThousandEyes Enterprise Agent Download Options
GreenField
BrownField
• Available in the bootflash under the /apps folder.
Shipped with the device.
• Use the install command to download and deploy
the application.
• Download the file from the Installing Enterprise
Agents on Cisco Switches with Docker page. The
file is signed by the same certificate authority
(CA) that is used by www.cisco.com for HTTPS
downloads; without an username or a password.
• Use the install command to download and
deploy the application.
Programmability Configuration Guide, Cisco IOS XE Amsterdam 17.3.x
284
Application Hosting
Resources Required for the ThousandEyes Enterprise Agent
Page 299
This section describes the maximum resources required for the agent to run:
• CPU: 2 vCPUs
• Memory: 2G
• Storage: 1G for persistent logging by applications, out of the 4G partition in the flash file system. This
storage is shared by the IOx metadata.
• Media storage:
• 120G SSD for Cisco Catalyst 9300 and Cat9300 L Series Switches in Cisco IOS XE Amsterdam
17.3.3.
• 240/480/960GB M2-SATA-HDD for Cisco Catalyst 9400 Series Switches in Cisco IOS XE Bengaluru
17.5.1.
After the download of the Enterprise Agent, it initiates a call to create a secure channel to the ThousandEyes
cloud-based portal that provides the required application configuration, and gathers application data. The link
to the TE portal is https://app.thousandeyes.com.
Native Docker Container: Application Auto-Restart
The Application Auto-Restart feature helps applications deployed on platforms to retain the last configured
operational state in the event of a system switchover or restart. The underlying hosting framework is also
retained during switchovers. This feature is enabled by default, and cannot be disabled by users.
Applications' persistent data is not synchronized; only secure data storage and persistent data that is known
to Cisco Application Framework is synchronized.
IOx media present on the active and standby devices must be in-sync to restart IOx in the same state upon a
switchover or system restart.
Cisco Catalyst 9300 Series Switches only support Solid State Drive (SSD) for application hosting. When a
new SSD is inserted, it needs to be brought up to the same sync state as others. The standby device must have
an SSD that is compatible with IOx for application auto-restart synchronization to work.
The output of the show iox-service command displays the status of the synchronization.
The Application Auto-Restart feature is supported only on Cisco Catalyst 9300 Series Switches.
Application Auto-Restart Scenarios
This section describes various application auto-restart scenarios:
Table 34: Application Auto-Restart Scenarios
Media in the Active and Standby
Devices
Single Media in the Active Device
Scenario
Starts IOx and the application on
system bootup. Does a bulk
synchronization of the existing
information to the standby device.
Starts IOx and the application at
system bootup. The USB SSD is
visible immediately because it is a
local device. No synchronization
happens at this time.
System bootup
Programmability Configuration Guide, Cisco IOS XE Amsterdam 17.3.x
285
Application Hosting
Native Docker Container: Application Auto-Restart
Page 300
Media in the Active and Standby
Devices
Single Media in the Active Device
Scenario
Starts IOx and the application in
the previous state on the new active
device after the system switchover
(SSO). Does a bulk synchronization
of the information to the new
standby device after it boots up.
Media is not found on the new
active device. IOx starts on the
system flash with no previously
installed applications and with
minimum capabilities.
Switchover
No synchronization of the SSD
present in member devices. The
member SSD is not used to host
IOx and applications.
No synchronization of the SSD
present in member devices. The
member SSD is not used to host
IOx and applications.
Bootup or switchover: USB SSD
is present on a member device.
IOx takes care of the graceful exit.
Since IOx operates only on the
local disk, the standby SSD is not
used to start IOx.
User-triggered IOx restart is
required once SSD is plugged back
in the active device.
When the local USB SSD is
removed, IOx takes care of the
graceful exit.
User-triggered IOx restart is
required once SSD is plugged back
in the active device.
Device removal: Local USB SSD
is removed from the active device.
IOx synchronization operation
fails.. IOx is no longer SSO ready.
NA
Device removal: USB SSD is
removed from the standby device.
IOx does not use any member SSD,
and hence no impact.
IOx does not use any member SSD,
and hence no impact.
Device removal: Remote USB SSD
is removed from the remote
member device.
In the IOx sigterm handler handle
the clean unmounting of SSD.
Starts IOx and applications in the
previous state on the new active
device, after SSO. Does a bulk
synchronization of the information
to new standby device once it boots
up.
In the IOx sigterm handler handle
the clean unmounting of SSD.
Media is not found on the new
active device; and IOx starts up on
the system flash with no previously
installed applications and with
minimum capabilities.
Device going down: The active
device on which IOx is running
goes down.
The change is reflected after the
reboot. IOx starts from the new
active device after the reboot.
The change is reflected after the
reboot. IOx starts from the new
active device after the reboot.
Designated active-standby device
change (Stack environment 1:1)
Application Auto-Restart on Different Platforms
This section describes how application auto-restart works on Cisco Catalyst 9300 Series Switches in a
multimember stack:
On Cisco Catalyst 9300 Series Switches, application auto-restart is supported in 1+1 switch redundancy or
StackWise Virtual modes that assign the active and standby roles to specific devices in the stack.
Programmability Configuration Guide, Cisco IOS XE Amsterdam 17.3.x
286
Application Hosting
Application Auto-Restart on Different Platforms
Page 301
Application auto-restart is not supported when the switch stack in is N+1 mode. If the device is in N+1 mode,
the following log message is displayed on the console:
Feb 5 20:29:17.022: %IOX-3-IOX_RESTARTABITLITY: Switch 1 R0/0: run_ioxn_caf:Stack is in N+1
mode,
disabling sync for IOx restartability
IOx uses a Cisco-certified USB3.0 flash drive in the back-panel USB port as storage for application hosting.
This media may not be present in all the stack members.
Data is synced using the rsync utility from the active to the standby device.
Supported Network Types
This section lists the types of networks supported on Cisco Catalyst 9300 Series Switches and Cisco Catalyst
9400 Series Switches.
Table 35: Supported Network Types
Supported Platform and Release
Network Type
• Catalyst 9300 Series Switches and C9300L in
Cisco IOS XE Gibraltar 16.12.1
• Catalyst 9400 Series Switches in Cisco IOS XE
Amsterdam 17.1.1
• Catalyst 9500 Series Switches and Catalyst
9500-High Performance Series Switches in Cisco
IOS XE Amsterdam 17.2.1
• Catalyst 9600 Series Switches in Cisco IOS XE
Amsterdam 17.2.1
Management Port
• Catalyst 9300 Series Switches and C9300L in
Cisco IOS XE Gibraltar 16.12.1
• Catalyst 9400 Series Switches in Cisco IOS XE
Amsterdam 17.1.1
Front-panel trunk port
• Catalyst 9300 Series Switches and C9300L in
Cisco IOS XE Gibraltar 16.12.1
• Catalyst 9400 Series Switches in Cisco IOS XE
Amsterdam 17.1.1
Front-panel VLAN port
Programmability Configuration Guide, Cisco IOS XE Amsterdam 17.3.x
287
Application Hosting
Supported Network Types
Page 302
Supported Platform and Release
Network Type
• Catalyst 9300 Series Switches and C9300L in
Cisco IOS XE Gibraltar 16.12.1
• Catalyst 9400 Series Switches in Cisco IOS XE
Amsterdam 17.1.1
On both these platforms, NAT is supported through
the hardware data-port features applied on the
front-panel data ports and on the AppGigabitEthernet
port.
Cisco IOS Network Address Translation (NAT)
Not supported
Cisco IOx NAT
AppGigabitEthernet port is not supported on Catalyst 9500 Series Switches, Catalyst 9500-High Performance
Series Switches, and Catalyst 9600 Series Switches.
Note
Virtual Network Interface Card
To manage the life cycle of an application container, the Layer 3 routing model that supports one container
per internal logical interface is used. This means that a virtual Ethernet pair is created for each application,
and one interface of this pair, called the Virtual Network Interface Card (vNIC) is part of the application
container.
NIC is the standard Ethernet interface inside the container that connects to the platform data plane for the
sending and receiving packets. Cisco IOx is responsible for assigning the IP address and unique MAC address
for each vNIC in the container.
The vNICs inside a container are considered as standard Ethernet interfaces.
High Availability
IOx syncs the application data every 15 minutes, and if a SSOis done before the data sync, last 15 minutes of
data may be lost. The persistent data disk size is limited to 100MB. Applications with persistent disk size
greater than 100MB may not be periodically synced. Applications cannot control the periodic interval when
sync will happen.
ThousandEyes Enterprise Agent Installation
After installing the Enterprise Agent, wait for 30 minutes for the SSO. Due to infrastructure sync and application
sync issues, without the 30 minute wait period between the application installation and SSO, the Enterprise
Agent will restart on the new active. And the Enterprise Agent will show up on ThousandEyes portal with a
number attached to the hostname.
Programmability Configuration Guide, Cisco IOS XE Amsterdam 17.3.x
288
Application Hosting
Virtual Network Interface Card

Page 303
How to Configure Application Hosting
The following sections provide information about the various tasks that comprise the configuration of application
hosting.
Enabling Cisco IOx
Perform this task to enable access to Cisco IOx, which provides a CLI-based user interface that you can use
to manage, administer, monitor, and troubleshoot the apps on the host system, and to perform a variety of
related activities.
SUMMARY STEPS
1.
enable
2. configure terminal
3. iox
4. username name privilege level password {0 | 7 | user-password}encrypted-password
5. end
DETAILED STEPS
Procedure
Purpose
Command or Action
Enables privileged EXEC mode.
enable
Step 1
Example:
• Enter your password if prompted.
Device> enable
Enters global configuration mode.
configure terminal
Example:
Step 2
Device# configure terminal
Enables Cisco IOx.
iox
Example:
Step 3
Device(config)# iox
Establishes a username-based authentication system and
privilege level for the user.
username name privilege level password {0 | 7 |
user-password}encrypted-password
Step 4
Example:
• The username privilege level must be configured as
15.
Device(config)# username cisco privilege 15
password 0 ciscoI
Exits global configuration mode and returns to privileged
EXEC configuration mode.
end
Example:
Step 5
Device(config)# end
Programmability Configuration Guide, Cisco IOS XE Amsterdam 17.3.x
289
Application Hosting
How to Configure Application Hosting
Page 304
Configuring Application Hosting on Front-Panel VLAN Ports
This task is applicable to Cisco IOS XE Amsterdam 17.1.1 and later releases.
Note
In application-hosting trunk-configuration mode, all the allowed AppGigabitEthernet VLAN ports are connected
to a container. Native and VLAN-tagged frames are transmitted and received by the container guest interface.
Only one container guest interface can be mapped to the AppGigabitEthernet trunk port.
Concurrent configuration of both trunk and vlan-access ports are supported.
SUMMARY STEPS
1.
enable
2.
configure terminal
3.
interface AppGigabitEthernet number
4.
switchport trunk allowed vlan vlan-ID
5.
switchport mode trunk
6.
exit
7.
app-hosting appid name
8.
app-vnic AppGigabitEthernet trunk
9.
vlan vlan-ID guest-interface guest-interface-number
10.
guest-ipaddress ip-address netmask netmask
11.
end
DETAILED STEPS
Procedure
Purpose
Command or Action
Enables privileged EXEC mode.
enable
Step 1
Example:
• Enter your password if prompted.
Device> enable
Enters global configuration mode.
configure terminal
Example:
Step 2
Device# configure terminal
Configures the AppGigabitEthernet and enters interface
configuration mode.
interface AppGigabitEthernet number
Example:
Step 3
• For stackable switches, the number argument is
switch-number/0/1.
Device(config)# interface AppGigabitEthernet 1/0/1
Configures the list of VLANs allowed on the trunk.
switchport trunk allowed vlan vlan-ID
Example:
Step 4
Programmability Configuration Guide, Cisco IOS XE Amsterdam 17.3.x
290
Application Hosting
Configuring Application Hosting on Front-Panel VLAN Ports

Page 305
Purpose
Command or Action
Device(config-if)# switchport trunk allowed vlan
10-12,20
Sets the interface into permanent trunking mode and
negotiates to convert the neighboring link into a trunk link.
switchport mode trunk
Example:
Step 5
Device(config-if)# switchport mode trunk
Exits interface configuration mode and returns to global
configuration mode.
exit
Example:
Step 6
Device(config-if)# exit
Configures an application and enters application-hosting
configuration mode.
app-hosting appid name
Example:
Step 7
Device(config)# app-hosting appid iox_app
Configures a trunk port as the front-panel port for an
application, and enters application-hosting
trunk-configuration mode.
app-vnic AppGigabitEthernet trunk
Example:
Device(config-app-hosting)# app-vnic
AppGigabitEthernet trunk
Step 8
Configures a VLAN guest interface and enters
application-hosting VLAN-access IP configuration mode.
vlan vlan-ID guest-interface guest-interface-number
Example:
Step 9
• Multiple VLAN-to-guest interface mapping is
supported.
Device(config-config-app-hosting-trunk)# vlan 10
guest-interface 2
(Optional) Configures a static IP address.
guest-ipaddress ip-address netmask netmask
Example:
Step 10
Device(config-config-app-hosting-vlan-access-ip)#
guest-ipaddress 192.168.0.2
netmask 255.255.255.0
Exits application-hosting VLAN-access IP configuration
mode and returns to privileged EXEC mode.
end
Example:
Step 11
Device(config-config-app-hosting-vlan-access-ip)#
end
Configuring Application Hosting on Front-Panel Trunk Ports
In application-hosting trunk-configuration mode, all the allowed AppGigabitEthernet VLAN ports are connected
to a container. Native and VLAN-tagged frames are transmitted and received by the container guest interface.
Only one container guest interface can be mapped to the AppGigabitEthernet trunk port.
In Cisco IOS XE Gibraltar 16.2.1, you can configure an app-ID in either application-hosting trunk configuration
mode or application-hosting VLAN-access configuration mode; but not in both modes.
In Cisco IOS XE Amsterdam 17.1.1 and later releases, concurrent configuration of both trunk and vlan-access
ports is supported.
Programmability Configuration Guide, Cisco IOS XE Amsterdam 17.3.x
291
Application Hosting
Configuring Application Hosting on Front-Panel Trunk Ports
Page 306
SUMMARY STEPS
1.
enable
2.
configure terminal
3.
interface AppGigabitEthernet number
4.
switchport trunk allowed vlan vlan-ID
5.
switchport mode trunk
6.
exit
7.
app-hosting appid name
8.
app-vnic AppGigabitEthernet trunk
9.
guest-interface guest-interface-number
10.
end
DETAILED STEPS
Procedure
Purpose
Command or Action
Enables privileged EXEC mode.
enable
Step 1
Example:
• Enter your password if prompted.
Device> enable
Enters global configuration mode.
configure terminal
Example:
Step 2
Device# configure terminal
Configures the AppGigabitEthernet and enters interface
configuration mode.
interface AppGigabitEthernet number
Example:
Step 3
• For stackable switches, the number argument is
switch-number/0/1.
Device(config)# interface AppGigabitEthernet 1/0/1
Configures the list of VLANs allowed on the trunk.
switchport trunk allowed vlan vlan-ID
Example:
Step 4
Device(config-if)# switchport trunk allowed vlan
10-12,20
Sets the interface into permanent trunking mode and
negotiates to convert the neighboring link into a trunk link.
switchport mode trunk
Example:
Step 5
Device(config-if)# switchport mode trunk
Exits interface configuration mode and returns to global
configuration mode.
exit
Example:
Step 6
Device(config-if)# exit
Configures an application and enters application-hosting
configuration mode.
app-hosting appid name
Example:
Step 7
Programmability Configuration Guide, Cisco IOS XE Amsterdam 17.3.x
292
Application Hosting
Configuring Application Hosting on Front-Panel Trunk Ports
Page 307
Purpose
Command or Action
Device(config)# app-hosting appid iox_app
Configures a trunk port as the front-panel port for an
application, and enters application-hosting
trunk-configuration mode.
app-vnic AppGigabitEthernet trunk
Example:
Device(config-app-hosting)# app-vnic
AppGigabitEthernet trunk
Step 8
Configures an application’s interface that is connected to
the AppGigabitEthernet interface trunk.
guest-interface guest-interface-number
Example:
Step 9
Device(config-config-app-hosting-trunk)#
guest-interface 2
Exits application-hosting trunk-configuration mode and
returns to privileged EXEC mode.
end
Example:
Step 10
Deviceconfig-config-app-hosting-trunk)# end
Starting an Application in Configuration Mode
The start command in application-hosting configuration mode is equivalent to the app-hosting activate
appid and app-hosting start appid commands.
The no start command in application-hosting configuration mode is equivalent to the app-hosting stop appid
and app-hosting deactivate appid commands.
If the start command is configured before an application is installed, and then the install command is
configured, Cisco IOx automatically performs internal activate and start actions. This allows the application
to be automatically started by configuring the install command.
Note
SUMMARY STEPS
1.
enable
2. configure terminal
3. app-hosting appid application-name
4. start
5. end
DETAILED STEPS
Procedure
Purpose
Command or Action
Enables privileged EXEC mode.
enable
Step 1
Example:
• Enter your password if prompted.
Device> enable
Programmability Configuration Guide, Cisco IOS XE Amsterdam 17.3.x
293
Application Hosting
Starting an Application in Configuration Mode

Page 308
Purpose
Command or Action
Enters global configuration mode.
configure terminal
Example:
Step 2
Device# configure terminal
Configures an application and enters application-hosting
configuration mode.
app-hosting appid application-name
Example:
Step 3
Device(config)# app-hosting appid iox_app
(Optional) Starts and runs an application.
start
Step 4
Example:
• Use the no start command to stop the application.
Device(config-app-hosting)# start
Exits application-hosting configuration mode and returns
to privileged EXEC mode.
end
Example:
Step 5
Device(config-app-hosting)# end
Lifecycle of an Application
The following EXEC commands take you through an application's lifecycle.
If any configuration changes are made after an application is installed, the application in the running state
will not reflect these changes. The application must be explicitly stopped and deactivated, and then activated
and started again for the configuration changes to take effect.
Note
SUMMARY STEPS
1.
enable
2. app-hosting install appid application-name package package-path
3. app-hosting activate appid application-name
4. app-hosting start appid application-name
5. app-hosting stop appid application-name
6. app-hosting deactivate appid application-name
7.
app-hosting uninstall appid application-name
DETAILED STEPS
Procedure
Purpose
Command or Action
Enables privileged EXEC mode.
enable
Step 1
Example:
• Enter your password if prompted.
Programmability Configuration Guide, Cisco IOS XE Amsterdam 17.3.x
294
Application Hosting
Lifecycle of an Application

Page 309
Purpose
Command or Action
Device> enable
Installs an application from the specified location.
app-hosting install appid application-name package
package-path
Step 2
• An application can be installed from a local storage
location such as, flash, bootflash, usbflash0, usbflash1,
and harddisk.
Example:
Device# app-hosting install appid iox_app package
usbflash1:my_iox_app.tar
Activates the application.
app-hosting activate appid application-name
Step 3
Example:
• This command validates all the application resource
requests, and if all the resources are available, the
application is activated; if not, the activation fails.
Device# app-hosting activate appid iox_app
Starts the application.
app-hosting start appid application-name
Step 4
Example:
• Application start-up scripts are activated.
Device# app-hosting start appid iox_app
(Optional) Stops the application.
app-hosting stop appid application-name
Example:
Step 5
Device# app-hosting stop appid iox_app
(Optional) Deactivates all the resources allocated for the
application.
app-hosting deactivate appid application-name
Example:
Step 6
Device# app-hosting deactivate appid iox_app
(Optional) Uninstalls the application.
app-hosting uninstall appid application-name
Step 7
Example:
• Uninstalls all the packaging and images stored. All the
changes and updates to the application are also
removed.
Device# app-hosting uninstall appid iox_app
Configuring Docker Run Time Options
You can add a maximum of 30 lines of run time options. The system generates a concatenated string from
line 1 though line 30. A string can have more than one Docker run time option.
When a run time option is changed, stop, deactivate, activate, and start the application for the new run time
options to take effect.
SUMMARY STEPS
1.
enable
2. configure terminal
3. app-hosting appid application-name
4. app-resource docker
5. run-opts options
6. end
Programmability Configuration Guide, Cisco IOS XE Amsterdam 17.3.x
295
Application Hosting
Configuring Docker Run Time Options
Page 310
DETAILED STEPS
Procedure
Purpose
Command or Action
Enables privileged EXEC mode.
enable
Step 1
Example:
• Enter your password if prompted.
Device> enable
Enters global configuration mode.
configure terminal
Example:
Step 2
Device# configure terminal
Configures an application and enters application-hosting
configuration mode.
app-hosting appid application-name
Example:
Step 3
Device(config)# app-hosting appid iox_app
Enters application-hosting docker-configuration mode to
specify application resource updates.
app-resource docker
Example:
Step 4
Device(config-app-hosting)# app-resource docker
Specifies the Docker run time options.
run-opts options
Example:
Step 5
Device(config-app-hosting-docker)# run-opts 1 "-v
$(APP_DATA):/data"
Exits application-hosting docker-configuration mode and
returns to privileged EXEC mode.
end
Example:
Step 6
Device(config-app-hosting-docker)# end
Configuring a Static IP Address in a Container
When configuring a static IP address in a container, the following guidelines apply:
• Only the last configured default gateway configuration is used.
• Only the last configured name server configuration is used.
You can configure the IP address of a container through Cisco IOS CLIs.
SUMMARY STEPS
1.
enable
2. configure terminal
3. app-hosting appid name
4. name-server# ip-address
5. app-vnic management guest-interface interface-number
Programmability Configuration Guide, Cisco IOS XE Amsterdam 17.3.x
296
Application Hosting
Configuring a Static IP Address in a Container
Page 311
- guest-ipaddress ip-address netmask netmask
exit
8. app-default-gateway ip-address guest-interface network-interface
9. end
DETAILED STEPS
Procedure
Purpose
Command or Action
Enables privileged EXEC mode.
enable
Step 1
Example:
• Enter your password if prompted.
Device> enable
Enters global configuration mode.
configure terminal
Example:
Step 2
Device# configure terminal
Configures an application and enters application-hosting
configuration mode.
app-hosting appid name
Example:
Step 3
Device(config)# app-hosting appid iox_app
Configures the Domain Name System (DNS) server.
name-server# ip-address
Example:
Step 4
Device(config-app-hosting)# name-server0 10.2.2.2
Configures the management gateway of the virtual network
interface and guest interface, and enters application-hosting
management-gateway configuration mode.
app-vnic management guest-interface interface-number
Example:
Device(config-app-hosting)# app-vnic management
guest-interface 0
Step 5
Configures the management guest interface details.
guest-ipaddress ip-address netmask netmask
Example:
Step 6
Device(config-app-hosting-mgmt-gateway)#
guest-ipaddress 172.19.0.24
netmask 255.255.255.0
Exits application-hosting management-gateway
configuration mode and returns to application-hosting
configuration mode.
exit
Example:
Device(config-app-hosting-mgmt-gateway)# exit
Step 7
Configures the default management gateway.
app-default-gateway ip-address guest-interface
network-interface
Step 8
Example:
Device(config-app-hosting)# app-default-gateway
172.19.0.23
guest-interface 0
Programmability Configuration Guide, Cisco IOS XE Amsterdam 17.3.x
297
Application Hosting
Configuring a Static IP Address in a Container
Page 312
Purpose
Command or Action
Exits application-hosting configuration mode and returns
to privileged EXEC mode.
end
Example:
Step 9
Device(config-app-hosting)# end
Configuring Application Hosting on the Management Port
SUMMARY STEPS
1.
enable
2. configure terminal
3. interface gigabitethernet0/0
4. vrf forwarding vrf-name
5. ip address ip-address mask
6. exit
7.
app-hosting appid name
8. app-vnic management guest-interface network-interface
9. end
DETAILED STEPS
Procedure
Purpose
Command or Action
Enables privileged EXEC mode.
enable
Step 1
Example:
• Enter your password if prompted.
Device> enable
Enters global configuration mode.
configure terminal
Example:
Step 2
Device# configure terminal
Configures an interface and enters interface configuration
mode.
interface gigabitethernet0/0
Example:
Step 3
• On Cisco Catalyst 9000 Series Switches, the
management interface is GigabitEthernet0/0.
Device(config)# interface gigabitethernet0/0
Associates a Virtual Routing and Forwarding (VRF)
instance or a virtual network with an interface or
subinterface.
vrf forwarding vrf-name
Example:
Device(config-if)# vrf forwarding Mgmt-vrf
Step 4
• Mgmt-vrf is automatically set for the management
interface on the Cisco Catalyst 9000 Series Switch.
Programmability Configuration Guide, Cisco IOS XE Amsterdam 17.3.x
298
Application Hosting
Configuring Application Hosting on the Management Port
Page 313
Purpose
Command or Action
Configures an IP address for the interface.
ip address ip-address mask
Example:
Step 5
Device(config-if)# ip address 198.51.100.1
255.255.255.254
Exits interface configuration mode and returns to global
configuration mode.
exit
Example:
Step 6
Device(config-if)# exit
Configures an application and enters application-hosting
configuration mode.
app-hosting appid name
Example:
Step 7
Device(config)# app-hosting appid iox_app
Connects the guest interface to the management port, and
enters application-hosting management-gateway
configuration mode.
app-vnic management guest-interface network-interface
Example:
Device(config-app-hosting)# app-vnic management
guest-interface 1
Step 8
• The management keyword specifies the Cisco IOS
management GigabitEthernet0/0 interface that is
connected to the container.
• The guest-interface network-interface
keyword-argument pair specifies the container's
internal Ethernet interface number that is connected
to the Cisco IOS management interface. The example
provided here uses guest-interface 1 for the container's
Ethernet 1 interface.
Exits application-hosting management-gateway
configuration mode and returns to privileged EXEC mode.
end
Example:
Step 9
Device(config-app-hosting-mgmt-gateway)# end
Manually Configuring the IP Address for an Application
You can set up the IP address of a container using the following methods:
• Log into the container, and configure the ifconfig Linux command.
1.
Log in to the application by using the following command:
app-hosting connect appid APPID {session | console}
2.
Based on the application's Linux support, use the standard Linux interface configuration commands:
- ifconfig dev IFADDR/subnet-mask-length
Or
- ip address {add|change|replace} IFADDR dev IFNAME [ LIFETIME ] [ CONFFLAG-LIST ]
Programmability Configuration Guide, Cisco IOS XE Amsterdam 17.3.x
299
Application Hosting
Manually Configuring the IP Address for an Application
Page 314
• Enable the Dynamic Host Configuration Protocol (DHCP) in the container, and configure the DHCP
server and relay agent in the Cisco IOS configuration.
• Cisco IOx provides a DHCP client to run within the application container that is used for an
application DHCP interface.
Overriding App Resource Configuration
For resource changes to take effect, you must first stop and deactivate an app using the app-hosting stop and
app-hosting deactivate commands, and then restart the app using the app-hosting activate and app-hosting
start commands.
If you are using the start command in application-hosting configuration mode, configure the no start and
start commands.
You can use these commands to reset both resources and the app-hosting appid iox_app configuration.
SUMMARY STEPS
1.
enable
2. configure terminal
3. app-hosting appid name
4. app-resource profile name
5. cpu unit
6. memory memory
7.
vcpu number
8. end
DETAILED STEPS
Procedure
Purpose
Command or Action
Enables privileged EXEC mode.
enable
Step 1
Example:
• Enter your password if prompted.
Device> enable
Enters global configuration mode.
configure terminal
Example:
Step 2
Device# configure terminal
Enables application hosting and enters application-hosting
configuration mode.
app-hosting appid name
Example:
Step 3
Device(config)# app-hosting appid iox_app
Programmability Configuration Guide, Cisco IOS XE Amsterdam 17.3.x
300
Application Hosting
Overriding App Resource Configuration
Page 315
Purpose
Command or Action
Configures the custom application resource profile, and
enters custom application resource profile configuration
mode.
app-resource profile name
Example:
Device(config-app-hosting)# app-resource profile
custom
Step 4
• Only the custom profile name is supported.
Changes the default CPU allocation for the application.
cpu unit
Step 5
Example:
• Resource values are application specific, and any
adjustment to these values must ensure that the
application can run reliably with the changes.
Device(config-app-resource-profile-custom)# cpu
7400
Changes the default memory allocation.
memory memory
Example:
Step 6
Device(config-app-resource-profile-custom)# memory
2048
Changes the virtual CPU (vCPU) allocation for the
application.
vcpu number
Example:
Step 7
Device(config-app-resource-profile-custom)# vcpu
2
Exits custom application resource profile configuration
mode and returns to privileged EXEC mode.
end
Example:
Step 8
Device(config-app-resource-profile-custom)# end
Installing the ThousandEyes Enterprise Agent
To install the Enterprise Agent, follow these steps:
1.
Configure IOx. For more information, see the "Enabling Ciso IOx" section.
2.
Configure AppHosting.
3.
Configure the AppGigabitEthernet port.
4.
Install the ThousandEyes Enterprise Agent.
Configuring AppHosting for the ThousandEyes Enterprise Agent
SUMMARY STEPS
1.
enable
2.
configure terminal
3.
app-hosting appid application-name
4.
app-vnic AppGigabitEthernet trunk
5.
vlan vlan-ID guest-interface guest-interface-number
6.
guest-ip ip-address netmask netmask
Programmability Configuration Guide, Cisco IOS XE Amsterdam 17.3.x
301
Application Hosting
Installing the ThousandEyes Enterprise Agent
Page 316
exit
8.
exit
9.
app-default-gateway ip-address guest-interface network-interface
10.
nameserver# ip-address
11.
app-resource docker
12.
run-opts options
13.
prepend-pkg-opts
14.
end
DETAILED STEPS
Procedure
Purpose
Command or Action
Enters privileged EXEC mode.
enable
Example:
Step 1
Device> enable
Enters global configuration mode.
configure terminal
Example:
Step 2
Device# configure terminal
Configures an application and enters application-hosting
configuration mode.
app-hosting appid application-name
Example:
Step 3
Device(config)# app-hosting appid appid 1keyes
Configures a trunk port as the front-panel port for an
application, and enters application-hosting
trunk-configuration mode.
app-vnic AppGigabitEthernet trunk
Example:
Device(config-app-hosting)# app-vnic
AppGigabitEthernet trunk
Step 4
Configures a VLAN guest interface and enters
application-hosting VLAN-access IP configuration mode.
vlan vlan-ID guest-interface guest-interface-number
Example:
Step 5
Device(config-config-app-hosting-trunk)# vlan 10
guest-interface 2
Configures a static IP address for the guest interface.
guest-ip ip-address netmask netmask
Example:
Step 6
Device(config-config-app-hosting-vlan-access-ip)#
guest-ipaddress 172.19.0.24
netmask 255.255.255.0
Exits application hosting VLAN-access IP configuration
mode and returns to application-hosting
trunk-configuration mode.
exit
Example:
Device(config-config-app-hosting-vlan-access-ip)#
exit
Step 7
Programmability Configuration Guide, Cisco IOS XE Amsterdam 17.3.x
302
Application Hosting
Configuring AppHosting for the ThousandEyes Enterprise Agent
Page 317
Purpose
Command or Action
Exits application-hosting trunk-configuration mode and
returns to application hosting configuration mode.
exit
Example:
Step 8
Device(config-config-app-hosting-trunk)# exit
Configures the default management gateway.
app-default-gateway ip-address guest-interface
network-interface
Step 9
Example:
Device(config-app-hosting)# app-default-gateway
172.19.0.23
guest-interface 0
Configures the DNS server.
nameserver# ip-address
Example:
Step 10
Device(config-app-hosting)# name-server0 10.2.2.2
Enters application-hosting docker-configuration mode to
specify application resource updates.
app-resource docker
Example:
Step 11
Device(config-app-hosting)# app-resource docker
Specifies the Docker run time options.
run-opts options
Example:
Step 12
Device(config-app-hosting-docker)# run-opts 1
"-e TEAGENT_ACCOUNT_TOKEN=[account-token]"
Merges the package options with the Docker runtime
options.
prepend-pkg-opts
Example:
Step 13
• Any duplicate variable is overwritten.
Device(config-app-hosting-docker)#
prepend-pkg-opts
Exits application-hosting docker-configuration mode and
returns to privileged EXEC mode.
end
Example:
Step 14
Device(config-app-hosting-docker)# end
Configuring AppGigabitEthernet Interface for the ThousandEyes Enterprise Agent
SUMMARY STEPS
1.
enable
2. configure terminal
3. interface appgigabitethernet number
4. switchport trunk allowed vlan vlan-ID
5. switchport mode trunk
6. end
Programmability Configuration Guide, Cisco IOS XE Amsterdam 17.3.x
303
Application Hosting
Configuring AppGigabitEthernet Interface for the ThousandEyes Enterprise Agent
Page 318
DETAILED STEPS
Procedure
Purpose
Command or Action
Enters privileged EXEC mode.
enable
Example:
Step 1
Device> enable
Enters global configuration mode.
configure terminal
Example:
Step 2
Device# configure terminal
Configures the AppGigabitEthernet and enters interface
configuration mode.
interface appgigabitethernet number
Example:
Step 3
• For stackable switches, the number argument is
switch-number/0/1.
Device(config)# interface AppGigabitEthernet 1/0/1
Configures the list of VLANs allowed on the trunk.
switchport trunk allowed vlan vlan-ID
Example:
Step 4
Device(config-if)# switchport trunk allowed vlan
10-12,20
Sets the interface into permanent trunking mode and
negotiates to convert the neighboring link into a trunk link.
switchport mode trunk
Example:
Step 5
Device(config-if)# switchport mode trunk
Exits interface configuration mode and returns to privileged
EXEC mode.
end
Example:
Step 6
Device(config-if)# end
Installing the ThousandEyes Enterprise Agent
Before you begin
You can install the ThousandEyes Enterprise Agent either from the URL given below or from the flash
filesystem.
SUMMARY STEPS
1.
enable
2. app-hosting install appid application-name package package-path
3. app-hosting start appid application-name
4. end
Programmability Configuration Guide, Cisco IOS XE Amsterdam 17.3.x
304
Application Hosting
Installing the ThousandEyes Enterprise Agent
Page 319
DETAILED STEPS
Procedure
Purpose
Command or Action
Enters privileged EXEC mode.
enable
Example:
Step 1
Device> enable
Installs an application from the specified location.
app-hosting install appid application-name package
package-path
Step 2
Example:
Device# app-hosting install 1keyes
https://downloads.thousandeyes.com/
enterprise-agent/thousandeyes-enterprise-agent-3.0.cat9k.tar
Or
Device# app-hosting install appid 1keyes package
flash:/apps/[greenfield-app-tar]
(Optional) Starts the application.
app-hosting start appid application-name
Example:
Step 3
Device# app-hosting start appid 1keyes
Exits application hosting configuration mode and returns
to privileged EXEC mode.
end
Example:
Step 4
Device# end
The following is sample output from the show app-hosting list command:
Device# show app-hosting list
App id
State
1keyes
RUNNING
Verifying the Application-Hosting Configuration
Use these show commands to verify the configuration. These commands can be used in any order.
SUMMARY STEPS
1.
enable
2. show iox-service
3. show app-hosting detail
Programmability Configuration Guide, Cisco IOS XE Amsterdam 17.3.x
305
Application Hosting
Verifying the Application-Hosting Configuration
Page 320
- show app-hosting device
- show app-hosting list
- show interfaces trunk
show controller ethernet-controller AppGigabitEthernet interface-number
DETAILED STEPS
Procedure
Step 1
enable
Enables privileged EXEC mode.
• Enter your password if prompted.
Example:
Device> enable
Step 2
show iox-service
Displays the status of all the Cisco IOx services.
Example:
Device# show iox-service
IOx Infrastructure Summary:
IOx service (CAF)
: Not Running
IOx service (HA)
: Not Running
IOx service (IOxman)
: Not Running
IOx service (Sec storage) : Not Running
Libvirtd
: Running
Dockerd
: Not Running
Application DB Sync Info
: Not available
Step 3
show app-hosting detail
Displays detailed information about the application.
Example:
Device# show app-hosting detail
State
: Running
Author
: Cisco Systems, Inc
Application
Type
: vm
App id
: Wireshark
Name
: Wireshark
Version
: 3.4
Activated Profile Name
: custom
Description
: Ubuntu based Wireshark
Resource Reservation
Memory
: 1900 MB
Disk
: 10 MB
CPU
: 4000 units
VCPU
: 2
Programmability Configuration Guide, Cisco IOS XE Amsterdam 17.3.x
306
Application Hosting
Verifying the Application-Hosting Configuration
Page 321
Attached devices
Type
Name
Alias
––––––––––––––––––––––––––––––––––––––––––––––––––––––––––––––––––--
Serial/shell
Serial/aux
Serial/Syslog
serial2
Serial/Trace
serial3
Network Interfaces
–––––––––––––––––––––––––––––––––––––––––––––––––––––––––––––––
eth0:
MAC address
: 52:54:dd:80:bd:59
IPv4 address
eth1:
MAC address
: 52:54:dd:c7:7c:aa
IPv4 address
Step 4
show app-hosting device
Displays information about the USB device.
Example:
Device# show app-hosting device
USB port Device name Available
1 Front_USB_1 true
app-hosting appid testvm
app-vnic management guest-interface 0
app-device usb-port 1
Step 5
show app-hosting list
Displays the list of applications and their status.
Example:
Device# show app-hosting list
App id
State
–––––––––––––––––––––––––––––––––––––––--
Wireshark
Running
Step 6
show interfaces trunk
Displays trunk interface information.
Example:
Device# show interfaces trunk
Port Mode Encapsulation Status Native vlan
Gi3/0/1 on 802.1q trunking 1
Ap3/0/1 on 802.1q trunking 1
Port Vlans allowed on trunk
Gi3/0/1 1-4094
Ap3/0/1 1-4094
Port Vlans allowed and active in management domain
Gi3/0/1 1,8,10,100
Ap3/0/1 1,8,10,100
Programmability Configuration Guide, Cisco IOS XE Amsterdam 17.3.x
307
Application Hosting
Verifying the Application-Hosting Configuration
Page 322
Port Vlans in spanning tree forwarding state and not pruned
Gi3/0/1 1,8,10,100
Ap3/0/1 1,8,10,100
Device# show runnning-config interface AppGigabitEthernet 3/0/1
Building configuration...
Current configuration : 64 bytes
!
interface AppGigabitEthernet3/0/1
switchport mode trunk
end
Step 7
show controller ethernet-controller AppGigabitEthernet interface-number
Displays the send and receive statistics for the AppGigabitEthernet interface that is read from the hardware.
Example:
Device# show controller ethernet-controller AppGigabitEthernet 1/0/1
Transmit
AppGigabitEthernet1/0/1
Receive
0 Total bytes
0 Total bytes
0 Unicast frames
0 Unicast frames
0 Unicast bytes
0 Unicast bytes
0 Multicast frames
0 Multicast frames
0 Multicast bytes
0 Multicast bytes
0 Broadcast frames
0 Broadcast frames
0 Broadcast bytes
0 Broadcast bytes
0 System FCS error frames
0 IpgViolation frames
0 MacUnderrun frames
0 MacOverrun frames
0 Pause frames
0 Pause frames
0 Cos 0 Pause frames
0 Cos 0 Pause frames
0 Cos 1 Pause frames
0 Cos 1 Pause frames
0 Cos 2 Pause frames
0 Cos 2 Pause frames
0 Cos 3 Pause frames
0 Cos 3 Pause frames
0 Cos 4 Pause frames
0 Cos 4 Pause frames
0 Cos 5 Pause frames
0 Cos 5 Pause frames
0 Cos 6 Pause frames
0 Cos 6 Pause frames
0 Cos 7 Pause frames
0 Cos 7 Pause frames
0 Oam frames
0 OamProcessed frames
0 Oam frames
0 OamDropped frames
0 Minimum size frames
0 Minimum size frames
0 65 to 127 byte frames
0 65 to 127 byte frames
0 128 to 255 byte frames
0 128 to 255 byte frames
0 256 to 511 byte frames
0 256 to 511 byte frames
0 512 to 1023 byte frames
0 512 to 1023 byte frames
0 1024 to 1518 byte frames
0 1024 to 1518 byte frames
0 1519 to 2047 byte frames
0 1519 to 2047 byte frames
0 2048 to 4095 byte frames
0 2048 to 4095 byte frames
0 4096 to 8191 byte frames
0 4096 to 8191 byte frames
0 8192 to 16383 byte frames
0 8192 to 16383 byte frames
0 16384 to 32767 byte frame
0 16384 to 32767 byte frame
0 > 32768 byte frames
0 > 32768 byte frames
0 Late collision frames
0 SymbolErr frames
0 Excess Defer frames
0 Collision fragments
0 Good (1 coll) frames
0 ValidUnderSize frames
0 Good (>1 coll) frames
0 InvalidOverSize frames
0 Deferred frames
0 ValidOverSize frames
0 Gold frames dropped
0 FcsErr frames
0 Gold frames truncated
0 Gold frames successful
Programmability Configuration Guide, Cisco IOS XE Amsterdam 17.3.x
308
Application Hosting
Verifying the Application-Hosting Configuration
Page 323
0 1 collision frames
0 2 collision frames
0 3 collision frames
0 4 collision frames
0 5 collision frames
0 6 collision frames
0 7 collision frames
0 8 collision frames
0 9 collision frames
0 10 collision frames
0 11 collision frames
0 12 collision frames
0 13 collision frames
0 14 collision frames
0 15 collision frames
0 Excess collision frame
Configuration Examples for Application Hosting
The following are the various examples pertaining to the configuration of the Application Hosting feature.
Example: Enabling Cisco IOx
This example shows how to enable Cisco IOx.
Device> enable
Device# configure terminal
Device(config)# iox
Device(config)# username cisco privilege 15 password 0 ciscoI
Device(config)# end
Example: Configuring Application Hosting on Front-Panel VLAN Ports
This section is applicable to Cisco IOS XE Amsterdam 17.1.1 and later releases.
Note
This example shows how to configure application hosting on front-panel VLAN ports.
Device# configure terminal
Device(config)# interface AppGigabitEthernet 1/0/1
Device(config-if)# switchport trunk allowed vlan 10-12,20
Device(config-if)# switchport mode trunk
Device(config-if)# exit
Device(config)# app-hosting appid iox_app
Device(config-app-hosting)# app-vnic AppGigabitEthernet trunk
Device(config-config-app-hosting-trunk)# vlan 10 guest-interface 2
Device(config-config-app-hosting-vlan-access-ip)# guest-ipaddress 192.168.0.1
netmask 255.255.255.0
Programmability Configuration Guide, Cisco IOS XE Amsterdam 17.3.x
309
Application Hosting
Configuration Examples for Application Hosting

Page 324
Device(config-config-app-hosting-vlan access-ip)# end
Example: Configuring Application Hosting on Front-Panel Trunk Ports
This example shows how to configure application hosting on front-panel trunk ports.
Device# configure terminal
Device(config)# interface AppGigabitEthernet 3/0/1
Device(config-if)# switchport trunk allowed vlan 10-12,20
Device(config-if)# switchport mode trunk
Device(config-if)# exit
Device(config)# app-hosting appid iox_app
Device(config-app-hosting)# app-vnic AppGigabitEthernet trunk
Device(config-config-app-hosting-trunk)# guest-interface 2
Device(config-config-app-hosting-trunk)# end
Example: Installing an Application from disk0:
The following example shows how to install an application from disk0:
Device> enable
Device# app-hosting install appid iperf3 package disk0:iperf3.tar
Installing package 'disk0:iperf3.tar' for 'iperf3'. Use 'show app-hosting list' for progress.
Device# show app-hosting list
App id
State
iperf3
DEPLOYED
Switch#app-hosting activate appid iperf3
iperf3 activated successfully
Current state is: ACTIVATED
Switch#
Switch#show app-hosting list
App id
State
iperf3
ACTIVATED
Switch#app-hosting start appid iperf3
iperf3 started successfully
Current state is: RUNNING
Switch#show app-hosting list
App id
State
iperf3
RUNNING
Device#
Example: Starting an Application
This example shows how to start an application.
Programmability Configuration Guide, Cisco IOS XE Amsterdam 17.3.x
310
Application Hosting
Example: Configuring Application Hosting on Front-Panel Trunk Ports
Page 325
Device> enable
Device# configure terminal
Device(config)# app-hosting appid iox_app
Device(config-app-hosting)# start
Device(config-app-hosting)# end
Example: Lifecycle for an Application
This example shows how to install and uninstall an application:
Device> enable
Device# app-hosting install appid iox_app package usbflash1:my_iox_app.tar.tar
Device# app-hosting activate appid iox_app
Device# app-hosting start appid iox_app
Device# app-hosting stop appid iox_app
Device# app-hosting deactivate appid iox_app
Device# app-hosting uninstall appid iox_app
Example: Configuring Docker Run Time Options
This example shows how to configure Docker run time options.
Device> enable
Device# configure terminal
Device(config)# app-hosting appid iox_app
Device(config-app-hosting)# app-resource docker
Device(config-app-hosting-docker)# run-opts 1 "-v $(APP_DATA):/data"
Device(config-app-hosting-docker)# run-opts 3 "--entrypoint '/bin/sleep 1000000'"
Device(config-app-hosting-docker)# end
Example: Configuring a Static IP Address in a Container
This example shows how to configure a static IP address in a container.
Device> enable
Device# configure terminal
Device(config)# app-hosting appid iox_app
Device(config-app-hosting)# name-server0 10.2.2.2
Device(config-app-hosting)# app-vnic management guest-interface 0
Device(config-app-hosting-mgmt-gateway)# guest-ipaddress 172.19.0.24 netmask 255.255.255.0
Device(config-app-hosting-mgmt-gateway)# exit
Device(config-app-hosting)# app-default-gateway 172.19.0.23 guest-interface 0
Device(config-app-hosting)# end
Programmability Configuration Guide, Cisco IOS XE Amsterdam 17.3.x
311
Application Hosting
Example: Lifecycle for an Application
Page 326
Example: Configuring Application Hosting on the Management Port
This example shows how to manually configure the IP address for an application.
Device# configure terminal
Device(config)# interface gigabitethernet 0/0
Device(config-if)# vrf forwarding Mgmt-vrf
Device(config-if)# ip address 198.51.100.1 255.255.255.254
Device(config-if)# exit
Device(config)# app-hosting appid iox_app
Device(config-app-hosting)# app-vnic management guest-interface 1
Device(config-app-hosting-mgmt-gateway)# end
Example: Overriding App Resource Configuration
This example shows how to override an app resource configuration.
Device# configure terminal
Device(config)# app-hosting appid iox_app
Device(config-app-hosting)# app-resource profile custom
Device(config-app-resource-profile-custom)# cpu 7400
Device(config-app-resource-profile-custom)# memory 2048
Device(config-app-resource-profile-custom)# vcpu 2
Device(config-app-resource-profile-custom)# end
Example: Installing ThousandEyes Enterprise Agent
This example shows how to:
• Enable IOx.
• Configure AppHosting.
• Configure the AppGigabitEthernet port.
• Install the ThousandEyes Enterprise Agent.
The following example shows how to enable IOx:
Device> enable
Device# configure terminal
Device(config)# iox
Device(config)# username cisco privilege 15 password 0 ciscoI
Device(config)# end
The following example shows how to configure AppHosting:
Device> enable
Device# configure terminal
Device(config)# app-hosting appid appid 1keyes
Device(config-app-hosting)# app-vnic AppGigabitEthernet trunk
Device(config-config-app-hosting-trunk)# vlan 10 guest-interface 2
Programmability Configuration Guide, Cisco IOS XE Amsterdam 17.3.x
312
Application Hosting
Example: Configuring Application Hosting on the Management Port
Page 327
Device(config-config-app-hosting-vlan-access-ip)# guest-ipaddress 172.19.0.24
netmask 255.255.255.0
Device(config-config-app-hosting-vlan-access-ip)# exit
Device(config-config-app-hosting-trunk)# exit
Device(config-app-hosting)# app-default-gateway 172.19.0.23
guest-interface 0
Device(config-app-hosting)# name-server0 10.2.2.2
Device(config-app-hosting)# app-resource docker
Device(config-app-hosting-docker)# run-opts 1
"-e TEAGENT_ACCOUNT_TOKEN=[account-token]"
Device(config-app-hosting-docker)# prepend-pkg-opts
Device(config-app-hosting-docker)# end
The following example shows how to configure the Appgigabitethernet interface:
Device> enable
Device# configure terminal
Device(config)# interface AppGigabitEthernet 1/0/1
Device(config-if)# switchport trunk allowed vlan 10-12,20
Device(config-if)# switchport mode trunk
Device(config-if)# end
The following example shows how to install the ThousandEyes Enterprise Agent.
You can either download the BrownField application from the ThousandEyes website or install the prepackaged
Greenfield application from the flash filesystem.
Note
Device> enable
Device# Device# app-hosting install 1keyes https://downloads.thousandeyes.com/
enterprise-agent/thousandeyes-enterprise-agent-3.0.cat9k.tar
OR
Device# app-hosting install appid 1keyes package flash:/apps/[greenfield-app-tar]
Device# app-hosting start appid 1keyes
Device# end
Sample Configuration for ThousandEyes Enterprise Agent
The following is sample output from the show app-hosting detail command:
Device# show app-hosting detail
App id
: 1keyes
Owner
: iox
State
: RUNNING
Application
Type
: docker
Name
: thousandeyes/enterprise-agent
Version
: 3.0
Description
:
Path
: flash:thousandeyes-enterprise-agent-3.0.cat9k.tar
URL Path
:
Activated profile name : custom
Resource reservation
Memory
: 0 MB
Disk
: 1 MB
Programmability Configuration Guide, Cisco IOS XE Amsterdam 17.3.x
313
Application Hosting
Sample Configuration for ThousandEyes Enterprise Agent

Page 328
CPU
: 1850 units
CPU-percent
: 25 %
VCPU
: 1
Attached devices
Type
Name
Alias
serial/shell
iox_console_shell
serial0
serial/aux
iox_console_aux
serial1
serial/syslog
iox_syslog
serial2
serial/trace
iox_trace
serial3
Network interfaces
eth0:
MAC address
: 52:54:dd:c0:a2:ab
IPv4 address
: 10.0.0.110
IPv6 address
: ::
Network name
: mgmt-bridge-v14
Docker
Run-time information
Command
:
Entry-point
: /sbin/my_init
Run options in use
: -e TEAGENT_ACCOUNT_TOKEN=TOKEN_NOT_SET --hostname=$(SYSTEM_NAME)
--cap-add=NET_ADMIN
--mount type=tmpfs,destination=/var/log/agent,tmpfs-size=140m
--mount type=tmpfs,destination=/var/lib/te-agent/data,tmpfs-size=200m
-v $(APP_DATA)/data:/var/lib/te-agent -e TEAGENT_PROXY_TYPE=DIRECT
-e TEAGENT_PROXY_LOCATION= -e TEAGENT_PROXY_USER= -e
TEAGENT_PROXY_AUTH_TYPE=
-e TEAGENT_PROXY_PASS= -e TEAGENT_PROXY_BYPASS_LIST= -e
TEAGENT_KDC_USER=
-e TEAGENT_KDC_PASS= -e TEAGENT_KDC_REALM= -e TEAGENT_KDC_HOST=
-e TEAGENT_KDC_PORT=88
-e TEAGENT_KERBEROS_WHITELIST= -e TEAGENT_KERBEROS_RDNS=1 -e
PROXY_APT=
-e APT_PROXY_USER= -e APT_PROXY_PASS= -e APT_PROXY_LOCATION= -e
TEAGENT_AUTO_UPDATES=1
-e TEAGENT_ACCOUNT_TOKEN=r3d29srpebr4j845lvnamwhswlori2xs
--hostname=cat9k-9300-usb --memory=1g
Package run options
: -e TEAGENT_ACCOUNT_TOKEN=TOKEN_NOT_SET --hostname=$(SYSTEM_NAME)
--cap-add=NET_ADMIN
--mount type=tmpfs,destination=/var/log/agent,tmpfs-size=140m
--mount type=tmpfs,destination=/var/lib/te-agent/data,tmpfs-size=200m
-v $(APP_DATA)/data:/var/lib/te-agent -e TEAGENT_PROXY_TYPE=DIRECT
-e TEAGENT_PROXY_LOCATION= -e TEAGENT_PROXY_USER= -e
TEAGENT_PROXY_AUTH_TYPE=
-e TEAGENT_PROXY_PASS= -e TEAGENT_PROXY_BYPASS_LIST= -e
TEAGENT_KDC_USER=
-e TEAGENT_KDC_PASS= -e TEAGENT_KDC_REALM= -e TEAGENT_KDC_HOST=
-e TEAGENT_KDC_PORT=88 -e TEAGENT_KERBEROS_WHITELIST= -e
TEAGENT_KERBEROS_RDNS=1
-e PROXY_APT= -e APT_PROXY_USER= -e APT_PROXY_PASS= -e
APT_PROXY_LOCATION=
-e TEAGENT_AUTO_UPDATES=1
Application health information
Status
: 0
Programmability Configuration Guide, Cisco IOS XE Amsterdam 17.3.x
314
Application Hosting
Sample Configuration for ThousandEyes Enterprise Agent
Page 329
Last probe error
:
Last probe output
:
The following sample output from the show running-configuration command displays the static IP address
configuration:
Device# show running-config | section app-hosting
app-hosting appid 1keyes
app-vnic AppGigabitEthernet trunk
vlan 14 guest-interface 0
guest-ipaddress 10.0.0.110 netmask 255.255.255.0
app-default-gateway 10.0.0.1 guest-interface 0
app-resource docker
prepend-pkg-opts
run-opts 1 "-e TEAGENT_ACCOUNT_TOKEN=r3d29srpebr4j845lvnamwhswlori2xs"
run-opts 2 "--hostname=cat9k-9300-usb --memory=1g"
name-server0 10.0.0.1
start
The following sample output from the show running-configuration command displays the static IP address
configuration and the proxy server information:
Device# show running-config | section app-hosting
app-hosting appid 1keyes
app-vnic AppGigabitEthernet trunk
vlan 14 guest-interface 0
guest-ipaddress 172.27.0.137 netmask 255.240.0.0
app-default-gateway 172.27.0.129 guest-interface 0
app-resource docker
run-opts 1 "-e TEAGENT_ACCOUNT_TOKEN=r3d29srpebr4j845lvnamwhswlori2xs"
run-opts 3 "-e TEAGENT_PROXY_TYPE=STATIC"
run-opts 4 "-e TEAGENT_PROXY_LOCATION='proxy-wsa.esl.cisco.com:80'"
prepend-pkg-opts
name-server0 172.16.0.2
start
The following is sample output from running the app-resource Docker package merged with the Docker
runtime options:
// Example of "prepend-package-opts" merging
app-hosting appid TEST
app-vnic management guest-interface 3
app-resource docker
prepend-package-opts !!!
run-opts 1 "--entrypoint '/bin/sleep 1000000'"
run-opts 2 "-e TEST=1 "
Specify runtime and startup
startup:
runtime_options: "--env MYVAR2=foo --cap-add=NET_ADMIN"
Merged docker run-opts passed to CAF's activation payload:
{"auto_deactivate": false, "resources": {"profile": "custom", "cpu":
"1000", "memory": "1024", "rootfs_size": "0", "vcpu": 1, "disk": 10,"network":
[{"interface-name": "eth3", "network-name": "mgmt-bridge100"}, {"interface-name":
"eth4", "network-type": "vlan", "mode": "static", "ipv4": {"ip": "10.2.0.100",
"prefix": "24", "default": false, "gateway": "" },"network-info": { "vlan-id": "10" },
"mac_forwarding": "no", "mirroring": "no"}, {"interface-name": "eth0",
"network-type": "vlan", "network-info": { "vlan-id": "12" }, "mac_forwarding": "no",
Programmability Configuration Guide, Cisco IOS XE Amsterdam 17.3.x
315
Application Hosting
Sample Configuration for ThousandEyes Enterprise Agent
Page 330
"mirroring": "no"}, {"interface-name": "eth2", "network-type": "vlan", "networkinfo":
{"vlan-id": "22" }, "mac_forwarding": "no", "mirroring": "no"},
{"interface-name
": "eth1", "network-type": "vlan", "network-info": {"vlan-id": "all" },
"mac_forwarding": "no", "mirroring": "no"}]},
"startup":{"runtime_options":"--env MYVAR2=foo --cap-add=NET_ADMIN --
entrypoint'/bin/sleep 1000000' -e TEST=1"}}
// Example of no "prepend-package-opts" which is the current behavior since
16.12 where pkg.yml default runoptions are ignored.
app-hosting appid TEST
app-vnic management guest-interface 3
app-resource docker !!!
run-opts 1 "--entrypoint '/bin/sleep 1000000'"
run-opts 2 "-e TEST=1 "
Specify runtime and startup
startup:
runtime_options: "--env MYVAR2=foo --cap-add=NET_ADMIN"
Merged docker run-opts passed to CAF's activation payload:
{"auto_deactivate": false, "resources": {"profile": "custom", "cpu":
"1000", "memory": "1024", "rootfs_size": "0", "vcpu": 1, "disk": 10,"network":
[{"interface-name": "eth3", "network-name": "mgmt-bridge100"}, {"interface-name":
"eth4", "network-type": "vlan", "mode": "static", "ipv4": {"ip": "10.2.0.100",
"prefix": "24", "default": false, "gateway": "" },"network-info": { "vlan-id": "10" },
"mac_forwarding": "no", "mirroring": "no"}, {"interface-name": "eth0",
"network-type": "vlan", "network-info": { "vlan-id": "12" }, "mac_forwarding": "no",
"mirroring": "no"}, {"interface-name": "eth2", "network-type": "vlan", "networkinfo":
{"vlan-id": "22" }, "mac_forwarding": "no", "mirroring": "no"},
{"interface-name": "eth1", "network-type": "vlan", "network-info": {"vlan-id": "all" },
"mac_forwarding": "no", "mirroring": "no"}]},
"startup":{"runtime_options":"--entrypoint '/bin/sleep 1000000' -e
TEST=1"}}
// Config 1 : default behavior when "app-resource docker" is not
configured.
app-hosting appid TEST
app-vnic management guest-interface 3
// Config 2: no docker run-opts specified
app-hosting appid TEST
app-vnic management guest-interface 3
app-resource docker
prepend-package-opts
Additional References
Related Documents
Document Title
Related Topic
Programmability Command Reference
Programmability commands
https://developer.cisco.com/docs/app-hosting/
DevNet
Programmability Configuration Guide, Cisco IOS XE Amsterdam 17.3.x
316
Application Hosting
Additional References
Page 331
Document Title
Related Topic
M2 SATA Module
M2 SATA on Cisco Catalyst 9400 Series Switches
M2 SATA Module
M2 SATA on Cisco Catalyst 9500-High Performance Series
Switches
M2 SATA Module
M2 SATA on Cisco Catalyst 9600 Series Switches
Configuring USB 3.0 SSD
USB3.0 SSD on Cisco Catalyst 9300 Series Switches
Configuring USB 3.0 SSD
USB3.0 SSD on Cisco Catalyst 9500 Series Switches
https://app.thousandeyes.com
ThousandEyes URL
Technical Assistance
Link
Description
http://www.cisco.com/support
The Cisco Support website provides extensive online resources, including
documentation and tools for troubleshooting and resolving technical issues
with Cisco products and technologies.
To receive security and technical information about your products, you can
subscribe to various services, such as the Product Alert Tool (accessed from
Field Notices), the Cisco Technical Services Newsletter, and Really Simple
Syndication (RSS) Feeds.
Access to most tools on the Cisco Support website requires a Cisco.com user
ID and password.
Feature Information for Application Hosting
The following table provides release information about the feature or features described in this module. This
table lists only the software release that introduced support for a given feature in a given software release
train. Unless noted otherwise, subsequent releases of that software release train also support that feature.
Use Cisco Feature Navigator to find information about platform support and Cisco software image support.
To access Cisco Feature Navigator, go to www.cisco.com/go/cfn. An account on Cisco.com is not required.
Programmability Configuration Guide, Cisco IOS XE Amsterdam 17.3.x
317
Application Hosting
Feature Information for Application Hosting
Page 332
Table 36: Feature Information for Application Hosting
Feature Information
Release
Feature Name
A hosted application is a software as a service
(SaaS) solution, and users can execute and
operate this solution entirely from the cloud.
This module describes the Application Hosting
feature and how to enable it.
• In Cisco IOS XE Gibraltar 16.12.1, this
feature was implemented on Cisco
Catalyst 9300 Series Switches.
• In Cisco IOS XE Amsterdam 17.1.1, this
feature was implemented on Cisco
Catalyst 9400 Series Switches.
• In Cisco IOS XE Amsterdam 17.2.1, this
feature was implemented on Cisco
Catalyst 9500-High Performance Series
Switches, and Cisco Catalyst 9600 Series
Switches.
• In Cisco IOS XE Bengaluru 17.5.1, this
feature was implemented on Cisco
Catalyst 9410 Series Switches.
• In Cisco IOS XE Cupertino 17.7.1, this
feature was implemented on Cisco
Catalyst 9500X Series Switches.
Cisco IOS XE Gibraltar
16.12.1
Cisco IOS XE Amsterdam
17.1.1
Cisco IOS XE Amsterdam
17.2.1
Cisco IOS XE Bengaluru
17.5.1
Cisco IOS XE Cupertino
17.7.1
Application Hosting
When IOx is restarted and a different media
is selected, all applications must be migrated
to the new media, and containers must be
restored to the same state as before the change.
In Cisco IOS XE Bengaluru 17.6.1, this
feature was introduced on the following
platforms:
• Cisco Catalyst 9200 Series Switches
• Cisco Catalyst 9300 and 9300L Series
Switches
• Cisco Catalyst 9400 Series Switches
Cisco IOS XE Bengaluru
17.6.1
Application Hosting:
Autotransfer and Auto-Install
of Apps from Internal Flash
to SSD
Programmability Configuration Guide, Cisco IOS XE Amsterdam 17.3.x
318
Application Hosting
Feature Information for Application Hosting
Page 333
Feature Information
Release
Feature Name
Introduces datapath connectivity between the
Application Hosting container and the
front-panel network ports. Also enables ZTP
functionality on the front-panel network.
• In Cisco IOS XE Gibraltar 16.12.1, this
feature was implemented on Cisco
Catalyst 9300 Series Switches.
• In Cisco IOS XE Amsterdam 17.1.1, this
feature was implemented on Cisco
Catalyst 9400 Series Switches.
Cisco IOS XE Gibraltar
16.12.1
Cisco IOS XE Amsterdam
17.1.1
Application Hosting:
Front-Panel Network Port
Access
Introduces datapath connectivity between the
Application Hosting container and the
front-panel USB port.
• In Cisco IOS XE Gibraltar 16.12.1, this
feature was implemented on Cisco
Catalyst 9300 Series Switches.
• In Cisco IOS XE Amsterdam 17.1.1, this
feature was implemented on Cisco
Catalyst 9400 Series Switches.
Cisco IOS XE Gibraltar
16.12.1
Cisco IOS XE Amsterdam
17.1.1
Application Hosting:
Front-Panel USB Port Access
ThousandEyes is a cloud-ready, enterprise
network-monitoring tool that provides an
end-to-end view across networks and services.
• In Cisco IOS XE Amsterdam 17.3.3, this
feature was implemented on Cisco
Catalyst 9300 and 9300L Series
Switches.
• In Cisco IOS XE Bengaluru 17.5.1, this
feature was implemented on Cisco
Catalyst 9400 Series Switches.
• In Cisco IOS XE Bengaluru 17.6.1, this
feature was implemented on Cisco
Catalyst 9300X Series Switches.
Note
The ThousandEyes Integration feature is not
supported in Cisco IOS XE Bengaluru 17.4.x
release.
Cisco IOS XE Amsterdam
17.3.3
Cisco IOS XE Bengaluru
17.5.1
Cisco IOS XE Bengaluru
17.6.1
Application Hosting:
ThousandEyes Integration
Programmability Configuration Guide, Cisco IOS XE Amsterdam 17.3.x
319
Application Hosting
Feature Information for Application Hosting
Page 334
Feature Information
Release
Feature Name
ThousandEyes add-on agent mode is
supported. Add-on mode provides a
BrowserBot for transaction scripting test.
In Cisco IOS XE Bengaluru 17.6.1, this
feature was introduced on the following
platforms:
• Cisco Catalyst 9300, 9300L, and 9300X
Series Switches
• Cisco Catalyst 9400 Series Switches
Cisco IOS XE Bengaluru
17.6.1
ThousandEyes BrowserBot
The Application Auto-Restart feature helps
applications deployed on platforms to retain
the last configured operational state in the
event of a system switchover or restart. This
feature is enabled by default, and cannot be
disabled by users.
• In Cisco IOS XE Amsterdam 17.2.1, this
feature was implemented on Cisco
Catalyst 9300 Series Switches.
• In Cisco IOS XE Bengaluru 17.5.1, this
feature was implemented on Cisco
Catalyst 9410 Series Switches.
Cisco IOS XE Amsterdam
17.2.1
Cisco IOS XE Bengaluru
17.5.1
Native Docker Container:
Application Auto-Restart
Programmability Configuration Guide, Cisco IOS XE Amsterdam 17.3.x
320
Application Hosting
Feature Information for Application Hosting
Page 335
P A R T V
OpenFlow
• OpenFlow , on page 323

Page 336
Page 337
C H A P T E R 17
OpenFlow
This module describes how to enable and configure OpenFlow on a device.
• Prerequisites for OpenFlow, on page 323
• Restrictions for OpenFlow, on page 323
• Information About OpenFlow, on page 323
• How to Configure OpenFlow, on page 328
• Verifying OpenFlow, on page 333
• Configuration Examples for OpenFlow, on page 335
• Additional References, on page 336
• Feature Information for OpenFlow, on page 337
Prerequisites for OpenFlow
The device must be booted up in OpenFlow mode. (OpenFlow mode is enabled when you configure the boot
mode openflow command on a device. All ports will be in this mode, and the device will not support any
regular Cisco IOS XE features.)
Restrictions for OpenFlow
• When enabling OpenFlow mode on a device, erase all prior configurations, and delete the vlan.dat and
stby-vlan.dat files from the flash filesystem.
• When the device is in Openflow mode, do not enable other control plane protocols, Border Gateway
Protocol (BGP), Spanning Tree Protocol (STP), Port Channels, StackWise Virtual, and so on that work
when the device is in normal mode.
Information About OpenFlow
The following sections provide more information about the feature.
Programmability Configuration Guide, Cisco IOS XE Amsterdam 17.3.x
323

Page 338
OpenFlow Overview
OpenFlow is a specification from the Open Networking Foundation (ONF) that defines a flow-based forwarding
infrastructure and a standardized application-programmatic interface. OpenFlow allows a controller to direct
the forwarding functions of a device through a secure channel.
OpenFlow is the protocol between a controller (control plane) and an Ethernet switch (data plane). The switch
has flow tables arranged in a pipeline. Flows are rules to examine packets that reach these tables.
An OpenFlow agent on the switch communicates with the controller using the OpenFlow protocol. The agent
supports both OpenFlow 1.0 (wire protocol 0x1) and OpenFlow 1.3 (wire protocol 0x4). It can have up to
eight controller connections. These connections are not preserved across a switchover, and the controller will
have to reconnect to the agent after a switchover.
The OpenFlow implementation on Cisco Catalyst 9400 Series Switches is stateless, and nonstop forwarding
(NSF) is not supported. The standby supervisor does not synchronize with the flow database.
OpenFlow Controller
The OpenFlow controller is an entity that interacts with an OpenFlow switch using the OpenFlow protocol.
In most cases, a controller is a software that manages many OpenFlow logical switches. Controllers offer a
centralized view of the network, and enable administrators to dictate to the underlying systems (switches and
routers) on how to handle the network traffic. A controller typically runs on a Linux server, and must have
IP connectivity to OpenFlow-capable switches.
A controller manages a switch, and inserts and deletes the flows on the switch. These flows support a subset
of OpenFlow 1.3 and 1.0 match and action criteria.
The switch connects to the controller using the management port. The management port is in the management
virtual routing and forwarding (VRF) instance, and hence provides a secure connection to the controller. To
connect a controller to the switch, configure the IP address and port number on which the controller can be
reached.
Flow Management
A flow entry is an element in a flow table that is used to match and process packets. It contains priority levels
for matching precedence, a set of match fields for matching packets, a set of instructions to apply, and packet
and byte counters. A timeout is also associated with each flow (a hard timeout or an inactivity timeout), which
is used to automatically remove flows.
Cisco Catalyst 9000 Series Switches support a maximum of nine flow tables.
Each flow provides the following information:
• Priority: High-priority flows are matched first. A flow update requires all the flows to be prioritized
based on the configured priority.
• Match fields: A part of a flow entry against which a packet is matched. Match fields can match the various
packet header fields. If no match information is provided for a field, a wildcard is used.
• Action: An operation that acts on a packet.
Programmability Configuration Guide, Cisco IOS XE Amsterdam 17.3.x
324
OpenFlow
OpenFlow Overview
Page 339
OpenFlow Pipeline
An OpenFlow pipeline is a set of linked flow tables that provide matching, forwarding, and packet modification
in an OpenFlow switch. A port is where packets enter and exit the pipeline.
Packets are received on an ingress port and processed by the OpenFlow pipeline that forwards it to output
ports. The packet ingress port is owned by the packet throughout the pipeline, and represents the port on which
the packet was received into the switch. Note that the ingress port can also be used as a match field in a flow.
Flow actions allow packets to be sent to subsequent tables in the pipeline for further processing, and allow
information to be communicated between tables. Pipeline processing stops when the action associated with
a matching flow entry does not specify the next table. At this point, the packet is usually modified and
forwarded. The packet can also be dropped.
Flow tables of an OpenFlow switch are sequentially numbered, starting from 0. Pipeline processing always
starts by matching the packet against flow entries of flow table 0. Other flow tables can be used depending
on the outcome of the match and actions in the first table, which could result in matching the packet against
flow entries in subsequent tables.
Supported Match Fields and Actions
Match Field is a field against which a packet is matched, including packet headers, and the ingress port. A
match field can be a wildcard (match any value) and have a bit mask to match selected bits of the field.
Action is an operation that forwards a packet to a port or subsequent tables, or modifies a packet field. Actions
can be specified as part of the instructions associated with a flow entry, or an action bucket associated with
a group entry. A group entry is a collection of actions that can be shared by multiple flows.
The action specified in one or more flow entries can direct packets to a base action called a group action. The
purpose of the group action is to share a set of actions among multiple flows. A group consist of one or more
buckets, and in turn, a bucket can have a set of actions (set, pop, or output). Cisco Catalyst 9000 Series Switches
support the group types all and indirect.
The following table lists the supported match fields and actions:
Table 37: Supported Match Fields
Example Value
Maskable Entrie
Prerequisite
Header Field
01:80:c2:00:00:00/
ff:ff:ff:00:00:00 (with
mask)
de:f3:50:c7:e2:b2 (without
mask)
Yes
—
Ethernet destination MAC
address
0e:00:00:00:00:019
(without mask)
Yes
—
Ethernet source MAC
address
ARP (0x0806), IPv4
(0x0800), IPv6 (0x86dd),
and so on
—
—
Ethernet type
0x13f
—
VLAN ID
Programmability Configuration Guide, Cisco IOS XE Amsterdam 17.3.x
325
OpenFlow
OpenFlow Pipeline
Page 340
Example Value
Maskable Entrie
Prerequisite
Header Field
—
Yes
Ethernet type should be
set to 0x0806
ARP target protocol
address
ICMP (0x01), TCP
(0x06), UDP (0x11), and
so on
—
Ethernet type should be
set to 0x0800 or 0x86dd
IP protocol
10.0.0.0/24 (with mask)
Yes
Ethernet type should be
set to 0x0800
IPv4 source address
10.0.0.254 (without mask)
Yes
Ethernet type should be
set to 0x0800
IPv4 destination address
2001:DB8::1 (without
mask)
Yes
Ethernet type should be
set to 0x08dd
IPv6 source address
2001:DB8:0:ABCD::1/48
(with mask)
Yes
Ethernet type should be
set to 0x08dd
IPv6 destination address
ND target
—
Ethernet type should be
set to 0x08dd and IP
protocol should be set to
0x01
Neighbor discovery target
—
—
Ethernet type should be
set to 0x08dd and IP
protocol should be set to
0x01
ICMPv6 type
—
—
Ethernet type should be
set to 0x0800 or 0x86dd
and protocol should be set
to 0x06 or 0x11
UDP/TCP source port
—
—
Ethernet type should be
set to 0x0800 or 0x86dd
and protocol should be set
to 0x06 or 0x11
UDP/TCP destination port
—
—
—
Incoming interface
Supported Actions
A flow can send a packet to:
• The controller.
• Any interface of the switch (including the incoming interface).
• A subsequent flow table (after Table 0) for another lookup.
• A group.
Programmability Configuration Guide, Cisco IOS XE Amsterdam 17.3.x
326
OpenFlow
Supported Match Fields and Actions
Page 341
• The switch CPU for local processing. Only Cisco Discovery Protocol and Link Layer Discovery Protocol
(LLDP) packets can be sent for local processing.
A flow can also modify the following header fields of a packet:
• Ethernet destination MAC address
• Ethernet source MAC address
• VLAN ID
A flow can add (push) or remove (pop) a VLAN tag. If a packet is an IP packet, the flow can decrement the
Time to Live (TTL) header field.
OpenFlow Scale Information
Table 38: Scale Information on Supported Platforms
Cisco Catalyst 9500
High-PerformanceSeries
Switches
CiscoCatalyst9400Series
Switches, and Cisco
Catalyst 9500 Series
Switches
CiscoCatalyst9300Series
Switches
54K/27K
54K/27K
18K/9K
Total number of flows
54K/27K
54K/27K
18K/9K
256/512-bit ACL
TCAM Entries
302K
192K
192K
Statistics /Flexible
counters (Byte + Frame)
When a system boots up, by default, there are two table entries per flow. With table feature message, flows
use a single entry; however, keys with IPv6_SRC AND IPv6_DEST requires two entries per flow.
Flow Operations
This section describes the operations that take place when a flow is sent by the controller to be programmed
in the OpenFlow device.
Typically a device has flow tables arranged in a pipeline. The pipeline capabilities information specifies the
structure of the pipeline, such as the number of tables or stages, what each stage is capable of doing (match
or actions), and the size of each table.
When the controller sends a flow request, the OpenFlow agent verifies whether the flow can be handled by
the hardware. It compares the flow against the capabilities of the hardware that are defined when the switch
is booted up. If the flow is valid, it is programmed in the appropriate flow table.
If the new pipeline is validated (whether the hardware can support the pipeline), it becomes the new set of
capabilities used to check if a flow can be installed or not.
After the pipeline is instantiated and flows are installed, packets are forwarded by the switch. Ingress packets
are matched against the flows in each flow table, until the highest-priority matching flow entry is found. Packet
matching may be exact (match all fields of the table exactly), or partial (match some or all fields, and fields
with bit masks may be partially matched). Packets can be modified or forwarded based on the configured
Programmability Configuration Guide, Cisco IOS XE Amsterdam 17.3.x
327
OpenFlow
OpenFlow Scale Information
Page 342
actions. Actions can be applied in the pipeline at any time. An action can determine the next flow table to
match, the set of egress ports for the packet, and whether the packet should be routed to the controller.
OpenFlow Table Pipeline
OpenFlow table feature request messages allow an OpenFlow controller to query the capabilities of existing
flow tables of an OpenFlow-managed device, or configure these tables to match the supplied configuration.
All the tables can be configured with a subset of the match and action capabilities. Table sizes can also be
modified at runtime. When a new flow table configuration is successfully applied, flow entries from old flow
tables are removed without any notification. Dynamically configured flow tables are not persistent across
reboot. The default pipeline comes up when the device boots up.
While configuring a new flow table based on a request from the OpenFlow controller, ongoing traffic, if any,
flowing through the existing flows are dropped.
OpenFlow Power over Ethernet
OpenFlow supports Power over Ethernet (PoE). For PoE to work, configure either Cisco Discovery Protocol
or LLDP on the device so that Cisco Discovery Protocol packets or LLDP packets are processed (and sent)
by the device. Note that no OpenFlow-specific configuration is required for PoE to work with OpenFlow.
On the OpenFlow controller, configure a flow with the output-to-local action to ensure that packets are sent
to the device CPU for local processing.
For more information about PoE, see the Configuring POE chapter.
How to Configure OpenFlow
The following sections provide information about the various OpenFlow configuration tasks.
Enabling OpenFlow Mode on a Device
If the switch is operating in normal mode, we recommend that you configure the write erase command to
delete the previous configuration.
SUMMARY STEPS
1.
enable
2. configure terminal
3. boot mode openflow
4. exit
5. write erase
6.
delete flash:vlan.dat
•
• delete flash:stby-vlan.dat
7.
reload
8. enable
9. show boot mode
Programmability Configuration Guide, Cisco IOS XE Amsterdam 17.3.x
328
OpenFlow
OpenFlow Table Pipeline
Page 343
DETAILED STEPS
Procedure
Purpose
Command or Action
Enables privileged EXEC mode.
enable
Step 1
Example:
• Enter your password if prompted.
Device> enable
Enters global configuration mode.
configure terminal
Example:
Step 2
Device# configure terminal
Enables OpenFlow forwarding mode.
boot mode openflow
Example:
Step 3
Device(config)# boot mode openflow
Exits global configuration mode and enters privileged EXEC
mode.
exit
Example:
Step 4
Device(config)# exit
Erases all the files in the NVRAM.
write erase
Step 5
Example:
• We recommend erasing all the files, if the device was
operating in normal mode previously.
Device# write erase
Step 6
• Deletes the vlan.dat file that stores the VLAN
information.
• delete flash:vlan.dat
• delete flash:stby-vlan.dat
• Deletes the stby-vlan.dat file, if you have a standby
device.
Example:
Device# delete flash:vlan.dat
Device# delete flash:stby-vlan.dat
Reloads the switch and enables OpenFlow forwarding mode
for the switch.
reload
Example:
Step 7
Device# reload
Enables privileged EXEC mode.
enable
Step 8
Example:
• Enter your password if prompted.
Device> enable
Displays information about the device's forwarding mode.
show boot mode
Example:
Step 9
Device# show boot mode
Programmability Configuration Guide, Cisco IOS XE Amsterdam 17.3.x
329
OpenFlow
Enabling OpenFlow Mode on a Device
Page 344
Example
The following is sample output from the show boot mode command that shows the device in
OpenFlow mode:
Device# show boot mode
System initialized in openflow forwarding mode
System configured to boot in openflow forwarding mode
What to do next
To go back to normal mode, configure the no boot mode openflow command and then reload the device.
Configuring OpenFlow
SUMMARY STEPS
1.
enable
2. configure terminal
3. feature openflow
4. openflow
5. switch 1 pipeline 1
6. controller ipv4 ip-address port port-number vrf vrf-name security {none | tls}
7.
datapath-id ID
8. tls trustpoint local name remote name
9. end
DETAILED STEPS
Procedure
Purpose
Command or Action
Enables privileged EXEC mode.
enable
Step 1
Example:
• Enter your password if prompted
Device> enable
Enters global configuration mode.
configure terminal
Example:
Step 2
Device# configure terminal
Enables the OpenFlow feature.
feature openflow
Example:
Step 3
Device(config)# feature openflow
Programmability Configuration Guide, Cisco IOS XE Amsterdam 17.3.x
330
OpenFlow
Configuring OpenFlow
Page 345
Purpose
Command or Action
Enables OpenFlow configuration and enters OpenFlow
configuration mode.
openflow
Example:
Step 4
Device(config)# openflow
Configures a logical switch and pipeline, and enters
OpenFlow switch configuration mode.
switch 1 pipeline 1
Example:
Step 5
Device(config-openflow)# switch 1 pipeline 1
Connects to a controller.
controller ipv4 ip-address port port-number vrf vrf-name
security {none | tls}
Step 6
• You must configure the tls trustpoint command if
you have configured TLS as the OpenFlow controller
connection security option.
Example:
Device(config-openflow-switch)# controller ipv4
10.2.2.2 port 6633 vrf Mgmt-vrf security tls
• You do not have to configure tls trustpoint command
if you have not configured any security option for the
OpenFlow controller.
(Optional) Sets the OpenFlow logical switch ID.
datapath-id ID
Step 7
Example:
• The ID argument specifies the switch ID, which is a
hexadecimal value.
Device(config-openflow-switch)# datapath-id
0x12345678
(Optional) Configures an OpenFlow switch Transport Layer
Security (TLS) trustpoint.
tls trustpoint local name remote name
Example:
Step 8
Device(config-openflow-switch)# tls trustpoint
local trustpoint1 remote trustpoint1
Exits OpenFlow switch configuration mode and returns to
privileged EXEC mode.
end
Example:
Step 9
Device(config-openflow-switch)# end
Configuring an Interface in OpenFlow Mode
You can configure either a Layer 2 or Layer 3 interface in OpenFlow mode. When using a Layer 3 interface,
configure the no switchport command in interface configuration mode. Perform the following task when
using a Layer 2 interface.
SUMMARY STEPS
1.
enable
2. configure terminal
3. feature openflow
4. interface type number
5. switchport mode trunk
6. switchport nonnegotiate
Programmability Configuration Guide, Cisco IOS XE Amsterdam 17.3.x
331
OpenFlow
Configuring an Interface in OpenFlow Mode
Page 346
no keepalive
8. spanning-tree bpdufilter enable
9. end
DETAILED STEPS
Procedure
Purpose
Command or Action
Enables privileged EXEC mode.
enable
Step 1
Example:
• Enter your password if prompted
Device> enable
Enters global configuration mode.
configure terminal
Example:
Step 2
Device# configure terminal
Enables the OpenFlow feature.
feature openflow
Example:
Step 3
Device(config)# feature openflow
Configures an interface and enters interface configuration
mode.
interface type number
Example:
Step 4
Device(config)# interface gigabitethernet 1/0/3
Sets the trunking mode of the Layer 2-switched interface
to trunk.
switchport mode trunk
Example:
Step 5
Device(config-if)# switchport mode trunk
Specifies that the device will not engage in negotiation
protocol on this interface.
switchport nonnegotiate
Example:
Step 6
Device(config-if)# switchport nonnegotiate
Disables keepalive packets.
no keepalive
Example:
Step 7
Device(config-if)# no keepalive
Enables bridge protocol data unit (BPDU) filtering on the
interface.
spanning-tree bpdufilter enable
Example:
Step 8
Device(config-if)# spanning-tree bpdufilter enable
Exits interface configuration mode and returns to privileged
EXEC mode.
end
Example:
Step 9
Device(config-if)# end
Programmability Configuration Guide, Cisco IOS XE Amsterdam 17.3.x
332
OpenFlow
Configuring an Interface in OpenFlow Mode
Page 347
Verifying OpenFlow
Use these commands to verify your OpenFlow configuration. These commands can be used in any order.
SUMMARY STEPS
1.
enable
2. show openflow hardware capabilities
3. show openflow switch 1 controller
4. show openflow switch 1 ports
5. show openflow switch 1 flows list
DETAILED STEPS
Procedure
Step 1
enable
Enables privileged EXEC mode.
• Enter your password if prompted.
Example:
Device> enable
Step 2
show openflow hardware capabilities
Displays the hardware capabilities of an OpenFlow device.
Example:
Device# show openflow hardware capabilities
Max Interfaces: 1000
Aggregated Statistics: YES
Pipeline ID: 1
Pipeline Max Flows: 2322
Max Flow Batch Size: 100
Statistics Max Polling Rate (flows/sec): 10000
Pipeline Default Statistics Collect Interval: 5
Flow table ID: 0
Max Flow Batch Size: 100
Max Flows: 1022
Bind Subintfs: FALSE
Primary Table: TRUE
Table Programmable: TRUE
Miss Programmable: TRUE
Number of goto tables: 1
Goto table id: 1
Number of miss goto tables: 1
Miss Goto table id: 1
Programmability Configuration Guide, Cisco IOS XE Amsterdam 17.3.x
333
OpenFlow
Verifying OpenFlow
Page 348
Stats collection time for full table (sec): 1
.
.
.
Step 3
show openflow switch 1 controller
Displays information about the controller connected to the switch.
Example:
Device# show openflow switch 1 controller
Logical Switch Id: 1
Total Controllers: 1
Controller: 1
10.10.23.200:6633
Protocol: tcp
VRF: Mgmt-vrf
Connected: Yes
Role: Equal
Negotiated Protocol Version: OpenFlow 1.3
Last Alive Ping: 2018-06-04 17:59:20 PDT
state: ACTIVE
sec_since_connect: 50
Step 4
show openflow switch 1 ports
Displays information about the ports on an OpenFlow switch.
Example:
Device# show openflow switch 1 ports
Logical Switch Id: 1
Port
Interface Name
Config-State
Link-State
Features
1
Gi1/0/1
PORT_UP
LINK_UP
1GB-FD
2
Gi1/0/2
PORT_UP
LINK_UP
1GB-FD
3
Gi1/0/3
PORT_UP
LINK_UP
1GB-FD
4
Gi1/0/4
PORT_UP
LINK_UP
1GB-FD
5
Gi1/0/5
PORT_UP
LINK_DOWN
1GB-HD
6
Gi1/0/6
PORT_UP
LINK_DOWN
1GB-HD
7
Gi1/0/7
PORT_UP
LINK_DOWN
1GB-HD
8
Gi1/0/8
PORT_UP
LINK_DOWN
1GB-HD
9
Gi1/0/9
PORT_UP
LINK_UP
1GB-FD
10
Gi1/0/10
PORT_UP
LINK_UP
1GB-FD
11
Gi1/0/11
PORT_UP
LINK_UP
1GB-FD
12
Gi1/0/12
PORT_UP
LINK_UP
1GB-FD
13
Gi1/0/13
PORT_UP
LINK_DOWN
1GB-HD
14
Gi1/0/14
PORT_UP
LINK_DOWN
1GB-HD
15
Gi1/0/15
PORT_UP
LINK_DOWN
1GB-HD
16
Gi1/0/16
PORT_UP
LINK_DOWN
1GB-HD
17
Gi1/0/17
PORT_UP
LINK_DOWN
1GB-HD
18
Gi1/0/18
PORT_UP
LINK_DOWN
1GB-HD
19
Gi1/0/19
PORT_UP
LINK_UP
1GB-FD
20
Gi1/0/20
PORT_UP
LINK_UP
1GB-FD
21
Gi1/0/21
PORT_UP
LINK_UP
1GB-FD
22
Gi1/0/22
PORT_UP
LINK_UP
1GB-FD
23
Gi1/0/23
PORT_UP
LINK_DOWN
1GB-HD
24
Gi1/0/24
PORT_UP
LINK_DOWN
1GB-HD
25
Gi1/1/1
PORT_UP
LINK_DOWN
1GB-HD
26
Gi1/1/2
PORT_UP
LINK_DOWN
1GB-HD
27
Gi1/1/3
PORT_UP
LINK_DOWN
1GB-HD
28
Gi1/1/4
PORT_UP
LINK_DOWN
1GB-HD
Programmability Configuration Guide, Cisco IOS XE Amsterdam 17.3.x
334
OpenFlow
Verifying OpenFlow
Page 349
29
Te1/1/1
PORT_UP
LINK_DOWN
10GB-FD
30
Te1/1/2
PORT_UP
LINK_DOWN
10GB-FD
31
Te1/1/3
PORT_UP
LINK_DOWN
10GB-FD
32
Te1/1/4
PORT_UP
LINK_DOWN
10GB-FD
33
Te1/1/5
PORT_UP
LINK_DOWN
10GB-FD
34
Te1/1/6
PORT_UP
LINK_DOWN
10GB-FD
35
Te1/1/7
PORT_UP
LINK_DOWN
10GB-FD
36
Te1/1/8
PORT_UP
LINK_DOWN
10GB-FD
37
Fo1/1/1
PORT_UP
LINK_DOWN
40GB-FD
38
Fo1/1/2
PORT_UP
LINK_DOWN
40GB-FD
39
Twe1/1/1
PORT_UP
LINK_DOWN
10GB-FD
40
Twe1/1/2
PORT_UP
LINK_DOWN
10GB-FD
Step 5
show openflow switch 1 flows list
Displays OpenFlow entries.
The following sample output displays a flow that is available in Table 0, where match any goes to Table 1. (match any
means that all the packets go to Table 1.) In Table 1, the destination MAC address 00:00:01:00:00:01 is matched, and
the output port is set to 36.
Example:
Device# show openflow switch 1 flows list
Logical Switch Id: 1
Total flows: 8
Flow: 1 Match: any Actions: goto_table:1, Priority: 9000, Table: 0, Cookie: 0x1,
Duration: 2382.117s, Packets: 34443, Bytes: 3359315
Flow: 2 Match: any Actions: drop, Priority: 0, Table: 0, Cookie: 0x0,
Duration: 2382.118s, Packets: 294137, Bytes: 28806211
Flow: 3 Match: any Actions: drop, Priority: 0, Table: 1, Cookie: 0x0,
Duration: 2382.118s, Packets: 34443, Bytes: 3359315
Flow: 4 Match: dl_dst=00:00:01:00:00:01 Actions: output:36, Priority: 9000,
Table: 1, Cookie: 0x1, Duration: 2382.116s, Packets: 0, Bytes: 0
Configuration Examples for OpenFlow
Example: Enabling OpenFlow on a Device
The following example shows how to enable OpenFlow:
Device> enable
Device# configure terminal
Device(config)# boot mode openflow
Device(config)# exit
Device# write erase
Device# delete flash:vlan.dat
Device# reload
Device> enable
Programmability Configuration Guide, Cisco IOS XE Amsterdam 17.3.x
335
OpenFlow
Configuration Examples for OpenFlow
Page 350
Device# show boot mode
Example: Configuring OpenFlow
The following example shows how to configure OpenFlow:
Device# configure terminal
Device(config)# feature openflow
Device(config)# openflow
Device(config-openflow)# switch 1 pipeline 1
Device(config-openflow-switch)# controller ipv4 10.2.2.2 port 6633 vrf Mgmt-vrf security
tls
Device(config-openflow-switch)# datapath-id 0x12345678
Device(config-openflow-switch)# tls trustpoint local trustpoint1 remote trustpoint1
Device(config-openflow-switch)# end
Additional References
Related Documents
Document Title
Related Topic
Programmability Command Reference
OpenFlow commands
https://www.opennetworking.org/
Open Network Foundation
• https://faucet.nz/
• https://docs.faucet.nz/en/latest/
Faucet OpenFlow controller
• "Configuring Power over Ethernet" on Cisco
Catalyst 9300 Series Switches
• "Configuring PoE" on Cisco Catalyst 9400 Series
Switches
PoE
Programmability Configuration Guide, Cisco IOS XE Amsterdam 17.3.x
336
OpenFlow
Example: Configuring OpenFlow
Page 351
Technical Assistance
Link
Description
http://www.cisco.com/support
The Cisco Support website provides extensive online resources,
including documentation and tools for troubleshooting and resolving
technical issues with Cisco products and technologies.
To receive security and technical information about your products,
you can subscribe to various services, such as the Product Alert
Tool (accessed from Field Notices), the Cisco Technical Services
Newsletter, and Really Simple Syndication (RSS) Feeds.
Access to most tools on the Cisco Support website requires a
Cisco.com user ID and password.
Feature Information for OpenFlow
The following table provides release information about the feature or features described in this module. This
table lists only the software release that introduced support for a given feature in a given software release
train. Unless noted otherwise, subsequent releases of that software release train also support that feature.
Use Cisco Feature Navigator to find information about platform support and Cisco software image support.
To access Cisco Feature Navigator, go to www.cisco.com/go/cfn. An account on Cisco.com is not required.
Table 39: Feature Information for OpenFlow
Feature Information
Release
Feature Name
OpenFlow is a Software-Defined Network
(SDN) standard. It defines a communication
protocol in SDN environments that enables an
SDN controller to directly interact with the
forwarding plane of network devices such as
switches and routers.
This feature was implemented on the following
platforms:
• Catalyst 9300 Series Switches
• Catalyst 9400 Series Switches
• Catalyst 9500 Series Switches
• Catalyst 9500 Series High Performance
Switches
Cisco IOS XE Fuji 16.9.1
OpenFlow
Table feature message support on Catalyst
9500 Series High Performance Switches was
introduced.
Cisco IOS XE Gibraltar 16.10.1
Programmability Configuration Guide, Cisco IOS XE Amsterdam 17.3.x
337
OpenFlow
Feature Information for OpenFlow
Page 352
Feature Information
Release
Feature Name
PoE is supported on OpenFlow ports.
This feature was implemented on the following
platforms:
• Catalyst 9300 Series Switches
• Catalyst 9400 Series Switches
Cisco IOS XE Gibraltar 16.12.1
OpenFlow Power over
Ethernet
Programmability Configuration Guide, Cisco IOS XE Amsterdam 17.3.x
338
OpenFlow
Feature Information for OpenFlow