Document Metadata
Format: PDF 1.4
Title: Cisco Unified Contact Center Express Install and Upgrade Guide, Release 12.5(1) SU3
Author: Unknown
Creator: DITA Open Toolkit
Producer: XEP 4.30.961; modified using iText 2.1.7 by 1T3XT
Creation Date: D:20240614054122Z
Mod Date: D:20240614020330-07'00'
Page 1
Cisco Unified Contact Center Express Install and Upgrade Guide,
Release 12.5(1) SU3
First Published: 2023-05-08
Last Modified: 2023-05-08
Americas Headquarters
Cisco Systems, Inc.
170 West Tasman Drive
San Jose, CA 95134-1706
USA
http://www.cisco.com
Tel: 408 526-4000
800 553-NETS (6387)
Fax: 408 527-0883

Page 2
THE SPECIFICATIONS AND INFORMATION REGARDING THE PRODUCTS IN THIS MANUAL ARE SUBJECT TO CHANGE WITHOUT NOTICE. ALL STATEMENTS,
INFORMATION, AND RECOMMENDATIONS IN THIS MANUAL ARE BELIEVED TO BE ACCURATE BUT ARE PRESENTED WITHOUT WARRANTY OF ANY KIND,
EXPRESS OR IMPLIED. USERS MUST TAKE FULL RESPONSIBILITY FOR THEIR APPLICATION OF ANY PRODUCTS.
THE SOFTWARE LICENSE AND LIMITED WARRANTY FOR THE ACCOMPANYING PRODUCT ARE SET FORTH IN THE INFORMATION PACKET THAT SHIPPED WITH
THE PRODUCT AND ARE INCORPORATED HEREIN BY THIS REFERENCE. IF YOU ARE UNABLE TO LOCATE THE SOFTWARE LICENSE OR LIMITED WARRANTY,
CONTACT YOUR CISCO REPRESENTATIVE FOR A COPY.
The Cisco implementation of TCP header compression is an adaptation of a program developed by the University of California, Berkeley (UCB) as part of UCB's public domain version of
the UNIX operating system. All rights reserved. Copyright © 1981, Regents of the University of California.
NOTWITHSTANDING ANY OTHER WARRANTY HEREIN, ALL DOCUMENT FILES AND SOFTWARE OF THESE SUPPLIERS ARE PROVIDED “AS IS" WITH ALL FAULTS.
CISCO AND THE ABOVE-NAMED SUPPLIERS DISCLAIM ALL WARRANTIES, EXPRESSED OR IMPLIED, INCLUDING, WITHOUT LIMITATION, THOSE OF
MERCHANTABILITY, FITNESS FOR A PARTICULAR PURPOSE AND NONINFRINGEMENT OR ARISING FROM A COURSE OF DEALING, USAGE, OR TRADE PRACTICE.
IN NO EVENT SHALL CISCO OR ITS SUPPLIERS BE LIABLE FOR ANY INDIRECT, SPECIAL, CONSEQUENTIAL, OR INCIDENTAL DAMAGES, INCLUDING, WITHOUT
LIMITATION, LOST PROFITS OR LOSS OR DAMAGE TO DATA ARISING OUT OF THE USE OR INABILITY TO USE THIS MANUAL, EVEN IF CISCO OR ITS SUPPLIERS
HAVE BEEN ADVISED OF THE POSSIBILITY OF SUCH DAMAGES.
Any Internet Protocol (IP) addresses and phone numbers used in this document are not intended to be actual addresses and phone numbers. Any examples, command display output, network
topology diagrams, and other figures included in the document are shown for illustrative purposes only. Any use of actual IP addresses or phone numbers in illustrative content is unintentional
and coincidental.
All printed copies and duplicate soft copies of this document are considered uncontrolled. See the current online version for the latest version.
Cisco has more than 200 offices worldwide. Addresses and phone numbers are listed on the Cisco website at www.cisco.com/go/offices.
Cisco and the Cisco logo are trademarks or registered trademarks of Cisco and/or its affiliates in the U.S. and other countries. To view a list of Cisco trademarks, go to this URL:
https://www.cisco.com/c/en/us/about/legal/trademarks.html. Third-party trademarks mentioned are the property of their respective owners. The use of the word partner does not imply a
partnership relationship between Cisco and any other company. (1721R)
© 2023 Cisco Systems, Inc. All rights reserved.
Page 3
C O N T E N T S
Preface
vii
P R E F A C E
Change History
vii
About This Guide
vii
Audience
vii
Conventions
viii
Related Documents
ix
Documentation and Support
x
Documentation Feedback
x
Installation Preparation
1
C H A P T E R 1
Installation Scenarios
1
System Requirements
2
Important Considerations Before Installation
2
Preinstallation Tasks
4
Unified CCX Installation
5
C H A P T E R 2
Install Unified CCX from Installation DVD
5
Add Second Node
6
Install Unified CCX on Second Node
6
Unattended Installation
7
Perform Unattended Installation Using Answer File Generator
8
Service Update During Installation
8
Post-Installation Tasks
9
C H A P T E R 3
Configure the First Node
9
Configure the Second Node
10
Cisco Unified Contact Center Express Install and Upgrade Guide, Release 12.5(1) SU3
iii

Page 4
Configure Network Protocol for the Unified Intelligence Center Cluster
11
Switch Network Deployment from LAN to WAN
11
Upload Self-Signed Certificate
11
Unified CCX Upgrade
13
C H A P T E R 4
Unified CCX Upgrade Types
13
Important Considerations for Upgrade
14
Preupgrade Tasks
17
Unified CCX Upgrade Scenarios
19
COP File
21
Apply COP File
22
Upgrade Unified CCX Using Web Interface
22
Upgrade Unified CCX Using CLI
23
Upgrade VMware Tools
23
Upgrade VMware Tools using vSphere Client for Unified CCX
24
Upgrade VMware Tools using CLI for Unified CCX
24
Upgrade VMware Tools using Windows guest OS for Unified CCX
24
Change NIC Adapter Type
24
Check and Perform Switch Version
25
Verify Version of Unified CCX
26
Verify Status of Services
26
Verify Unified CCX Database Replication
27
Verify Cisco Database Replication
27
Upgrade Unified CCX Editor
28
Launch Unified CCX Editor
28
Install Unified CCX Real-Time Monitoring Tool
28
Launch Unified CCX Real-Time Reporting Tool
29
Unified CCX Rollback
31
C H A P T E R 5
Important Considerations for Rollback
31
Roll Back Upgrade for Single Node Setup
31
Roll Back Upgrade for HA Setup
32
Reset Database Replication after Rollback
32
Roll Back Unified CCX Clients
32
Cisco Unified Contact Center Express Install and Upgrade Guide, Release 12.5(1) SU3
iv
Contents
Page 5
Impact on Historical Reporting Users After Roll Back
33
Server Configuration Table
35
A P P E N D I X A
Server Configuration Information for Installation
35
Unified CCX Licenses
39
A P P E N D I X B
Obtain License MAC
40
Upload Licenses
40
Cisco Unified Contact Center Express Install and Upgrade Guide, Release 12.5(1) SU3
v
Contents
Page 6
Cisco Unified Contact Center Express Install and Upgrade Guide, Release 12.5(1) SU3
vi
Contents
Page 7
Preface
• Change History, on page vii
• About This Guide, on page vii
• Audience, on page vii
• Conventions, on page viii
• Related Documents, on page ix
• Documentation and Support, on page x
• Documentation Feedback, on page x
Change History
This table lists changes made to this guide. Most recent changes appear at the top.
Date
See
Change
Initial Release of Document for Release 12.5(1) SU3
May 2023
Unified CCX Upgrade >
Preupgrade Tasks
Added details about preupgrade
COP files
About This Guide
This guide explains the deployment options, how to install, upgrade, uninstall, and patch Unified CCX, and
how to change a Unified CCX deployment.
Audience
System installers and administrators or anyone who installs or configures Unified CCX and a Unified IP IVR
telephony system.
Cisco Unified Contact Center Express Install and Upgrade Guide, Release 12.5(1) SU3
vii


Page 8
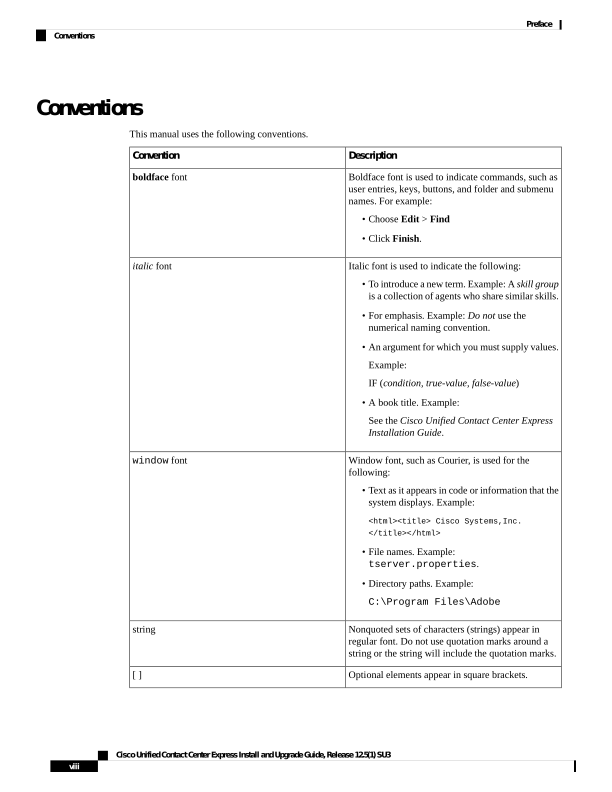
Conventions
This manual uses the following conventions.
Description
Convention
Boldface font is used to indicate commands, such as
user entries, keys, buttons, and folder and submenu
names. For example:
• Choose Edit > Find
• Click Finish.
boldface font
Italic font is used to indicate the following:
• To introduce a new term. Example: A skill group
is a collection of agents who share similar skills.
• For emphasis. Example: Do not use the
numerical naming convention.
• An argument for which you must supply values.
Example:
IF (condition, true-value, false-value)
• A book title. Example:
See the Cisco Unified Contact Center Express
Installation Guide.
italic font
Window font, such as Courier, is used for the
following:
• Text as it appears in code or information that the
system displays. Example:
<html><title> Cisco Systems,Inc.
</title></html>
• File names. Example:
tserver.properties.
• Directory paths. Example:
C:\Program Files\Adobe
window font
Nonquoted sets of characters (strings) appear in
regular font. Do not use quotation marks around a
string or the string will include the quotation marks.
string
Optional elements appear in square brackets.
[ ]
Cisco Unified Contact Center Express Install and Upgrade Guide, Release 12.5(1) SU3
viii
Preface
Conventions
Page 9
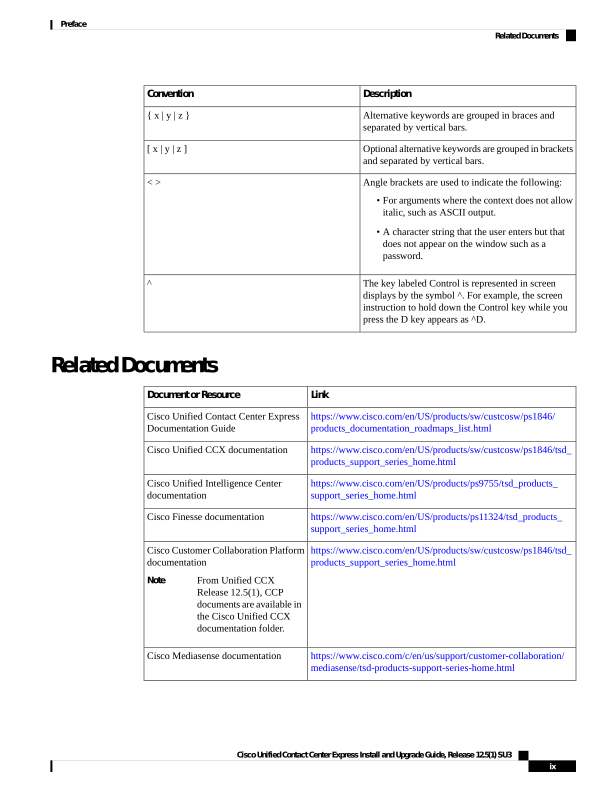
Description
Convention
Alternative keywords are grouped in braces and
separated by vertical bars.
{ x | y | z }
Optional alternative keywords are grouped in brackets
and separated by vertical bars.
[ x | y | z ]
Angle brackets are used to indicate the following:
• For arguments where the context does not allow
italic, such as ASCII output.
• A character string that the user enters but that
does not appear on the window such as a
password.
< >
The key labeled Control is represented in screen
displays by the symbol ^. For example, the screen
instruction to hold down the Control key while you
press the D key appears as ^D.
^
Related Documents
Link
Document or Resource
https://www.cisco.com/en/US/products/sw/custcosw/ps1846/
products_documentation_roadmaps_list.html
Cisco Unified Contact Center Express
Documentation Guide
https://www.cisco.com/en/US/products/sw/custcosw/ps1846/tsd\_
products_support_series_home.html
Cisco Unified CCX documentation
https://www.cisco.com/en/US/products/ps9755/tsd\_products\_
support_series_home.html
Cisco Unified Intelligence Center
documentation
https://www.cisco.com/en/US/products/ps11324/tsd\_products\_
support_series_home.html
Cisco Finesse documentation
https://www.cisco.com/en/US/products/sw/custcosw/ps1846/tsd\_
products_support_series_home.html
Cisco Customer Collaboration Platform
documentation
From Unified CCX
Release 12.5(1), CCP
documents are available in
the Cisco Unified CCX
documentation folder.
Note
https://www.cisco.com/c/en/us/support/customer-collaboration/
mediasense/tsd-products-support-series-home.html
Cisco Mediasense documentation
Cisco Unified Contact Center Express Install and Upgrade Guide, Release 12.5(1) SU3
ix
Preface
Related Documents
Page 10
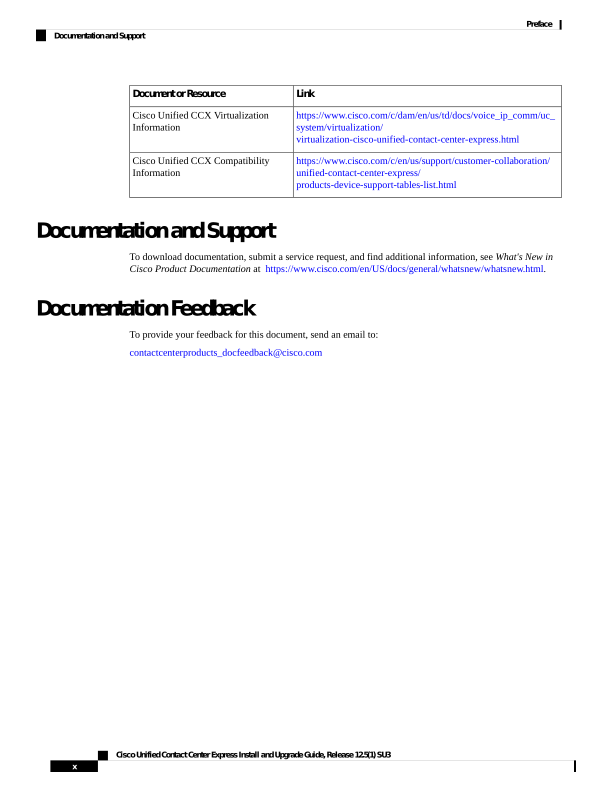
Link
Document or Resource
https://www.cisco.com/c/dam/en/us/td/docs/voice\_ip\_comm/uc\_
system/virtualization/
virtualization-cisco-unified-contact-center-express.html
Cisco Unified CCX Virtualization
Information
https://www.cisco.com/c/en/us/support/customer-collaboration/
unified-contact-center-express/
products-device-support-tables-list.html
Cisco Unified CCX Compatibility
Information
Documentation and Support
To download documentation, submit a service request, and find additional information, see What's New in
Cisco Product Documentation at https://www.cisco.com/en/US/docs/general/whatsnew/whatsnew.html.
Documentation Feedback
To provide your feedback for this document, send an email to:
contactcenterproducts_docfeedback@cisco.com
Cisco Unified Contact Center Express Install and Upgrade Guide, Release 12.5(1) SU3
x
Preface
Documentation and Support
Page 11
C H A P T E R 1
Installation Preparation
• Installation Scenarios, on page 1
• System Requirements, on page 2
• Important Considerations Before Installation, on page 2
• Preinstallation Tasks, on page 4
Installation Scenarios
Unified CCX installation has the following installation options:
• Standard installation - This option allows you to install Unified CCX software from the installation disc.
• Unattended installation - This option allows you to use the installation disc and a preconfigured USB
disk to install Unified CCX software unattended.
• Virtualization - Unified CCX supports installation on a virtual machine.
For more information, see the Unified CCX Virtualization related information
located at: https://www.cisco.com/c/dam/en/us/td/docs/voice\_ip\_comm/uc\_system/
virtualization/virtualization-cisco-unified-contact-center-express.html.
Note
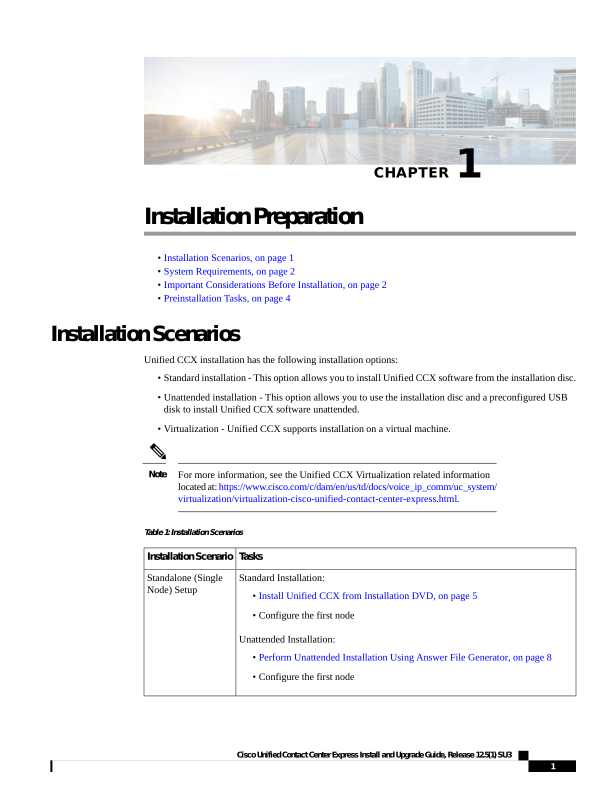
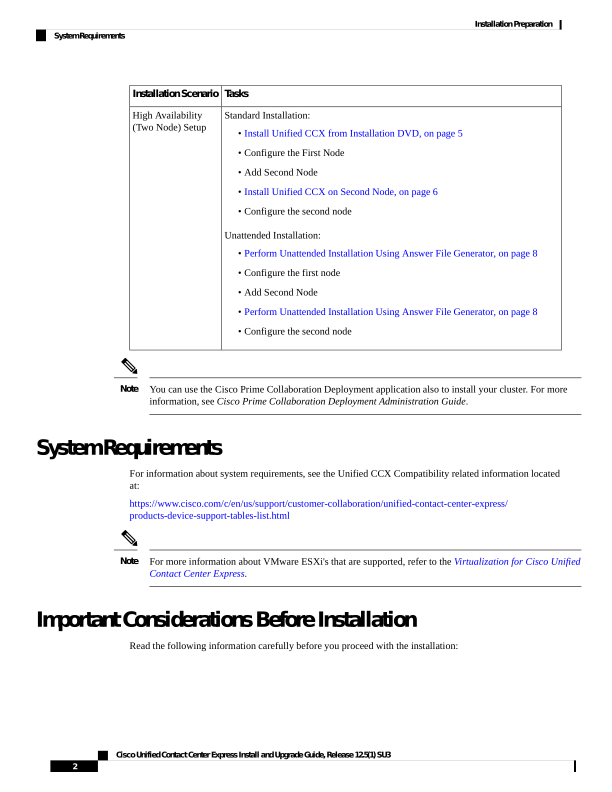
Table 1: Installation Scenarios
Tasks
Installation Scenario
Standard Installation:
• Install Unified CCX from Installation DVD, on page 5
• Configure the first node
Unattended Installation:
• Perform Unattended Installation Using Answer File Generator, on page 8
• Configure the first node
Standalone (Single
Node) Setup
Cisco Unified Contact Center Express Install and Upgrade Guide, Release 12.5(1) SU3
1


Page 12
Tasks
Installation Scenario
Standard Installation:
• Install Unified CCX from Installation DVD, on page 5
• Configure the First Node
• Add Second Node
• Install Unified CCX on Second Node, on page 6
• Configure the second node
Unattended Installation:
• Perform Unattended Installation Using Answer File Generator, on page 8
• Configure the first node
• Add Second Node
• Perform Unattended Installation Using Answer File Generator, on page 8
• Configure the second node
High Availability
(Two Node) Setup
You can use the Cisco Prime Collaboration Deployment application also to install your cluster. For more
information, see Cisco Prime Collaboration Deployment Administration Guide.
Note
System Requirements
For information about system requirements, see the Unified CCX Compatibility related information located
at:
https://www.cisco.com/c/en/us/support/customer-collaboration/unified-contact-center-express/
products-device-support-tables-list.html
For more information about VMware ESXi's that are supported, refer to the Virtualization for Cisco Unified
Contact Center Express.
Note
Important Considerations Before Installation
Read the following information carefully before you proceed with the installation:
Cisco Unified Contact Center Express Install and Upgrade Guide, Release 12.5(1) SU3
2
Installation Preparation
System Requirements

Page 13
Both nodes in a cluster must be on the same version. However, if you have upgraded only one node and want
the Cisco Unified Intelligence Center Reporting Service available on the upgraded node, do one of the
following:
• Stop the Cisco Unified Intelligence Center Reporting Service on the node that is not upgraded and then
restart the upgraded node.
• Before the upgrade, change the cluster mode to UDP on both nodes using the utils cuic cluster mode
CLI command. After upgrading both nodes, set the cluster mode to TCP. For more information, see the
section in the Administration Console User Guide Cluster Configuration for JVM Using Hazelcast for
Cisco Unified Intelligence Center.
Note
• For a 100 agent profile, if you want to deploy Cloud Connect on the BE6000, configure 14GB of vRAM.
For the 400 agent profile, use the new OVA for which you configure 20GB of vRAM.
Ensure the reservation of CPU and memory adhere to the specifications mentioned
in the Virtualization Wiki.
Note
• Unified CCX can be installed only on virtual machines and not on bare metal servers.
• DNS configuration and domain fields are mandatory for Unified CCX installation. Both forward and
reverse lookups are required. DNS is required for the Unified CCX Chat feature to function and for
integration with ICM by hostname in Unified IP IVR.
• When you Install Unified CCX on an existing server formats the hard drive, it overwrites all existing
data on the drive. It also upgrades the system BIOS, firmware, and Redundant Array of Inexpensive
Disks (RAID) configuration if they are outdated.
• Ensure that you connect each Unified CCX node to an uninterrupted power supply (UPS). This protects
the Unified CCX server from unexpected power failure that damages the physical media.
• All servers in a cluster must run the same release of Unified CCX. The only exception is while upgrading
cluster software, during which a temporary mismatch is allowed.
• Configure the server by using a static IP address so that the server IP address remains unchanged.
• Do not attempt to perform any configuration tasks during the installation.
• The field values (namely hostname and passwords) that you enter while you are running the installation
program are case-sensitive. The hostname must be in lower case and the character limit is 24 characters.
• Ensure that the administrator username is not the same as any end user in CUCM.
• When you insert or remove a USB drive, you might see error messages on the console similar to “sdb:
assuming drive cache: write through.” You can safely ignore these messages.
• Ensure that the third-party web services support TLS version 1.2 before you integrate any third-party
web services.
• After the installation of Unified CCX, you have to select the appropriate Smart License Type. For Smart
Licensing details, see Cisco Unified Contact Center Express Features Guide.
Cisco Unified Contact Center Express Install and Upgrade Guide, Release 12.5(1) SU3
3
Installation Preparation
Important Considerations Before Installation

Page 14
• When creating the OS Administrator ID, ensure that it does not start with “uccx” or “UCCX” because
such IDs conflict with system account names that are used internally within the Contact Center Express
server. Ensure that the OS Administration password is at least six characters long; it can contain
alphanumeric characters, hyphens, and underscores.
• Ensure that the Application User password is at least six characters long; it can contain alphanumeric
characters, hyphens, and underscores.
Preinstallation Tasks
Step 1
If the system time is from an Network Time Protocol (NTP) server (mandatory for VMware deployments), verify that
the first node synchronizes with the NTP server before you install a second node.
If the first node fails to synchronize with an NTP server, installation of a second node also fails.
Note
Step 2
If the firewall is in the routing path, disable the firewall between nodes. Increase the firewall timeout settings until you
complete the installation.
Step 3
Record the network interface card (NIC) speed and duplex settings of the switch port to which you will connect the new
server.
Step 4
Enable PortFast on all switch ports that are connected to Cisco servers.
Do not run Network Address Translation (NAT) or Port Address Translation (PAT) between Unified CCX
nodes.
Caution
Step 5
If you choose to apply a patch during installation, use a Secure File Transfer Protocol (SFTP) server that is certified by
Cisco through the Cisco Technology Developer Partner program (CTDP). For more information about Supported SFTP
Servers, see System Requirements section in Cisco Unified Contact Center Express Admin and Operations Guide.
Cisco Unified Contact Center Express Install and Upgrade Guide, Release 12.5(1) SU3
4
Installation Preparation
Preinstallation Tasks
Page 15
C H A P T E R 2
Unified CCX Installation
• Install Unified CCX from Installation DVD, on page 5
• Add Second Node, on page 6
• Install Unified CCX on Second Node, on page 6
• Unattended Installation, on page 7
• Service Update During Installation, on page 8
Install Unified CCX from Installation DVD
To install Unified CCX from an installation DVD, perform the following steps:
Step 1
Boot from the installation DVD.
Step 2
The installer checks the integrity of the DVD before beginning installation. Click Yes to perform a media check.
a)
If the media check fails, create another DVD.
b) If the media check passes, click OK to proceed with installation.
Step 3
Follow the instructions on the screen. When the Apply Patch window appears, select No to begin the basic installation.
If you want to perform a service upgrade by applying patch, see Service Update During Installation.
Note
Step 4
Follow the instructions on the screen to complete the installation. Use the information from Server Configuration
Information for Installation to enter the basic configuration information.
What to do next
Configure the first node.
If you are installing on the second node, configure the first node and then add the second node.
Note
Cisco Unified Contact Center Express Install and Upgrade Guide, Release 12.5(1) SU3
5


Page 16
Starting from Release 12.0(1), DVD support is not available. You can download the ISO files from
https://software.cisco.com/download/home/270569179.
Note
Add Second Node
Configure the IP address of the second node on the first node.
If you are using Smart Licensing and have already registered the first node with Cisco SSM, ensure that you
have purchased HA license. Else, the product instance will be moved to out-of-compliance state.
Note
Step 1
Log in to the Cisco Unified CCX Administration web interface of the first node.
Step 2
Choose System > Server.
Step 3
Click Add New.
Step 4
Enter the IP address or the host name of the second node in the Host Name/IP Address field.
When a new Unified CCX node is added , the Customer Collaboration Platform Configurations must be
saved again in the Subsystems menu of Cisco Unified Contact Center Express Administration. This
enables the change to take effect to re-create all the notifications for email and chat in Customer Collaboration
Platform. For more details on this, see the guide at https://www.cisco.com/c/en/us/support/
customer-collaboration/unified-contact-center-express/products-maintenance-guides-list.html.
Note
Step 5
Enter the IPv6 Address in IPv6 Address (for dual IPv4/IPv6) field.
Step 6
Enter the MAC address details in the MAC Address field.
Step 7
Click ADD.
What to do next
Install Unified CCX on Second Node, on page 6
Install Unified CCX on Second Node
Perform the following steps to install Unified CCX on the second node in the cluster:
Perform this installation during off-peak hours to avoid possible dropped calls during the formation of a
cluster.
Note
Cisco Unified Contact Center Express Install and Upgrade Guide, Release 12.5(1) SU3
6
Unified CCX Installation
Add Second Node

Page 17
Step 1
Verify that the first node is synchronized with an NTP server.
a)
From the CLI on the first node, enter utils ntp status. The output indicates the synchronization state.
If the first node is not synchronized with an NTP server, installation of the second node fails.
Note
Step 2
Install Unified CCX on the second node using the procedure Install Unified CCX from Installation DVD, on page 5.
The system checks that the second node connects to the first node during the installation.
a.
If you have configured an SMTP server for the first node, you must configure it for the second node
also.
b.
During the installation procedure, when you are prompted to enter the administrator user name and
password, enter the administrator user name and password that you set up in the first node of Unified
CCX. Otherwise, the installation fails.
Note
After installing Unified CCX on the second node, configure it immediately. Until the second node is
configured, do not change the security password or enable FIPS 140-2 mode on the first node.
Caution
What to do next
Configure the second node.
Unattended Installation
Unified Communications Answer File Generator generates answer files for unattended installations of Unified
CCX 11.6(1) or later. Go to https://www.cisco.com/c/en/us/applicat/content/cuc-afg/index.html (Cisco Unified
Communications Answer File Generator web page) for details on the Answer File Generator.
The Answer File Generator supports the following features:
• Allows simultaneous generation and saving of answer files for unattended installation on the publisher
node and the subscriber node.
• Provides syntactical validation of data entries.
• Provides online help and documentation.
1.
Unattended installation supports only basic installations and not the upgrades.
2.
Use a USB disk that is preformatted to be compatible with Linux 2.6 for the configuration file. This key
has a FAT32 format.
Note
Cisco Unified Contact Center Express Install and Upgrade Guide, Release 12.5(1) SU3
7
Unified CCX Installation
Unattended Installation

Page 18
Perform Unattended Installation Using Answer File Generator
Step 1
Go to https://www.cisco.com/c/en/us/applicat/content/cuc-afg/index.html (Cisco Unified Communications Answer File
Generator web page).
Step 2
Save the platformConfig.xml file to a Linux-compatible USB drive.
Step 3
Plug in the USB drive to the server on which you will install Unified CCX.
Step 4
Follow the instructions in Install Unified CCX from Installation DVD, on page 5.
Service Update During Installation
Unified CCX Release 12.5(1) SU2 does not support the Service Update (SU) upgrade from the installation
disc. To upgrade to Release 12.5(1) SU2, see Preupgrade Tasks, on page 17.
Cisco Unified Contact Center Express Install and Upgrade Guide, Release 12.5(1) SU3
8
Unified CCX Installation
Perform Unattended Installation Using Answer File Generator
Page 19
C H A P T E R 3
Post-Installation Tasks
• Configure the First Node, on page 9
• Configure the Second Node, on page 10
• Configure Network Protocol for the Unified Intelligence Center Cluster , on page 11
• Switch Network Deployment from LAN to WAN, on page 11
• Upload Self-Signed Certificate, on page 11
Configure the First Node
Before you begin
After a successful installation, perform one of the following:
• If the Cisco Unified Communications Manager (CUCM) cluster is using the self-signed certificate, upload
Tomcat certificates from all the nodes of CUCM cluster into the Unified CCX Tomcat trust store. To
upload certificates, use the Cisco Unified OS Administration interface (for example,
https://<uccx-hostname>/cmplatform) or the set cert import trust tomcat CLI.
• If the Cisco Unified Communications Manager (CUCM) cluster is using the CA signed certificate, upload
the root CA certificate into Unified CCX Tomcat trust store.
Verify that the following users are added in Unified Communications Manager application:
• Unified CM Users - These are end users in Unified Communications Manager, who are assigned in
Unified CCX as administrators. Using administrator credentials, you can login to the following components
for Unified CCX:
• Unified CCX Application Administration
• Cisco Unified CCX Serviceability
• Cisco Finesse Administration
• Cisco Unified Intelligence Center Administration
• Cisco Identity Service
• Disaster Recovery System
• Cisco Unified Serviceability
Cisco Unified Contact Center Express Install and Upgrade Guide, Release 12.5(1) SU3
9

Page 20
These users are required to integrate Unified Communications Manager with Unified CCX. For information
on adding Unified CM users, see topic "Adding Users to a User Group" under the “User Management
Configuration” section and “User Group Configuration” sub section in the Cisco Unified Communications
Manager Administration Guide at:
https://www.cisco.com/c/en/us/support/unified-communications/unified-communications-manager-callmanager/
products-maintenance-guides-list.html.
Step 1
Log in to Cisco Unified CCX Administration page on the first node to initiate the configuration using the following
URL format:
http://<servername or IP address>/appadmin
Use the credentials entered for Application User Name and Application User Password
during installation.
User IDs are case-sensitive when logging into the Unified CCX Administration web interface. To make them
case-insensitive, you must install 12.5(1) SU1 ES02.
Note
Step 2
Follow instructions on the screen to complete the configurations.
Use the credentials of the Unified Communications Manager End User having administrator privileges in
Unified CCX to configure the application users (AXL users).
Note
What to do next
Add Second Node, on page 6
Configure the Second Node
Upload Tomcat certificates from all the nodes of Cisco Unified Communications Manager cluster into the
second node and restart it.
Step 1
Log in to Cisco Unified CCX Administration page of the second node to initiate the configuration.
Use the credentials entered for Application User Name and Application User Password
during installation.
User IDs are case-sensitive when logging into the Unified CCX Administration web interface. To make them
case-insensitive, you must install 12.5(1) SU1 ES02.
Note
Step 2
In the Welcome to Unified CCX Replication Wizard page, enter values for all the fields and click Next.
Step 3
In the Component Activation page, wait until all the components get activated and then click Next.
If you have selected Network Deployment Type as LAN, the Cisco Unified CCX Setup Result Information page gets
displayed.
Step 4
If you have selected Network Deployment Type as WAN, enter appropriate values in Cisco Unified CM Configuration
page. Follow the instructions on the screen to complete the configurations.
Cisco Unified Contact Center Express Install and Upgrade Guide, Release 12.5(1) SU3
10
Post-Installation Tasks
Configure the Second Node
Page 21
Step 5
Restart the first node and then restart the second node.
Configure Network Protocol for the Unified Intelligence Center
Cluster
Cisco Unified Intelligence Center supports Multicast and TCP/IP as the network protocol. The default
configuration is Multicast.
If Unified CCX is in an HA over WAN deployment where Multicast is not supported, then the following CLI
command must be executed to configure the network protocol to TCP/IP:
• utils cuic cluster mode tcp-ip
The CLI must be executed on both the nodes of the Unified Intelligence Center. Restart the Cisco Unified
Intelligence Center Service for the changes to take effect. To view the latest settings, you can execute the
following CLI commands:
• utils cuic cluster show
Switch Network Deployment from LAN to WAN
You can change a LAN-based two-node setup to work over WAN. To change the network deployment from
LAN to WAN for a two-node setup, do the following:
Step 1
Log in to the first node using the Unified CCX Administration web interface.
Step 2
Choose System > Server, and delete the second node from the list.
Step 3
Add the second node details again on the first node. See Add Second Node.
Step 4
Reinstall node 2. See Install Unified CCX on Second Node
Step 5
Configure the second node, and select the Network Deployment Type as WAN. See Configure Second Node.
Step 6
Add or configure new Unified Communications Manager Telephony Call Control Groups for the second node.
For more information, see the Unified CM Telephony Call Control Group configuration section in Cisco Unified Contact
Center Express Admin and Operations Guide.
Upload Self-Signed Certificate
The following procedure is an example for uploading the CUCM self-signed certificate to Unified CCX
Tomcat trust store.
Cisco Unified Contact Center Express Install and Upgrade Guide, Release 12.5(1) SU3
11
Post-Installation Tasks
Configure Network Protocol for the Unified Intelligence Center Cluster
Page 22
The same procedure can be followed to upload CCP and Standalone CUIC self-signed certificates.
Note
Step 1
Log in to Cisco Unified OS Platform CLI using administrator credentials.
Step 2
Enter the show cert own tomcat command to view the CUCM certificate details.
The CUCM certificate is displayed.
Step 3
Copy the certificate information starting from -----BEGIN CERTIFICATE----- to -----END CERTIFICATE----- and press
Enter.
Example:
A sample certificate is as follows:
-----BEGIN CERTIFICATE-----
MIID+TCCAuGgAwIBAgIQRMN6rnHtbGwm1nNqJ1pCfTANBgkqhkiG9w0BAQsFADB1
MQswCQYDVQQGEwJJTjEOMAwGA1UECgwFQ0lTQ08xDjAMBgNVBAsMBUNCQUJVMR4w
HAYDVQQDDBVsb2FkdWNjeC1uMS5jaXNjby5jb20xEjAQBgNVBAgMCUtBUk5BVEFL
QTESMBAGA1UEBwwJQkFOR0FMT1JFMB4XDTIwMTAxMjA2NDQzN1oXDTIyMTAxMjA2
NDQzNlowdTELMAkGA1UEBhMCSU4xDjAMBgNVBAoMBUNJU0NPMQ4wDAYDVQQLDAVD
QkFCVTEeMBwGA1UEAwwVbG9hZHVjY3gtbjEuY2lzY28uY29tMRIwEAYDVQQIDAlL
QVJOQVRBS0ExEjAQBgNVBAcMCUJBTkdBTE9SRTCCASIwDQYJKoZIhvcNAQEBBQAD
ggEPADCCAQoCggEBAMPL3K6yC5i7n/KidIpae3KMoet7BA5V+IT0x7Wyz9OV6M+U
rOJPsSryNiDwMYMeUFfpY4pxaA5KD4Hqh5pzWt887fc7nmMZIqb+tJutbeClEFeP
QIAbB1hLRYMGnMyqppVAmrvYwRCDCQfaOVMUDTFACLFtF4xxyJl+ov3AdRuHew7b
rw1wsnhI2dR3z/0CJ53wN5mdPmBEd83n5LIxLEH3HZBffz3anuJeHKkJg0TpTdd+
tWR3I0u/URaKcpci9q06h6bWrBmpYtM/hScYnS0ZuqVU0aO1Za7e7C+v4/CS1rOY
usnI0uLDZv/iVfuxcE0MoS8eqPxtH+0x4eK5lzECAwEAAaOBhDCBgTALBgNVHQ8E
BAMCArQwHQYDVR0lBBYwFAYIKwYBBQUHAwEGCCsGAQUFBwMCMB0GA1UdDgQWBBTt
jixZBx6x+k6rZ0zaqQ4PA+jWHzASBgNVHRMBAf8ECDAGAQH/AgEAMCAGA1UdEQQZ
MBeCFWxvYWR1Y2N4LW4xLmNpc2NvLmNvbTANBgkqhkiG9w0BAQsFAAOCAQEAqhe+
B3duk1inR5pmzIWdjKvYYm4CtNeAn9tRYlK2BijKV6a0qDuZwSpN0dGblRr0epRI
thfkZvQGDzo5VZ45mVfxla+wxT3UrfmsoiKmncXBdaYhSsEoKbmWjHbsxwSklRWb
nZatxwglXTluPbF5F9wJSJHTTwPk3P0pjZENF09S5hY/xDEM7wfOrnKUETHJJPts
z4LArPgdaFbmWv8YLCp1YBcOI9mdxQnUUn4in6G9Nv5c9BYDKctPWKHhX8Hr7gO2
RTyBJc9tnhG4LjD0ykokeSp+5u77Xug9ZCtAgiliHZu7cWpGu9lRToiFklgah23+
XbRBYlZpO5v7rd6HbQ==
-----END CERTIFICATE-----
Step 4
Log in to Unified CCX CLI using administrator credentials.
Step 5
Enter the set cert import trust tomcat command to provide the CUCM certificate details.
a)
Paste the copied CUCM certificate details and press Return.
The CUCM certificate is imported to Unified CCX Tomcat trust store.
Cisco Unified Contact Center Express Install and Upgrade Guide, Release 12.5(1) SU3
12
Post-Installation Tasks
Upload Self-Signed Certificate

Page 23
C H A P T E R 4
Unified CCX Upgrade
• Unified CCX Upgrade Types, on page 13
• Important Considerations for Upgrade, on page 14
• Preupgrade Tasks, on page 17
• Unified CCX Upgrade Scenarios, on page 19
• COP File, on page 21
• Upgrade Unified CCX Using Web Interface, on page 22
• Upgrade Unified CCX Using CLI, on page 23
• Upgrade VMware Tools, on page 23
• Change NIC Adapter Type , on page 24
• Check and Perform Switch Version, on page 25
• Verify Version of Unified CCX, on page 26
• Verify Status of Services, on page 26
• Verify Unified CCX Database Replication, on page 27
• Verify Cisco Database Replication, on page 27
• Upgrade Unified CCX Editor, on page 28
• Launch Unified CCX Editor, on page 28
• Install Unified CCX Real-Time Monitoring Tool, on page 28
• Launch Unified CCX Real-Time Reporting Tool, on page 29
Unified CCX Upgrade Types
You can upgrade to Unified CCX version 12.5(1) SU2 only from Unified CCX versions 11.6(2), 12.0, 12.5(1),
and 12.5(1) SU1. If you are using any prior release of Unified CCX, you have to upgrade to 11.6(2) or 12.0
and then upgrade to 12.5(1) SU2.
To upgrade to 12.5(1) SU2, apply the release-specific preupgrade COP file. For more information on release
versions and their corresponding COP files, see Preupgrade Tasks, on page 17.
Note
Cisco Unified Contact Center Express Install and Upgrade Guide, Release 12.5(1) SU3
13


Page 24
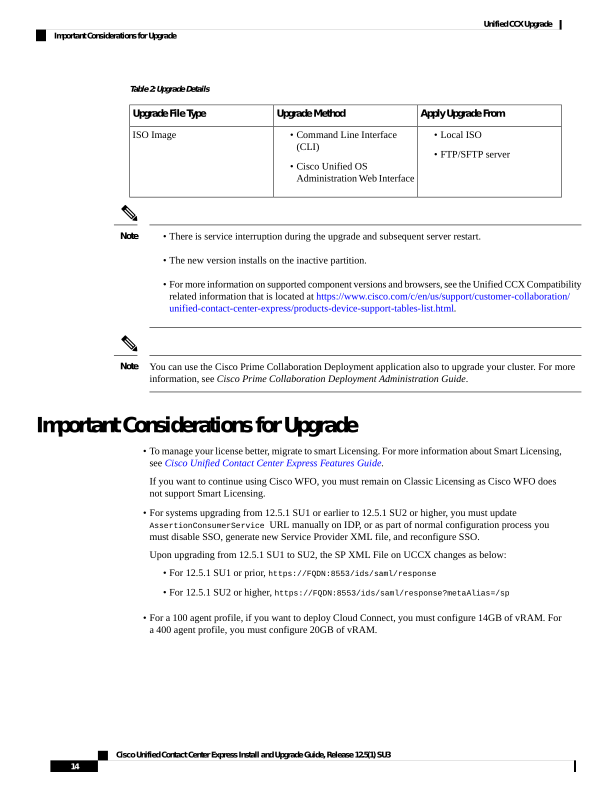
Table 2: Upgrade Details
Apply Upgrade From
Upgrade Method
Upgrade File Type
• Local ISO
• FTP/SFTP server
• Command Line Interface
(CLI)
• Cisco Unified OS
Administration Web Interface
ISO Image
• There is service interruption during the upgrade and subsequent server restart.
• The new version installs on the inactive partition.
• For more information on supported component versions and browsers, see the Unified CCX Compatibility
related information that is located at https://www.cisco.com/c/en/us/support/customer-collaboration/
unified-contact-center-express/products-device-support-tables-list.html.
Note
You can use the Cisco Prime Collaboration Deployment application also to upgrade your cluster. For more
information, see Cisco Prime Collaboration Deployment Administration Guide.
Note
Important Considerations for Upgrade
• To manage your license better, migrate to smart Licensing. For more information about Smart Licensing,
see Cisco Unified Contact Center Express Features Guide.
If you want to continue using Cisco WFO, you must remain on Classic Licensing as Cisco WFO does
not support Smart Licensing.
• For systems upgrading from 12.5.1 SU1 or earlier to 12.5.1 SU2 or higher, you must update
AssertionConsumerService URL manually on IDP, or as part of normal configuration process you
must disable SSO, generate new Service Provider XML file, and reconfigure SSO.
Upon upgrading from 12.5.1 SU1 to SU2, the SP XML File on UCCX changes as below:
• For 12.5.1 SU1 or prior, https://FQDN:8553/ids/saml/response
• For 12.5.1 SU2 or higher, https://FQDN:8553/ids/saml/response?metaAlias=/sp
• For a 100 agent profile, if you want to deploy Cloud Connect, you must configure 14GB of vRAM. For
a 400 agent profile, you must configure 20GB of vRAM.
Cisco Unified Contact Center Express Install and Upgrade Guide, Release 12.5(1) SU3
14
Unified CCX Upgrade
Important Considerations for Upgrade

Page 25
• A 300 agent profile is not available. You cannot switch versions.
• For a 100 agent profile, if you do not want to deploy Cloud Connect, there
is no change.
• Ensure that the reservation of CPU and memory adhere to the specifications
mentioned in the Virtualization Wiki.
Note
• Install Unified CCX only on virtual machines. Unified CCX will not run on bare metal.
• In the virtual machine, change the Guest OS version to match the OS version of Unified CCX.
• You must manually adjust the CPU Limit within VMware for the ESXi host to "Unlimited".
• DNS is mandatory. Before you upgrade, configure the domain name and DNS server IPs and ensure the
forward and reverse lookups on the DNS server are correct.
• Do not make any configuration changes during upgrade because changes are lost after upgrade.
• Always ensure to perform the backup on the first node before you start upgrading the second node.
• Upgrade Unified CCX during off-peak hours or during a maintenance window to avoid service
interruptions.
• In an HA deployment of Unified CCX, you must switch both the Unified CCX nodes to the newer version
during the same maintenance window.
If the contact center is expected to function with only the first node that is switched to the new version,
ensure that the following conditions are met until the switch version on the second node is complete:
• No agents are logged in to the second node.
• The services, Cisco Finesse Tomcat, Cisco Unified CCX Engine, and Cisco Unified CCX
Database are in Stopped state on the second node.
• Upgrade Unified CCX and Cisco Customer Collaboration Platform in the same maintenance window
and perform the upgrade on Cisco Customer Collaboration Platform first, followed by Unified CCX.
• After the upgrade of Cisco Customer Collaboration Platform, unread and unhandled emails are downloaded
from the mail server and added to Unified CCX. However, the draft emails are not downloaded.
• Ensure that a valid Cisco Customer Collaboration Platform OVA is deployed for a successful install or
upgrade. The upgrade stops if no Cisco Customer Collaboration Platform OVA is found in the deployment.
• Both the nodes in a cluster must run the same release of Unified CCX. The only exception is while you
are upgrading the cluster software, during which a temporary mismatch is allowed.
• Upgrade VMware tools and change the NIC adapter type for Unified CCX after the refresh upgrade and
before initiating the switch version.
• For more information on Certificates, see Cisco Unified Contact Center Certificate Management Guide
available at: https://www.cisco.com/c/en/us/support/docs/customer-collaboration/
unified-contact-center-express/118855-configure-uccx-00.html.
Cisco Unified Contact Center Express Install and Upgrade Guide, Release 12.5(1) SU3
15
Unified CCX Upgrade
Important Considerations for Upgrade

Page 26
• Unified CCX 10.0(1) and later versions include a feature in the VMware Installation information line to
indicate if the disk partitions are aligned. For aligned disk partitions, the VMware installation information
line indicates "Partitions aligned". After upgrading, if the VMware installation information line indicates
"ERROR-UNSUPPORTED: Partitions unaligned.", it means that Cisco cannot provide support for any
performance issues. To correct a virtual machine with unaligned partitions, you must perform the applicable
restore (with rebuild) scenario procedure in Unified CCX Administration. For more information, see
Cisco Unified Contact Center Express Admin and Operations Guide.
• After the upgrade, the OS Administration lists the manually uploaded third-party CA certificates but
does not list the third-party CA certificates that are packaged with Unified CCX.
• If any Unified Intelligence Center user was made an Administrator using the utils cuic user make-admin
[user-name] command before an upgrade of Unified CCX, the user loses the Cisco Cisco Unified
Intelligence Center Administrator capabilities after the upgrade. Execute the CLI again, after the upgrade,
to make the user a Cisco Unified Intelligence Center Administrator.
• In an HA setup, do not switch versions on both the first and second nodes at the same time.
• When you upgrade Unified CCX in an HA deployment, ensure that the following conditions are met
before the switch version is initiated on Node 2:
• If you have upgraded Node 1 to a new version and then reinstalled Node 2 with an older version,
you must upgrade Node 1 and Node 2 again to the new version, before you start the switch version.
• The switch version of Node 1 is complete and the node is successfully restarted. Otherwise, the
upgrade might fail or there might be discrepancy in data.
The switch version of Node 1 automatically initiates a node restart and there is
no need to manually restart Node 1.
Note
• Ensure that you are able to log in successfully to Cisco Unified Intelligence Center, on Node 1,
using the Administrator or Reporting User credentials.
• After switching the version, you may experience a delay of approximately 30 minutes for the services
to start during the first restart of the Unified CCX and Cisco Collaboration Platform systems. This is due
to the application of security policies after upgrade. This delay will not appear in subsequent restarts.
• Do not modify the Hostname or IP address of the Unified CCX server during the upgrade process.
• After the upgrade of Unified CCX, agents and supervisors must clear the browser cache and cookies
before logging in to the Cisco Finesse Desktop and the Cisco Unified Intelligence Center.
• After a successful installation or upgrade, download and install the language pack COP to use the Cisco
Unified Intelligence Center interface and the Cisco Finesse Desktop interface in a language other than
English.
• After the upgrade, you must manually remove the Context Service gadget from the Cisco Finesse desktop
(Desktop Layout and Team Desktop Layout).
• After the upgrade of Unified CCX, if necessary, the administrator can copy the sample configurations
for customizing desktop properties from the View Default Layout (Cisco Finesse Administration console
Desktop Layout) and add to the respective custom layouts.
Cisco Unified Contact Center Express Install and Upgrade Guide, Release 12.5(1) SU3
16
Unified CCX Upgrade
Important Considerations for Upgrade

Page 27
For more information, see the Upgrade section in the Cisco Finesse Installation and Upgrade Guide at
https://www.cisco.com/c/en/us/support/customer-collaboration/finesse/
products-installation-guides-list.html.
• After the upgrade, you can move to Smart Licensing. For Smart Licensing details, see Cisco Unified
Contact Center Express Features Guide.
• From Unified CCX Release 12.5(1) SU1, the connection between RmCm Subsystem and Unified CM
can be secured by enabling Secure Real–Time Transport Protocol (SRTP) in AppAdmin. If you had
enabled SRTP before upgrading to Unified CCX Release 12.5(1) SU1, disable and enable it again after
upgrade. Otherwise, the connection between RmCm Subsystem and Unified CM will not be secure.
• When SRTP is enabled in Unified CCX release 12.5(1), after upgrading to Unified CCX release 12.5(1)
SU1, the RmCm subsystem will be out of service on the subscriber node. Disable and enable SRTP again
to operate Unified CCX in SRTP-enabled mode.
• When SRTP is enabled in Unified CCX release 12.5(1) SU1, if you switch back to Unified CCX release
12.5(1), the RmCm subsystem will be out of service on both the nodes. Disable and enable SRTP again
to operate Unified CCX in SRTP-enabled mode.
Preupgrade Tasks
All the nodes in a cluster must be on the same version. However, if you have upgraded only some nodes and
want Intelligence Center Reporting Service available on the upgradednodes, do one of the following:
• Stop the Intelligence Center Reporting Service on all the nodes that aren’t upgraded and then restart
the upgraded nodes.
• Before the upgrade, change the cluster mode to UDP on all the nodes using the utils cuic cluster mode
CLI command. After upgrading all the nodes, set the cluster mode to TCP. For more information, see
the section in the Administration Console User Guide Cluster Configuration for JVM Using Hazelcast
for Cisco Unified Intelligence Center.
Note
Step 1
Obtain the pre-upgrade COP from https://software.cisco.com/download/home/270569179.
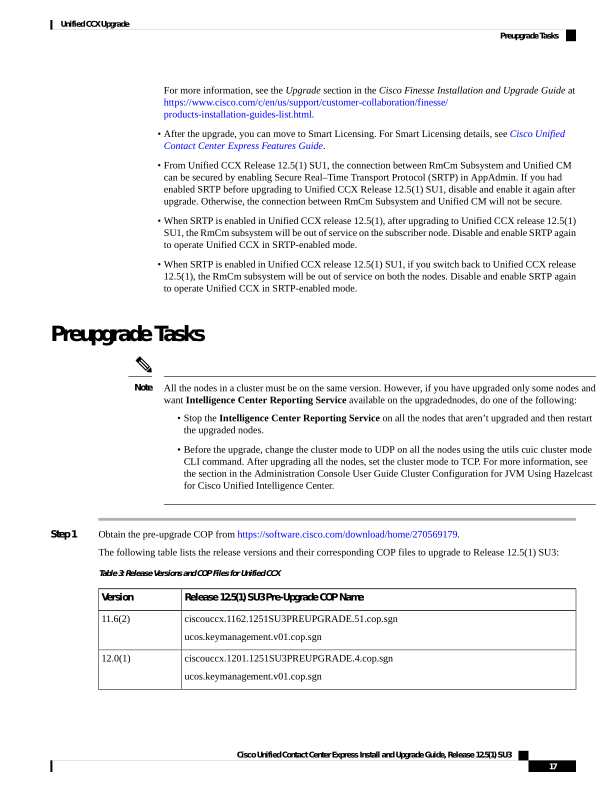
The following table lists the release versions and their corresponding COP files to upgrade to Release 12.5(1) SU3:
Table 3: Release Versions and COP Files for Unified CCX
Release 12.5(1) SU3 Pre-Upgrade COP Name
Version
ciscouccx.1162.1251SU3PREUPGRADE.51.cop.sgn
ucos.keymanagement.v01.cop.sgn
11.6(2)
ciscouccx.1201.1251SU3PREUPGRADE.4.cop.sgn
ucos.keymanagement.v01.cop.sgn
12.0(1)
Cisco Unified Contact Center Express Install and Upgrade Guide, Release 12.5(1) SU3
17
Unified CCX Upgrade
Preupgrade Tasks

Page 28
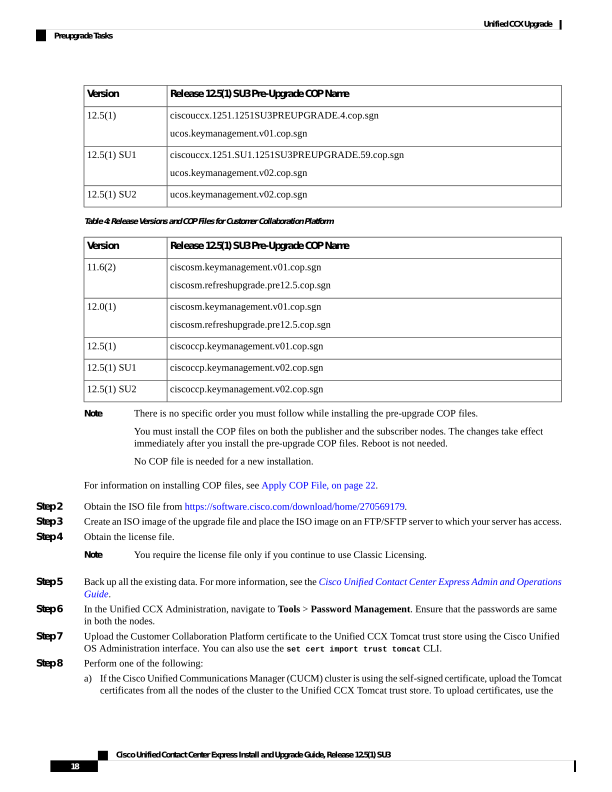
Release 12.5(1) SU3 Pre-Upgrade COP Name
Version
ciscouccx.1251.1251SU3PREUPGRADE.4.cop.sgn
ucos.keymanagement.v01.cop.sgn
12.5(1)
ciscouccx.1251.SU1.1251SU3PREUPGRADE.59.cop.sgn
ucos.keymanagement.v02.cop.sgn
12.5(1) SU1
ucos.keymanagement.v02.cop.sgn
12.5(1) SU2
Table 4: Release Versions and COP Files for Customer Collaboration Platform
Release 12.5(1) SU3 Pre-Upgrade COP Name
Version
ciscosm.keymanagement.v01.cop.sgn
ciscosm.refreshupgrade.pre12.5.cop.sgn
11.6(2)
ciscosm.keymanagement.v01.cop.sgn
ciscosm.refreshupgrade.pre12.5.cop.sgn
12.0(1)
ciscoccp.keymanagement.v01.cop.sgn
12.5(1)
ciscoccp.keymanagement.v02.cop.sgn
12.5(1) SU1
ciscoccp.keymanagement.v02.cop.sgn
12.5(1) SU2
There is no specific order you must follow while installing the pre-upgrade COP files.
You must install the COP files on both the publisher and the subscriber nodes. The changes take effect
immediately after you install the pre-upgrade COP files. Reboot is not needed.
No COP file is needed for a new installation.
Note
For information on installing COP files, see Apply COP File, on page 22.
Step 2
Obtain the ISO file from https://software.cisco.com/download/home/270569179.
Step 3
Create an ISO image of the upgrade file and place the ISO image on an FTP/SFTP server to which your server has access.
Step 4
Obtain the license file.
You require the license file only if you continue to use Classic Licensing.
Note
Step 5
Back up all the existing data. For more information, see the Cisco Unified Contact Center Express Admin and Operations
Guide.
Step 6
In the Unified CCX Administration, navigate to Tools > Password Management. Ensure that the passwords are same
in both the nodes.
Step 7
Upload the Customer Collaboration Platform certificate to the Unified CCX Tomcat trust store using the Cisco Unified
OS Administration interface. You can also use the set cert import trust tomcat CLI.
Step 8
Perform one of the following:
a)
If the Cisco Unified Communications Manager (CUCM) cluster is using the self-signed certificate, upload the Tomcat
certificates from all the nodes of the cluster to the Unified CCX Tomcat trust store. To upload certificates, use the
Cisco Unified Contact Center Express Install and Upgrade Guide, Release 12.5(1) SU3
18
Unified CCX Upgrade
Preupgrade Tasks
Page 29
Cisco Unified OS Administration interface (for example, https://<uccx-hostname>/cmplatform) or the
set cert import trust tomcat CLI.
b) If the Cisco Unified Communications Manager (CUCM) cluster is using a CA-signed certificate, upload the root and
the intermediate CA certificates to the Unified CCX Tomcat trust store.
• For adding the UCCX certificate to the CUCM Phone trust store, refer to Finesse IP Phone Agent
Certificate Management section in the Cisco Unified Contact Center Express Admin and Operations
Guide.
• For information on using secure ports, refer to Finesse Port Utilization section in the Port Utilization
Guide for Cisco Unified Contact Center Express Solution.
• The single button FIPPA service must be added to CUCM.
Note
Step 9
Install the COP files. Refer to Step 1, on page 17 for the list of Unified CCX and Customer Collaboration Platform COP
files and the corresponding releases.
For information about installing the COP files, see COP File, on page 21.
If you do not install these COP files, the upgrade fails.
Note
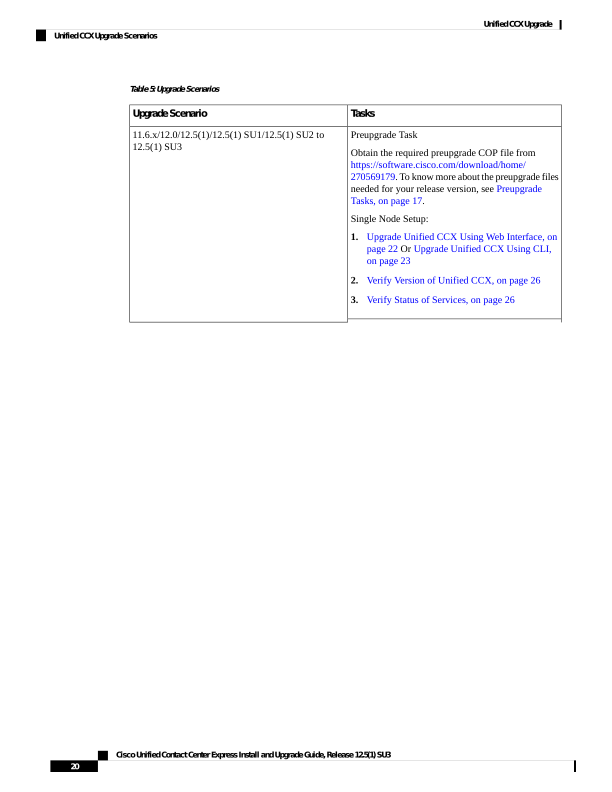
Unified CCX Upgrade Scenarios
The following table lists the required tasks to upgrade a Single Node and a High Availability (HA) setup for
Refresh Upgrade and Linux to Linux Upgrade types.
During Refresh Upgrade to Release 12.5.1 SU2, the system-history.log file may contain the following
information, which can be ignored:
Switch Version 12.5.1.11002-XYZ to 12.0.1.10000-24 Aborted
Note
Cisco Unified Contact Center Express Install and Upgrade Guide, Release 12.5(1) SU3
19
Unified CCX Upgrade
Unified CCX Upgrade Scenarios

Page 30
Table 5: Upgrade Scenarios
Tasks
Upgrade Scenario
Preupgrade Task
Obtain the required preupgrade COP file from
https://software.cisco.com/download/home/
270569179. To know more about the preupgrade files
needed for your release version, see Preupgrade
Tasks, on page 17.
Single Node Setup:
1.
Upgrade Unified CCX Using Web Interface, on
page 22 Or Upgrade Unified CCX Using CLI,
on page 23
2.
Verify Version of Unified CCX, on page 26
3.
Verify Status of Services, on page 26
11.6.x/12.0/12.5(1)/12.5(1) SU1/12.5(1) SU2 to
12.5(1) SU3
Cisco Unified Contact Center Express Install and Upgrade Guide, Release 12.5(1) SU3
20
Unified CCX Upgrade
Unified CCX Upgrade Scenarios
Page 31
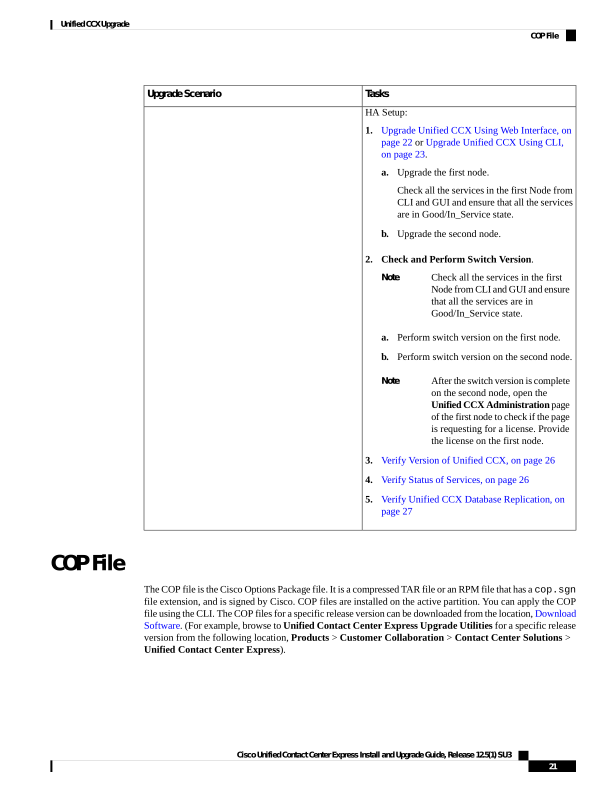
Tasks
Upgrade Scenario
HA Setup:
1.
Upgrade Unified CCX Using Web Interface, on
page 22 or Upgrade Unified CCX Using CLI,
on page 23.
a.
Upgrade the first node.
Check all the services in the first Node from
CLI and GUI and ensure that all the services
are in Good/In_Service state.
b.
Upgrade the second node.
2.
Check and Perform Switch Version.
Check all the services in the first
Node from CLI and GUI and ensure
that all the services are in
Good/In_Service state.
Note
a.
Perform switch version on the first node.
b.
Perform switch version on the second node.
After the switch version is complete
on the second node, open the
Unified CCX Administration page
of the first node to check if the page
is requesting for a license. Provide
the license on the first node.
Note
3.
Verify Version of Unified CCX, on page 26
4.
Verify Status of Services, on page 26
5.
Verify Unified CCX Database Replication, on
page 27
COP File
The COP file is the Cisco Options Package file. It is a compressed TAR file or an RPM file that has a cop.sgn
file extension, and is signed by Cisco. COP files are installed on the active partition. You can apply the COP
file using the CLI. The COP files for a specific release version can be downloaded from the location, Download
Software. (For example, browse to Unified Contact Center Express Upgrade Utilities for a specific release
version from the following location, Products > Customer Collaboration > Contact Center Solutions >
Unified Contact Center Express).
Cisco Unified Contact Center Express Install and Upgrade Guide, Release 12.5(1) SU3
21
Unified CCX Upgrade
COP File
Page 32
Apply COP File
See the documentation that is provided with the COP file for additional instructions on how to apply the COP
file.
Attention
Contact Cisco if you want to roll back the COP file.
Attention
For an HA setup, repeat this procedure for node 2 only after restarting node 1 after successful COP installation.
Note
Before you begin
1.
Place the COP file on an FTP/STFP server to which your server has access.
Step 1
Follow Steps 1 to 8 from Upgrade Unified CCX Using CLI, on page 23.
Step 2
Enter the command utils system restart to restart the server.
Upgrade Unified CCX Using Web Interface
You can upgrade Unified CCX either from a local DVD or from a FTP/SFTP server.
Step 1
Log in to Cisco Unified OS Administration using administrator username and password.
Step 2
Choose Software Upgrades > Install/Upgrade.
Step 3
Choose source as either DVD/CD or Remote Filesystem from the Source list.
Step 4
Enter the path of the upgrade file in the Directory field. For Remote Filesystem, enter a forward slash (/) followed by
the directory path.
Step 5
If you chose Remote Filesystem, follow the instructions on the screen; otherwise, skip to Step 6.
Step 6
Click Next to see the list of upgrades that are available.
Step 7
Choose the appropriate upgrade file, and click Next.
Step 8
Enter relevant information in the Email Destination and SMTP server fields to use the Email Notification feature.
Step 9
Click Next to initiate the upgrade process.
Cisco Unified Contact Center Express Install and Upgrade Guide, Release 12.5(1) SU3
22
Unified CCX Upgrade
Apply COP File

Page 33
After upgrading Unified CCX, the CAs that are not approved by Cisco are removed from the platform trust
store. However, you can add them back, if necessary.
• For information about the list of CAs that Cisco supports, see Cisco Trusted External Root Bundle in
https://www.cisco.com/security/pki.
• For information about adding a certificate, follow the procedure mentioned from step 5 under Obtain
and Upload CA Certificate section in Cisco Unified Contact Center Express Admin and Operations
Guide.
Note
Upgrade Unified CCX Using CLI
Step 1
Log in to Cisco Unified OS Platform CLI using administrator username and password.
Step 2
Enter the command show version active and check the current version.
Step 3
Enter the command utils system upgrade status and check that the node is ready for upgrade.
Step 4
Enter the command utils system upgrade initiate to initiate the upgrade process.
Step 5
Choose the source where the upgrade file is placed.
Step 6
Follow the instructions on the screen.
Your entries are validated and the available files list is displayed.
Step 7
After the installation is complete, enter the show version inactive command to check the upgraded version.
If you enter show version active command during the upgrade process (by using an ISO image), it displays
the version that is being upgraded to.
After upgrading Unified CCX, the CAs that are not approved by Cisco are removed from the platform trust
store. However, you can add them back, if necessary.
• For information about the list of CAs that Cisco supports, see Cisco Trusted External Root Bundle in
https://www.cisco.com/security/pki.
• For information about adding a certificate, follow the procedure mentioned from step 5 under Obtain
and Upload CA Certificate section in Cisco Unified Contact Center Express Admin and Operations
Guide.
Note
Upgrade VMware Tools
Perform the below procedures to install and upgrade VMware tools for Unified CCX post Refresh Upgrade
and prior to initiating Switch Version.
Cisco Unified Contact Center Express Install and Upgrade Guide, Release 12.5(1) SU3
23
Unified CCX Upgrade
Upgrade Unified CCX Using CLI
Page 34
Upgrade VMware Tools using vSphere Client for Unified CCX
Step 1
Ensure you have powered on the virtual machine.
Step 2
Right-click the VM menu bar, choose Guest > Install/Upgrade VMware tools.
Step 3
Select the automatic tools update and click OK. It takes few minutes to complete. Once the update is complete, the tools
are listed as Running (Current) on the VM's Summary tab in vSphere.
For more information about VMware ESXi's that are supported, refer to the Virtualization for Cisco Unified
Contact Center Express.
Note
Upgrade VMware Tools using CLI for Unified CCX
Step 1
Ensure you have powered on the virtual machine.
Step 2
Right-click the VM menu bar, choose Guest > Install/Upgrade VMware tools.
Step 3
Select the interactive tools update and click OK.
Step 4
Open the console and login at the command prompt.
Step 5
Enter the command utils vmtools refresh and confirm.
The server automatically reboots twice.
Step 6
After reboot, check the Summary tab for the VM to verify that the VMware tools version is current. If it is not current,
reboot the VM and check the version again. It takes few minutes to complete. Once the process is complete, the tools are
listed as Running (Current) on the VM's Summary tab in vSphere.
Upgrade VMware Tools using Windows guest OS for Unified CCX
Step 1
Ensure you have powered on the virtual machine.
Step 2
Right-click the VM menu bar, choose Guest > Install/Upgrade VMware tools. Click OK on the popup window.
Step 3
Login to the VM as a user with Administrative privileges.
Step 4
Run VMware tools from the DVD drive. The installation wizard starts.
Step 5
Follow the prompts in the wizard to complete the VMware Tools installation. Choose the Typical installation option.
Step 6
When the VM Tools installation finishes, restart the virtual machine for the changes to take effect. After the process is
complete , the tools are listed as Running (Current) on the VM's Summary tab in vSphere.
Change NIC Adapter Type
Perform the below procedure post Refresh Upgrade and prior to initiating Switch Version.
Cisco Unified Contact Center Express Install and Upgrade Guide, Release 12.5(1) SU3
24
Unified CCX Upgrade
Upgrade VMware Tools using vSphere Client for Unified CCX
Page 35
Step 1
From VMware VSphere, select the virtual machine > Edit Settings. The Virtual Machine Properties window appears.
Step 2
To add the new Network Adapter, on the Hardware tab, click Add. The Add Hardware window appears.
Step 3
Select Device Type and Ethernet Adapter. Click Next. Choose the adapter type as VXMNET3. Click Next and Finish.
Step 4
To remove the existing Network Adapter 1, under the Hardware tab, select Network Adapter 1, click Remove, and
select OK.
Step 5
Power on the virtual machine.
Check and Perform Switch Version
Never initiate switch version from the recovery CD.
Caution
• Perform switch version in the same maintenance window to avoid additional downtime.
• The time taken for switch version depends on the size of records in the database.
• Always ensure that all the third-party Wallboard server and WFM servers that query the Unified CCX
database externally are powered off prior to the switch version process. These servers may cause conflict
in database operations.
• Update the Unified CCX VM to latest OVA for 100 and 400 Agent profile for the switch version to be
successful. This is mandatory as the vRAM required has been changed. For more information, see the
Unified CCX Virtualization related information located at: https://www.cisco.com/c/dam/en/us/td/docs/
voice_ip_comm/uc_system/virtualization/virtualization-cisco-unified-contact-center-express.html.
• Do not modify the Hostname or IP address of the Unified CCX server before performing switch version.
Note
Step 1
To check and perform switch version using the web interface:
a)
Log in to Cisco Unified OS Administration using administrator username and password.
b) Choose Settings > Version to check the versions.
c)
Click Switch Versions, and click OK to initiate the switch version process.
d) Choose Settings > Version to check the active version.
Step 2
To check and perform switch version using the CLI:
a)
Log in to Cisco Unified OS Platform CLI using administrator username and password.
b) Enter the command show version active to check the active version.
c)
Enter the command show version inactive to check the inactive version.
d) Enter the command utils system switch-version to initiate the switch version process.
e)
Enter the command show version active to check the active version.
Step 3
If switch version is unsuccessful:
Cisco Unified Contact Center Express Install and Upgrade Guide, Release 12.5(1) SU3
25
Unified CCX Upgrade
Check and Perform Switch Version


Page 36
a)
Log in to Cisco Unified OS Platform CLI using administrator username and password.
b) Enter the command utils uccx switch-version db-check to check if the database is corrupt.
c)
Enter the command utils uccx switch-version db-recover to restore the database.
Verify Version of Unified CCX
You can verify the current active and inactive versions of Unified CCX either by using the web interface or
using CLI.
For an HA setup, verify the versions on both the nodes.
Note
Step 1
To verify the active and inactive versions of Unified CCX using the web interface:
a)
Log in to Cisco Unified OS Administration using administrator username and password.
b) Choose Settings > Version to check the current active and inactive versions.
Step 2
To verify the active and inactive versions of Unified CCX using the CLI:
a)
Log in to Cisco Unified OS Platform CLI using administrator username and password.
b) Enter the command show version active to check the active version.
c)
Enter the command show version inactive to check the inactive version.
Verify Status of Services
For HA setup, verify the services on both the nodes.
Note
Step 1
To verify the status of Customer Collaboration Platform:
a)
After Unified CCX upgrade, log in to Cisco Unified CCX Administration using administrator username and
password.
b) Choose Subsystems > Chat and Email CCP Configuration.
c)
Click Save and verify that the CCP Status displays green for all the components.
Step 2
To verify the status of services using the web interface:
a)
Log in to Cisco Unified CCX Serviceability using administrator username and password.
b) Choose Tools > Control Center - Network Services and verify that all the services are running.
Step 3
To verify the status of services using the CLI:
a)
Log in to Cisco Unified OS Platform CLI using administrator username and password.
Cisco Unified Contact Center Express Install and Upgrade Guide, Release 12.5(1) SU3
26
Unified CCX Upgrade
Verify Version of Unified CCX

Page 37
b) Enter the command utils service list to verify that all the services are running.
Verify Unified CCX Database Replication
For Cisco Finesse Desktop Failover to succeed, ensure the status of Cisco Database Replication is 'Good
replication'.
Note
Step 1
Log in to Cisco Unified CCX Serviceability using administrator username and password.
Step 2
Choose Tools > Datastore Control Center > Replication Servers.
Step 3
Ensure the servers are in ACTIVE/CONNECTED state and database replication of the operating system is functioning
between the first node and the second node.
Step 4
If there is a problem with the replication continue; otherwise, skip to Step 5.
a)
Log in to Unified CCX CLI using Unified CCX username and password.
b) Enter the command utils uccx dbreplication status and determine the location and cause of failure.
c)
Enter the command utils uccx dbreplication repair {all|database_name} on the node or nodes to remove data
discrepancy between the nodes.
d) Enter the command utils uccx dbreplication status to ensure the status is 'Good replication'. If failure persists,
continue; otherwise, skip to Step 5.
e)
Enter the command utils uccx dbreplication teardown to remove database replication.
f)
Enter the command utils uccx dbreplication setup to setup database replication.
g) Enter the command utils uccx dbreplication status to ensure the status is 'Good replication'.
Step 5
Log in to Unified CCX Administration using Unified CCX username and password.
Step 6
Verify that your configuration data exists on both the nodes.
Verify Cisco Database Replication
Step 1
Run the Cisco Unified Real-Time Monitoring Tool (RTMT).
Step 2
Choose System > Performance > Open Performance Monitoring.
Step 3
Click the Node1 or Node2 radio button as required.
Step 4
Click the Number of Replicates Created and State of Replication radio button.
Step 5
Double-click Replicate_State.
Step 6
Choose ReplicateCount, and click Add.
The “Performance Counter” graph is displayed in the right window.
Step 7
Use the following list to monitor the status of database replication.
Cisco Unified Contact Center Express Install and Upgrade Guide, Release 12.5(1) SU3
27
Unified CCX Upgrade
Verify Unified CCX Database Replication

Page 38
• 0—Initializing
• 1—Replication setup script fired from this node
• 2—Good replication
• 3—Bad replication
• 4—Replication setup did not succeed
Step 8
If there is a problem with the replication:
a)
Log in to Cisco Unified OS Platform CLI using administrator username and password.
b) Enter the command utils dbreplication status{all|node|replicate} and determine the location and cause of failure.
c)
Enter the command utils dbreplication repair{nodename|all} on the node or nodes to remove data discrepancy
between the nodes.
d) Enter the command utils dbreplication status to ensure the status is 'Good replication'.
Upgrade Unified CCX Editor
Step 1
Uninstall the Unified CCX Editor.
Step 2
Log in to Cisco Unified CCX Administration using Unified CCX username and password.
Step 3
Choose Tools > Plug-ins.
Step 4
Click the Cisco Unified CCX Editor Web Launcher hyperlink.
Step 5
Download the Unified CCX Editor (.jnlp) file.
Launch Unified CCX Editor
Step 1
Log in to Cisco Unified CCX Administration using Unified CCX username and password.
Step 2
Choose Tools > Plug-ins.
Step 3
Click the Cisco Unified CCX Editor Web Launcher hyperlink to download and launch the Unified CCX Editor (.jnlp)
file.
Install Unified CCX Real-Time Monitoring Tool
Step 1
Uninstall the previous version of Unified CCX Real-Time Monitoring Tool.
Step 2
Log in to Cisco Unified CCX Administration using Unified CCX username and password.
Cisco Unified Contact Center Express Install and Upgrade Guide, Release 12.5(1) SU3
28
Unified CCX Upgrade
Upgrade Unified CCX Editor
Page 39
Step 3
Choose Tools > Plug-ins.
Step 4
Click Cisco Unified Real-Time Monitoring Tool for Windows or Cisco Unified Real-Time Monitoring Tool for
Linux to download and install Unified Real-time Monitoring Tool.
• The current Unified RTMT requires JRE to run. Verify that the system has JRE installed (Java 1.8).
• On a Linux workstation, run RTMT with root access. Otherwise, when you initially install RTMT, the
application will not start.
Note
Launch Unified CCX Real-Time Reporting Tool
Step 1
Log in to Cisco Unified CCX Administration using Unified CCX username and password.
Step 2
Choose Tools > Plug-ins.
Step 3
Click the Cisco Unified CCX Real-Time Reporting Tool hyperlink to download and launch the RTR (.jnlp) file.
Cisco Unified Contact Center Express Install and Upgrade Guide, Release 12.5(1) SU3
29
Unified CCX Upgrade
Launch Unified CCX Real-Time Reporting Tool
Page 40
Cisco Unified Contact Center Express Install and Upgrade Guide, Release 12.5(1) SU3
30
Unified CCX Upgrade
Launch Unified CCX Real-Time Reporting Tool
Page 41
C H A P T E R 5
Unified CCX Rollback
• Important Considerations for Rollback, on page 31
• Roll Back Upgrade for Single Node Setup, on page 31
• Roll Back Upgrade for HA Setup, on page 32
• Reset Database Replication after Rollback, on page 32
• Roll Back Unified CCX Clients, on page 32
• Impact on Historical Reporting Users After Roll Back, on page 33
Important Considerations for Rollback
Configuration/reporting updates that are made after the upgrade are not be preserved when you roll back.
Caution
• Do not make any configuration changes during the rollback, because the changes are lost after the rollback.
• In an HA setup, do not switch versions on both the first and second nodes at the same time. Perform
switch version on the second node only after you have switched versions on the first node.
Roll Back Upgrade for Single Node Setup
Step 1
Check and Perform Switch Version
Step 2
Verify Version of Unified CCX, on page 26
Step 3
Verify Status of Services
Step 4
Roll Back Unified CCX Clients, on page 32
Cisco Unified Contact Center Express Install and Upgrade Guide, Release 12.5(1) SU3
31


Page 42
Roll Back Upgrade for HA Setup
Step 1
Check and Perform Switch Version. Perform switch version on the first node.
Step 2
Check and Perform Switch Version. Perform switch version on the second node.
Step 3
Verify Version of Unified CCX, on page 26
Step 4
Verify Status of Services
Step 5
Roll Back Unified CCX Clients, on page 32
Step 6
Reset Database Replication after Rollback, on page 32
Step 7
Verify Unified CCX Database Replication, on page 27
Step 8
Verify Cisco Database Replication, on page 27
Reset Database Replication after Rollback
If you roll back to an older version of Unified CCX, you must manually reset database replication within the
cluster for an HA setup.
Step 1
Log in to Cisco Unified OS Platform CLI using administrator username and password.
Step 2
Enter the command utils uccx dbreplication reset all to reset database replication.
Roll Back Unified CCX Clients
Step 1
Remove the Editor. For more information, refer to the "Removal of the Unified CCX Editor" section in Cisco Unified
Contact Center Express Getting Started with Scripts Guide .
Step 2
Uninstall the Cisco Unified Real-Time Monitoring Tool.
Step 3
Remove the Cisco Unified Real-Time Reporting Tool.
Step 4
Log in to Cisco Unified CCX Administration using Unified CCX username and password.
Step 5
Choose Tools > Plug-ins.
Step 6
Click the Cisco Unified CCX Editor Web Launcher hyperlink to download and launch the Unified CCX Editor (.jnlp)
file. No installation required.
Before launching the downloaded JNLP file, copy the file to a different location for future use. Ensure to clear the Java
cache before launching the JNLP file.
Step 7
Click Cisco Unified Real-Time Monitoring Tool for Windows or Cisco Unified Real-Time Monitoring Tool for
Linux as required to install Unified RTMT.
Cisco Unified Contact Center Express Install and Upgrade Guide, Release 12.5(1) SU3
32
Unified CCX Rollback
Roll Back Upgrade for HA Setup
Page 43
Step 8
Click Cisco Unified Real-Time Reporting Tool to launch Unified Real-Time Reporting Tool.
Impact on Historical Reporting Users After Roll Back
Rolling back versions from a later version of Unified CCX to an earlier version does not retain the privileges
of Historical Report Users that were created in later version. These users will not have access to Historical
Reports. After reverting to the earlier version, update the reporting capability for them.
To update the reporting capability:
Step 1
Log in to Cisco Unified CCX Administration using Unified CCX username and password.
Step 2
Choose Tools > User Management > Reporting Capability.
Step 3
Select the users that you want to update.
Step 4
Click Update.
Cisco Unified Contact Center Express Install and Upgrade Guide, Release 12.5(1) SU3
33
Unified CCX Rollback
Impact on Historical Reporting Users After Roll Back
Page 44
Cisco Unified Contact Center Express Install and Upgrade Guide, Release 12.5(1) SU3
34
Unified CCX Rollback
Impact on Historical Reporting Users After Roll Back
Page 45
A P P E N D I X A
Server Configuration Table
• Server Configuration Information for Installation, on page 35
Server Configuration Information for Installation
• You can use the configuration table for saving your entries either on a printed paper or in the PDF
document.
• Be aware that the field values (namely hostname and passwords) that you enter while you are running
the installation program are case-sensitive. Hostname must be in lower case and the character limit is 24
characters.
• All the fields may not be applicable to your system and network configuration. Unless mentioned
otherwise, you can change the values of most fields after the installation using CLI commands.
Note
Changes to some of the configuration parameters may result in changes to the licence MAC, and you may
have to rehost the Unified CCX license. For information about the configuration parameters, see Unified
CCX Licenses.
Attention
Table 6: Node Configuration Table
Your Entry
Parameter
Administrator ID
You cannot change the original administrator
account user ID; you can create additional
administrator accounts.
Attention
Do not create administrator IDs (for CLI access or
Operating System administration) that start with
"uccx" or "UCCX" because such IDs conflict with
system account names that are used internally
within the Unified CCX server.
Caution
Cisco Unified Contact Center Express Install and Upgrade Guide, Release 12.5(1) SU3
35


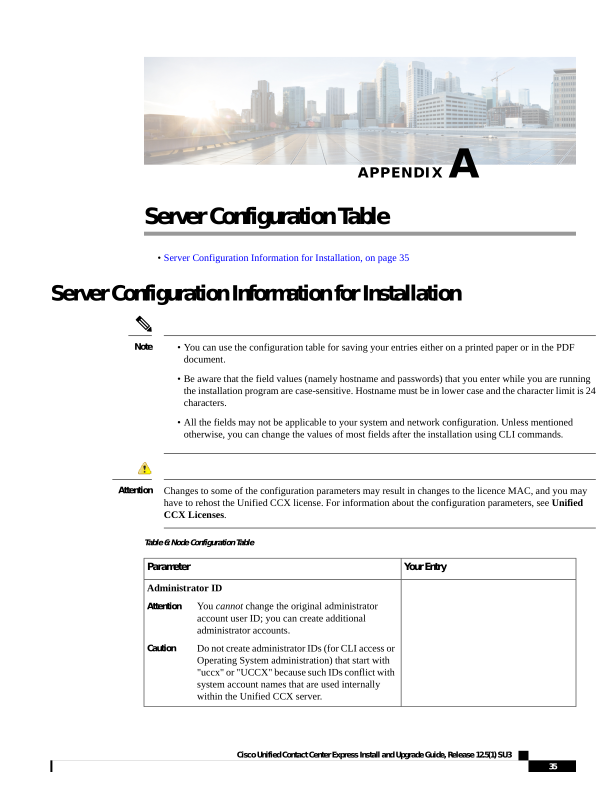
Page 46
Your Entry
Parameter
Administrator Password
This field specifies the password for the
administrator account, which you use for secure
shell access to the CLI, for logging in to Cisco
Unified Operating System Administration, and for
logging in to the Disaster Recovery System. Ensure
that the password is at least six characters long; it
can contain alphanumeric characters, hyphens, and
underscores.
You can change the password after installation.
Attention
Application User Name
Application User Password
Use the Application User password as the default
password for applications that are installed on the
system, including Unified CCX and Unified
Communications Manager. Ensure that the
password is at least six characters long; it can
contain alphanumeric characters, hyphens, and
underscores.
You can change the password after installation.
Attention
DNS Primary
DNS Secondary (optional)
Domain
Gateway Address
Hostname
IP Address
IP Mask
MTU Size
Use the same Maximum Transmission Unit (MTU)
value for all servers in the cluster.
Note
NIC Duplex
This parameter is not displayed if automatic
negotiation is used.
Note
Cisco Unified Contact Center Express Install and Upgrade Guide, Release 12.5(1) SU3
36
Server Configuration Table
Server Configuration Table

Page 47
Your Entry
Parameter
NIC Speed
This parameter is not displayed if automatic
negotiation is used.
Note
NTP Server
Enter the hostname or IP address of one or more
Network Time Protocol (NTP) servers with which
you want to synchronize.
You can enter up to five NTP servers.
You can change the NTP server after installation.
Attention
Security Password
Servers in the cluster use the Security password to
communicate with one another. The password must
contain at least six alphanumeric characters and
cannot exceed 20 characters. It can contain hyphens
and underscores, but it must start with an
alphanumeric character.
Save this password. You will be asked to enter the
same Security password when you install the
second node to form a cluster.
You can change the password after installation by
using the following CLI command:
CLI > set password user security
To avoid losing communications between nodes,
you must change the Security password on both
nodes in a cluster and reboot both the nodes. For
more information, see the description of this
command in the Cisco Unified Operating System
Administration Guide at https://www.cisco.com/c/
en/us/support/customer-collaboration/
unified-contact-center-express/
products-maintenance-guides-list.html.
Attention
SMTP Location
You must populate this field if you plan to use
electronic notification.
Note
Organization
The value you enter is used to generate a CSR.
Note
Unit
The value you enter is used to generate a CSR.
Note
Cisco Unified Contact Center Express Install and Upgrade Guide, Release 12.5(1) SU3
37
Server Configuration Table
Server Configuration Table
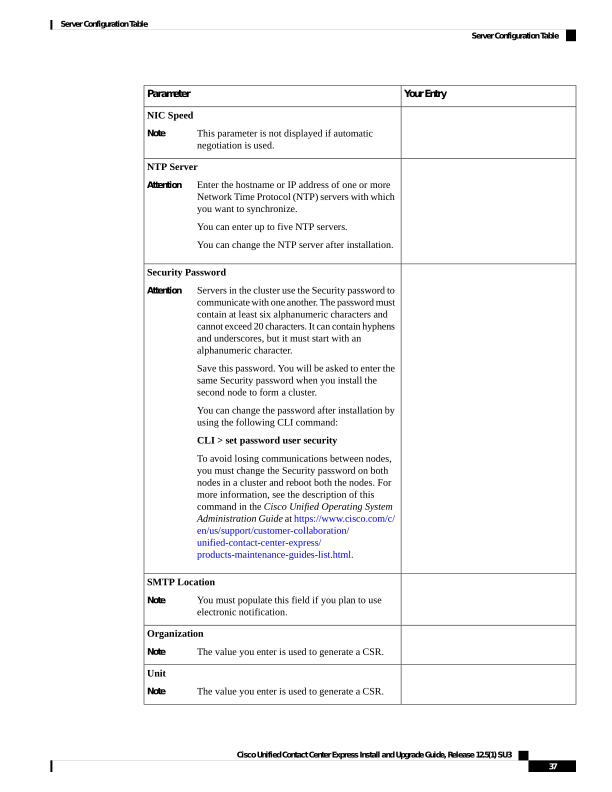
Page 48
Your Entry
Parameter
Location
State
The value you enter is used to generate a CSR.
Note
Country
The value you enter is used to generate a CSR and
self-signed certificates.
Note
Time Zone
Use the same Timezone for all nodes.
Note
Cisco Unified Contact Center Express Install and Upgrade Guide, Release 12.5(1) SU3
38
Server Configuration Table
Server Configuration Table

Page 49
A P P E N D I X B
Unified CCX Licenses
From Unified CCX release 12.5(1), fresh install of Unified CCX supports only Smart Licensing. For more
information on migrating to smart Licensing, see Cisco Unified Contact Center Express Features Guide. If
you are upgrading from releases prior to Unified CCX 12.5(1) and want to continue using Classic Licensing,
see the following sections in the document.
The Unified CCX licenses are based on a string called the license MAC, which is different from the physical
MAC address of a system. License MAC is dependent on the system parameters. A modification to any of
the parameters can change license MAC, thereby invalidating current License files. The following are the
parameters on which the validity of a license MAC depends:
• Time zone
• NTP server 1 (or none)
• NIC speed (or auto)
• Hostname
• IP Address
• IP Mask
• Gateway Address
• Primary DNS
• SMTP server
• Certificate Information (Organization, Unit, Location, State, Country)
The Unified CCX Warm Standby license and all other licenses are node-locked to the License MAC address
of the first node (typically the Database Publisher node) of a Unified CCX cluster. When a second node is
added, the verification of a valid add-on Warm Standby license on the first node is performed. After the cluster
is set up, the licenses are valid on both the nodes in a cluster.
Note
• Obtain License MAC, on page 40
• Upload Licenses, on page 40
Cisco Unified Contact Center Express Install and Upgrade Guide, Release 12.5(1) SU3
39


Page 50
Obtain License MAC
License MAC can be obtained in two ways—by using either the Command Line Interface or the Administrator
Web interface.
Upload Licenses
Software for all of the Unified CCX feature components are loaded on the system during installation. However,
no feature is available for use unless a license for that feature is added and activated.
You can upload and display licenses using the License Information page. To upload a license, complete the
following steps.
Step 1
From the Unified CCX Administration menu bar, choose System > License Information > Add License(s).
The License Information web page opens.
Step 2
Specify a License file or click Browse to locate a file.
You can either specify a single file with a .lic extension or a .zip file containing multiple .lic files.
While you are upgrading from a previous release, if there are multiple licenses, zip all the .lic files into a
single .zip file and then upload the zip file. If specifying a .zip file, ensure that all .lic files that need to be
added are in the root of the .zip file and are not in subfolders in the .zip file.
Note
Step 3
Click Upload.
On successful upload of the license, you will see the following confirmation message in the status bar at the top of this
web page : License has been uploaded successfully
If you upload an Add-on license to increase the existing licensed Outbound IVR ports, the following message will be
displayed :
As the number of licensed Outbound IVR Ports have increased, please increase the
number of ports in the Outbound Call Control Group to utilize all the licensed
ports.
Cisco Unified Contact Center Express Install and Upgrade Guide, Release 12.5(1) SU3
40
Unified CCX Licenses
Obtain License MAC
Page 51
I N D E X
A
Apply patch
8
L
license
40
adding components
40
U
uploading licenses
40
Cisco Unified Contact Center Express Install and Upgrade Guide, Release 12.5(1) SU3
IN-1

Page 52
Cisco Unified Contact Center Express Install and Upgrade Guide, Release 12.5(1) SU3
IN-2
INDEX