Document Metadata
Format: PDF 1.4
Title: Cisco Unified Operating System Administration Guide for Cisco Unified CCX and Cisco Unified IP IVR, Release 12.5(1) SU3
Author: Karthik Kumar
Creator: DITA Open Toolkit
Producer: XEP 4.30.961; modified using iText 2.1.7 by 1T3XT
Creation Date: D:20230712105216Z
Mod Date: D:20230718021824-07'00'
Page 1
Cisco Unified Operating System Administration Guide for Cisco Unified
CCX and Cisco Unified IP IVR, Release 12.5(1) SU3
First Published: 2023-07-10
Last Modified: 2023-07-12
Americas Headquarters
Cisco Systems, Inc.
170 West Tasman Drive
San Jose, CA 95134-1706
USA
http://www.cisco.com
Tel: 408 526-4000
800 553-NETS (6387)
Fax: 408 527-0883

Page 2
THE SPECIFICATIONS AND INFORMATION REGARDING THE PRODUCTS IN THIS MANUAL ARE SUBJECT TO CHANGE WITHOUT NOTICE. ALL STATEMENTS,
INFORMATION, AND RECOMMENDATIONS IN THIS MANUAL ARE BELIEVED TO BE ACCURATE BUT ARE PRESENTED WITHOUT WARRANTY OF ANY KIND,
EXPRESS OR IMPLIED. USERS MUST TAKE FULL RESPONSIBILITY FOR THEIR APPLICATION OF ANY PRODUCTS.
THE SOFTWARE LICENSE AND LIMITED WARRANTY FOR THE ACCOMPANYING PRODUCT ARE SET FORTH IN THE INFORMATION PACKET THAT SHIPPED WITH
THE PRODUCT AND ARE INCORPORATED HEREIN BY THIS REFERENCE. IF YOU ARE UNABLE TO LOCATE THE SOFTWARE LICENSE OR LIMITED WARRANTY,
CONTACT YOUR CISCO REPRESENTATIVE FOR A COPY.
The Cisco implementation of TCP header compression is an adaptation of a program developed by the University of California, Berkeley (UCB) as part of UCB's public domain version of
the UNIX operating system. All rights reserved. Copyright © 1981, Regents of the University of California.
NOTWITHSTANDING ANY OTHER WARRANTY HEREIN, ALL DOCUMENT FILES AND SOFTWARE OF THESE SUPPLIERS ARE PROVIDED “AS IS" WITH ALL FAULTS.
CISCO AND THE ABOVE-NAMED SUPPLIERS DISCLAIM ALL WARRANTIES, EXPRESSED OR IMPLIED, INCLUDING, WITHOUT LIMITATION, THOSE OF
MERCHANTABILITY, FITNESS FOR A PARTICULAR PURPOSE AND NONINFRINGEMENT OR ARISING FROM A COURSE OF DEALING, USAGE, OR TRADE PRACTICE.
IN NO EVENT SHALL CISCO OR ITS SUPPLIERS BE LIABLE FOR ANY INDIRECT, SPECIAL, CONSEQUENTIAL, OR INCIDENTAL DAMAGES, INCLUDING, WITHOUT
LIMITATION, LOST PROFITS OR LOSS OR DAMAGE TO DATA ARISING OUT OF THE USE OR INABILITY TO USE THIS MANUAL, EVEN IF CISCO OR ITS SUPPLIERS
HAVE BEEN ADVISED OF THE POSSIBILITY OF SUCH DAMAGES.
Any Internet Protocol (IP) addresses and phone numbers used in this document are not intended to be actual addresses and phone numbers. Any examples, command display output, network
topology diagrams, and other figures included in the document are shown for illustrative purposes only. Any use of actual IP addresses or phone numbers in illustrative content is unintentional
and coincidental.
All printed copies and duplicate soft copies of this document are considered uncontrolled. See the current online version for the latest version.
Cisco has more than 200 offices worldwide. Addresses and phone numbers are listed on the Cisco website at www.cisco.com/go/offices.
The documentation set for this product strives to use bias-free language. For purposes of this documentation set, bias-free is defined as language that does not imply discrimination based on
age, disability, gender, racial identity, ethnic identity, sexual orientation, socioeconomic status, and intersectionality. Exceptions may be present in the documentation due to language that
is hardcoded in the user interfaces of the product software, language used based on standards documentation, or language that is used by a referenced third-party product.
Cisco and the Cisco logo are trademarks or registered trademarks of Cisco and/or its affiliates in the U.S. and other countries. To view a list of Cisco trademarks, go to this URL:
https://www.cisco.com/c/en/us/about/legal/trademarks.html. Third-party trademarks mentioned are the property of their respective owners. The use of the word partner does not imply a
partnership relationship between Cisco and any other company. (1721R)
© 2000–2023 Cisco Systems, Inc. All rights reserved.
Page 3
C O N T E N T S
Full Cisco Trademarks with Software License
?
Preface
vii
P R E F A C E
Change History
vii
About This Guide
vii
Audience
vii
Conventions
viii
Related Documents
ix
Documentation and Support
x
Documentation Feedback
x
Introduction
1
C H A P T E R 1
Overview
1
Browser Requirements
2
Operating System Component Status
2
Operating System Settings
2
Operating System Security Options
3
Application Software Upgrades
3
Services
3
Command Line Interface
4
Cisco Unified Operating System Administration
5
C H A P T E R 2
Login to Cisco Unified Operating System
5
Reset Administrator or Security Password
6
Status and Configuration
9
C H A P T E R 3
Cisco Unified Operating System Administration Guide for Cisco Unified CCX and Cisco Unified IP IVR, Release 12.5(1) SU3
iii

Page 4
View Cluster Node Information
9
View Hardware Status
9
Display Network Status
10
Verify Installed Software
11
View System Status
12
Display Registered Ports
13
Settings
15
C H A P T E R 4
IP and Port Settings
15
Change IP Settings
15
IPv6 Configuration
16
View Publisher IP Settings
16
Configure NTP Servers
17
Set SMTP settings
17
Set Time
18
System Restart
19
C H A P T E R 5
Switch Versions and Restart
19
Restart Current Version
19
Shut Down System
20
Security
21
C H A P T E R 6
Set Internet Explorer Security Settings
21
Certificate Management Menu
21
Display Certificates
21
Download Certificate
22
Delete Certificate
22
Regenerate Certificate
23
Upload Certificate to Server
23
Upload Certificate or Certificate Chain
24
Directory Trust Certificate
24
Obtain Third-Party CA Certificates
24
Generate Certificate Signing Request
25
Download Certificate Signing Request
25
Cisco Unified Operating System Administration Guide for Cisco Unified CCX and Cisco Unified IP IVR, Release 12.5(1) SU3
iv
Contents
Page 5
Application Certificates
26
Monitor Certificate Expiration Dates
26
IPSec Management
27
Set Up New IPSec Policy
27
Manage IPSec Policies
29
Bulk Certificate Management
30
Software Upgrades
31
C H A P T E R 7
Unified CCX Upgrade and Roll Back
31
TFTP File Management
31
Set Up Customized Logon Message
32
Utility Functions
33
C H A P T E R 8
Ping
33
Remote Account Support
33
Cisco Unified Operating System Administration Guide for Cisco Unified CCX and Cisco Unified IP IVR, Release 12.5(1) SU3
v
Contents
Page 6
Cisco Unified Operating System Administration Guide for Cisco Unified CCX and Cisco Unified IP IVR, Release 12.5(1) SU3
vi
Contents
Page 7
Preface
• Change History, on page vii
• About This Guide, on page vii
• Audience, on page vii
• Conventions, on page viii
• Related Documents, on page ix
• Documentation and Support, on page x
• Documentation Feedback, on page x
Change History
This table lists changes made to this guide. Most recent changes appear at the top.
Date
See
Change
January 2020
Initial Release of Document for Release 12.5(1)
Preface >> Related Documents
Cisco SocialMiner (SM) has been
renamed as Customer Collaboration
Platform (CCP).
About This Guide
This document provides information about using the Cisco Unified Operating System graphical user interface
(GUI) from the Cisco Unified CCX Administration menu bar.
Audience
This document provides information for network administrators who are responsible for managing and
supporting the Cisco Unified Operating System in Cisco Unified CCX (Unified CCX). Network engineers,
system administrators, or telecom engineers use this guide to learn about, and administer, the operating system
features. This guide requires knowledge of telephony and IP networking technology.
Cisco Unified Operating System Administration Guide for Cisco Unified CCX and Cisco Unified IP IVR, Release 12.5(1) SU3
vii

Page 8
Conventions
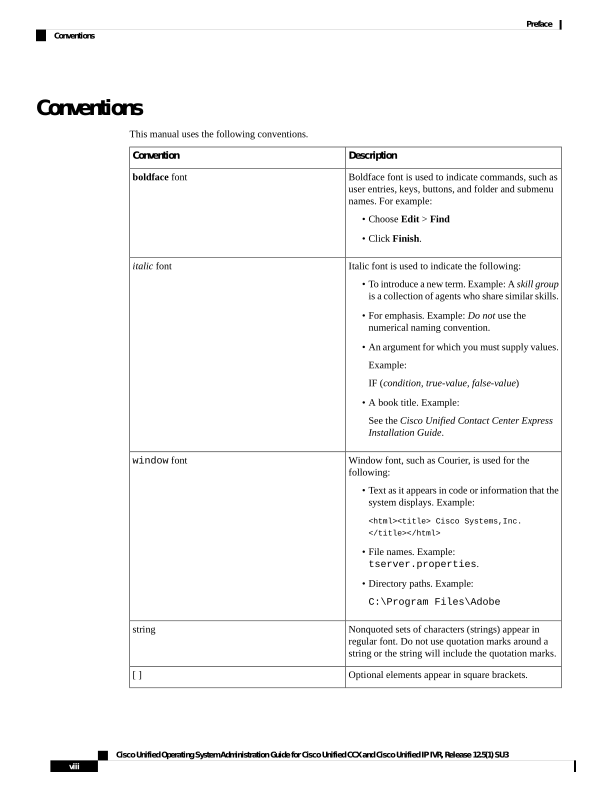
This manual uses the following conventions.
Description
Convention
Boldface font is used to indicate commands, such as
user entries, keys, buttons, and folder and submenu
names. For example:
• Choose Edit > Find
• Click Finish.
boldface font
Italic font is used to indicate the following:
• To introduce a new term. Example: A skill group
is a collection of agents who share similar skills.
• For emphasis. Example: Do not use the
numerical naming convention.
• An argument for which you must supply values.
Example:
IF (condition, true-value, false-value)
• A book title. Example:
See the Cisco Unified Contact Center Express
Installation Guide.
italic font
Window font, such as Courier, is used for the
following:
• Text as it appears in code or information that the
system displays. Example:
<html><title> Cisco Systems,Inc.
</title></html>
• File names. Example:
tserver.properties.
• Directory paths. Example:
C:\Program Files\Adobe
window font
Nonquoted sets of characters (strings) appear in
regular font. Do not use quotation marks around a
string or the string will include the quotation marks.
string
Optional elements appear in square brackets.
[ ]
Cisco Unified Operating System Administration Guide for Cisco Unified CCX and Cisco Unified IP IVR, Release 12.5(1) SU3
viii
Preface
Conventions
Page 9
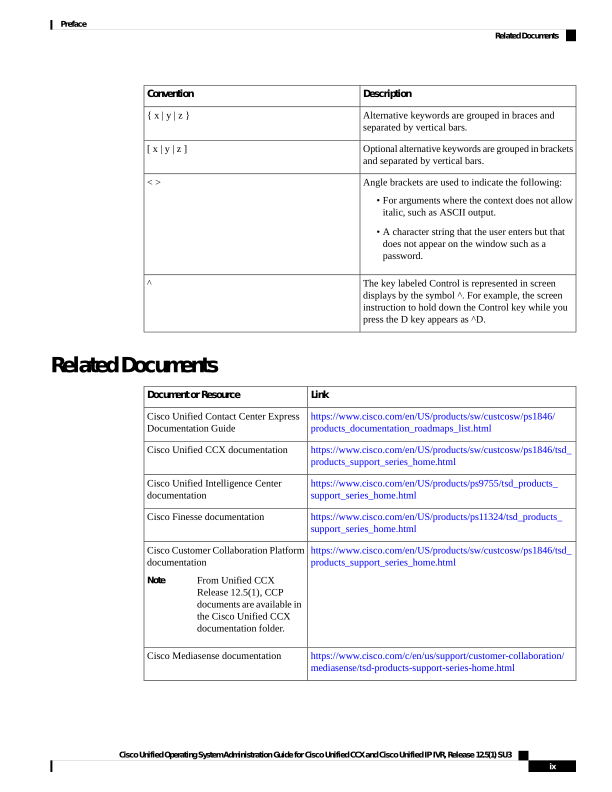
Description
Convention
Alternative keywords are grouped in braces and
separated by vertical bars.
{ x | y | z }
Optional alternative keywords are grouped in brackets
and separated by vertical bars.
[ x | y | z ]
Angle brackets are used to indicate the following:
• For arguments where the context does not allow
italic, such as ASCII output.
• A character string that the user enters but that
does not appear on the window such as a
password.
< >
The key labeled Control is represented in screen
displays by the symbol ^. For example, the screen
instruction to hold down the Control key while you
press the D key appears as ^D.
^
Related Documents
Link
Document or Resource
https://www.cisco.com/en/US/products/sw/custcosw/ps1846/
products_documentation_roadmaps_list.html
Cisco Unified Contact Center Express
Documentation Guide
https://www.cisco.com/en/US/products/sw/custcosw/ps1846/tsd\_
products_support_series_home.html
Cisco Unified CCX documentation
https://www.cisco.com/en/US/products/ps9755/tsd\_products\_
support_series_home.html
Cisco Unified Intelligence Center
documentation
https://www.cisco.com/en/US/products/ps11324/tsd\_products\_
support_series_home.html
Cisco Finesse documentation
https://www.cisco.com/en/US/products/sw/custcosw/ps1846/tsd\_
products_support_series_home.html
Cisco Customer Collaboration Platform
documentation
From Unified CCX
Release 12.5(1), CCP
documents are available in
the Cisco Unified CCX
documentation folder.
Note
https://www.cisco.com/c/en/us/support/customer-collaboration/
mediasense/tsd-products-support-series-home.html
Cisco Mediasense documentation
Cisco Unified Operating System Administration Guide for Cisco Unified CCX and Cisco Unified IP IVR, Release 12.5(1) SU3
ix
Preface
Related Documents
Page 10
Link
Document or Resource
https://www.cisco.com/c/dam/en/us/td/docs/voice\_ip\_comm/uc\_
system/virtualization/
virtualization-cisco-unified-contact-center-express.html
Cisco Unified CCX Virtualization
Information
https://www.cisco.com/c/en/us/support/customer-collaboration/
unified-contact-center-express/
products-device-support-tables-list.html
Cisco Unified CCX Compatibility
Information
Documentation and Support
To download documentation, submit a service request, and find additional information, see What's New in
Cisco Product Documentation at https://www.cisco.com/en/US/docs/general/whatsnew/whatsnew.html.
Documentation Feedback
To provide your feedback for this document, send an email to:
contactcenterproducts_docfeedback@cisco.com
Cisco Unified Operating System Administration Guide for Cisco Unified CCX and Cisco Unified IP IVR, Release 12.5(1) SU3
x
Preface
Documentation and Support
Page 11
C H A P T E R 1
Introduction
Cisco Unified Contact Center Express(Unified CCX) , a member of the Cisco Unified Communications family
of products, manages customer voice contact centers for departments, branches, or small to medium-size
companies planning to deploy an entry-level or mid-market contact center solution.
Cisco Unified Operating System Administration web interface in Unified CCX allows you to configure and
manage the Cisco Unified Operating System.
• Overview, on page 1
• Browser Requirements, on page 2
• Operating System Component Status, on page 2
• Operating System Settings, on page 2
• Operating System Security Options, on page 3
• Application Software Upgrades, on page 3
• Services, on page 3
• Command Line Interface, on page 4
Overview
For Unified CCX, you can perform many common system administration functions through the Cisco Unified
Operating System. Administration tasks include the following examples:
• Check software and hardware status.
• Check and update IP addresses.
• Ping other network devices.
• Manage NTP servers.
• Upgrade system software and options.
• Manage server security, including IPSec and certificates
• Manage remote support accounts
• Restart the system.
The following sections describe each operating system function in more detail.
Cisco Unified Operating System Administration Guide for Cisco Unified CCX and Cisco Unified IP IVR, Release 12.5(1) SU3
1

Page 12
Browser Requirements
For supported web browsers, see Solution Compatibility Matrix at https://www.cisco.com/c/en/us/support/
customer-collaboration/unified-contact-center-express/products-device-support-tables-list.html.
Ensure that the popup blocker is disabled.
Note
Operating System Component Status
From the Show menu, you can check the status of various operating system components, including:
• Cluster and node
• Hardware
• Network
• System
• Installed software and options
• IP Preferences
Operating System Settings
From the Settings menu, you can view and update the following operating system settings:
• IP—Updates the IP addresses that were entered when the application was installed.
• NTP Server settings—Configures the IP addresses of an external NTP server; add or delete an NTP
server.
• SMTP settings—Configures the SMTP host that the operating system uses to send e-mail notifications.
From the Settings > Version window, you can choose from the following options for restarting or shutting
down the system:
• Switch Versions—Switches the active and inactive disk partitions and restarts the system. You normally
choose this option after the inactive partition has been updated and you want to start running a newer
software version.
• Current Version—Restarts the system without switching partitions.
• Shutdown System—Stops all running software and shuts down the server.
This command does not power down the server. To power down the server, press
the power button.
Note
Cisco Unified Operating System Administration Guide for Cisco Unified CCX and Cisco Unified IP IVR, Release 12.5(1) SU3
2
Introduction
Browser Requirements

Page 13
Operating System Security Options
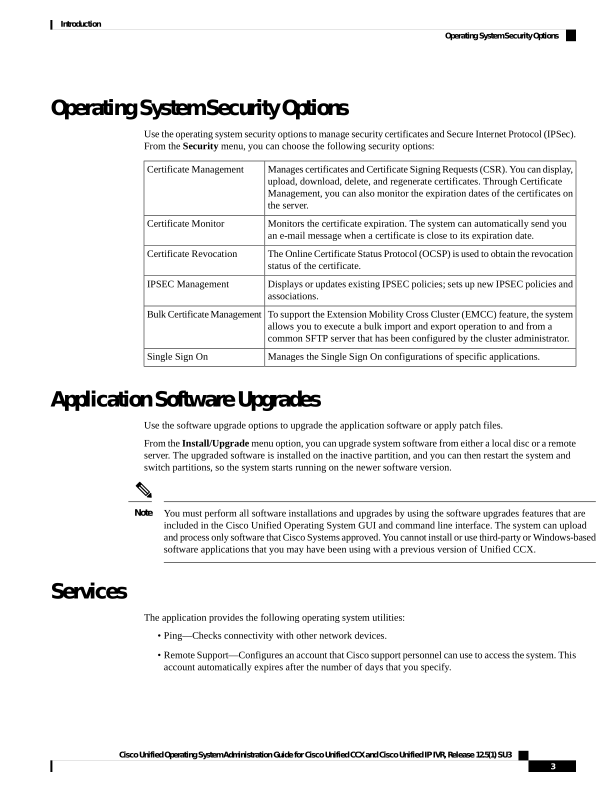
Use the operating system security options to manage security certificates and Secure Internet Protocol (IPSec).
From the Security menu, you can choose the following security options:
Manages certificates and Certificate Signing Requests (CSR). You can display,
upload, download, delete, and regenerate certificates. Through Certificate
Certificate Management
Management, you can also monitor the expiration dates of the certificates on
the server.
Monitors the certificate expiration. The system can automatically send you
an e-mail message when a certificate is close to its expiration date.
Certificate Monitor
The Online Certificate Status Protocol (OCSP) is used to obtain the revocation
status of the certificate.
Certificate Revocation
Displays or updates existing IPSEC policies; sets up new IPSEC policies and
associations.
IPSEC Management
To support the Extension Mobility Cross Cluster (EMCC) feature, the system
allows you to execute a bulk import and export operation to and from a
common SFTP server that has been configured by the cluster administrator.
Bulk Certificate Management
Manages the Single Sign On configurations of specific applications.
Single Sign On
Application Software Upgrades
Use the software upgrade options to upgrade the application software or apply patch files.
From the Install/Upgrade menu option, you can upgrade system software from either a local disc or a remote
server. The upgraded software is installed on the inactive partition, and you can then restart the system and
switch partitions, so the system starts running on the newer software version.
You must perform all software installations and upgrades by using the software upgrades features that are
included in the Cisco Unified Operating System GUI and command line interface. The system can upload
and process only software that Cisco Systems approved. You cannot install or use third-party or Windows-based
software applications that you may have been using with a previous version of Unified CCX.
Note
Services
The application provides the following operating system utilities:
• Ping—Checks connectivity with other network devices.
• Remote Support—Configures an account that Cisco support personnel can use to access the system. This
account automatically expires after the number of days that you specify.
Cisco Unified Operating System Administration Guide for Cisco Unified CCX and Cisco Unified IP IVR, Release 12.5(1) SU3
3
Introduction
Operating System Security Options

Page 14
Command Line Interface
You can access a command-line interface from the console or through a secure shell connection to the server.
For more information, see the Cisco Unified Contact Center Express Administration and Operations Guide,
located at https://www.cisco.com/c/en/us/support/customer-collaboration/unified-contact-center-express/
products-maintenance-guides-list.html.
For more information, see the Command Line Interface Reference Guide for Cisco Unified Contact Center
Express and Cisco Unified IP IVR, located at https://www.cisco.com/en/US/products/sw/custcosw/ps1846/
prod_installation_guides_list.html and see the Command Line Interface Guide for Cisco Unified
Communications Solutions, located at https://www.cisco.com/en/US/products/sw/voicesw/ps556/prod\_
maintenance_guides_list.html.
Cisco Unified Operating System Administration Guide for Cisco Unified CCX and Cisco Unified IP IVR, Release 12.5(1) SU3
4
Introduction
Command Line Interface
Page 15
C H A P T E R 2
Cisco Unified Operating System Administration
This chapter describes the procedure for accessing the Cisco Unified Operating System Administration. This
chapter also provides procedures for resetting a lost password.
• Login to Cisco Unified Operating System, on page 5
• Reset Administrator or Security Password, on page 6
Login to Cisco Unified Operating System
To access and login to Cisco Unified Operating System from Unified CCX, follow this procedure:
Do not use the browser controls (for example, the Back button) while you are using Cisco Unified Operating
System Administration.
Note
Step 1
Log in to Unified CCX Application Administration web interface.
Step 2
From the Navigation menu in the upper-right corner of the Unified CCX Application Administration web interface,
choose Cisco Unified OS Administration and click Go.
The Cisco Unified Operating System Administration Logon web page appears.
You can also access Cisco Unified Operating System Administration directly by entering the following URL:
https://<serverIP>/cmplatform
Note
Step 3
Enter your platform user credentials as configured during installation of Unified CCX.
The platform username and password get established during installation or created by using the command
line interface.
Note
Step 4
Click Submit.
The Cisco Unified Operating System Administration window appears.
Cisco Unified Operating System Administration Guide for Cisco Unified CCX and Cisco Unified IP IVR, Release 12.5(1) SU3
5


Page 16
Reset Administrator or Security Password
If you lose the administrator password or security password, use the following procedure to reset the passwords.
The security password on all nodes in a cluster must match. Change the security password on all machines,
or the cluster nodes cannot communicate.
Caution
During this procedure, you must remove and then insert a valid CD or DVD in the disk drive to prove that
you have physical access to the system.
Note
Before you begin
To perform the password reset process, you must be connected to the system through the system console, that
is, you must have a keyboard and monitor connected to the server. You cannot reset a password when connected
to the system through a secure shell session.
Step 1
Log in to the system with the following username and password:
a)
Username: pwrecovery
b) Password: pwreset
The Welcome to platform password reset window appears.
Step 2
Press any key to continue.
Step 3
If you have a CD or DVD in the disk drive, remove it now.
Step 4
Press any key to continue.
The system tests to ensure that you have removed the CD or DVD from the disk drive.
Step 5
Insert a valid CD or DVD into the disk drive. For this test, you must use a data CD, not a music CD. The system tests to
ensure that you inserted the disk.
Step 6
After the system verifies that you have inserted the disk, you are prompted to enter one of the following options to
continue:
• Enter a to reset the administrator password.
• Enter s to reset the security password.
• Enter q to quit.
Step 7
Enter a new password of the type that you chose.
Step 8
Reenter the new password.
The password must contain at least 6 characters. The system checks the new password for strength. If the password does
not pass the strength check, you are prompted to enter a new password.
Step 9
After the system verifies the strength of the new password, the password is reset, and you are prompted to press any key
to exit the password reset utility.
Cisco Unified Operating System Administration Guide for Cisco Unified CCX and Cisco Unified IP IVR, Release 12.5(1) SU3
6
Cisco Unified Operating System Administration
Reset Administrator or Security Password


Page 17
Restart the system for the changes to take effect.
Note
Cisco Unified Operating System Administration Guide for Cisco Unified CCX and Cisco Unified IP IVR, Release 12.5(1) SU3
7
Cisco Unified Operating System Administration
Reset Administrator or Security Password
Page 18
Cisco Unified Operating System Administration Guide for Cisco Unified CCX and Cisco Unified IP IVR, Release 12.5(1) SU3
8
Cisco Unified Operating System Administration
Reset Administrator or Security Password
Page 19
C H A P T E R 3
Status and Configuration
• View Cluster Node Information, on page 9
• View Hardware Status, on page 9
• Display Network Status, on page 10
• Verify Installed Software, on page 11
• View System Status, on page 12
• Display Registered Ports, on page 13
View Cluster Node Information
To view information on the nodes in the cluster, follow this procedure:
From the Cisco Unified Operating System Administration window navigate to Show > Cluster.
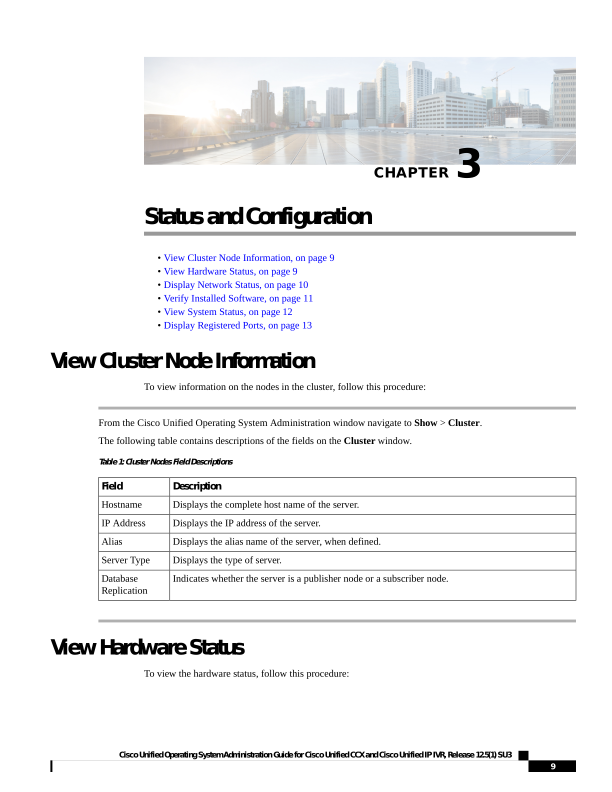
The following table contains descriptions of the fields on the Cluster window.
Table 1: Cluster Nodes Field Descriptions
Description
Field
Displays the complete host name of the server.
Hostname
Displays the IP address of the server.
IP Address
Displays the alias name of the server, when defined.
Alias
Displays the type of server.
Server Type
Indicates whether the server is a publisher node or a subscriber node.
Database
Replication
View Hardware Status
To view the hardware status, follow this procedure:
Cisco Unified Operating System Administration Guide for Cisco Unified CCX and Cisco Unified IP IVR, Release 12.5(1) SU3
9

Page 20
From the Cisco Unified Operating System Administration window, navigate to Show > Hardware.
The following table contains descriptions of the fields on the Hardware status window.
Table 2: Hardware Status Field Descriptions
Description
Field
Displays the model identity of the platform server.
Platform Type
Displays the serial number of the platform server.
Serial Number
Displays the status of the virtual hardware configured.
Virtual
Hardware
Displays the status of the virtual support available.
Virtual Support
Displays the processor speed.
Processor Speed
Displays the type of processor in the platform server.
CPU Type
Displays the total amount of memory in MB.
Memory
Displays the object ID.
Object ID
Displays the operating system version.
OS Version
Displays details about the RAID drive, including controller information, logical drive information,
and physical device information.
RAID Details
Display Network Status
The network status information that appears depends on if Network Fault Tolerance is enabled. When Network
Fault Tolerance is enabled, Ethernet port 1 automatically takes over network communications if Ethernet port
0 fails. If Network Fault Tolerance is enabled, network status information appears for the network ports
Ethernet 0, Ethernet 1, and Bond 0. If Network Fault Tolerance is not enabled, status information appears
only for Ethernet 0.
To view the network status, follow this procedure:
From the Cisco Unified System Administration window, navigate to Show > Network.
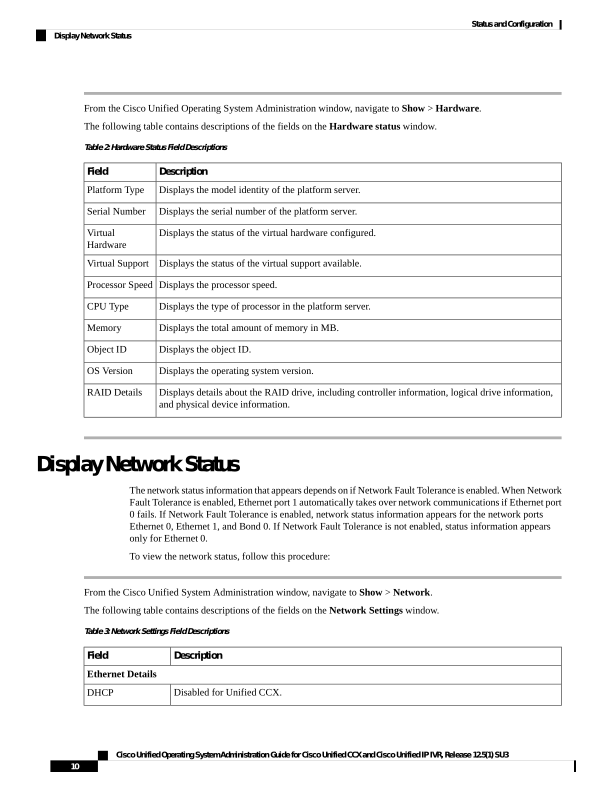
The following table contains descriptions of the fields on the Network Settings window.
Table 3: Network Settings Field Descriptions
Description
Field
Ethernet Details
Disabled for Unified CCX.
DHCP
Cisco Unified Operating System Administration Guide for Cisco Unified CCX and Cisco Unified IP IVR, Release 12.5(1) SU3
10
Status and Configuration
Display Network Status
Page 21
Description
Field
Indicates whether the port is Up or Down for Ethernet ports 0 and 1.
Status
Shows the IP address of Ethernet port 0 [and Ethernet port 1 if Network Fault Tolerance (NFT)
is enabled].
IP Address
Shows the IP mask of Ethernet port 0 (and Ethernet port 1 if NFT is enabled).
IP Mask
Indicates whether an active link exists.
Link Detected
Displays the length of the queue.
Queue Length
Displays the maximum transmission unit.
MTU
Displays the hardware address of the port.
MAC Address
Displays information on received bytes, packets, and errors, as well as dropped, overrun and
multicast statistics.
Receive Statistics
(RX)
Displays information on transmitted bytes, packets, and errors, as well as dropped, carrier, and
collision statistics.
Transmit Statistics
(TX)
DNS Details
Displays the IP address of the primary domain name server.
Primary
Displays the IP address of the secondary domain name server.
Secondary
Displays the configured DNS options.
Options
Displays the domain of the server.
Domain
Displays the IP address of the network gateway on Ethernet port 0.
Gateway
Verify Installed Software
To view the software versions and installed software options, follow this procedure:
From the Cisco Unified Operating System Administration window, navigate to Show > Software.
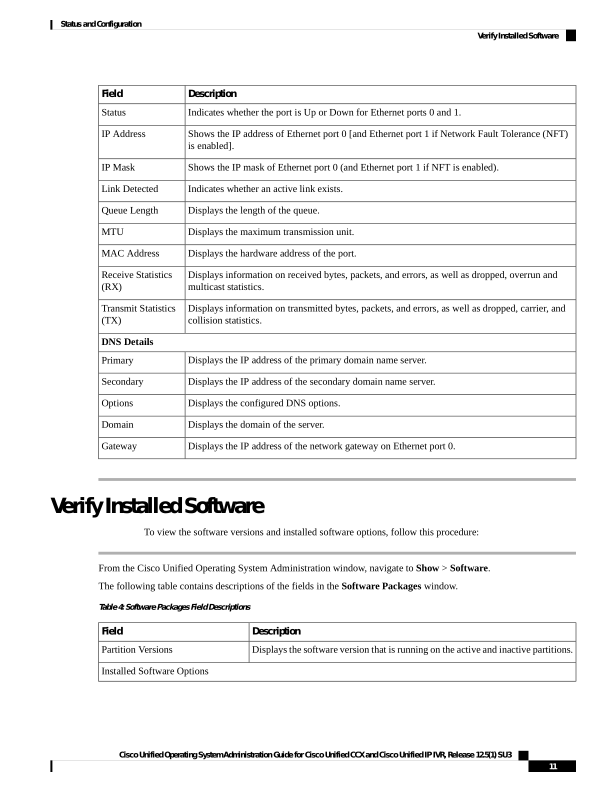
The following table contains descriptions of the fields in the Software Packages window.
Table 4: Software Packages Field Descriptions
Description
Field
Displays the software version that is running on the active and inactive partitions.
Partition Versions
Installed Software Options
Cisco Unified Operating System Administration Guide for Cisco Unified CCX and Cisco Unified IP IVR, Release 12.5(1) SU3
11
Status and Configuration
Verify Installed Software
Page 22
Description
Field
Displays the versions of installed software options, including Cisco Options
Package (COP) patch files that are installed on the active version.
Active Version Installed Software
Options
Displays the versions of installed software options, including COP patch files that
are installed on the inactive version.
Inactive Version Installed Software
Options
View System Status
To view the system status, follow this procedure:
From the Cisco Unified Operating System Administration window, navigate to Show > System.
See the following table for descriptions of the fields on the System Status window.
Table 5: System Status Field Descriptions
Description
Field
Displays the name of the Cisco MCS host where Cisco Unified Operating System is installed.
Host Name
Displays the date and time based on the continent and region that were specified during operating
system installation.
Date
Displays the time zone that was chosen during installation.
Time Zone
Displays the language that was chosen during operating system installation.
Locale
Displays the operating system version.
Product Version
Displays the platform version.
Platform Version
Displays the license MAC.
License MAC
Displays system uptime information.
Uptime
Displays the percentage of CPU capacity that is idle, the percentage that is running system
processes, and the percentage that is running user processes.
CPU
Displays information about memory usage, including the amount of total memory, free memory,
used memory, cached memory, shared memory, and buffers in KBytes.
Memory
Displays the amount of total, free, and used disk space on the active disk.
Disk/active
Displays the amount of total, free, and used disk space on the inactive disk.
Disk/inactive
Displays the amount of total, free, and disk space that is used for disk logging.
Disk/logging
Cisco Unified Operating System Administration Guide for Cisco Unified CCX and Cisco Unified IP IVR, Release 12.5(1) SU3
12
Status and Configuration
View System Status
Page 23
Display Registered Ports
You can use the IP Preferences window to display a list of registered ports that the system can use. The IP
Preferences window contains the following information:
• Application
• Protocol
• Port Number
• Type
• Translated Port
• Status
• Description
To access the IP Preferences window, follow this procedure.
Step 1
From the Cisco Unified System Administration window, choose Show > IPPreferences.
The IP Preferences window appears. Records from an active (prior) query may also appear in the window.
Step 2
To find all records in the database, ensure the dialog box is empty and go to Step 4.
Step 3
To filter or search records, do the following:
a)
From the first drop-down list box, select a search parameter.
b) From the second drop-down list box, select a search pattern.
c)
Specify the appropriate search text, if applicable.
To add additional search criteria, click the + button. When you add criteria, the system searches for a record
that matches all criteria that you specify. To remove criteria, click the – button to remove the last added
criterion or click the Clear Filter button to remove all added search criteria.
Note
Step 4
Click Find.
All matching records appear. You can change the number of items that appear on each page by choosing a different value
from the Rows per Page drop-down list box.
The following table contains descriptions of the IP Preferences fields.
Table 6: IP Preferences Field Descriptions
Description
Field
Name of the application using (listening on) the port.
Application
Protocol used on this port (TCP, UDP).
Protocol
Numeric port number.
Port Number
Cisco Unified Operating System Administration Guide for Cisco Unified CCX and Cisco Unified IP IVR, Release 12.5(1) SU3
13
Status and Configuration
Display Registered Ports
Page 24
Description
Field
Type of traffic allowed on this port:
• Public—All traffic allowed
• Translated—All traffic allowed but forwarded to a
different port
• Private—Traffic only allowed from a defined set of
remote servers, for example, other nodes in the cluster
Type
Traffic destined for this port is forwarded to the port listed
in the Port Number column. This field applies to Translated
type ports only.
Translated Port
Status of port usage:
• Enabled—In use by the application and opened by the
firewall
• Disabled—Blocked by the firewall and not in use
Status
Brief description of how the port is used.
Description
Cisco Unified Operating System Administration Guide for Cisco Unified CCX and Cisco Unified IP IVR, Release 12.5(1) SU3
14
Status and Configuration
Display Registered Ports
Page 25
C H A P T E R 4
Settings
• IP and Port Settings, on page 15
• Configure NTP Servers, on page 17
• Set SMTP settings, on page 17
• Set Time, on page 18
IP and Port Settings
Use the IP Settings option to view and change IP and port setting for the Ethernet connection on the subsequent
node and configure the IP address of the publisher.
This section contains the following topics:
• Change IP Settings, on page 15
• View Publisher IP Settings, on page 16
Update the values in the fields only if you are changing the IP address. IP address and Host name change is
not supported in Unified CCX 9.0(x).
For detailed instructions about changing the IP address of servers in a cluster, see the Cisco Unified Operating
System Administration Guide for Cisco Unified CCX and Cisco Unified IP IVR.
Change IP Settings
Use the IP Settings window to change or view the related Ethernet IP addresses, as well as the IP address for
the network gateway.
All Ethernet settings apply to ethernet interface Eth0 or Eth1. You cannot configure any settings for Eth1.
The Maximum Transmission Unit (MTU) on Eth0 defaults to 1500.
For detailed instructions about changing the IP address of servers in a cluster, see the Cisco Unified Operating
System Administration Guide for Cisco Unified CCX and Cisco Unified IP IVR, available here:
https://www.cisco.com/c/en/us/support/customer-collaboration/unified-contact-center-express/
products-maintenance-guides-list.html
Cisco Unified Operating System Administration Guide for Cisco Unified CCX and Cisco Unified IP IVR, Release 12.5(1) SU3
15

Page 26
IPv6 Configuration
Use the Ethernet Ipv6 Configuration page to enable or disable IPv6 address.
To enable or disable IPv6 address, follow this procedure:
Step 1
From the Cisco Unified Operating System Administration page, navigate to Settings > IP > Ethernet Ipv6.
Step 2
To enable or disable IPv6 address, check or uncheck the Enable IPv6 checkbox.
Step 3
Run the CLI command IPv6 Address →show network ipv6 settings to determine whether IPv6 is enabled or disabled.
If the Enable IPv6 checkbox is enabled, select an option:
• Router advertisement — to fetch IPv6 from the router
• DHCP — select the DHCP radio button for DHCPv6 server to issue a IPv6 address
• Manual entry — to manually enter the IPv6 address
Step 4
Enter the values for IPv6 Address, Subnet Mask, and the Default Gateway fields. For example, if IPv4 address is
aa:bb:cc:dd, then IPv6 address must be in (2001:aa:bb:cc::dd) format.
Step 5
To update the changes, check the Update with Reboot check box.
Step 6
Click Save button to save the changes and reboot the server.
What to do next
If you have:
• enabled IPv6 address, then add the IPv6 address in the Unified CCX Administration page immediately
after server is restarted.
• disabled IPv6 address, then remove the IPv6 address in the Unified CCX Administration page
immediately after server is restarted.
For more information, see the Access Server Menu chapter in Cisco Unified Contact Center Express
Administration and Operations Guide , available here:
https://www.cisco.com/c/en/us/support/customer-collaboration/unified-contact-center-express/
products-maintenance-guides-list.html
View Publisher IP Settings
You can view the IP address of the first node or publisher for the node on the subsequent node.
Update the values in the fields only if you are changing the IP address. For detailed instructions about changing
the IP address of servers in a cluster, see the Cisco Unified CCX Administration Guide.
Note
To view the publisher IP settings, follow this procedure:
From the Cisco Unified Operating System Administration window, navigate to Settings > IP > Publisher.
Cisco Unified Operating System Administration Guide for Cisco Unified CCX and Cisco Unified IP IVR, Release 12.5(1) SU3
16
Settings
IPv6 Configuration

Page 27
The Publisher Settings window appears.
You can view the publisher IP address only on the subsequent node of the cluster, not on the publisher itself.
Note
Configure NTP Servers
Ensure that external NTP servers are stratum 9 or higher (1-9). To add, delete, or modify an external NTP
server, follow this procedure:
You can only configure the NTP server settings on the first node or publisher.
Note
Step 1
From the Cisco Unified Operating System Administration window, navigate to Settings > NTP Servers.
The NTP Server Settings window appears.
Step 2
Add, delete, or modify an NTP server:
To avoid potential compatibility, accuracy, and network jitter problems, the external NTP servers that you
specify for the primary node must be NTP v4 (version 4). If you are using IPv6 addressing, external NTP
servers must be NTP v4.
Note
• To delete an NTP server, select the check box in front of the appropriate server, and then click Delete.
• To add an NTP server, click Add, enter the hostname or IP address, and then click Save.
• To modify an NTP server, click the IP address, modify the hostname or IP address, and then click Save.
Any change that you make to the NTP servers can take up to 5 minutes to complete. Whenever you make
any change to the NTP servers, you must refresh the window to view the correct status.
Note
Step 3
To refresh the NTP Server Settings window and view the correct status, choose Settings > NTP. After deleting, modifying,
or adding the NTP server, you must restart the other node in the cluster for the changes to take effect.
Set SMTP settings
Use the SMTP Settings window to view or set the SMTP hostname and determine if the SMTP host is active.
If you want the system to send you e-mail, you must configure an SMTP host.
Tip
To access the SMTP settings, follow this procedure:
Step 1
From the Cisco Unified Operating System Administration window, navigate to Settings > SMTP.
The SMTP Settings window appears.
Step 2
Enter or modify the SMTP hostname or IP address.
Cisco Unified Operating System Administration Guide for Cisco Unified CCX and Cisco Unified IP IVR, Release 12.5(1) SU3
17
Settings
Configure NTP Servers


Page 28
Step 3
Click Save.
Set Time
To manually configure the time, follow this procedure:
The time cannot be set if NTP is currently enabled. Before you can manually configure the server time, you
must delete any NTP servers that you configured.
Note
If you enter a time that is before the time when Unified CCX was installed on the server, the digital certificates
that the server uses for security become invalid, causing the webserver (Tomcat) to stop working. If this
happens, you must regenerate the certificates.
Caution
Step 1
From the Cisco Unified Operating System Administration window, navigate to Settings > Time.
Step 2
Enter the date and time for the system.
Step 3
Click Save.
Step 4
On a Unified CCX server, if you changed the date or if you changed the time by more than two minutes, use the CLI
command utils system restart to restart the server.
Cisco Unified Operating System Administration Guide for Cisco Unified CCX and Cisco Unified IP IVR, Release 12.5(1) SU3
18
Settings
Set Time


Page 29
C H A P T E R 5
System Restart
• Switch Versions and Restart, on page 19
• Restart Current Version, on page 19
• Shut Down System, on page 20
Switch Versions and Restart
You can use this option both when you are upgrading to a newer software version, and when you need to fall
back to an earlier software version. To shut down the system that is running on the active disk partition and
then automatically restart the system by using the software version on the inactive partition, follow this
procedure:
This procedure causes the system to restart and become temporarily out of service.
Caution
Step 1
From the Cisco Unified Operating System Administration window, navigate to Settings > Version.
The Version Settings window appears, showing the software version on both the active and inactive partitions.
Step 2
Click Switch Versions to switch versions and restart. Click Cancel to stop the operation.
If you click Switch Versions, the system restarts, and the partition that is inactive becomes active.
Restart Current Version
To restart the system on the current partition without switching versions, follow this procedure:
This procedure causes the system to restart and become temporarily out of service.
Caution
Step 1
From the Cisco Unified Operating System Administration window, navigate to Settings > Version.
The Version Settings window appears, showing the software version on both the active and inactive partitions.
Cisco Unified Operating System Administration Guide for Cisco Unified CCX and Cisco Unified IP IVR, Release 12.5(1) SU3
19


Page 30
Step 2
Click Restart to restart the system, or click Cancel to stop the operation.
If you click Restart, the system restarts on the current partition without switching versions.
Shut Down System
Do not press the power button on the server to shut down the server or to reboot the server. If you do, you
may accidentally corrupt the file system, which may prevent you from future server reboots.
Caution
This procedure causes the system to shut down.
Caution
Step 1
If you are shutting down the system from the command line interface, go to step 4. Otherwise, go to Step 2.
Step 2
From the Cisco Unified Operating System Administration window, navigate to Settings > Version.
The Version Settings window appears, showing the software version on both the active and inactive partitions.
Step 3
Click Shutdown to shut down the system, or click Cancel to stop the operation.
If you click Shutdown, the system halts all processes and shuts down.
The hardware may require several minutes to power down.
Note
Step 4
Enter the command utils system shutdown or the command utils system restart.
For more information about CLI commands, see the Cisco Unified Contact Center Express Command Line Interface
Reference Guide, located at https://www.cisco.com/en/US/products/sw/custcosw/ps1846/prod\_installation\_guides\_
list.html.
For more information, see the Cisco Unified Contact Center Express Administration and Operations Guide, located at
https://www.cisco.com/c/en/us/support/customer-collaboration/unified-contact-center-express/
products-maintenance-guides-list.html.
What to do next
When the user initiates a switch version, system restart, or system shutdown from the Cisco Unified OS
Administration web interface, the operation fails in the following scenarios:
• If the system detects that a switch version is in progress.
• If the system detects that a previous switch version was abruptly terminated.
A switch version operation is abruptly terminated if a power reset or hard reboot is done on the Unified CCX
system when it is in progress.
Note
Cisco Unified Operating System Administration Guide for Cisco Unified CCX and Cisco Unified IP IVR, Release 12.5(1) SU3
20
System Restart
Shut Down System


Page 31
C H A P T E R 6
Security
This chapter describes Certificate Management and IPSec Management and provides procedures for managing
system security.
• Set Internet Explorer Security Settings, on page 21
• Certificate Management Menu, on page 21
• IPSec Management, on page 27
• Bulk Certificate Management, on page 30
Set Internet Explorer Security Settings
To download certificates from the server, ensure your Internet Explorer security settings are configured as
follows:
Step 1
Start Internet Explorer.
Step 2
Navigate to Tools > Internet Option.
Step 3
Click the Advanced tab.
Step 4
Scroll down to the Security section on the Advanced tab.
Step 5
If necessary, clear the Do not save encrypted pages to disk check box.
Step 6
Click OK.
Certificate Management Menu
To access the Security menu items, you must log in to Cisco Unified Operating System Administration using
your administrator credentials.
Note
Display Certificates
To display existing certificates, follow this procedure:
Cisco Unified Operating System Administration Guide for Cisco Unified CCX and Cisco Unified IP IVR, Release 12.5(1) SU3
21


Page 32
Step 1
Navigate to Security > Certificate Management.
The Certificate List window appears.
Step 2
You can use the Find controls to filter the certificate list.
Step 3
To view details of a certificate or trust certificate, click its file name.
The Certificate Details window shows information about the certificate.
Step 4
To return to the Certificate List window, click Close to close the Certificate Details window.
Download Certificate
To download a certificate from the Cisco Unified Operating System to your PC, follow this procedure:
Step 1
Navigate to Security > Certificate Management.
The Certificate List window appears.
Step 2
You can use the Find controls to filter the certificate list.
Step 3
Click the file name of the certificate.
The Certificate Details window appears.
Step 4
Click Download.PEM File or Download.DER File.
Step 5
In the dialog box, click Save File to download the certificate.
Delete Certificate
To delete a trusted certificate, follow this procedure:
Deleting a certificate can affect your system operations.
Caution
Any existing CSR for the certificate that you choose from the Certificate list is deleted from the system. You
must generate a new CSR.
Caution
Step 1
Navigate to Security > Certificate Management.
The Certificate List window appears.
Step 2
You can use the Find controls to filter the certificate list.
Step 3
Click the filename of the certificate.
The Certificate Details window appears.
Step 4
Click Delete.
Cisco Unified Operating System Administration Guide for Cisco Unified CCX and Cisco Unified IP IVR, Release 12.5(1) SU3
22
Security
Download Certificate

Page 33
You must restart the Unified CCX server. In the case of high availability deployments, restart both the nodes.
Note
Related Topics
Regenerate Certificate
Regenerate Certificate
To regenerate a certificate, follow this procedure:
Regenerating a certificate can affect your system operations.
Caution
For certificate regeneration, the supported key lengths are restricted to 1024, 2048, 3072, and 4096.
Step 1
Navigate to Security > Certificate Management.
The Certificate List window appears.
Step 2
Click Generate Self-signed.
The Generate New Self-signed Certificate dialog box opens.
Step 3
Choose a certificate name from the Certificate Purpose list.
The following table contains descriptions of the certificate names that appear:
Description
Name
This self-signed root certificate is generated during installation for the HTTPS server.
tomcat
This self-signed root certificate is generated during installation for IPSec connections with MGCP and
H.323 gateways.
ipsec
Step 4
Click Generate.
Step 5
After you regenerate a certificate, you must restart the Unified CCX server. In the case of high availability deployments,
restart both the nodes.
What to do next
After you regenerate a certificate in Cisco Unified Operating System, you must perform a backup so that the
latest backup contains the regenerated certificates.
For information on performing a backup, see the Cisco Unified Contact Center Express System Administration
Guide.
Upload Certificate to Server
Uploading a new certificate can affect your system operations. After you upload a new certificate, you must
restart the Unified CCX server (in the case of high availability deployments, restart both nodes).
Caution
Cisco Unified Operating System Administration Guide for Cisco Unified CCX and Cisco Unified IP IVR, Release 12.5(1) SU3
23
Security
Regenerate Certificate

Page 34
The system does not distribute trust certificates to other cluster node automatically. If you must have the same
certificate on more than one node, you must upload the certificate to each node individually.
Note
Upload Certificate or Certificate Chain
Step 1
Navigate to Security > Certificate Management.
The Certificate List window appears.
Step 2
Click Upload Certificate or Certificate Chain.
The Upload Certificate or Certificate Chain dialog box opens.
Step 3
Select the certificate name from the Certificate Purpose list.
Step 4
Select the file to upload by performing one of the following steps:
• In the File Upload text box, enter the path to the file, or
• Click the Browse button and navigate to the file; then, click Open.
Cisco Unified CCX supports Privacy Enhanced Mail (PEM) Base64 encoded format of X.509 certificate (only one
PEM certificate in a file), Distinguished Encoding Rules (DER) format of X509 Certificate and DER format of
PKCS#7 (Public-Key Cryptography Standards) Certificate Chain. The system does not support PEM format of
PKCS#7 Certificate Chain.
Step 5
Click the Upload button to upload the file to the server.
After you upload a certificate, you must restart the Unified CCX server. In the case of high availability
deployments, restart both the nodes.
Note
Directory Trust Certificate
Uploading a Directory Trust Certificate is not applicable for Unified CCX.
Note
Obtain Third-Party CA Certificates
Cisco Unified Operating System supports certificates that a third-party Certificate Authority (CA) issues with
PKCS # 10 Certificate Signing Request (CSR). The following table provides an overview of this process,
with references to more documentation:
Step 1
Generate a CSR on the server.
See Generate Certificate Signing Request, on page 25.
Step 2
Download the CSR to your PC.
See Download Certificate Signing Request, on page 25.
Cisco Unified Operating System Administration Guide for Cisco Unified CCX and Cisco Unified IP IVR, Release 12.5(1) SU3
24
Security
Upload Certificate or Certificate Chain

Page 35
Step 3
Use the CSR to obtain an application certificate from a CA.
Get information about obtaining application certificates from your CA. See Application Certificates, on page 26 for more
notes.
Step 4
Obtain the CA root certificate.
Get information about obtaining a root certificate from your CA. See Application Certificates, on page 26 for more notes.
Step 5
Upload the CA root certificate to the server.
See Upload Certificate or Certificate Chain, on page 24.
Step 6
Upload the application certificate to the server.
See Application Certificates, on page 26
Step 7
Restart the Unified CCX server. In the case of high availability deployments, restart both the nodes.
Generate Certificate Signing Request
To generate a Certificate Signing Request (CSR), follow these steps:
For CSR generation, the supported key lengths are restricted to 1024, 2048, 3072, and 4096.
Step 1
Navigate to Security > Certificate Management.
The Certificate List window appears.
Step 2
Click Generate CSR.
The Generate Certificate Signing Certificate dialog box opens.
Step 3
Select the certificate name from the Certificate Purpose list.
For the current release of the Cisco Unified Operating System, the Directory option no longer appears in the
list of Certificate Names.
Note
Step 4
Click Generate.
Download Certificate Signing Request
To download a Certificate Signing Request, follow this procedure:
Step 1
Navigate to Security > Certificate Management.
The Certificate List window appears.
Step 2
Click Download CSR.
The Download Certificate Signing Request dialog box opens.
Step 3
Select the certificate name from the Certificate Name list.
Step 4
Click Download CSR.
Step 5
In the File Download dialog box, click Save.
Cisco Unified Operating System Administration Guide for Cisco Unified CCX and Cisco Unified IP IVR, Release 12.5(1) SU3
25
Security
Generate Certificate Signing Request
Page 36
Application Certificates
To use an application certificate that a third-party CA issues, you must obtain both the signed application
certificate and the CA root certificate from the CA. Collect information about obtaining these certificates from
your CA. The process varies among CAs.
Ensure that you get an RSA signed certificate from CA.
Note
Cisco Unified Operating System generates certificates in DER and PEM encoding formats and generates
CSRs in PEM encoding format. It accepts certificates in DER and PEM encoding formats.
For all certificate types, obtain and upload a CA root certificate and an application certificate on each node.
Or upload Certificate Chain that has both the application certificate and the chain of the corresponding
certificate issuer.
The CSRs for Tomcat and IPSec use the following extensions:
X509v3 Key Usage:
Digital Signature, Key Encipherment, Data Encipherment, Key Agreement
X509v3 Extended Key Usage:
TLS Web Server Authentication, TLS Web Client Authentication, IPSec End System
1.
Upload the CA root certificate of the CA that signed an application certificate. If a subordinate CA signs
an application certificate, you must upload the CA root certificate of the subordinate CA, not the root CA.
2.
Upload CA root certificates and application certificates by using the same Upload Certificate dialog box.
When you upload a CA root certificate, choose the certificate name with the format certificate type-trust.
3.
When you upload an application certificate, choose the certificate name that only includes the certificate
type. For example, choose tomcat-trust when you upload a Tomcat CA root certificate; choose tomcat
when you upload a Tomcat application certificate. Restart the Unified CCX server.
Monitor Certificate Expiration Dates
The system can automatically send you an e-mail when a certificate is close to its expiration date. To view
and configure the Certificate Expiration Monitor, follow this procedure:
Step 1
Navigate to Security > Certificate Monitor.
The Certificate Monitor window appears.
Step 2
Enter the required configuration information.
See the table below for a description of the Certificate Monitor Expiration fields.
Step 3
To save your changes, click Save.
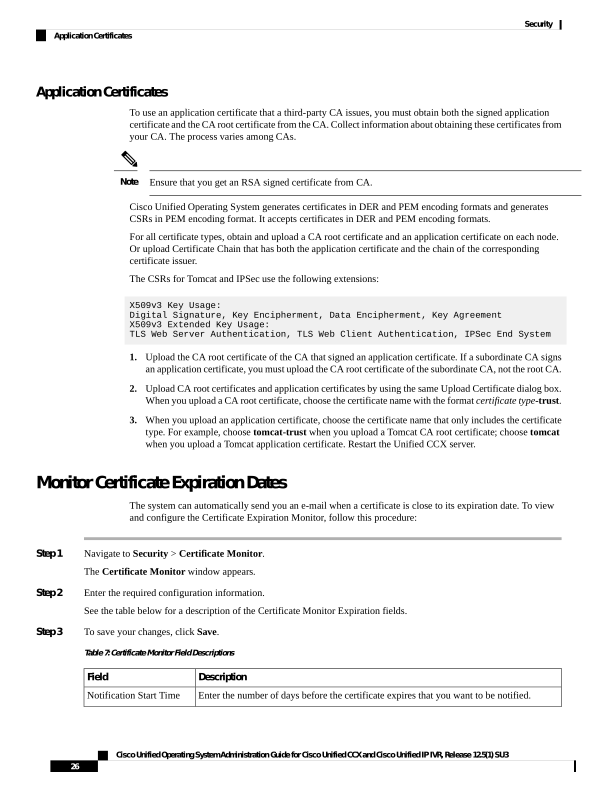
Table 7: Certificate Monitor Field Descriptions
Description
Field
Enter the number of days before the certificate expires that you want to be notified.
Notification Start Time
Cisco Unified Operating System Administration Guide for Cisco Unified CCX and Cisco Unified IP IVR, Release 12.5(1) SU3
26
Security
Application Certificates

Page 37
Description
Field
Enter the frequency for notification, either in hours or days.
Notification Frequency
Select the check box to enable e-mail notification.
Enable Email Notification
Enter the e-mail address to which you want notifications sent.
For the system to send notifications, you must configure an SMTP host.
Note
Email IDs
IPSec Management
The following topics describe the functions that you can perform with the IPSec menu:
• Set Up New IPSec Policy, on page 27
• Manage IPSec Policies, on page 29
IPSec does not automatically get set up between nodes in the cluster during installation.
Note
Set Up New IPSec Policy
Any changes that you make to an IPSec policy during a system upgrade are lost, so do not modify or create
IPSec policies during an upgrade.
IPSec, especially with encryption, affects the performance of your system.
Caution
Step 1
Navigate to Security > IPSEC Configuration.
The IPSEC Policy List window appears.
Step 2
Click Add New.
The IPSEC Policy Configuration window appears.
Step 3
Enter the appropriate information on the IPSEC Policy Configuration window. See the table below for descriptions of
the fields on this window.
Step 4
Click Save to set up the new IPSec policy.
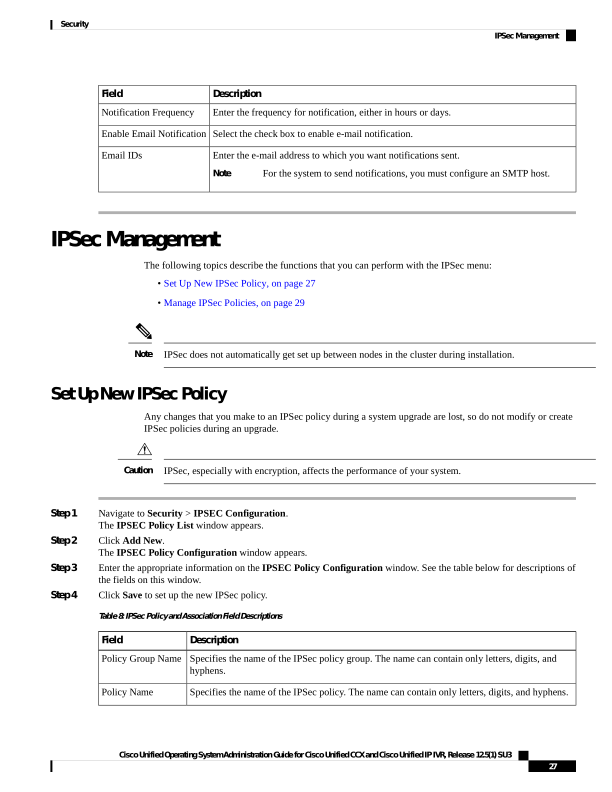
Table 8: IPSec Policy and Association Field Descriptions
Description
Field
Specifies the name of the IPSec policy group. The name can contain only letters, digits, and
hyphens.
Policy Group Name
Specifies the name of the IPSec policy. The name can contain only letters, digits, and hyphens.
Policy Name
Cisco Unified Operating System Administration Guide for Cisco Unified CCX and Cisco Unified IP IVR, Release 12.5(1) SU3
27
Security
IPSec Management


Page 38
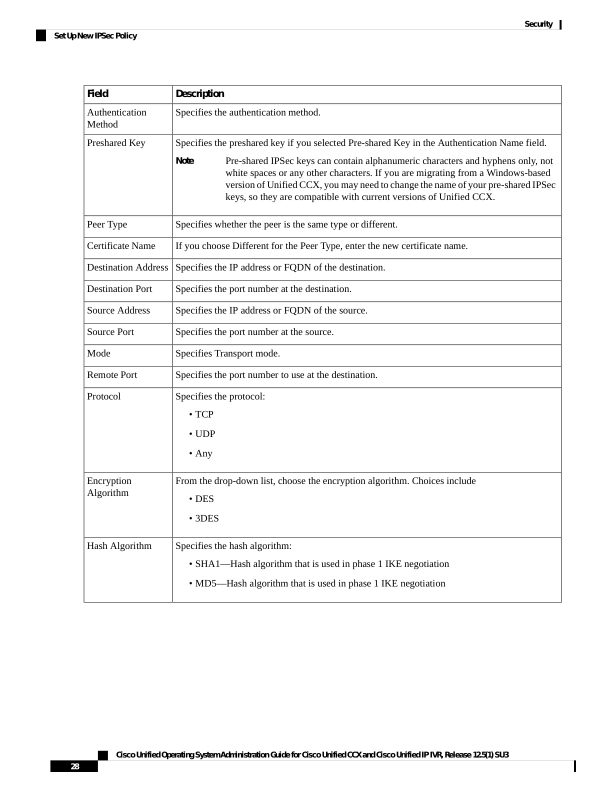
Description
Field
Specifies the authentication method.
Authentication
Method
Specifies the preshared key if you selected Pre-shared Key in the Authentication Name field.
Pre-shared IPSec keys can contain alphanumeric characters and hyphens only, not
white spaces or any other characters. If you are migrating from a Windows-based
version of Unified CCX, you may need to change the name of your pre-shared IPSec
keys, so they are compatible with current versions of Unified CCX.
Note
Preshared Key
Specifies whether the peer is the same type or different.
Peer Type
If you choose Different for the Peer Type, enter the new certificate name.
Certificate Name
Specifies the IP address or FQDN of the destination.
Destination Address
Specifies the port number at the destination.
Destination Port
Specifies the IP address or FQDN of the source.
Source Address
Specifies the port number at the source.
Source Port
Specifies Transport mode.
Mode
Specifies the port number to use at the destination.
Remote Port
Specifies the protocol:
• TCP
• UDP
• Any
Protocol
From the drop-down list, choose the encryption algorithm. Choices include
• DES
• 3DES
Encryption
Algorithm
Specifies the hash algorithm:
• SHA1—Hash algorithm that is used in phase 1 IKE negotiation
• MD5—Hash algorithm that is used in phase 1 IKE negotiation
Hash Algorithm
Cisco Unified Operating System Administration Guide for Cisco Unified CCX and Cisco Unified IP IVR, Release 12.5(1) SU3
28
Security
Set Up New IPSec Policy
Page 39
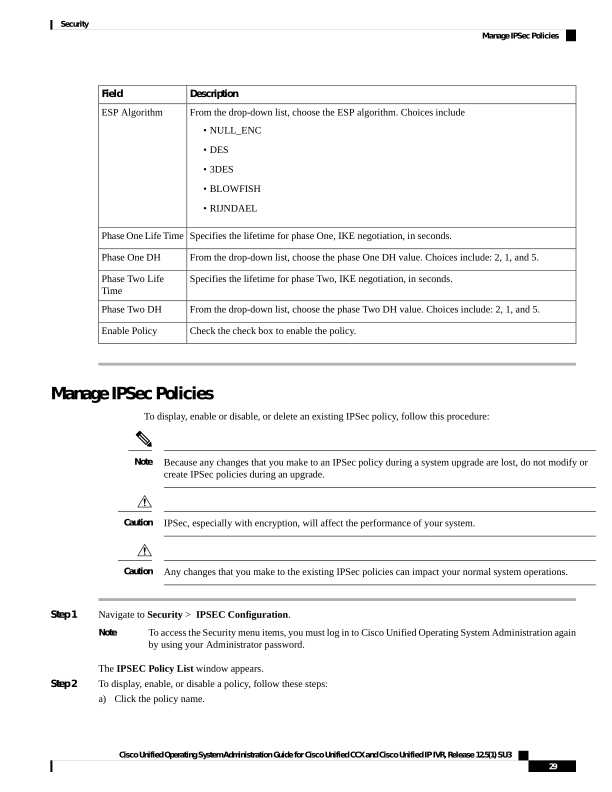
Description
Field
From the drop-down list, choose the ESP algorithm. Choices include
• NULL_ENC
• DES
• 3DES
• BLOWFISH
• RIJNDAEL
ESP Algorithm
Specifies the lifetime for phase One, IKE negotiation, in seconds.
Phase One Life Time
From the drop-down list, choose the phase One DH value. Choices include: 2, 1, and 5.
Phase One DH
Specifies the lifetime for phase Two, IKE negotiation, in seconds.
Phase Two Life
Time
From the drop-down list, choose the phase Two DH value. Choices include: 2, 1, and 5.
Phase Two DH
Check the check box to enable the policy.
Enable Policy
Manage IPSec Policies
To display, enable or disable, or delete an existing IPSec policy, follow this procedure:
Because any changes that you make to an IPSec policy during a system upgrade are lost, do not modify or
create IPSec policies during an upgrade.
Note
IPSec, especially with encryption, will affect the performance of your system.
Caution
Any changes that you make to the existing IPSec policies can impact your normal system operations.
Caution
Step 1
Navigate to Security > IPSEC Configuration.
To access the Security menu items, you must log in to Cisco Unified Operating System Administration again
by using your Administrator password.
Note
The IPSEC Policy List window appears.
Step 2
To display, enable, or disable a policy, follow these steps:
a)
Click the policy name.
Cisco Unified Operating System Administration Guide for Cisco Unified CCX and Cisco Unified IP IVR, Release 12.5(1) SU3
29
Security
Manage IPSec Policies


Page 40
The IPSEC Policy Configuration window appears.
b) To enable or disable the policy, click the Enable Policy check box.
c)
Click Save.
Step 3
To delete one or more policies, follow these steps:
a)
Check the check box next to the policies that you want to delete.
You can click Select All to select all policies or Clear All to clear all the check boxes.
b) Click Delete Selected.
Bulk Certificate Management
The Security > Bulk Certificate Management menu option is not applicable for Unified CCX 9.0(x).
Note
To support the Extension Mobility Cross Cluster (EMCC) feature, the system allows you to execute a bulk
import and export operation to and from a common SFTP server that has been configured by the cluster
administrator.
To use Bulk Certificate Management to export certificates, use the following procedure:
1.
Navigate to Security > Bulk Certificate Management.
The Bulk Certificate Management window displays.
2.
Enter the appropriate information on the Bulk Certificate Management window.
3.
To save the values you entered, click Save.
4.
To export certificates, click Export.
The Bulk Certificate Export popup window displays.
5.
From the drop-down menu, choose Tomcat as the type of certificate to export.
6.
Click Export.
The system exports and stores the certificates you chose on the central SFTP server.
You can also use the Bulk Certificate Management window to import certificates that you have exported
from other clusters. However, before the Import button displays, you must complete the following activities:
• Export the certificates from at least two clusters to the SFTP server.
• Consolidate the exported certificates.
Cisco Unified Operating System Administration Guide for Cisco Unified CCX and Cisco Unified IP IVR, Release 12.5(1) SU3
30
Security
Bulk Certificate Management

Page 41
C H A P T E R 7
Software Upgrades
You can use the Install/Upgrade option to upgrade the Unified CCX software and install Unified CCX COP
patch files.
For more information regarding the supported versions of Unified CCX and Unified CM, see Cisco Unified
Contact Center Express (Unified CCX) Compatibility Matrix.
Note
When you upgrade from an earlier version of Unified CCX to the latest version the system restarts as part of
the upgrade process. Therefore, you may want to perform the upgrade during maintenance window to avoid
service interruptions.
Caution
• Unified CCX Upgrade and Roll Back, on page 31
• TFTP File Management, on page 31
• Set Up Customized Logon Message, on page 32
Unified CCX Upgrade and Roll Back
For Upgrade and Rollback instructions, see Cisco Unified Contact Center Express Installation and Upgrade
Guide available here:
https://www.cisco.com/c/en/us/support/customer-collaboration/unified-contact-center-express/
products-installation-guides-list.html
TFTP File Management
The Software Upgrades > TFTP File Management menu option is not applicable for Unified CCX.
Note
Cisco Unified Operating System Administration Guide for Cisco Unified CCX and Cisco Unified IP IVR, Release 12.5(1) SU3
31



Page 42
Set Up Customized Logon Message
You can upload a text file that contains a customized logon message that appears when users log on to Unified
CCX applications. In the applications, the message appears in one of the following ways as:
• A pop-up window, as soon as the authentication page is loaded.
• Cisco Unified CCX Administration
• Cisco Unified CCX Serviceability
• A pop-up window, after entering username and password.
• Cisco Identity Service Management
• Cisco Finesse Administration
• Cisco Unified Intelligence Center
• Finesse Desktop
• A text in the authentication page.
• Disaster Recovery System
• Cisco Unified Serviceability
• Cisco Unified OS Administration
If the message appears in a pop-up window, you must acknowledge the message to log in.
In CLI, the message is displayed after you enter the username and again after you enter the password.
Note
To upload a customized logon message, the procedure is as follows:
Step 1
From the Cisco Unified Operating System Administration window, navigate to Software Upgrades > Customized Logon
Message.
The Customized Logon Message window appears.
Step 2
Click Browse. Choose the text file that you want to upload.
Step 3
Select the required file and click Upload File.
You cannot upload a file that is larger than 10kB.
Note
The customized logon message appears.
Step 4
To revert to the default logon message, click Delete.
By default, there is no custom message configured for Cisco Finesse.
Note
Your customized logon message is deleted, and the system displays the default logon message.
Cisco Unified Operating System Administration Guide for Cisco Unified CCX and Cisco Unified IP IVR, Release 12.5(1) SU3
32
Software Upgrades
Set Up Customized Logon Message

Page 43
C H A P T E R 8
Utility Functions
This chapter describes the utility functions that are available on the operating system: pinging another system
and setting up remote support.
• Ping, on page 33
• Remote Account Support, on page 33
Ping
Use the Ping Utility window to ping another server in the network.
To ping another system, follow this procedure:
Step 1
From the Cisco Unified Operating System Administration window, navigate to Services > Ping.
The Ping Remote window appears.
Step 2
Enter the IP address or network name for the system that you want to ping.
Step 3
Enter the ping interval in seconds.
Step 4
Enter the packet size.
Step 5
Enter the ping count (the number of times that you want to ping the system).
When you specify multiple pings, the ping command does not display the ping date and time immediately.
Be aware that the Ping command displays the data after it completes the number of pings that you specified.
Note
Step 6
Choose whether you want to validate IPSec.
Step 7
Click Ping.
The Ping Remote window displays the ping statistics.
Remote Account Support
From the Remote Access Configuration window, you can set up a remote account that Cisco support personnel
can use to access the system for a specified time.
The remote support process works like this:
Cisco Unified Operating System Administration Guide for Cisco Unified CCX and Cisco Unified IP IVR, Release 12.5(1) SU3
33

Page 44
The customer sets up a remote support account. This account includes a time limit on how long Cisco
personnel can access it. This time limit can be configured to various values.
2.
When the remote support account is set up, a pass phrase gets generated.
3.
The customer calls Cisco support and provides the remote support account name and pass phrase.
4.
Cisco support enters the pass phrase into a decoder program that generates a password from the pass
phrase.
5.
Cisco support logs into the remote support account on the customer system by using the decoded password.
6.
When the account time limit expires, Cisco support can no longer access the remote support account.
To set up remote support, follow this procedure:
Step 1
From the Cisco Unified Operating System Administration window, navigate to Services > Remote Support.
The Remote Access Configuration window appears.
Step 2
Enter an account name for the remote account in the Account Name field.
The account name must comprise at least six-characters that are all lowercase, alphabetic characters.
Avoid creating remote account names starting with “uccx” or “UCCX” because such user names may conflict
with system account names used internally within Unified CCX server.
Caution
Step 3
Enter the account duration, in days, in the Account Duration field.
The default account duration specifies 30 days.
Step 4
Click Save.
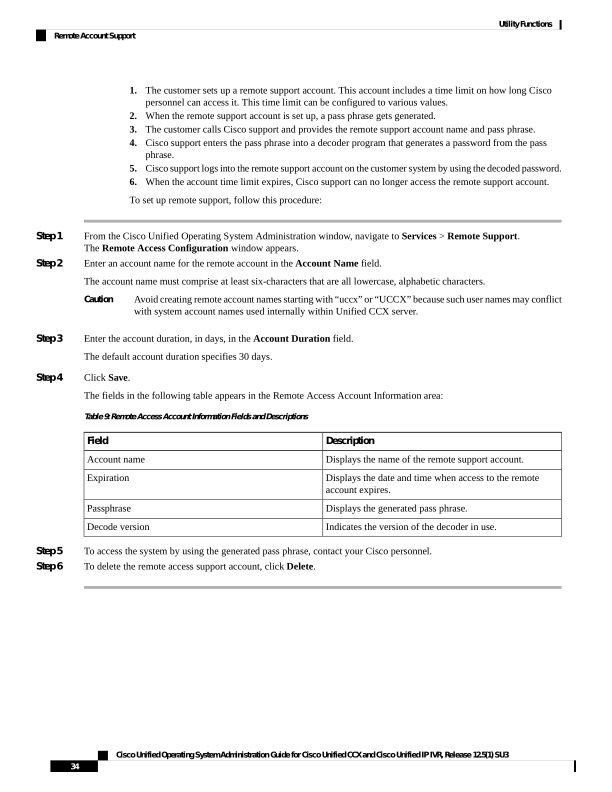
The fields in the following table appears in the Remote Access Account Information area:
Table 9: Remote Access Account Information Fields and Descriptions
Description
Field
Displays the name of the remote support account.
Account name
Displays the date and time when access to the remote
account expires.
Expiration
Displays the generated pass phrase.
Passphrase
Indicates the version of the decoder in use.
Decode version
Step 5
To access the system by using the generated pass phrase, contact your Cisco personnel.
Step 6
To delete the remote access support account, click Delete.
Cisco Unified Operating System Administration Guide for Cisco Unified CCX and Cisco Unified IP IVR, Release 12.5(1) SU3
34
Utility Functions
Remote Account Support
Page 45
I N D E X
<$nopage>remote support
33
A
administrator password
6
B
browser requirements
2
C
certificates
25–26
downloading a signing request
25
monitoring expiration dates
26
CLI
4
cluster nodes
9
procedure
9
Command Line Interface
4
configuration
2
operating system
2
E
Ethernet settings
15
H
hardware, status
9
procedure
9
I
install/upgrade, menu
3
installed software
11
procedure
11
Internet Explorer
21
set security options
21
IPSec
27, 29
changing policy
29
displaying policy
29
management
27
setting up new policy
27
L
logging in
5
overview
5
procedure
5
M
menu
2–3
install/upgrade
3
security
3
settings
2
show
2
N
nodes, cluster
9
procedure
9
NTP server settings
17
O
operating system
1–3, 5–6, 9, 19
administrator password
6
browser requirements
2
configuration
2
hardware status
9
procedure
9
introduction
1
logging in
5
overview
1
restart
19
security
3
services
3
settings
2
software upgrades
3
status
2
P
password, recovering
6
ping
33
publisher settings
16
Cisco Unified Operating System Administration Guide for Cisco Unified CCX and Cisco Unified IP IVR, Release 12.5(1) SU3
IN-1

Page 46
R
remote support
33
setting up
33
restart
19
current version
19
S
security
3, 21
configuration
3
menu
3
overview
21
set IE options
21
services
3, 33
overview
33
ping
3, 33
remote support
3, 33
overview
33
setting up
33
settings
2, 15–18
Ethernet
15
procedure
15
menu
2
NTP servers
17
publisher
16
SMTP
17
time
18
show, menu
2
shutdown, operating system
20
SMTP settings
17
software
3, 11, 31
installed
11
procedure
11
upgrades
3, 31
overview
31
status
2, 9, 12
hardware
9
procedure
9
operating system
2
system
12
procedure
12
system
12, 20
shutdown
20
status
12
procedure
12
T
time settings
18
V
version, restart
19
Cisco Unified Operating System Administration Guide for Cisco Unified CCX and Cisco Unified IP IVR, Release 12.5(1) SU3
IN-2
INDEX