Document Metadata
Format: PDF
Title: System Administration Guide
Author: Unknown
Creator: DITA Open Toolkit
Page 1
System Administration Guide
First Published: 2019-01-24
Last Modified: 2023-06-27
Americas Headquarters
Cisco Systems, Inc.
170 West Tasman Drive
San Jose, CA 95134-1706
USA
http://www.cisco.com
Tel: 408 526-4000
800 553-NETS (6387)
Fax: 408 527-0883


Page 2
© 2019 Cisco Systems, Inc. All rights reserved.
Page 3
C O N T E N T S
Introduction
1
C H A P T E R 1
Introduction
1
Administrative Tools
1
Using Single Sign-On
2
Configuring Browsers on a Unity Connection Administrator Workstation
2
Accessing and Exiting Cisco Unity Connection Administration
3
To Login to Unity Connection Administration
3
To Exit Cisco Unity Connection Administration
4
Cisco Unity Connection Administration User Interface
4
Cisco Unity Connection Configuration Scenarios
5
Configuring Voice Messaging for Each User
6
Configuring Telephony in Unity Connection
8
Connecting Various Locations in a Network
9
Configuring Mailbox Storage and Email Account for Each User
10
Advanced Configuration
11
Accessibility
13
C H A P T E R 2
Overview
13
Shortcut Keys for Cisco Unity Connection Administration
13
Enabling TAB Key Navigation for Hyperlink On Safari
15
Enabling TAB Key Navigation for Hyperlink On MAC
15
Other Unity Connection Features
15
Speech Connect
15
Cisco SpeechView
16
TTY Overview
16
Setting Up Cisco Unity Connection to Use the TTY Prompt Set
17
System Administration Guide
iii

Page 4
User Attributes
19
C H A P T E R 3
User Attributes
19
Overview
19
Preparing to Add User Accounts
19
Class of Service
20
Default Class of Service
20
Configuring Class of Service
21
Class of Service Membership
21
Class of Service Settings
21
User Templates
24
Default User Templates
24
Configuring User Templates
24
Roles
26
System Roles
26
Custom Roles
28
Users
37
C H A P T E R 4
Introduction
37
Default Users
37
Finding Users
38
Creating User Accounts
39
Creating User Accounts Manually
40
Adding a User Account
40
Importing Users through AXL
41
Considerations While Importing Data From LDAP Directory Integrated with Cisco Unified CM
42
Importing Users using LDAP Directory
42
Creating User Accounts using BAT
42
Using Import Users and Synch Users Functionalities
42
Accessing the Import and Synch Users Tools
43
Editing User Account
43
Editing Individual User Account
43
Editing User Accounts in Bulk Edit Mode
44
Editing User Accounts through BAT
45
System Administration Guide
iv
Contents
Page 5
Deleting User Accounts
45
Deleting User Accounts Manually
46
Moving or Migrating Users Between Locations in Cisco Unity Connection
47
Moving One or Several Users Between Networked Unity Connection Locations
47
Migrating Users Between Unity Connection Locations
48
Task List for Migrating Users Using COBRAS Briefcase Mode
48
Contacts
51
C H A P T E R 5
Introduction
51
Types of Contacts
51
Contact Templates
52
Configuring Contact Templates
52
Configuring Contacts
52
Configuring Contacts Manually
53
Configuring Contacts through Bulk Administration Tool (BAT)
53
Contact Settings
53
Alternate Names
54
SMTP Proxy Addresses
54
System Distribution List
55
C H A P T E R 6
Introduction
55
Default System Distribution Lists
55
Configuring System Distribution Lists
56
Adding or Removing Distribution List Members
57
Using Advanced Settings to Enable System Distribution List Access Lists
58
Enable and Configure System Distribution List Access List
59
Enabling Users to Send Messages to a System Distribution List
59
Telephony Integration
61
C H A P T E R 7
Introduction
61
Phone System
62
Configuring Phone System Integration
62
Phone System Settings
63
Phone System Basics
63
System Administration Guide
v
Contents
Page 6
Cisco Unified Communications Manager AXL Servers
63
Configuring an AXL Server in Unity Connection
64
Phone System Associations
64
Port
64
Configuring Ports
65
Viewing the Port Certificate
66
Port Group
66
Configuring Port Group
66
Port Group Settings
67
Port Group Basics
67
Servers
68
Advanced Settings
70
Codec Advertising
71
Trunk
71
Configuring Trunk
72
Speech Connect Port
72
Configuring a Speech Connect Port
72
Audio and Video Format Using Phone
73
Configuring the Audio and Video Format
73
Configuring Unity Connection to Send Comfort Noise Packets every second during Record
74
Configuring Unity Connection to clean up Inactive Calls caused by Phone Inactivity
75
Security
75
Viewing and Saving Unity Connection Root Certificate
75
Viewing and Save the Unity Connection Root Certificate
75
Configuring a SIP Security Profile (Cisco Unified Communications Manager SIP Trunk Integrations
Only)
76
Adding a SIP Security Profile (Cisco Unified Communications Manager SIP Trunk Integrations
Only
76
IPv6 in Unity Connection (Cisco Unified Communications Manager Integrations Only)
77
Call Management
79
C H A P T E R 8
Call Management Elements
79
Call Management Plan
80
Creating a Call Management Plan
80
System Administration Guide
vi
Contents
Page 7
Implementing a Call Management Plan
81
System Call Handlers
81
Call Handler Templates
82
Default Call Handler Templates
82
Configuring Call Handler Templates
82
Default System Call Handlers
83
Configuring System Call Handlers
84
Call Handler Settings
85
Transfer Rules
85
Caller Input
85
Greetings
85
Message Settings
86
Call Handler Owners
86
Directory Handlers
87
Default Directory Handler
87
Configuring Directory Handlers
88
Routing Calls to a Voice Directory Handler
88
Interview Handlers
89
Configuring Interview Handlers
89
Dial Plan
90
Default Partition and Search Space in Unity Connection
90
Changing the System Default Partition and Search Space
90
Partitions
91
Configuring Partitions
91
Search Spaces
92
Search Space Example for Automated Attendant
92
Multiple Site Search Space Example
93
How Search Spaces Work
94
Configuring Search Spaces
96
Call Routing
96
Default Call Routing Rules
96
Configuring Call Routing Rules
97
Call Routing Tables
98
Using Routing Rules with the Route from Next Call Routing Rule Action
99
System Administration Guide
vii
Contents
Page 8
Restriction Tables
99
How Restriction Tables Work
100
Default Restriction Table
102
Configuring Restriction Tables
102
Schedules
103
Default Schedules
104
Configuring Schedules
104
Holiday Schedules
105
Configuring Holiday Schedules
105
Custom Recordings
106
Configuring Custom Recordings
106
Default Automated Attendant Behavior
107
Message Storage
109
C H A P T E R 9
Message Storage
109
Overview
109
About Mailbox Stores
109
User Templates Settings
110
Maximum Size Supported for a Mailbox Store
110
Backup with Multiple Mailbox Stores
111
Configuring Mailbox Stores
111
Moving Mailboxes between Mailbox Stores
112
Disabling and Re-Enabling a Mailbox Store
113
Controlling the Size of Mailboxes
113
Mailbox Size Quotas
113
Mailbox Quota Alert
115
Configuring the Quota Notification Settings
115
Customizing the Subject Line or Body Text of Mailbox Quota Alert Text
116
Message Aging Policies
116
Message Aging Alerts
117
Message Recording Expiration
118
Networking
121
C H A P T E R 1 0
Legacy Links
122
System Administration Guide
viii
Contents
Page 9
Intrasite Links
122
Configuring an Intrasite Link
122
Intersite Links
122
Configuring an Intersite Link
122
Branch Management
123
Branches
123
Configuring a Branch
123
Branch Synch Results
123
HTTPS Links
124
Configuring an HTTPS Link
124
Locations
124
VPIM
124
Configuring an HTTPS Link
124
Connection Location Passwords
125
Messaging
127
C H A P T E R 1 1
Overview
127
Basics of Messaging
127
Types of Messages
127
Message Recording
129
Configuring Termination Warning Prompt
129
Default Recipient Accounts
129
Dispatch Messages
129
Configuring Dispatch Messages
130
Configuring Dispatch Messaging for Interview Handlers
130
Dispatch Messaging Limitations and Behavior
130
Message Delivery
131
Message Delivery and Sensitivity Settings
131
Message Delivery Issues
132
Message Actions
133
Message Subject Line Formats
133
Message Storage and Disk Capacity
133
Message Deletion
133
Message Access
134
System Administration Guide
ix
Contents
Page 10
Live Record
134
Configuring Live Record
134
Broadcast Messaging
135
Enable Phone Access to the Broadcast Message Administrator
136
Setting Up a One Key Dialing Option from a User Greeting to Access Broadcast Message
Administrator
137
Enabling Sending and Updating Broadcast Messages
138
Importance of Broadcast Message Administrator
138
Changing Broadcast Message Administrator Defaults
139
Integrated Messaging
139
SMTP Message Handling
139
Example Using IMAP and ViewMail for Outlook
140
Important Points for Deploying Integrated Messaging
141
Task List for Configuring IMAP Access
141
Configuring Unity Connection to Relay Messages to a Smart Host
142
Configuring Message Relay Settings
142
Configuring Message Actions for Users or User Templates
143
Configuring SMTP Proxy Addresses for Users or User Templates
143
Enabling IMAP Client Access to Voice Messages for Users
143
Configuring SMTP Proxy Addresses for Contacts
143
Configuring IMAP Client Access and Authentication
143
Configuring SMTP Message Parameters
144
Configure SMTP client communication
144
Unified Messaging
145
Cisco Voicemail for Gmail
145
LDAP
147
C H A P T E R 1 2
Overview
147
Integrating Unity Connection with an LDAP Directory
147
Task List for Configuring LDAP
148
Activating Cisco DirSync Service
150
Enabling LDAP Synchronization
150
Configuring LDAP Directory Configurations
150
Converting Phone Numbers into Extensions
151
System Administration Guide
x
Contents
Page 11
Adding a Regular Expression and Replacement Pattern
152
Uploading SSL Certificates on the Cisco Unity Connection 9.x Server
152
Configuring LDAP Authentication in Unity Connection
153
Selecting the LDAP Users to Import into Unity Connection
154
Directories Other than Active Directory
155
Active Directory
155
Unity Connection Intrasite and Intersite Networking
155
Filtering LDAP Users
155
Adding an LDAP Filter
156
Creating Unity Connection Users from LDAP Data Using the Import Users Tool
156
Creating Unity Connection Users from LDAP Data Using Bulk Administration Tool
156
Editing LDAP Directory Configuration
157
Changing or Deleting LDAP Directory Configuration
157
Disabling LDAP Authentication
158
Changing the LDAP Field Mapped to the Alias Field
158
Determining if a Unity Connection User is Integrated with an LDAP Directory
159
Changing LDAP Integration Status
159
Changing the LDAP Integration Status of an Individual Unity Connection User
160
Changing the LDAP Integration Status of Multiple Unity Connection User Accounts in Bulk Edit
Mode
161
Integrating Existing Unity Connection User Accounts with LDAP User Accounts Using Bulk
Administration Tool
161
SpeechView
165
C H A P T E R 1 3
Overview
165
SpeechView Security Considerations
167
Considerations for Deploying SpeechView
167
Task List for Configuring SpeechView
168
Enabling SpeechView Transcription of Voice Messages in Class of Service
169
Configuring Unity Connection to Relay Messages to a Smart Host
169
Configuring Unity Connection to Accept Messages from Email System
169
Configuring Email System to Route Incoming SpeechView Traffic
170
Configuring SpeechView Transcription Service
170
SpeechView Reports
171
System Administration Guide
xi
Contents
Page 12
SpeechView Transcription Error Codes
171
Configuring Transcription Error Codes
172
Notifications
173
C H A P T E R 1 4
Introduction
173
Default Notification Devices
174
Configuring Notification Devices
174
Cascading Message Notification
176
Task List for Cascading Message Notification
176
Chaining Message Notification
177
Task List for Chaining Message Notification
177
Setting Up SMTP Message Notification
178
Enabling SMTP Notification
178
Configuring the Unity Connection Server to Relay Messages to a Smart Host
178
Setting Up SMS Message Notification
179
Enabling SMS Message Notifications
180
Setting Up an SMPP Provider
180
Setting Up HTML Message Notification
180
Notification Templates
181
Default Notification Templates
181
Configuring Notification Templates
182
Custom Variables
185
Configuring Custom Variables
185
Custom Graphics
186
Configuring Custom Graphics
186
Administrative Replaceable Images
187
Editing an Administrative Replaceable Image
187
Configuring HTML-based Message Notification
188
Configuring the Authenticated and Non-Authenticated Mode
188
Configuring Unity Connection to Send Voice Message as an Attachment with HTML Notification
188
Configuring Unity Connection to Send Voice Message as an Attachment
189
Configuring the Size of Voice Messages Sent as an Attachment
189
Notifications Subject Line Format
190
Subject Line Parameters
190
System Administration Guide
xii
Contents
Page 13
Subject Line Format Examples
192
Subject Line Format Configuration
192
Video
195
C H A P T E R 1 5
Video
195
Task List for Configuring Video Messaging
195
Installing and Configuring Cisco MediaSense
196
Configuring Video Services
197
Configuring Video Services Accounts
198
System Settings
201
C H A P T E R 1 6
Overview
201
General Configuration
201
Managing the General Configuration Settings
202
Cluster
202
Authentication Rules
202
Configuring Authentication Rules
203
Roles
204
Configuring Roles
204
Assigning or Removing Roles to a User
205
Restriction Tables
206
Licenses
206
Schedules
206
Holiday Schedules
206
Global Nicknames
206
Configuring a Global Nickname in Unity Connection
206
Subject Line Formats
207
Subject Line Parameters for Voice Messages
208
Subject Line Format Examples for Voice Messages
209
Subject Line Format Configuration
210
Configuring Subject Line Formats in Unity Connection
210
Attachment Descriptions
210
Configuring Description of a Message Attachment
211
Enterprise Parameters
211
System Administration Guide
xiii
Contents
Page 14
Service Parameters
214
Plugins
221
Real-Time Monitoring Tool
221
Installing a Plugin in Unity Connection
222
Fax Server
222
LDAP
222
SAML Single Sign On
223
Authz Server
223
Configuring an Authz Server in Unity Connection
224
Cross-Origin Resource Sharing (CORS)
224
Configuring CORS in Unity Connection
225
SMTP Configuration
225
Advanced System Settings
227
C H A P T E R 1 7
Advanced System Settings
227
SMPP Providers
227
Conversations
227
Applying Conversation Settings for All Users
228
Conversation Settings
228
Messaging
232
Intrasite Networking
232
Telephony
232
Reports
233
Available Reports
233
Connection Administration
237
Editing Administration Settings using Cisco Unity Connection Administration
237
TRAP
237
Editing Telephone Record and Play Settings
237
Disk Capacity
238
PCA
238
Editing the Settings for Cisco PCA Inbox
238
RSS
239
Enabling Insecure RSS Connections
239
Configuring an RSS Reader to View Voice Messages
239
System Administration Guide
xiv
Contents
Page 15
RSS Feed Limitations and Behavioral Notes
239
Cluster Configuration
240
Fax
240
Unified Messaging Services
240
API Settings
240
Enabling or Disable CUMI API Settings
240
Fax Server
243
C H A P T E R 1 8
Fax Server
243
Task List for Configuring Fax Server Integration
243
Configuring Unity Connection for Fax Server Integration
244
Configure SMTP on Unity Connection server
244
Enabling or Updating Fax Server Integration on Unity Connection
244
Customizing or Updating Fax Server Integration on Unity Connection
244
Configuring or Updating Users for Fax Server Integration
245
Testing Fax Server Integration
245
Tools
247
C H A P T E R 1 9
Task Management Tool
247
Viewing and Managing Tasks Using Task Management Tool
247
Bulk Administration Tool
248
Configuring the Objects Using BAT
248
Constructing Input CSV Files
249
Correcting Errors Using Failed Objects File
251
Correcting Errors Using the Failed Objects File
251
Custom Keypad Mapping Tool
252
Using the Custom Keypad Mapping Tool
252
Guidelines for Assigning Keys to Menu Options
253
Setting a Keypad Mapping to Match an Existing Conversation Mapping
253
Conversation Menus in Custom Keypad Mapping Tool
253
Main Menu Tab
253
Message Playback Menu Tabs
255
After Message Menu Tab
259
Settings Menu Tab
261
System Administration Guide
xv
Contents
Page 16
Message Settings Menu Tab
262
Preferences Menu Tab
262
Documenting Your Keymap
263
Migrate Utilities
263
Accessing the Migrate Utilities
264
Grammar Statistics Tool
264
SMTP Address Search
264
Show Dependency Results
264
Other Administrative Tools
265
Remote Database Administration Tools
265
Enabling Database Access for Remote Administration Tools
265
Starting the Database Proxy Service
266
Cisco Unified Backup and Restore Application Suite (COBRAS)
266
Cisco Voice Technology Group Subscription Tool
266
Cisco Utilities Database Link for Informix (CUDLI)
266
Unity Connection User Data Dump (CUDD)
267
Wallet Card Wizard
267
User Settings
269
A P P E N D I X A
Settings for User Accounts and User Templates
269
User Template Basics
270
User Basics
270
Password Settings
271
Securing and Changing User Phone PINs
271
PIN Synchronization between Unity Connection and Cisco Unified CM
271
Task List for Configuring PIN Synchronization in Unity Connection
272
Password and PIN Security Considerations for Template Defaults
273
Change Password
273
Securing and Changing the Web Application (Cisco PCA) Password
274
Roles
274
Message Waiting Indicator
275
Transfer Rules
275
Message Settings
276
Message Actions
276
System Administration Guide
xvi
Contents
Page 17
Caller Input
277
Mailbox
278
Message Aging Policy
278
Phone Menu
278
Phone View feature
279
Playback Message Settings
279
Send Message Settings
279
Greeting
280
Changing the Audio or Video Format of Recordings
280
To Change the Audio or Video Format of Recorded Messages Using Phone
280
Post Greeting Recording
281
Notification Devices
281
Unified Messaging Account
281
Video Service Accounts
282
Alternate Extensions
282
Alternate Extension Custom Settings
283
Alternate Names
283
Private Distribution Lists
284
SMTP Proxy Addresses
284
Bulk Administration Tool
285
A P P E N D I X B
Required and Optional CSV Fields in BAT
285
Required and Optional CSV Fields for User
285
Required and Optional CSV Fields for Contacts
306
Required and Optional CSV Fields for Distribution Lists
312
Required and Optional CSV Fields for Distribution List Members
313
Required and Optional CSV Fields for Unified Messaging Accounts
313
Tenant Partitioning
317
A P P E N D I X C
Understanding Tenant
317
Tenant Provisioning using APIs
317
Working with Tenant Partitioning
318
Modifying the Objects after Tenant Creation
319
System Administration Guide
xvii
Contents
Page 18
System Administration Guide
xviii
Contents
Page 19
C H A P T E R 1
Introduction
• Introduction, on page 1
• Administrative Tools, on page 1
• Using Single Sign-On, on page 2
• Configuring Browsers on a Unity Connection Administrator Workstation, on page 2
• Cisco Unity Connection Administration User Interface, on page 4
• Cisco Unity Connection Configuration Scenarios, on page 5
Introduction
Cisco Unity Connection provides a set of tools for administering, monitoring, and troubleshooting the system.
The tools that enable the system administrators to provision the Unity Connection server and provide feature
rich services, such as integrated voice messaging and audio text application for enterprise level businesses.
Administrative Tools
Following are the administrative tools supported with Unity Connection:
• Cisco Unity Connection Administration: A tool used in most of the administrative tasks such as,
customizing user settings and implementing a call management plan. Unity Connection Administration
also provides access to several other tools including the Bulk Administration Tool (BAT), Custom Keypad
Mapping, Task Management, and Migration Utilities. See Cisco Unity Connection Administration User
Interface, on page 4 section.
• Cisco Unified Serviceability: A monitoring and troubleshooting tool for serviceability that is shared
between Unity Connection and Cisco Unified Communications Manager. This tool allows you to generate
reports, enable alarms, set trace information, activate or deactivate services that are generic to the platform.
• Cisco Unity Connection Serviceability: A monitoring and troubleshooting tool for serviceability that
is used only by Unity Connection.This tool allows you to generate reports, enable alarms, set trace
information, manage a Unity Connection cluster, and activate or deactivate services that are specific to
Unity Connection. For more information, see the Administration Guide for Cisco Unity Connection
Serviceability Release 15 at https://www.cisco.com/c/en/us/td/docs/voice_ip_comm/connection/15/serv_
administration/guide/b_15cucservag.html .
• Cisco Unified Operating System Administration: A tool used to change operating system settings (for
example, IP address or NTP servers), view hardware and software configuration information (for example,
System Administration Guide
1

Page 20
the amount of memory or the Cisco Unified Communications Operating System version), manage SSL
certificates, upgrade Unity Connection and the operating system (they are upgraded together), and enable
remote access to the Unity Connection server. For more information, see the Cisco Unified
Communications Operating System Administration Guide for Cisco Unity Connection at
https://www.cisco.com/c/en/us/td/docs/voice_ip_comm/connection/15/os_administration/guide/b_
15cucosagx.html.
• Disaster Recovery System: A tool that allows you to perform full data back up and restore capabilities
when required. For more information, see the "Backing Up and Restoring Cisco Unity Connection
Components" chapter of the Install, Upgrade, and Maintenance Guide for Cisco Unity Connection Release
15 at https://www.cisco.com/c/en/us/td/docs/voice_ip_comm/connection/15/install_upgrade/guide/b_
15cuciumg.html.
• Real-Time Monitoring Tool (RTMT): A tool that runs as a client side application to monitor system
performance, view system alarms and alerts and collect trace information for detailed debugging. For
more information, see the Cisco Unified Real-Time Monitoring Tool Administration Guide Release 12.5
at https://www.cisco.com/c/en/us/td/docs/voice_ip_comm/cucm/service/12_5_1/rtmt/cucm_b_
cisco-unified-rtmt-administration-1251.html.
Using Single Sign-On
Unity Connection support Windows based single sign on feature that allows end users to log in once and gain
access to the following Unity Connection web applications without signing on again:
• Cisco Personal Communications Assistant
• Web Inbox
• Cisco Unity Connection Administration
• Cisco Unity Connection Serviceability
Single Sign-On feature can be implemented using SAML SSO. This functionality allows you to implement
SSO using SAML open industry standard protocol for providing single sign-on access to client applications.
For more information on SAML SSO, see the Quick Start Guide for SAML SSO in Cisco Unity Connection
Release 15 at https://www.cisco.com/c/en/us/td/docs/voice_ip_comm/connection/15/quick_start/guide/b_
15cucqssamlsso.html.
Configuring Browsers on a Unity Connection Administrator
Workstation
To access all the administrative tools and web applications, you need to install the supported web browsers,
such as Microsoft Internet Explorer or Mozilla Firefox on the administrator workstation depending on the
operating system you are using. Confirm that the software required for correct browser configuration is
installed. For information on supported web browsers for each operating system, see the “Software
Requirements—Administrator Workstations” section of System Requirements for Cisco Unity Connection
Release 15, available at https://www.cisco.com/c/en/us/td/docs/voice_ip_comm/connection/15/requirements/
b_15cucsysreqs.html.
System Administration Guide
2
Introduction
Using Single Sign-On
Page 21
Make sure to run the Trusted Sites and Add Exceptions when logging in to Cisco Unity Connection
Administration or related web pages after a successful installation of Unity Connection.
Table 1-1 specifies the configuration steps that you need to perform on each browser before accessing the
web applications.
Note
Table 1: Configuring Browsers
Configuration
Browser
1.
Enable Java.
2.
Enable Java Script > Enable Change Images in Java Script
Advanced.
3.
Allow sites to set cookies. (For security purposes, you should set
this to Allow Sites to Set Cookies for the Originating Web Site
Only.)
Mozilla Firefox
1.
Enable Active scripting.
2.
Download and run ActiveX controls.
3.
Enable Java scripting.
4.
Accept all cookies.
5.
Automatically check for newer versions of temporary Internet files.
6.
Enable Medium-High privacy.
Microsoft Internet Explorer
1.
Accept all cookies and select the Allow local data to be set option.
2.
Enable Java Script and select the Allow all sites to run JavaScript
option.
3.
Enable images and select the Show all images option.
Chrome
Accessing and Exiting Cisco Unity Connection Administration
The first time when you sign in to Unity Connection Administration, use the default username and password
of the administrator account specified during installation. Later, you can use the username and password for
any additional administrator account that you create in Unity Connection Administration page.
To Login to Unity Connection Administration
Step 1
On an administrator workstation, open a browser session.
Step 2
Go to https://<Unity Connection server hostname>/cuadmin.
System Administration Guide
3
Introduction
Accessing and Exiting Cisco Unity Connection Administration

Page 22
Step 3
Enter the applicable username and password. Select Login.
By default, a Unity Connection Administration session is set to time out after twenty minutes. You can change the
Administration Session Timeout settings on the System Settings > Advanced > Connection Administration page.
To Exit Cisco Unity Connection Administration
Step 1
In the Cisco Unity Connection Administration title pane, select Sign Out.
Step 2
Exit the web browser.
Unity Connection Administration supports both the IPv4 and IPv6 addresses. However, the IPv6 address
works only when Unity Connection platform is configured in Dual (IPv4/IPv6) mode.
Note
Cisco Unity Connection Administration User Interface
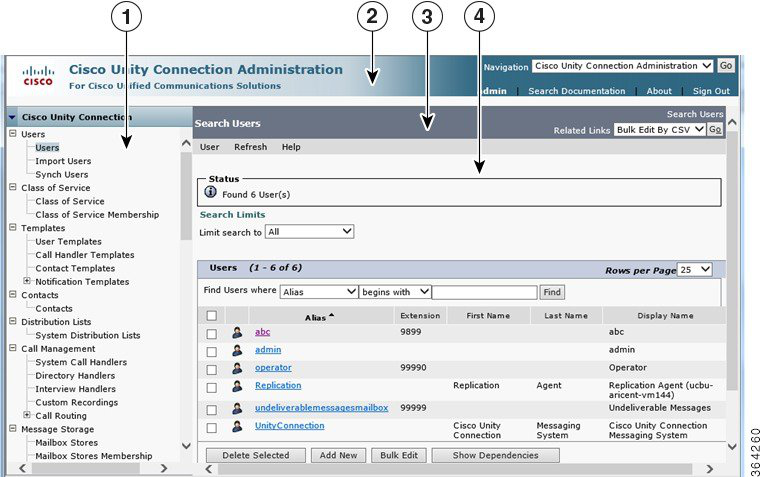
The Unity Connection Administration interface is divided into four areas as mentioned in the followinf table.
Located along the left side of the interface, contains links to the Unity
Connection Administration pages. Select the name of the page to display it.
Navigation pane
Located across top of the interface, contains an About link and the Sign Out link.
The title pane also offers a Navigation menu that you can use to browse to other
Unity Connection applications. Select the name of the application from the Navigation
list, and then select Go. Depending on the application, you may be required to sign in
again.
Title Pane
Displays the name of the page and, if applicable, the name of the record displayed on
the page. For example, on the Edit User Basics page for a user with the alias John, the
title bar reads “Edit User Basics (John).” The right side of the title bar also shows the
navigation path of the page, as it relates to other pages in the category. You can select
a page in the navigation path to go that page.
Title Bar
Area in which the Unity Connection data is entered and displayed, page name appears
in the title bar at the top of the page. For example, while adding new user template, the
title bar reads “New User Template”.
Page Frame
System Administration Guide
4
Introduction
To Exit Cisco Unity Connection Administration
Page 23
Figure 1: Cisco Unity Connection Administration Interface
Navigation Pane
1
Title Pane
2
Title Bar
3
Page Frame
4
Unity Connection provides a means to access Unity Connection Administration and other web applications
using accessibility shortcut keys. For more information, see the Accessibility, on page 13 chapter.
Note
Cisco Unity Connection Configuration Scenarios
Following table lists some of the scenarios that can be used by the System Administrator for configuring
various tasks in Unity Connection depending on the organizational needs.
System Administration Guide
5
Introduction
Cisco Unity Connection Configuration Scenarios

Page 24
Table 2: Unity Connection Configuration Scenarios
Description
Scenarios
The first group of information to be gathered is users
requirements that includes total number of users in the
company, location of the users, current voice messaging
solution adopted by the users, and the expectation from
Unity Connection as a unified messaging product.This
enables the administrators to configure users as per the
messaging needs. For more information, see the Configuring
Voice Messaging for Each User, on page 6 section.
Configuring voice messaging
for each user
A successful deployment requires you to make careful
analysis of your existing telephony infrastructure and perform
the correct planning steps to deploy and manage voicemail
in a unified messaging environment. For more information,
see the Configuring Telephony in Unity Connection, on page
8 section.
Configuring telephony in
Unity Connection
Depending on the messaging needs of the organization, more
than one Unity Connection servers located in different
locations can be networked together. Being a highly scalable
solution, the user configuration can be extended up to 10,
0000 users per server. For more information, see the
Connecting Various Locations in a Network, on page 9
section.
Connecting various locations
in a network
Users voice messages are stored, retrieved, and synchronized
from the voice mailboxes that are created during the server
installation. The administrators can integrate
Unity Connection to synchronize voice messages in user
voice mailbox with the user exchange mailbox configured
on Microsoft Business Productivity Online Suite
(BPOS-Dedicated) environments or other third party hosted
Exchange environments. For more information, see the
Configuring Mailbox Storage and Email Account for Each
User, on page 10 section.
Configuring mailbox storage
and an email account for each
user
Unity Connection provides the system administrators to
configure the additional parameters for enhanced messaging
experience. For more information, see the Advanced
Configuration, on page 11 section.
Advanced configuration
Follow the tasks specified in the table to provide the organizations with an enriched voicemail solution.
Configuring Voice Messaging for Each User
In Unity Connection, two users, Application Administrator and Platform Administrator are created at the time
of installation. Both the user accounts enable the administration of different web pages in Unity Connection.
System Administration Guide
6
Introduction
Configuring Voice Messaging for Each User
Page 25
• Application Administrator is a user without a mailbox that provides access to Cisco Unity Connection
Administration, Cisco Unified Serviceability, and Cisco Unity Connection Serviceability web pages.
• Platform Administrator provides access to Command Line Interface (CLI), Cisco Unified Operating
System Administration, and Disaster Recovery System (DRS).
Do the following steps to configure voice messaging in an organization:
1.
Customizing the user templates for personalized user accounts.
2.
Importing users through LDAP and Cisco Unified CM.
3.
Synchronizing the Cisco Unified CM imported end users.
4.
Defining the class of service for users with or without mailboxes.
5.
Enabling HTML Notification for users
See the following sections to understand the importance of voice messaging components:
• User Templates and User Accounts: A user template is a way to apply configurations to a new user. The
user template consists of the authentication rules, class of services, schedules, and a number of other
configuration options and settings. If you change the template in any way, the users already created based
on this template are not affected. However, new users that are created based on this template adopt all
new changes that were made to the template. By default, you have two user templates, Administrator
Template and Voicemail User Template. You can also create your own customized user templates.
With Unity Connection, the administrator can configure the users with mailboxes and without mailboxes. The
default application administrator user that cannot send, receive, or forward voice message is an example of
user without mailbox, and is created using the administrator template. While the users with mailbox that can
send, receive, and forward messages to other users using phones or web clients are based on voicemail user
template. Users can also send video greetings to other voicemail users. For more information on user templates
and settings, see the Call Management, on page 79 chapter.
• Creating Users: You can either manually add users or import them from the LDAP directory or Cisco
Unified CM configured AXL server on the Cisco Unity Connection Administration page.You can also
use Bulk Administration Tool (BAT) to create users with and without mailbox. For more information
on creating users, see the Users, on page 37 chapter.
• Class of Service and Membership status: Class of service (COS) is a parameter that defines the limits
and permissions for using Unity Connection. COS can be configured for users with mailbox and controls
the user access to various features and applications such as, message length and using IMAP capability.
You can customize the way COS handles the various options by editing or creating a new COS depending
on your business needs. For more information on class of service, see the Class of Service, on page 20
section.
You can modify class of service membership status for individual user accounts to restrict access for various
features using default COS defined during installation. For more information on class of service and class of
service membership, see the User Attributes, on page 19 chapter.
• Distribution List: A distribution list is a systematic way to group multiple users in Unity Connection that
allows to send and receive voice messages to users that need the same type of information. For more
information on distribution lists, see the System Distribution List, on page 55 chapter.
• Contacts: Contacts are the users that frequently communicate with Unity Connection users. The contacts
are part of voice messaging system with voice mailbox account other than the Unity Connection server.
System Administration Guide
7
Introduction
Configuring Voice Messaging for Each User
Page 26
Contacts can be configured as part of VPIM messaging and are accessible using directory access, name
dialing access and Personal Call Transfer Rules. For more information on contacts, see the Contacts, on
page 51 chapter.
• Notification Templates: The notification feature allows alerting the user outside the context of a web
page of an occurrence, such as the delivery of email or voice message. User accounts in Unity Connection
can be configured for HTML notification on desired email addresses. The default notification templates
or the ones customized by administrators provides an easy access to subscriber messages by enabling
the HTML notification device. For example, the administrators can configure the HTML templates to
include header, footer, logos, images, MWI status, and hyperlink to the Mini Web Inbox. For more
information on notification templates, see the Notifications, on page 173 chapter.
Configuring Telephony in Unity Connection
Unity Connection integrations are built using a phone system configuration that includes one or more port
groups. Each port group contain one or more ports that you can use to support connectivity between the phone
system and Unity Connection.
You can follow the below procedure to configure telephony integration in your organization.
• Identifying the call agent for integrating Unity Connection.
• Determining the integration type (SCCP/SIP/PIMG/TIMG/Secure SIP).
• Configuring the phone system and adding ports as per the supported OVA and hardware requirements.
• Defining the search space and partitions.
• Mapping the routing rules with the call handlers as per your requirements.
• Telephony Integration: It allows you to manage and integrate phone system in Unity Connection with a
call agent for call processing functions, such as sending and receiving telephone calls. For more information
on telephony integration, see the Telephony Integration, on page 61 chapter.
• Phone System: A phone system in Unity Connection describes a single integration with a PBX or Cisco
Unified CM system for call processing redundancy. The phone system contains global configurations
that apply to the integrations, such as SIP and SCCP affecting all the port groups. For more information
on phone system, see the Telephony Integration, on page 61 chapter.
• Ports: Ports are endpoints in Unity Connection that answer calls (inbound) to record, retrieve messages,
and handle call transfers.They can also initiate calls (outbound), as in the case of MWI and message
notification. For example, if users use the clients (Cisco ViewMail for Microsoft Outlook) to retrieve
voicemails, ports are not used for this operation, as long as they download the messages and listen using
the workstation speakers. However, if users select IP phones to send or retrieve messages, a port is used.
This operation requires a port to be configured for telephony record and playback (TRAP). Ports are
associated to only one port group. For more information on ports, see the Telephony Integration, on page
61 chapter.
• Port Groups: Port groups include one or more ports. Port groups contain most of the configuration settings
for the integration, including the Message Waiting Indicator (MWI), IP address or hostname of the phone
system, port numbers, advertised codecs, and other settings that apply to the ports within the port group.
Multiple port groups can be configured depending on the type of integration method used for
communication, such as SCCP or PIMG/TIMG. The multiple port groups are added under one phone
system. For more information on port groups, see theTelephony Integration, on page 61 chapter.
System Administration Guide
8
Introduction
Configuring Telephony in Unity Connection
Page 27
• Dial Plan: The dial plan in Unity Connection provides flexibility and access to resources, users, and
features through the use of partitions and calling search spaces. Partitions enable an organization to
segment resources in Unity Connection for the purpose of dialing, transfers, messaging, addressing, or
multi-tenant functionality. The dial plan is an addressing method defined by the network administrator.
Partitions are logical groupings of devices with similar reachability and a Search Space is an ordered list
of partitions. Extensions must be unique within a partition, but not necessary in case of search spaces.
For more information on dial plan, see the Call Management, on page 79 chapter.
• Call Routing: Call routing provides a method to route calls from a call agent to Unity Connection. Routing
rules influence the call routing as an incoming call is presented to Unity Connection on a voicemail port.
The direct routing rule and forwarded routing rules are the two routing rules that can be applied on the
calls placed directly to a voicemail number or the calls forwarded when a user is busy. User experience
varies depending on the type of caller (internal or outside caller). For more information on call routing,
see the Call Management, on page 79 chapter.
• Call Management Handlers: Unity Connection offers various handlers as part of call management plan
that includes System Call Handlers, Directory Handlers, and Interview Handlers.
• A System Call Handler can serve multiple functions in Unity Connection, such as answering calls and
playing a recorded announcement to other users or other call handlers. The call handlers are based on
pre-defined call handler templates and the functions vary depending on the current call routing rule. The
Directory Handlers provide an easy access method to reach the subscribers with recorded names. Interview
Handlers offers a way to gather information from callers by playing a series of questions and recording
the answers. You can customize the handlers over the phone to offer better user experience. For more
information on call management handlers, see the Call Management, on page 79 chapter.
Connecting Various Locations in a Network
Networking in Unity Connection clusters enables the system administrators to inter-network with other voice
messaging systems to achieve inter-interoperability and high scalability. Depending on the messaging needs
of the organization, multiple Unity Connection directories (Unity Connection servers or clusters) can be
combined to form a site (and to interlink multiple Unity Connection sites to form a voicemail organization.
Unity Connection allows you to meet your expanding business needs by providing various networking options:
• VPIM: Unity Connection as a unified messaging system provides VPIM gateways with on ramps (gateways
that connects from another voicemail networking protocol to VPIM) and off ramp (gateways that connect
from VPIM to another voicemail networking protocol) to allow integration of similar and dissimilar
messaging systems, such as Avaya Solutions and Unity Connection.
Voice Profile for Internet Mail (VPIM) protocol is an industry standard that allows different voice messaging
systems to exchange voice and text messages over the Internet or any TCP/IP network. It is based on the
Simple Mail Transfer Protocol (SMTP) and the Multi-Purpose Internet Mail Extension (MIME) protocol. For
more information on VPIM, see the Networking, on page 121 chapter.
Unity Connection supports up to 10 VPIM locations and 100,000 VPIM contacts in the Unity Connection
directory.
Note
• Legacy Networking: Unity Connection supports intrasite and intersite networking between various
Unity Connection clusters.
System Administration Guide
9
Introduction
Connecting Various Locations in a Network

Page 28
• Intrasite Networking: If your organization has users that are more than what a single Unity Connection
server or cluster pair can support, you can join two or more Unity Connection servers or clusters
(up to a maximum of ten) to form a well-connected network, referred to as a Unity Connection site.
The servers that are joined to the site are referred to as Locations. (When a Unity Connection cluster
is configured, the cluster counts as one location in the site.) Each location is said to be linked to
every other location in the site via an intrasite link. The Unity Connection site concept was known
as a digital network in Unity Connection 7.x. You can join Unity Connection 7.x locations, 8.x
locations, 9.x locations, 10.x locations, 11.x, and 12.x locations in the same Unity Connection site,
as long as you do not link the site to any other site. Users, system distribution lists, partitions, search
spaces, and Unity Connection locations are replicated between sites.
• Intersite Networking: An intersite link can be used to connect either one Unity Connection site to
another Unity Connection site or to inter-network Unity Connection with the Unity servers. Intersite
link can be configured for 20 locations. For more information on legacy networking, see the
Networking, on page 121 chapter.
To support inter-networking between Cisco Unity and Unity Connection sites,
all servers in the site must be running Unity Connection version 10.x or later.
Note
• HTTPS: With Unity Connection 10.0(1), a new concept of networking, HTTPS networking, has
been introduced to connect different Unity Connection servers and clusters in a network. You should
deploy a new network as an HTTPS network. You can connect maximum 25 Unity Connection
locations in an HTTPS network. Within a network, each location uses HTTP or HTTPS to exchange
directory information and SMTP to exchange voice messages with each other. For more information
on HTTPS, see the Networking, on page 121 chapter.
• SRSV: Cisco Unity Connection Survivable Remote Site Voicemail (Unity Connection SRSV) is a
backup voicemail solution that works in conjunction with Cisco Unified Survivable Remote Site
Telephony (SRST) for providing voicemail service to central and all remote locations during WAN
outages. For more information on SRSV, see Complete Reference Guide for Cisco Unity Connection
Survivable Remote Site Voicemail (SRSV) for Release 15, available at https://www.cisco.com/c/
en/us/td/docs/voice_ip_comm/connection/15/srsv/guide/b_15cucsrsvx.html.
SRSV deployment is supported with Unity Connection 9.1.2 and later.
Note
Configuring Mailbox Storage and Email Account for Each User
Unity Connection has an installed mailbox store. Unity Connection handles user properties, such as user
mailbox accounts and voice messages by creating a directory configuration database. You need to configure
your mailbox store as per your messaging needs.
• Mailbox Store: Mailbox store is a repository that is used to store messages and Unity Connection directory
information. A single mailbox store is created at the time of installation and is named as UnityMbxDb1.
You can add additional message storage for better performance.For more information on message storage,
see the Message Storage, on page 109 chapter.
System Administration Guide
10
Introduction
Configuring Mailbox Storage and Email Account for Each User

Page 29
• Mailbox Quotas: Mailbox Quotas allows you to define the size limits of user voice mailboxes in
Unity Connection. Unity Connection is configured with system-wide mailbox size quotas that can be
customized to set restrictions on the send or receive of user voice messages. For more information on
mailbox quotas, see the Message Storage, on page 109 chapter.
• Message Aging Policy: When a mailbox store is created, maximum amount of disk space is created for
the user voice messages. To maintain the allocated disk space within the specified mailbox quota,
Unity Connection provides message aging policies. The rules apply on users mailbox and ensure that
disk space for where voice messages are stored do not fill up. The state of the messages is changed when
the aging policy is active. For example, new message moves to saved state and saved to deleted in the
specified period of time. For more information on message aging policy, see the Message Storage, on
page 109 chapter.
• Unified Messaging Service: Unity Connection supports Unified Messaging Service (UMS) that integrates
voice messaging with your email account, allowing you to store voice messages in your mailbox along
with your email. With UMS, you can access your voice messages using an email client or a Telephone
User Interface (TUI).
To enable communication between Unity Connection and Exchange, unified messaging service can be
configured depending on the Exchange type, Exchange 2010, Exchange 2013 or Exchange 20016, Office365.
UMS provides features that enables you to hear your exchange emails using TTS (text-to-speech) functionality
in Unity Connection, enables access to exchange calendars and contacts, synchronize voice messages in
Unity Connection and Exchange mailboxes for single inbox.
• Single inbox: Single inbox is one of the unified messaging features in Unity Connection that synchronizes
voice messages in Unity Connection and Exchange mailboxes.When a user is enabled for single inbox,
all Unity Connection voice messages that are sent to the user, including the messages sent from Cisco Unity
Connection ViewMail for Microsoft Outlook (VMO), are first stored in Unity Connection and are
immediately replicated to the user mailbox in Exchange.ViewMail for Outlook is an add-in that allows
voice messages to be heard and composed from within Microsoft Outlook 2010, or 2016.
Advanced Configuration
Unity Connection provides many tools and options that can be enabled for enhanced user experience and
system performance.Deploying and configuring a voice messaging system in your organization can also be
further customized with some of the additional settings as described in the below section:
• Tools: Various tools and utilities can be used for administering Unity Connection such as, Task
Management and SMTP Address Search.
Some of the Unity Connection tools are:
• Bulk Administration Tool (BAT) tool allows you to add, delete, edit object properties, such as users and
distribution lists by exporting and importing the default templates.
• Custom Keypad Mapping allows you to customize phone menu key press for users. User can change the
DTMF keys for Cisco IP phones for sending and receiving voice messages through Telephone User
Interface (TUI).
• Task Management lists the Unity Connection services that run on a scheduled basis and can be used for
various troubleshooting and system maintenance tasks.
• Real-Time Monitoring Tool is an application plugin used as extension of Unity Connection for monitoring
the system performance and port usage.
System Administration Guide
11
Introduction
Advanced Configuration
Page 30
For more information on tools in Unity Connection, see the Tools, on page 247 chapter.
• System Settings: Unity Connection allows the System Administrator to specify the system wide parameters
for various object properties including cluster settings at the time of subscriber server installation,
authentication rules to define the web password and voicemail PIN for user voice mailbox, licenses to
view the license state of Unity Connection registered with Cisco Smart Software Manager (CSSM) or
Cisco Smart Software Manager satellite, changing roles, setting the restriction table for phone extensions
with larger digits, smart host settings, and many others. For more information on system settings, see
the System Settings, on page 201 chapter.
• Advanced Settings: It provides enabling and disabling check boxes for various functionalities including
conversations for call transfer settings, messaging for user mailboxes, disk capacity to determine disk
size, cluster configuration for change in cluster status, unified messaging service settings related to
calendaring in UMS and more. For more information on advanced settings, see the Advanced System
Settings, on page 227 chapter.
System Administration Guide
12
Introduction
Advanced Configuration
Page 31
C H A P T E R 2
Accessibility
• Overview, on page 13
• Shortcut Keys for Cisco Unity Connection Administration, on page 13
• Other Unity Connection Features, on page 15
Overview
Cisco Unity Connection supports various shortcut keys and features that provides easy access to web
applications, such as Cisco Unity Connection Administration and Web Inbox.
Shortcut Keys for Cisco Unity Connection Administration
Following are the details on the usage of shortcut keys for Cisco Unity Connection Administration:
• The administrator can use the TAB key to navigate all links, all form fields, and widgets in the sequential
order. After login, when the administrator first presses the TAB key then focus comes on top of the tree
labeled as Cisco Unity Connection. Then by pressing the TAB key again, the administrator can traverse
all links, all form fields, and widgets.
• At any time if the administrator wants to navigate to the page corresponding to the tree link, then press
the 'ENTER' key after selecting the link using the TAB key.
• Once focus goes to page frame, then by pressing TAB key you can traverse all visual adds on that page.
• The administrator can move the focus from any of the page/form to the top of the tree by the “Ctrl+Alt+t”
key. This shortcut key focuses the top tree label Cisco Unity Connection and from there you can traverse
all tree links using the TAB key.
• The Ctrl+Alt+t shortcut can be used at anywhere in the tree and pages to focus tree label Cisco Unity
Connection.
• The shortcut keys work on Windows and MAC operating system.
System Administration Guide
13

Page 32
Usage
Safari/Chrome
Mozilla Firefox
Internet Explorer
Item
The TAB key is
used to navigate
all links, all form
fields, and widget
in the forward
sequence.
To select or
de-select radio
button you can use
any Arrow key.
TAB
TAB
Note: The TAB key
does not work on
MAC for any
hyperlink navigation.
To make it work, the
administrator needs to
do some configuration
changes in Firefox
specified in Enabling
TAB Key Navigation
for Hyperlink On
MAC, on page 15
section.
TAB
Forward navigation
of links, form fields,
and widget on Unity
ConnectionAdministration
This shortcut key
is used to bring
focus back on the
top of tree in the
Unity
ConnectionAdministration
page.
Ctrl+Alt+t
Ctrl+Alt+t
Ctrl+Alt+t
Focus on the top of
Unity
ConnectionAdministration
tree
This combination
of key is used to
navigate links,
form fields, and
widget in the
backward
sequence.
Shift+TAB
Shift+TAB
Shift+TAB
Backward navigation
of links, form fields,
and widget on Unity
ConnectionAdministration
First bring focus
on any menu item
using TAB or
Shift+TAB and
then use the Left
or Right arrow
key to navigate to
all the menu
items.
Left or Right
arrow key
Left or Right arrow
key
Left or Right arrow
key
Navigate menu item
First bring focus
on the drop down
list using TAB or
Shift+TAB and
then use Up or
Down arrow key
to navigate to all
the items in the
list.
Up or Down arrow
key
Up or Down arrow
key
Up or Down arrow
key
Navigate drop down
list Item
System Administration Guide
14
Accessibility
Shortcut Keys for Cisco Unity Connection Administration
Page 33
Usage
Safari/Chrome
Mozilla Firefox
Internet Explorer
Item
First bring focus
on tree node then
press ENTER to
expand and
collapse the tree
for fast navigation
ENTER Key
ENTER Key
ENTER Key
Expand and Collapse
tree in Unity
ConnectionAdministration
Enabling TAB Key Navigation for Hyperlink On Safari
The TAB key does not work on the Safari browser for hyperlink navigation. Therefore, left most tree is not
accessible in the Unity Connection Administration page through the TAB key directly. To make the tree
accessible through TAB key it is required to change the following browser settings on Safari.
Step 1
Click goto Preferences> Advanced.
Step 2
Select the Press tab to highlight each item on a web page check box to make the tree links accessible using the TAB key.
Enabling TAB Key Navigation for Hyperlink On MAC
Step 1
Open the Firefox browser and type about:config in the address bar.
Step 2
Press 'ENTER' key.
Step 3
Accept the security warning.
Step 4
From the list of configuration parameters. Try to search for "accessibility.tabfocus".
Step 5
If it is not listed then add this parameter as an "integer" and give its value "7".
Step 6
Refresh the page and use TAB key for page navigation.
If there is a DTMF number in the display name then the part of the name after DTMF digit does not play as
recorded name.
Note
Other Unity Connection Features
Other Unity Connection Features that can improve the Accessibility for the end user:
Speech Connect
The Speech Connect feature provides a speech-enabled enhancement to the automated attendant functionality.
Speech Connect uses voice-enabled directory handlers to allow both Unity Connection users and outside
callers to do the following:
System Administration Guide
15
Accessibility
Enabling TAB Key Navigation for Hyperlink On Safari
Page 34
• Speak out the name of an employee (Unity Connection user) and instantly be connected, without navigating
an audio-text tree and without knowing the extension of the employee.
• For easy access to employees, configure a Speech Connect speed dial on user phones.
• If multiple employees have the same name or if Speech Connect does not have a perfect match for the
name spoken by the caller, it presents numerous name choices for the caller and can include additional
information such as the employee location or department. Speech Connect also plays the recorded name
of the employee in his or her own voice, if available, making it easier for the caller to choose among
multiple names.
For more information about setting up directory handlers, see the Call Management, on page 79 chapter.
Cisco SpeechView
The SpeechView feature allows you to receive voice messages in your mailbox in the form of text. When a
voice message arrives, it is delivered to the mailbox of the recipient with a blank text attachment. The text
attachment is updated with the transcription text when the transcription service completes the transcription.
If there was a problem with the transcription, then an error message is received in the text attachment of the
voice message.
Only the first 500 characters of a voice message are transcribed and the remaining message is truncated.
However, the users have access to the original recording in its entirety.
SpeechView is a feature of the unified messaging solution. Therefore, the original audio version of each voice
message remains available to you anytime.
TTY Overview
A TTY prompt set, available in U.S. English (ENX) only, can be installed and used just like any other supported
phone language. When the TTY prompt set is installed, the subscribers and outside callers that use TTY can
call in to Unity Connection and use the same features that a hearing caller can use. However, note the following
limitations:
• G.711 MuLaw must be selected as the message recording and storage codec because the Unity Connection
TTY prompt set is not compatible with G.729a or other message recording and storage codecs.
• A dedicated phone number must be set up for use by outside callers with TTY. All greetings, prompts,
and subscriber names accessible from this number must be created with the TTY prompt set.
• TTY is a TUI language only. At present, there is no compatible Text to Speech (TTS) language for TTY.
The TTY prompt set is also not suitable for use as a GUI language.
• TTY tones are not available for use in navigating through the Unity Connection conversation. Some TTY
phones do not have the capability to send DTMF tones. In this case, TTY users may need to use the
phone keypad for system navigation.
• Due to recording and playback limitations, the TTY prompt set cannot be used in interview handlers.
• TTY phones do not display the voice names but simply playback the voice names.
• Use TTY angel to display voice name as text and replace them in Unity Connection. For more information
on TTY angel, see the TTY Angel Help at http://www.ciscounitytools.com/Applications/General/
TTYAngel/TTYAngel.html.
System Administration Guide
16
Accessibility
Cisco SpeechView
Page 35
• It is recommended to disable the comfort noise on Cisco Unity Connection Administration for better
quality conversation using ipTTY device. To disable the comfort noise, navigate to System Settings >
Advanced > Telephony and uncheck the "Vad Enabled" check box. For information on how to use
ipTTY device, see the ipTTY Configuration Guide for Cisco UCM 9.x at https://docs.google.com/document/
d/1CmS0aTN7hIFqlZ_PvjKqTlhgK5xV8IPNTmi8cgsbn6w/edit?pref=2&pli=1.
Setting Up Cisco Unity Connection to Use the TTY Prompt Set
To set up Unity Connection for TTY, do the following tasks.
Step 1
Obtain a dial-in number that will be used exclusively for outside callers with TTY to call in to Unity Connection. Set
up the phone system and integration as required.
Step 2
Install TTY devices for subscribers, as needed.
Step 3
Install the ENX language on the Unity Connection server.
Step 4
Confirm that G.711 is selected as the Unity Connection message recording and storage code.
Step 5
Create a TTY subscriber template. This template will be used when creating subscriber accounts for all subscriber who
will use TTY. You may also want to create a TTY class of service, on which you disable Text to Speech for these
subscribers.
Step 6
Create a routing rule for the TTY dial-in number.
Step 7
Create an opening greeting call handler for the TTY dial-in number.
Step 8
Set up additional TTY call handlers as needed.
Step 9
Record greetings in TTY by using the TTY Angel, or by using the Media Player and a TTY phone as a recording and
playback device. You will need to record the following greetings, as applicable: the opening greeting, additional call
handler greetings, and subscriber greetings.
Step 10
Test the TTY dial-in number, opening greeting, call handlers, and all subscriber devices to confirm correct operation
for both incoming and outgoing TTY calls.
System Administration Guide
17
Accessibility
Setting Up Cisco Unity Connection to Use the TTY Prompt Set
Page 36
System Administration Guide
18
Accessibility
Setting Up Cisco Unity Connection to Use the TTY Prompt Set
Page 37
C H A P T E R 3
User Attributes
• User Attributes, on page 19
User Attributes
Overview
Cisco Unity Connection users are created to administer or provide access to the voice messaging system. The
user attributes are the objects that enable you to control which users can connect to the system, and determine
the system features and resources they can access.
Preparing to Add User Accounts
You need to select and define user attributes before adding user accounts in Unity Connection. The settings
defined by each attribute helps determine which features are available to the users and callers, define limits,
and permissions for using Unity Connection resources.
Following are the user attributes that should be configured before adding user accounts individually or in
bulk:
• Class of Service: The class of service enables you to define the control access to critical features on Unity
Connection. The class of service membership enables applies the class of service settings to all the
member users. See the Class of Service, on page 20 section.
• User Templates: The user template settings are applied to the newly created user accounts and enables
you to create predefined configurations for the majority of user settings. Any changes made to the user
template settings do not affect the existing user accounts associated with that template. See the User
Templates, on page 24 section.
• Mailbox Stores: Unity Connection allows you to create multiple mailbox stores that can be useful for
customers with large installations, where the time required to complete a backup is an issue. Before you
add user accounts, review the mailbox store that is specified in the user template that you plan to use.
You may need to edit the template to specify a different mail store, or create a new template. If you
change the mailbox store specified in a user template, any already-created user accounts that were based
on that template are not re-assigned to the new mailbox store. However, you can reassign a user to a
different mailbox store at any time. To configure the mailbox stores, see the Message Storage, on page
109 chapter.
System Administration Guide
19

Page 38
• Dial Plan: The dial plan in Unity Connection includes partitions and search spaces. Partitions and search
spaces provide a way to segregate the global dial and message addressing space within Unity Connection.
A partition comprises a logical grouping of objects, such as users and call handlers. The objects are
identified by extension, name or SMTP address. A search space contains an ordered list of partitions.
See the Dial Plan, on page 90 section.
• Schedules: Unity Connection uses schedules to determine which user transfer rule to apply and which
user greeting to play. Before you add user accounts, review the active schedule that is specified for the
template that you plan to use. You may need to edit the template to specify a different schedule or create
a new template. If you change the active schedule specified on a user template page, any already-created
user accounts that were based on that template are not reassigned to the new schedule. In contrast, when
you edit a schedule, the changes affect both new and existing users of that schedule. This means that you
can update schedule settings before and after you create user accounts. You can also reassign a user to
a different schedule at any time. For more information on managing holiday and schedules, see the
Schedules, on page 103 and Holiday Schedules, on page 206 sections.
• Roles: Unity Connection offers levels of privileges for administrator accounts, set according to a list of
predefined roles. Roles specify which tasks administrators can do. Before you add administrator accounts,
select the roles that are assigned to each account. You can change which roles are assigned to the accounts
at any time. For more information, see the Roles, on page 274 section.
Class of Service
A class of service (COS) defines limits and permissions for accounts with voice mailboxes. For example, a
COS:
• Controls user access to licensed features, such as Web Inbox or Messaging Inbox (When a COS includes
access to a feature that requires individual licenses, you can assign groups of users to the COS only if
enough licenses are available.)
• Controls user access to non licensed features, such as Personal Call Transfer Rules and digital networking.
• Controls how users interact with Unity Connection. For example, a COS dictates the maximum length
of user messages and greetings, and whether users can choose to be listed in the corporate directory.
• Controls call transfer options.
• Specifies the number of private distribution lists allowed to users, and the number of members allowed
on each list.
• Specifies the restriction tables used to control the phone numbers that users can use for transfers and
when placing calls.
A COS is not specified for the individual accounts or templates that are associated with users without voice
mailboxes or the administrator accounts.
Remember that if you change the COS that is specified on a user template page, any user accounts that have
already been created based on that template are not reassigned to the new COS. In contrast, when you edit
the settings in a COS, the changes affect both new and existing members, so you can edit COS settings before
and after you create user accounts. You can also reassign a user to a different COS at any time.
Default Class of Service
Unity Connection creates two predefined classes of service that you use when setting up the system.
System Administration Guide
20
User Attributes
Class of Service
Page 39
• System: The system class of service is assigned to the administrator (users without voicemail box
accounts). This class of service cannot be deleted.
• Voice Mail User COS: The voicemail user class of service is assigned to the user accounts with voicemail
boxes. This class of service cannot be deleted.
Configuring Class of Service
This section includes information on configuring a class of service for Unity Connection, define the settings
for the class of service and save them.
Step 1
In Cisco Unity Connection Administration, expand Class of Service, and then select Class of Service.
The Cisco Unity Connection Administration displays the currently configured class of services.
Step 2
Configure a class of service (For information on each field, see Help> This Page):
• To add a class of service, select Add New. On the New Class of Service page, enter the applicable settings
and select Save.
• To edit a single class of service, select that COS and to edit multiple class of services, check the applicable
check boxes and then select Bulk Edit.
1.
On the Edit Class of Service page, edit the class of service settings.
2.
After editing the settings, select Save.
• To delete a class of service by selecting the applicable check boxes of the class of services you want to
delete. Select Delete Selected.
Class of Service Membership
The class of service membership allows to add user accounts to a particular class of service containing the
required features enabled in the COS.
Step 1
In Cisco Unity Connection Administration, expand Class of Services, then select Class of Service Membership.
Step 2
Select the class of service members by checking the applicable check boxes and select Move Selected.
Class of Service Settings
You can specify the settings, such as live reply and private distribution lists for the user accounts based on
the selected class of service.
Live Reply
When live reply is enabled, users listening to messages over phone can reply to a message or user calls the
sender. You can use COS settings to specify whether users can live reply only to messages from other users,
or to messages from both users and unidentified callers (unidentified callers are outside callers or users who
are forwarded to Unity Connection but who cannot be identified by the calling extension).
System Administration Guide
21
User Attributes
Configuring Class of Service
Page 40
Users can live reply to a message using the touchstone conversation or the voice-recognition conversation.
Consider informing users when you enable this feature, because even when it is enabled, the live reply option
is not mentioned in the main phone menus for some phone conversation types.
The following points to be considered for live reply to users:
• Unity Connection dials the extension of the user who left the message only when the Transfer Incoming
Calls to User’s Phone setting for the user who left the message is set to ring an extension or another
number.
The Transfer Incoming Calls to User’s Phone field is on the Call Transfer page.
Note
• The call transfer settings for the user who left the message dictate what Unity Connection does when the
user phone is busy, and whether Unity Connection screens the call.
• If a user attempts to live reply to a message but the sender is unavailable to take the call, a reply message
left for the sender is correctly identified as been sent by the user if the user called from a primary or an
alternate extension. This is because Unity Connection releases the live reply call to the phone system
and the user is no longer signed in to Unity Connection when leaving the reply message.
The following considerations for live reply to unidentified callers:
• Unity Connection uses the calling number provided by the phone system in the Automatic Number
Identification (ANI) string. To initiate the live reply, Unity Connection checks the ANI digits against
the transfer restriction table associated with the class of service of the user. If the number is allowed,
Unity Connection returns the call by performing a release transfer to the phone system.
• You can configure a prefix that Unity Connection prepends to the ANI string and the minimum length
of the ANI string before the prefix is applied. For example, to prepend a trunk access code to all numbers
of a sufficient length, or to provide additional information that the phone system may need to process
the number. Any other formatting that must be done to generate a proper dial string must be performed
by the phone system.
Private Distribution Lists
COS settings allow you to specify the maximum number of lists that are available to users and the maximum
number of members that users can add to each list when they use the Unity Connection conversation or the
Messaging Assistant to manage the lists.
You can set the maximum number of lists, up to 99, available to each user assigned to the COS.
While both the Unity Connection conversation and the Messaging Assistant use this COS setting to determine
when a user has reached the maximum number of lists, each application calculates differently the number of
lists that a user owns:
• When a user uses the phone to create a new list by adding members, the Unity Connection conversation
counts the number of private lists that have members and compares the total to the value in this setting
to determine whether the user has reached the list limit. Lists with no members (empty lists) are not
included in the total number of lists that a user owns, even if the lists have recorded names or text names.
• When a user uses the Messaging Assistant to create a new list, the Messaging Assistant counts the number
of lists that have a recorded name, a text name, or members, and then compares the total to the value in
System Administration Guide
22
User Attributes
Private Distribution Lists

Page 41
this setting to determine whether the user has reached the list limit. Lists with no members are included
in the total number as long as they have recorded names or text names.
This means that if a user belongs to a COS that allows 15 lists and the user has 12 private lists with members
and two lists with recorded names but no members, the user can potentially create more lists by phone than
in the Messaging Assistant before reaching the list limit.
• When the user uses the Unity Connection conversation, the user reaches the list limit either by adding
members to the two empty lists and creating one new list, or by creating three new lists. If the user reaches
the limit by creating three new lists, the user cannot add members to the two empty lists until two lists
are deleted.
• When the user uses the Messaging Assistant, the user reaches the list limit by creating one new list.
Despite reaching the list limit, the user can add members to the two empty lists.
Recorded Name and Length
For each COS, you can specify whether users are allowed to record the names and the length of the recorded
name.
Hearing a name recorded in the voice of the user can help callers distinguish between users with similar names.
When allowed to record the names, users can either use phone conversation or Messaging Assistant to do the
recording and they are prompted to complete the task during first time enrollment.
Unity Connection does not prevent users from completing the enrollment process if they do not record a name.
Note
When Unity Connection users have no recorded name, Unity Connection uses the Text to Speech feature to
play the username (either the display name or the concatenated first and last name, depending on which name
is entered in Unity Connection Administration). The recorded names can give callers an extra level of assurance
that they are reaching the person or mailbox they intended to reach. You must record the usernames at the
first time enrollment. This assists the callers in understanding names.
SpeechView Transcriptions of Voice Messages
When the SpeechView feature is enabled, Unity Connection uses a third-party external transcription service
to convert voice messages into text.
To use SpeechView, users must belong to a class of service that provides transcriptions of voice messages.
Members of the class of service can view the transcriptions of the messages using an IMAP client configured
to access the messages. The original voice message is still attached to the transcribed text message. Users can
optionally configure an SMS or SMTP notification device so that Unity Connection sends the transcription
to a phone or external email address.
Video
In Unity Connection, for each COS, the administrator can specify whether the users are allowed to record and
play video greetings and messages. The administrator allows to play video greetings and messages for both
the identified and outside callers. Unity Connection also allows the identified callers to record video greetings
and messages.
The video greeting and messages settings enable the administrators to control whether the members of a class
of service can record video greetings or messages nd if the video greetings and messages can be played for
outside callers.
System Administration Guide
23
User Attributes
Recorded Name and Length

Page 42
Unity Connection classifies remote users connecting through an intersite, intrasite, or HTTPS link as outside
callers.
Note
To allow the outside callers to access video greetings and messages, you need to enable the enable class of
service settings for video greetings and messages, navigate to Cisco Unity Connection Administration>
Class of Service> Edit Class of Service> check the Enable Video check box.
You can enable or disable the check box to allow the users to play and record video greetings and messages.
User Templates
Each user and administrator account that you add in Unity Connection is based on a user template. The user
template settings include authentication rules and schedules. The authentication rules dictate the password or
PIN and account lockout policy for the users that you create.
You must review the settings in the user templates that you plan to use before creating a user account. This
helps you to determine whether you need to make changes to an existing user template or create new user
templates. For each template, consider the features that you want to enable, specify a class of service, set a
schedule and time zone for the accounts you want to create.
To minimize the number of modifications that you need to make to user accounts later, use a separate user
template to specify settings applicable for each group of users that you plan to create. For example, if you
plan to create accounts for the members of a sales department, create or edit an existing template to set up
message notifications. Specify that messages left for the sales employees are encrypted for extra security,
increase the length of messages that callers can leave, and make similar appropriate changes to settings that
control the conversation heard by the sales employees.
If a particular setting must be unique for each user account, leave that setting blank on the user template, and
then you can edit the setting for each user account after they are created.
Default User Templates
Unity Connection has two predefined user templates that you can edit but cannot delete.
The settings on this template are suitable for most users.
Voicemail User Template
The settings on this template are suitable for users who administer Unity
Connection. User accounts that are based on this template do not have voice
mailboxes.
By default, the template specifies the System Administrator role, which is
the administrator role with the highest privileges.
Administrator Template
Configuring User Templates
This section includes information on configuring a user template for Unity Connection, defining the settings
for the user template, and saving them.
System Administration Guide
24
User Attributes
User Templates

Page 43
You can manage the user templates using the Bulk Administration Tool. For more information, see the Bulk
Administration Tool, on page 248 section.
Note
Step 1
In Cisco Unity Connection Administration, expand Templates and select User Templates.
The Search User Templates page displays the default and currently configured user templates.
Step 2
Configure a user template (For information on each field, see Help> This Page):
• To add a user template, select Add New. The New User Template page appears. Enter the applicable settings and
select Save.
• To edit a user template, select the user template that you want to edit. On the Edit User Template Basics page, select
the applicable settings from the Edit menu:
• User Template Basics
• Password Settings
• Change Password
• Roles
• Transfer Rules
• Message Settings
• Message Actions
• Caller Input
• Mailbox
• Phone Menu
• Playback Message Settings
• Send Message Settings
• Greetings
• Post Greeting Recording
• Notification Devices
• Unified Messaging Accounts
• Video Services Accounts
For more information on each user template setting, see the Settings for User Accounts and User
Templates, on page 269 section.
Note
System Administration Guide
25
User Attributes
Configuring User Templates

Page 44
• To delete a user template, select the user template that you want to delete. Select Delete Selected and
OK to confirm deletion.
Roles
A role comprises of set of privileges that define the access level to the system. System Administrator can
configure multiple roles based on the administrative needs. The role assignment for a user account can be
done based on the set of operations required. Unity Connection offers two types of roles:
• System Roles: System roles are predefined roles that come installed with Unity Connection. You cannot
create, modify or delete these roles. System roles can only be assigned or unassigned to users by System
Administrator.
• Custom Roles: Custom roles are the roles that you create with a list of privileges based on your
organizational requirements. Custom roles can be assigned or unassigned to users by System Administrator
or a custom role user with role assignment privilege.
Only a user with System Administrator role can create, update or delete custom roles.
Note
System Roles
At the time of Unity Connection installation, default system roles are created for various administrative
functions, as mentioned in below table.
Read Only Administrator System Role
Unity Connection supports Read Only Administrator system role to provide the read only access of Unity
Connection functions to administrator.
Description
System Role
This role allows an administrator to manage call handlers, directory handlers,
and interview handlers.
Audio Text Administrator
This role allows an administrator to enable or disable Unity Connection
application and database auditing, to configure audit settings, and to view or
delete audit logs.
Audit Administrator
This role allows an administrator to manage call handler recorded greetings for
the Unity Connection users via TUI.
You need to assign this role to a User with Voice Mailbox account
because the administrator must be able to access Unity Connection
by phone.
Note
Greeting Administrator
System Administration Guide
26
User Attributes
Roles

Page 45
This role allows an administrator to reset user passwords and PINs, unlock user
accounts, and view user setting pages.
The “Manage Call Handlers Belonging To Users Only - View
Only” privilege refers to the primary call handler assigned to a
user which include all greetings, transfer rules, and menu entries
that you see on the User's page under the Roles section.
Note
Help Desk Administrator
This role allows an administrator to access to all messages. Remote applications,
for example, Cisco Unified Mobility Advantage use the username and password
of a user with this role for the purposes of retrieving messages on behalf of
other users.
Typically, this role is assigned to only one user account, which does not represent
a real user but exists to access mailboxes on behalf of other users.
Mailbox Access Delegate
Account
This role allows an administrator to view all the Unity Connection administrative
functions such as system settings configurations and reports.
This role also provides access to view the Clusters, Enterprise
Parameters, LDAP, SAML SSO, Service Parameters, Plugins
pages under System Settings on Cisco Unity Connection
Administration. You can view the Cisco Unified Serviceability
and RTMT client also with this role.
Note
Read Only Administrator
This role allows an administrator to administer the database using remote tools.
Remote Administrator
This is the top-level Unity Connection administration role. This role allows
access to all Unity Connection administrative functions, including users, system
settings configurations, reports, along with the administration and diagnostic
tools.
The default administrator account that the installer specified during initial setup
of Unity Connection is set to this role.
A System Administrator is the only role that has permission to create
administrative accounts.
System Administrator
This role allows an administrator to access all functions that enable management
of the Unity Connection server and phone system integration settings;
administrators with this role can also run all reports, use diagnostic tools, and
view all system and user settings pages.
Technician
This role allows an administrator to manage user accounts, access all user
administration functions and user administration tools.
User Administrator
You can assign the above mentioned roles to the users with mailboxes except the Greeting Administrator role.
As a best practice, make sure that administrators have two accounts: one without a voice mailbox for
administering Unity Connection and another with a voice mailbox that they can use to access the personal
mailbox.
To see the specific privileges for each administrator role, in Cisco Unity Connection Administration, expand
System Settings > Roles > System Roles and select the name of each role. You cannot make changes to the
permissions that are associated with each predefined role.
System Administration Guide
27
User Attributes
System Roles
Page 46
Custom Roles
Unity Connection allows the system administrator to create, update, or delete custom roles with different
privileges as per the requirements, where each privilege is associated with an operation or a set of operations.
Custom role can be assigned to a user having no role as well as to the user who already has a system or a
custom role.
A user with custom role cannot assign system role to a user and cannot modify or delete a user with system
role.
Note
Custom Roles are created by selecting a privilege or set of privileges.
Unity Connection provides an option to inherit a system role while creating a custom role. All the privileges
associated with the inherited system role are assigned to the custom role. You cannot unassign or remove the
privileges of inherited system role. As per the requirement, you can assign other privileges to the custom role
as well.
Each new custom role has read only access privilege by default.
Note
Below table describes the Unity Connection privileges that can be selected while creating a custom role:
Privilege to Manage Users
Allows the administrator to manage users and all of
their attributes.
Manage Users - Full Access
Allows the administrator to assign or unassign
different custom roles to users.
Manage Users: Assign/Unassign Roles
Allows the administrator to change the user name
attributes like First Name, Display Name, Voice Name
etc.
Manage Users: User Name Attributes - View, Update
Allows the administrator to perform user bulk
operations.
Manage Users In Bulk - Full Access
Allows the administrator to have Read Only access
to the Cisco Unity Connection Administration page.
It is mandatory to select this privilege
while creating a custom role. Also, this
privilege does not provide access to
Clusters, Enterprise Parameters, LDAP,
SAML SSO, Service Parameters and
Plugins.
Note
Read Access to System Configuration Data - Read
Access
Privilege to Manage Class of Service
Allows the administrator to manage class of service
and assign/unassign it to users through class of service
membership page.
Class of Service - Full Access
System Administration Guide
28
User Attributes
Custom Roles

Page 47
Privileges to Manage Templates
Allows the administrator to manage user templates.
Templates: User Templates - Full Access
Allows the administrator to manage system call
handler greetings.
Manage Call Handlers Greetings - Full Access
Allows the administrator to manage call handler
templates and system call handlers.
Manage Call Handler Templates And System Call
Handlers- Full Access
Allows the administrator to create and modify call
handler templates and system call handlers. Delete
action is not allowed with this privilege.
Manage Call Handler Templates And System Call
Handlers- View, Create, Update
Allows the administrator to manage notification
templates.
Templates: Notification Templates - Full Access
Privilege to Manage Distribution Lists
Allows the administrator to manage distribution lists.
Distribution Lists - Full Access
Privileges to Manage Call Management
Allows the administrator to manage directory
handlers.
Call Management: Directory Handlers - Full Access
Allows the administrator to create and modify
directory handlers. Delete action is not allowed with
this privilege.
Call Management: Directory Handlers - View, Create,
Update
Allows the administrator to manage interview
handlers.
Call Management: Interview Handlers - Full Access
Allows the administrator to create and modify
directory handlers. Delete action is not allowed with
this privilege.
Call Management: Interview Handlers - View, Create,
Update
Allows the administrator to manage call routing rules.
Call Management: Call Routing Rules - Full Access
Privilege to Manage Message Storage
Allows the administrator to manage mailbox stores,
mailbox quota, mailbox store membership and
message aging policies.
Message Storage - Full Access
Privileges to Manage Networking
Allows the administrator to create VPIM locations
and manage them.
Networking: VPIM - Full Access
Allows the administrator to manage networking,
server configurations and activation/deactivation of
services.
Manage Networking And Server
Roles/Activation/Deactivation - Full Access
Privileges to Manage Unified Messaging
System Administration Guide
29
User Attributes
Custom Roles
Page 48
Allows the administrator to integrate Unity
Connection with unified messaging servers such as
Microsoft Exchange, Office 365 etc. and manage the
unified messaging accounts.
Select "Manage Users - Full Access"
privilege to associate users with the
unified messaging account.
Note
Unified Messaging: Configuration - Full Access
Allows the administrator to manage speechview
services.
Unified Messaging: Speechview Transcription - Full
Access
Privilege to Manage Video
Allows the administrator to manage video service and
assign them to users.
Video Service - Full Access
Privilege to Manage Dial Plan
Allows the administrator to manage partitions and
searchspaces.
Dial Plan: Partitions and Search Spaces - Full Access
Privileges to Manage System Settings
Allows the administrator to manage all the System
Settings operations except Enterprise Parameters,
Cluster, LDAP, SAML SSO, Service Parameters,
Custom Roles and Plugins.
System Settings - Full Access
Allows the administrator to manage advanced settings.
System Settings: Advanced - Full Access
Allows the administrator to manage general
configurations.
System Settings: General Configuration - Full Access
Allows the administrator to manage authentication
rules.
System Settings: Authentication Rules - Full Access
Allows the administrator to manage Cluster,
Enterprise Parameters, SAML SSO, LDAP, Service
Parameters and Plugins.
System Settings: Cluster, Plugins, LDAP, SAML,
Enterprise and Service Parameters - Full Access
Allows the administrator to manage restriction tables.
System Settings: Restriction Tables - Full Access
Allows the administrator to manage system schedules
and holidays.
System Settings: Schedules, Holidays - Full Access
Allows the administrator to manage global nicknames.
System Settings: Global Nicknames - Full Access
Allows the administrator to edit subject line formats.
System Settings: Subject Line Formats - Full Access
Allows the administrator to manage attachment
descriptions.
System Settings: Attachment Descriptions - Full
Access
Allows the administrator to manage enterprise
password settings.
System Settings: Enterprise Passwords - Full Access
Allows the administrator to manage fax servers.
System Settings: Fax Server - Full Access
Allows the administrator to integrate SAML and
LDAP with Unity Connection.
System Settings: SAML And LDAP - Full Access
System Administration Guide
30
User Attributes
Custom Roles
Page 49
Allows the administrator to manage ldap phone
number transform settings.
System Settings: LDAP Phone Number Transforms
- Full Access
Allows the administrator to manage cross origin
resource sharing.
System Settings: CORS - Full Access
Allows the administrator to manage SMTP
configurations.
System Settings: SMTP Configuration - Full Access
Privilege to Manage Phone System Integration
Allows the administrator to manage telephony
integrations.
Telephony Integrations - Full Access
Privileges to Manage Tools
Allows the administrator to schedule and execute
Unity Connection tasks.
Tools: Task Management - Full Access
Allows the administrator to execute administrative
tools such as Grammar Statistics , SMTP Address
Search and Show Dependencies.
Tools: Run Administration Tools
Allows the administrator to manage custom keypad
mappings.
Tools: Custom Keypad Mapping - Full Access
Privileges to Manage User MWI and Password Settings
Allows the administrator to reset user MWIs.
Reset User MWI
Allows the administrator to reset user passwords.
Reset User Passwords
Privilege to Run Unity Connection Serviceability
Allows the administrator to access the Cisco Unity
Connection Serviceability page.
Run Serviceability Page
To perform different operations on Unity Connection, administrator must provide the required privilege to
the role and assign the role to a user. The table below describes different Unity Connection operations and
the privileges required to perform the operations.
Table 3: Privileges Required for Each Unity Connection Operation
Set of Privileges
Sub - Operation
Operation
Manage Users - Full Access
Select the Manage
"Users:
Assign/Unassign
Roles" privilege for
custom role
assignment or
unassignment.
Note
Users
Manage Users
This operation allows you to
manage user accounts on Unity
Connection.
Import Users
Synch Users
For Import Users and
Sync Users operation,
you must have LDAP
or AXL configured
on Unity Connection.
Note
System Administration Guide
31
User Attributes
Custom Roles
Page 50
Set of Privileges
Sub - Operation
Operation
Class Of Service - Full Access
Class of Service
Manage Class of Service (COS)
This operation allows you to
manage class of services and assign
them to different users through
Class of Service Membership page
on Unity Connection.
Class of Service Membership
Templates: User Templates - Full
Access
User Templates
Manage Templates
This operation allows you to
manage different types of
templates.
For each sub operation associated
with the templates, separate
privileges are defined to provides
access only to that sub operation.
Manage Users - Full Access
Manage Users - Full Access
Manage Call Handler Templates
And System Call Handlers- Full
Access
Call Handler Template
Templates: User Templates - Full
Access
Contact Template
Templates: Notification Templates
- Full Access
Notification Template
Manage Users - Full Access
Contacts
Manage Contacts
This operation allows you to
manage contacts.
Distribution Lists - Full Access
System Distribution List
Manage Distribution Lists
This operation allows you to
manage distribution lists..
Manage Users - Full Access
Manage Call Handler Templates
and System Call Handlers - Full
Access
System Call Handler
Manage Call Management
This operation allows you to
manage System Handlers and Call
Routing rules.
For each sub operation associated
with the call management, separate
privileges are defined to provides
access only to that sub operation.
Call Management: Directory
Handlers - Full Access
Directory Handler
Call Management: Interview
Handlers - Full Access
Interview Handler
Manage Call Handler Templates
and System Call Handlers - Full
Access
Custom Recordings
Call Management: Call Routing
Rules - Full Access
Call Routing
System Administration Guide
32
User Attributes
Custom Roles
Page 51
Set of Privileges
Sub - Operation
Operation
Message Storage - Full Access
Mailbox Stores
Manage Message Storage
This operation allows you to
manage the mailbox and message
storage settings.
Mailbox Stores Membership
Mailbox Quotas
Message Aging
Manage Networking and Server
Roles/ Activation/Deactivation -
Full Access
Legacy Link
Manage Networking
This operation allows you to
manage networking on Unity
Connection server.
Branch Management
HTTPS Links
Locations
Networking: VPIM - Full Access
VPIM (Full Access)
Manage Enterprise Passwords-
Add/Delete/Modify passwords
Connection Location Passwords
Unified Messaging: Configuration
- Full Access
Manage Users - Full Access
Unified Messaging Services
Manage Unified Messaging
This operation allows you to
manage unified messaging services
and assign them to users.
Unified Messaging Account Status
Unified Messaging: SpeechView
Transcription - Full Access
SpeechView Transcription
Video Service - Full Access
Video Services
Manage Video
This operation allows you to
manage Video services and assign
the services to the users.
Video Services Account Status
Dial Plan: Partitions and Search
Spaces - Full Access
Partitions
Manage Dial Plan
This operation allows you to
manage Unity Connection
partitions and search spaces.
SearchSpaces
System Administration Guide
33
User Attributes
Custom Roles
Page 52
Set of Privileges
Sub - Operation
Operation
Manage System Settings - Full
Access
This privilege
provides access to
manage the complete
System Settings
operations except
Custom Roles,
Cluster, LDAP,
SAML SSO and
Enterprise
Parameters, Service
Parameters and
Plugins.
Note
System Settings
Manage System Settings
This operation allows you to
manage system configurations.
Along with the privilege to manage
all the System Settings operations,
separate privileges are defined for
each sub operation to provide
access only to that sub operation.
System Settings: General
Configuration - Full Access
General Configuration
System Settings: CUCM Inherited
Settings - Full Access
Cluster
System Settings: Authentication
Rules - Full Access
Authentication Rules
System Settings: Restriction Tables
- Full Access
Restriction Table
System Settings: Schedules,
Holidays - Full Access
Schedules
Holiday Schedules
System Settings: Global Nicknames
- Full Access
Global Nicknames
System Settings: Subject Line
Formats - Full Access
Subject Line Format
System Administration Guide
34
User Attributes
Custom Roles
Page 53
Set of Privileges
Sub - Operation
Operation
System Settings: Attachment
Descriptions - Full Access
Attachment Description
System Settings: Cluster, Plugins,
LDAP, SAML, Enterprise and
Service Parameters - Full Access
Enterprise Parameters
Service Parameters
Plugins
System Settings: Fax Server - Full
Access
Fax Server
System Settings: SAML And
LDAP - Full Access
LDAP
SAML Single Sign On
System Settings: CORS - Full
Access
Cross Origin Resource Sharing
System Settings: SMTP
Configuration - Full Access
SMTP Configurations
System Settings: Advanced - Full
Access
Advanced
Telephony Integrations - Full
Access
Phone System
Manage Telephony Integrations
This operation allows you to
manage Telephony Integrations.
Port Group
Port
Speech Connect Port
Trunk
Security
Tools: Task Management - Full
Access
Task Management
Manage Tools
This operation allows you to access
different tools and utilities for
administering Unity Connection
along with scheduling tasks for
various operations.
Manage Users In Bulk - Full
Access
Bulk Administration Tool
Tools: Custom Keypad Mapping -
Full Access
Custom Keypad Mapping
Manage Users In Bulk - Full
Access
Migration Utilities
Tools: Run Administration Tools
Grammar Statistics
SMTP Address Search
Show Dependencies
System Administration Guide
35
User Attributes
Custom Roles
Page 54
Set of Privileges
Sub - Operation
Operation
Run Serviceability Page
Cisco Unified Serviceability
Manage Serviceability
This operation allows you to access
both the Unity Connection and the
Unified Communication
Serviceability page.
System Settings: Cluster, Plugins,
LDAP, SAML, Enterprise and
Service Parameters - Full Access
Run Serviceability Page
Cisco Unity Connection
Serviceability
Example to Use Custom Roles
Unity Connection offers a predefined system role Technician to manage various system settings and networking
related operations along with the administrative tasks such as reset of user MWI etc.
If you want a user to perform all the operations of the technician role along with some additional operations
such as reset passwords and managing Unity Connection tasks, you must create a custom role with the same
privileges as of the technician role, provide the privileges for password reset and task management to the role,
and assign the role to user.
To create a custom role as per the above example, do the following:
Step 1
Create a new role Custom Technician and provide the following privileges to create a custom role equivalent to the
Technician system role:
• Read Access to System Configuration Data - Read Access
• System Settings: Advanced - Full Access
• System Settings: LDAP Phone Number Transforms - Full Access
• Dial Plan: Partitions and Search Spaces - Full Access
• Telephony Integrations - Full Access
• System Settings: Cluster, Plugins, LDAP, SAML, Enterprise and Service Parameters - Full Access
• Manage Networking And Server Roles/Activation/Deactivation - Full Access
• Networking: VPIM - Full Access
• Reset User MWI
• Tools: Run Administration Tools
Creation of a new role Custom Technician is simplified by selecting the Technician system role from Inherit System
Role field.
Step 2
Provide the following additional privileges to the custom role:
• Reset User Passwords
• Tools: Task Management - Full Access
Step 3
Assign the role to the user.
For more information on configuring Custom Roles, see the Configuring Roles, on page 204 section of System Settings
chapter.
System Administration Guide
36
User Attributes
Example to Use Custom Roles
Page 55
C H A P T E R 4
Users
• Introduction, on page 37
• Default Users, on page 37
• Finding Users, on page 38
• Creating User Accounts, on page 39
• Using Import Users and Synch Users Functionalities, on page 42
• Editing User Account, on page 43
• Deleting User Accounts, on page 45
• Moving or Migrating Users Between Locations in Cisco Unity Connection, on page 47
Introduction
Users in Cisco Unity Connection are the user accounts that determine who can access the system and which
system features and resources they can use (other than the ones already controlled by the associated class of
service). Unity Connection supports the following types of users:
Includes the users who need to send or receive voice messages and use other
Unity Connection features, such as personal call transfer rules and Web
Inbox or Messaging Inbox depending on the class of service assigned to the
user.
A user account that is set up with a voice mailbox has a phone extension and
is counted as a voicemail licensed user.
Users With Voice Mailboxes
Includes the users who do not need to send or receive voice messages but
need to administer the system. You can determine the tasks that the
administrators can do by assigning any of the predefined roles to the user.
An account that is set up without a voice mailbox does not have a phone
extension and is not counted as a voicemail licensed user.
Users Without Voice
Mailboxes
Default Users
By default, Unity Connection creates the following user accounts, which you use when setting up the system.
System Administration Guide
37

Page 56
The Administrator user account has the highest level of administrative privileges (System
Administrator role) and is used to access Cisco Unity Connection Administration. The
alias and password for this account are specified during installation. This account is
configured as a user without a voice mailbox.
The default Administrator account can be deleted. However, be sure that you have
assigned the System Administrator role to at least one other user before you delete this
account.
Administrator
The Operator user account is the message recipient for the Operator call handler. When
calls to the operator go unanswered, callers can leave a message, depending on the call
transfer settings for the Operator call handler. You should assign someone to monitor
the mailbox for the Operator user account or reconfigure the Operator call handler to
send messages to a different user or a distribution list.
This account cannot be deleted.
Operator
By default, the Undeliverable Messages Mailbox user account is the only member of the
Undeliverable Messages distribution list, which receives notification of undeliverable
messages. You should assign someone to monitor this mailbox or add a user to the
Undeliverable Messages distribution list to monitor and reroute (as appropriate) any
messages that are delivered to the list.
This account cannot be deleted.
Undeliverable
Messages Mailbox
The Unity Connection Messaging System user account is configured as a user without
a voice mailbox. It acts as a surrogate sender of messages from outside callers. Thus,
messages from outside callers are identified as coming from the Unity Connection
Messaging System mailbox.
This account cannot be deleted.
Unity Connection
Messaging System
The default user accounts are not included in your user license count.
Note
Finding Users
Cisco Unity Connection Administration allows you to find users based on search criteria that you enter. You
can enter all or part of a name, extension, and/or user alias (ID) to find a user.
As a best practice, do not use wildcards such as * in search strings. If you want to find a user, use Begins
With, Contains, or Ends With to match part of a string, or leave the search string blank to return all results.
Unity Connection attempts to match wildcard characters within the field you are searching; if no objects
contain such characters in that field, no results are returned.
You can use the Search Limits fields on the search page to limit the results that are displayed to a particular
partition in which user extensions are configured, or to a particular location if the directory contains users
from other digitally-networked Unity Connection locations. When you search for users and limit the results
by partition, you can also choose whether to display only users whose primary extension is in the partition,
or users whose primary extension and any alternate extensions appear in the partition. If you choose to display
System Administration Guide
38
Users
Finding Users

Page 57
the primary extension and any alternate extensions, multiple records may display for a single user in the search
results.
You can use the navigation buttons at the bottom of the search results table to move between pages, and use
the Rows Per Page setting to display 25, 50, 100, 150, 200, or 250 rows per page. Unity Connection saves
your Rows Per Page setting so that on subsequent sign-ins you receive the same number of results per page
for this search page.
Step 1
In Cisco Unity Connection Administration, select Users.
Step 2
On the Search Users page, in the Search Results table, select the user alias to display the user account.
If you do not see the user alias listed in the Search Results table, continue with Step 3.
Step 3
In the Find Users Where search fields, indicate whether to search by Alias, extension, First Name, Last Name, or Display
Name. You can further refine your search by setting additional parameters, such as Begins With or Ends With. Enter the
applicable characters to search for, and select Find.
Step 4
To limit the search results by partition or location, do the following:
a)
In the Limit Search To list, select Partition or Location.
b) In the Where Name Is list, select the name of the partition or location in which you want to find the user.
When limiting the search to a partition, select whether to display only primary extensions in the partition or both
primary and alternate extensions in the partition.
If you select to display both the primary extension and any alternate extensions, multiple records may
display for a single user in the search results.
Note
Step 5
In the Search Results table, select the user alias to display the user account.
Creating User Accounts
Before creating user accounts, you must configure user templates and class of service that want to use to create
the accounts. After creating a user account, the changes made to the associated user template does not apply
to the account. For more information on user templates or class of service, see <User Attributes> chapter.
You can use either of the following methods to create users in Unity Connection:
• Creating Users Manually: Allows to manually create each user through Search Users page. For information,
see Creating User Accounts Manually, on page 40.
• Importing Users from Cisco Unified Communications Manager: Allows you to import users from Cisco
Unified Communications Manager to Unity Connection using AXL. For information, see Importing
Users through AXL, on page 41.
• Importing Users from LDAP Directory: Allows you to import users from LDAP directory to Unity
Connection. For information, see Importing Users using LDAP Directory, on page 42.
• Creating Users through Bulk Administration Tool (BAT): Allows you to create multiple users using
BAT at the same time. For information, see Creating User Accounts using BAT, on page 42.
System Administration Guide
39
Users
Creating User Accounts
Page 58
Creating User Accounts Manually
Users with voice mailboxes are end users and the users without voice mailboxes are system administrators.
Before you add user accounts individually, you need to select and define a template and class of service (COS)
for each type of account you need to add. For administrator accounts, you also need to select the roles that
are assigned to each account. To learn more about the tasks you should do before adding a user account, see
the User Attributes, on page 19 chapter.
In case of end users, the default voicemail PINs and web application passwords are applied to each user
account that you create. These PINs and passwords are either the defaults set for the default Voicemail User
Template during installation, or defaults that are set on the Change Password page for the user template that
you select when creating the accounts. You need to give these PINs and passwords to users so that they can
sign in to the Unity Connection conversation and to the Cisco Personal Communications Assistant (PCA).
To increase system security, you need to instruct users to change both PIN and password as soon as possible
and you need to enforce PIN and password complexity rules.
When you create administrator accounts, consider the following security issues:
• By default, the user without a voice mailbox template specifies the System Administrator role, which is
the administrator role with the highest privileges.
• A default web application password is applied to each administrative account that you create. If you use
the default Administrator Template to create a new account, keep in mind that the default password
associated with that account is a randomly-generated string. Therefore, make sure to first enter a new
default password for the template to replace the randomly-generated string or change the password for
each new account that you create it based on the default Administrator Template. To increase system
security, you must instruct administrators to change the password as soon as possible and you must
enforce password complexity rules also.
• If system administrators in your organization require voice mailboxes, you must set up separate accounts
for each system administrator. This means that you must create a user account without voice account for
signing in to Unity Connection Administration to do administrative tasks and a separate user account
with a voice mailbox for sending and receiving voice messages.
Do the following procedure to add a user account with or without a voice mailbox.
The information in this section is not applicable for adding end user accounts in Cisco Business Edition.
Note
Adding a User Account
Step 1
In Cisco Unity Connection Administration, select Users.
The Search Users page appears displaying the currently configured user accounts.
Step 2
On the Search Users page, select Add New . The New User page appears. (For information on each field, select Help >
This Page.)
Step 3
In the User Type list, do either of the following:
• Select User With Mailbox to create an end user account.
• Select User Without Mailbox to create an administrator account.
System Administration Guide
40
Users
Creating User Accounts Manually

Page 59
Step 4
In the Based on Template list, do either of the following:
• Select VoiceMailUserTemplate for end user account.
• Select AdministratorTemplate for administrator account.
Step 5
Enter the required information in the fields.
Note that the SMTP Address field is optional which means that if you do not enter a value, Unity Connection uses the
alias to form the SMTP address. However, the SMTP address cannot include non-ASCII characters. Thus, if the user
alias contains non-ASCII characters, you must provide an acceptable SMTP address.
Step 6
Select Save . The Edit User Basics page appears.
Step 7
Enter the additional information as applicable and select Save.
Importing Users through AXL
Unity Connection requires an Administrative XML Layer (AXL) server to access the Cisco Unified
Communications Manager database, therefore, you must configure an AXL server for the Cisco Unified CM
server from which you want to import the users. AXL is an Application Programming Interface (API) that
provides a mechanism for inserting, retrieving, updating, and removing data from the database.
Prior to importing users, you must do the following on the Cisco Unity Connection server:
• Edit or add a user template. In the Phone System field for the template, select the Cisco Unified CM
server from which you are importing users.
• Configure an AXL server for the Cisco Unified CM server from which you are importing users. For
details on configuring AXL servers, see the section Cisco Unified Communications Manager AXL
Servers, on page 63
You use the Users > Import Users page in Cisco Unity Connection Administration to create multiple user
with voicemail accounts from Cisco Unified CM users. For more information see, Using Import Users and
Synch Users Functionalities, on page 42.
Cisco Unified CM users must have a Primary Extension defined otherwise the users do not appear on the
Users > Import Users page in Cisco Unity Connection Administration.
Note
When user accounts are created using this method, Unity Connection takes the user Alias, Extension, First
Name, Last Name, and all the other available data from the end user table of Cisco Unified CM and fills the
remaining information from the user template that you specify. The data from the fields that are taken from
Cisco Unified CM cannot be modified using Unity Connection Administration. The method that you can use
to update the data in Unity Connection depends on whether Cisco Unified CM is integrated with an LDAP
directory:
• If Cisco Unified CM is not integrated with an LDAP directory: You must change the data in Cisco Unified
Communications Manager Administration and then use the Synch Users page in Unity
Connection Administration to manually refresh information from Cisco Unified CM for voicemail users
that were created using the Import Users page.
• If Cisco Unified CM is integrated with an LDAP directory: You must update the data in the LDAP
directory, resynchronize the Cisco Unified CM database with the LDAP directory, and then use the Synch
System Administration Guide
41
Users
Importing Users through AXL

Page 60
Users page in Unity Connection Administration to manually refresh information from Cisco Unified CM
for voicemail users that were created using the Import Users page.
Considerations While Importing Data From LDAP Directory Integrated with Cisco Unified CM
An alternative of creating users by importing data from Cisco Unified Communications Manager is to integrate
Unity Connection with an LDAP directory and then import user data from the LDAP directory as described
in the LDAP, on page 147 chapter. Note the following:
• If you import users from Cisco Unified CM and if Cisco Unified CM is integrated with the LDAP
directory, Unity Connection does not automatically have access to LDAP synchronization or authentication.
If you want Unity Connection users to authenticate against the LDAP directory, you must integrate Unity
Connection with the LDAP directory, too.
• If you import users from Cisco Unified CM, updates to Cisco Unified CM data do not automatically
replicate to the Unity Connection server, so you must use the Synch Users page in Cisco Unity Connection
Administration to manually synchronize Unity Connection user data with Cisco Unified CM user data
from time to time. If you integrate Unity Connection with an LDAP directory, you can define a
synchronization schedule that specifies when data in the Unity Connection database is automatically
resynchronized with data in the LDAP directory.
Note that when you add users to the LDAP directory, you still need to manually import them into Unity
Connection; automatic synchronization only updates the Unity Connection database with new data for existing
users, not new data for new users.
• When you integrate Unity Connection with an LDAP directory, you can configure Unity Connection to
authenticate passwords for web applications against the LDAP database. When you import data from
Cisco Unified CM, you must maintain passwords for Unity Connection web applications in Unity
Connection and for Cisco Unified CM web applications in Cisco Unified CM.
Importing Users using LDAP Directory
You can use Import Users functionality to import users from the LDAP directory to Unity Connection server.
For more information on configuring LDAP, see the LDAP, on page 147 chapter.
Creating User Accounts using BAT
Cisco Unity Connection provides the Bulk Administration Tool that allows you to create, update, and delete
multiple user accounts or contacts at the same time by importing information contained in a comma separated
value (CSV) file. In addition, it allows you to export information about users or contacts from Cisco Unity
Connection to a CSV file.
For information on how to create users using BAT, see the Bulk Administration Tool, on page 248 section.
Using Import Users and Synch Users Functionalities
You can use the Import Users functionality to import existing Cisco Unified CM users in Unity Connection.
After importing users from Cisco Unified CM, you can use the Synch Users functionality to manually refresh
the information you imported from Cisco Unified CM.
System Administration Guide
42
Users
Considerations While Importing Data From LDAP Directory Integrated with Cisco Unified CM
Page 61
In Cisco Business Edition configurations, synchronization happens automatically. You are not required to
manually synchronize the users.
Note
You can also use Import Users functionality to import users from an LDAP directory.
A Cisco Unified CM or LDAP directory server must be integrated with Unity Connection before importing
the users.
Note
Accessing the Import and Synch Users Tools
Step 1
In Cisco Unity Connection Administration, expand Users.
Step 2
Select Import Users or Synch Users, as applicable.
Editing User Account
After a Cisco Unity Connection user account has been created, you may need to adjust settings (for example,
to reset a user PIN or password or to set up new notification devices for the user) or delete the account.
Editing Individual User Account
You can edit settings for an individual user account from the pages available on the Edit menu in Cisco Unity
Connection Administration.
Do the following procedure to edit individual user account settings.
Step 1
In Cisco Unity Connection Administration, select Users.
Step 2
On the Search Users page, select the alias of the user account that you want to edit.
If the user does not appear in the search results table, set the applicable parameters in the search fields at the
top of the page, and select Find.
Note
Step 3
On the Edit User Basics page, change the applicable settings. When you have finished, select Save.
Step 4
On the Edit menu, select any of the following settings that you want to edit and select Save:
• User Basics
• Password Settings
• Change Password
• Roles
System Administration Guide
43
Users
Accessing the Import and Synch Users Tools

Page 62
• Message Waiting Indicators
• Transfer Rules
• Message Settings
• Caller Input
• Mailbox
• Phone Menu
• Playback Message Settings
• Send Message Settings
• Message Actions
• Greetings
• Post Greeting Recording
• Notification Devices
• Alternate Extensions
• Alternate Names
• Private Distribution Lists
• Unified Messaging Accounts
• Video Services Accounts
• SMTP Proxy Addresses
For information on each user settings, see the Settings for User Accounts and User Templates, on page
269section.
Note
Editing User Accounts in Bulk Edit Mode
Bulk Edit option on the Search Users page allows you to select large numbers of user accounts and quickly
make the same changes to the selected user account at one time.
If you have multiple locations in your network and want to edit the data across the network in Bulk Edit mode,
you need to configure remote access to other locations in your network before attempting a Bulk Edit operation.
For more information on configuring location passwords, see the Connection Location Passwords, on page
125 section of the Networking, on page 121 chapter.
The following procedure provides instructions for beginning a Bulk Edit operation.
Step 1
In Cisco Unity Connection Administration, on the Search Users page, check the applicable user check boxes, and select
Bulk Edit.
Step 2
On the Edit User Basics page, change settings as applicable.
System Administration Guide
44
Users
Editing User Accounts in Bulk Edit Mode
Page 63
• While updating settings for multiple video service accounts in Bulk Edit mode, you can only map or
unmap the video service for the accounts. To create or update the video service accounts for multiple
users simultaneously, you can use Bulk Administration Tool. For more information, see Bulk
Administration Tool, on page 248
• You can also set the Bulk Edit Task Scheduling field to schedule the Bulk Edit operation for a later date
and/or time.
Note
Step 3
Select Submit.
Step 4
If applicable, continue to change settings for these user accounts on the related pages available from the Edit menu. As
you make changes on each page, select Submit before going on to the next page to make additional changes.
Editing User Accounts through BAT
BAT allows you to edit Unity Connection user accounts (with or without voice mailboxes) using the information
contained in a comma separated value (CSV) file. For more information on using BAT tool and CSV file, see
the Bulk Administration Tool, on page 248 section.
Deleting User Accounts
In Cisco Business Edition, you delete Cisco Unity Connection user accounts in Cisco Unified CM
Administration. (Use the applicable User Management page to find the user or application user, then delete.)
To learn more about deleting Unity Connection accounts in Cisco Unified CM Administration, see the online
Help or the “Application User Deletion” and “End User Setup” chapters of the applicable Cisco Unified
Communications Manager Administration Guide. The guide is available at
http://www.cisco.com/c/en/us/support/unified-communications/unified-communications-manager-callmanager/products-maintenance-guides-list.html.
Note
When a user leaves the organization or otherwise no longer needs a Unity Connection account, delete the
account in Cisco Unity Connection Administration.
Note the following considerations for deleting an account:
• All messages in the Unity Connection voice mailbox for the user are automatically deleted. However, if
Unity Connection and Exchange mailbox synchronization (single inbox) is configured for the user, Unity
Connection voice messages are not deleted from the corresponding Exchange mailbox (the single-inbox
feature is available in Unity Connection).
• If a user account is referenced by other objects in Unity Connection (for example, if the user is set to be
a recipient of messages left in an interview handler or if a call handler is set to transfer incoming calls
to the user phone), you are not allowed to delete the user account until you have changed settings on the
other objects to remove references to the user account you want to delete. If you try to delete a user
account without first changing settings on objects that reference the user account, the delete operation
fails.
• An administrator is prohibited from deleting his or her own account from Unity Connection Administration.
System Administration Guide
45
Users
Editing User Accounts through BAT

Page 64
• When you delete the account of a user with a voice mailbox, that user is automatically deleted from the
All Voice Mail Users distribution list.
• If the account for a user has a voice mailbox and if the mailbox store for that voice mailbox is disabled
(for example, because the mailbox store is being backed up), the user account cannot be deleted.
• If the user account that you are deleting is for a user who is listed as a caller in a personal call transfer
rule of another user, the user is removed from the rule and no notice is sent to the user who set up the
rule. In addition, if you search for dependencies prior to deleting user accounts, the presence of those
users in personal call transfer rules are not reported.
The behavior is different when Unity Connection or Cisco Business Edition is integrated with an LDAP
directory:
• If Unity Connection is integrated with an LDAP directory, you must delete the user both in the LDAP
directory and in Unity Connection. If you delete the user only in Unity Connection, the LDAP user is
unaffected. If you delete the user only in the LDAP directory, in Unity Connection Administration, the
Status area on the Edit User Basics page for that user indicates that the Unity Connection user is inactive.
The status cannot be changed manually, but after 48 hours, the user is automatically converted to a regular
Unity Connection user, and the message in the Status area no longer appears.
Unity Connection functionality is mostly unaffected by the deletion of an LDAP user. However, if you use
LDAP authentication for Unity Connection web applications or for IMAP access to Unity Connection voice
messages, the user cannot access Unity Connection web applications for the 48 hours after the LDAP user is
deleted and before the Unity Connection user is converted to a regular Unity Connection user. After 48 hours,
you must enter a new web application password for the user in Unity Connection Administration.
• If Cisco Business Edition is integrated with an LDAP directory, you must start by deleting the LDAP
user that corresponds with the Unity Connection user. When Cisco Unified CM data is next synchronized
with the LDAP directory, the user is deleted from the Cisco Unified CM database. When the user no
longer appears in Cisco Unified CM Administration, you can use Unity Connection Administration to
delete the user from the Unity Connection database.
If LDAP synchronization is not enabled and if you do not manually synchronize
Cisco Unified CM data with the LDAP directory, the deletion of an LDAP user
is never replicated to the Cisco Unified CM database, and the corresponding
Unity Connection user cannot be deleted.
Note
See the following procedures:
Deleting User Accounts Manually
Step 1
In Cisco Unity Connection Administration, select Users > Users.
Step 2
On the Search Users page, check the check box next to the user account that you want to delete.
If the user does not appear in the search results table, set the applicable parameters in the search fields at
the top of the page, and select Find.
Note
Step 3
Select Show Dependencies to search for any database objects that have dependencies on the user you want to delete.
System Administration Guide
46
Users
Deleting User Accounts Manually

Page 65
Step 4
From the dependencies search results, follow links to the affected objects and reassign the dependency to another user.
Step 5
Select Tools > Show Dependency Results.
Step 6
On the Show Dependency Results page, select Display Previous Results.
Step 7
Repeat Step 4 through Step 6 until all dependencies have been reassigned.
Step 8
Select Users > Users.
Step 9
On the Search Users page, check the check box next to the user account that you want to delete.
Step 10
Select Delete Selected.
Step 11
In the dialog box that opens, asking you to confirm the deletion, select OK.
You can also use BAT to delete multiple users at the same time. For more information, see the Bulk
Administration Tool, on page 248 section.
Note
Moving or Migrating Users Between Locations in Cisco Unity
Connection
Occasionally, you may need to move one or more user accounts from one Unity Connection server or cluster
to another, for load balancing or other reasons. Or, you may need to migrate many or all of the users from
one server or cluster to another. In this chapter, the server or cluster from which you move users is referred
to as the source location, and the server or cluster to which you move the users is referred to as the target
location.
The information in this chapter is not applicable to Cisco Business Edition.
Note
MovingOneorSeveralUsersBetweenNetworkedUnityConnectionLocations
The information in this section is not applicable to Cisco Business Edition.
Note
To move users with voice mailboxes between Cisco Unity Connection locations (where a location represents
either a server or cluster on the network), you use Cisco Object Backup and Restore Application Suite
(COBRAS) Hot Mode. Hot Mode moves the user profile information and the user mailbox (including all new
and saved voice messages, but not including deleted voice messages, receipts, faxes or email messages) from
the source location to the target location. In the process, information about the moved users is modified on
both the source and target locations, and when replication is complete, all locations in the site or organization
are appropriately updated. To use Hot Mode, both the source and target locations must be running Unity
Connection, and the locations must be networked via intrasite or intersite networking.
Hot Mode is designed to be used on a single user or a small group of users at a time. Compared to COBRAS
Briefcase Mode, Hot Mode has the advantage of preserving relationships between objects (for example, the
private distribution lists of a user and personal call transfer rules that reference the user being moved are
updated automatically to point to the new location). However, Hot Mode moves can be slow. If you need to
System Administration Guide
47
Users
Moving or Migrating Users Between Locations in Cisco Unity Connection

Page 66
move large groups of users or migrate servers and are not concerned about preserving such relationships,
consider using the COBRAS Briefcase Mode method explained in the Migrating Users Between Unity
Connection Locations, on page 48 section. If you are concerned about preserving such relationships, split
large groups of users into small batches when using Hot Mode.
To use Hot Mode, download the latest version of COBRAS, and view training videos and Help at
http://www.ciscounitytools.com/Applications/General/COBRAS/COBRAS.html.
Before moving users, read the COBRAS help file and the COBRAS Hot Mode for Unity Connection to Unity
Connection help file carefully and thoroughly.
Caution
Migrating Users Between Unity Connection Locations
The information in this section is not applicable to Cisco Business Edition.
Note
If the source or target server is running different versions of Unity Connection or if the locations are not
networked via intrasite or intersite networking, you use Briefcase Mode in the Cisco Object Backup and
Restore Application Suite (COBRAS) tool to move users with voice mailboxes. Rather than moving all
pertinent objects from one location to another and cleaning up the original location automatically, Briefcase
Mode requires that you copy information from the source location, remove the objects, and then restore them
on the target location.
When migrating users in Briefcase Mode, you can choose whether to copy the user voice names and voice
messages.
Task List for Migrating Users Using COBRAS Briefcase Mode
Use the following high-level task list to migrate users in Briefcase Mode:
Step 1
Download the latest version of COBRAS, and view training videos and Help at
http://www.ciscounitytools.com/Applications/General/COBRAS/COBRAS.html.
Before migrating users, read the COBRAS help file and the COBRAS Briefcase Mode help file carefully
and thoroughly.
Caution
Step 2
Back up the source and target locations using the Disaster Recovery System. The source backup is not used to restore
data on the target location; you should take back up of each location so you can revert to the previous state of the location
if necessary. For more information, see the Install, Upgrade, and Maintenance Guide Release 15 available at
https://www.cisco.com/c/en/us/td/docs/voice_ip_comm/connection/15/install_upgrade/guide/b_15cuciumg.html.
Step 3
Use COBRAS Briefcase Mode to export the users to be moved from the source location. See the COBRAS Briefcase
Mode help file for instructions.
Step 4
If the source and target locations are connected via any type of networking, delete the users to be moved from the source
location. To delete accounts one at a time, see the Deleting User Accounts, on page 45 section.
If the source and target are connected via any type of networking, it is critical that you delete the users and
verify that the deletion has completed on all networked locations before importing the users on the target
location.
Note
System Administration Guide
48
Users
Migrating Users Between Unity Connection Locations


Page 67
Step 5
Use COBRAS Briefcase Mode to import users on the target location. See the COBRAS Briefcase Mode help file for
instructions.
Step 6
If you did not delete the original user accounts from the source location in Task 4., delete them now. To delete accounts
one at a time, see the Deleting User Accounts, on page 45.
System Administration Guide
49
Users
Task List for Migrating Users Using COBRAS Briefcase Mode
Page 68
System Administration Guide
50
Users
Task List for Migrating Users Using COBRAS Briefcase Mode
Page 69
C H A P T E R 5
Contacts
•
• Introduction, on page 51
• Types of Contacts, on page 51
• Contact Templates, on page 52
• Configuring Contacts, on page 52
• Contact Settings, on page 53
Introduction
Cisco Unity Connection provides a set of tools for administering, monitoring, and troubleshooting the system.
The tools that enable the system administrators to provision the Unity Connection server and provide feature
rich services, such as integrated voice messaging and audio text application for enterprise level businesses.
Types of Contacts
Unity Connection supports the following types of contacts:
• Administrator defined contacts: Administrator defined contacts are the contacts are available to all users.
These contacts can be configured for agents, staff vendors, or contractors that have an external phone
number and need to be reachable from the voice messaging system.
Administrator-defined contacts can be configured for VPIM messaging. These contacts represent users on
other VPIM-compatible voice messaging systems. When contacts have been set up to represent the VPIM
users, Unity Connection users can send and receive messages to and from the VPIM users on the other voice
messaging systems. For more information on VPIM network, see the “Creating VPIM Contacts” section of
the “VPIM Networking” chapter of the Networking Guide for Cisco Unity Connection Release 15 at
https://www.cisco.com/c/en/us/td/docs/voice_ip_comm/connection/15/networking/guide/b_15cucnetx.html.
• User defined contacts: User defined contacts are created by the individual users and are only accessible
to the users who create them. You can create such contacts through Cisco Personal Communications
Assistant. You can also add such contacts to their personal call routing rules, caller groups, and can also
use voice commands to call other contacts.
System Administration Guide
51

Page 70
For more information on how a user can maintain contacts, see the “Managing Your Contacts” chapter of
User Guide for the Cisco Unity Connection Messaging Assistant Web Tool Release 15 available at
https://www.cisco.com/c/en/us/td/docs/voice_ip_comm/connection/15/user/guide/assistant/b_15cucugasst.html.
Contact Templates
Contacts are based on contact templates. Contact Template settings apply to all newly created contacts and
any change in the template thereafter is not reflected in any existing contact.
Unity Connection includes one predefined contact template that you can edit. You can also create new templates
based on your requirements. If Unity Connection has more than one partition defined or is configured for
VPIM networking, you may want to create a contact template for each partition or for each VPIM location.
Configuring Contact Templates
Step 1
In Cisco Unity Connection Administration, expand Templates and select Contact Templates.
The Search Contact Templates page appears displaying the currently configured contact templates.
Step 2
Configure contact templates (For more information on each field, see Help> This Page):
• To add a contact template:
On the Search Contact Templates page, select Add New.
On the New Contact Template page, enter the values of the required fields and select Save.
On the Edit Contact Template Basics page, enter the values of the required fields and select Save.
• To edit an existing contact template:
On the Search Contact Templates page, select the contact template that you want to edit.
On the Edit Contact Template Basics page, enter the values of the required fields and select Save.
• To delete one or more contact templates:
On the Search Contact Templates page, check the check boxes to select the contact templates that you want to delete.
Select Delete Selected and OK to confirm deletion.
Configuring Contacts
You can configure contacts using either of the following methods:
• Configuring Contacts Manually: Allows to manually configure each contact through Search Contacts
page. For information, see the Configuring Contacts Manually, on page 53.
• Configuring Contacts through Bulk Administration Tool (BAT): Allows you to configure multiple
contacts using BAT at the same time. For information, see the Configuring Contacts through Bulk
Administration Tool (BAT), on page 53.
System Administration Guide
52
Contacts
Contact Templates
Page 71
Configuring Contacts Manually
Step 1
In Cisco Unity Connection Administration, expand Contacts and select Contacts.
The Search Contacts page appears displaying the currently configured contacts.
Step 2
Configure contacts in Unity Connection (For more information on each field, see Help> This Page):
• To add a contact:
On the Search Contacts page, select Add New.
On the New Contact page, enter the values of the required fields and select Save.
On the Edit Contact Basics page, enter the values of the required fields and select Save.
• To edit a contact:
On the Search Contacts page, select the contact that you want to edit.
On the Edit Contacts Basics page, select Edit to edit the contact settings and select Save.
• To edit multiple contacts:
On the Search Contacts page, check the check boxes for the contacts you want to edit and then select Bulk Edit.
On the Edit Contact Basics page, enter the values of the required fields and select Submit.
You cannot edit the Alternate Names of multiple contacts using Bulk Edit.
Note
• To delete one or more contacts:
On the Search Contacts page, select the contacts that you want to delete.
Select Delete Selected and OK to confirm deletion.
Configuring Contacts through Bulk Administration Tool (BAT)
BAT allows you to create Cisco Unity Connection contacts from a CSV file. For information on configuring
contacts and constructing CSV file, see the Bulk Administration Tool, on page 248 section.
Contact Settings
Contact settings includes configuring the contacts with alternate names and providing SMTP proxy addresses.
Using Alternate names, contacts can be recognized using voice recognition functionality and setting up SMTP
proxy address enables the IMAP client users to communicate with Unity Connection contacts or VPIM
contacts.
System Administration Guide
53
Contacts
Configuring Contacts Manually
Page 72
Alternate Names
Alternate names are different versions of a name than what is listed in the corporate directory. For example,
if a caller asks Unity Connection to dial “Mary Jameson,” which was the maiden name of Mary Brown, Unity
Connection can reference this information and connect the caller to the correct user.
Alternate names can be created for VPIM contacts, administrator defined contacts, and user defined contacts.You
could also use alternate names to add phonetic spellings of hard to pronounce names. For example, you can
add “Goolay” as an alternate name for the last name “Goulet”.
SMTP Proxy Addresses
Unity Connection uses SMTP proxy addresses to map the recipients of an incoming SMTP message sent from
an IMAP client to the appropriate Unity Connection user or VPIM contact. If users use IMAP clients to send,
reply to, or forward messages to VPIM contacts you should configure each VPIM contact with an SMTP
address.
Unity Connection handles SMTP messages sent to the contacts that are not associated with a VPIM location
according to the option selected for the System Settings > General Configuration > When a Recipient Cannot
Be Found setting.
Note
For example, when Robin Smith, whose email client is configured to access Unity Connection with the email
address robin.smith@example.com, records a voice message in ViewMail for Outlook and sends it to
chris.jones@example.com, Unity Connection searches the list of SMTP proxy addresses for
robin.smith@example.com and chris.jones@example.com. If these addresses are defined as SMTP proxy
addresses for the Unity Connection users Robin Smith and Chris Jones respectively, Unity Connection delivers
the message as a voice message from Robin Smith to Chris Jones.
Step 1
In Cisco Unity Connection Administration, expand Contacts and select Contacts.
The Search Contacts page appears displaying the currently configured contacts.
Step 2
Configure SMTP proxy addresses for contacts (For more information on each field, see Help> This Page):
• To add SMTP proxy address for a contact:
On the Search Contact page, select the contact that you want to edit.
On the Edit Contact Basics page, select Edit> SMTP Proxy Address.
On the SMTP Proxy Addresses page, select Add New.
Enter the SMTP proxy address and select Save.
• To add SMTP proxy addresses for multiple contacts:
On the Search Contact page, select the contacts that you want to edit and then select Bulk Edit.
On the Edit Contact Basics page, select Edit> SMTP Proxy Address.
Enter the SMTP proxy addresses and select Submit.
System Administration Guide
54
Contacts
Alternate Names

Page 73
C H A P T E R 6
System Distribution List
• Introduction, on page 55
• Default System Distribution Lists, on page 55
• Configuring System Distribution Lists, on page 56
• Adding or Removing Distribution List Members, on page 57
• Using Advanced Settings to Enable System Distribution List Access Lists, on page 58
• Enabling Users to Send Messages to a System Distribution List, on page 59
Introduction
System distribution lists enables the users to send or forward voice messages to a group of Cisco Unity
Connection users for example, employees of a team who need the same information on a regular basis can be
members of a system distribution list.
Distribution List can include users, user templates, contacts, contact templates and distribution lists as members
of another distribution list.
Consider an organization with three departments; sales, marketing and admin. Each departments have individual
distribution lists, as Sales DL, Marketing DL, and Admin DL. Also, an organization level distribution list,
Company DL has been created. Sales DL, Marketing DL, and Admin DL are the members of Company DL.
To send a message to all the members of sales team, an authorized user forwards a voice message to Sales
DL. In order to send a message to all the employees of an organization, a user can either send the message to
all three distribution lists or to the Company DL.
Default System Distribution Lists
You can create your own system distribution lists from the default ones included in Unity Connection.
Default System Distribution Lists in Unity Connection
System Administration Guide
55

Page 74
Users that are the members of the Undeliverable Messages list receive either
of the following:
• Messages left by outside callers for recipients with mailboxes that cannot
be located or have deleted, or
• Non-delivery receipts (NDRs) that cannot be delivered to the original
sender of a message.
By default, the UndeliverableMessagesMailbox user is the only member of
the Undeliverable Messages distribution list. You should add a user to the list
to monitor and re-route any messages, if required.
Undeliverable Messages
All the users with mailboxes and the user templates assigned to the voicemail
users are automatically added to the All Voicemail Users list. When the
voicemail users or voicemail user templates are deleted, they are automatically
removed from this list.
The default users, such as operator and messaging system are
not the members of this list.
Note
All Voice Mail Users
By default, the All Voicemail-Enabled Contacts list has no members. You can
add all the VPIM contacts as members of this list to address messages to all
the users of the entire group. You can also add contact templates that are used
to create VPIM contacts to this list. Adding contact templates ensure that the
VPIM contacts further created are automatically added as members of this list.
For information on VPIM, see the Networking, on page 121
chapter.
Note
All Voicemail Enabled
Contacts
Configuring System Distribution Lists
This section includes information on creating a system distribution list in Unity Connection, defining the
settings for the system distribution list, and adding alternate names of the distribution lists.
You can also specify alternate names for the distribution lists if you want to use the voice recognition feature.
The users say the display name using voice commands to address a message to the distribution list over the
phone. For example, the distribution list name for the Technical Support department is IT. You would add
the pronunciation spelling “Eye Tea” as an alternate name. You can also add “Help Desk” as an alternate
name.
You can manage the distribution lists using the Bulk Administration Tool. For more information, see the Bulk
Administration Tool, on page 248 section.
Note
System Administration Guide
56
System Distribution List
Configuring System Distribution Lists

Page 75
The Distribution List Builder tool can be used to add multiple users to a new or existing system distribution
list based on a number of search criteria or by importing from a comma-separated value (CSV) file. Download
the latest version, and view training videos and Help at
http://www.ciscounitytools.com/Applications/CxN/PublicDistributionListBuilder/PublicDistributionListBuilder.html.
Tip
Step 1
In Cisco Unity Connection Administration, expand Distribution Lists and select System Distribution Lists.
The Search Distribution Lists page appears displaying the currently configured distribution lists.
Step 2
Configure system distribution list (For more information on each field, see Help> This Page):
• To add a new distribution list, do the following steps:
On the Search Distribution Lists page, select Add New.
On the New Distribution List page, enter the values of the required fields and select Save.
On the Edit Distribution List Basics page, select Edit> Alternate Name.
On the Edit Alternate Names page, add a new alternate name in the Display Name field and select Add
New. When you have finished adding new alternate names, select Save.
• To edit an existing distribution list, do the following steps:
On the Search Distribution Lists page, select the distribution list that you want to edit.
On the Edit Distribution List Basics page, change the values of the required fields and select Save.
On the Edit Distribution List Basics page, select Edit> Alternate Name.
On the Edit Alternate Names page, change the display name and select Save.
• To edit more than one distribution lists, do the following steps:
On the Search Distribution Lists page, check the check boxes for the distribution lists that you want to
edit and select Bulk Edit.
On the Edit Distribution List Basics page, change the values of the required fields and select Save.
• To delete one or more distribution lists, do the following steps:
On the Search Distribution Lists page, check the check boxes for the distribution lists that you want to
delete and select Delete Selected.
Select OK to confirm deletion.
Adding or Removing Distribution List Members
You can add users, user templates, and other distribution lists as members of a distribution list. You can also
add contacts and contact templates to the All Voicemail-Enabled Contacts distribution list.
When you delete any of the components, such as user or user template, Unity Connection automatically
removes it from the associated distribution list.
System Administration Guide
57
System Distribution List
Adding or Removing Distribution List Members

Page 76
Step 1
In Cisco Unity Connection Administration, expand Distribution Lists and select System Distribution Lists.
The Search Distribution Lists page appears displaying the currently configured distribution lists.
Step 2
On the Search Distribution Lists page, select the distribution list to which you want to add or remove the distribution list
members.
Step 3
On the Edit Distribution List Basics page, select Edit> Distribution List Members.
Step 4
Add or remove the distribution list members (For more information on each field, see Help> This Page):
• To add a distribution list member, select either of the following:
• Add User
• Add User Template
• Add Distribution List
• Add Contact (All Voicemail-Enabled Contacts list only)
• Add Contact Template (All Voicemail-Enabled Contacts list only)
• Check the check boxes of the components that you want to add as distribution list members and select
Add Selected.
• To remove one or more distribution list members from the list, on the Distribution List Members page,
check the check boxes to select the components that you want to remove from the list and then select
Remove Selected.
Using Advanced Settings to Enable System Distribution List
Access Lists
To control which users have access to a distribution list you can also create partitions and search spaces to
manage the users that can send messages to a system distribution list. However, when you have a large number
of lists, the search space approach may not scale well and you may reach the limit on the number of partitions
and search spaces that you can create on the server. As an alternative approach, you can configure advanced
settings that allow you to set up individual access lists for each system distribution list that you want to manage.
A system distribution access list specifies the particular users who can send messages to a distribution list.
If you want to set up an access list for a distribution list with alias allvoicemailusers you enable and create a
system distribution access list with the same alias and a suffix you specified like “allvoicemailusers-accesslist”.
The second distribution list is created with the alias allvoicemailusers-accesslist. You can add the users or
contacts, who need to be able to send messages to allvoicemailusers distribution list, as members of the access
list.
Only a Unity Connection user can be added as a member of system distribution list access list.
Note
System Administration Guide
58
System Distribution List
Using Advanced Settings to Enable System Distribution List Access Lists

Page 77
Do the following tasks to set up system distribution list access lists:
1.
Configure the advanced settings that enable and control the access lists by performing the steps in the
Enable and Configure System Distribution List Access List, on page 59 section. If you are using digital
networking to connect multiple Unity Connection servers, you need to enable and configure distribution
list access list on all of the servers.
In a digital network, the values for the advanced settings that enable and control access lists must be
configured identically on each location in the network in order for access lists to function properly.
2.
For each system distribution list that you want to control with an access list, create a new system distribution
list. With an alias consisting the alias of original list plus a suffix defined in the System Distribution List
Alias Suffix for Access Lists field. For more information, see the Configuring System Distribution Lists,
on page 56 section.
Enable and Configure System Distribution List Access List
Step 1
In Cisco Unity Connection Administration, expand System Settings > Advanced and select Messaging.
Step 2
Check the Use Access Lists to Control Who Can Send to System Distribution Lists check box.
Step 3
Check the Allow Delivery of Messages to System Distribution Lists That Have No Access List check box.
Uncheck this check box to reject all messages sent to system distribution lists that do not have an access list,
and send a Non-Delivery Receipt (NDR) to the message sender.
Note
Step 4
Specify the suffix that is used to distinguish access lists in the System Distribution List Alias Suffix for Access Lists
field and select Save.
Enabling Users to Send Messages to a System Distribution List
The users must be configured to send messages to a distribution list. The default settings in class of service
allow the user to send messages to distribution lists.
Step 1
In Cisco Unity Connection Administration, expand Class of Service and select Class of Service.
The Search Class of Service page appears displaying the currently configured classes of services.
Step 2
On the Search Class of Service page, select the class of service applied to the voicemail users.
Step 3
On the Edit Class of Service page, in the Message Options section, check the Allow Users to Send Messages to System
Distribution Lists check box and select Save.
System Administration Guide
59
System Distribution List
Enable and Configure System Distribution List Access List
Page 78
System Administration Guide
60
System Distribution List
Enabling Users to Send Messages to a System Distribution List
Page 79
C H A P T E R 7
Telephony Integration
•
• Introduction, on page 61
• Phone System, on page 62
• Port, on page 64
• Port Group, on page 66
• Trunk, on page 71
• Speech Connect Port, on page 72
• Audio and Video Format Using Phone, on page 73
• Security, on page 75
• IPv6 in Unity Connection (Cisco Unified Communications Manager Integrations Only), on page 77
Introduction
Telephony Integration is a process that enables the communication between Cisco Unity Connection and the
phone system, providing access to various features such as:
• Calls to a user extension that does not answer are forwarded to the personal greeting of the user.
• Messages left for a user activate the message waiting indicator (MWI) on the extension.
• A user has easy access to messages by pressing a button on the phone and entering a password.
• Calls to a user extension that is busy are forwarded to the busy greeting of the user.
• Unity Connection receives caller ID information from the phone system (if available).
• Unity Connection identifies the user who leaves a message during a forwarded internal call, based on
the extension from which the call originated.
To know more about integrating Unity Connection with phone system, see the “Integrating Cisco Unity
Connection with the Phone System” chapter of Design Guide for Cisco Unity Connection, Release 15, available
at https://www.cisco.com/c/en/us/td/docs/voice_ip_comm/connection/15/design/guide/b_15cucdg.html
After understanding how the Unity Connection integrates with a phone system, you need to configure and
edit the settings for phone system, ports, port group, trunk, and security in Unity Connection.
System Administration Guide
61

Page 80
Phone System
Cisco Unity Connection Administration identify multiple phone systems that integrate Unity Connection with
Cisco Unified Communications Manager. For a matrix of supported combinations, see the Multiple Phone
System Integration Guide for Cisco Unity Connection at
http://www.cisco.com/en/US/products/ps6509/products_installation_and_configuration_guides_list.html.
A phone system has one or more port groups that further have voice messaging ports.
Cisco Business Edition does not support adding or deleting phone system integrations.
Note
Configuring Phone System Integration
The settings for a phone system can be modified after it is integrated with Unity Connection. The phone
system settings identify the phone system with which Unity Connection integrates and regulate certain phone
system features. (Integration configuration settings are located in the port groups that belong to the phone
system.)
You can delete a phone system if it is no longer used by Unity Connection. Before a phone system is deleted,
make sure to delete or reassign all of the following objects that are associated with the phone system to another
phone system:
• All users (including MWI devices and notification devices)
• All user templates
• All systems
• All call handler templates
Step 1
In Cisco Unity Connection Administration, expand Telephony Integrations and select Phone System.
The Search Phone System page displays the currently configured phone system integrations.
The port count is zero for the newly configured phone systems. After adding ports to the specific phone
system, the port count shows the number of available voice ports.
Note
Step 2
Configure a phone system (For more information on each field, see Help> This Page):
• To create a new phone system, select Add New. On the New Phone System page, enter the values of the
required fields and select Save.
• To edit a phone system, select the phone system. On the Phone System Basics page, select Edit and
change any of the following settings:
• Phone System Basics. See Phone System Basics, on page 63.
• Cisco Unified Communications Manager AXL Servers. See Cisco Unified Communications Manager
AXL Servers, on page 63.
• Phone System Associations. See Phone System Associations, on page 64.
After editing the settings, select Save.
System Administration Guide
62
Telephony Integration
Phone System

Page 81
• To delete a phone system, check the check box adjacent to the display name of the phone system that
you want to delete. Select Delete Selected and OK to confirm deletion.
Phone System Settings
Phone System Basics
• If you created the phone system integration to use the same voice messaging port to turn on and off an
MWI the Use Same Port for Enabling and Disabling MWIs check box is checked. You can disable this
configuration without leaving MWIs on when there are no voice messages for the user by un checking
the Use Same Port for Enabling and Disabling MWIs and Force All MWIs Off for This Phone System
check boxes.
• If you want to synchronize all the MWIs for a phone system without affecting MWIs on other phone
systems, select Run in front of Synchronize All MWIs on This Phone System option.
• If you want to change the call loop detection settings to enable or disable the types of calls that are
checked, set the applicable settings in Call Loop Detection Using DTMF and select Save.
Call loop occurs when the forwarded Unity Connection calls (for example, to
notify a user that a message has been received) sometimes return back to Unity
Connection.
Note
Cisco Unified Communications Manager AXL Servers
AXL servers are supported only for Cisco Unified CM phone systems and are needed when Unity Connection
must have access to the Cisco Unified CM database for:
• Importing Cisco Unified CM users (In a Unity Connection cluster configuration, you must be signed in
to the publisher server to import Cisco Unified CM user data).
• Changing certain phone settings for users of Unity Connection personal call transfer rules.
Cisco Unified Communications Manager
Cisco Unity
Connection
11.x
10.x
9.x
8.x
version
No
Yes
Yes
Yes
8.x
No
Yes
Yes
Yes
9.x1
No
Yes
Yes
Yes
10.x
Yes
Yes
Yes
Yes
11.x
1 Unity Connection 9.1(2) SU4 and later supports all the versions of Cisco Unified CM for AXL server
integration.
System Administration Guide
63
Telephony Integration
Phone System Settings

Page 82
AXL servers are not supported for Cisco Unified Communications Manager Express integrations or Cisco
Business Edition.
Note
Configuring an AXL Server in Unity Connection
Step 1
In Cisco Unity Connection Administration, expand Telephony Integrations and select Phone System .
On the Phone Systems Basics page of the selected Cisco Unified CM phone system, in the Edit menu, select Cisco Unified
Communications Manager AXL Servers.
Step 2
Configure an AXL server (For more information on each field, see Help> This Page):
• To add an AXL server:
On the Edit AXL Servers page, in the AXL Servers field, select Add New. Enter the values of the required fields
and select Save.
Make sure that the username entered on Edit AXL Server page must match the username of a Cisco
Unified CM application user who is assigned to the "Standard AXL API Access" role. Also, the password
must match the password of the Cisco Unified CM application username.
Note
• To add a corresponding application server in Cisco Unified CM:
a.
Sign in to Cisco Unified CM Administration, expand System and select Application Server.
b.
On the Find and List Application Servers page, select Find to display all application servers .
c.
In the Name column, select the name of the Unity Connection server.
d. On the Application Server Configuration page, in the Available Application User field, select the Cisco Unified
CM application user and move it to the Selected Application User field. Select Save.
• To edit an AXL server integration:
On the Edit AXL Servers page, select the AXL server that you want to edit. Enter the values of the required fields
and select Save.
• To delete an AXL server:
On the Edit AXL Servers page, in AXL Servers field, check the check box next to the AXL server that you want to
delete. Select Delete Selected and OK to confirm deletion .
Phone System Associations
You can view the list of all Unity Connection users associated with the phone system by selecting the Phone
System Associations option on the Edit menu of Phone System Basics page.
Port
The voice messaging ports allow Unity Connection to receive calls (for example, to record a message) and
make calls (for example to send message notifications or to set MWIs).
System Administration Guide
64
Telephony Integration
Configuring an AXL Server in Unity Connection

Page 83
Each voice messaging port belongs to only one port group. Port groups have their own voice messaging ports.
Ports are no longer licensed in the Unity Connection server. The ports are now configurable as per the hardware
of the server deployed for installing Unity Connection.
Note
Configuring Ports
Voice messaging ports provide the connections for calls between Unity Connection and the phone system.
You can add voice messaging ports after the phone system has been created.
Cisco Business Edition only: Before you add ports, you must have existing voice messaging ports in Cisco
Unified CM Administration that do not belong to a port group.
This section includes information on configuring a port group for Unity Connection, define the settings for
the ports, and save them.
Step 1
In Cisco Unity Connection Administration, expand Telephony Integrations and select Port.
The Search Ports page displays the currently configured ports.
Step 2
Configure ports (For more information on each field, see Help> This Page):
• To add a port:
On the Search Ports page, select Add New.
On the New Port page, enter the values of the required settings and select Save.
In Cisco Unity Connection Administration, in the Related Links list, select Check Telephony
Configuration, and select Go to confirm the phone system integration settings.
If the test is not successful, the Task Execution Results list displays one or more messages with
troubleshooting steps. After correcting the problems, check the configuration again.
Verify that there are appropriate number of ports set to answer calls and an appropriate number of ports
are set to dial out otherwise the integration may not function correctly. See the “Usage of Voicemail
Ports in Cisco Unity Connection” section of the applicable Cisco Unity Connection integration guide at
http://www.cisco.com/en/US/products/ps6509/products_installation_and_configuration_guides_list.html.
• To edit an existing port:
On the Search Ports page, select a port that you want to edit.
On the Port Basics page, enter the values of the required fields and select Save.
• To delete one or more ports:
On the Search Ports page, check the check box next to the voice messaging ports that you want to delete.
Select Delete Selected and OK to confirm deletion.
System Administration Guide
65
Telephony Integration
Configuring Ports

Page 84
Viewing the Port Certificate
Port certificates for voice messaging ports are used only by SCCP integrations with Cisco Unified
Communications Manager 6.x and later and are required for authentication of the Unity Connection voice
messaging ports. You can view the port certificate that helps in troubleshooting authentication and encryption
problems.
Step 1
In Cisco Unity Connection Administration, expand Telephony Integrations and select Port.
Step 2
On the Search Ports page, select the display name of the voice messaging port for which you want to see the device
certificate.
Step 3
On the Port Basics page, select View Certificate.
Step 4
In the View Port Certificate window, the information from the port device certificate is displayed.
Port Group
Port Groups are assigned voice messaging ports that define Unity Connection integration configuration settings.
Most of the phone system integrations need only one port group. However, you may need multiple port groups
in the following scenarios:
• For integration with phone systems through PIMG/TIMG units, each PIMG/TIMG unit is connected to
one port group with the applicable voice messaging ports. For example, a system that uses five PIMG
units requires five port groups, one port group for each PIMG unit.
• For integrations with other phone systems, an additional port group with its own voice messaging ports
may be used for testing a new configuration or for troubleshooting.
Cisco Business Edition only: Before you can add a port group, you must have the existing voice messaging
ports in Cisco Unified CM Administration, which do not belong to a port group.
You can create a maximum of 90 port groups if you are using only TUI (touchtone conversation) and VUI
(voice-recognition) features of Unity Connection. However, if you are using all the features of Unity Connection,
you are allowed to create a maximum of 60 port groups.
Note
You can change the settings of a port group, which affects only the voice messaging ports of that port group.
When you delete a port group, any voice messaging port belonging to that port group are deleted at the same
time. However, the phone system to which the port group belongs is not deleted.
Configuring Port Group
This section includes information on configuring a port group for Unity Connection, define the settings of
the port group, and save them.
Step 1
In Cisco Unity Connection Administration, expand Telephony Integrations and select Port Group.
System Administration Guide
66
Telephony Integration
Viewing the Port Certificate

Page 85
The Search Port Groups page displays the currently configured port groups.
Step 2
Configure port groups (For more information on each field, see Help> This Page):
• To add a port group:
On the Search Port Groups page, select Add New.
On the New Port Group page, enter the values of the required fields and select Save.
• To edit a port group:
On the Search Port Groups page, select the port group name that you want to edit.
On the Port Group Basics page, select Edit and change any of the following settings:
• Port Group Basics. For information, see Phone System Basics, on page 63.
• Servers. For information, see Servers, on page 68.
• Advanced Settings. For information, see Advanced Settings, on page 70.
• Codec Advertising. For information, see Codec Advertising, on page 71.
Select Save after editing the settings.
• To delete a port group:
On the Search Port Groups page, check the check box next to the port group name of the port groups
that you want to delete.
Select Delete Selected and OK to confirm deletion.
Port Group Settings
You can change the settings of a port group after it has been added. Changes to the settings affect only the
voice messaging ports that belong to the port group.
Port Group Basics
Message Waiting Indicators (MWI)
An MWI is a flashing LCD panel or special dial tone on user phones, which allows the user to know that a
voice message is waiting. The type of indicator depends on the phone system and the user phones. Phone
systems that support message counts may also display the number of messages that the user has.
To change the MWI settings, on the Port Group Basics page of a selected port group, change the applicable
settings in Message Waiting Indicator Settings and select Save.
Session Initiation Protocol (SIP) Settings
You can change the SIP settings after the phone system integration has been created.
Cisco Business Edition does not support phone system integrations that use SIP.
Note
System Administration Guide
67
Telephony Integration
Port Group Settings

Page 86
To change the SIP settings, on the Port Group Basics page of a selected port group, change the applicable
settings in Session Initiation Protocol (SIP) Settings and select Save.
Servers
Cisco Unified Communications Manager Servers
For Cisco Unified Communications Manager integrations, Related Links helps you to integrate with one Cisco
Unified CM server only. The secondary Cisco Unified CM server in the cluster must be added after the
integration is completed. You can change the Cisco Unified CM server settings after the server has been
added.
You can delete a Cisco Unified Communications Manager server when it is no longer used by the phone
system integration. If you want to move a Cisco Unified CM server to another port group, you must delete
the Cisco Unified CM server from one port group and add it to the second port group.
Cisco Business Edition does not support adding or deleting secondary Cisco Unified CM servers.
Note
Configuring Cisco Unified Communications Manager Server
Step 1
In Cisco Unity Connection Administration, expand Telephony Integrations and select Port Group.
The Search Port Groups page displays the currently configured Cisco Unified CM servers. On the Port Group Basics
page of a selected port group, select Edit and select Servers.
Step 2
Configure a Cisco Unified Communications Manager Server (For information on each field, see Help> This Page):
• To add a secondary Cisco Unified CM server, on the Edit Servers page, in the Cisco Unified Communications
Manager Servers list, select Add. Enter the values of the required fields and select Save.
• To edit a Cisco Unified CM server, on the Edit Servers page, in Cisco Unified Communications Manager Servers,
enter the values of the required fields and select Save.
• To delete a Cisco Unified CM server, in Cisco Unified Communications Manager Servers, check the check box next
to the Cisco Unified CM servers that you want to delete. Select Delete Selected and OK to confirm the deletion.
TFTP Servers
For Cisco Unified Communications Manager integrations, TFTP servers are required only when the Cisco
Unified CM cluster uses authentication and encryption for the Unity Connection voice messaging ports. You
must add a TFTP server after you create the Cisco Unified CM phone system integration.
You can change the TFTP server settings after the server has been added. You can also delete a TFTP server
when it is no longer used by the port group.
Configuring a TFTP Server in Unity Connection
1.
System Administration Guide
68
Telephony Integration
Servers

Page 87
Step 1
In Cisco Unity Connection Administration, expand Telephony Integrations and select Port Group.
The Search Port Groups page displays the currently configured TFTP servers.On the Port Group Basics page of a selected
port group, select Edit> Servers.
Step 2
Configure a TFTP server (For more information on each field, see Help> This Page):
• To add a TFTP server:
On the Edit Servers page, in the TFTP Servers field, select Add.
Enter the values of the required fields and select Save.
• To edit a TFTP server:
On the Edit Servers page, in TFTP Servers, enter the values of the required fields and select Save.
• To delete a TFTP server:
• On the Edit Servers page, in TFTP Servers, check the checkbox next to the TFTP server that you want to delete.
• Select Delete Selected and OK to confirm the deletion.
SIP Server
For a phone system integration with Cisco Unified Communications Manager through a SIP trunk or with
another SIP server, you can add SIP server after the phone system has been created. You can change the SIP
server settings after the server has been added. A SIP server can be deleted if it is no longer used by a port
group.
Cisco Business Edition does not support SIP servers.
Note
Configuring a SIP Server
Step 1
In Cisco Unity Connection Administration, expand Telephony Integrations and select Port Group.
The Search Port Groups page displays the currently configured SIP servers.On the Port Group Basics page of a selected
port group, select Edit and then select Servers.
Step 2
Configure a SIP server (For more information on each field, see Help> This Page):
• To add a SIP server:
a.
On the Edit Servers page, in the SIP Servers field, select Add.
b.
Enter the values of the required fields and select Save.
• To edit a SIP server:
a.
On the Edit Servers page, in the SIP Servers field, select the SIP server you want to edit.
b.
Change the values of the required fields and select Save.
• To delete a SIP server:
System Administration Guide
69
Telephony Integration
SIP Server

Page 88
a.
On the Edit Servers page, in the SIP Servers field, check the check box next to the SIP server that you want to
delete.
b.
Select
Delete Selected
and
OK to confirm deletion.
PIMG/TIMG Units
If the phone systems are integrated through PIMG/TIMG units, each PIMG/TIMG unit is created in a separate
port group. You can add, change, or delete PIMG/TIMG units after the phone system integration has been
created.
In Unity Connection, integration with multiple phone systems is supported only with Cisco Business Edition
6000/7000.
Note
Configuring PIMG/TIMG Units
Step 1
In Cisco Unity Connection Administration, expand Telephony Integrations and select Port Group.
The Search Port Groups page displays the currently configured PIMG/ TIMG units.
Step 2
Configure a PIMG/TIMG unit (For more information on each field, see Help> This Page):
• To add a PIMG/TIMG unit, in Port Group Search Results, select Add New. On the New Port Group page, in the
Phone System field, select the phone system for which you want to add a PIMG/TIMG unit. Enter the applicable
settings and select Save.
• To edit a PIMG/TIMG unit, select the display name of the port group for which you want to change PIMG/TIMG
settings. On the Port Group Basics page, in PIMG Settings, enter the applicable settings and select Save.
• To delete a PIMG/TMG unit, in Port Group Search Results, check the check box next to the port group for the
PIMG/TIMG unit that you want to delete. Select Delete Selected and then select OK to confirm deletion.
Advanced Settings
The port group advanced settings control the settings that are not often used, such as delays and MWI usage.
Do not change the default values of port group advanced settings.
Normalization controls automatic volume adjustments for recording messages. For enabling or disabling
normalization, make sure to leave normalization enabled and do not change the value of the Target Decibel
Level for Recordings and Messages field in System Settings > General Configuration.
System Administration Guide
70
Telephony Integration
PIMG/TIMG Units

Page 89
Editing Port Group Advanced Settings
Step 1
In Cisco Unity Connection Administration, expand Telephony Integrations, and then select Port Group.
On the Search Port Groups page, select the display name of the port group for which you want to change the advanced
settings.
Step 2
On the Port Group Basics page, on the Edit menu, select Advanced Settings and do the following:
• To edit a port group, change the applicable settings in Port Group Advanced Settings and select Save.
• To enable or disable normalization, change the applicable settings in Audio Normalization for Recordings and
Messages and select Save.
Codec Advertising
For calls, Unity Connection advertises the audio or video format (or codec) that is preferred for the media
stream with the phone system.
For the following reasons, Unity Connection should use the same audio or video format for the media stream
that the phone system uses:
• To reduce the need for transcoding the media stream from one audio or video format to another.
• To minimize the performance impact on the Unity Connection server and on the phone system.
• To preserve the audio or video quality of calls.
When Unity Connection advertises a different audio or video format other than the one used by the phone
system, the phone system transcodes the media stream.
Changing the Audio or Video Format Used for Calls
Step 1
In Cisco Unity Connection Administration, expand Telephony Integrations, and then select Port Group.
Step 2
On the Search Port Groups page, select the port group that belongs to the phone system integration for which you want
to change the audio or video format of the media stream.
Step 3
On the Port Group Basics page, select Edit, and then select Codec Advertising.
Step 4
On the Edit Codec Advertising page, select the Up and Down arrows to move the codec between the Advertised Codec
box and the Unadvertised Codecs box, and then select Save.
Step 5
(Only SIP integrations) If you want to change the packet size that is used by the advertised codecs, select the applicable
packet setting for each codec in the Packet Size list, and then select Save.
Trunk
When multiple phone systems are integrated with Cisco Unity Connection, you can configure a phone system
trunk so that calls on one phone system can be transferred to extensions on another phone system. Phone
system trunks are accessed by dialing extra digits (for example, dialing 9) before dialing the extension.
System Administration Guide
71
Telephony Integration
Editing Port Group Advanced Settings
Page 90
Cisco Business Edition does not support phone system trunks.
Note
Configuring Trunk
If another phone system integration exists, you can add a phone system trunk to provide access of calls from
one phone system to extensions on the other phone system. You can add phone system trunks after the phone
system integration has been created.
Phone system trunk settings cannot be changed. However, you can delete the phone system trunk that you
want to change and add a new phone system trunk with the settings that you want. A phone system trunk can
be deleted when it is no longer used by a phone system integration.
Step 1
In Cisco Unity Connection Administration, expand Telephony Integrations, and then select Trunk.
The Search Phone System Trunks page displays the currently configured phone system trunks.
Step 2
Configure a phone system trunk (For information on each field, see Help> This Page):
a)
To add a new phone system trunk, in Phone System Trunk Search Results, select Add New. On the New Phone
System Trunk page, enter the applicable settings and select Save.
b) To delete a phone system trunk, in Phone System Trunk Search Results, check the check box next to the phone system
trunk that you want to delete. Select Delete Selected. Select OK to confirm deletion.
Speech Connect Port
Speech Connect uses voice-enabled directory handlers that allow both the employees and outside callers to
speak the name of an employee and instantly get connected, without navigating to an audio-text tree, and
without knowing the extension of the employee. For easy access, you can configure a Speech Connect speed
dial on user phones.
Speech Connect port can be configured as per the hardware profile of the virtual machine deployed for installing
Unity Connection.
By default Unity Connection provide two system generated Speech Connect ports. These ports are not mapped
to actual licenses. To use Speech Connect Port functionality properly, you must install proper licenses on
Prime License Manager. For more information on the Licenses, see "Managing Licenses" chapter of the Install,
Upgrade, and Maintenance Guide for Cisco Unity Connection Release 15https://www.cisco.com/c/en/us/td/
docs/voice_ip_comm/connection/15/install_upgrade/guide/b_15cuciumg.html available at
Note
Configuring a Speech Connect Port
Step 1
In Cisco Unity Connection Administration, expand Telephony Integrations, and then select Speech Connect Port.
System Administration Guide
72
Telephony Integration
Configuring Trunk

Page 91
The Speech Connect Port Configuration page displays the currently configured speech connect ports.
Step 2
In New Speech Connect Port, select the Unity Connection server from the Server drop down list and in the Number of
Ports field, enter the number of Speech Connect ports that you want to configure.
Step 3
Select Save.
Audio and Video Format Using Phone
Cisco Unity Connection advertises the audio format (or codec) that is preferred for the media stream with the
phone system.
Consider the following when setting the audio format:
• When Unity Connection advertises a different audio format than the one used by the phone system, the
phone system transcodes the media stream.
• Unity Connection should use the same audio format for the media stream that the phone system uses for
the following reasons:
• To reduce the need for transcoding the media stream from one audio format to another.
• To minimize the performance impact on the Unity Connection server and on the phone system.
• To preserve the audio quality of the calls.
For more information on audio format codecs, see the “Audio Codecs” section in the “Sizing and Scaling
Cisco Unity Connection Servers” chapter of the Design Guide for Cisco Unity Connection available at,
https://www.cisco.com/c/en/us/td/docs/voice_ip_comm/connection/15/design/guide/b_15cucdg.html.
Configuring the Audio and Video Format
Step 1
In Cisco Unity Connection Administration, expand Telephony Integrations, and then select Port Group.
Step 2
On the Search Port Groups page, select the port group that belongs to the phone system integration for which you want
to change the audio format of the media stream.
Step 3
On the Port Group Basics page, on the Edit menu, select Codec Advertising.
Step 4
On the Edit Codec Advertising page, select the Up and Down arrows to change the order of the codecs or to move codecs
between the Advertised Codec box and the Unadvertised Codecs box.
If only one codec is in the Advertised Codecs box, Cisco Unity Connection sends the media stream in that audio format.
The phone system transcodes if it does not use this audio format.
If two or more codecs are in the Advertised Codecs box, Unity Connection advertises its preference for the first codec
in the list. It sends the media stream in the audio format from the list that the phone system selects.
Step 5
Select Save.
Step 6
(All integrations except SCCP) If you want to change the packet size that is used by the advertised codecs, on the Port
Group Basics page, under Advertised Codec Settings, select the applicable packet setting for each codec in the Packet
Size list, and select Save.
System Administration Guide
73
Telephony Integration
Audio and Video Format Using Phone
Page 92
Step 7
(Only SIP integrations) If you want to change the packet size that is used by the advertised codecs, on the Port Group
Basics page, under Advertised Codec Settings, select the applicable packet setting for each codec in the Packet Size list,
and select Save.
For both the audio and video calls, change the packet size for the codecs G711, G729, and G722 in Cisco Unified
Communications Manager and the remaining codecs is changed in Cisco Unity Connection Administration.
In SIP integration, you can also send comfort noise packets through telephony. For information on how to
send comfort noise packets, see Configuring Unity Connection to Send Comfort Noise Packets every second
during Record section.
Note
Step 8
On the Port Group menu, select Search Port Groups.
Step 9
Repeat Step 2 through Step 8 for all remaining port groups that belong to the phone system integration for which you
want to change the audio format of the media stream.
Configuring Unity Connection to Send Comfort Noise Packets every second during Record
In SIP integration, you can configure Unity Connection to send comfort noise packets through telephony
interface. Do the following procedure for configuring Unity Connection to send comfort noise packets:
Step 1
In Cisco Unity Connection Administration, navigate System Settings > Advanced > Telephony. On the Telephony
Configuration page, check the Vad Enabled check box.
By default, VAD is enabled on the system.
Note
Step 2
Execute below CLI command:
run cuc dbquery unitydirdb execute procedure
csp_configurationmodify(pfullname='System.Mixer.EnableSendSIDPacketsDuringRecord',pvaluebool=1)
Step 3
Restart Connection Mixer service for the changes to take effect.
It is recommended to peform the given steps during off peak hours as it require restart of a "Connection Mixer"
critical service.
Caution
• In case of a cluster, execute CLI command only on publisher server and make sure that database replication
is working fine for the cluster.
• Restart the Connection Mixer service on both the nodes.
Note
System Administration Guide
74
Telephony Integration
Configuring Unity Connection to Send Comfort Noise Packets every second during Record


Page 93
Configuring Unity Connection to clean up Inactive Calls caused by Phone
Inactivity
Cisco Unity Connection can be configured to clean up the inactive call after five minutes of phone inactivity
to conserve resources.
Enabling this configuration helps prevent the ports from congestion by performing call cleanup for inactive
and unresponsive endpoints. It also reduces the frequency of ICMP floods caused by such endpoints . Do the
following procedure for configuring Unity Connection to activate this behavior :
Step 1
The configuration is disabled by default. To enable it, execute the following CLI command :
run cuc dbquery unitydirdb execute procedure
csp_configurationmodify(pfullname='System.Mixer.EnableEpInactivityDetection',pvaluebool=1)
Step 2
Restart the Connection Mixer service for the changes to take effect.
It is recommended to perform the given steps during off hours as it require restart of a Connection Mixer
service.
Caution
• In case of a cluster, execute CLI command only on publisher node and make sure that database replication
is working fine for the cluster.
• Restart the Connection Mixer service on both the nodes of cluster.
Note
Security
Certificates and security profile can be managed when Cisco Unified Communications Manager authentication
and encryption is configured for Unity Connection voice messaging ports.
Viewing and Saving Unity Connection Root Certificate
The root certificate is used by SCCP integrations with Cisco Unified Communications Manager 7.x and later
and SIP trunk integrations with Cisco Unified CM 7.0 and later. It is required for authentication of the Unity
Connection voice messaging ports. You can view the root certificate that helps in troubleshooting authentication
and encryption problems.
Viewing and Save the Unity Connection Root Certificate
Step 1
In Cisco Unity Connection Administration, expand Telephony Integrations > Security, and then select Root Certificate.
Step 2
To view the root certificate, on the View Root Certificate page, the information from the root certificate is displayed.
System Administration Guide
75
Telephony Integration
Configuring Unity Connection to clean up Inactive Calls caused by Phone Inactivity


Page 94
Step 3
To save the root certificate as a file, on the View Root Certificate page, right-click the Right-Click to Save the Certificate
as a File link, and select Save Target As.
a)
In the Save As dialog box, browse to the location where you want to save the Unity Connection root certificate as a
file and in the File Name field, confirm that the extension is .pem (rather than .htm) for Cisco Unified CM 5.x or
later. Select Save.
The certificate must be saved as a file with the correct extension otherwise Cisco Unified CM does not
recognize the certificate.
Caution
b) In the Download Complete dialog box, select Close. The Unity Connection root certificate file is ready to be copied
to all Cisco Unified CM servers in this Cisco Unified CM phone system integration. For instructions, see the applicable
Cisco Unified CM integration guide at
http://www.cisco.com/en/US/products/ps6509/products_installation_and_configuration_guides_list.html.
Configuring a SIP Security Profile (Cisco Unified Communications Manager
SIP Trunk Integrations Only)
The SIP security profile is used only by SIP trunk integrations with Cisco Unified CM 7.0 and later, and is
required for authentication of the Unity Connection voice messaging ports. You can change a SIP security
profile after it is created. You can delete a SIP security profile when the Cisco Unified CM server is no longer
configured for authentication of the Unity Connection voice messaging ports.
Adding a SIP Security Profile (Cisco Unified Communications Manager SIP Trunk Integrations
Only
Step 1
In Cisco Unity Connection Administration, expand Telephony Integrations > Security, and then select SIP Security
Profile.
The Search SIP Security Profiles page displays the currently configured SIP security profiles.
Step 2
Configure a SIP security profile (For information, see Help> This Page):
• To add a SIP security profile:
On the Search SIP Security Profiles page, select Add New.
On the New SIP Security Profile page, in the Port field, enter the port number that the Cisco Unified CM server uses
for SIP trunk authentication and encryption of the voice messaging ports.
To encrypt the call signaling messages, check the Do TLS check box and select Save.
• To edit a SIP security profile:
On the Search SIP Security Profiles page, select the name of the SIP security profile that you want to edit.
On the Edit SIP Security Profile page, enter the applicable settings and select Save.
• To delete a SIP security profile:
On the Search SIP Security Profiles page, check the check box next to the display name of the SIP security profile
that you want to delete.
System Administration Guide
76
Telephony Integration
Configuring a SIP Security Profile (Cisco Unified Communications Manager SIP Trunk Integrations Only)
Page 95
Select Delete Selected and then select OK.
IPv6 in Unity Connection (Cisco Unified Communications
Manager Integrations Only)
Unity Connection supports IPv6 addressing with Cisco Unified Communications Manager phone system
integrations using SCCP or SIP:
• IPv6 support is disabled by default. When you enable IPv6, you can configure Unity Connection to obtain
an IPv6 address either through router advertisement, through DHCP, or by manually configuring an
address. You can also configure the mode in which Unity Connection listens for incoming traffic—IPv4,
IPv6, or both IPv4 and IPv6.
• For SCCP integrations with Cisco Unified CM, if Unity Connection is configured to listen for the incoming
IPv4 and IPv6 traffic, you can configure the addressing mode that Unity Connection uses for call control
signaling for each port group to use either IPv4 or IPv6. (This mode is also used when connecting to a
TFTP server.)
• For SIP integrations with Cisco Unified CM, if Unity Connection is configured to listen for the incoming
IPv4 and IPv6 traffic, you can configure the addressing mode that Unity Connection uses for call control
signaling for each port group to use either IPv4 or IPv6. (This mode is also used when connecting to a
TFTP server.) In addition, you can configure the addressing mode that Unity Connection uses for media
for each port group to use either IPv4 or IPv6.
For instructions on enabling and configuring IPv6 for an existing Cisco Unified CM integration, see the
“Upgrading Cisco Unity Connection” chapter in Install, Upgrade, and Maintenance Guide for Cisco Unity
Connection, Release 15, available at https://www.cisco.com/c/en/us/td/docs/voice_ip_comm/connection/15/
install_upgrade/guide/b_15cuciumg.html.
For instructions on enabling and configuring IPv6 while setting up a new Cisco Unified CM integration, see
the applicable Cisco Unified CM integration guide at
http://www.cisco.com/en/US/products/ps6509/products_installation_and_configuration_guides_list.html.
System Administration Guide
77
Telephony Integration
IPv6 in Unity Connection (Cisco Unified Communications Manager Integrations Only)
Page 96
System Administration Guide
78
Telephony Integration
IPv6 in Unity Connection (Cisco Unified Communications Manager Integrations Only)
Page 97
C H A P T E R 8
Call Management
•
• Call Management Elements, on page 79
• Call Management Plan, on page 80
• System Call Handlers, on page 81
• Directory Handlers, on page 87
• Interview Handlers, on page 89
• Dial Plan, on page 90
• Call Routing, on page 96
• Restriction Tables, on page 99
• Schedules, on page 103
• Holiday Schedules, on page 105
• Custom Recordings, on page 106
• Default Automated Attendant Behavior, on page 107
Call Management Elements
Call Management in Cisco Unity Connection is combination of different call management elements that can
be used to customize how your system handles the calls and collect input from callers.
Unity Connection provides the following elements for managing incoming and outgoing calls:
Usage
Components
Answer calls and take messages; provide menus of options (for example, “For
customer service press 1, for sales press 2...”); route calls to the users and other
call handlers; and play audiotext (prerecorded information).
Call Handlers
Provide access to a corporate directory by playing an audio list that users and
outside callers use to reach a users and leave messages.
Directory Handlers
Collect information from callers by playing a series of questions and then
recording the answers.
Interview Handlers
System Administration Guide
79

Page 98
Allow you to define how calls are initially routed, based on criteria such as the
phone number of the caller and the schedule. When you have set up call handlers,
interview handlers, directory handlers, and extensions for users, you can route
the calls to the applicable person or handler by editing the call routing tables.
Call Routing Tables
Control outgoing calls by allowing you to specify the numbers that Unity
Connection can dial for transferring calls, for notifying users of messages, and
for delivering faxes.
Restriction Tables
Define business, nonbusiness, and holiday hours for the organization for the
purpose of controlling which set of call routing rules, greetings, or transfer options
is currently active.
Schedules and Holidays
All of these elements can be used as building blocks. You can use or customize the default objects in Unity
Connection, or add new objects and combine them to create the caller experience.
Call Management Plan
Call management plan shows how the handlers connect to one another, include a menu of one-key dialing
options and all possible navigation choices (such as reaching a call handler by dialing an extension or via a
routing rule). You can also include the predefined Unity Connection call handlers in your plan.
Creating a Call Management Plan
When you have considered how your call management plan ought to work, you can create a sketch to connect
the handlers.
The figure below shows a sample call management map that makes use of the automated attendant.
System Administration Guide
80
Call Management
Call Management Plan
Page 99
Implementing a Call Management Plan
After you map your plan, write detailed scripts for the greeting of each call handler that is used during the
recording session.
When you are ready to set up your system of call handlers, first create the call handlers to which the calls are
routed. You select these “destination” call handlers when you create the call handlers that route calls to them.
Before creating the call handlers, you also need to create accounts for the users to which call handlers transfer
the calls.
Using above figure as an example, you first create a user account for Kelly Bader, and the handlers for Place
an Order, Order Status, and Job Listings. Then you create the handlers for the Order Department and Human
Resources.
In addition to mapping call handlers, you also need to plan call routing tables. The above figure, for example,
all new call handlers are reached through the Opening Greeting. You can also assign extensions to some of
your call handlers and to route incoming calls to those extensions using a call routing table.
System Call Handlers
Call handlers are used to answer calls, greet callers with recorded prompts and provide them with information
and options, route calls, and take messages. You can use the predefined Unity Connection call handlers, or
can create unlimited new call handlers.
Each call handler that you add in Unity Connection is based on a template known as Call Handler Template.
System Administration Guide
81
Call Management
Implementing a Call Management Plan
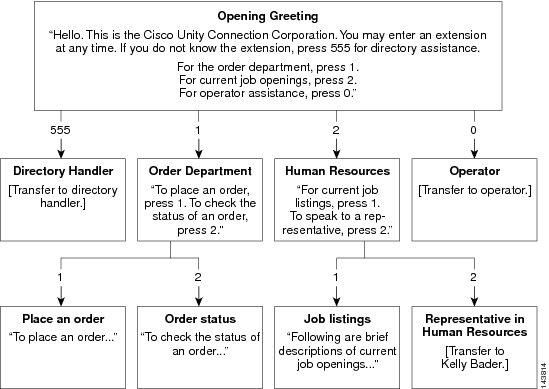
Page 100
You may want to use call handlers in the following ways:
• As an automated attendant—A call handler can be used in place of a human operator to answer and direct
calls by playing greetings and responding to key presses. The automated attendant can provide a menu
of options (for example, “For Sales, press 1; for Service, press 2; for our business hours, press 3.”).
• To offer prerecorded audiotext—A call handler can be used to provide information that customers request
frequently (for example, “Our normal business hours are Monday through Friday, 8 a.m. to 5 p.m.”), or
to play a prerecorded message that all callers hear before they can interact with the system.
• As a message recipient—A call handler can be used to take messages for the organization (for example,
“All of our customer service representatives are busy. Please state your name, phone number, and account
number, this returns your call as soon as possible.”).
• To transfer calls—A call handler can be used to route callers to a user (for example, after hours, you
could transfer calls that come to a technical support call handler directly to the mobile phone of the person
who is on call), or to another call handler.
Unity Connection supports 40,000 system call handlers.
Note
Call Handler Templates
Each call handler that you add in Unity Connection is based on a template. Settings from the template are
applied as when you create a call handler. Unity Connection includes predefined templates that you can edit.
You can also create additional call handler templates.
For each template, you should consider enabling the transfer, caller input, greetings, and message settings
that is needed for the call handlers that you create.
If you change settings on a call handler template, the new settings are in effect only for new call handlers that
are created using that template.
Note
Deleting a call handler template does not affect any call handlers that were based on that template when they
were created.
Default Call Handler Templates
Unity Connection has one default call handler template that has settings suitable for most call handlers. You
can edit the default call handler template but cannot delete it.
The settings on this template are suitable for most call handlers.
System Call Handler
Template
Configuring Call Handler Templates
This section includes information on configuring a call handler template for Unity Connection, defining the
settings for the call handler template, and saving them.
System Administration Guide
82
Call Management
Call Handler Templates

Page 101
Step 1
In Cisco Unity Connection Administration, expand Templates > and select > Call Handler Templates.
The Search Call Handler Templates page displays the currently configured call handler templates.
Step 2
Configure a call handler template (For information on each field, see Help> This Page):
• To add a call handler template, select Add New. The New Call Handler Template page appears. Enter the applicable
settings and select Save.
• To edit a call handler template, select the call handler template. On the Edit Call Handler Template Basics page,
select the applicable settings from the Edit menu:
• Call Handler Template Basics
• Transfer Rules
• Caller Input
• Greetings
• Post Greeting Recording
• Message Settings
• To delete a call handler template, do the following:
In the Search Call Handler Templates page, select the call handler template that you want to delete.
Select Delete Selected and then select OK to confirm deletion.
Default System Call Handlers
Unity Connection includes the following predefined call handlers that you can edit but not delete.
You should at least edit the greetings for these call handlers.
Note
Acts as an automated attendant, playing the greeting that callers first hear when
they call your organization, and performing the actions you specify. The Opening
Greeting Call Routing rule transfers all incoming calls to the Opening Greeting call
handler.
By default, the Opening Greeting call handler allows callers to press * to reach the
Sign-In conversation, or press # to reach the Operator call handler. Messages left
in the Opening Greeting call handler are sent to the Undeliverable Messages
distribution list.
Opening Greeting
System Administration Guide
83
Call Management
Default System Call Handlers

Page 102
Calls are routed to this call handler when callers press “0” or do not press any key
(the default setting). You can configure the Operator call handler so that callers can
leave a message or can be transferred to a live operator.
By default, the Operator call handler allows callers to press * to reach the Sign-In
conversation, or press # to reach the Opening Greeting call handler. Messages left
in the Operator call handler are sent to the mailbox for the Operator user.
Operator
Plays a short goodbye message and then hangs up if there is no caller input.
By default, the Goodbye call handler allows callers to press * to reach the Sign-In
conversation, or press # to reach the Opening Greeting call handler. If you change
the After Greeting action from Hang Up to Take Message, messages left in the
Goodbye call handler are sent to the Undeliverable Messages distribution list.
Goodbye
Configuring System Call Handlers
This section includes information on configuring a system call handler for Unity Connection, define the
settings for call handler and save them.
Step 1
In Cisco Unity Connection Administration, expand Call Management and select System Call Handler.
The Search Call Handlers page displays the currently configured call handlers.
Step 2
Configure a system call handler (For information on each field, see Help > This Page):
• To add a system call handler:
On the Search Call Handlers page, select Add New.
On the New Call Handler page, enter the applicable settings and select Save.
• To edit a system call handler:
On the Search Call Handlers page, select the call handler that you want to edit. To edit multiple system
call handlers, check the applicable check boxes and select Bulk Edit.
On the Edit Call Handler Basics page, select the Edit menu and then edit any of the following settings:
• Call Handler Basics.
• Transfer Rules. See Transfer Rules.
• Caller Input. See Caller Input.
• Greetings. See Greetings.
• Post Greeting Recording.
• Message Settings. See Message Settings.
• Call Handler Owners. See Call Handler Owners.
After editing the settings, select Save.
System Administration Guide
84
Call Management
Configuring System Call Handlers
Page 103
• To delete a system call handler:
On the System Call Handlers page, select the system call handler to delete.
Select Show Dependencies to search the database objects that have dependencies on the call handler you
want to delete. From the dependencies search results, follow links to the affected objects and reassign
the dependency to another call handler.
Select Delete Selected.
Call Handler Settings
Transfer Rules
The transfer rules for a system call handler specify how Unity Connection transfer the calls that reach the call
handler from the automated attendant.
When a call is transferred to the call handler, Unity Connection first checks the applicable transfer rule to
determine where to transfer the call—either to the call handler greeting, or to an extension.
You configure a transfer rule to transfer the call to the greeting if you want to provide the caller with a
prerecorded menu of options or an informational message.
Each call handler has three transfer rules that you can customize:
• Standard: This is for standard hours
• Closed: This is for closed (nonbusiness and holiday) hours of the active schedule
• Alternate: This transfer rule when enabled, overrides the standard and closed transfer rules and is in
effect at all times.
Caller Input
The caller input settings define actions that Unity Connection takes in response to phone keys pressed by
callers during a call handler greeting. Using the settings on the Edit Greeting page for each individual greeting,
you can specify whether the greeting allows caller input and whether callers can perform transfers.
Greetings
You can configure individual call handler greetings to allow callers to transfer to numbers that are not associated
with Unity Connection users or call handlers while the greeting is playing.
Each system call handler can have up to seven greetings.
Note
The default greetings are:
Plays at all the times unless overridden by another greeting. You cannot disable the
standard greeting.
Standard
Plays during the closed (nonbusiness) hours defined for the active schedule. A closed
greeting overrides the standard greeting.
Closed
System Administration Guide
85
Call Management
Call Handler Settings

Page 104
Plays during the specific dates and times specified in the schedule of holidays associated
with the active schedule. A holiday greeting overrides the standard and closed greetings.
Holiday
Plays for internal callers only. It can provide information that only co-worker needs to
know. An internal greeting overrides the standard, closed, and holiday greetings. Not all
phone system integrations provide the support necessary for an internal greeting.
Internal
Plays when the extension is busy. A busy greeting overrides the standard, closed, internal,
and holiday greetings.
Not all phone system integrations provide the support necessary for a busy greeting.
Busy
Can be used for a variety of special situations, such as vacations or a leave. An alternate
greeting overrides all other greetings.
Alternate
Plays if the caller enters invalid digits. This may happen if the digits do not match an
extension, the extension is not found in the search scope, or the caller is otherwise restricted
from dialing the digits. You cannot disable the error greeting.
The system default error recording is, “I did not recognize that as a valid entry.” By default,
after the error greeting plays, Unity Connection replays the greeting.
Error
Call handler greetings can be recorded in multiple languages when the language for the call handler is inherited
from the caller. For example, if Unity Connection is configured to provide prompts in French and Spanish, it
is possible to record the standard greeting in both languages so that Spanish- and French-speaking callers can
hear the greeting in their own language.
Note
Message Settings
The message settings specify who receives messages for the call handler, whether messages are marked for
dispatch delivery, the maximum recording length for messages from outside callers, what callers can do when
leaving messages, whether their messages are automatically marked secure, and what action to take next on
a call after a message is left.
Call Handler Owners
Call handler owners select a different call handler greeting or record the call handler greetings from the System
Call Handlers > Greetings page in Cisco Unity Connection Administration, or they can use the Cisco Unity
Greetings Administrator to do so by phone.
With Unity Connection 10.5 and later, both the users and distribution lists can be added as the call handler
owners. However, only the local users (not the members of nested distribution lists) in a distribution list can
added as call handler owners.
Note
System Administration Guide
86
Call Management
Message Settings

Page 105
Directory Handlers
Directory handlers are used to provide access to a corporate directory that callers can use to reach Unity
Connection users with mailboxes. When a caller searches for a username or part of a name, a directory handler
looks for the extension and routes the call to the appropriate user.
Directory handlers do not have greetings so you should use call handlers to route callers to a directory handler.
Then use the call handler greetings to explain caller the options for each directory handler.
Each directory handler contains settings that specify how it searches for names, what it does when it finds
one or more matches, and what it does when it detects no caller input.
There are two types of directory handlers:
Callers enter search information or extensions using the phone keypad.
For this type of directory handler, you can specify how it searches for
names, what it does when it finds one or more matches, and what it
does when it detects no caller input.
Phone Keypad
Callers say the first name and last name of the Unity Connection user
that they want to reach, or enter an extension by saying the individual
digits in the extension. The voice directory handler can also include
alternate names in searches. The voice-recognition option is required
in order to create voice-enabled directory handlers.
Users who are listed in the directory are available to outside callers but
administrator-defined contacts are only available to users who are signed
in to Unity Connection. User-defined contacts are only available to the
Unity Connection users who defined them.
For this type of directory handler, users cannot be accessed
using directory handlers unless they have a display name
specified and the List in Directory check box is checked
for them on the User Basics page.
Note
Voice Enabled
You can create both phone-keypad and voice-enabled directory handlers on the same system.
Note
Default Directory Handler
Unity Connection includes one default directory handler that is System Directory Handler that you can edit
but cannot delete. By default, this directory handler is configured to search all users who have mailboxes on
the system, in last name, first name order.
Callers use the phone keypad to interact with the default System Directory Handler. There is no default
voice-enabled directory handler.
By default, directory handler is accessed when callers press 4 during the Opening call handler greeting.
System Administration Guide
87
Call Management
Directory Handlers

Page 106
Configuring Directory Handlers
This section includes information to configure a directory handler for Unity Connection, define the settings
for the directory handler, and save them.
Step 1
In Cisco Unity Connection Administration, expand Call Management and select Directory Handlers.
The Search Directory Handlers page displays the currently configured directory handlers.
Step 2
Configure a directory handler, (For information on each field, see Help> This Page):
• To add a directory handler:
On the Search Directory Handlers page, select Add New.
On the New Directory Handler page, enter the applicable settings and select Save.
• To edit a directory handler:
On the Search Directory Handlers page, select the directory handler you want to edit. To edit multiple system
directory handlers, check the applicable check boxes and select Bulk Edit.
On the Edit Directory Handler Basics page, select the Edit menu and then select any of the following settings:
• Directory Handler Basics
• Caller Input
• Greetings
After editing the settings, select Save before leaving the page.
• To delete a directory handler:
On the Directory Handlers page, select the directory handler to delete.
Select Show Dependencies to search the database objects that have dependencies on the directory handler you want
to delete. From the dependencies search results, follow links to the affected objects and reassign the dependency to
another directory handler.
Select Delete Selected.
Routing Calls to a Voice Directory Handler
If you are setting up a voice directory handler, see the following task list for configuring Cisco Unified
Communications Manager to route a phone number from Cisco Unified CM to the Unity Connection voice
directory.
Step 1
In Cisco Unified Communications Manager Administration, add the ports that you want to use for the voice-type directory
handler to a new line group.
Step 2
Add the line group to a new hunt list.
Step 3
Add the hunt list to a new hunt pilot to which calls for the voice-type directory handler is routed.
System Administration Guide
88
Call Management
Configuring Directory Handlers
Page 107
Step 4
In Cisco Unity Connection Administration, configure the ports to route calls to the voice-type directory
handler.
Step 5
For details on configuring Cisco Unified CM, see the Cisco Unified CM documentation at
http://www.cisco.com/en/US/products/sw/voicesw/ps556/tsd_products_support_series_home.html.
Interview Handlers
Interview handlers collects information from callers by playing a series of questions that you have recorded,
and then recording the answers offered by callers.
You can specify who receives the messages for the interview handler, whether the message is marked for
dispatch delivery, the message is marked urgent, and what actions to take next on the call when a message is
left.
If an interview handler is referenced by other objects in Unity Connection (for example, a caller input key on
a call handler sends calls to the interview handler), you are not allowed to delete the interview handler until
you have changed the settings on the other objects to remove references of the interview handler that you
want to delete. If you try and delete an interview handler without first changing settings on objects, the delete
operation fails.
If you delete an interview handler that was referenced by one or more call handlers, be sure to rerecord the
call handler greetings so that callers hear the appropriate information about input options.
With Cisco Unity Connection Release 14SU1 and later, the maximum recording time for one Interview Handler
Question is 300 seconds.
If you want to record Interview Handler Question of length more than 300 seconds, you should record multiple
questions.The maximum number of questions that can be recorded on Unity Connection is 20.
Note
Configuring Interview Handlers
To configure a interview handler for Unity Connection, define the settings for the interview handler and save
them.
Step 1
In Cisco Unity Connection Administration, expand Call Management and select Interview Handlers.
The Search Interview Handlers page displays the currently configured interview handlers.
Step 2
Configure an interview handler, (For information on each field, see Help> This Page):
• To add an interview handler:
On the Search Interview Handlers page, select Add New.
On the New Interview Handler page, enter the applicable settings and select Save.
System Administration Guide
89
Call Management
Interview Handlers

Page 108
• To edit a directory handler:
On the Search Interview Handlers page, select the interview handlers that you want to edit. To edit multiple
system directory handlers, check the applicable check boxes and select Bulk Edit. Enter the applicable settings
and select Save.
• To delete an interview handler:
On the Interview Handlers page, select the interview handler to delete.
Select Show Dependencies to search the database objects that have dependencies on the interview handler
you want to delete. From the dependencies search results, follow links to the affected objects and reassign
the dependency to another interview handler.
Select Delete Selected.
Dial Plan
Partitions and search spaces provide a way to segregate the global dial and message addressing space within
Unity Connection. A partition comprises a logical grouping of objects that are identifiable by extension, name
or SMTP address. A search space contains an ordered list of partitions.
Default Partition and Search Space in Unity Connection
When you install or upgrade to the Unity Connection server, all objects, such as users and user templates that
belong to a partition are placed in a partition named <Server Name> Partition. Similarly, all objects that are
configured to use search spaces use a search space named <Server Name> Search Space (which includes
<Server Name> Partition as its sole member). In addition, all templates are configured to use this partition
and search space where applicable. Thus, by default, Unity Connection uses only one server-wide partition
and search space. You can rename or delete the default partition and search space and edit the default search
space by changing the description or partition membership.
Changing the system default partition and search space do not affect any objects or templates that have already
been created.
Note
Changing the System Default Partition and Search Space
Step 1
In Cisco Unity Connection Administration, expand System Settings and select General Configuration.
Step 2
In the Edit General Configuration page, in the Default Partition field, select the name of the new default partition.
Step 3
In the Default Search Scope field, select the name of the new default search space and select Save.
System Administration Guide
90
Call Management
Dial Plan

Page 109
Partitions
In Unity Connection, you create partitions as a way to group together objects to which callers and users can
address messages or place calls while interacting with Unity Connection. One or more partitions can be
grouped together as members of a search space and a partition can be a member of more than one search
space. The following types of objects belong to a partition:
• Users with mailboxes (primary extension)
• User alternate extensions
• Contacts (including VPIM contacts)
• System distribution lists
• System call handlers
• Directory handlers
• Interview handlers
• VPIM locations
In addition, you can use user templates, contact templates, and system call handler templates to set the partition
membership for new objects of similar types.
Extensions must be unique within a partition, although partitions can contain objects that do not have an
associated extension (for example, some contacts and system distribution lists). The names of objects do not
have to be unique within a partition. Administrator-defined contact phone numbers also do not need to be
unique within a partition.
In general, objects can only be a member of a single partition, although a user can have a primary extension
in one partition and an alternate extension in a different partition. If there are alternate names defined for the
user, the alternate names are available in each partition where the user has an extension.
When you change partition of an alternate extension in a bulk edit mode, the primary extension of the user is
taken as an alternate extension. If primary extension already exist in the changed partition then it throws an
error message with the duplicate extension.
Note
Configuring Partitions
This section includes information on configuring a partition for Unity Connection, defining the settings and
saving them. After creating a partition, you can assign various objects, such as users and user templates as
partition members.
Step 1
In Cisco Unity Connection Administration, expand Dial Plan > and select Partitions.
Step 2
The Search Partitions page displays the currently configured partitions.
Step 3
Configure partitions (For more information on each field, see Help> This Page):
• To add a partition, select Add New.
On the New Partition page, enter a name for the partition and select Save.
System Administration Guide
91
Call Management
Partitions

Page 110
The Edit Partition page appears, you can optionally add a description and select Save.
You can change the name or description of a partition. To change the partition membership, you must
edit the individual member objects.
Note
• To edit a partition, select the partition you want to edit. On the Edit Partition page, change the settings as applicable
and select Save.
• To delete a partition, check the check boxes next to the display name of the partitions that you want to delete. Select
Delete Selected and OK to confirm deletion.
You can delete a partition when the partition is empty (there are no objects that are members of the
partition) and when the partition is not configured as the system default partition. If you attempt to
delete a partition that is not empty, Unity Connection warns you that the partition is in use and does not
allow the deletion.
Note
Search Spaces
Search spaces are used to define the search scope of objects, such as users and distribution lists that a user or
outside caller can reach while interacting with Unity Connection. For example, the search scope that is applied
to a user identifies which users, distribution lists, or VPIM contacts the user can address messages to. The
search scope that is applied to a user also identifies which users and contacts the user can call by name dialing
when using the voice-recognition conversation.
The following types of objects can use a search space for the search scope:
• Users with mailboxes
• Routing rules (both direct and forwarded)
• System call handlers
• Phone directory handlers
• Voice-enabled directory handlers
• VPIM locations
In addition, you can use user templates, contact templates, and system call handler templates to set the search
scope for new objects of similar types. A search space is comprised of one or more ordered partitions.
When Unity Connection searches for an object on behalf of a caller, it searches the partitions in the order in
which they are arranged in the search space. While extensions must be unique within a partition, they do not
need to be unique within a search space, so you can use search spaces to handle dial plans that have overlapping
extensions.
For information on VPIM and networking concepts, see the Networking, on page 121 chapter.
Search Space Example for Automated Attendant
In an organization, you have installed a Unity Connection server that is setup as an automated attendant to
handle the calls for customer service department and take voice messages for users. All the employees of the
System Administration Guide
92
Call Management
Search Spaces
Page 111
organization have a primary extension in Employee partition and the employees of customer service department
have alternate extensions in Customer Service partition.
The Unity Connection server is configured with the following search spaces and associated partition
membership:
Partition Membership (in Order)
Search Space
Employee, Customer Service
Employees search space
Customer Service
Customer Service search
space
In addition, two routing rules are configured. As per the first routing rule, when outside callers call in to Unity
Connection, they use the Customer Service search space. The system call handlers and directory handlers
with which the outside callers interact are configured to use Customer Service search space. As per the second
routing rule, all the employees of the organization use Employee search space when they call each other within
the organization.
In this example, when users call and sign in to Unity Connection, they can address messages or place calls to
any other user at the company. However, when outside callers call Unity Connection and reach the automated
attendant, they can reach only the employees with alternate extensions in the Customer Service partition.
Multiple Site Search Space Example
An organization has three digitally networked Unity Connection locations serving three sites: Headquarters,
Regional-East, and Regional-West.
The configuration is as follows:
• Unity Connection is configured with the following search spaces and associated partitions:
Partition Membership (in Order)
Search Space
HQ, Primary, RE, RW
Headquarters-SS
RE, Primary
Regional-East-SS
RW, Primary
Regional-West-SS
• The following user accounts are set up:
Alternate Exte
Partition
PrimaryExtensionandPartition
Search Space of
User
Home Server
User
3001, HQ
85553001, Primary
Headquarters-SS
Headquarters
Alex Abade
3002, HQ
85553002, Primary
Headquarters-SS
Headquarters
Chris Brown
3001, RE
82223001, Primary
Regional-East-SS
Regional-East
Pat Smith
3002, RE
82223002, Primary
Regional-East-SS
Regional-East
Shannon Johnson
3001, RW
87773001, Primary
Regional-West-SS
Regional-West
Robin Smith
3333, RW
87773333, Primary
Regional-West-SS
Regional-West
Terry Jones
System Administration Guide
93
Call Management
Multiple Site Search Space Example
Page 112
• There is a VPIM server that is configured as a VPIM location on the Headquarters server: VPIM-South.
This VPIM location has a Dial ID of 8468 and is configured to allow blind addressing, to belong to the
Primary partition, and to use the Headquarters-SS search space.
• The Attempt Sign In direct routing rule and the Attempt Forward forwarded routing rule on each server
are configured to use the same search space as the users on that server. (For example, the rules on the
Headquarters server use the Headquarters-SS search space.)
In this example, users at one site can address other users in the same site using 4-digit extensions. Users can
blind address messages to a VPIM mailbox by entering 8468 plus the mailbox number on the remote system.
Messages sent by users at the VPIM-South VPIM location can be delivered to any user in the HQ, Primary,
RE, or RW partitions.
How Search Spaces Work
Search spaces are applied to the following components:
• Users: Users can reach only the objects in a partition that is part of a search space defined as the search
scope for the user. This search space need not include any partitions that contain the primary or alternate
extensions of the user.
If a user addresses a message by extension and there are overlapping extensions in different partitions in the
search space, Unity Connection searches the partitions in the search space in the order that they appear in the
Assigned Partitions list in Cisco Unity Connection Administration and returns the first result found.
The search scope of a user defines the objects that a user can reach when addressing a message by extension
or name, adding members to a private distribution list, adding names to an addressing priority list, placing a
call to another user by calling the name, addressing a message to a VPIM contact, an blind addressing a
message to a VPIM location.
• Call Routing Rules: When a call comes in to Unity Connection, it is first checked against the applicable
routing rules table, depending on whether the caller dialed directly into Unity Connection or was forwarded
from an extension. When Unity Connection matches the call to a routing rule in the applicable table
based on the parameters of the call, the configuration of the routing rule determines the initial search
scope of the call.
To facilitate setting the correct search scope on a call routing rule, you can set up routing rule conditions to
select a rule based on the port of the incoming call, the phone system, the dialed number, or other criteria. If
you are setting up multiple partitions and multiple search spaces, you must carefully consider the impact of
the search scope that is configured for each call routing rule. Consider the following considerations related
to setting the search scope with call routing rules:
• Unity Connection uses the search space defined as the initial scope of the call to identify whether the
call is from a user and if so, which user. If a user calls from an extension that is in a partition that is not
a member of the search space set as the initial search scope for the call, the call is not identified as coming
from the user. If the extension of the user overlaps with an extension in another partition that also appears
in this search space, the call is identified as coming from the first object that Unity Connection finds
when searching the partitions in the order that they appear in the search space.
• Users who call to sign in to Unity Connection do not have the search scope set to the search space defined
for the user profile until they have successfully completed the sign-in process.
• System Distribution Lists: You can use search spaces to limit user access to send messages to distribution
lists because you assign a partition to each distribution list. If you assign a distribution list in a partition
System Administration Guide
94
Call Management
How Search Spaces Work
Page 113
that is not part of the search scope of a particular group of users, the users are not able to find the
distribution list to address messages to it. For example, you can create a new partition called “Distribution
Lists Partition” and configure the allvoicemailusers, allvoicemailenabledcontacts, and
undeliverablemessages to use this partition. To grant certain users access to send to the lists, you can
create a new search space that includes both the default partition and the “Distribution Lists Partition,”
and assign this search space as the search scope for the users.
• System Call Handlers: Unity Connection uses the call handler search scope to match extensions that are
dialed from the call handler to users, administrator defined contacts, and remote contacts at VPIM
locations. You can set the scope of the handler to either inherit the search scope that is already set on the
call (from a previous handler or from a call routing rule) or to use the particular search scope that you
specify.
• Directory Handlers: Unity Connection uses the directory handler search scope to define the objects that
callers who reach the directory handler can find or hear. For phone directory handlers, you can set the
scope to the entire server, a particular class of service, a system distribution list, or a search space (either
inherited from the call or specified for the directory handler). For voice enabled directory handlers, you
can set the scope to the entire server or to a search space (either inherited from the call or specified for
the directory handler).
When callers search a directory handler for a particular name, if the scope of the directory handler is set to a
search space, Unity Connection searches each partition in the search space and returns a list of all of the objects
that match the name.
• Interview Handlers: Each interview handler is associated with a partition, so that it can be included in a
search space and callers can reach it from other parts of the conversation. Because interview handlers
do not involve dialing or addressing to users or other objects, they do not have a search scope defined.
• Networking: When you network a Unity Connection server with other Unity Connection locations, the
partitions and search spaces that are configured on the server replicate to all other Unity Connection
locations on the network. A Unity Connection network supports up to 10K partitions and 10K search
spaces shared among all of the locations in the network.
• VPIM Locations: Each VPIM location belongs to a single partition. If a VPIM location allows blind
addressing and the partition to which the location belongs is in the search space for a user, the user can
blind address to a user on the remote VPIM system. To blind address, the user addresses the message to
the Dial ID of the VPIM location followed by the remote user mailbox number. For example, to reach
mailbox 1000 at VPIM location 555, the user would address the message to 5551000.
The partition of the VPIM location is used as the partition of automatically-created VPIM contacts if the
VPIM location is configured for automatic contact creation. You can also change the partition of VPIM
contacts independent of the associated VPIM location. Each VPIM location also has a search scope. When
Unity Connection receives a message from a sender at a VPIM location, Unity Connection searches the search
space that is defined as the search scope for the location to determine the message recipient by matching the
extension in the To: address field with a Unity Connection user.
• Administrator Defined Contacts: Each administrator defined contact belongs to a partition. When a
contact is configured with phone numbers that callers can use to call the contact using voice commands,
voice-recognition users with search space includes the partition of the contact are able to call the contact;
users with search space does not include this partition are not able to call the contact. In addition, the
contact is reachable by callers who reach any voice-enabled directory handler with search scope uses or
inherits a search space that includes this partition (or if the directory handler search scope is set to the
entire server).
System Administration Guide
95
Call Management
How Search Spaces Work
Page 114
Configuring Search Spaces
This section includes information on configuring a search spaces for Unity Connection, defining the settings
and saving them.
Step 1
In Cisco Unity Connection Administration, expand Dial Plan and select Search Spaces.
Step 2
Configuring search spaces (For more information on each field, see Help> This Page):
• To add new search space, select Add New.
On the New Search Space page, enter a name for the search space and select Save.
In the Edit Search Space page, enter a description for the search space and select Save.
• To edit a search space, select the name of the search space that you want to edit. On the Edit Search Space page,
change the settings as applicable and select Save.
• To delete a search space, check the check box next to the display names of the search spaces that you want to delete.
Select Delete Selected and OK to confirm deletion.
You can delete a search space even when there are objects using it; however, in this case you must select
a replacement search space. Objects that had a search scope set to the deleted search space are changed
to use the replacement search space instead.
Note
• You cannot delete more than 50 search spaces simultaneously.
Call Routing
Call routing is used to route incoming calls to the operator or to specific subscribers, call handlers, directory
handlers, or interview handlers. Also, call routing is used to route subscribers to the subscriber logon
conversation.
Default Call Routing Rules
Unity Connection has two call routing tables—one for direct calls and other for forwarded calls—that handle
calls from users and from unidentified callers.
1.
Direct rules handle calls from users and unidentified callers that are dialed directly to Unity Connection.
The predefined direct routing rules are:
• Attempt Sign-In—Calls from users are routed to the user sign-in conversation.
With Unity Connection 10.0(1) and later, a user can play and record both video
and audio greetings, when login via Attempt Sign-in.
Note
• Opening Greeting—Calls from unidentified callers are routed to the Opening Greeting.
2.
Forwarded rules handle calls that are forwarded to Unity Connection from either a user extension
System Administration Guide
96
Call Management
Configuring Search Spaces

Page 115
or from an extension that is not associated with a user account (such as a conference room). The
predefined forwarded routing rules are:
• Attempt Forward—All calls forwarded from a user extension are routed to the user greeting.
With Unity Connection 10.0(1) and later, a user can play both video and audio
greetings, when the calling user receives unanswered call.
Note
• Opening Greeting—Calls forwarded from an extension that is not associated with a user account are
routed to the Opening Greeting.
You can change the order of the Attempt Sign-In and Attempt Forward rules relative to additional rules that
you add in the respective routing tables. The Opening Greeting rule is always the last entry for both tables.
You cannot delete the predefined rules.
When you create a new rule, you need to specify only the criteria that are used to route the calls. You can
leave the other fields on the page blank because the blank field matches everything.
Configuring Call Routing Rules
This section includes information on configuring call routing rules in Unity Connection, define the settings
for the routing rules, and save them.
Step 1
In Cisco Unity Connection Administration, expand Call Management> Call Routing.
• If you want to configure routing rules for direct calls, select Direct Routing Rules. The Direct Routing Rules page
displays the default and currently configured routing rules.
• If you want to configure routing rules for forwarded calls, select Forwarded Routing Rules. The Forwarded Routing
Rules page displays the default and currently configured routing rules.
Step 2
Configure a routing rule in the direct or forwarded routing rules: (For information on each field, see Help> This Page):
• To add a routing rule, select Add New.
On New Direct Routing Rule page or New Forwarded Routing Rule page, enter the applicable settings and select
Save.
To add the routing rule condition, select Add New on the Edit Routing Rule page.
Edit the routing rule condition settings and select Save.
• To delete a routing rule, do the following:
On the Search Contacts page, select the routing rule to delete.
Select Delete Selected.
System Administration Guide
97
Call Management
Configuring Call Routing Rules

Page 116
Call Routing Tables
Call routing tables are used to route incoming calls to the operator or to specific users, call handlers, directory
handlers, or interview handlers. In addition, call routing tables are used to route users to the user sign-in
conversation.
You can add new rules and change the order of the rules in the respective routing tables. You can change the
order of the Attempt Sign-In and Attempt Forward rules relative to additional rules that you add in the respective
routing tables, but the Opening Greeting rule is always the last entry for both tables. You cannot delete the
predefined rules.
Call routing tables consist of a series of rules that let you route incoming calls based on the information that
Cisco Unity Connection may have about a call, such as the calling phone number (ANI or caller ID), the trunk
or port on which the call comes in, the dialed phone number (DNIS), the forwarding station, and the schedule.
When Unity Connection receives a call, it first determines if it is a direct or forwarded call based on the call
information that is sent by the phone system, and then applies the applicable call routing table. If the call
information matches all of the conditions for the first rule, the call is routed as specified in the rule. If any of
the conditions specified in the first rule are not met, the call information is then compared to the conditions
of the second rule, and so on, until a rule is found that matches all the characteristics of the call.
The integration between the phone system and Unity Connection determines the information that is provided
about a call (for example, call type, port, trunk, calling number, and dialed number). The schedule is determined
by the date and time that the call is received.
The following examples show how call routing tables are used in Unity Connection to route calls.
Example 1
In below table, calls that meet the criteria specified in the Operator rule settings—any direct external call
received while the Weekdays schedule is active—are transferred to the operator. Calls that do not meet this
criteria are routed as specified by one of the other call routing rules in the table. In this case, any direct external
calls received on the weekends are routed to the Opening Greeting, according to the Opening Greeting call
routing rule.
Table 4: Direct Calls Call Routing Table
Send Call To
Schedule
Port
Phone
System
Calling
Number
Dialed
Number
Status
Rule
Attempt transfer for operator
Weekdays
Any
Any
Any
Any
Active
Operator
Attempt Sign-In
Always
Any
Any
Any
Any
Active
Attempt Sign-In
Attempt transfer for Opening G
Always
Any
Any
Any
Any
Active
Opening Greeting
Example 2
In below table, calls forwarded from specific extensions—1234 and 5678—are routed according to the Product
Info and Customer Service rules, respectively. Calls that do not match the extension (or forwarding station)
in either of the first two rules are routed according to the two remaining rules.
System Administration Guide
98
Call Management
Call Routing Tables
Page 117
Table 5: Forwarded Calls Call Routing Table
Send Call To
Schedule
Port
Phone
System
Forwarding
Station
Calling
Number
Dialed
Number
Status
Rule
Attempt transfer for C
Service
Always
Any
Any
5678
Any
Any
Active
Customer Service
Send to greeting for P
Always
Any
Any
1234
Any
Any
Active
Product Info
Attempt Forward
Always
Any
Any
Any
Any
Any
Active
Attempt Forward
Attempt transfer for O
Greeting
Always
Any
Any
Any
Any
Any
Active
Opening Greeting
Using Routing Rules with the Route from Next Call Routing Rule Action
In a user profile or call handler, you can configure the After Greeting action, the After Message action, or the
action of a caller input key to apply the Route from Next Call Routing Rule action to calls. This action causes
Cisco Unity Connection to continue processing the call according to the applicable call routing table (direct
or forwarded, depending on how the call was received from the phone system) starting at the rule immediately
after the rule that Unity Connection previously applied to the call. If the call was already processed according
to the final rule in the table, the final rule is applied again.
For example, you might want to have Unity Connection always play a standard greeting or legal disclaimer
to all callers, whether they call Unity Connection directly or are forwarded by an extension. The greeting
plays before callers can take any other action—for example, leaving a message or signing in. To do so, you
do the following tasks:
1.
Create a new call handler and record the message as the alternate greeting.
2.
Enable the alternate greeting, configure it to ignore caller input during the greeting, and then configure
the After Greeting action with the Route from Next Call Routing Rule call action.
3.
Add a new direct call routing rule to send all direct calls to the new call handler (with Go Directly to
Greetings selected) and verify that the rule appears at the top of the direct call routing table.
4.
Add a new forwarded call routing rule to send all forwarded calls to the same new call handler (again
with Go Directly to Greetings selected) and verify that the rule appears at the top of the forwarded call
routing table.
Once the system is configured in this way, all calls—no matter where they come from or how they get to the
system—hear this greeting in its entirety and then proceed directly to their original destination.
Restriction Tables
Restriction tables allow you to control which phone numbers or URIs the users and administrators can use
for:
• Transferring calls—including both the numbers or URIs users can enter for transferring their calls, and
the numbers or URIs that outside callers can enter when using Caller system transfers.
System Administration Guide
99
Call Management
Using Routing Rules with the Route from Next Call Routing Rule Action
Page 118
• Recording and playback by phone from Cisco Unity Connection applications, when the phone is the
designated recording and playback device in the Media Player.
• Delivering faxes to a fax machine.
• Sending message notifications.
• Creating user-defined alternate extensions—including the extensions that Unity Connection offers to
add automatically on behalf of users.
For example, you can specify that users have calls transferred only to internal extensions or that faxes are
delivered only to local phone numbers. (Restriction tables do not affect the phone numbers that users can dial
directly from their phones when they are not interacting with Unity Connection.)
Each class of service specifies for its members a restriction table for call transfers, one for message notification,
and one for fax deliveries. The restriction table can be the same for all three, or different for each.
How Restriction Tables Work
When a user uses the Messaging Assistant or the Unity Connection conversation to attempt to change a phone
number that is used for call transfer, message notification, or fax delivery, or when signed-in users use the
Unity Connection conversation to perform User system transfers to a number that they specify, Unity Connection
applies the restriction table associated with the class of service of the user to verify that the phone number
entered is allowed.
For example, if a user uses the Unity Connection Messaging Assistant to enter a phone number to set up a
message notification device, Unity Connection applies the restriction table that is associated with the class of
service of that user, and displays an error message if the phone number is not allowed.But when an administrator
changes a message notification number for a user using Cisco Unity Connection Administration, Unity
Connection does not apply any restriction table to the number. Therefore, an administrator can, when necessary,
override the limitations of the class of service of a particular user.
The User-Defined and Automatically-Added Alternate Extensions restriction table functions similarly to other
restriction tables in that it restricts the numbers the users can use to create alternate extensions for themselves
through interfaces such as the Cisco Personal Communications Assistant or via an API call. It can also restrict
a number from being offered as an alternate extension when a user frequently calls Unity Connection and
signs in from the number. (The table is named Excluded Extensions for Automatically-Added Alternate
Extensions, and does not apply to alternate extensions that users create for themselves in Cisco PCA.) Unlike
other restriction tables, this restriction table applies to all users and therefore is not associated with a class of
service. It also applies when administrators use Unity Connection Administration to change user-defined
alternate extensions, but does not apply when administrators enter or change administrator-defined alternate
extensions.
Each row of a restriction table is made up of a dial string. Each dial string consists of a call pattern and a
setting that specifies whether numbers that match the call pattern can be called. In most cases, the restriction
table is applied when a user attempts to change a number that is controlled by a restriction table, not when
Unity Connection tries to complete a transfer or delivery. In the case of Caller system transfers, which allow
unauthenticated callers to transfer to a number that they specify, Unity Connection checks the specified number
against the Default System Transfer table. By default, this table blocks all numbers, in order to protect against
toll fraud and unauthorized use.
When a restriction table is applied to a number (such as a pager number for a message notification), Unity
Connection compares the number with the call pattern of the first dial string in the restriction table. If the
number does not match the call pattern, Unity Connection then compares the number with the call pattern in
System Administration Guide
100
Call Management
How Restriction Tables Work
Page 119
the second dial string, and so on, until it finds a match. When Unity Connection finds a match, it either permits
or restricts calling the number as specified in the dial string.
Restriction tables are commonly used to permit or restrict calls to the following:
• Specific numbers, such as an extension.
• Numbers that are greater than or less than a specific length.
• Numbers that contain a specific digit or pattern of digits, such as an external access code followed by a
long-distance access code.
For example, the restriction table below restricts most long distance phone numbers, but permits extensions
starting with “91.” In this case, if a user enters “9123” as a transfer number, Unity Connection first compares
the number to the call pattern in Dial String 0, which restricts all numbers that begin with “91” and are followed
by at least seven digits. Because the number entered does not match the call pattern, Unity Connection then
compares the number to Dial String 1, which restricts all numbers that begin with “9011” and are followed
by at least seven digits. Finally, Unity Connection compares the number to the last dial string, which contains
the wildcard character that matches all numbers of any length. Because the Allow This String field is set to
Yes for this dial string, Unity Connection permits this number to be used.
Table 6: Example 1
Allow This String
Call Pattern
Dial String
No
91???????*
0
No
9011???????*
1
Yes
*
2
The restriction table below restricts long distance phone numbers and numbers with fewer than four digits.
In this example, “9” is the external access code for the phone system, and “1” is the long-distance access code.
Dial String 0 restricts any number beginning with “91,” while numbers fewer than four digits in length are
restricted by Dial String 2. Thus, the only numbers permitted by this restriction table have at least four digits,
and are not long distance phone numbers.
Table 7: Example 2
Allow This String
Call Pattern
Dial String
No
91*
0
Yes
????*
1
No
*
2
In Unity Connection 10.5(1) and later, you can also restrict the call pattern of a URI. For example, you can
restrict the call pattern that starts the user portion with “abc” and belongs to the hostname “dummy.com”
(such as, abc*@dummy.com).
Note
System Administration Guide
101
Call Management
How Restriction Tables Work

Page 120
Default Restriction Table
Unity Connection comes with the following predefined restriction tables that you can edit (including changing
their names) but not delete. By default, each of these restriction tables prevents access to long distance phone
numbers.
In Unity Connection 10.5 and later, you can restrict URIs along with the phone numbers.
Note
Restricts numbers for fax delivery.
Default Fax
Restricts numbers for message notifications. Also restricts the user extensions that
Unity Connection dials when the phone is selected as the recording and playback
device in the Media Player.
Default Outdial
Restricts numbers that can be used for Caller system transfers, which allow
unidentified callers to transfer to a number that they specify. For example, callers
may want to dial a lobby or conference room phone that is not associated with a
Unity Connection user. By default, the table does not allow Unity Connection to
dial any numbers.
Default System
Transfer
Restricts numbers for call transfers.
Default Transfer
Restricts the numbers the users can use to create alternate extensions for themselves
through interfaces such as the Cisco Personal Communications Assistant or via an
API call. Also restricts numbers from being offered as alternate extensions. For
example, you might block a lobby or conference room extension so that users who
frequently call Unity Connection from those shared phones are not automatically
prompted to add the number as an alternate extension.
User-Defined and
Automatically-Added
Alternate Extensions
Restricts numbers from being offered as alternate extensions. For example, you
might add a lobby or conference room extension so that users who frequently call
Unity Connection from those shared phones are not automatically prompted to add
the number as an alternate extension.
Excluded Extensions
for Automatically
Added Alternate
Extensions
Configuring Restriction Tables
You can edit the predefined restriction tables, and you can create up to 100 new ones. You can also add up
to 50 dial strings to a table. New dial strings are automatically inserted into the restriction table as Dial String 0.
Note that the order of the dial strings is very important because Unity Connection sequentially compares a
phone number to the call patterns in the restriction table, starting with Dial String 0. If a number matches
more than one call pattern, the number is handled according to the first call pattern it matches.
You can indicate call patterns by entering specific numbers or using the following special characters as
wildcards:
Matches zero or more alphanumeric strings.
*
Matches exactly one digit or character. Use? as a placeholder for a single digit.
?
Corresponds to the # key on the phone.
System Administration Guide
102
Call Management
Default Restriction Table

Page 121
By default, all restriction tables have * as the call pattern in the last dial string of the table. You cannot edit
this call pattern setting, as it prevents a case in which the entered number does not match any call pattern in
the table. However, you can change the Blocked field setting for this dial string to either permit or restrict a
number.
Step 1
In Cisco Unity Connection Administration, expand System Settings > and select Restriction Tables.
The Search Restriction Tables page displays the currently configured restriction tables.
Step 2
Configure a restriction table (For information on each field, see Help> This Page):
• To add a restriction table:
On the Search Restriction Tables page, select Add New.
On the New Restriction Table page, enter the values of the required fields.
On the Edit Restriction Table page, add patterns to the restriction table and select Save.
• To edit a restriction table:
On the Search Restriction Tables page, select the restriction table that you want to delete.
On the Edit Restriction Tables page, change the settings as applicable.
To change the order of the patterns, select Change Order. To move a pattern within the list, on the
Change Restriction Pattern Order page, select the pattern, then select the down or up arrows as applicable.
When you have finished with the changes, select Save
• To delete a restriction table:
On the Search Restriction Tables page, check the check box adjacent to the display name of the restriction
table that you want to delete.
Select Delete Selected and OK to confirm deletion.
If the restriction table you are attempting to delete is referenced by a class of
service, you receive an error message and are not able to delete the table until
you find and remove the reference.
Note
Schedules
Unity Connection use schedules to determine which user transfer rule to apply and which user greeting to
play. You must review the active schedule specified in the user template before adding a user. You either
need to edit an existing user template or create a new user template to specify a different schedule.
If you change the active schedule specified on a user template, the existing users based on that template are
not assigned to the new schedule.
Note
System Administration Guide
103
Call Management
Schedules

Page 122
When you edit an existing schedule, the changes are applied to both new and existing users of that schedule.
Therefore, you can edit the schedule settings before and after you create user accounts. You can also re-assign
a user to a different schedule at any time.
Default Schedules
Unity Connection has the following predefined schedules that you can edit but cannot delete:
• All Hours: This schedule is configured to be active 24 hours a day, seven days a week, and with no
holidays. The routing rules that follow this schedule are always active and the call handlers that use this
schedule never use closed hour transfer settings or play closed greetings.
• Weekdays: This schedule is configured to be active from 8 a.m. to 5 p.m. (in the timezone of the Unity
Connection server) from Monday through Friday. It is also configured to observe any days and times
that are set in the default Holidays schedule.
• Voice Recognition Update: This schedule dictates the times and days when the Unity Connection voice
recognition transport utility can automatically rebuild the voice recognition name grammars if there are
pending changes. By default, all days and times are active for this schedule but re-building large names
affects the system performance adversely.
Configuring Schedules
Step 1
In Cisco Unity Connection Administration, expand System Settings and select Schedules.
The Search Schedules page appears displaying the currently configured schedules.
Step 2
Configure a schedule (For more information on each field, see Help> This Page):
• To add a schedule:
On the Search Schedules page, select Add New.
On the New Schedule page, enter the Display Name and select Save.
On the Edit Schedule Basics page, enter the values of the required fields and select Save.
• To edit an existing schedule:
On the Search Schedules page, select the schedule that you want to edit.
On the Edit Schedule Basics page, enter the values of the required fields and select Save.
If you remove schedule details from a schedule, the schedule is never active.
Note
• To delete a schedule:
On the Search Schedules page, check the check boxes to select the schedule you want to delete and select Show
Dependencies.
Assign the dependent Unity Connection components to any other schedule.
Select Delete Selected and OK to confirm deletion.
System Administration Guide
104
Call Management
Default Schedules
Page 123
Holiday Schedules
You can setup a holiday schedule that can be played on Unity Connection users or call management components
for a specified date and time. The date and time depends on the timezone assigned to the Unity Connection
server.
When a holiday schedule is in effect, Unity Connection only plays the holiday greeting (if enabled) and
observes closed hour transfer rules. You can set up several years of holidays at a time. There is a default
Holiday schedule that can be modified but cannot be deleted.
For each schedule that you create or edit, you can identify multiple ranges of hours and days that make up
the standard and closed hours, and associate a holiday schedule that defines specific holiday dates and times:
The hours and days that make up the normal business hours, when the organization is
open. Standard hours can include multiple time ranges and different time ranges on different
days. (For example, standard hours for an organization might be Monday through Friday
from 8 a.m. to 12 p.m. and 1 p.m. to 5 p.m., to accommodate a lunch break, and Saturday
from 9 a.m. to 1 p.m.)
Standard transfer rules are in effect during the days and time ranges you add to the standard
schedule; standard user and call handler greetings play during standard hours.
Standard hours
The hours and days not identified as standard hours are considered nonbusiness hours,
when the organization is closed.
Closed user and call handler transfer rules operate at all times not specified by the standard
schedule—including holidays; closed user and call handler greetings play according to
the closed schedule.
Closed hours
When a Holiday setting is in effect, Unity Connection plays holiday greetings (if enabled)
and observes closed hours transfer rules. You can set up several years of holidays at a
time. Because many holidays occur on different dates each year, confirm that the holiday
schedule remains accurate annually.
Closed user and call handler transfer rules operate at all times not specified by the standard
schedule—including holidays; holiday greetings for users and call handlers also play
during this time period.
Holidays
Configuring Holiday Schedules
Step 1
In Cisco Unity Connection Administration, expand System Settings and select Holiday Schedules.
The Search Holiday Schedules page appears displaying the currently configured holiday schedules.
Step 2
Configure a holiday schedule (Fore more information on each field, see Help> This Page):
• To add a holiday schedule:
On the Search Holiday Schedules page, select Add New.
On the New Holiday Schedule page, enter the Display Name and select Save.
On the Edit Holiday Schedule Basics page, enter the values of the required fields and select Save.
System Administration Guide
105
Call Management
Holiday Schedules
Page 124
• To edit an existing schedule:
On the Search Holiday Schedule page, select the schedule that you want to edit.
On the Edit Holiday Schedule Basics page, enter the values of the required fields and select Save.
• To delete a schedule:
On the Search Holiday Schedule page, select the schedule that you want to delete.
Select Delete Selected and OK to confirm deletion.
Custom Recordings
Unity Connection allows you to record and play multiple customized recordings in various languages, after
message is send or greeting is played.
In Cisco Unity Connection Administration, after the message is sent, you have the options to play no recording,
default system recording, or custom recordings.
The Play After Message Recording and Custom Recording options can be set for the following:
• Users
• User Templates
• Call Handlers
• Call Handler Templates
Configuring Custom Recordings
This section includes information on configuring a custom recording for Unity Connection, define the settings
for the custom recording and save them.
Step 1
In Cisco Unity Connection Administration, expand Call Management and select Custom Recordings.
The Search Custom Recordings page displays the currently recorded custom recordings.
Step 2
Configure a custom recording: (For information on each field, see Help> This Page):
• To add a custom recording:
On the Search Custom Recording page, select Add New.
On New Custom Recording page, enter the display name and select Save.
On the Edit Custom Recording page, select the language in which you want to record and select Play/Record. When
you are finished with the recording, select Save.
To record each custom recording, you need to use the Media Player on the Edit Custom Recording page.
Note
• To edit a custom recording:
System Administration Guide
106
Call Management
Custom Recordings
Page 125
On the Search Custom Recordings page, select the custom recording that you want to edit.
On the Edit Custom Recording page, edit the custom recording settings and select Save.
• To delete a custom recording:
On the Search Custom Recording page, select the custom recording that you want to delete.
Select Delete Selected and OK to confirm deletion.
Default Automated Attendant Behavior
The following example uses the default Unity Connection automated attendant configuration to illustrate a
call flow through various call management elements. It illustrates some of the default behavior that you can
expect if you have not changed the call management configuration after installing Unity Connection.
Consider an outside caller that does not have a Unity Connection mailbox dials the main phone number in
Unity Connection at 9:00 a.m. on a Monday morning. The following steps describes the call flow:
1.
Information from the phone system indicates that the call is a direct call from an outside caller. Unity
Connection checks the call routing rules for a rule that matches the call. The Direct routing rules table
contains two entries: Attempt Sign In and Opening Greeting. For the Attempt Sign-In rule, Unity Connection
attempts to match the caller phone number with the extension or alternate extension of a Unity Connection
user. When this fails, Unity Connection tries the next routing rule, the Opening Greeting rule.
2.
The Opening Greeting call routing rule matches any incoming call at any time of day. It is configured to
attempt to route the call to the Opening Greeting call handler.
3.
Unity Connection checks the transfer option settings for the Opening Greeting call handler. Because the
call came in during the Weekdays active schedule, the standard transfer options apply. These specify to
send the call to the greeting for this call handler. (Note that if the Opening Greeting call routing rule had
been configured to send the call to the greeting for the Opening Greeting call handler rather than attempting
to transfer to it, this step would be skipped).
4.
Because the call came in during the Weekdays active schedule from a phone number that did not match
an internal Unity Connection user, Unity Connection plays the standard greeting for the call handler:
“Hello: Cisco Unity Connection Messaging System. From a touchtone phone you may dial an extension
at any time. For a directory of extensions, press 4. Otherwise, please hold for an operator.”
5.
While the greeting plays, as the greeting indicates, the caller can enter digits to reach a user extension.
The caller input settings on the Opening Greeting call handler also define several one-key dialing actions
that can be taken—for example, when the caller presses key 4, Unity Connection is configured to send
the call to the System Directory Handler if no other keys are pressed within the time configured to wait
for additional digits.
6.
If no digits are entered, Unity Connection proceeds with the after greeting action for the Standard greeting
on this call handler, which is configured to attempt to transfer the call to the Operator call handler.
7.
The Operator call handler is also configured for the Weekdays active schedule, and once again, Unity
Connection checks the standard transfer options for the call handler, which specify to transfer to the call
handler greeting. The greeting plays: “Sorry, the operator is not available.”
System Administration Guide
107
Call Management
Default Automated Attendant Behavior
Page 126
The after greeting action for this greeting directs Unity Connection to take a message. The message settings
for this call handler specify that the Operator user receives the message, and that after the caller leaves
the message, Unity Connection should hang up.
System Administration Guide
108
Call Management
Default Automated Attendant Behavior
Page 127
C H A P T E R 9
Message Storage
• Message Storage, on page 109
Message Storage
Overview
Cisco Unity Connection uses separate databases to store the system configuration and the information in
voicemails.
About Mailbox Stores
Consider the following points to understand the importance of mailbox stores in Unity Connection:
• During installation, Unity Connection automatically creates:
• A directory database to store system configuration information, such as user data and templates.
• A mailbox store database to store information, such as the sender of each message and the location
of the .wav file associated with a particular voice message.
• An operating system directory to store voice message .wav files.
• A Unity Connection server or cluster supports up to 20,000 users. You need to create a separate mailbox
store for every 5000 users. Creating additional mailbox stores allow you to backup selected mailboxes
and ensure that backup gets completed during non-business hours.
• You can modify the default 15 GB size of the Unity Connection mailbox stores depending on your
requirements. The maximum mailbox size recommended by Unity Connection is 30 GB.
• An administrator with the required permissions can create up to four additional mailbox stores. Each
additional mailbox store includes a separate mailbox store database and a separate operating system
directory.
• The directory information of all the users in a Unity Connection server or cluster remain in one directory
database created during Unity Connection installation.
System Administration Guide
109

Page 128
• After you create a new mailbox store, you can either move the existing mailboxes into the new mailbox
store or create new mailboxes in the new mailbox store. For more information, see the Moving Mailboxes
between Mailbox Stores, on page 112 section.
• In case of a Unity Connection cluster, all the mailbox stores are replicated to both publisher and subscriber.
User Templates Settings
The user template selected at the time of creating a new user account specifies some settings that are used as
a default value for the user account. The mailboxes of the user accounts based on the default user template
are created in the default mailbox store. If you create new mailbox stores, you can change the mailbox settings
in the default user templates or in any new user templates that you create.
If a mailbox store is applied to one or more user templates, you cannot delete that mailbox store until the user
template setting is changed or the user template is deleted.
Note
For more information changing the mailbox settings in a user template, see the Configuring User Templates,
on page 24.
Maximum Size Supported for a Mailbox Store
You must specify the maximum amount of disk space that the voice messages for a mailbox store can occupy
at the time of creating a new mailbox store. The maximum size of mailbox store is not an absolute maximum
but specifies a limit. On exceeding the limit specified for a mailbox, warnings or errors are logged into Unity
Connection.
Consider the following information related to the maximum size supported for a mailbox store:
• The size of a mailbox store is still less than the maximum specified value if:
• Unity Connection saves new messages in the mailbox store.
• You can create new mailboxes in the mailbox store.
• You can move other mailboxes into the mailbox store.
• When the size of the mailbox store reaches 90 percent of the specified maximum size, a warning is logged
in the system log.
• When the size of the store reaches 100 percent of the specified maximum size, an error is logged in the
system log. In addition, in Cisco Unity Connection Administration, an error appears in the Status bar on
the Edit Mailbox Store page.
• If you want to maintain the mailbox store below 100 percent of the specified maximum limit, do any of
the following:
• Increase the maximum size of the mailbox store, if an additional space is available on the hard disk.
• Create another mailbox store and move some mailboxes into the new mailbox store.
• Revise the mailbox size quotas and message aging policy to reduce the individual mailbox size and
the size of mailbox store. You can also delete the voice messages to reduce the size of the mailboxes
that reduces the total size of the mailbox store. However, before deleting the mailboxes, make sure
to backup the mailbox stores to preserve any important information.
System Administration Guide
110
Message Storage
User Templates Settings

Page 129
When users delete messages, the deleted messages are not removed from the
mailbox store until the next time the Clean Deleted Messages task runs. The task
runs every 30 minutes and the schedule for the task cannot be edited.
Note
Changing the Maximum Size Supported for a Mailbox Store
Step 1
In Cisco Unity Connection Administration, expand Message Storage and select Mailbox Stores.
Step 2
On the Search Mailbox Store page, select the applicable mailbox store.
Step 3
On the Edit Mailbox Store page, change the value in the Maximum Size Before Warning field. (For more information
on each field, see Help> This Page).
Do not change the value of this field if the mailbox store is already at the maximum size that can be backed
up during non-business hours.
Note
Step 4
Select Save.
Backup with Multiple Mailbox Stores
The duration of backup depends on the size of a mailbox store. The Disaster Recovery System takes the
backup of an entire mailbox store and the corresponding database during a single backup session. The default
size of a mailbox store is limited to 15 GB so that the backup can be completed during non business hours.
For more information on how to backup the multiple mailbox stores, see the “Backing Up and Restoring
Cisco Unity Connection Components” chapter of the Install, Upgrade, and Maintenance Guide, Release 15,
available at https://www.cisco.com/c/en/us/td/docs/voice_ip_comm/connection/15/install_upgrade/guide/b_
15cuciumg.html
Configuring Mailbox Stores
Consider the following points when creating, editing, or deleting the mailbox stores:
• You can create or edit the settings of one mailbox store at a time.
• You cannot delete a mailbox store if:
• The mailbox store still contains one or more mailboxes.
• The mailbox store is still referenced by one or more user templates.
• The administrator is trying to delete the default mailbox store (UnityMbxDb1).
Step 1
In Cisco Unity Connection Administration, expand Message Storage and select Mailbox Stores.
The Search Mailbox Store page displays the currently configured mailbox stores.
A user account without the System Administrator role cannot create a new mailbox store.
Note
System Administration Guide
111
Message Storage
Changing the Maximum Size Supported for a Mailbox Store

Page 130
Step 2
Configure one or mailbox stores (For more information on each field, see Help> This Page):
• To add a new mailbox store:
On the Search Mailbox Store page, select Add New.
On the New Mailbox Store page, enter the values of the required fields and select Save.
The new mailbox store appears on the Search Mailbox Stores page. The value in the Access Enabled
column is Yes and the value of the Status column is OK.
• To edit an existing mailbox store:
On the Search Mailbox Store page, select the mailbox store that you want to edit.
On the Edit Mailbox Store page, enter the values of the required fields and select Save.
• To delete one or more mailbox stores:
On the Search Mailbox Store page, check the check boxes to select the users with mailboxes that you
want to delete.
Select Delete Selected and OK to confirm.
Moving Mailboxes between Mailbox Stores
When moving mailboxes from one mailbox store to another, note the following:
• The MWI status is retained after a mailbox is moved from one mailbox store to another.
• (Unity Connection cluster only) Sign in to the server with Primary status to move the mailboxes.
• Moving the mailboxes from one mailbox store to another fails, if:
• The user do not have sufficient permissions in Cisco Unity Connection Administration and is not
authorized to move a mailbox.
• The source or the target mailbox store is disabled.
• The user with mailbox that you are moving is a system user. System mailboxes cannot be moved
out of the default mailbox store(UnityMbxDb1).
Step 1
In Cisco Unity Connection Administration, expand Message Storage and select Mailbox Stores Membership.
Step 2
On the Search Mailbox Stores Membership page, in the Choose Membership Type list, select User Mailbox.
Step 3
In the User Mailbox Search Results section, specify the mailbox store from which you want to move the mailboxes.
Step 4
Select the mailbox store to which you want to move the mailboxes and check the applicable check boxes for the users
with mailboxes that you want to move.
Step 5
Select Move Selected Mailboxes.
System Administration Guide
112
Message Storage
Moving Mailboxes between Mailbox Stores
Page 131
Disabling and Re-Enabling a Mailbox Store
Each mailbox store is automatically disabled when you take the backup of that mailbox store using Disaster
Recovery System. When a mailbox store is disabled:
• You cannot create a new mailbox in the store.
• You cannot move existing mailboxes into or out of the store.
• New messages for users with mailboxes that are in the disabled store are queued for delivery until the
store is re-enabled.
Cisco Unity Connection Administration provides an option to manually disable a mailbox store but you should
not disable a mailbox store that is in use.
Step 1
In Cisco Unity Connection Administration, expand Message Storage and select Mailbox Stores.
Step 2
On the Search Mailbox Stores page, select the mailbox store that you want to disable.
Step 3
To disable a mailbox store:
On the Edit Mailbox Store page, uncheck the Mounted check box and select Save.
Step 4
To re-enable a mailbox store:
On the Edit Mailbox Store page, check the Mounted check box and select Save.
Controlling the Size of Mailboxes
You can specify mailbox size quotas and change the message aging policy in Cisco Unity Connection
Administration to control the size of the user voice mailboxes.
Mailbox Size Quotas
To help control the size of the user voice mailboxes, Unity Connection allows you to specify quotas or limits
on the maximum size of voice mailbox. You can configure quotas so that Unity Connection:
• Issues a warning when a mailbox reaches a specified size.
• Prevents a user from sending messages when the mailbox reaches the limit.
• Prevents a user from sending or receiving messages when the mailbox reaches the limit.
By default, Unity Connection is configured with the system-wide mailbox size quotas listed in below Table
. However, to handle the varying needs of users in your organization, you can override the system-wide quotas
for individual mailboxes and for user templates.
Mailbox Size Quotas Defined in Unity Connection
System Administration Guide
113
Message Storage
Disabling and Re-Enabling a Mailbox Store
Page 132
Recording Time Before Quota is Reached/ Disk Space Used 2
Quota
Level
GSM
6.10
G.729a
PCM 16
kHz 3
PCM8kHz
G.726
G.711
A-Law
G.711
Mu-Law
91 min./
2.25
KB/sec
122
min./
1.67
KB/sec
4.5 min./
44 KB/sec
9 min./ 22
KB/sec
37 min./
5.53
KB/sec
18 min./
11 KB/sec
18 min./
11
KB/sec
The user
is
warned
that the
mailbox
is
reaching
the
maximum
size
allowed.
12 MB
Warning
98 min./
2.25
KB/sec
132
min./
1.67
KB/sec
5 min./ 44
KB/sec
10 min./
22 KB/sec
40 min./
5.53
KB/sec
20 min./
11 KB/sec
20 min./
11
KB/sec
The user
is
prevented
from
sending
any
more
voice
messages.
13 MB
Send
106
min./
2.25
KB/sec
143
min./
1.67
KB/sec
5 min./ 44
KB/sec
10 min./
22 KB/sec
43 min./
5.53
KB/sec
21 min./
11 KB/sec
21 min./
11
KB/sec
The user
is
prevented
from
sending
or
receiving
any
more
voice
messages.
14 MB
Send/
Receive
2 Here "Disk Space Used" is not limited to size of the file but includes complex metadata.
3 Here Recording Time and Disk Space Used are calculated using Opus codec as advertised codec.
However the default advertised codec is G.711 Mu-Law.
Quotas alone can control the size of mailboxes for the users who regularly check Unity Connection voice
messages using the telephone user interface. Web Inbox and Cisco ViewMail for Microsoft Outlook do not
notify users that the mailbox has reached its limit. If users check messages using Web Inbox or Cisco ViewMail
for Microsoft Outlook, you need to configure message aging so that the old messages are automatically deleted.
Caution
System Administration Guide
114
Message Storage
Mailbox Size Quotas

Page 133
Changing the Default System-wide Mailbox Quotas in Unity Connection
Step 1
In Cisco Unity Connection Administration, expand Message Storage > > > Mailbox Quotas > and select Mailbox
Quotas.
Step 2
On the Edit System-wide Mailbox Quotas page, enter the values of the required settings. (For more information on each
field, see Help> This Page).
Step 3
Select Save.
For information to override system-wide mailbox quota settings for Unity Connection users and user templates,
see the “User Attributes” and “Users” chapters.
Note
Mailbox Quota Alert
Unity Connection allows you to specify the maximum quota for the voice mailbox of every user. In Unity
Connection 10.0(1) and later releases, when the mailbox size of a user starts reaching its specified threshold
limit, the user receives a quota notification message.
A quota notification message is an email that is sent automatically by Unity Connection to the corporate email
address of the mailbox of the user when its exceeds the threshold limit. You can use Cisco Unity Connection
Administration to view the default quota notification message or to create, view, and edit the quota notification
messages. The quota notification message is sent by the Quota Notification Mail task to the configured
corporate addresses of the users whose mailbox has reached the size specified for warning quota.
Configuring the Quota Notification Settings
Step 1
In Cisco Unity Connection Administration, expand Tools and select Task Management.
Step 2
On the Task Definitions page, select Quota Notification Mail.
Step 3
On the Task Definition Basics (Quota Notification Mail) page, select Edit > Task Schedules.
Step 4
On the Task Schedule page, enter the values of the required fields and select Save. (For more information on each field,
see Help> This Page).
The quota notification messages are not sent to the users that do not have corporate email addresses configured.
Note
You can also execute the following command through CLI to run the Quota Notification Mail task:
run cuc sysagent task Umss.QuotaNotificationMailTask
Umss.QuotaNotificationMailTask is the name of the Quota Notification Mail task.
For more information on the above command, see the “run cuc sysagent task” section of the “Run commands” chapter
of Command Line Interface Reference Guide for Cisco Unified Communications Solutions, Release 10.0(1), available
at
htp:/www.cisco.com/c/en/us/td/docs/voice_ip_comm/cucm/cli_ref/10_0_1/CUCM_BK_CBEED39F_00_cucm-cli-reference-guide-100/CUCM_BK_CBEED39F_00_cucm-cli-reference-guide-100_chapter_0101.html#CUCM_CL_R812A687_00.
System Administration Guide
115
Message Storage
Changing the Default System-wide Mailbox Quotas in Unity Connection
Page 134
Customizing the Subject Line or Body Text of Mailbox Quota Alert Text
Step 1
In Cisco Unity Connection Administration, expand Message Storage> Mailbox Quotas and then select Quota Alert Text.
Step 2
On the Edit Mailbox Quota Alert Text page, in the Language list, enter the values of the required fields. (For more
information on each field, see Help> This Page).
Step 3
Select Save.
Step 4
Repeat Step2 through Step3 for each language installed on the system.
Message Aging Policies
In a single inbox configuration, messages that users delete using Outlook are only moved to the Deleted Items
folder in Outlook but are not permanently deleted. To keep a check on the mailbox size for users, you need
to configure a message aging policy for the Unity Connection users.
Message aging policies ensure that the databases storing the voice messages are not filled up. The message
aging policies are managed through Cisco Unity Connection Administration> Message Storage> Message
Aging> Aging Policies.
Each policy allows you to specify message aging rules that automatically perform the following operations
mentioned on the Message Aging Policy page:
• Move New Messages to the Saved Messages Folder after the specified number of days.
• Move Saved Messages to the Deleted Items Folder after the specified number of days.
• Permanently Delete Messages in the Deleted Items Folder after the specified number of days. This is the
only rule enabled in the Default System Policy message aging policy, this is the only rule that is enabled.
• Permanently Delete Secure Touched Messages That are Older Than a specified number of days. The
secure messages are considered as touched messages if we mark the messages as new, read or deleted
messages.
• Permanently Delete All Secure Messages That are Older Than a specified number of days. This policy
is regardless of whether users have listened to or touched the messages in any way.
For each policy, you can enable or disable each message aging rule and can specify a different number of
days for each rule. For each message aging rule, you can also specify whether Unity Connection sends an
email alert to the users prior to aging the message.
Depending on the system requirement of a company, Unity Connection may need only one or additional
message aging rules. If you are using only one set of message aging rules, you can change the specifications
for the default message aging policy and apply it to all users and user templates. If you need to allow some
users to retain messages longer than other users or send messaging alerts only to a few users, you can create
additional policies and assign different policies to user templates and to individual users.
You can also enable or disable an entire message aging policy. Unity Connection includes a default policy,
Do Not Age Messages, that is disabled and for which all of the rules are disabled.
Some of the message aging rules are based on when a message was last modified. To edit a message, you
must do one of the following:
• In the Web Inbox mark the message as new, mark the message as deleted, or change the message subject,
and select Save.
System Administration Guide
116
Message Storage
Customizing the Subject Line or Body Text of Mailbox Quota Alert Text
Page 135
• From the phone interface, select the options to mark the message as new, save the message again, delete
the message, or restore a deleted message as saved.
The schedule for message aging is controlled by the message aging task that can
be managed from the Task Management page in Cisco Unity Connection
Administration.
Note
Configuring a Message Aging Policy in Unity Connection
Step 1
In Cisco Unity Connection Administration, expand Message Storage> Message Aging > and select Aging Policies.
Step 2
Configure message aging policies, do the following steps (For more information on each field, see Help> This Page):
• To add a new message aging policy:
On the Search Message Aging Policy page, select Add New.
Enter the display name of the policy and select Save.
On the Message Aging Policy page, enter the values of the required fields and check the Enabled check
box. Select Save to apply the changes in the policy.
• To edit an existing message aging policy:
On the Search Message Aging Policy page, select the policy that you want to edit.
On the Message Aging Policy page, change the values of the required fields and select Save.
Do not change the settings of the Do Not Age Messages policy.
Caution
• To delete a message aging policy:
On the Search Message Aging Policy page, check the check boxes for the policies you want to delete.
Select Delete Selected and OK to confirm.
You should not delete the Default System Policy and the Do Not Age Messages
policy. If you do not want to age messages, disable the Default System Policy
instead of deleting it.
Note
Message Aging Alerts
For each message aging rule, you can specify whether Unity Connection sends email alerts to users prior to
taking the aging action associated with the rule. This gives the users time to review and act on the applicable
messages. You specify the number of days between the time that Unity Connection sends the alert and the
time that the message aging action takes place.
System Administration Guide
117
Message Storage
Configuring a Message Aging Policy in Unity Connection


Page 136
Alerts cannot be sent to users unless the Corporate Email Address field for each user on the Users > Users >
Edit User Basics page contains a valid email address. Unity Connection must also be configured to relay
messages through an SMTP smart host.
You can customize the text in the email alerts or you can use the default text. The default subject line and
body text are different for the alerts related to each aging rule and they can be customized separately.
As all the message aging policies use the same five rules, if you customize the alert text for a rule, the text is
the same for any policy that uses that rule. (For example, if you customize the email subject line and body
text for the Move Saved Messages to the Deleted Items Folder rule, that text is used for all alerts that are sent
to users who are assigned to any message aging policy for which that rule is enabled with alerts.)
Note
Message aging alerts can be customized for multiple languages.To enable Unity Connection to send message
aging alert emails to users, you must configure the Unity Connection server to relay messages through an
SMTP smart host. For more information on SMTP smart host, see the Messaging, on page 127 chapter.
Customizing the Message Aging Alert Text in Unity Connection
Step 1
In Cisco Unity Connection Administration, expand Message Storage > Message Aging and select Aging Alert Text.
Step 2
On the Edit Message Aging Alert Text page, in the Language list, select the applicable language.
Step 3
Enter the values of the required fields. (For more information on each field, see Help> This Page).
Step 4
Select Save.
Step 5
Repeat all the above steps for each language installed on the system.
Message Recording Expiration
The Message Recording Expiration feature allows you to specify an expiration date after which the voice
message stored in Unity Connection database is not accessible, regardless of whether the message has been
forwarded to another Unity Connection recipient. Message recording expiration is a system-wide setting and
cannot be applied only to a subset of users. At expiration, message recordings are automatically replaced with
a decoy recording that says, “The message has expired.”
You can specify the Message Recording Expiration policy for video messages also. This feature allows you
to specify the expiration days for video messages, after which the video part of a video message get expired
and only audio part is retained as a voice message.
Typically, message aging rules are sufficient for enforcing message-retention policies. However, when a
message is forwarded, it is considered as a new message and its age is reset. If you are concerned that users
may forward messages in an attempt to circumvent the message-retention policy, consider enabling the Message
Recording Expiration feature. The message recording and transcription (if any) expire based on the date when
the original copy of the message has arrived, regardless of user forwarding.
By default, the Message Recording Expiration feature is not enabled.
Enabling and Configuring Message Recording Expiration in Unity Connection
Step 1
In Cisco Unity Connection Administration, expand Message Storage> Message Aging and select Message Recording
Expiration.
System Administration Guide
118
Message Storage
Customizing the Message Aging Alert Text in Unity Connection

Page 137
Step 2
On the Edit Message Recording Expiration page, specify the number of message expiry days and check the Enabled
check box. (For more information on each field, see Help> This Page).
Step 3
Specify the number of message expiry days for a video messages in Video Message Recordings Expire in field (For more
information on each field, see Help> This Page).
Step 4
Select Save.
The Message Recording Expiration feature does not apply to messages that have been forwarded to personal
email addresses or to message recordings that have been saved locally to user workstations.
Note
To prevent users from saving local copies or forwarding voice messages to personal email addresses, consider configuring
Unity Connection to mark all messages as secure. Unity Connection applies the Message Recording Expiration feature
to messages in the mailboxes of recipients that are homed on the Unity Connection server. For example, if User A homed
on Unity Connection server A sends a message to User B homed on Unity Connection server B, the message is subject
to message expiration only if the Message Recording Expiration feature is enabled on server B.
System Administration Guide
119
Message Storage
Enabling and Configuring Message Recording Expiration in Unity Connection
Page 138
System Administration Guide
120
Message Storage
Enabling and Configuring Message Recording Expiration in Unity Connection
Page 139
C H A P T E R 10
Networking
Each Unity Connection server (or cluster) has a maximum number of users that it can serve. When the
messaging needs of your organization require more than one Unity Connection server or cluster; you need a
way to combine multiple Unity Connection servers or connect Unity Connection with Cisco Unity in a network
to allow the connected servers communicate with each other. The servers that are joined to the network are
referred to as locations. You can use either of the following ways to setup a network:
• VPIM (Voice Profile for Internet Mail) Network: Involves creating a network of different locations, such
as Unity Connection and Cisco Unity based on VPIM protocol that allows different voice messaging
systems to exchange voice and text messages over the Internet or any TCP/IP network. For more
information on VPIM network, see the "VPIM Networking in Cisco Unity Connection" chapter of the
Networking Guide for Cisco Unity Connection Release 15 available at https://www.cisco.com/c/en/us/
td/docs/voice_ip_comm/connection/15/networking/guide/b_15cucnetx.html.
• Legacy Network: Involves creating a network of different locations, such as Unity Connection and Cisco
Unity using intrasite and intersite links. For more information on legacy network, see the Networking
Guide for Cisco Unity Connection Release 15 available at https://www.cisco.com/c/en/us/td/docs/voice_
ip_comm/connection/15/networking/guide/b_15cucnetx.html.
• HTTPS Network: Involves creating a network of different locations, such as Unity Connection and VPIM
using the HTTPS link. For more information on HTTPS network, see the HTTPS Networking Guide for
Cisco Unity Connection Release 15 available at https://www.cisco.com/c/en/us/td/docs/voice_ip_comm/
connection/15/https_networking/guide/b_15cuchttpsnet.html.
A Cisco Unity location cannot be connected in an HTTPS network.
Note
• Cisco Unity Connection Survivable Remote Site Voicemail Network: Involves creating a network of
multiple branches (Unity Connection SRSV) and central (Unity Connection) location based on client-server
architecture. Cisco Unity Connection Survivable Remote Site Voicemail (Unity Connection SRSV) is a
backup voicemail solution that allows you to receive voice messages during WAN outages. For more
information on Unity Connection SRSV, see the Complete Reference Guide for Cisco Unity Connection
Survivable Remote Site Voicemail (SRSV) for Release 15 available at https://www.cisco.com/c/en/us/td/
docs/voice_ip_comm/connection/15/srsv/guide/b_15cucsrsvx.html.
• Legacy Links, on page 122
• Branch Management, on page 123
• HTTPS Links, on page 124
• Locations, on page 124
• VPIM, on page 124
System Administration Guide
121


Page 140
• Connection Location Passwords, on page 125
Legacy Links
Legacy links include intrasite and intersite links. In a legacy or digital network, you can create, edit, or delete
an intrasite or an intersite link.
Intrasite Links
You can connect multiple Unity Connection locations in an organization through an intrasite link. The network
of locations connected through intrasite links is referred to as Unity Connection site.
Configuring an Intrasite Link
Step 1
In Cisco Unity Connection Administration, expand Networking > Legacy Links and select Intrasite Links.
The Search Intrasite Links page appears displaying the currently configured intrasite links.
Step 2
Configure an intrasite link (For information on each field, select Help > This Page.):
• To add an intrasite link, select Join Site. On the Join Site page, enter the required information and select Auto Join
Site or Upload based on the option that you select in the Method Used to Join Site field.
• To edit an intrasite link, select the intrasite link that you want to edit. On the Edit Intrasite Link page, enter the
required information and select Save.
• To delete an intrasite link:
On the Search Intrasite Links page, select the intrasite link that you want to delete.
Select Remove Selected or Remove Self from Site.
Intersite Links
You can connect multiple Unity Connection sites through intersite links.
Configuring an Intersite Link
Step 1
In Cisco Unity Connection Administration, expand Networking > Legacy Links and select Intersite Links.
The Search Intersite Links page appears displaying the currently configured intersite links.
Step 2
Configure an intersite link (For information on each field, select Help > This Page.):
• To add an intersite link, select Add. On the New Intersite Link page appears, enter the required information and
select Link.
• To edit an intersite link, select the intersite link that you want to edit. On the Edit Intersite Link page, enter the
required information and select Save.
System Administration Guide
122
Networking
Legacy Links
Page 141
• To delete an intersite link:
On the Search Intersite Links page, select the intersite link that you want to delete.
Select Remove Selected.
Branch Management
Branch Management node allows you to perform various tasks, such as viewing branch synchronization results
and updating branch information.
Branches
You can add one or more branches associated with a central Unity Connection location where each branch
acts as a backup voicemail solution for receiving voice messages during WAN outages.
Configuring a Branch
Step 1
In Cisco Unity Connection Administration, expand Networking > Branch Management and select Branches.
The Branch Listing page appears displaying the currently configured branches.
Step 2
Configure a branch (For information on each field, select Help > This Page.):
• To add a branch, select Add New. The New Branch page appears. Enter the required information and select Link.
• To edit a branch, select the branch that you want to edit. On the Edit Branch page, enter the required information
and select Save.
• To delete a branch:
On the Branch Listing page, select the branch that you want to delete.
Select Deleted Selected.
Branch Synch Results
You can view the details, such as synchronization type and start date associated with the different branches
connected to a central Unity Connection location.
In Cisco Unity Connection Administration, expand Networking > Branch Management and then select
Branch Synch Results. The Branch Synch Results page appears displaying the details of the currently
configured branches. For information on each field, see Help> This Page.
System Administration Guide
123
Networking
Branch Management
Page 142
HTTPS Links
HTTPS links allows you to create a network that is more scalable both in terms of number of Unity Connection
locations and the total directory size.
Configuring an HTTPS Link
Step 1
In Cisco Unity Connection Administration, expand Networking > and then select > HTTP(S) Links.
The Search HTTP(S) Links page appears displaying the details of the currently configured HTTPS links.
Step 2
Configure an HTTPS link (For information on each field, select Help > This Page.):
• To add an HTTPS link, select Add. On the New HTTP(S) Link page, enter the required information and select Link.
• To edit an HTTPS link, select the HTTPS link that you want to edit. On the Edit HTTPS Link page, enter the required
information and select Save.
• To delete an HTTPS link:
On the Search HTTP(S) Links page, select the HTTPS link that you want to delete.
Select Remove Selected or Remove Self from Site.
Locations
You can view a brief description (type and display name) of all the locations connected to a Unity Connection
location.
To view the locations, in Cisco Unity Connection Administration, expand Networking and then select
Locations. For information on each field, see Help> This Page.
VPIM
Unity Connection supports the Voice Profile for Internet Mail (VPIM) protocol, an industry standard that
allows different voice messaging systems to exchange voice and text messages over the Internet or any TCP/IP
network.
Configuring an HTTPS Link
Step 1
In Cisco Unity Connection Administration, expand Networking > and then select > HTTP(S) Links.
The Search HTTP(S) Links page appears displaying the details of the currently configured HTTPS links.
System Administration Guide
124
Networking
HTTPS Links
Page 143
Step 2
Configure an HTTPS link (For information on each field, select Help > This Page.):
• To add an HTTPS link, select Add. On the New HTTP(S) Link page, enter the required information and select Link.
• To edit an HTTPS link, select the HTTPS link that you want to edit. On the Edit HTTPS Link page, enter the required
information and select Save.
• To delete an HTTPS link:
On the Search HTTP(S) Links page, select the HTTPS link that you want to delete.
Select Remove Selected or Remove Self from Site.
Connection Location Passwords
You can configure remote access to other Cisco Unity Connection Administration locations in the network
by saving login credentials of all the locations on one location.
Step 1
In Cisco Unity Connection Administration, expand Networking > and then select > Connection Location Passwords.
The Search Enterprise Administration Passwords page displays the currently configured location passwords.
Step 2
Configure a location password (For information on each field, select Help > This Page.):
• To add a location password:
Select the location from the Connection Location drop-down and enter the required information.
Select Add New and then select Save.
• To delete a location password:
On the Search Enterprise Administration Passwords page, select the location for which you want to delete the
credentials.
Select Delete Selected.
System Administration Guide
125
Networking
Connection Location Passwords
Page 144
System Administration Guide
126
Networking
Connection Location Passwords
Page 145
C H A P T E R 11
Messaging
•
• Overview, on page 127
• Basics of Messaging, on page 127
• Integrated Messaging, on page 139
• Unified Messaging, on page 145
Overview
This chapter outlines the types of messages available in Cisco Unity Connection, how Unity Connection
handles the recording, delivery, storage of messages, and the integrated messaging and unified messaging
models.
Basics of Messaging
Unity Connection handles the recording, playback, storage, and delivery of different types of messages.
Types of Messages
Following are the different types of messages supported by Unity Connection:
• Unidentified Voice Messages: The messages left by outside callers are unidentified or outside caller
voice messages. The outside callers are non Unity Connection users or the users who are not signed in
to Unity Connection.
An outside caller can call the main phone number for the Unity Connection server and spell by name or enter
an extension to reach the user using a handler, or can be directed to the user mailbox (or to a distribution list)
through a call handler. If an outside callers calls a user extension and the user does not answer, the call gets
forwarded to the voicemail and the caller leaves a voicemail. Unity Connection identifies the senders of these
messages as unidentified callers. When an unidentified caller leaves a message, the From field of the message
displays “UnityConnection@<servername>” in the Web Inbox or in an email client or an RSS reader, if
applicable. Depending on whether the subject line has been customized, it displays the phone number of the
caller, if it is available. Messages from outside callers can be forwarded to other users but cannot be replied
to.
System Administration Guide
127

Page 146
• User to User Voice Messages: The messages left by Unity Connection users to another users or
distribution lists are identified or user to user voice messages. Users can reply or forward messages from
other users.
Consider a user calls another user extension, the called user does not answer and the call is forwarded to user
mailbox where the caller leaves a voice message. In this case, if Identified User Messaging is enabled and
supported by phone system, and the user calls from primary extension or an alternate device, Unity Connection
recognizes that the calling extension is associated with a user or identified user. The identified user messaging
is enabled by default. It can be disabled using the Disable Identified User Messaging Systemwide setting on
the System Settings > Advanced > Conversations page. Unity Connection does not perform caller authentication
or verification when an identified caller leaves a voicemail for another user.
• Email Messages in Exchange Server: Users can access emails stored in the user mailboxes on an
Exchange server. The Exchange emails can be accessed using the Text-to-Speech feature. For more
information, see the Unified Messaging, on page 145 section.
• System Broadcast Messages: The recorded announcements sent to everyone in an organization are
system broadcast messages. Users must listen to each system broadcast message in its entirety before
listening to other new and saved messages or changing setup options. They cannot fast-forward or skip
a system broadcast message. For more information, see the Broadcast Messaging, on page 135 section.
By design, system broadcast messages do not trigger message waiting indicators
(MWIs) on user phones.
Note
• Text or HTML Notifications: Message notifications are sent in the form of text messages to email
addresses, text pagers, and text-compatible mobile phones. When a new voicemail is delivered to users,
they receive SMTP based HTML notifications. For more information, see the Notifications, on page 173
chapter.
• Receipts: A user can request a read receipt when sending a message. The sender receives a message
receipt when the recipient listens to the message. New receipts turn on the message waiting indicator on
the user phone and can trigger message notifications.
When a voice message cannot be delivered, if the sender is configured to accept receipts, Unity Connection
alerts the sender with a nondelivery receipt (NDR). A user can re-send the NDR to a different recipient at a
later time. The NDR contains a copy of the original message.
• Interview Handler Messages: Interview handlers collect information from callers by playing a series
of questions that you have recorded and then recording the answers offered by callers.
When all the answers have been recorded, they are forwarded as a single voice message, with beeps separating
the answers, to the recipient (user or distribution list) that you designate in the interview handler configuration.
• Dispatch Messages: The dispatch message is sent to a distribution list with the message configured in
such a way that only one user responds to that message. A user can accept, decline, or postpone the
dispatch message. For more information, see the Dispatch Messages, on page 129 section.
• Live Record Messages: The messages recorded during a live conversation between a user and a caller
are the live record messages. The recorded messages are stored in the user mailbox. The user can access
the messages at any time or forward it another user or group of users. For more information, see the Live
Record, on page 134 section.
System Administration Guide
128
Messaging
Types of Messages

Page 147
Message Recording
The audio format (or codec) used for recording a message is in the same format as used by playback devices.
For example, if you listen to messages primarily on a phone system extension, you should configure Unity
Connection to record messages in the same audio format that the phone system uses. For more information,
see the Changing the Audio or Video Format of Recordings, on page 280 section.
Configuring Termination Warning Prompt
By default, Unity Connection plays a termination warning prompt before reaching the maximum allowable
message length while callers record their messages. By default, the warning plays 15 seconds before the end
of a recording, provided that the recording is not restricted to less than 30 seconds in length.
Step 1
In Cisco Unity Connection Administration, expand System Settings and select Telephony.
Step 2
On the Telephony Configuration page, enter the values of the following fields:
• Minimum Recording Duration in Milliseconds for Termination Warning
• Recording Termination Warning Time in Milliseconds
• Select Save to apply the changes.
If the system is temporarily unavailable to take your message, disable the Recording Termination Warning
by setting the value to zero.
Note
Default Recipient Accounts
The default users are created at the time of installation. The users can be modified but cannot be deleted.
Following are the three default users that are responsible for message delivery and retrieval of messages when
callers are routed to one of the default call management objects:
• Operator: By default, the mailbox of the Operator user stores the messages left for Operator call handler.
You should either assign a user to monitor this mailbox or reconfigure the Operator call handler to send
messages to a different user or system distribution list.
• UndeliverableMessagesMailbox: By default, this mailbox is the only member of the Undeliverable
Messages distribution list. You should either assign a user to monitor this mailbox or add a user to the
Undeliverable Messages distribution list to monitor and reroute (as appropriate) any messages that are
delivered to the list.
• Unity Connection Messaging System: By default, this mailbox acts as a surrogate sender for unidentified
messages or messages from unidentified callers.
Dispatch Messages
Dispatch messaging is useful when a team is available to respond to messages and only one member of the
team is required to respond.
Following are the ways to handle dispatch messages:
System Administration Guide
129
Messaging
Message Recording
Page 148
• If a user selects to accept a message, all other copies of the message are removed from the mailboxes of
the other members of the distribution list, regardless of whether the other users have listened to or
postponed the message.
• If a user selects to postpone the message, it remains as an unread message in the mailbox of that user
and in the mailboxes of the other members of the distribution list.
• If the user selects to decline the message, it is removed from the mailbox of that user but copies of the
message remain as unread in the mailboxes of the other members of the distribution list.
• If there is only one copy of the dispatch message remaining and no user has yet selected to accept the
message, the final user whose mailbox it is in must accept it. That user is not given the option to decline
the message.
Configuring Dispatch Messages
Step 1
In Cisco Unity Connection Administration, expand Call Management and select System Call Handlers.
Step 2
On the Search Call Handlers page, in the System Call Handlers table, select the applicable call handler.
Step 3
On the Edit Call Handler Basics page, in the Edit menu, select Message Settings.
Step 4
On the Edit Message Settings page, under Message Recipient, select a distribution list as the recipient and check the Mark
for Dispatch Delivery check box. Select Save.
Configuring Dispatch Messaging for Interview Handlers
Step 1
In Cisco Unity Connection Administration, expand Call Management and select Interview Handlers.
Step 2
On the Search Interview Handlers page, in the Interview Handlers table, select the applicable interview handler.
Step 3
On the Edit Interview Handler Basics page, under Message Recipient, select a distribution list as the recipient and check
the Mark for Dispatch Delivery check box. Select Save.
Dispatch Messaging Limitations and Behavior
Following are the limitations and behavior of dispatch messaging:
• Only voice messages can be flagged for dispatch.
• The handling of dispatch messaging is supported only over the phone interface. If you handle the dispatch
messages from any other client interface, such as Web Inbox or Cisco Unified Personal Communicator,
the user cannot postpone, accept, or decline the message.
The handling of dispatch messaging is not supported with Visual Voicemail.
Note
• The dispatch messages are not synchronized between Unity Connection and Exchange server if single
inbox has been configured. For information on single inbox, see the Unified Messaging, on page 145
section.
System Administration Guide
130
Messaging
Configuring Dispatch Messages

Page 149
• The dispatch messages can never be transcribed even if SpeechView has been enabled for the recipients.
• A user can delete the last copy of a dispatch message using Web Inbox or Cisco Unified Personal
Communicator.
• During playback of a dispatch message, if a user presses the phone keypad key that is mapped to the
“skip” or “delete” menu options, Unity Connection interprets the “skip” key press as “postpone,” and
the “delete” key press as “decline.”
• The recipient who accepts the dispatch message is the only user to have a copy of that message in his/
her mailbox. The recipient can select to hear the dispatch messages first, during the playback of all voice
messages using phone interface.
• The copy of a dispatch message is not stored in the Deleted Items folder if the recipient declines a dispatch
message.
• A dispatch message once accepted by a user is treated as a general voice message. Therefore, a dispatch
message once accepted cannot be forwarded to another user. The message is presented to the phone
interface like a voice message and not announced as a dispatch message.
• If message notification rules are configured for dispatch messages, by the time users receive the notification
and call in to retrieve the message, the accepted dispatch messages are gone from the recipient mailboxes.
• The dispatch messaging is not supported for digital networking. For more information on digital
networking, see the Networking, on page 121 chapter.
• For a Unity Connection cluster configuration, two different users can call into the publisher and subscriber
servers to accept the same dispatch message if the cluster is stuck in a split brain condition. The split
brain condition refers to the time when both publisher and subscriber servers are stuck in Primary state.
After the split brain condition has been resolved, the user who last accepted the dispatch message is the final
recipient and the message is removed from the mailbox of the other user.
Message Delivery
When a message is delivered by Unity Connection, the recipient is either the Unity Connection Messaging
system for unidentified messages or the recipient listed in the identified messages.
Message Delivery and Sensitivity Settings
The message delivery and sensitivity settings allow the users to control the delivery time of a message, the
users who can access it, and if the messages can be forwarded to other users.
Following are the message delivery and sensitivity options for users and outside callers:
• Urgent: The urgent messages are delivered before other messages. The users who are signed in to the
mailboxes can always mark a message urgent.
• Private: A private message can be send to any user but it cannot be forwarded using phone, Messaging
Inbox, Web Inbox, ViewMail for Outlook, or ViewMail for Notes. The identified messages can always
be marked private and can be saved as .wav files.
• Secure: Only Unity Connection users can receive secure messages. The secure messages can be played
or forwarded using phone, Messaging Inbox, Web Inbox, or ViewMail for Outlook 8.5. The identified
messages can be marked secure but cannot be saved as .wav files.
System Administration Guide
131
Messaging
Message Delivery
Page 150
• Future delivery: A user can mark a message for future delivery to a recipient using the touchtone
conversation or the voice recognition conversation. Unity Connection waits to send the message on the
day and time that the user specifies. Once future delivery is set on the message, the user can cancel the
future delivery as long as the user has not yet selected the option to send the message.
An administrator can cancel the pending messages set for future delivery using the delete cuc futuredelivery
CLI command.
The unidentified callers or users who are not signed in to mailboxes, can mark a message urgent, private, or
secure depending on the user or user template settings. If any other Unity Connection user calls a user extension
and the user does not answer. Unity Connection identifies the caller as unidentified callers. The message
delivery and sensitivity settings can be managed in either of the following ways:
• In Cisco Unity Connection Administration> Users> Users> select a user> Edit> Message Settings> select
the desirable action under the Message Urgency, Message Security, and Message Sensitivity fields.
• In Cisco Unity Connection Administration> Templates> User Template> select a user template> Edit>
Message Settings> select the desirable action under the Message Urgency, Message Security, and Message
Sensitivity fields.
Message Delivery Issues
Following are the information pertaining to message delivery issues:
• If a message failed to be delivered to a recipient that the caller intended to reach, the message is sent to
the Undeliverable distribution list. Unity Connection sends a non delivery receipt (NDR) to the sender
if the sender is configured to accept NDRs.
NDRs are not send if the sender is an unidentified caller or the mailstore of the
recipient is offline.
Note
If the original message is malformed, the message is not sent to Undeliverable distribution list. The message
is instead sent to the MTA bad mail folder (UmssMtaBadMail).
• If the Unity Connection components involved in message delivery are unavailable, the recorded messages
are queued and delivered when the components are available. For example, if a mailbox store is disabled,
messages are held in queue, and delivered once the mailbox store is enabled again.
For single inbox configuration, if network or other conditions are slow and prevent attempts to retrieve
messages from Exchange, Unity Connection announces to users that email is unavailable. The time period
that Unity Connection waits for a response from Exchange is four seconds by default. This can be configured
in Cisco Unity Connection Administration> System Settings> Advanced> Unified Messaging Services> the
TTS and Calendars: Time to Wait for a Response (in seconds) field.
The messages are held in queue for delivery but they are not synchronized with Exchange mailboxes. The
synchronization between Unity Connection and Exchange resumes once Exchange is available.
• If a call is disconnected while users are in the process of sending, replying, or forwarding messages, the
messages are handled in the way depending on user configuration. This configuration is specified in
either of the following ways:
System Administration Guide
132
Messaging
Message Delivery Issues

Page 151
• In Cisco Unity Connection Administration> Users> Users> select a user> Edit> Send Message
Settings> select the desirable action under the When a Call is Disconnected or the User Hangs Up
field.
• In Cisco Unity Connection Administration> Templates> User Templates> select a user template>
Edit> Send Message Settings> select the desirable action under the When a Call is Disconnected
or the User Hangs Up field.
• If the mailbox quota is exceeded or the mailbox store size is exceeded, Unity Connection allows to record
the message if the recipient mailbox has not exceeded the Send/ Receive Quota. For more information
on mailbox quotas and mailbox store size, see the Controlling the Size of Mailboxes, on page 113 section
of the Message Storage, on page 109 chapter.
Message Actions
The message actions for a user or user template determines how to handle the different types of messages
received for a user. For more information, see the Message Actions, on page 276 section.
Message Subject Line Formats
Message subject lines are visible when users view and listen to messages in the Messaging Inbox, Web Inbox,
or any other visual client that displays the message subject. Subject lines are not presented to users when they
listen to voice messages by phone. For more information, see the Subject Line Formats, on page 207 section.
Message Storage and Disk Capacity
The message content is stored as .wav file on the Unity Connection server and the information about the
messages is stored in a database.
Message Deletion
The users can delete messages using multiple methods, such as phone, Web Inbox, or Messaging Inbox. In
addition to this, an administrator can also manage the message deletion to meet the disk capacity requirements
and security needs.
Following are the ways to delete messages:
• The messages can be either soft deleted or hard deleted depending on the settings configured in Cisco Unity
Connection Administration> Class of Service> class of service for the users> the Delete Messages without
Saving to Deleted Items Folder check box under the Message Options field.
If the check box is unchecked and a user deletes a message, then the deleted message moves to the Deleted
Items folder. This action is referred to as soft delete.
If the check box is checked and a user deletes a message, then the message is permanently deleted without
sending any copy to Deleted Items folder. This action is referred to as hard delete.
• The messages can be permanently deleted without any action required from the users who received them,
using the message aging policies. For more information, see the Message Aging Policies, on page 116
section.
System Administration Guide
133
Messaging
Message Actions
Page 152
• The messages can be deleted using the Message File Shredding Level setting in the Messaging
Configuration page in Cisco Unity Connection Administration> Advanced System Settings. This is a
system wide setting that ensures copies of messages are securely deleted by shredding the messages the
specified number of times when they are deleted. The shredding can be done only when they have been
hard deleted.
Message Access
Users can access new and saved voice messages using a touchtone or voice recognition conversation over
phone. You can specify whether users can access the deleted messages.
The users may also gain access to voice messages using Web Inbox, Messaging Inbox, Cisco Unified Personal
Communicator, RSS reader or other applications. For information on accessing voice messages using RSS
reader, see the Enabling Insecure RSS Connections, on page 239 section.
Depending on the unified messaging service accounts, users may access email messages in an external message
store using phone.
Live Record
Live record allows users to record conversations while they talk to callers. The recorded conversation is stored
as a message in the user mailbox and the user can review it later, or redirect it to another user or group of
users. Operators in your organization may find live record particularly useful. Live record is supported only
for Cisco Unified Communications Manager integrations.
The live record does not work for users who have full mailboxes. When a user with a full mailbox tries to
record a call, the recorded conversation is not stored as a message in the user mailbox.
Configuring Live Record
Step 1
Add a live record pilot number to Cisco Unified Communications Manager:
a)
In Cisco Unified Communications Manager Administration, expand Call Routing and select Directory Number.
b) In the Find and List Directory Numbers page, select Add New. The Directory Number Configuration page appears.
c)
In the Directory Number field, enter the directory number of the live record pilot number.
d) In the Route Partition field, select the partition that contains voicemail port directory numbers.
e)
In the Description field, enter a description.
f)
In the Voice Mail Profile field, accept the default of None.
g) In the Calling Search Space field, select the calling search space that includes the partition with all voicemail port
directory numbers.
h) In the Forward All field, under Destination, enter the voicemail pilot number for the voice messaging ports.
i)
In the Forward All field, under Calling Search Space, select the calling search space that includes the partition with
all voicemail port directory numbers and select Save.
Step 2
(optional) Configure Cisco Unified Communications Manager conference settings:
a)
In Cisco Unified Communications Manager Administration, expand System and select Service Parameters.
b) On the Service Parameters Configuration page, in the Server field, select the name of the Cisco Unified CM server.
c)
In the Service list, select Cisco CallManager. In the Clusterwide Parameters (Feature - Conference), in the Drop Ad
Hoc Conference field, select When Conference Controller Leaves and select Save.
System Administration Guide
134
Messaging
Message Access
Page 153
Step 3
Create a routing rule for live record in Unity Connection:
a)
In Cisco Unity Connection Administration, expand Call Management and select Call Routing > Forwarded Routing
Rules.
b) On the Forwarded Routing Rules page, select Add New.
c)
On the New Forwarded Routing Rule page, enter a description in the Description field and select Save.
d) On the Edit Forwarded Routing Rule page, in the Status field, select Active.
e)
In the Send Call To field, select Conversation.
f)
In the Conversation list, select Start Live Record and select Save.
g) In the Routing Rule Condition section, select Add New.
h) In the New Forwarded Routing Rule Condition page, select Forwarding Station. To the right of the Forwarding Station
option, select Equals and enter the live record pilot number that you created in the To Add a Live Record Pilot Number
to Cisco Unified CM field and select Save.
Step 4
(optional) Adjust the live record beep interval:
a)
In Cisco Unity Connection Administration, expand System Settings and select Advanced > Telephony.
b) In the Telephony Configuration page, enter value in the Live Record Beep Interval in Milliseconds field. (For more
information on this field, see Help> This Page).
c)
Select Save.
Step 5
Test the live record:
a)
From a user phone, dial an extension.
b) After the dialed extension is answered, on the user phone, press the Confrn softkey to start a conference call.
c)
Dial the live record pilot number that you created in Cisco Unified Communications Manager.
d) Press the Confrn softkey to join the Unity Connection live recorder with the conference call.
e)
After recording the phone conversation, hang up the user phone. Sign in to the voice mailbox for the user and listen
to the recorded phone conversation.
Broadcast Messaging
System broadcast messages are different from regular voice messages in the following ways:
• The users when sign in to Unity Connection using phone, immediately hear the number of broadcast
messages they have and the system begins playing them. This happens even before users hear message
counts for new and saved messages.
• The sender of a broadcast message specifies the time for which the message is active. The system can
broadcast the message till it is active. The message can be active for a day, week, month or for an indefinite
time period.
• The playback of a broadcast message can be interrupted by a user, for example, a user hangs up. The
message plays again the next time when the user signs in to Unity Connection using phone.
• The broadcast message can either be replayed or permanently deleted after a user has finished playing
a system broadcast message. Users cannot respond to, forward, or save broadcast messages.
• The users can receive an unlimited number of system broadcast messages even when they exceed the
mailbox size limits and are no longer able to receive other messages. This is because the storage of
broadcast messages is not included in the total mailbox size for each user.
System Administration Guide
135
Messaging
Broadcast Messaging
Page 154
• The users can listen to broadcast messages only using phone. Other clients, such as RSS reader and Web
Inbox cannot be used to listen to broadcast messages.
• The single inbox messages are not synchronized between Unity Connection and Exchange server.
• Unity Connection stops responding to voice commands during the playback of voice messages. When
using the voice-recognition input style, users needs to use key presses to either replay or delete the
broadcast message.
Follow the given steps to configure broadcast messaging to users:
1.
Set up a way for users to access the Broadcast Message Administrator. See the Enable Phone Access to
the Broadcast Message Administrator section.
2.
Enable user accounts or a template to send and update system broadcast messages. See the Enabling
Sending and Updating Broadcast Messages section.
Enable Phone Access to the Broadcast Message Administrator
To send a system broadcast message, users sign in to the Broadcast Message Administrator, a special
conversation that allows them to send and update system broadcast messages. You can give users access to
the Broadcast Message Administrator using either of the following ways:
• Configure a Custom Keypad Mapping conversation: The Custom Keypad Mapping tool can be configured
to map a key to the Broadcast Message Administrator Conversation so that it is offered to users from the
main menu. See the Custom Keypad Mapping Tool, on page 252 section.
• Create a call handler: See the Creating a Call Handler to Send Users to the Broadcast Message
Administrator, on page 136 section.
• Set up a one-key dialing option: See the Setting Up a One Key Dialing Option to Send Users to Broadcast
Message Administrator, on page 137 section.
• Set up a phone number and routing rule: Set up a new phone number and then add a routing rule. See
the Setting Up a Routing Rule to Send Users to Broadcast Message Administrator, on page 137 section.
Creating a Call Handler to Send Users to the Broadcast Message Administrator
A new call handler with unique extension is created to specify the Broadcast Message Administrator as the
destination to which Unity Connection sends the user after hearing the greeting.
Step 1
In Cisco Unity Connection Administration, expand Call Management and select System Call Handlers.
Step 2
In the Search Call Handlers page, select Add New.
Step 3
In the New Call Handler page, enter a display name and the extension that users can dial to reach the call handler. Select
the call handler template on which to base the new call handler and select Save.
Step 4
In the Edit Call Handler Basics page, in the Edit menu, select Greetings.
Step 5
In the Greetings page, select the Standard greeting.
Step 6
In the Edit Greeting page, in the Callers Hear section, select Nothing.
Step 7
In the After Greeting section, select Conversation and then select Broadcast Message Administrator and select Save.
System Administration Guide
136
Messaging
Enable Phone Access to the Broadcast Message Administrator
Page 155
Setting Up a One Key Dialing Option to Send Users to Broadcast Message Administrator
You can specify that Unity Connection sends a caller to the Broadcast Message Administrator when a caller
presses a particular key during the greeting. To set up a one-key dialing option for accessing the Broadcast
Message Administrator, use either of the following procedures:
Step 1
In Cisco Unity Connection Administration, expand Call Management and select System Call Handlers.
Step 2
In the Search Call Handlers page, select the applicable call handler. If you want to set up access to the Broadcast Message
Administrator from the opening greeting, select the Opening Greeting call handler.
Step 3
In the Edit Call Handler Basics page, in the Edit menu, select Caller Input.
Step 4
In the Caller Input page, in the Caller Input Keys table, select the applicable phone keypad key.
Step 5
In the Edit Caller Input page for the key that you have selected, check the Ignore Additional Input (Locked) check box.
Step 6
In the Conversation section, select Broadcast Message Administrator and then select Save.
Setting Up a One Key Dialing Option from a User Greeting to Access Broadcast Message
Administrator
Step 1
In Cisco Unity Connection Administration, expand Users and select Users.
Step 2
In the Search Users page, in the Search Results table, select the applicable user.
Step 3
In the Edit User Basics page, in the Edit menu, select Caller Input.
Step 4
In the Caller Input page, in the Caller Input Keys table, select the applicable phone keypad key.
Step 5
In the Edit Caller Input page for the key that you have selected, check the Ignore Additional Input (Locked) check box.
Step 6
In the Conversation section, select Broadcast Message Administrator and then select Save.
Setting Up a Routing Rule to Send Users to Broadcast Message Administrator
Step 1
In Cisco Unity Connection Administration, expand Call Management > Call Routing and select Direct Routing Rules.
Step 2
In the Direct Routing Rules page, select Add New.
Step 3
In the New Direct Routing Rule page, enter a display name for the new routing rule and select Save.
Step 4
In the Edit Direct Routing Rule page, confirm that the Status is set to Active.
Step 5
In the Send Call To field, in the Conversation section, select Broadcast Message Administrator and select Save.
Step 6
In the Routing Rule Conditions table, select Add New.
Step 7
In the New Direct Routing Rule Condition page, in the Dialed Number section, select Equals and enter the phone number
that has been set up for access to the Broadcast Message Administrator. Select Save.
Step 8
In the Direct Routing Rule menu, select Direct Routing Rules. Make sure that the new routing rule is in an appropriate
position in the routing table.
Step 9
(optional) If you want to change the order of routing rules, select Change Order. In the Edit Direct Routing Rule Order
page, select the name of the rule you want to reorder, and select the Up or Down arrow until the rules appear in the correct
order. Select Save.
System Administration Guide
137
Messaging
Setting Up a One Key Dialing Option to Send Users to Broadcast Message Administrator
Page 156
Enabling Sending and Updating Broadcast Messages
After configuring the Broadcast Message Administrator, you need to enable users to send or update broadcast
messages using either of the following ways:
Step 1
In Cisco Unity Connection Administration, expand Users and select Users.
Step 2
In the Search Users page, select the applicable user. For more than one user, check the check boxes against the applicable
users and select Bulk Edit.
Step 3
In the Edit User Basics page, in the Edit menu, select Send Message Settings.
Step 4
In the Send Message Settings page, under Broadcast Messages, check the applicable check boxes and select Save. (For
more information on each field, see Help> This Page).
Enabling Sending and Updating Broadcast Messages for User Templates
Step 1
In Cisco Unity Connection Administration, expand Templates and select User Templates.
Step 2
In the Search User Templates page, select the applicable user template. For more than one user template, check the check
boxes against the applicable user templates and select Bulk Edit.
Step 3
In the Edit User Template Basics page, in the Edit menu, select Send Message Settings.
Step 4
In the Send Message Settings page, under Broadcast Messages, check the applicable check boxes and select Save. (For
more information on each field, see Help> This Page).
Importance of Broadcast Message Administrator
The users allowed to send and update broadcast messages can use the Broadcast Message Administrator to
do the following tasks:
• Record and send one or more broadcast messages.
• Define when a system broadcast message becomes active and for how long. The date and time reflect
the time zone for the user who sends the message.
If a sender hangs up or is disconnected while creating a broadcast message but
before sending it, Unity Connection deletes the recording.
Note
The users allowed to update broadcast messages can use the Broadcast Message Administrator to do the
following tasks:
• Review active messages. If there is more than one active message, the Broadcast Message Administrator
presents them in order based on the start date and time, starting with the newest messages.
• Change the end date and time for active messages.
• Change or add to a recording for future messages.
System Administration Guide
138
Messaging
Enabling Sending and Updating Broadcast Messages

Page 157
• Change the start date and time or the end date and time for future messages. (Note that the end date and
time does not adjust automatically if senders change the start date and time but do not change the end
date and time.)
• Delete active and future messages.
Changing Broadcast Message Administrator Defaults
Default behavior for the Broadcast Message Administrator is controlled by settings on the System Settings >
Advanced > Conversations page in Cisco Unity Connection Administration.
Following are the changes you can make to the system defaults:
• Retention Period: This indicates the time for which Unity Connection retains the expired broadcast
messages on the server. By default, the .WAV file and any data associated with a message purges in 30
days. To change the retention period for expired broadcast messages, enter a number from one to 60
days.
• Default Active Days: This indicates the number of days that a broadcast message remains active when
the sender does not specify an end date and time. The default is 30 days. To change how long a message
without an end date and time remains active, enter a number from zero (0) to 365 days. A value of zero
(0) days means that messages that are sent without a specified end date and time remain active indefinitely.
• Maximum Recording Length: This indicates the maximum length allowed for system broadcast messages.
By default, senders can record messages up to 300,000 milliseconds (5 minutes) in length. To change
the maximum recording length, enter a number from 60,000 (1 minute) to 36,000,000 (60 minutes)
milliseconds.
• Play Oldest Message First: This indicates the order in which broadcast messages are presented to users.
By default, the check box is checked that plays the oldest message first. To play the newest message
first, uncheck the check box.
Integrated Messaging
The model of messaging in which there are separate user accounts handle the voicemails and emails for a user
is known as integrated messaging. The emails for a user are managed through the user mailbox on an email
server and the voicemails for a user are managed through a user mailbox in Unity Connection.
Unity Connection supports IMAP and SMTP protocols for integrated messaging. The SMTP protocol is used
for sending messages to another users and IMAP protocol is used for retrieval of messages.
SMTP Message Handling
Unity Connection can receive and process SMTP messages generated by IMAP clients, for example, a voice
message recorded in a Microsoft Outlook email client using ViewMail for Outlook.
When an authorized IMAP client tries to send a message to Unity Connection through SMTP, the message
is categorized as a voicemail, email, fax, or delivery receipt. The sender is mapped to a user and the message
recipients are mapped to users or contacts by comparing the SMTP address in the message header to its list
of SMTP proxy addresses.
Unity Connection processes the message for each recipient under either of the given conditions:
System Administration Guide
139
Messaging
Changing Broadcast Message Administrator Defaults
Page 158
• If SMTP authentication is configured for IMAP client and SMTP address of the sender matches a proxy
address or primary SMTP address for the authenticated user.
• If SMTP authentication is not configured for the IMAP client and the SMTP address of the sender matches
a proxy address or primary SMTP address for any Unity Connection user.
Following are the types of recipient based on which Unity Connection processes the messages for each
individual:
• If the recipient maps to a VPIM contact, Unity Connection converts the message into a VPIM message,
removing any attachment that is not allowed by the VPIM standard. Unity Connection either delivers
the message to the specified VPIM location if the VPIM location is homed on the local server, or forwards
it to another digitally networked Unity Connection server for delivery if the VPIM location is homed on
that server. For more information on VPIM, see the Networking Guide for Cisco Unity Connection,
Release 15, available at https://www.cisco.com/c/en/us/td/docs/voice_ip_comm/connection/15/networking/
guide/b_15cucnetx.html.
• If the recipient maps to a user homed on the local server, Unity Connection performs the action specified
on the Message Actions page of the profile for the user in Cisco Unity Connection Administration. For
each type of message (voice, email, fax, or delivery receipt) you can configure whether the message is
accepted and placed in the user mailbox on the Unity Connection server, relays the message to the user
at an alternate SMTP address, or rejects the message and generates a non delivery receipt (NDR).
• If the recipient maps to a user homed on a remote Unity Connection server, the message is relayed to
the home server of the user that performs the action specified on the Message Actions page of the user
profile.
• If the recipient does not map to any of the above, Unity Connection either relays the message to the
SMTP smart host or sends an NDR to the sender, depending on the option selected for the When a
Recipient Cannot be Found setting on the System Settings > General Configuration page in Cisco Unity
Connection Administration. By default, Unity Connection sends an NDR.
If SMTP authentication is configured for the IMAP client and the SMTP address of the sender does not match
a proxy address or the primary SMTP address for the authenticated user, the Unity Connection server returns
an SMTP error that causes the message to remain in the client outbox.
If SMTP authentication is not configured for the IMAP client and the SMTP address of the sender does not
match any known user proxy address or primary SMTP address, Unity Connection places the message into
the MTA bad mail folder (UmssMtaBadMail).
Example Using IMAP and ViewMail for Outlook
Consider an example of an organization ExampleCo. that uses Microsoft Outlook to access a Microsoft
Exchange server for email. Each employee at the company receives corporate email at an address that follows
the pattern firstname.lastname@example.com. ExampleCo wants employees to be able to use Outlook to
access voice messages stored on the Unity Connection server. To allow employees to send, forward, or reply
to voice messages in the Outlook client, ExampleCo deploys the Cisco Unity Connection ViewMail for
Microsoft Outlook plugin. The Outlook client for each employee is configured to access the user account
using IMAP.
When Robin Smith at ExampleCo wants to send an email message to a coworker, Chris Jones, Robin composes
a new email message to chris.jones@example.com. By default, Outlook is configured to route new email
messages to the Microsoft Exchange server for delivery. Next, Robin wants to send Chris a voice message
and selects the New Voice Message icon that opens the ViewMail for Outlook form. Robin again addresses
System Administration Guide
140
Messaging
Example Using IMAP and ViewMail for Outlook
Page 159
the message to chris.jones@example.com, records audio for the message, and selects the Send button. The
voice message is routed to Unity Connection for delivery because ViewMail is configured to use Unity
Connection IMAP accounts to send the messages.
When Unity Connection receives the voice message, it searches the list of SMTP proxy addresses for
robin.smith@example.com (the sender) and chris.jones@example.com (the recipient). Unity Connection
delivers the message as a voice message from Robin Smith to Chris Jones because these addresses are defined
as SMTP proxy addresses for the user profiles of Robin Smith and Chris Jones respectively.
When Chris opens Outlook, the email message from Robin shows up as a new message in the Microsoft
Exchange Inbox. The voice message from Robin, on the other hand, shows up as a new message in the Inbox
of the Unity Connection account that Chris accesses using IMAP. If Chris replies to either message, the
Outlook client automatically route the reply using the account in which Chris received the original message.
Important Points for Deploying Integrated Messaging
Following are the considerations when deploying IMAP clients to send and receive Unity Connection messages:
• Use a firewall to protect the SMTP port from unauthorized access. The SMTP port and domain are listed
on the System Settings > SMTP Configuration > Server page in Cisco Unity Connection Administration.
• Configure Transport Layer Security for IMAP client connections in order to protect user passwords.
• Configure the corporate email address of each user as an SMTP proxy address for the user. When setting
up theUnity Connection IMAP account on user workstation, use the corporate email address of the user
instead of the Unity Connection specific email address. In this way, users are insulated from changes to
the Unity Connection-specific addresses if the SMTP domain is changed.
• Create a separate Outlook address book for ViewMail users that is limited to the objects in the user search
space if you are using search spaces to limit the objects that users can reach and do not want users to
receive NDRs for unreachable objects.
Task List for Configuring IMAP Access
Follow the given steps to configure IMAP access to Unity Connection messages:
1.
(optional) Do the following tasks if you plan to configure Unity Connection to relay messages for users
to another SMTP server:
Configure the SMTP smart host to accept messages from Unity Connection server. For more information,
see the documentation for the SMTP server you are using.
Configure Unity Connection to relay messages to smart host. For more information, see the Configuring
Unity Connection to Relay Messages to a Smart Host section.
Review the settings that control whether private or secure messages can be relayed. For more information,
see the Configuring Message Relay Settings section.
2.
Configure message actions for users or user templates. For more information, see the Configuring Message
Actions for Users or User Templates section.
3.
Configure SMTP proxy addresses for users who send or receive messages from IMAP clients. For more
information, see the Configuring SMTP Proxy Addresses for Users or User Templates section.
System Administration Guide
141
Messaging
Important Points for Deploying Integrated Messaging
Page 160
Associate users with a class of service that offers a license to use an IMAP client to access voice messages.
For more information, see the Enabling IMAP Client Access to Voice Messages for Users section.
5.
Configure SMTP proxy addresses for VPIM contacts who may receive messages from IMAP clients. For
more information, see the Configuring SMTP Proxy Addresses for Contacts section.
6.
If you configured Transport Layer Security to be required or optional in the procedure in Task 7.: Configure
the Unity Connection server to provide a secure IMAP Unity Connection, as described in the “Securing
Cisco Unity Connection Administration, Cisco PCA, Cisco Unity Connection SRSV, and IMAP Email
Client Access to Cisco Unity Connection” section in the “Using SSL to Secure Client/ Server Connections
in Cisco Unity Connection” chapter of the Security Guide for Cisco Unity Connection, Release 15, available
at https://www.cisco.com/c/en/us/td/docs/voice_ip_comm/connection/15/security/b_15cucsecx.html.
7.
Configure Unity Connection to allow SMTP connections from IMAP clients. For more information. see
the Configuring IMAP Client Access and Authentication section.
8.
(optional) If you want to customize SMTP settings, do the steps as mentioned in the Configuring SMTP
Message Parameters section.
9.
Configure a supported IMAP client to access the SMTP messages in the user mailbox. For more
information, see the “Configuring an Email Account to Access Cisco Unity Connection Voice Messages”
chapter of the User Workstation Setup Guide for Cisco Unity Connection, Release 15 available at
https://www.cisco.com/c/en/us/td/docs/voice_ip_comm/connection/15/user_setup/guide/b_15cucuwsx.html.
Configuring Unity Connection to Relay Messages to a Smart Host
Step 1
In Cisco Unity Connection Administration, expand System Settings> SMTP Configuration and select Smart Host.
Step 2
In the Smart Host page, in the Smart Host field, enter the IP address or fully qualified domain name of the SMTP smart
host server and select Save. (For more information on each field, see Help> This Page).
The Smart Host can contain up to 50 characters.
Note
Configuring Message Relay Settings
Step 1
In Cisco Unity Connection Administration, expand System Settings> Advanced and select Messaging.
Step 2
Configure message relay settings (For information on each field, see Help> This Page):
a)
To mark the relay messages private, check the Allow Relaying of Private Messages check box.
b) To mark the relay messages secure, check the Allow Relaying of Secure Messages check box and select Save.
Unity Connection sends an NDR to the message sender when it receives a message that it cannot relay
because the message is marked private or secure.
Note
System Administration Guide
142
Messaging
Configuring Unity Connection to Relay Messages to a Smart Host
Page 161
Configuring Message Actions for Users or User Templates
Step 1
In Cisco Unity Connection Administration, expand Users> Users and select the applicable user. To apply changes in user
template, expand Templates> User Templates and select the applicable user template.
Step 2
In the Edit menu of the user or user template, select Message Actions.
Step 3
In the Edit Message Actions page, enter the values of the required fields and select Save. (For information on each field,
see Help> This Page).
Configuring SMTP Proxy Addresses for Users or User Templates
Step 1
In Cisco Unity Connection Administration, expand Users> Users and select the applicable user. To apply changes in user
template, expand Templates> User Templates and select the applicable user template.
Step 2
In the Edit menu of the user or user template, select SMTP Proxy Addresses.
Step 3
In the SMTP Proxy Addresses page, select Add New to add a new SMTP proxy address. Enter the values of the required
fields and select Save. (For information on each field, see Help> This Page).
Enabling IMAP Client Access to Voice Messages for Users
Step 1
In Cisco Unity Connection Administration, expand Class of Service and select Class of Service. The Search Class of
Service page appears displaying the currently configured class of services.
Step 2
Select the class of service that you want to update. If you select more than one class of service, select Bulk Edit.
Step 3
On the Edit Class of Service page, under Licensed Features, select the Allow Users to Access Voicemail Using an IMAP
Client and/ or Single Inbox field. Check the applicable check boxes. (For more information on each field, see Help> This
Page).
Step 4
Select Save.
Configuring SMTP Proxy Addresses for Contacts
Step 1
In Cisco Unity Connection Administration, expand Contacts and select Contacts. Select the contact that you want to
update. If you select more than one contact, select Bulk Edit.
Step 2
On the Edit Contact Basics page, in the Edit menu, select SMTP Proxy Addresses.
Step 3
On the SMTP Proxy Addresses page, select Add New to add an SMTP proxy address. Enter the address and select Save.
Configuring IMAP Client Access and Authentication
Step 1
In Cisco Unity Connection Administration, expand System Settings > SMTP Configuration, then select Server. The
SMTP Server Configuration page appears.
System Administration Guide
143
Messaging
Configuring Message Actions for Users or User Templates
Page 162
Step 2
Configure IP address access list (For more information, see Help> This Page):
a)
In the Edit menu, select Search IP Address Access List.
b) In the Search IP Address Access List page, select Add New to add a new IP address to the list.
c)
In the New Access IP Address page, enter an IP address and select Save.
d) In the Access IP Address page, to allow connections from the IP address, check the Allow Unity Connection check
box and select Save.
Configuring SMTP Message Parameters
You can configure Unity Connection to reject any incoming SMTP messages that are larger than a configurable
total size or have more than a configurable number of recipients.
Step 1
In Cisco Unity Connection Administration, expand System Settings> SMTP Configuration and select Server.
Step 2
In the SMTP Server Configuration page, in the Limit Size of Message field, enter a number in kilobytes to limit the size
of an individual message sent by an SMTP client.
Step 3
In the Limit Number of Recipients per Message field, enter the number of recipients allowed per message and select
Save.
Configure SMTP client communication
Over STARTTLS on Port 25
Unity Connection Release 14SU1 and earlier, supports secure SMTP client communication. You can configure
Unity Connection to support secure SMTP client interface using STARTTLS.
Step 1
To enable Secure SMTP client feature, execute
run cuc dbquery unitydirdb update tbl_configuration set valuebool='1'
where name ='SmtpSecureClientEnabled'
CLI command. By default this feature is disabled.
Step 2
In Cisco Unity Connection Administration, expand System Settings> SMTP Configuration and select Server.
Step 3
(Applicable to both Server and Client side configuration) On SMTP Server Configuration page check option Allow
Connections From Untrusted IP Addresses. Make sure the value of field Transport Layer Security From Untrusted
IP Addresses is is same on client and SMTP Smart Host.
Cisco Unity Connection and SMTP client communication will be at port 25 using STARTTLS.
Note
Step 4
Select Save to apply the changes.
Over STARTTLS on Port 25 and 587 using Authentication Support
Unity Connection Release 14SU2 and later, supports secure SMTP client communication over port 25 and
587 using Authentication support. You can configure Unity Connection to support secure SMTP client interface
using STARTTLS on port 587. You can also authenticate SMTP client interface using username and password.
System Administration Guide
144
Messaging
Configuring SMTP Message Parameters
Page 163
Step 1
Server side configuration:
a)
In Cisco Unity Connection Administration, expand System Settings> SMTP Configuration and select Server.
b) You can choose SMTP Port that Unity Connection uses for incoming and outgoing SMTP connections between 25
and 587.
c)
Select other fields on SMTP Server Configuration page as per requirement.
d) Select Save to apply the changes. (For more information on each field, see Help> This Page).
e)
For changes to take effect, you must restart the Connection SMTP Server service in Cisco Unity Connection
Serviceability. If a Connection cluster is configured, restart the service on both nodes.
Step 2
Client side configuration:
a)
In Cisco Unity Connection Administration, expand System Settings> SMTP Configuration and select Smart Host.
b) To enable Secure SMTP client feature, check option Enable Secure Client.
c)
You can choose secure port between 25 and 587 using Host Port field if Enable Secure Client option is checked.
d) To enable authentication support, check the Use Authentication option and enter the details of password protected
Smart Host. You must enter username and password if this option is checked.
e)
Select Save to apply the changes. (For more information on each field, see Help> This Page).
f)
For changes to take effect, you must restart the Connection SMTP Server service in Cisco Unity Connection
Serviceability. If a Connection cluster is configured, restart the service on both nodes.
Unified Messaging
The model of messaging in which different types of messages are integrated into a single interface and
accessible from variety of devices is known as unified messaging. The voicemails, emails, and faxes are all
stored in a single message store, for example, an Exchange mailbox store. The voice messages in the supported
mail servers are synchronized with the user mailbox in Unity Connection.
Unity Connection is supported to be integrated with the following servers:
• Microsoft Exchange 2019, 2016.
• Microsoft Office 365
• Gmail Server.
The unified messaging, also known as the single inbox feature also supports access to Exchange calendars
and contacts, transcription of voice messages, notification of upcoming meeting over phone, and many other
features. For more information on configuring unified messaging and the supported features, see the Unified
Messaging Guide for Cisco Unity Connection, Release 15 available at https://www.cisco.com/c/en/us/td/docs/
voice_ip_comm/connection/15/unified_messaging/guide/b_15cucumgx.html.
Cisco Voicemail for Gmail
Unity Connection 15 and later provides a new way to users for accessing the voicemails on their Gmail account.
For this, you need to configure unified messaging with Google Workspace to synchronize the voicemails
between Unity Connection and Gmail server.
System Administration Guide
145
Messaging
Unified Messaging
Page 164
Cisco Voicemail for Gmail provides a visual interface for an enriched experience with voicemails at Gmail.
With this extension, user can perform the following :
• Compose a voicemail from within Gmail.
• Play the received voicemail without the need of any external player.
• Compose a voicemail in reply-to a received message.
• Compose a voicemail while forwarding a received message.
Follow below steps for using chrome extension:
1.
Administrator should configure Unified Messaging with Google Workspace using steps mentioned in
Task List for Configuring Unified Messaging with Google Workspace section of the "Configuring Unified
Messaging" chapter of the Unified Messaging Guide for Cisco Unity Connection Release 15 available at
https://www.cisco.com/c/en/us/td/docs/voice_ip_comm/connection/15/unified_messaging/guide/b_
15cucumgx.html.
2.
Administrator should add SMTP proxy addresses for Unified Messaging users in Unity Connection by
following below steps:
• Login Cisco Unity Connection Administration.
• On the Edit Users Basics page, enter user's Gmail ID in Corporate Email Address field.
• Enable Generate SMTP Proxy Address From Corporate Email Address checkbox corresponding
to user.
3.
Users can now configure and use the chrome extension. For more information, see the Quick Start Guide
for Cisco Voicemail for Gmail available at https://www.cisco.com/c/en/us/td/docs/voice_ip_comm/
connection/vmg/quick_start/guide/b_cucqsvmgchrext.html.
Steps to configure Cisco Voicemail for Gmail chrome extension cannot be performed in bulk by Administrator.
Note
System Administration Guide
146
Messaging
Cisco Voicemail for Gmail

Page 165
C H A P T E R 12
LDAP
• Overview, on page 147
• Integrating Unity Connection with an LDAP Directory, on page 147
• Task List for Configuring LDAP, on page 148
• Editing LDAP Directory Configuration, on page 157
• Changing LDAP Integration Status, on page 159
Overview
When you are using an LDAP compliant directory as your corporate directory and do not want to separately
maintain basic user information in Cisco Unity Connection, you can use the LDAP integration feature.
The LDAP integration in Unity Connection involves:
• Creating Unity Connection users by importing user data from an LDAP directory.
• Configuring Unity Connection to periodically synchronize the users with the user data in an LDAP
directory.
• Authenticating Unity Connection users against the user data in an LDAP directory. An LDAP authenticated
user uses the LDAP password as the web application password to log in to Unity Connection web
applications.
For a list of the LDAP directories that are supported for use with Unity Connection, see the “Requirements
for an LDAP Directory Integration” section in System Requirements for Cisco Unity Connection Release 15
available at https://www.cisco.com/c/en/us/td/docs/voice_ip_comm/connection/15/requirements/b_
15cucsysreqs.html.
Integrating Unity Connection with an LDAP Directory
If a Unity Connection server is integrated with a Cisco Unified CM phone system and you want to integrate
both the servers with an LDAP directory, you must separately integrate each server with the LDAP directory.
Integrating only one of the servers with an LDAP directory is not sufficient to allow the other server to
synchronize or authenticate to the LDAP directory.
See the related links:
System Administration Guide
147

Page 166
• For information on integrating Cisco Unified CM with an LDAP directory, see the “LDAP System Setup”
chapter of the Cisco Unified Communications Manager Administration Guide for the required release,
available at
http://www.cisco.com/c/en/us/support/unified-communications/unified-communications-manager-callmanager/products-maintenance-guides-list.html.
• For information on integrating Unity Connection with an LDAP directory, see the Task List for
Configuring LDAP section.
Task List for Configuring LDAP
This section contains a list of tasks that you must follow to ensure successful LDAP integration in a Unity
Connection server:
System Administration Guide
148
LDAP
Task List for Configuring LDAP
Page 167
In case of a cluster, you perform all the LDAP configuration tasks only on the publisher server.
1.
Activate the Cisco DirSync service in Unity Connection to access an LDAP directory. See the Activating
Cisco DirSync Service section.
2.
Enable LDAP synchronization. See the Enabling LDAP Synchronization section.
3.
Add one or more LDAP directory configurations that define the LDAP directory and user search bases
in which Unity Connection accesses data, and import data from the LDAP directory in to a Unity Connection
server. See the Configuring LDAP Directory Configurations section.
4.
(Optional) If the phone numbers stored in the LDAP directory are not in the same format as the extensions
that you want to use in Unity Connection, specify a regular expression that converts phone numbers into
extensions when you import LDAP data into Unity Connection. See the Converting Phone Numbers into
Extensions section.
5.
(Optional) If you want to use SSL to encrypt the usernames and passwords that are sent to the LDAP
server for authentication, export an SSL certificate from the applicable LDAP servers, and upload the
certificates on the Unity Connection server. See the Uploading SSL Certificates on the Cisco Unity
Connection 9.x Server section.
6.
(Optional) Configure LDAP authentication if you want to authenticate the username and web application
password of a Unity Connection user. See the Configuring LDAP Authentication in Unity Connection
section.
7.
You can add new Unity Connection users linked to the user data in LDAP directory or integrate existing
Unity Connection users with the LDAP user data. Do the following steps:
Select the user search bases that you specify when you create LDAP directory configurations. See the
Selecting the LDAP Users to Import into Unity Connection section.
If you need to determine whether a Unity Connection user is integrated with an LDAP directory, see the
Determining if a Unity Connection User is Integrated with an LDAP Directory section.
(Optional) You need to specify one or more LDAP filters if the user search bases are not sufficient enough
to control the LDAP users that are synchronized with Unity Connection users. See the Filtering LDAP
Users section.
You can use either of the following tools to import user data from an LDAP directory:
The Bulk Administration Tool is used to add new Unity Connection users by importing the LDAP user
data information into a comma separated value (CSV) file. Importing from a CSV file can be useful for
transferring information from an LDAP directory to Unity Connection. For more information, see the
Changing LDAP Integration Status and the Integrating Existing Unity Connection User Accounts with
LDAP User Accounts Using Bulk Administration Tool sections.
The Import Users tool is used to add new Unity Connection users by importing the user data from an
LDAP directory. For more information, see the Creating Unity Connection Users from LDAP Data Using
the Import Users Tool section.
Note
System Administration Guide
149
LDAP
Task List for Configuring LDAP

Page 168
Activating Cisco DirSync Service
Step 1
In Cisco Unified Serviceability, expand Tools and select Service Activation.
Step 2
On the Service Activation page, select the Unity Connection server in the Server drop-down field.
Step 3
In the Directory Services list, check the Cisco DirSync Service check box.
Step 4
Select Save and OK to confirm the activation of this service.
Enabling LDAP Synchronization
Enable LDAP synchronization to specify the LDAP directory with which Unity Connection integrates to get
basic information from the LDAP directory.
Step 1
In Cisco Unity Connection Administration, expand System Settings > LDAP and select LDAP Setup.
Step 2
To configure LDAP synchronization, do the following steps on the LDAP Setup page (For information on each field,
see Help> This Page):
a)
Check the Enable Synchronizing from LDAP Server check box.
b) Select the LDAP server type in the LDAP Server Type list.
c)
In the LDAP Attribute for User ID list, select the attribute in the LDAP directory from which you want the data to
appear in the Alias field in Unity Connection.
If you select an attribute other than sAMAccountName, when users sign in to Cisco PCA, an IMAP
client, or Web Inbox, they must enter the Unity Connection alias and LDAP password.
Caution
If you later need to change the attribute in LDAP Attribute for User ID list after creating LDAP directory
configurations on the LDAP Directory page, you must delete all LDAP directory configurations, change
the value, and re-create all the LDAP directory configurations. For more information, see the Changing
the LDAP Field Mapped to the Alias Field section.
Caution
Step 3
Select Save.
(Applicable to Cisco Unity Connection 12.5SU7 and later releases) If you choose LDAP Attribute for User
ID, mail as Alias field then the relay address will be selected as %Email%@ldap.com in User Templates
Message Actions by default. If Alias field contains @ldap.com then it will be truncated so that the valid
email address is saved in database while creating users.
Note
Configuring LDAP Directory Configurations
If you want to import the user data from LDAP directory into Unity Connection, do the following steps for
each user search base in the LDAP directory.
Step 1
In Cisco Unity Connection Administration, expand System Settings > LDAP > and select LDAP Directory
Configuration.
System Administration Guide
150
LDAP
Activating Cisco DirSync Service
Page 169
Step 2
On the Find and List LDAP Directory Configurations page, select Add New to add a new LDAP directory configuration.
Step 3
To configure the LDAP Directory Configuration, do the following steps on the LDAP Directory Configuration page (For
more information on each field, see Help> This Page):
a)
Enter the values in all the required fields.
b) If you specify an LDAP filter, LDAP filter syntax is checked. If the syntax is invalid, an error message appears.
c)
If you uploaded SSL certificates to the Unity Connection server in the Uploading SSL Certificates on the Cisco Unity
Connection 9.x Server section, check the Use SSL check box for every LDAP server that you specify in the Host
Name or IP Address for Server field.
Step 4
Select Save and select Perform Full Sync Now.
Step 5
To add another LDAP directory configuration for another user search base, select Add New, and repeat Step 2 through
Step 4
When importing users from LDAP, the user gets successfully imported into the end user table. However,
when the user is imported into the tbl_user from end user table, the synchronization fails if the middlename
has value more than 12 bytes.
Note
Converting Phone Numbers into Extensions
If the phone numbers in LDAP directory do not match the Extension field in Unity Connection, you need to
add a regular expression and a replacement pattern that converts the phone numbers into extensions. If you
use the Bulk Administration Tool to add users by exporting the user data to a CSV file, edit the CSV file, and
import the edited file. During this process, you can open the CSV file in a spreadsheet application and possibly
create a formula that is more effective than the regular expression.
Consider the following points when converting phone numbers in LDAP directory into extensions in Unity
Connection:
• Phone numbers are converted to extensions only at the time when you first synchronize Unity Connection
data with LDAP data. Later on, during the scheduled LDAP synchronizations, the extension is not
overwritten by any changes in the phone number.
• Unity Connection automatically removes non-numeric characters from a phone number, therefore it is
not required to add a regular expression for non-numeric characters.
• You can often specify more than one combination of regular expression and replacement pattern that
produces the same result. Unity Connection uses the regular expression package of the Java library. Table
8: Examples for Converting LDAP Phone Numbers to Unity Connection Extensions lists some examples
of the conversions that are possible with the expanded functionality.
Table 8: Examples for Converting LDAP Phone Numbers to Unity Connection Extensions
Replaceme
Regular Expression for LDAP
Phone Number Pattern
Example Conversion Operation
$1
(.)
Use LDAP phone number as Unity Connection extension
$1
.(\d{4})
Use the last four digits of LDAP phone number as Unity Connection
extension
System Administration Guide
151
LDAP
Converting Phone Numbers into Extensions
Page 170
Replacement P
Regular Expression for LDAP
Phone Number Pattern
Example Conversion Operation
$1
(\d{4}).*
Use the first four digits of LDAP phone number as Unity Connection
extension.
$18
^(.)
Append 8 to the end of LDAP phone number
9$1
.(\d{4})
Append 9 to the left of the last four digits of LDAP phone number
$18
(.)
Append 88 to the end of LDAP phone number
$1555$2
(\d{3}).(\d{4})
Use the digits 555 between the first three digits and the last four digits
of LDAP phone number
$1
\d{3,6}(\d{4})
Use the last four digits of LDAP phone number as Unity Connection
extension if LDAP phone number is between seven and ten digits long
$1
206.*(\d{4})
Use the last four digits of LDAP phone number as Unity Connection
extension if LDAP phone number starts with 206
+9$1
(.+)
Prepend +9 to the left of the LDAP phone number
85$1
\d{5}(\d{5})
Prepend 85 to the left of the rightmost 5 digits of LDAP phone number
if LDAP phone number is 10-digit long
$1
011(\d{10})
Remove the leftmost three digits of LDAP phone number if LDAP phone
number is 13 digits long and the first three digits are 011
52$1
206\d{3}(\d{4})
Remove the leftmost six digits of LDAP phone number and then prepend
52 to the remaining digits if LDAP phone number is 10 digits long and
the first three digits are 206
Adding a Regular Expression and Replacement Pattern
Step 1
In Cisco Unity Connection Administration, expand System Settings > LDAP and select Phone Number Conversion.
Step 2
On the Phone Number Conversion page, enter the values in the required fields. (For information on each field, see Help>
This Page).
Step 3
Select Save.
Uploading SSL Certificates on the Cisco Unity Connection 9.x Server
If you want to use SSL to encrypt data transmitted between the LDAP server and the Unity Connection server,
check the Use SSL check box for each LDAP server that you configure for synchronization. To upload SSL
certificates, do the following procedure.
Step 1
Export the SSL certificates from the following LDAP servers:
System Administration Guide
152
LDAP
Adding a Regular Expression and Replacement Pattern
Page 171
• Each LDAP server with which Unity Connection should synchronize data.
• Each LDAP server that Unity Connection user should access to authenticate user sign-ins.
• Each redundant LDAP server which you want Unity Connection to synchronize or authenticate.
Step 2
In Cisco Unified Operating System Administration, expand Security and select Certificate Management > .
Step 3
To upload the SSL certificate you exported in Step 1, do the following steps:
• Select the Upload Certificate/ Certificate chain option.
• Select tomcat-trust from the Certificate Purpose drop-down list.
• Select Browse in the Upload File field to upload the SSL certificate.
• Restart the Cisco DirSync and Cisco Tomcat services to avoid failures in LDAP synchronization and authentication.
Step 4
To restart Cisco DirSync service, do the following steps:
• In Cisco Unified Serviceability, expand Tools and select Service Activation.
• On the Service Activation page, uncheck the Cisco DirSync service field and select Save.
• Check the Cisco DirSync service field and select Save.
To restart the Cisco Tomcat service, run the CLI command utils service restart Cisco Tomcat.
Configuring LDAP Authentication in Unity Connection
The LDAP directories supported for LDAP synchronization are also supported for LDAP authentication.
LDAP authentication authenticates Unity Connection user data against the user data in the LDAP directory,
so that:
• Passwords that allow Unity Connection users gain single sign-on access on Unity Connection web
applications, such as Cisco Unity Connection Administration and Cisco PCA.
• Passwords that are required to sign in to IMAP email applications to access Unity Connection voicemails.
If LDAP authentication is enabled, the web application password field does not appear in Cisco Unity
Connection Administration and can only be managed from the LDAP directory.
The voicemail passwords used to access Unity Connection voicemails from telephone user interface (TUI)
are authenticated against the Unity Connection database. The passwords or PINs can be managed using phone
interface or Messaging Assistant web tool.
The administrator account that is used to sign in to Cisco Unified Operating System Administration, Disaster
Recovery System, and the command line interface cannot be configured for LDAP integration.
Note
Step 1
In Cisco Unity Connection Administration, expand System Settings > LDAP and select LDAP Authentication.
System Administration Guide
153
LDAP
Configuring LDAP Authentication in Unity Connection

Page 172
Step 2
On the LDAP Authentication page, do the following steps (For information on each field, see Help> This Page):
a)
Check the Use LDAP Authentication for End Users check box.
b) Enter the values in all other fields.
c)
If you change the value of the Host Name or IP Address for Server field and if the IMAP clients are accessing Unity
Connection, you need to restart the Unity Connection IMAP Server service. If other web applications are accessing
Unity Connection, restart the server.
d) If you uploaded SSL certificates to the Unity Connection server in the Uploading SSL Certificates on the Cisco Unity
Connection 9.x Server section, check the Use SSL check box.
Step 3
Select Save.
Selecting the LDAP Users to Import into Unity Connection
Consider the following points when importing LDAP user accounts into Unity Connection:
• Before importing users into Unity Connection, check the LDAP directory that integrates with Unity
Connection.
• You can create up to 20 LDAP directory configurations to specify the users in the LDAP directory you
want to import into Unity Connection. For each LDAP directory configuration, specify a user search
base in which Unity Connection should search for user accounts.
• Unity Connection imports all users that belong to the specified user search base, such as domain or
Organization Unit in an LDAP directory tree. A Unity Connection server or cluster can only import
LDAP data from subtrees with the same directory root, for example, from the same Active Directory
forest.
• After creating the LDAP directory configurations, synchronize Unity Connection data with data in the
LDAP directory to import the LDAP data in to the Unity Connection server. The practical limit of users
that can be imported into the Cisco Unified CM database is 120,000. The limit is not enforced by the
synchronization process but importing a large numbers of LDAP users who do not become Unity
Connection users. This reduces the amount of disk space available for messages and slows down the
database performance causing the upgrades to take longer.
Do not specify user search bases that causes more than 120,000 users to be
imported into the Cisco Unified CM database during synchronization to avoid
impact on Unity Connection performance.
Caution
You can synchronize the data of 160,000 users with LDAP directory.
• Analyze the structure of your LDAP directory and determine whether you can specify five or less than
five user search bases that:
• Include the LDAP users that you want to import into Unity Connection.
• Exclude the LDAP users that you do not want to import into Unity Connection.
• Causes less than 60,000 users to be imported into the Cisco Unified CM database.
System Administration Guide
154
LDAP
Selecting the LDAP Users to Import into Unity Connection

Page 173
Directories Other than Active Directory
If you are using an LDAP directory other than Microsoft Active Directory, you should specify one or more
user search bases that include the smallest possible number of users to enhance the speed of synchronization,
even when that means creating multiple configurations.
If the root directory contains subtrees that you do not want Unity Connection to access (for example, a subtree
for service accounts), do either of the following tasks:
• Create two or more LDAP directory configurations and specify the search bases that you do not want
Unity Connection to access.
• Create an LDAP search filter. For more information, see the “Filtering LDAP Users” section of the
“LDAP Directory Integration with Cisco Unity Connection” chapter of the Design Guide for Cisco Unity
Connection Release 15, available at https://www.cisco.com/c/en/us/td/docs/voice_ip_comm/connection/
15/design/guide/b_15cucdg.html.
Active Directory
You must create a separate LDAP directory configuration when using Active Directory or when the LDAP
directory domain has several child domains. Unity Connection do not follow Active Directory referrals during
synchronization. In this type of LDAP configuration, you must map the UserPrincipalName (UPN) attribute
to the Unity Connection Alias field because UPN is unique across the forest in Active Directory.
Unity Connection Intrasite and Intersite Networking
Intrasite or intersite networking allows to network two or more Unity Connection servers that may be each
integrated with an LDAP directory. When you are using intrasite or intersite networking, you may specify a
user search base on one Unity Connection server that overlaps a user search base on another Unity Connection
server. Be careful not to accidentally create duplicate Unity Connection users on different Unity Connection
servers by importing the same LDAP user more than once.
Regardless of how you create users, Unity Connection prevents you from creating two users with the same
alias on the same Unity Connection server but does not prevent you from creating two users with the same
alias on different Unity Connection servers in the same site or organization.
Note
In some cases, you may find it useful to create multiple Unity Connection users from the same LDAP user.
For example, if you import the some of the LDAP administrator accounts into every Unity Connection server
as Unity Connection users without voice mailboxes and use them as administrator accounts. This allows you
to use LDAP synchronization and authentication for Unity Connection administrator accounts without creating
one or more LDAP users for every Unity Connection server.
Filtering LDAP Users
For more information, see the “Filtering LDAP Users” section of the “LDAP Directory Integration with
Cisco Unity Connection” chapter of the Design Guide for Cisco Unity Connection Release 15, available at
https://www.cisco.com/c/en/us/td/docs/voice_ip_comm/connection/15/design/guide/b_15cucdg.html.
System Administration Guide
155
LDAP
Directories Other than Active Directory

Page 174
Adding an LDAP Filter
Step 1
In Cisco Unity Connection Administration, expand System Settings > LDAP, then select LDAP Custom Filter.
Step 2
The Find and List LDAP Filters page appears displaying the currently configured LDAP filters.
Step 3
Select Add New.
Step 4
In the Filter Name field, enter a name for this LDAP filter. If you are adding more than one LDAP filter configuration,
enter a name that identifies the LDAP users included in the current filter, for example, “Engineering.”
Step 5
In the Filter field, enter a filter that adheres to the LDAP filter syntax specified in RFC 2254, “The String Representation
of LDAP Search Filters.” You must enclose the filter text in parentheses.
Step 6
Select Save.
Creating Unity Connection Users from LDAP Data Using the Import Users Tool
The LDAP Integration process imports the LDAP data into a hidden Cisco Unified CM database on the Unity
Connection server. You can create new Unity Connection users by importing the user data from an LDAP
directory using the Bulk Administration Tool or Import Users tool. You can also use BAT tool to update the
existing Unity Connection users with the users in an LDAP directory.
Step 1
In Cisco Unity Connection Administration, expand Users and select Import Users.
Step 2
On the Import Users page, import the LDAP user accounts to create Unity Connection users (For more information on
each field, see Help> This Page):
a)
Select LDAP Directory in Find End Users In field.
b) Select the template on which the new user is based.
c)
Specify the Alias, First Name, or Last Name of the LDAP user accounts that you want to import.
d) Check the check boxes against the LDAP user accounts that you want to import and select Import Selected.
Creating Unity Connection Users from LDAP Data Using Bulk Administration
Tool
Step 1
In Cisco Unity Connection Administration, expand Tools and select Bulk Administration Tool.
Step 2
To add Unity Connection users, do the following steps on the Bulk Administration Tool page (For more information on
each field, see Help> This Page):
a)
From Select Operation, select Export.
b) From Select Object Type, select Users from LDAP Directory.
c)
Enter the values in all the required fields.
d) Select Submit.
This creates a CSV file with the LDAP user data. Open the CSV file in a spreadsheet application or in a text editor
and edit the data as applicable. Now, import the data from the CSV file:
System Administration Guide
156
LDAP
Adding an LDAP Filter
Page 175
e)
From Select Operation, select Create.
f)
From Select Object Type, select Users with Mailbox.
g) Enter the values in all the required fields.
h) Select Submit.
Step 3
When the import is complete, review the file that you specified in the Failed Objects Filename field to verify that all users
are created successfully.
Editing LDAP Directory Configuration
Changing or Deleting LDAP Directory Configuration
To make any changes to the existing LDAP directory configuration, you must delete the existing LDAP
integration and re-create it to change the LDAP user fields that are imported into Unity Connection.
You must re-create the directory configuration within 24 hours else the LDAP integrated Unity Connection
users are converted to standalone Unity Connection users.
Caution
Step 1
In Cisco Unity Connection Administration, expand System Settings > , select > LDAP, and then select LDAP Directory
Configuration.
If you do not have a record of the existing settings, you must write it down before deleting the LDAP directory
configuration.
Note
Step 2
On the Find and List LDAP Directory Configurations page, check the check box next to the LDAP directory configuration
that you want to change or delete.
Step 3
Select Delete Selected and select OK to confirm deletion.
Step 4
Expand System Settings > , select > LDAP, and then select LDAP Setup.
Step 5
On the LDAP Setup page, uncheck the Enable Synchronizing from LDAP Server check box and select Save.
Step 6
Recheck the Enable Synchronizing from LDAP Server check box and select Save again.
This confirms the deletion of LDAP directory configuration. However, if you want to change the existing LDAP directory
configuration, then follow the next step to re-create a new LDAP directory configuration after deleting the existing LDAP
configuration.
Step 7
Re-create the directory configuration, and perform a full synchronization for the re-created directory configuration. See
the Configuring LDAP Directory Configurations section.
If you need to create an IMAP account for a user after changing the LDAP directory synchronization, make
sure to restart Unity Connection before creating the accounts.
Note
System Administration Guide
157
LDAP
Editing LDAP Directory Configuration

Page 176
Disabling LDAP Authentication
If you permanently disable LDAP authentication, users sign in to Unity Connection web applications using
the Unity Connection web application password instead of the LDAP directory password. As LDAP integrated
users do not have separate web application passwords, they manage the Unity Connection web applications
using LDAP directory passwords. All the users with mailbox must change the web application password the
next time they sign in to a Unity Connection web application.
However, if you temporarily disable LDAP authentication, for example, when you are changing the LDAP
field mapped to the user Alias field in Unity Connection, you do not have to change password settings for
Unity Connection users.
You can use Bulk Edit to change the passwords for all the users who have mailboxes but you must individually
change passwords for users who not have mailboxes (meaning administrators).
Step 1
In Cisco Unity Connection Administration, expand System Settings > LDAP and select LDAP Authentication.
Step 2
On the LDAP Authentication page, uncheck the Use LDAP Authentication for End Users check box and select Save.
If you are temporarily disabling LDAP authentication, skip the rest of this procedure. Do not change password settings
of users with mailbox.
Step 3
To change the password settings for all LDAP integrated users, do the following steps:
a)
In Cisco Unity Connection Administration, expand Users and select Users.
b) On the Search Users page, select the LDAP users and select Bulk Edit.
c)
From the Edit menu, select Password Settings.
d) For Web Application password, check the User Must Change at Next Sign-In check box.
e)
If you want to schedule when Unity Connection changes the setting for the selected users, from the Bulk Edit Task
Scheduling menu, select Run Later and specify a date and time.
f)
Select Submit.
Changing the LDAP Field Mapped to the Alias Field
To change the field in LDAP directory that is mapped to the Alias field in Unity Connection, do the following
steps.
If you are using LDAP authentication, after you complete this procedure, users have to sign in to Unity
Connection web interfaces using the new value of the Alias field in Unity Connection.
Caution
Step 1
Deactivate the Cisco DirSync service:
a)
In Cisco Unified Serviceability, expand the Tools menu and select Service Activation.
b) On the Service Activation page, in the Directory Services list, uncheck the Cisco DirSync Service check box and
select Save.
Step 2
Disable LDAP authentication. See the Disabling LDAP Authentication section.
Step 3
Delete all the LDAP directory configurations. See the Changing or Deleting LDAP Directory Configuration section.
System Administration Guide
158
LDAP
Disabling LDAP Authentication

Page 177
Step 4
Change the field that is mapped to the Unity Connection Alias field:
a)
In Cisco Unity Connection Administration, expand System Settings > LDAP and select LDAP Setup.
b) On the LDAP Setup page, change the values in the required fields and select Save. (For more information on each
field, see Help> This Page).
If you select a field other than sAMAccountName, when the users sign in to the Cisco PCA or an IMAP client or
sign in to the Web Inbox, they must enter the Unity Connection alias and the LDAP password.
Step 5
Re-enable LDAP authentication. For more information, see the Configuring LDAP Authentication in Unity Connection
section.
Step 6
Re-add LDAP configurations but do not synchronize Unity Connection and LDAP data. The synchronization do not work
until you re-enable the DirSync service. For more information, see the Configuring LDAP Directory Configurations
section.
Step 7
Activate the DirSync service. See the Activating Cisco DirSync Service section.
Step 8
Synchronize Unity Connection data with LDAP data:
a)
In Cisco Unity Connection Administration, expand System Settings > LDAP and select LDAP Directory
Configuration.
b) On the Find and List LDAP Directory Configurations page, select the necessary directory configuration.
c)
On the LDAP Directory Configuration page, select Perform Full Sync Now.
Determining if a Unity Connection User is Integrated with an LDAP Directory
If you integrate Unity Connection user accounts with LDAP user accounts, you are not required to integrate
every Unity Connection account with an LDAP account. In addition, you can create new Unity Connection
accounts that are not integrated with LDAP accounts.
Step 1
In Cisco Unity Connection Administration, expand Users and select Users.
Step 2
The Search Users page appears displaying the default and currently configured users.
Step 3
Select the user that you want to determine if it is integrated with LDAP directory.
Step 4
On the Edit User Basics page, if the user is integrated with an LDAP user account, the Status area contains one of the
following messages:
• Active User Imported from LDAP Directory
• Inactive User Imported from LDAP Directory
If neither of these messages appears in the Status area, the user is not integrated with an LDAP user account.
Changing LDAP Integration Status
To change the LDAP integration status of a Unity Connection user, you use one of the following methods,
depending on your situation:
System Administration Guide
159
LDAP
Determining if a Unity Connection User is Integrated with an LDAP Directory
Page 178
• To change the LDAP integration status of an individual Unity Connection user who was not created by
importing from Cisco Unified Communications Manager, see the Changing the LDAP Integration Status
of an Individual Unity Connection User.
• To change the LDAP integration status of multiple Unity Connection users who were not created by
importing from Cisco Unified Communications Manager, see the Changing the LDAP Integration Status
of Multiple Unity Connection User Accounts in Bulk Edit Mode.
• To change the LDAP integration status of Unity Connection users who were created by importing from
Cisco Unified Communications Manager, see the Integrating Existing Unity Connection User Accounts
with LDAP User Accounts Using Bulk Administration Tool.
Regardless of the method you select, note the following considerations which apply to all cases:
If you are integrating a Unity Connection user account with an LDAP user account, note the following:
• If any users in the LDAP directory were missing values in the field that you specified on the LDAP Setup
page in the LDAP Attribute for User ID list, you must add the missing values in the LDAP directory and
resynchronize the Unity Connection database with the LDAP directory.
• During the next scheduled synchronization of the Connection database with the LDAP directory, existing
values for certain fields are overwritten with values from the LDAP directory.
• If you have configured Unity Connection to periodically resynchronize Unity Connection data with
LDAP data, new values in the LDAP directory are automatically imported into the Unity Connection
database during the next automatic resynchronization. However, if new users have been added to the
LDAP directory, this resynchronization does not create new Unity Connection users. You must manually
create new Unity Connection users using either the Import Users tool or the Bulk Administration Tool.
If you are breaking the association between a Unity Connection user account and an LDAP directory user
account, note the following:
• If Unity Connection is configured to authenticate passwords for web applications against the LDAP
directory, the Unity Connection user is no longer authenticate against the LDAP password for the
corresponding user. To enable the user to log on to Unity Connection web applications, you must enter
a new password on the Edit > Change Password page.
• If Unity Connection is configured to periodically synchronize with the LDAP directory, selected data
for the Unity Connection user is no longer be updated when the corresponding data in the LDAP directory
is updated.
Changing the LDAP Integration Status of an Individual Unity Connection User
Step 1
In Cisco Unity Connection Administration, click Users.
Step 2
On the Search Users page, click the alias of the user account.
If the user does not appear in the search results table, set the applicable parameters in the search fields at the
top of the page, and click Find.
Note
Step 3
On the Edit User Basics page, in LDAP Integration Status section, select the desired radio button:
• Integrate with LDAP Directory—To integrate a Unity Connection user account with an LDAP user account, select
this option. The Unity Connection alias must match the corresponding value in the LDAP directory. (On the System
System Administration Guide
160
LDAP
Changing the LDAP Integration Status of an Individual Unity Connection User
Page 179
Settings > LDAP > LDAP Setup page, the LDAP Attribute for User ID list identifies the field in the LDAP directory
for which the value must match the value of the Alias field in Unity Connection.)
• Do Not Integrate with LDAP Directory—To break the association between a Unity Connection user account and
an LDAP directory user account, select this option.
If the user was created by importing from Cisco Unified Communications Manager, the LDAP Integration Status field
is grayed out and you must use Bulk Administration Tool to integrate them with an LDAP user account. See Integrating
Existing Unity Connection User Accounts with LDAP User Accounts Using Bulk Administration Tool.
Step 4
Click Save.
Changing the LDAP Integration Status of Multiple Unity Connection User
Accounts in Bulk Edit Mode
Step 1
In Cisco Unity Connection Administration, on the Search Users page, check the applicable user check boxes, and select
Bulk Edit.
If the user accounts that you want to edit in bulk do not all appear on one Search page, check all applicable check boxes
on the first page, then go to the next page and check all applicable check boxes, and so on, until you have selected all
applicable users. Then select Bulk Edit.
Step 2
On the User Basics page, in LDAP Integration Status section, select the desired radio button:
• Integrate with LDAP Directory—To integrate a Unity Connection user account with an LDAP user account, select
this option. The Unity Connection alias must match the corresponding value in the LDAP directory. (On the System
Settings > LDAP > LDAP Setup page, the LDAP Attribute for User ID list identifies the field in the LDAP directory
for which the value must match the value of the Alias field in Unity Connection.)
• Do Not Integrate with LDAP Directory—To break the association between a Unity Connection user account and
an LDAP directory user account, select this option.
• If applicable, set the Bulk Edit Task Scheduling Fields to schedule the Bulk Edit operation for a later date and/or
time.
• Select Submit.
If any of the users were created by importing from Cisco Unified Communications Manager, Bulk Edit logs an error
indicating that you must use the Bulk Administration Tool to integrate them with an LDAP user account. See Integrating
Existing Unity Connection User Accounts with LDAP User Accounts Using Bulk Administration Tool.
IntegratingExistingUnityConnectionUserAccountswithLDAPUserAccounts
Using Bulk Administration Tool
The Bulk Administration Tool can be used to integrate existing Unity Connection users with LDAP user
accounts, but it cannot be used to break the association between a Unity Connection user account and an
LDAP directory user account.
System Administration Guide
161
LDAP
Changing the LDAP Integration Status of Multiple Unity Connection User Accounts in Bulk Edit Mode
Page 180
That process invisibly imported the LDAP data into a hidden Cisco Unified Communications Manager database
on the Unity Connection server.
When you use the Bulk Administration Tool to integrate existing Unity Connection users with LDAP users,
you do the following tasks, which update each Unity Connection user account with the LDAP user ID for the
corresponding LDAP user account:
• Export the data from the Cisco Unified CM database into a CSV file.
• Update the CSV file to remove LDAP users who don’t have Unity Connection accounts and to remove
Cisco Unified CM IDs, if applicable.
If any users in the LDAP directory were missing values in the field that you specified on the LDAP Setup
page in the LDAP Attribute for User ID list, you must add the missing values in the LDAP directory and
resynchronize the Unity Connection database with the LDAP directory. Do not enter the values in the CSV
file and then import the CSV file; Unity Connection is not able to locate those users in the LDAP directory.
Caution
• Import the updated CSV file into the Unity Connection database.
When you import LDAP user data into the Unity Connection database, existing values for the fields being
imported are overwritten with values from the LDAP directory.
Caution
Step 1
For every Cisco Unity Connection user that you want to integrate with an LDAP user, if the value of the Unity Connection
Alias field does not match the value of the LDAP user ID, use Cisco Unity Connection Administration to update the
Unity Connection alias so that they do match.
Step 2
Sign in to Unity Connection Administration as a user that has the System Administrator role.
Step 3
Expand Tools and select Bulk Administration Tool.
Step 4
Export to a CSV file the LDAP user data that is currently in the cache on the Connection server:
a)
Under Select Operation, select Export.
b) Under Select Object Type, select Users from LDAP Directory.
c)
In the CSV File field, enter the name of the file in which you want to save exported data.
d) Select Submit.
Step 5
Download and edit the CSV file that you created in Step 4:
• Remove any Unity Connection users who you do not want to synchronize with users in the LDAP directory.
• For Unity Connection users who were originally created by importing data from Cisco Unified CM, enter %null%
in the CcmId field.
• Confirm that the LdapCcmUserId field contains the correct LDAP alias for each user.
Step 6
Import the data that you edited in Step 5:
• a.
In Cisco Unity Connection Administration, expand Tools and select Bulk Administration Tool.
b.
Under Select Operation, select Update.
c.
Under Select Object Type, select Users with Mailbox.
System Administration Guide
162
LDAP
Integrating Existing Unity Connection User Accounts with LDAP User Accounts Using Bulk Administration Tool

Page 181
d. In the CSV File field, enter the full path to the file from which you want to import data.
e.
In the Failed Objects Filename field, enter the name of the file to which you want Unity Connection to write
error messages about users who could not be created.
f.
Select Submit.
Step 7
When the import is complete, review the file that you specified in the Failed Objects Filename field to verify that all
Unity Connection users were successfully integrated with the corresponding LDAP users.
System Administration Guide
163
LDAP
Integrating Existing Unity Connection User Accounts with LDAP User Accounts Using Bulk Administration Tool
Page 182
System Administration Guide
164
LDAP
Integrating Existing Unity Connection User Accounts with LDAP User Accounts Using Bulk Administration Tool
Page 183
C H A P T E R 13
SpeechView
• Overview, on page 165
• SpeechView Security Considerations, on page 167
• Considerations for Deploying SpeechView, on page 167
• Task List for Configuring SpeechView, on page 168
• SpeechView Reports, on page 171
• SpeechView Transcription Error Codes, on page 171
Overview
The SpeechView feature enables the transcription of voice messages so that users can receive the voicemails
in the form of text. Users can access the transcripted voicemails using email clients. SpeechView is a feature
of Cisco Unity Connection unified messaging solution. Therefore, the audio part of each voice message is
also available to the users.
When a voice message is sent from Web Inbox to ViewMail for Outlook, the voice message is delivered to
the mailbox of the recipient along with the transcribed text both in the transcript view box and in the mail
body.
Note
Without this feature, the voice message delivered to the user mailbox has a blank text attachment. This feature
requires the use of a third party transcription service to convert the voice message to text. Therefore, the blank
text attachment is updated with the transcripted text or an error message if there was a problem with
transcription.
The SpeechView feature supports the following types of transcription services:
• Standard Transcription Service: The standard transcription service automatically converts the voice
message to text and the transcripted text received is sent to the user over email.
• Professional Transcription Service: The professional transcription or SpeechView Pro service automatically
converts the voice message to text and then confirms the accuracy of transcription. If the accuracy of
trancription is low at any part, the particular part of trancription text is sent to a human operator who
reviews the audio and improves the quality of transcription.
As the professional transcription involves both automatic transcription and accuracy confirmation by a human
operator, it delivers more accurate transcripted texts of voice messages.
System Administration Guide
165


Page 184
Unity Connection supports only (Universal Transformation Format) UTF-8 character set encoding for
transcription.
Note
The following messages are never transcribed:
• Private messages
• Broadcast messages
• Dispatch messages
• Secure messages
• Messages with no recipients
Secure messages are not transcribed by default, however the Class of Service provides an option under Licensed
Features which enables the SpeechView Transcription Service.
Note
For Speechview feature, it is recommended not to use any interference device, such as Email Scanner as the
device might modify the content of the data being exchanged with the nuance server. Using such devices may
lead to the failure of audio message transcriptions.
Note
Unity Connection can be configured to deliver transcriptions to an SMS device as a text message or to an
SMTP address as an email message. The fields to turn on transcription delivery are located on the SMTP and
SMS Notification Device pages where you set up message notification. For more information on notification
devices, see the Configuring Notification Devices, on page 174 section.
Following are the considerations for effective use of transcription delivery:
• In the From field, enter the number users dial to reach Unity Connection when they are not dialing from
their desk phone. If users have a text-compatible mobile phone, they may be able to initiate a callback
to Unity Connection in the event that they want to listen to the message.
• Check the Include Message Information in Message Text check box to include call information such as
caller name and caller ID (if available) and the time that the message was received. Otherwise, there is
no indication in the message of when it was received.
In addition, if they have a text-compatible mobile phone, they may be able to initiate a callback when the
caller ID is included with the transcription.
• In the Notify Me Of section, if you turn on notification for voice or dispatch messages, users are notified
when a message arrives. The transcription soon follows. If you do not want notification before the
transcription arrives, do not select the voice or dispatch message options.
• Email messages that contain transcriptions have a subject line that is identical to notification messages.
So if you have notification for voice or dispatch messages turned on, users have to open the messages
to determine which one contains the transcription.
System Administration Guide
166
SpeechView
Overview

Page 185
Nuance server converts the voice message to text into the phone language in which Unity Connection plays
system prompts to users and callers. If phone language is not supported by nuance, it recognizes the audio of
the message and converts into the language of the audio. You can set the phone language for the following
Unity Connection components: user accounts, routing rules, call handlers, interview handlers, and directory
handlers. For information on supported language for SpeechView, see Available Languages for Unity
Connection Components section of System Requirements for Cisco Unity Connection Release 12.x available
at https://www.cisco.com/c/en/us/td/docs/voice_ip_comm/connection/12x/requirements/b_12xcucsysreqs.html
Note
Unity Connection allows you to send an alternate language along with default language to nuance server for
transcription. For this, execute
run cuc dbquery unitydirdb update tbl_configuration set valuebool ='1' where
fullname='System.Conversations.ConfigParamForAlternateTranscriptionLanguage'
CLI command.
SpeechView Security Considerations
S/MIME (Secure/ Multipurpose Internet Mail Extensions), a standard for public key encryption, secures the
communication between Unity Connection and the third party transcription service. A private key and public
key is generated each time Unity Connection registers with a third party transcription service.
The pair of private and public keys ensures that each time voice messages are sent to the transcription service,
the user information is not passed along with the message. Therefore, the transcription service is unaware of
the specific user to whom the voice message belongs to.
If human operator is involved during transcription, the user or the organization from which the message
generated cannot be determined. In addition to this, the audio part of a voice message is never stored in the
workstation of the person processing the transcription service. After sending the transcripted message to the
Unity Connection server, the copy in the transcription service is purged.
Considerations for Deploying SpeechView
Consider the following when deploying the SpeechView feature:
• To enable SpeechView in a digital network deployment, consider configuring one of the Unity Connection
servers in the network as a proxy server that registers with the third party transcription service.
This can make it easier to troubleshoot any problems with transcriptions, track your transcription usage and
monitor the load it introduces to your network. If one of your Unity Connection servers has a lower call volume
than others in the network, consider designating it as the proxy server for transcriptions. If you do not use a
proxy server for transcriptions, you need a separate external facing SMTP address for each server (or cluster)
in the network.
• To extend the SpeechView functionality, users who want to transcribe the voice messages left on their
personal number must configure their personal phones to forward calls to Unity Connection when a caller
wants to leave a voicemail. This allows to collect all voicemails in one mailbox where they are transcribed.
To configure the mobile phones for call forwarding, see the “Task List for Consolidating Your Voicemail
from Multiple Phones into One Mailbox” section of the “Changing Your User Preferences” chapter of
System Administration Guide
167
SpeechView
SpeechView Security Considerations

Page 186
the User Guide for the Cisco Unity Connection Messaging Assistant Web Tool, Release 15, available at
https://www.cisco.com/c/en/us/td/docs/voice_ip_comm/connection/15/user/guide/assistant/b_
15cucugasst.html.
When personal phones are configured to forward callers to Unity Connection to
leave voice messages, callers may hear a lot of rings before reaching the user
mailbox. To avoid this problem, you can instead forward the mobile phone to a
special number that does not ring a phone and forwards directly to the mailbox
of the user. This can be accomplished by adding the special number as an alternate
extension for the user.
Note
• To allow both transcription and relay of voice messages, configure the Message Action in Cisco Unity
Connection Administration> Users to accept and relay messages. For more information, see the Message
Actions section.
• You can configure the SMTP notification devices to send the transcription text message to the SMTP
address. This means users receive two emails at the SMTP address, first one is the relayed copy of the
message.WAV file and the second one is the notification with transcription text. For more information
on configuring SMTP notifications, see the Setting Up SMTP Message Notification section.
Task List for Configuring SpeechView
This section contains a list of tasks to configure the SpeechView feature in Unity Connection:
1.
Ensure that Unity Connection is registered with Cisco Smart Software Manager (CSSM) or Cisco Smart
Software Manager satellite. You have acquired the proper licenses, SpeechView or SpeechViewPro from
Cisco to use this feature. For more information, see the “Managing Licenses” chapter of the Install,
Upgrade, and Maintenance Guide for Cisco Unity Connection, Release 15, available at
https://www.cisco.com/c/en/us/td/docs/voice_ip_comm/connection/15/install_upgrade/guide/b_
15cuciumg.html
2.
Assign users to a class of service that provides SpeechView transcription of voice messages. For more
information, see the Enabling SpeechView Transcription of Voice Messages in Class of Service section.
3.
Configure an SMTP smart host to accept messages from the Unity Connection server. For more information,
see the documentation for the SMTP server application that you are using.
4.
Configure the Unity Connection server to relay messages to the smart host. For more information, see the
Configuring Unity Connection to Relay Messages to a Smart Host section.
5.
(When Unity Connection is configured to refuse connections from untrusted IP addresses) Configure
Unity Connection to receive messages from the user email address. For more information, see the
Configuring Unity Connection to Accept Messages from Email System section.
6.
Configure the user email system to route incoming SpeechView traffic to Unity Connection. For more
information, see the Configuring Email System to Route Incoming SpeechView Traffic section.
7.
Configure SpeechView transcription service. For more information, see the Configuring SpeechView
Transcription Service section.
8.
Configure SMS or SMTP notification devices for users and user templates.
System Administration Guide
168
SpeechView
Task List for Configuring SpeechView

Page 187
Enabling SpeechView Transcription of Voice Messages in Class of Service
The members of the class of service can view the transcriptions of the voice messages using an IMAP client
configured to access the user messages.
Step 1
In Cisco Unity Connection Administration, expand Class of Service and select Class of Service.
Step 2
In the Search Class of Service page, select the class of service in which you want to enable SpeechView transcription or
create a new one selecting Add New.
Step 3
On the Edit Class of Service page, under Licensing Features section, select the Use Standard SpeechView Transcription
Service option to enable the standard transcription. Similarly, you may select Use SpeechView Pro Transcription Service
option to enable professional transcription.
Cisco Unity Connection supports only Standard SpeechView Transcription Service in HCS mode.
Note
Step 4
Select the applicable options under transcription service section and select Save. (For information on each field, see Help>
This Page).
Configuring Unity Connection to Relay Messages to a Smart Host
To enable Unity Connection to send messages to the third party transcription service, you must configure the
Unity Connection server to relay messages through a smart host.
If we configure SpeechView on Unity Connection with Exchange Server as Microsoft Office 365, then on
prem Microsoft Exchange as Smart Host is not a essential requirement.
Note
Step 1
In Cisco Unity Connection Administration, expand System Settings> SMTP Configuration and select Smart Host.
Step 2
In the Smart Host page, in the Smart Host field, enter the IP address or fully qualified domain name of the SMTP smart
host server and select Save. (For more information on each field, see Help> This Page).
The Smart Host can contain up to 50 characters.
Note
Configuring Unity Connection to Accept Messages from Email System
Step 1
In Cisco Unity Connection Administration, expand System Settings> SMTP Configuration and select Server.
Step 2
In the SMTP Server Configuration page, in the Edit menu, select Search IP Address Access List.
Step 3
On the Search IP Address Access List page, select Add New to add a new IP address to the list.
Step 4
On the New Access IP Address page, enter the IP address of your email server and select Save.
Step 5
To allow connections from the IP address that you entered in Step 4, check the Allow Unity Connection check box and
select Save.
System Administration Guide
169
SpeechView
Enabling SpeechView Transcription of Voice Messages in Class of Service

Page 188
Step 6
If you have more than one email server in your organization, repeat Step 2 through Step 6 to add each additional IP
address to the access list.
Configuring Email System to Route Incoming SpeechView Traffic
Step 1
Set up an external facing SMTP address that the third party transcription service can use to send transcriptions to Unity
Connection. For example, “transcriptions@<yourdomain.com>”
If you have more than one Unity Connection server or cluster, you need a separate external facing SMTP address for
each server. Alternatively, you can configure one Unity Connection server or cluster to act as a proxy for the remaining
servers or clusters in the digital network. For example, if the SMTP domain for the Unity Connection server is “Unity
Connectionserver1.cisco.com,” the email infrastructure must be configured to route “transcriptions@cisco.com” to
“stt-service@connectionserver1.cisco.com.”
If you are configuring SpeechView on a Unity Connection cluster, configure the smart host to resolve the SMTP domain
of the cluster to both the publisher and subscriber servers in order for incoming transcriptions to reach the cluster subscriber
server in the event that the publisher server is down.
Step 2
Add “nuancevm.com” to the “safe senders” list in the email infrastructure so that incoming transcriptions do not get
filtered out as spam.
In Unity Connection, to avoid timeout or failure of the registration request with the Nuance server, make
sure to:
• Remove the email disclaimers from the inbound and outbound email messages between Unity Connection
and the Nuance server.
• Maintain SpeechView registration messages in the S/MIME format.
Note
Configuring SpeechView Transcription Service
Step 1
In Cisco Unity Connection Administration, expand Unified Messaging and select SpeechView Transcription Service.
Step 2
In the SpeechView Transcription Service page, check the Enabled check box.
Step 3
Configure SpeechView transcription service (For more information, see Help> This Page):
• If this server access the transcription services through another Unity Connection location that is digitally networked,
select the Access Transcription Services Through Unity Connection Proxy Location field. Select the name of the
Unity Connection location from the list and select Save. Skip to Step 4.
• If the server is going to access trancription services through another location that isdigitally networked, do the given
steps:
Select Access Transcription Service Directly field.
In the Incoming SMTP Address field, enter the email address recognized by the email system and routed to the
“stt-service” alias on the Unity Connection server.
System Administration Guide
170
SpeechView
Configuring Email System to Route Incoming SpeechView Traffic
Page 189
In the Registration Name field, enter a name that identifies the Unity Connection server within your organization.
This name is used by the third party transcription service to identify this server for registration and subsequent
transcription requests.
If you want this server to offer transcription proxy services to other Unity Connection locations in a digital network,
check the Advertise Transcription Proxy Services to Other Unity Connection Locations check box. Select Save and
then Register.
Another window displaying the results open. Wait for the registration process to complete successfully before going
on to the next step. If registration does not complete within 5 minutes, there may be a configuration issue. The
registration process timeout after 30 minutes.
Make sure to save all the configuration of Speech View Transcription Services before synchronizing the
license data.
Note
Step 4
Select Test. Another window displaying the results open. The test usually takes several minutes but can take up to 30
minutes.
SpeechView Reports
Unity Connection can generate the following reports about SpeechView usage:
• SpeechView Activity Report by User —Shows the total number of transcribed messages, failed
transcriptions, and truncated transcriptions for a given user during a given time period.
• SpeechView Activity Summary Report—Shows the total number of transcribed messages, failed
transcriptions, and truncated transcriptions for the entire system during a given time period. Note that
when messages are sent to multiple recipients, the message is transcribed only once, so the transcription
activity is counted only once.
SpeechView Transcription Error Codes
Whenever a transcription fails, the third party external transcription service sends an error code to Unity
Connection.
Cisco Unity Connection Administration interface shows the five default error codes that can modified or
deleted by an administrator. In addition, user has the privilege to add a new error code. Whenever a new error
code is sent by the third party external transcription service, the administrator needs to add a new error code
along with the appropriate description.
• The error code and description should be in the default system language.
• If the error code provisioning is not done, then the error code received from the third party external
transcription service is displayed.
Note
The default error codes are sent by the third party external transcription service to the SpeechView user. The
Table 13-1 shows the default error codes in the Cisco Unity Connection Administration interface.
System Administration Guide
171
SpeechView
SpeechView Reports

Page 190
Default Error Codes
Description
Error Code Name
When Unity Connection tries to register with the third party external
transcription service and the registration fails.
Fault
When a voice mail sent by a SpeechView user is inaudible at the third
party external transcription service site and system was unable to
transcribe the message.
Inaudible
When the conversion request contains more than one audio file
attachment, the third party external transcription service rejects the
messages.
Rejected
Whenever there is a response timeout from the third party external
transcription service.
Time-out
When the third party external transcription service is not able to
transcript the voice mail sent by a SpeechView user.
Unconverted
Configuring Transcription Error Codes
Step 1
In Cisco Unity Connection Administration, expand Unified Messaging > SpeechView Transcription, and select Error
Codes.
Step 2
The Search Transcription Error Codes appears displaying the currently configured error codes.
Step 3
Configure transcription error code (For more information on each field, see Help> This Page):
• To add a transcription error code, select Add New.
On the New Transcription Error Code page, enter the error code and the error code description to create a new error
code.
Select Save.
• To edit a transcription error code, select the error code that you want to edit.
On the Edit Transcription Error Code (Fault) page, change the error code or the error code description, as applicable.
Select Save.
• To delete a transcription error code, check the check box adjacent to the display name of the schedule that you want
to delete. Select Delete Selected and OK to confirm deletion.
System Administration Guide
172
SpeechView
Configuring Transcription Error Codes
Page 191
C H A P T E R 14
Notifications
• Introduction, on page 173
• Default Notification Devices, on page 174
• Configuring Notification Devices, on page 174
• Cascading Message Notification, on page 176
• Chaining Message Notification, on page 177
• Setting Up SMTP Message Notification, on page 178
• Setting Up SMS Message Notification, on page 179
• Setting Up HTML Message Notification, on page 180
• Configuring HTML-based Message Notification, on page 188
• Notifications Subject Line Format, on page 190
Introduction
Cisco Unity Connection allows the users to be notified of the incoming voice messages and emails as soon
as the message arrives in the user mailbox.
Following are some of the types of notifications received by users:
• Users receive message alerts through text notifications on pager.
• Users receive a call on their configured phones to get notified about new messages.
• Users receive messages and calendar notifications in the form of SMS messages to wireless devices using
SMPP.
• Users receive messages and missed call notifications as plain text or HTML emails.
• User receives summary and scheduled summary of latest voicemail as HTML emails.
The notifications for events are delivered to the end users through various notification devices. The notification
devices can be enabled or disabled by the administrator for individual or multiple users through Cisco Unity
Connection Administration and a user can override their specific notification device settings through Messaging
Assistant feature of Cisco Personal Communications Assistant.
System Administration Guide
173

Page 192
Default Notification Devices
Unity Connection comes with a set of default notification devices that can be configured as required.
Following are the default notification devices:
• Pager: Allows users to receive voice message alerts as a text notification.
• Work Phone: Allows users to receive voice message alerts as a dial out call on work phone.
• Home Phone: Allows users to receive voice message alerts as a dial out call on home phone.
• Mobile Phone: Allows users to receive voice message alerts as a dial out call on mobile phone.
• SMTP: Allows users to receive voice message alerts as an email notification.
• HTML: Allows users to receive voice message alerts as an HTML email notification.
• HTML Missed Call: Allows users to receive missed call alerts as an HTML email notification.
• HTML Scheduled Summary: Allows users to receive summary of latest voice messages at a configured
time as an HTML email notification.
The notification devices can be modified or enabled but cannot be deleted. An administrator can add, edit, or
delete additional notification devices whereas, a user can only edit the notification devices.
Do not change the display name of default notification devices.
Caution
Missed call event type is pre-checked under Notify me of section of an HTML device when
“Default_Missed_Call” template is used. Similarly, when “Default_Scheduled_Summary” template is used
with HTML device, all the event types are un-checked.
Note
User should not use the default notification devices in CSV file while using Bulk Administration Tool.
Note
Configuring Notification Devices
Message notification settings for each user account or user template allows you to control how and when
Unity Connection notifies a user of new messages. User accounts and user templates include notification
devices for a home phone, mobile phone, work phone, and one pager. Users can also use the Messaging
Assistant to set up phones and pagers to receive message notifications.
Step 1
In Cisco Unity Connection Administration, find the user account that you want to edit.
Step 2
On the Search User Basics page of the user account, select the user account that you want to edit.
Step 3
On the Edit User Basics page, in the Edit menu, select Notification Devices.
System Administration Guide
174
Notifications
Default Notification Devices


Page 193
Step 4
Configure a notification device.(Phone, Pager, SMTP, HTML, SMS) (For more information on each field, see Help>
This Page)
• To add a notification device:
a.
On the Edit User Basics page, select Edit> Notification Devices.
b.
On the Notification Devices page, select Add New.
c.
On the New Notification Device page, enter the fields as applicable depending on the notification device you
selected and Save.
• To edit a notification device:
a.
On the Edit User Basics page, select Edit> Notification Devices.
b.
On the Notification Device page, select the notification device that you want to edit.
c.
On the Edit Notification Device page, edit the required settings and Save.
To edit the notification devices for more than one user, on the Search Users page, check the check boxes
for the applicable users and select Bulk Edit.
You can also schedule Bulk Edit for a later period using Bulk Edit Task scheduling and select Submit.
Note
• To delete one or more notification devices:
a.
On the Edit User Basics page, select Edit> Notification Devices.
b.
On the Notification Device page, select the notification devices you want to delete.
c.
Select Delete Selected and OK to confirm deletion.
Similarly, you can configure the notification devices associated with a particular user template.
Note
Cisco Unity Connection supports create, update and export of maximum 3 Custom Notification Devices
with Device Type as HTML using Bulk Administration Tool (BAT) as explained below:
a.
Users can export CSV file containing 3 Custom Notification Devices using BAT.
b.
Users can edit or create column values in CSV file for 3 Custom Notification Devices.
c.
For creation for the first time since no new custom device is added, there will be blank columns for those
three newly added custom devices in CSV. Users can enter the values in CSV file accordingly and create
new custom devices.
For updation of other than 3 Custom Notification Devices which are not in CSV file, see section "HTML
Notifications Not Working" of the chapter "Troubleshooting Notification Devices" of the Troubleshooting
Guide for Cisco Unity Connection Release 15available at https://www.cisco.com/c/en/us/td/docs/voice_ip_
comm/connection/15/troubleshooting/guide/b_15cuctsg.html
Note
System Administration Guide
175
Notifications
Configuring Notification Devices
Page 194
Cascading Message Notification
Cascading message notification allows you to send notifications to a wide circle of recipients. Unity Connection
continues to send notifications until the message has been saved or deleted by a recipient.
For example, to create a cascade of message notifications for your Technical Support department, set the first
message notification to be sent immediately to the pager of the front-line technical support representative. If
the message that triggered the first notification has not been saved or deleted, then after a delay of 15 minutes,
the next notification can be sent to the pager of the department manager. A third notification can be set up to
call an employee in the Problem Resolution Group if the message is not saved or deleted after 30 minutes,
and so on.
When a user receives a notification as part of the cascade, the notification prompts the user to sign in to the
mailbox that is being monitored by the cascade.
Note
An alternative to cascading message notification is to use dispatch messaging.
Task List for Cascading Message Notification
SUMMARY STEPS
1.
For the first recipient in the notification chain, you need to set up the notification device in the following
way:
2. For each of the other recipients in the notification chain, you can repeat step Task List for Cascading
Message Notification to setup the device till you reach the end of recipient list.
DETAILED STEPS
Purpose
Command or Action
For the first recipient in the notification chain, you need to
set up the notification device in the following way:
Step 1
a.
Find the user account or user template to configure with
chaining notifications.
b.
In the Notification Devices page for the user or
template, for On Notification Failure, select Send To,
and select the device that you want Unity Connection
to notify next if notification to the device fails.
c.
Select the device that you specified for Send To in the
Edit Notification devices page
Uncheck all Notification Rule Events check boxes. If
you enable any notification events, message notification
for the device starts immediately and does not wait for
the notification failure of the previous device. Your
notifications do not chain, they all trigger at once.
If you want to chain to a third device if notification to
the device fails, select Send To and the device that you
System Administration Guide
176
Notifications
Cascading Message Notification

Page 195
Purpose
Command or Action
want Unity Connection to notify next if notification to
the device fails. If not, select Do Nothing.
For each of the other recipients in the notification chain,
you can repeat step Task List for Cascading Message
Step 2
Notification to setup the device till you reach the end of
recipient list.
Chaining Message Notification
Message notification can be set to “chain” to a series of notification devices if an attempt to send a notification
to the first selected device fails. A failure occurs when a notification device is not answering or is busy and
the retry attempts to reach that device using various options has also failed
Do not configure SMTP devices for chaining message notification, except as the last device in the chain.
Unity Connection does not detect notification failure for SMTP devices.
Note
Task List for Chaining Message Notification
SUMMARY STEPS
1.
For the first recipient in the notification chain, you need to set up the notification device in the following
way:
2. For each of the other recipients in the notification chain, you can repeat step Task List for Chaining
Message Notification to setup the device till you reach the end of recipient list.
DETAILED STEPS
Purpose
Command or Action
For the first recipient in the notification chain, you need to
set up the notification device in the following way:
Step 1
a.
Find the user account or user template to configure with
chaining notifications.
b.
In the Notification Devices page for the user or
template, for On Notification Failure, select Send To,
and select the device that you want Unity Connection
to notify next if notification to the device fails.
c.
Select the device that you specified for Send To in the
Edit Notification devices page.
Uncheck all Notification Rule Events check boxes. If
you enable any notification events, message notification
for the device starts immediately and does not wait for
the notification failure of the previous device. Your
notifications do not chain, they all trigger at once.
System Administration Guide
177
Notifications
Chaining Message Notification

Page 196
Purpose
Command or Action
If you want to chain to a third device if notification to
the device fails, select Send To and the device that you
want Unity Connection to notify next if notification to
the device fails. If not, select Do Nothing.
For each of the other recipients in the notification chain,
you can repeat step Task List for Chaining Message
Step 2
Notification to setup the device till you reach the end of
recipient list.
Setting Up SMTP Message Notification
Cisco Unity Connection can notify a user of new messages by calling a phone or pager. Also, you can set up
Unity Connection to send message and calendar event notifications in the form of text messages to text pagers
and text-compatible mobile phones using SMTP.
Users can receive notification of new messages by email. Unity Connection supports two types of notification
emails: plain text using SMTP notification devices; or HTML using HTML notification devices. HTML
notifications can only be used for new voice mail. For other types of messages, you must use plain text SMTP
notifications. To enhance security, both types of devices require connection to an SMTP smart host.
Note
Enabling SMTP Notification
Step 1
Configure the SMTP smart host to accept messages from the Unity Connection server. See the documentation for the
SMTP server application that you are using.
Step 2
Configure the Unity Connection server. See the Configuring the Unity Connection Server to Relay Messages to a Smart
Host section.
Step 3
Configure Unity Connection user accounts or user templates. See the Configuring Notification Devices section.
Configuring the Unity Connection Server to Relay Messages to a Smart Host
Step 1
In Cisco Unity Connection Administration, expand System Settings > SMTP Configuration, then select Smart Host.
Step 2
On the Smart Host page, in the Smart Host field, enter the IP address or fully qualified domain name of the SMTP
smarthost server, for example, https://<domain name of server>.cisco.com. (Enter the fully qualified domain name of the
server only if DNS is configured.)
The Smart Host can contain up to 50 characters.
Note
Step 3
Select Save.
System Administration Guide
178
Notifications
Setting Up SMTP Message Notification

Page 197
What to do next
If the Unity Connection server has not been properly enabled to use SMTP smart host for message notification,
it places SMTP notification messages in the Unity Connection SMTP server badmail folder
Note
Setting Up SMS Message Notification
With the services and information provided by a wireless carrier, mobile messaging service provider, Unity
Connection can use the Short Message Peer-to-Peer (SMPP) protocol to send message notifications in the
Short Message Service (SMS) format to mobile phones and other SMS-compatible devices when users receive
new messages.
Advantages Over SMTP Message Notifications
An advantage of using SMS is that the user device often receives message notifications much faster than when
using SMTP. You can configure Unity Connection so that each SMS notification message replaces the previous
one. Note that this functionality may not be supported by all mobile service providers.
SMS Message Length Limitations
The acceptable message length for an SMS message varies depending on the service provider, the character
set used to compose the message text, and the specific characters used in the message text.
Character sets available include:
• Default alphabet (GSM 3.38), 7-bit characters
• IA5/ASCII, 7-bit characters
• Latin 1 (ISO-8859-1), 8-bit characters
• Japanese (JIS), multi-byte characters
• Cyrillic (ISO-8859-5), 8-bit characters
• Latin/Hebrew (ISO-8859-8), 8-bit characters
• Unicode (USC-2), 16-bit characters
• Korean (KS C 5601), multi-byte characters
For 7-bit character sets, a maximum of 160 characters can fit into an SMS message; for 8-bit character sets,
the limit is 140 characters; for 16-bit character sets, the limit is 70 characters; for multi-byte character sets,
the limit is somewhere between 70 and 140 characters, depending on which characters make up the text of
the message. (For multi-byte character sets, most characters are 16 bits; some of the more common characters
are eight bits.)
Not all mobile phones support all character sets; most support the GSM 3.38 default alphabet.
Note
Cost Considerations
System Administration Guide
179
Notifications
Setting Up SMS Message Notification

Page 198
The cost of setting up SMS(SMPP) message notifications depends directly on the number of SMS notifications
that Unity Connection sends to user devices. More SMS notification implies higher cost as the service providers
typically charge for each SMS message or group of messages sent.
To cut down cost, you can restrict the use SMS notifications to a group of users or inform users to limit the
number of message notifications that they receive by message type or urgency. For example, users can specify
in the Messaging Assistant that Unity Connection sends message notifications only when new urgent voice
messages arrive.
Enabling SMS Message Notifications
Step 1
Set up an account with a mobile messaging service provider that offers SMS messaging. Unity Connection supports the
SMPP version 3.3 or SMPP version 3.4 protocols.
Step 2
Gather the information needed to allow Unity Connection to communicate with the SMPP server at the SMSC affiliated
with your contracted service provider, and enter the information on the SMPP Provider page. See the To Set Up an SMPP
Provider.
Step 3
When the Unity Connection server is set up behind a firewall, configure the TCP port used by the SMPP server when
connecting to Unity Connection.
Step 4
Enable the SMPP provider on Cisco Unity Connection Administration. See the Setting Up an SMPP Provider section.
Step 5
Configure SMS message notification, set up an SMS notification device to receive notifications for a test user account.
See the Configuring Notification Devices section.
Setting Up an SMPP Provider
Step 1
In Cisco Unity Connection Administration, expand System Settings > Advanced, then select SMPP Providers.
Step 2
On the Search SMPP Providers page, select Add New.
Step 3
Enable the new provider and enter the Name, System ID and Hostname of the provider and Save. For more information
on settings, select Help > This Page).
Step 4
On the Edit SMPP Provider page, enter the Port, which is the TCP port number that is used by the SMSC to listen for
incoming connections.
The port number should be in range of >100 and <=99999.
Note
Setting Up HTML Message Notification
The HTML notification is triggered based on the HTML notification device settings and is received on the
configured email address.
The administrator can create or edit the content and format of the HTML notifications using notification
templates, custom variables, and custom graphics. Unity Connection sends HTML notifications to an email
System Administration Guide
180
Notifications
Enabling SMS Message Notifications
Page 199
server over SMTP in the IPv4 mode only. Therefore, the administrator must ensure that the HTML notifications
are configured over IPv4.
Users can configure different types of HTML notifications:
• HTML notification when a new voice message is received.
• HTML notification when a new missed call is received.
• HTML notification when a new voice message is received along with the summary of latest voice
messages.
• HTML notification when a new missed call is received along with the summary of latest voice messages
• HTML notification at a configured time containing the summary of latest voice messages.
• HTML notification configured for interview handler will contain the attachment of the last question
answer.
Notification Templates
HTML notification template includes the following:
• Free flow HTML text.
• HTML tags, the support of which depend on the email client that the user is using.
• Custom Variables and Custom Graphics.
• Status Items for Voice Message - MWI, Message Status as Icons within an HTML template.
• Embedded links to external URIs or URLs.
Default Notification Templates
The default templates for HTML message notification are:
• Default_Actionable_Links_Only template has the HTML tags along with the actionable links without
any images, custom graphics, or status items. For example, the administrators can configure the HTML
templates to include header, footer, logos, images, and hyperlinks to Mini Web Inbox.
• Default_Dynamic_Icons template has the HTML tags along with the custom graphics and the status
items. It allows Unity Connection to send details of new voicemail containing actionable links with image
and message status.
• Default_Missed_Call template allows Unity Connection to send details of missed call including timestamp
and sender details.
• Default_Voice_Message_With_Summary template allows Unity connection to send notification when
a new voice message is received along with the summary of latest voicemails.
• Default_Missed_Call_With_Summary template allows Unity Connection to send notification when a
new missed call is received along with the summary of latest voicemails.
• Default_Scheduled_Summary allows Unity Connection to send summary of voice messages at configured
time(s) daily.
System Administration Guide
181
Notifications
Notification Templates
Page 200
• Default_Google_Workspace_Notification template allows Unity Connection to send messages with
template attached when user configured with Google Workspace service is sending/replying/forwarding
messages or sending read/non-delivery receipts.
The administrator can assign a notification template to the users or can allow the users to select a template.
But the users do not have the permissions to create or edit a template.The template selected can either be a
default or a custom template that the administrator has created.
The use of images, MWI status, and Message status is not mandatory. However, if used, the administrators
need to ensure that the image rendering when used with the HTML tags and the APIs is supported by their
respective email clients.
Note
Configuring Notification Templates
Notification templates can be created, modified, and deleted that include status items, action items, static
items, custom variables, custom graphics, and collection tags.
Step 1
In Cisco Unity Connection Administration, expand Templates > Notification Templates and select Notification Templates.
The Search Notification Templates page appears displaying the list of currently configured templates.
Step 2
Configure notification template. (For more information on each field, see Help> This Page)
• To add new notification template:
a.
Select Add new and New Notification Template page appears.
b.
Enter the Display name and HTML content.
c.
Select and copy the required status, action, and/or static items from the left panel of the HTML field and paste
the items on the right panel. See the table 14-1 for more information.
Description of Notification Templates
Description
Items
Displays the image based on MWI status.The default
images are displayed as defined in the Administrative
Replaceable Images section.To insert the status items
directly in the notification template, you can use the
<img src=”%MWI_STATUS%”> </img> tag.
%MWI_STATUS%
Displays the message status as unread, read, unread
urgent, read urgent, or deleted.The default images are
displayed as defined in the Administrative
Replaceable Images section.
To insert the status items directly in the
notification template, you can use the <img
src="%MESSAGE_STATUS%"> </img>tag.
%MESSAGE_STATUS%
System Administration Guide
182
Notifications
Configuring Notification Templates

Page 201
Launches the Unity Connection Mini Web Inbox. To
insert this item directly in the notification template,
you can use the <a
href="%LAUNCH_MINI_INBOX%"> Text </a>tag.
%LAUNCH_MINI_INBOX%
Launches the Web Inbox only on computer.
To insert this item directly in the notification
template, you can use the <a
href="%LAUNCH_WEB_INBOX%"> Text </a>tag.
%LAUNCH_WEB_INBOX%
Launches the Mini Web Inbox for a specific message
and auto plays the message.
To insert this item directly in the notification
template, you can use the <a
href="%MESSAGE_PLAY_MINI_INBOX%"> Text
</a> tag.
%MESSAGE_PLAY_MINI_INBOX%
Deletes the voice message. To insert this item directly
in the notification template, you can use the <a
href="%MESSAGE_DELETE%">Text </a> tag.
%MESSAGE_DELETE%
Forwards a particular voice message. To insert this
item directly in the notification template, you can use
the <a href="%MESSAGE_FORWARD%">Text
</a> tag.
%MESSAGE_FORWARD%
Launches the Mini Web Inbox with the Reply to
Message window to reply to a voice message.To
insert this item directly in the notification template,
you can use the <a
href="%MESSAGE_REPLY%">Text </a> tag.
%MESSAGE_REPLY%
Launches the Mini Web Inbox with the Reply to
Message window. The To and Subject fields get
populated automatically with multiple recipients.
To insert this item directly in the notification
template, you can use the <a
href="%MESSAGE_REPLY_ALL%">Text </a>
tag.
%MESSAGE_REPLY_ALL%
Launches the Mini Web Inboxwith marking the
message as unread and increasing the unread message
count.To insert this item directly in the notification
template, you can use the <a
href="%MESSAGE_MARKUNREAD%">Text</a>
tag.
%MESSAGE_MARKUNREAD%
System Administration Guide
183
Notifications
Configuring Notification Templates
Page 202
The administrator can store values in the form of text
and numbers in custom variables. For example, the
administrator can use custom variables for headers
and footers. To insert a variable directly in the
notification template, as specified by the administrator
under the Templates > Notification Templates >
Custom Variables page, you can use the %Var1%.
For more information on custom variables, see the
Configuring Custom Variables section.
Custom Variables
The administrator can use custom graphics for adding
logos, images, within an HTML template. The images
could also be used to define Image based Template
Structure.For example - See Default_Dynamic_Icons.
To insert a graphic directly in the notification template
as specified by the administrator under the Templates
Notification Templates > Custom Graphics page,
you can use the <img src="%GRAPHIC1%"></img>
tag.For more information on custom graphics, see the
Configuring Custom Graphics section.
Custom Graphics
Displays the alias name of the caller who has received
a voice message.
%CALLER_ID%
Displays the alias name of the sender who has
dropped a voice message.
%SENDER_ALIAS%
Displays the alias name of the receiver who has
received a voice message.
%RECEIVER_ALIAS%
Displays the time when voice message is received as
per the time zone of the recipient.
%TIMESTAMP%
Displays the total number of new messages.
%NEW_MESSAGE_COUNT%
Displays the subject of the message.
%SUBJECT%
Displays the missed call related information.
%MISSED_CALL%
Displays the summary of messages.
<VOICE_MESSAGE_SUMMARY>
</VOICE_MESSAGE_SUMMARY>
• The administrator can upload a new image through the administrative replaceable images
option for %MWI_STATUS%, %MESSAGE_STATUS%. For more information refer to
Administrative Replaceable Images.
• If %MESSAGE_STATUS% tag is enclosed within VOICE_MESSAGE_SUMMARY collection
tags, the status tag displays the status of the voice message at the time when notification email
was sent. If the message status changes later, it will not reflect in the summary content of the
notification email. However, if the tag is used outside the summary tags, it displays the current
status of the message.
Note
System Administration Guide
184
Notifications
Configuring Notification Templates
Page 203
d. Select Validate after creating or updating the notification template page to verify the HTML content.
The notification template does not get saved if any error is returned in the HTML validation. You
must remove the error(s) returned by validation before saving the notification template. However,
an HTML template with warnings can be saved successfully.
Note
e.
Select Save.
f.
You can also preview the template by selecting Preview. The Preview option displays the view as per your
default browser, however, the display may vary on the various email clients.
• To edit a notification template:
1.
On the Search Notification Templates page, select the template that you want to edit.
2.
On the Edit Notification Template <device> page, change the settings, as applicable.
3.
Select Validate to verify the HTML content and Save.
• To delete a notification template:
1.
On the Search Notification Templates page, check the check box next to the display name of the
notification template that you want to delete.
2.
Select Delete Selected and OK to confirm deletion.
If a template is assigned to an HTML notification device, then you cannot delete the template unless all the
existing associations with the template are removed.
Note
Custom Variables
The custom variables can be used to define commonly used HTML fragments such as, company's name,
address, web address.
You should not create more than 20 custom variables.
Note
Configuring Custom Variables
Step 1
In Cisco Unity Connection Administration, expand Templates > Notification Templates and select Custom Variables.
The Search Custom Variables page appears.
Step 2
Configure a custom variable. (For more information on each field, see Help> This Page)
• To add a custom variable:
a.
Select Add New and the New Custom Variables page appears.
b.
Enter the values of the required fields and select Save.
System Administration Guide
185
Notifications
Custom Variables

Page 204
You can also add new custom variables in the notification templates. For more information, see the
Notification Templates section.
Note
• To edit a custom variable:
a.
On the Search Custom Variables page, select the custom variable that you want to edit.
b.
On the Edit Custom Variables page, enter the values of the required fields and select Save.
• To delete a custom variable:
a.
On the Search Custom Variables page, check the check box next to the display name of the custom variable that
you want to delete.
b.
Select Delete Selected and OK to confirm deletion.
If a notification template uses a custom variable that has been deleted, then the variable gets displayed in the
notification instead of its value.
Note
Custom Graphics
The custom graphics can be used to insert the company’s graphics into notifications including logos and
product images.
You cannot create more than 20 custom graphics.
Note
The default custom graphics are DEFAULT_BOTTOM and DEFAULT_TOP. You cannot edit or delete the
default custom graphics.
Custom graphics display in email clients when they are correctly configured and are functionally capable of
displaying graphics.
For more information refer to “Configuring Cisco Unity Connection for HTML-based Message Notification”
section of the User Guide for Accessing Cisco Unity Connection Voice Messages in an Email Application,
available at http://www.cisco.com/c/en/us/td/docs/voice_ip_comm/connection/11x/user/guide/email/
11xcucugemailx.html.
Note
Configuring Custom Graphics
Step 1
In Cisco Unity Connection Administration, expand Templates > Notification Templates and select Custom Graphics.
The Search Custom Graphics page appears.
Step 2
Configure a custom graphic (For more information on each field, see Help> This Page)
• To add a custom graphic
System Administration Guide
186
Notifications
Custom Graphics

Page 205
a.
Select Add New and the new Custom Graphics page appears.
b.
Enter the value of the required fields and select Save.
• To edit a custom graphic
a.
On the Search Custom Graphics page, select the display name of the custom graphic that you want to edit.
b.
On the Edit Custom Graphics page, enter the value of the required fields and select Save.
• To delete a custom graphic:
a.
On the Search Custom Graphics page, check the check box next to the display name of the custom graphics that
you want to delete.
b.
Select Delete Selected and OK to confirm deletion.
The file must not be more than 1 MB in size and must be unique in its display name and image. You
cannot upload the same graphic again.
Note
Administrative Replaceable Images
The administrator can replace the default images for the following status items:
• Deleted_message
• MWI_OFF
• MWI_ON
• Read_message
• Read_urgent_message
• Unread_message
• Unread_urgent_message
You can restore the images to the defaults using Restore button present on the Search Replaceable Images
page. You cannot add or delete any image in the default list.
Editing an Administrative Replaceable Image
Step 1
In Cisco Unity Connection Administration, expand Templates > Notification Templates and select Administrative
Replaceable Image.
Step 2
On the Search Replaceable Image page, select the display name of the image that you want to edit.
Step 3
On the Edit Replaceable Image page, change the settings, as applicable. (For field information, see Help> This Page).
You are not allowed to edit the Display Name field. The replaceable images are used in the notification
templates for the status items tags, for example, %MWI_STATUS% and %MESSAGE_STATUS% displays
the MWI status and message status of the voice message.
Note
System Administration Guide
187
Notifications
Administrative Replaceable Images
Page 206
Step 4
Select Save after applying the settings.
Configuring HTML-based Message Notification
Unity Connection can be configured to send message notifications in the form of HTML template to an email
address. The HTML-based templates can be selected and applied by the administrator to allow HTML
notification for a device.
To get the HTML notifications exactly as per the template defined by the administrator, the user’s email client
must support the display of images and icons. For more information on whether your email client support the
display of images and icons, refer to documentation of your email service provider.
HTML notifications are supported with the following email clients:
• Microsoft Outlook 2010
• Microsoft Outlook 2013
• Microsoft Outlook 2016
• IBM Lotus Notes
• Gmail (Web based access only)
The user must ensure to select the authentication or non-authentication mode as desired.
Configuring the Authenticated and Non-Authenticated Mode
If the administrator has created a template that includes images, icons, or status items, then the authentication
mode ensures that the user authenticates with the Unity Connection credentials before the images are displayed
in an email notification.
The non-authentication mode does not prompt user for credentials and the embedded images or icons are
displayed without authentication in the email notification.
By default, the system is configured for the authentication mode. The administrator can configure the settings
through Cisco Unity Connection Administration.
Step 1
In Cisco Unity Connection Administration, select System Settings > General Configuration.
Step 2
On the Edit General Configuration page, select the Authenticate Graphics for HTML Notification option to turn on the
authentication mode and Save.
Configuring Unity Connection to Send Voice Message as an Attachment with
HTML Notification
With Unity Connection 10.0(1) or later release, the administrator can configure Unity Connection to send the
voice message as an attachment in the HTML notification to the user. Along with the link to access Unity
Connection Mini Web Inbox through the HTML notification email, the user can now access the voice message
System Administration Guide
188
Notifications
Configuring HTML-based Message Notification
Page 207
attachment in the .wav format that can be played on a PC or mobile using any player. Prior to 10.0(1) version,
the end user received only a link in the HTML notifications to access Unity Connection Mini Web Inbox and
listen to voice messages through Mini Web Inbox only.
In case of forwarded messages, the attachment is sent only for the latest voice message. The secure and private
voice messages cannot be sent as an attachment.
Note
Following mobile clients are supported to access voice messages from mobile devices:
• iPhone 4 and above
• Android
Configuring Unity Connection to Send Voice Message as an Attachment
SUMMARY STEPS
1.
In Cisco Unity Connection Administration, expand Advanced and select Messaging.
2. On the Messaging Configuration page, select the Allow voice mail as attachments to HTML notifications
option to send the voice message as an attachment and Save.
DETAILED STEPS
Purpose
Command or Action
In Cisco Unity Connection Administration, expand
Advanced and select Messaging.
Step 1
On the Messaging Configuration page, select the Allow
voice mail as attachments to HTML notifications option to
send the voice message as an attachment and Save.
Step 2
Configuring the Size of Voice Messages Sent as an Attachment
Unity Connection is configured to send the voice message as an attachment upto 2048KB with HTML
notification. The administrator can configure the size of the voice message using the Cisco Unity Connection
Administration.
Step 1
In Cisco Unity Connection Administration, expand Advanced and select Messaging.
Step 2
On the Messaging Configuration page, enter the size of voice message in the Max size of voice mail as attachment to
HTML notifications (KB) text box.
Step 3
Select Save. You should restart the Connection Notifier service for changes to take effect.
System Administration Guide
189
Notifications
Configuring Unity Connection to Send Voice Message as an Attachment

Page 208
Notifications Subject Line Format
Notification subject line format is a feature that enables you to configure the subject lines of the notification
emails.
The subject line of the following Notification types can be configured:
• Message Notifications: This includes email notifications that are sent to the Unity Connection users for
new voice messages.
• Missed Call Notifications: This includes the email Notifications for missed calls.
• Scheduled Summary Notifications: This includes the email Notifications sent at scheduled time.
The subject line for Message Notifications can only be customized for All Voice
Messages. For other events, like Dispatch Messages, Fax Messages, Calender
Appointments, and Calender Meetings, system generated subject is used.
Note
Subject Line Parameters
The below table describes the parameters that can be specified in the subject line of the notification emails.
Description of Subject Line Format Parameters
Enter text to be used in subject lines when the Caller
ID of the sender of a message is not known.
• When the %CALLERID% parameter is used in
the subject line format, it is automatically
replaced with the ANI Caller ID of the sender
of the message.
• If the ANI Caller ID is not available and the
sender is a Unity Connection user, the primary
extension of the caller is used.
• If the ANI Caller ID is not available and the
sender is a non Unity Connection user, the text
that you enter in this field is inserted into the
subject line.For example, if you enter ‘Unknown
Caller ID’ in this field, same appears on the
screen.
You can also leave this field blank.
%CALLERID%
(When Unknown)
System Administration Guide
190
Notifications
Notifications Subject Line Format

Page 209
Enter text to be used in subject lines when both the
display name and ANI Caller Name of the sender of
the message is not known.
• When an outside caller sends a voice message
and %NAME% parameter is used in the subject
line format of the notification, it is automatically
replaced with the ANI Caller Name of the sender
of the message.If the ANI Caller Name is not
available, Unity Connection inserts the value
specified in the %NAME% (When Unknown)
field.
• When Unity Connection user sends a voice
message and %NAME% parameter is used in
the subject line format of the notification, it is
automatically replaced with the display Name
of the sender of the message.If the display Name
is not available, Unity Connection inserts the
ANI Caller Name. If the ANI Caller Name is
not available, the SMTP address of the Unity
Connection user is used.
%NAME%
(When Unknown)
Enter text to be used in subject lines when the
message is flagged as Urgent.
When the %U% parameter is used in the subject line,
it is automatically replaced with the text that you enter
in this field if the message is flagged as urgent. If the
message is not urgent, this parameter is omitted.
%U%
Enter text to be used in subject lines when the
message is flagged as Private.
When the %P% parameter is used in the subject line,
it is automatically replaced with the text that you enter
in this field if the message is flagged as private. If the
message is not private, this parameter is omitted.
%P%
Enter text to be used in subject lines when the
message is flagged as secure message.
When the %S% parameter is used in the subject line,
it is automatically replaced with the text that you enter
in this field if the message is flagged as secure. If the
message is not a secure message, this parameter is
omitted.
%S%
System Administration Guide
191
Notifications
Subject Line Parameters
Page 210
Enter text to be used in subject lines when the
message is flagged as dispatch message.
When the %D% parameter is used in the subject line,
it is automatically replaced with the text that you enter
in this field if the message is flagged as dispatch
message. If the message is not a dispatch message,
this parameter is omitted.
%D%
When %TIMESTAMP% parameter is used in the
subject line format of Message Notification or Missed
call Notification, its value is the delivery time of the
message for which the notification is sent as per the
timezone of the recipient.
When %TIMESTAMP% parameter is used in the
subject line of Scheduled Summary Notification, then
its value is the time at which scheduled notification
is sent.
%TIMESTAMP%
Subject Line Format Examples
Subject Line Format Examples
Subject Line of the Message
Received
Subject Line Format
Type of Notification
Message notification: Voice
message from John 4132
Message notification: Voice
message from %NAME%
%CALLERID%
Message Notification
Missed Call from John (4132)
11.12 hrs
Missed Call from %NAME%
(%CALLERID%)TIMESTAMP%
Missed Call Notification
Message Summary Notification
Missed Call from %NAME%
(%CALLERID%)
Scheduled Summary Notification
Subject Line Format Configuration
You should consider the following when defining the subject line formats:
• You must include a % before and after the parameter.
• You can define a separate subject line format for each language that is installed on the system.
• When a subject line format is not defined for the preferred language of the user, the subject line format
definition for the system default language is used instead.
Step 1
In Cisco Unity Connection Administration page, expand System Settings > Subject Line Formats.
System Administration Guide
192
Notifications
Subject Line Format Examples
Page 211
Step 2
On the Edit Subject Line Formats page, select Notifications from Choose Message Type drop down to select the required
message type.
Step 3
Select the applicable language from Choose Language drop down menu.
Step 4
Enter text and parameters in the Subject Line Formats fields, as applicable. (For more information on each parameter,
see Help> This Page).
Step 5
Enter texts in the Parameter Definitions field, as applicable.
Step 6
Select Save.
Step 7
Repeat Step 2 through Step 5 as needed for the other languages.
System Administration Guide
193
Notifications
Subject Line Format Configuration
Page 212
System Administration Guide
194
Notifications
Subject Line Format Configuration
Page 213
C H A P T E R 15
Video
• Video, on page 195
Video
Cisco Media Sense is now end of life and end of support, hence Unity Connection will no longer provide the
Video Messaging feature for users.For more information on Cisco Media Sense EOL, see
https://www.cisco.com/c/en/us/products/collateral/customer-collaboration/mediasense/eos-eol-notice-c51-738857.html.
Note
In Unity Connection, a user or an outside caller can also send video message to another user using video
enabled end point in case of Ring No Answer (RNA). A user can also record a greeting in video format from
a video enabled end point.
For more information, see the following references:
• Video Messaging chapter of Design Guide for Cisco Unity Connection Release 15 at
https://www.cisco.com/c/en/us/td/docs/voice_ip_comm/connection/15/design/guide/b_15cucdg.html
• Video Compatibility Matrix section of Compatibility Matrix for Cisco Unity Connection available at
https://www.cisco.com/c/en/us/td/docs/voice_ip_comm/connection/compatibility/matrix/b_cucclientmtx.html.
Task List for Configuring Video Messaging
Do the following tasks to enable video messaging for the users:
1.
Enable video messaging for the users through class of service:
a.
In Cisco Unity Connection Administration, expand Class of Service and select Class of Service.
b.
On the Search Class of Service page, select the class of service applied to the voicemail users.
c.
On the Edit Class of Service page, in the Enable Video section, check the check boxes depending on
your requirement. (For more information on each field, see Help> This Page).
d. Select Save.
2.
Install the Cisco MediaSense video server. For more information, see theInstalling and Configuring Cisco
MediaSense section.
System Administration Guide
195


Page 214
Configure video services in Unity Connection. Ensure that the current video call is not exceeding 20
concurrent video sessions as supported in Unity Connection.
Make sure that the video server with which Unity Connection integrates for the storage and retrieval of video
messages and greetings is in the active state.
Note
For more information, see the Configuring Video Services section.
4.
Configure video service accounts for Unity Connection users to access the video services. For more
information on creating the video service accounts for Unity Connection users, see the Configuring Video
Services Accounts section.
You can also use the Bulk Administration Tool (BAT) to configure video service accounts. For more
information on configuring video service accounts using BAT tool, see the Bulk Administration Tool section.
Note
5.
Configure the video resolution for video messages and greetings associated with a port group. For more
information on configuring port group, see the Codec Advertising section in Telephony Integration chapter.
6.
Configure the number of expiration days for video messages after which the video part of a video message
get expired and only audio part is retained as a voice message. For more information on configuring
message expiration policy, see the Message Recording Expiration section in the Message Storage chapter.
You can also configure the Differentiated Services Code Point (DSCP) value for the video messaging on
Telephony Configuration page of Cisco Unity Connection Administration. However, it is recommended to
set the value of this parameter to the default unless a Cisco support engineer instructs otherwise.
Note
Installing and Configuring Cisco MediaSense
Cisco MediaSense is a video server that integrates with Unity Connection to support the recording, playback,
and storage of audio and video recordings.
Step 1
Download and install Cisco MediaSense:
For information, see the “Cisco MediaSense Installation” chapter of Installation and Administration Guide for Cisco
MediaSense Release 9.0(1), available at
http://www.cisco.com/en/US/docs/voice_ip_comm/cust_contact/contact_center/mediasense/901/inst_admin/CUMS_BK_IFE33F4B_00_mediasense-install-and-admin-guide_chapter_010.html.
Step 2
Access Cisco MediaSense Administration:
a)
From a web browser on any computer in your Unified Communications network, go to http://servername/oraadmin.
The servername is the IP address of the server where you have installed Cisco MediaSense.
b) A Security Alert message may appear, prompting you to accept the self-signed security certificate, if you have not
already installed it. This security message may not appear if you have already installed a security certificate. The
Cisco MediaSense Administration Authentication page appears.
c)
Enter the Application Administrator User ID and Password and select Log In.
System Administration Guide
196
Video
Installing and Configuring Cisco MediaSense

Page 215
Step 3
Select the video file from Cisco MediaSense:
a)
In Cisco MediaSense Administration, select Media File Management > Add.
b) On the Add Media File page, enter a title for the video to be uploaded. Make sure that the title name of the image
should be CiscoUnityConnectionLogo.mp4.
c)
(Optional) Enter a description of the file.
d) Browse to select the Cisco logo in the File field and select Save.
You can either select a customized logo from your system or can select the standard Cisco logo.
Note
The customized logo must be in MP4 format and should meet the following specifications:
• H.264 constrained baseline profile
• Resolution 1080p, 720p, 480p, or 360p
• Audio AAC-LC (MediaSense converts it to AAC-LD upon import)
• 48000 Hz sampling frequency
• Mono
• Maximum 2GB file size
Step 4
Disable Cisco Media Sense Prune Policy:
Cisco MediaSense has a default setting of pruning enabled for 60 days, which means that MediaSense deletes all video
messages/greetings after 60 days and the messages/greetings are not available any more. To avoid your video
messages/greetings from getting deleted, you must disable the MediaSense Prune Policy setting
a.
In Cisco MediaSense Administration, select Prune Policy Configuration.
b.
On the MediaSense Prune Policy Configuration page, uncheck the Automatically prune recordings after they are
more than 60 days old, and when disk space is needed for new recordings (1) check box and select Save.
c.
Restart all the Cisco MediaSense media services on all the nodes.
Configuring Video Services
Video services allow Unity Connection to integrate with video server to store and retrieve all the video
messages and greetings recorded by the user. In addition, it allows Unity Connection to verify the state of
video server, codecs, and user credentials used with video server.
Step 1
In Cisco Unity Connection Administration, expand Video and select Video Services.
The Search Video Services page appears displaying the currently configured video services.
Step 2
Configure video services (For more information on each field, see Help > This Page):
• To add a new video service account:
• On the Search Video Services page, select Add New.
• On the New Video Service page, enter the values of the required fields and select Save. You need to restart the
Connection Conversation service on each server in a Unity Connection cluster.
• Select Test to display the task execution results window.
System Administration Guide
197
Video
Configuring Video Services
Page 216
• To edit an existing video service:
• On the Search Video Services page, select the video service that you want to edit.
• On the Edit Video Service page, enter the values of the required fields and select Save.
• Select Test to display the task execution results window.
• To delete one or more video services:
• On the Search Video Services page, check the check boxes for the video services that you want to delete.
• Select Delete Selected and OK to confirm.
Configuring Video Services Accounts
After configuring video services in Unity Connection, the administrator needs to configure video service
accounts for each user.
You can also use the Bulk Administration Tool (BAT) to create, edit, and delete multiple video services
accounts at the same time by importing information contained in a comma separated value (CSV) file.
Note
Step 1
In Cisco Unity Connection Administration, expand Users and select Users.
The Search Users page appears displaying the currently configured users.
Step 2
Configure video service accounts for the users (For more information on each field, see Help> This Page):
• To add a video service account for a user:
• On the Search Users page, find the user for which you want to create a video service account.
• On the Edit Users Basics page, select Edit> Video Services Accounts.
• On the Video Services Accounts page, select Add New.
• For each user, you can add only one video service account.
• On the New Video Services Accounts page, enter the values of the required fields. Check the Map
Video Service check box to configure the video service with video service account and select Save.
Note
• To edit an existing video service account for one or more users:
• On the Search Users page, find the user for which you want to edit the video service account. To edit the video
service account of more than one user, check the check boxes for the users and select Bulk Edit.
• On the Edit User Basics page, select Edit> Video Services Accounts.
• On the Video Services Accounts page, select the video service account that you want to edit.
• On the Edit Video Services Accounts page, enter the values of the required fields. Select the Map Video Service
check box to configure the video service with video service account and select Save.
• To delete a video service account for one or more users:
• On the Search Users page, find the user for which you want to delete the video service account.
• On the Edit User Basics page, select Edit> Video Service Accounts.
System Administration Guide
198
Video
Configuring Video Services Accounts

Page 217
• On the Video Service Accounts page, select the video service account that you want to delete.
• Select Delete Selected and OK to confirm.
System Administration Guide
199
Video
Configuring Video Services Accounts
Page 218
System Administration Guide
200
Video
Configuring Video Services Accounts
Page 219
C H A P T E R 16
System Settings
•
• Overview, on page 201
• General Configuration, on page 201
• Cluster, on page 202
• Authentication Rules, on page 202
• Roles, on page 204
• Restriction Tables, on page 206
• Licenses, on page 206
• Schedules, on page 206
• Holiday Schedules, on page 206
• Global Nicknames, on page 206
• Subject Line Formats, on page 207
• Attachment Descriptions, on page 210
• Enterprise Parameters, on page 211
• Service Parameters, on page 214
• Plugins, on page 221
• Fax Server, on page 222
• LDAP, on page 222
• SAML Single Sign On, on page 223
• Authz Server, on page 223
• Cross-Origin Resource Sharing (CORS), on page 224
• SMTP Configuration, on page 225
Overview
The System Settings menu in Cisco Unity Connection Administration provides various options that helps you
to manage the system wide settings for different features and parameters.
General Configuration
The General Configuration settings enables the administrator to manage various system settings and
conversation settings in Unity Connection.
System Administration Guide
201

Page 220
The system settings include the default partition, default search space, and timezone in which Unity Connection
plays the system prompts to users and callers. The conversation settings include the default phone language
settings, target decibel level for messages and greetings, and maximum greeting length in Unity Connection
system.
Managing the General Configuration Settings
Step 1
In Cisco Unity Connection Administration, expand System Settings and select General Configuration.
Step 2
On the Edit General Configuration page, enter the values of the required settings. (For more information on each field,
see Help> This Page).
Step 3
Select Save.
Cluster
The Cluster settings page enables an administrator to view and manage the Unity Connection cluster related
information. To access the cluster settings, sign in to Cisco Unity Connection Administration, expand System
Settings and select Cluster.
The Find and List Servers page displays the hostname or IP address and the server type of the installed Unity
Connection servers. If you have installed only the publisher server, you need to add the details of the subscriber
server in the Cluster settings to configure a cluster. For more information, see the “Configuring Cisco Unity
Connection Cluster” chapter in Install, Upgrade, and Maintenance Guide for Cisco Unity Connection Release
15 available at
https://www.cisco.com/c/en/us/td/docs/voice_ip_comm/connection/15/install_upgrade/guide/b_15cuciumg.html.
You can manage the server details of publisher or subscriber server from the Server Configuration page in
which you specify the hostname, IP address, MAC details, and local bandwidth management (LBM) information
of the server. For more information on each field, see Help> This Page.
Authentication Rules
Authentication rules in Unity Connection govern the policies for user passwords, PINs, and user account
lockouts. The authentication rules prevent unauthorized access to Unity Connection web applications, such
as Cisco PCA and Web Inbox, by locking out users when they enter invalid PINs or passwords. The two
predefined authentication rules are Recommended Voice Mail Authentication Rule and the Recommended
Web Application Authentication Rule.
When you add users to Unity Connection, the phone PINs and web application passwords are determined by
the user template used to create the user account. By default, user templates are assigned randomly generated
strings for the phone PIN and web password. All users created from a user template are assigned the same
PIN and password. A user must change the password or PIN during the next sign in to secure access to his
account details.
Consider the following points when configuring PINs and passwords in Unity Connection:
System Administration Guide
202
System Settings
Managing the General Configuration Settings
Page 221
• To enhance security settings, change the PINs and passwords frequently. For information on changing
the web application or phone passwords, see the Users, on page 37 chapter.
Users can also change the PINs or passwords using the Messaging Assistant.
Note
• To protect Unity Connection from unauthorized access and toll fraud, every user should be assigned a
unique phone PIN and web application password.
• The PINs or passwords should be of six characters and non trivial.
The PINs and passwords used in various Unity Connection applications are:
• Voicemail password: The voicemail passwords are used to sign in to a Unity Connection conversation
using phone. Users can either use the phone keypad to enter a password that entirely consists of digits
or can speak out the PIN if enabled for voice recognition.
• Web Application password: The web application password is used by a user to sign in to the Unity
Connection web applications, such as Messaging Assistant and Web Inbox.
If you are using Cisco Business Edition or LDAP authentication, users must use
the Cisco Business Edition or LDAP user passwords to access the Unity
Connection web applications.
Note
Configuring Authentication Rules
The authentication rules configured in Cisco Unity Connection Administration helps determine:
• The number of failed sign in attempts to the Unity Connection phone interface, Cisco PCA, or Unity
Connection Administration that are allowed before an account is locked.
• The number of minutes an account remains locked before it is reset.
• Whether a locked account must be unlocked manually by an administrator.
• The minimum length allowed for passwords and PINs.
• The number of days before a password or PIN expires.
Step 1
In Cisco Unity Connection Administration, expand System Settings and select Authentication Rules.
The Search Authentication Rules page appears displaying the default and currently configured authentication rules.
Step 2
Configure an authentication rule (For more information on each field, see Help> This Page):
• To add an authentication rule:
On the Search Authentication Rules page, select Add New.
On the New Authentication Rules page, enter the values of the required fields and select Save.
System Administration Guide
203
System Settings
Configuring Authentication Rules

Page 222
• To edit an existing authentication rule:
On the Search Authentication Rules page, select the authentication rule that you want to edit.
On the Edit Authentication Rules page, enter the values of the required fields and select Save.
• To delete one or more authentication rules:
On the Search Authentication Rules page, select the authentication rule that you want to delete.
Select Delete Selected and OK to confirm deletion.
Roles
A role comprises of set of privileges that define the access level to the system. System Administrator can
configure multiple roles based on the administrative needs. The role assignment for a user account can be
done based on the set of operations required. Unity Connection offers two types of roles:
• System Roles - System Roles are the predefined roles that come installed with Unity Connection.
• Custom Roles - Custom Roles are the roles which can be created, updated or deleted by a System
Administrator.
You can assign or remove any role to one or more users from the Edit Roles page of Users. For more
information, see the Users, on page 37 chapter.
Note
User with System Admin or User Admin role can only update the Pin/Password for any other user with any
system roles. Also any user can update the Pin/Password for other user who is not assigned any role.
Note
Configuring Roles
You can create, modify, or delete Custom Roles based on your requirements.
To Configure Custom Role
Step 1
In Cisco Unity Connection Administration, expand System Settings > Roles and select Custom Roles.
The Search Custom Role page appears displaying the currently configured custom roles.
Step 2
Configure the custom role:
• To add a Custom Role (For more information on each field, see Help> This Page):
a.
Select Add New. The New Custom Role page appears.
b.
Enter the required information in the fields.
c.
Select a system role that you want to inherit.
d. Select the privileges to be assigned to the custom role.
System Administration Guide
204
System Settings
Roles

Page 223
Note
(Applicable only for Unity Connection12.0 and 11.5) Make sure to select the "Read Access To
System Configuration Data - Read Access " privilege.
e.
Select Save.
• To update a Custom Role:
a.
Select the Custom Role that you want to edit. The Edit Custom Role page appears displaying the current settings
of the custom role.
b.
Edit the Custom Role settings as applicable..
c.
Select Save.
• To delete a Custom Role:
a.
Check the check box next to the custom role that you want to delete.
b.
Select Delete Selected.
A dialog box with the "After role deletion, it's association with the users will be removed" message
appears.
Note
c.
Select OK to confirm the deletion.
You can delete multiple roles by selecting more than one checkbox at a time.
Note
Assigning or Removing Roles to a User
To Assign or Remove a Role to a User from System Settings
Step 1
In Cisco Unity Connection Administration, expand System Settings > Roles and select either of the following: .
• System Roles: The Search Roles page appears displaying already configured system roles.
• Custom Roles: The Search Custom Roles page appears displaying already configured custom roles.
Step 2
Assign a role to one or more users (For more information on each field, see Help> This Page):
a)
Select the role that you want to assign to one or more users.
b) Select Role Assignments on the Edit page of the selected role.
Make sure to select not in from the Find Users dropdown list for the specific role that you want to
assign.
Note
c)
Check the check boxes next to the users to whom you want to assign the role and select Assign Selected.
Step 3
Remove a role from one or more users (For more information on each field, see Help> This Page):
a)
Select the role that you want to remove from one or more users.
b) Select Role Assignments on the Edit page of the selected role..
c)
Check the check boxes next to the users for whom you want to remove the role and select Remove Selected.
System Administration Guide
205
System Settings
Assigning or Removing Roles to a User
Page 224
Restriction Tables
The restriction tables allow you to control which phone numbers or URIs the users and administrators can
use for transferring calls, dialing out message notifications and faxes, and to restrict specific extensions from
being added as alternate extensions. For more information, see the Restriction Tables section.
Licenses
The License settings page displays the license information in a Unity Connection server. In Unity Connection,
the licenses are managed by Cisco Smart Software Licensing. This licensing model adds flexibility to your
licensing and simplifies it across the enterprise. Unity Connection must be registered with the Cisco Smart
Software Manager (CSSM) or Cisco Smart Software Manager satellite to use various licensed feature.
Unity Connection remains in the Evaluation Mode until it registers with the Cisco Smart Software Manager
(CSSM) or Cisco Smart Software Manager satellite. For information on Unity Connection licenses, see the
“Managing Licenses“ chapter of the Install, Upgrade, and Maintenance Guide for Cisco Unity Connection,
Release 15, available at https://www.cisco.com/c/en/us/td/docs/voice_ip_comm/connection/15/install_upgrade/
guide/b_15cuciumg.html.
Schedules
The Schedule settings page helps to manage the various schedules in Unity Connection. An administrator can
control greetings, transfer types, and access rights based on the schedules applied to a user or call handler.
Holiday Schedules
Holiday schedules work together with active schedules to control greetings, transfer types, and access rights.
For more information see the Holiday Schedules section.
Global Nicknames
The Global Nickname list is a comprehensive list of common nicknames that Unity Connection considers
when a caller uses voice recognition to place a call or to address messages. For example, Unity Connection
considers “Bill,” “Billy,” and “Will” to be nicknames for the name “William.”
If a user has an uncommon name or if others know the user by a different name (for example, a maiden name)
consider adding these alternate names for the user. Alternate names improve the likelihood of Unity Connection
placing a call when callers ask for the user by name.
Configuring a Global Nickname in Unity Connection
Step 1
In Cisco Unity Connection Administration, expand System Settings and select Global Nicknames.
System Administration Guide
206
System Settings
Restriction Tables
Page 225
The Search Global Nicknames page appears displaying the currently configured global nicknames.
Step 2
Configure a nickname (For more information on each field, see Help> This Page)
• To add a nickname:
On the Search Global Nicknames page, select Add New.
On the New Global Nicknames page, enter the values of the required fields and select Save.
• To edit a nickname:
On the Search Global Nicknames page, select the nickname that you want to edit.
On the Edit Global Nicknames page, enter the values of the required fields and select Save.
• To delete a nickname:
On the Search Global Nicknames page, select the nickname that you want to delete.
Select Delete Selected and OK to confirm deletion.
Subject Line Formats
The message subject lines are visible when users view and listen to messages in Web Inbox, Messaging Inbox,
an IMAP client, an RSS client, or any other visual client that displays the message subject. Subject lines are
not presented to users when they listen to voice messages over phone.
You can configure both the wording and the information that is included in the subject line of voice messages,
including localizing the subject line according to the language of the recipient.
The subject line format is defined for the following types of messages:
1.For Voice Messages:
• Outside caller messages: The unidentified voice messages or messages from callers who are not Unity
Connection users. This also includes the messages left for a system call handler.
• User to user messages: The identified voice messages or messages from Unity Connection users.
• Interview handler messages: The messages left for interview handlers.
• Live record messages: The messages containing conversation recorded during the communication between
users and callers.
2.For Notifications:
• Message Notifications: This includes Email notifications that are sent to the Unity Connection users for
new voice messages.
• Missed Call Notifications: This includes the Email notifications for missed calls.
• Scheduled Summary Notifications: This includes the Email notifications sent at scheduled time(s).
For more information on Notifications Subject Line Format, see Notifications Subject Line Format section.
System Administration Guide
207
System Settings
Subject Line Formats
Page 226
Subject Line Parameters for Voice Messages
Following table describes the parameters that can be used to define message subject lines.
Table 9: Parameters Used to Define Message Subject Lines
Description
Parameter
When the %CALLERID% parameter is used in a subject line format, it is automatically
replaced with the ANI Caller ID of the sender of the message.
If the ANI Caller ID is not available, the text entered in the %CALLERID% (When
Unknown) field is inserted into the subject line instead.
%CALLERID%
When the %CALLEDID% parameter is used in a subject line format, it is automatically
replaced with the ID of the number called by the sender of the message. If the Called
ID is not available, the text entered in the %CALLEDID% (When Unknown) field is
inserted into the subject line instead.
You might find this field useful in cases where more than one organization shares a
single Cisco Unity Connection system, and there are multiple inbound numbers defined
so that callers can be routed to different opening greetings. In this case it might be
helpful if messages left in a general help voice mailbox include the number that the
sender of the message used when calling the system.
%CALLEDID%
When the %NAME% parameter is used in the subject line format of an outside caller
message, it is automatically replaced with the ANI Caller Name of the sender of the
message. If the ANI Caller Name is not available, Cisco Unity Connection inserts the
value specified in the %NAME% (When Unknown) field.
When the %NAME% parameter is used in the subject line format of a user to user
message, it is automatically replaced with the display name of the sender of the
message. If the display name is not available, Unity Connection inserts the ANI Caller
Name. If the ANI Caller Name is not available, Unity Connection inserts the value
specified in the %NAME% (When Unknown) field.
When the %NAME% parameter is used in the subject line format of an interview
handler message, it is automatically replaced with the ANI Caller Name of the sender
of the message. If the ANI Caller Name is not available, Unity Connection inserts the
display name of the interview handler. If the display name is not available, Unity
Connection inserts the value specified in the %NAME% (When Unknown) field.
When %NAME% is used in the Live Record Messages field, it is automatically replaced
with the display name of the user who initiated the live record message. If the display
name is not available, Unity Connection inserts the ANI Caller Name. If the ANI
Caller Name is not available, Unity Connection inserts the value specified in the
%NAME% (When Unknown) field.
%NAME%
System Administration Guide
208
System Settings
Subject Line Parameters for Voice Messages
Page 227
Description
Parameter
When the %EXTENSION% parameter is used in a subject line format, it is
automatically replaced with the extension of the sender of the message, or for messages
recorded by call handlers or interview handlers, with the extension of the handler.
If the extension is not available, the value entered in the %EXTENSION% (When
Unknown) field is inserted into the subject line instead.
When %EXTENSION% is used in the Live Record Messages field, it is
replaced with the extension of the user who initiated the live record
message
Note
%EXTENSION%
When the %U% parameter is used in a subject line format, it is automatically replaced
with the text that you enter in the %U% field if the message is flagged as urgent. If
the message is not urgent, this parameter is omitted.
%U%
When the %P% parameter is used in a subject line format, it is automatically replaced
with the text that you enter in the %P% field if the message is flagged as private. If
the message is not private, this parameter is omitted.
%P%
When the %S% parameter is used in a subject line format, it is automatically replaced
with the text that you enter in the %S% field if the message is flagged as a secure
message. If the message is not a secure message, this parameter is omitted.
%S%
When the %D% parameter is used in a subject line format, it is automatically replaced
with the text that you enter in the %D% field if the message is flagged as a dispatch
message. If the message is not a dispatch message, this parameter is omitted.
%D%
Subject Line Format Examples for Voice Messages
Table 10: Subject Line Format Example
Subject Line of the
Message Received
Message Details
Subject Line Format
Type of Message
"Voice message
from 2065551212"
An outside caller with the
ANI Caller ID 2065551212
%U% %D% Voice message from
%CALLERID%
Outside caller
message
"Urgent Message
from John Jones
[4133]"
John Jones, at extension
4133-an urgent message
%U% %P% %S% Message from
%NAME% [%CALLERID%]
User to user
message
"Message from
Sales Survey
[Unknown caller
ID]"
"Sales Survey" interview
handler, no ANI caller ID
available
Message from %NAME%
[%CALLERID%]
Interview handler
message
"Live Record
message from
4085551212"
User recording of a phone call
from a caller with the ANI
caller ID 4085551212
Live Record message from
%CALLERID%
Live Record
message
System Administration Guide
209
System Settings
Subject Line Format Examples for Voice Messages
Page 228
When a System Call Handler or Interview Handler is configured to receive the voice messages that are
forwarded to the user with mailbox assigned to the Call handler, by default the information of call handler is
appeared in the From field of Subject Line for the messages. If you want to get the sender's original information
in the From field of subject line of the message, do the following:
1.
Execute
run cuc dbquery unitydirdb update tbl_configuration set valuebool ='1' where
fullname='System.Conversations.ConfigParamForSenderInfo'
CLI command.
2.
Restart the Connection Conversation Manager on the Unity Connection server to reflect the changes
3.
In case of a cluster, run the CLI command on publisher server and restart the Connection Conversation
Manager on both the nodes of Unity Connection.
Subject Line Format Configuration
You should consider the following when defining the subject line formats:
• You must include a % before and after the parameter.
• You can define a separate subject line format for each language that is installed on the system.
• When a subject line format is not defined for the preferred language of the user, the subject line format
definition for the system default language is used instead.
• When a message is sent to a distribution list, the subject line format for the system default language is
used for all recipients in the distribution list. This means that the subject line is not necessarily in the
preferred language of each recipient.
• Subject line formats are applied to voice messages when the messages are saved to the database. Messages
that are already in user mailboxes are not altered if the subject line format definitions are subsequently
changed. Only voice messages that are recorded after the changes have been saved reflect the new subject
line definition.
Configuring Subject Line Formats in Unity Connection
Step 1
In Cisco Unity Connection Administration, expand System Settings and select Subject Line Formats.
Step 2
On the Edit Subject Line Formats page, enter the values of the required fields or parameters. (For more information on
each field, see Help> This Page).
Step 3
Select Save.
Attachment Descriptions
When Unity Connection is integrated with a third party message store, it uses Text to Speech (TTS) descriptions
of message attachments for the users who check the messages on phone. For example, an attachment with the
extension .jpg is described as “an image.”
System Administration Guide
210
System Settings
Subject Line Format Configuration
Page 229
Configuring Description of a Message Attachment
Step 1
In Cisco Unity Connection Administration, expand System Settings and select Attachment Descriptions.
The Search TTS Descriptions of Message Attachments page appears displaying the currently configured message
attachment descriptions.
Step 2
Configure description of a message attachment (For more information on each field, see Help> This Page):
• To add description of a message attachment:
On the Search TTS Descriptions of Message Attachments page, select Add New.
On the New TTS Description of Message Attachment page, enter the values of the required fields and select Save.
• To edit an existing description of a message attachment:
On the Search TTS Descriptions of Message Attachments page, select the attachment that you want to edit.
On the Edit TTS Descriptions of Message Attachments page, enter the values of the required fields and select Save.
• To delete description of a message attachment:
On the Search TTS Descriptions of Message Attachments page, select the attachment that you want to delete.
Select Delete Selected and OK to confirm deletion.
Enterprise Parameters
Enterprise parameters for Unity Connection provide default settings that apply to all services in Cisco Unified
Serviceability. To view and manage the enterprise parameters, sign in to Cisco Unity Connection
Administration, expand System Settings and select Enterprise Parameters.
For more information about Cisco Unified Serviceability services, see the Cisco Unified Serviceability
Administration Guide Release 10.0(1), available at
http://www.cisco.com/c/en/us/td/docs/voice_ip_comm/cucm/service/10_0_1/admin/CUCM_BK_CDDBCDEB_00_cisco-unified-serviceability-merge-100.html.
The Table 16-1 describes the enterprise parameters available in Unity Connection. The fields not described
in this table are managed from Cisco Unified Communications Manager.
Enterprise Parameter Descriptions
Description
Parameter Name
Specifies the parameter value for the server. The administrator cannot edit
the parameter value from the Enterprise Parameters page.
Cluster ID
Specifies the number of devices that can be traced concurrently if you select
device name based trace in the Trace Configuration in Cisco Unified
Serviceability.
Default setting: 12 Minimum: 0 Maximum: 256
Max Number of Device Level
Trace
System Administration Guide
211
System Settings
Configuring Description of a Message Attachment
Page 230
Description
Parameter Name
Localization Parameters
Specifies the default network locale for tones and modulations of voice.
The selected network locale applies to all gateways and phones that do not
have the network locale set at the device or device pool level.
Make sure that the selected network locale is installed and
supported for all gateways and phones. Reset all devices for
the parameter change to take effect.
Note
Default setting: United States
Default Network Locale
Specifies the default user locale for language selection. Not all locales are
supported by all models. For models that do not support this setting, set
their locale explicitly to something they support.
Reset all devices for the parameter change to take effect.
Note
Default setting: English United States
Default User Locale
Prepare Cluster for Rollback
If a Unity Connection cluster is upgraded to a higher version, this settings
specifies the previous version of Unity Connection
Default setting: False
Prepare Cluster for Rollback to
pre 8.0
Trace Parameters
Enables the use of separate threads to close trace files. This may improve
the performance of the system at the end of a trace file.
Default setting: True
File Close Thread Flag
Defines the high-water mark after which the separate thread used to close
trace files stops accepting trace files to close; the trace file is then closed
without the use of a separate thread.
Default setting: 100 Minimum: 0 Maximum: 500
FileCloseThreadQueueWaterMark
Clusterwide Domain Configuration Parameters
Defines the top level domain for the organization (for example, cisco.com).
Maximum length: 255 Allowed values: Provide a valid domain (for example,
cisco.com) with up to 255 of the following characters: any upper or lower
case letter (a-z, A-Z), any number (0-9), the hyphen (-), or the dot (.) The
dot serves as a domain label separator. Domain labels must not start with
a hyphen. The last label (for example, .com) must not start with a number.
Abc.1om is an example of an invalid domain.
Organization Top Level Domain
System Administration Guide
212
System Settings
Enterprise Parameters
Page 231
Description
Parameter Name
Defines one or more Fully Qualified Domain Names (FQDN) for the cluster.
Multiple FQDNs must be separated by a space. Wildcards can be specified
within an FQDN using an asterisk (*). Examples are cluster-1.rtp.cisco.com
and *.cisco.com. Requests containing URLs (for example, SIP calls) whose
host portion matches any of the FQDNs in this parameter are recognized
as a request destined for the cluster and/or devices attached to it.
Maximum length: 255 Allowed values: Provide one or more fully qualified
domain names (FQDN), or partial FQDNs using the * wildcard (for example,
cluster-1.cisco.com or .cisco.com). Multiple FQDNs must be separated
by a space. The following characters are allowed:
• Any upper or lower case letter (a-z or A-Z)
• Any number (0-9)
• Hyphen (-)
• Asterisk ()
• Dot (.) The dot serves as a domain label separator.
Domain labels must not start with a hyphen. The last label (for example,
.com) must not start with a number. Abc.1om serves as an example of an
invalid domain.
Cluster Fully Qualified Domain
Name
Cisco Support Use
Used by Cisco Technical Support only.
Maximum length: 10
Cisco Support Use 1
Used by Cisco Technical Support only.
Maximum length: 10
Cisco Support Use 2
Cisco Syslog Agent
System Administration Guide
213
System Settings
Enterprise Parameters
Page 232
Description
Parameter Name
Enter the name or IP address of the remote Syslog server that you want to
use to accept Syslog messages. You can configure up to five remote Syslog
servers to accept Syslog messages. If a server name is not specified, Cisco
Unified Serviceability does not send the Syslog messages. Do not specify
a Cisco Unified Communications Manager server as the destination because
the Cisco Unified Communications Manager server does not accept Syslog
messages from another server.
Maximum length: 255 Allowed values: Provide a valid remote syslog server
name with the following characters:
• A-Z
• a-z
• 0-9
• .
• -
Remote Syslog Server Name 1
to Remote Syslog Server Name
5
Select the desired Syslog messages severity for the remote syslog server.
All the syslog messages with selected or higher severity level are sent to
remote syslog. If a remote server name is not specified, Cisco Unified
Serviceability does not send the Syslog messages.
Default setting: Error
Syslog Severity for Remote
Syslog Messages
CUCReports Parameters
Specifies the maximum number of seconds used when trying to establish
a Unity Connection with another server. Increase this time if Unity
Connection experiences issues on a slow network.
Default setting: 10 Minimum: 5 Maximum: 120
Report Socket Unity Connection
Timeout
Specifies the maximum number of seconds used when reading data from
another server. Increase this time if Unity Connection experiences issues
on a slow network.
Default setting: 60 Minimum: 5 Maximum: 600
Report Socket Read Timeout
Service Parameters
Service parameters for Unity Connection allow you to configure different services in Cisco Unified
Serviceability.You can view a list of service parameters and the descriptions by selecting the question mark
button in the Service Parameter Configuration window.
If you turn off a service in Cisco Unified Serviceability, Unity Connection retains any updated service parameter
values. If you start the service again, Unity Connection sets the service parameters to the changed values.
To view and manage the service parameters, sign in to Cisco Unity Connection Administration, expand System
Settings and select Service Parameters.
System Administration Guide
214
System Settings
Service Parameters
Page 233
For more information about Cisco Unified Serviceability services, see the Cisco Unified Serviceability
Administration Guide Release 10.0(1), available at
http://www.cisco.com/c/en/us/td/docs/voice_ip_comm/cucm/service/10_0_1/admin/CUCM_BK_CDDBCDEB_00_cisco-unified-serviceability-merge-100.html.
Some changes to service parameters can cause system failure. You should not make any changes to service
parameters unless you fully understand the feature that you are changing or unless the Cisco Technical
Assistance Center (Cisco TAC) specifies the changes.
Caution
The Table 16-2 describes the service parameters that can be modified for Unity Connection. The fields not
described in this table are managed from Cisco Unified Communications Manager.
Service Parameter Descriptions
Description
Service Parameter
Cisco AMC Service
Specifies the Primary AMC (AlertMgr and Collector) server that collects
clusterwide real-time information. Value must match one of the configured
servers and, preferably, a server with no or minimal call processing.
Primary Collector
Specifies the Failover AMC (AlertMgr and Collector) server. The server
specified in this parameter is used to collect real-time data when the Primary
AMC is down or unreachable. No data is collected if Failover Collector is
not specified when Primary Collector is not active.
Failover Collector
Determines whether collecting and alerting of real-time cluster information
is enabled (True) or disabled (False).
Default setting: True
Data Collection Enabled
Specifies the AMC collecting rate, in seconds.
Default setting: 30 Minimum: 15 Maximum: 300 Unit: seconds
Data Collection Polling Rate
Specifies the amount of time, in seconds, that backup AMC (AlertMgr and
Collector) waits at startup in order to determine if primary AMC is up and
actively collecting. This parameter prevents backup AMC from assuming
a collecting task prematurely.
Restart the AMC service on the backup server for the
parameter change to take effect.
Note
Default setting: 60 Minimum: 15 Maximum: 300 Unit: seconds
Server Synchronization Period
Specifies the port number to turn on RMI registry. This port is used for
primary or backup AMC to locate other AMC and for the RTMT servlet
to find primary/backup AMC.
Restart the AMC service for the parameter change to take
effect.
Note
Default setting: 1099 Minimum: 1024 Maximum: 65535
RMI Registry Port Number
System Administration Guide
215
System Settings
Service Parameters

Page 234
Description
Service Parameter
Specifies the port number used for RMI remote object. This port is used
for AMC to exchange data with other AMC as well as with RTMT servlet.
Restart the AMC service for the parameter change to take
effect.
Note
Default setting: 1090 Minimum: 1024 Maximum: 65535
RMI Object Port Number
(For AMC troubleshooting purpose only.) Enables and disables the alerting
(email/epage) feature.
Restart the AMC service for the parameter change to take
effect.
Note
Default setting: True
AlertMgr Enabled
(For AMC troubleshooting purpose only.) Enables and disables the logging
feature (CSV files for generating reports).
Restart the AMC service for the parameter change to take
effect.
Note
Default setting: True
Logger Enabled
Cisco Database Layer Monitor Service
Specifies the hour to begin call detail recording (CDR) database
maintenance. Use this parameter in combination with the Maintenance
Window parameter. For example, specifying 22 in this parameter means
that the CDR maintenance would begin at 10 p.m. If the Maintenance
Window parameter is set to 2, it means that CDR maintenance runs every
hour from 10 p.m. to midnight. If both parameters are set to 24, CDR
maintenance runs every hour all day long. During CDR maintenance, the
system deletes the oldest CDRs and associated call management records
(CMRs). Therefore, the maximum number of records specified in the Max
CDR Records parameter is maintained. Also during maintenance, the system
issues an alarm if the CDR file count exceeds 200 and checks for replication
links between servers that have been broken and tries to reinitialize them.
Default setting: 24 Minimum: 1 Maximum: 24 Unit: hours
Maintenance Time
System Administration Guide
216
System Settings
Service Parameters
Page 235
Description
Service Parameter
Specifies the time during which CDR maintenance is performed on an
hourly basis. For example, if this parameter is set to 12, CDR maintenance
runs every hour for 12 hours, starting at the time that is specified in the
Maintenance Time parameter. For example, if the Maintenance Time
parameter is set to 7 and this parameter is set to 12, CDR maintenance
begins at 7 a.m. and run every hour until 7 p.m. If both parameters are set
to 24, CDR maintenance runs every hour all day long. During CDR
maintenance, the system deletes the oldest CDRs and associated CMRs.
Therefore, the maximum number of records specified in the Max CDR
Records parameter is maintained. Also, during maintenance, the system
issues an alarm if the CDR file count exceeds 200 and checks for replication
links between servers that have been broken, and tries to reinitialize them.
Default setting: 2 Minimum: 1 Maximum: 24 Unit: hours
Maintenance Window
When set to On, collects Database Replication Status summary every day
during the Maintenance window and compares the output of three
consecutive days to determine if there are tables that have been out of sync
for all three days. If that is the case, it triggers an alert. This parameter, by
default, is set to Off and runs at the time specified in Maintenance Time
parameter.
Default: Off
Table Out of Sync Detection
Sets the Maintenance Task trace. You must turn on this parameter to get a
performance counter trace from the Maintenance Task.
This is a required field.
Default setting: Off
MaintenanceTaskTrace
Cisco DirSync
Specifies the maximum number of LDAP directories (also known as
agreements) that can be configured in the LDAP Directory window in Cisco
Unified CM Administration (System > LDAP > LDAP Directory). Creating
more than one LDAP directory helps in synchronizing users from more
than one search base.
You must restart the Cisco DirSync service for changes to this
parameter to take effect.
Note
Default setting: 5 Minimum: 1 Maximum: 5
Maximum Number of
Agreements
Specifies the maximum number of LDAP host names that can be configured
for failover purposes.
You must restart the Cisco DirSync service for changes to this
parameter to take effect.
Note
Default setting: 3 Minimum: 1 Maximum: 3
Maximum Number of Hosts
System Administration Guide
217
System Settings
Service Parameters
Page 236
Description
Service Parameter
Specifies the number of seconds to delay before retrying the Unity
Connection to the first LDAP server (hostname) that is configured in Cisco
Unified CM Administration. After a Unity Connection failure, the system
tries three times with reconnect to the same host. When the third attempt
is also unsuccessful, the system attempts to connect to the next host name
in the list in hierarchical order.
Default setting: 5 Minimum: 5 Maximum: 60
Retry Delay on Host Failure
(secs)
Specifies the number of minutes to delay before retrying every LDAP server
(hostnames) that is configured in Cisco Unified CM Administration. Unity
Connection to LDAP servers are retried in the order they appear in Cisco
Unified CM Administration and three attempts are made based on the delay
interval specified in the Retry Delay On Host Failure service parameter.
When all three attempts fail, the next LDAP server in the list is tried. If the
system is unable to connect to any of the servers in the list, an error gets
logged and the system waits until the next sync interval before retrying to
connect starting with the first server in the list.
Default setting: 10 Minimum: 10 Maximum: 120
Retry Delay on HostList Failure
(mins)
Specifies the number of seconds allowed for establishing the LDAP
connection in Unity Connection. The LDAP service provider aborts the
attempt if a connection to Unity Connection cannot be established in the
specified amount of time.
Default setting: 5 Minimum: 1 Maximum: 60
LDAP Unity Connection
Timeout (secs)
Specifies the delay in starting the directory synchronization process after
the Cisco DirSync service starts. Directory synchronization ensures that
the users in the LDAP server are copied to the Cisco Unified
Communications Manager database.
You must restart the Cisco Tomcat service for changes to this
parameter to take effect.
Note
Default setting: 5 Minimum: 5 Maximum: 60
Delayed Sync Start Time (mins)
Cisco RIS Data Collector Parameters
Specifies the static TCP port that the Cisco RIS Data Collector services in
the cluster use to communicate with each other.
This is a required field.
Restart the Cisco RIS Data Collector service on each server
in the cluster for the parameter change to take effect.
Note
Default setting: 2555 Minimum: 1024 Maximum: 65535
RIS Cluster TCP Port
System Administration Guide
218
System Settings
Service Parameters
Page 237
Description
Service Parameter
Specifies the static TCP port that the RIS clients use to communicate with
the Cisco RIS Data Collector services in the cluster. Note: You must restart
Cisco Database Layer Monitor service and the Cisco RIS Data Collector
service on each server in the cluster for the parameter change to take effect.
Restart Cisco Database Layer Monitor service and the Cisco
RIS Data Collector services on each server in the cluster for
the parameter change to take effect.
Note
Default setting: 2556 Minimum: 1024 Maximum: 65535
RIS Client TCP Port
Specifies the time (in seconds) that a RIS client waits for a reply from the
Cisco RIS Data Collector service. The RIS Data Collector service running
on each server internally distributes 90 percent of the value specified in this
parameter. To set this parameter correctly for a cluster with multiple servers,
specify a value that is 4 times (or more) the number of servers that are
running the RIS Data Collector service in your cluster.
Choosing a higher value helps ensure that the RIS Data Collector service
on one server has enough time to receive a reply from the RIS Data Collector
service on another server. The time needed for a reply can vary based on
factors such as the processor speed of the server, number of devices
registered to the server, amount of server memory, the volume of calls, and
other performance-affecting factors.
Default setting: 30 Minimum: 10 Maximum: 1000 Unit: seconds
RIS Client Timeout
Specifies the time of the day that the RIS database is cleaned up to remove
any unused and old device information. During this time, the Number of
Registration Attempts performance counters for all devices reset to 0.
Default setting: 22:00 Maximum length: 5 Allowed values: Specify time
in HH:mm format (for example 06:11). Unit: hours:minutes
RIS Cleanup Time of the Day
Specifies the RIS database information storage period for any unregistered
or rejected device information from the Cisco CallManager service. After
the time specified in this parameter expires, Cisco CallManager removes
the expired entries during the next RIS database cleanup time (specified in
the RIS Cleanup Time of the Day parameter).
Default setting: 3 Minimum: 1 Maximum: 30 Unit: days
RIS Unused Cisco CallManager
Device Store Period
Specifies the RIS database information storage period for any closed
provider, device, or line information from the CTI Manager. After the time
specified in this parameter expires, Cisco CTI Manager removes the expired
entries during the next RIS database cleanup time (specified in the RIS
Cleanup Time of the Day parameter).
Default setting: 1 Minimum: 0 Maximum: 5 Unit: days
RIS Unused CTI Records
Storage Period
System Administration Guide
219
System Settings
Service Parameters
Page 238
Description
Service Parameter
Specifies the maximum number of records for closed CTI providers, devices,
and lines that is kept in the RIS database. After the limit specified in this
parameter reaches, Cisco CTI Manager does not save any new record for
unused CTI providers, devices, or lines to the RIS database.
Default setting: 3000 Minimum: 0 Maximum: 5000 Unit: records
RIS Maximum Number of
Unused CTI Records
Enables or disables Trace and Log Central throttling behavior.
Default setting: True
TLC Throttling Enabled
Specifies the system IOWait percentage that TLC throttles towards itself.
Default setting: 10 Minimum: 10 Maximum: 40
TLC Throttling IOWait Goal
Specifies the system CPU utilization percentage that TLC throttles towards
itself.
Default setting: 80 Minimum: 65 Maximum: 90
TLC Throttling CPU Goal
Specifies the minimum delay in milliseconds between IO wait and CPU
usage polls for the purpose of trace collection throttling.
Default setting: 250 Minimum: 200 Maximum: 2000
TLC Throttling Polling Delay
Specifies the maximum time an SFTP transfer is paused in order to prevent
timeouts.
This is a required field.
Default setting: 5000 Minimum: 1000 Maximum: 10000
TLC Throttling SFTP Maximum
Delay
Specifies the maximum number of Processes and Threads running on the
machine. If the total number of Processes and Threads on the machine has
exceeded the maximum number, SystemAccess sends
TotalProcessesThreadsExceededThresholdStart alarm and the corresponding
alert is generated.
Default setting: 2000 Minimum: 1000 Maximum: 3000
Maximum Number of Processes
and Threads
Determines whether collecting and logging of troubleshooting perfmon
data is enabled (True) or disabled (False).
Default setting: True
Enable Logging
Specifies the troubleshooting perfmon data polling rate, in seconds.
Default setting: 15 Minimum: 5 Maximum: 300 Unit: seconds
Polling Rate
System Administration Guide
220
System Settings
Service Parameters
Page 239
Description
Service Parameter
Specifies the maximum number of troubleshooting perfmon log files that
are saved on disk. If the “Maximum No. of Files” is set to a large number,
the “Maximum File Size” be reduced.
If this value is reduced, excessive log files with the oldest time
stamp is deleted if Troubleshooting Perfmon Data Logging is
enabled and RISDC is turned on. If desired, please save these
files first before changing Maximum No. of Files.
Note
Default setting: 50 Minimum: 1 Maximum: 100
Maximum No. of Files
Specifies the maximum file size, in megabytes, in each troubleshooting
perfmon log file before the next file is started. If the “Maximum File Size”
is set to a large number, the “Maximum No. of Files” should be reduced.
Default setting: 5 Minimum: 1 Maximum: 500
Maximum File Size (MB)
Cisco Serviceability Reporter
Specifies the designated server on which RTMTReporter runs. It is desirable
that this server is a non-callprocessing server since RTMT Reporter service
is CPU intensive. This field is automatically filled in with the local server
IP at which Reporter is first turned on.
RTMT Reporter Designated
Node
Specifies the number of minutes after midnight (00:00hrs) when the
Real-Time Monitoring Tool, (RTMT) reports are generated. To reduce any
impact to call processing, run non-real-time reports during non-production
hours.
Default setting: 30 Minimum: 0 Maximum: 1200
RTMT Report Generation Time
Specifies the number of days that must elapse before reports are deleted.
For example, if this parameter is set to 7, reports that were generated seven
days ago get deleted on the eighth day. A value of 0 disables report
generation, and any existing reports get deleted.
Default setting: 7 Minimum: 0 Maximum: 30
RTMT Report Deletion Age
Plugins
Application plugins extend the functionality of Unity Connection. For example, the Real-Time Monitoring
Tool (RTMT) allows you to monitor the health of the system remotely through tools, such as
performance-monitoring counters and the Port Monitor.
Real-Time Monitoring Tool
The Real-Time Monitoring Tool (RTMT) that runs as a client side application, uses HTTPS and TCP to
monitor system performance, device status, device discovery, and CTI applications for Unity Connection.
RTMT can connect directly to devices via HTTPS to troubleshoot system problems. RTMT can also monitor
the voice messaging ports on Unity Connection.
System Administration Guide
221
System Settings
Plugins
Page 240
RTMT allows you to do the following tasks:
• Monitor a set of predefined management objects that focus on the health of the system.
• Generate various alerts in the form of emails, for objects when values go over or below user-configured
thresholds.
• Collect and view traces in various default viewers that exist in RTMT.
• View syslog messages and alarm definitions in SysLog Viewer.
• Work with performance-monitoring counters.
• Monitor the voice messaging ports on Unity Connection.
When a Unity Connection cluster is configured, you can open multiple instances of RTMT to monitor voice
messaging ports on each server in the Unity Connection cluster.
For more information, see the Cisco Unified Real-Time Monitoring Tool Administration Guide for the required
release, available at http://www.cisco.com/en/US/products/ps6509/prod_maintenance_guides_list.html.
Before you install any plugins, you must disable all intrusion detection or anti-virus services that run on the
server where you want to install the plugin.
Note
Installing a Plugin in Unity Connection
Step 1
In Cisco Unity Connection Administration, expand System Settings and select Plugins.
Step 2
On the Search Plugins page, select Find to select the plugin you want to install.
Step 3
Select Download and follow the on screen instructions for installing the plugin.
Fax Server
Fax integration in Unity Connection enables the users to receive faxes in the mailboxes and forward the
received faxes to other users or fax machines for printing. Users manage faxes using phone, Messaging Inbox,
or IMAP client. For more information, see the Fax Server, on page 243 chapter.
LDAP
The LDAP integration allows to import users from and synchronize the users with a supported corporate
directory to maintain single directory information database. For more information, see the LDAP, on page
147 chapter.
System Administration Guide
222
System Settings
Installing a Plugin in Unity Connection

Page 241
SAML Single Sign On
Security Assertion Markup Language Single Sign On (SAML SSO) is an enhancement to the existing sign
on feature. SAML SSO allows a user to gain single sign on access with Unity Connection subscriber web
interfaces and across the administrative web applications on the following Unified Communications products:
• Unity Connection
• Cisco Unified Communications Manager
• Cisco Unified IM/ Presence
SAML SSO supports both LDAP and non LDAP users to gain single sign on access to web applications. For
more information on SAML SSO, see the Quick Start Guide for SAML SSO in Cisco Unity Connection,
Release 15, available at https://www.cisco.com/c/en/us/td/docs/voice_ip_comm/connection/15/quick_start/
guide/b_15cucqssamlsso.html.
Authz Server
Unity Connection enhances the SAML SSO and non SSO login experience for Jabber users by providing the
support of OAuth 2.0 Authorization Code Grant Flow. For faster login, Authorization Code Grant Flow
requires an Authorization Server (Authz Server) to provide the access and refresh tokens to the Jabber client.
In Unity Connection, the publisher server of Cisco Unified CM associated with a phone system is configured
as an Authz server. After configuring an Authz server, Unity Connection uses the authorization keys provided
by the Authz server to validate the token of a Jabber client. If authorization keys are changed on Cisco Unified
CM, you must synchronize the keys between Unity Connection and Authz server. You can configure multiple
Authz server by providing the credential of Cisco Unified CM associated with the phone system.
In multisite deployment where CUCM SME is installed, you can configure the publisher server (where Jabber
end points are connected) of every leaf cluster as an Authz server for connecting with Unity Connection.
Note
To configure an Authz server, see Configuring an Authz Server in Unity Connection
Consider the following points while configuring the Authz server in Unity Connection:
• Make sure that OAuth Authorization Code Grant Flow feature is enabled on both Cisco Unified CM and
Cisco Unity Connection.
By default, the OAuth flow is disabled on Cisco Unity Connection. To enable the feature, navigate to
System Settings > Enterprise Parameters in Cisco Unity Connection Administration. On Enterprise
Parameters page, enter the applicable settings under SSO and OAuth Configuration field and select
the Enabled option for OAuth with Refresh Login Flow.
• The username and password entered for the Authz server must be same as the username and password
of the system administrator of Cisco Unified CM.
• The Tomcat services of Cisco Unified CM are up and running.
• Make sure to upload the valid certificates of Cisco Unified CM to the tomcat trust of Cisco Unity
Connection or check the Ignore Certificate Errors check box to ignore the certificate validation errors
for the Authz server.
System Administration Guide
223
System Settings
SAML Single Sign On

Page 242
For more information on certificates, see "Security" chapter of Cisco Unified Communications Operating
System Administration Guide for Cisco Unity Connection Release 15 at https://www.cisco.com/c/en/us/
td/docs/voice_ip_comm/connection/15/os_administration/guide/b_15cucosagx.html.
• The version of Jabber client must be 11.9 and later.
• The version of Cisco Unified CM must be 11.5.1 SU3 and later.
Configuring an Authz Server in Unity Connection
To configure an Authz server in Unity Connection, do the following procedure:
Step 1
In Cisco Unity Connection Administration, expand System Setting and select Authz Server. The Search Authz Server
page appears displaying the currently configured Authz servers.
Step 2
Configure an Authz server (For more information on each field, see Help> This Page):
• To add an Authz server :
a.
Select Add New. The New Authz Server page appears.
b.
Enter the required information in the field.
c.
Select Save.
• To update an Authz server:
a.
Select the Authz server that you want to edit. The Edit Authz Server page appears.
b.
Edit the Authz server settings as required.
c.
Select Save.
• To delete an Authz server:
a.
Check the check box adjacent to the display name of the Authz server that you want to delete.
b.
Select Delete Selected.
c.
Select OK to confirm the deletion.
You can delete multiple Authz server by selecting more than one check box at a time.
Cross-Origin Resource Sharing (CORS)
CORS is a specification that allows client applications to process cross-origin requests in a more secure way.
Typically for a web application, cross-origin requests from the original domain (where the application
originated) to another domain are forbidden by the web browser due to a Single Origin Policy. CORS provide
a way for the web browser and server to interact and determine whether or not to allow cross-origin request.
CORS standard uses HTTP headers to establish an agreement between the web browser and the Unity
Connection server to provide services to permitted domains.
Unity Connection provides support to the client applications of a cross domain server to access content on a
Unity Connection server directly by creating an entry for cross domain server in Unity Connection. The entry
for cross domain server must pre-exist in Unity Connection to process the CORS requests.
Unity Connection has extended the Single Sign On (SAML SSO) endpoint to support CORS.
System Administration Guide
224
System Settings
Configuring an Authz Server in Unity Connection
Page 243
CORS functionality is supported by Unity Connection 10.5 and later releases using VMRest APIs.
Note
Configuring CORS in Unity Connection
Step 1
In Cisco Unity Connection Administration, expand System Settings and select Cross-Origin Resource Sharing (CORS).
The Search Cross-Origin Resource Sharing page appears displaying the currently configured CORS.
Step 2
Configure Cross-Origin Resource Sharing (For more information on each field, see Help> This Page):
• To add a CORS:
On the Search Cross-Origin Resource Sharing page, select Add New.
On the New Cross-Origin Resource Sharing page, enter the values of the required fields and select Save.
• To edit an existing CORS:
On the Search Cross-Origin Resource Sharing page, select the CORS that you want to edit.
On the Edit Cross-Origin Resource Sharing page, enter the values of the required settings and select Save.
• To delete one or more CORS:
On the Search Cross-Origin Resource Sharing page, select the CORS that you want to delete.
Select Delete Selected to delete the CORS.
SMTP Configuration
The SMTP configuration is a type of messaging that allows users to send and receive Unity Connection voice
messages. For more information on SMTP configuration and messaging, see the Messaging, on page 127
chapter.
System Administration Guide
225
System Settings
Configuring CORS in Unity Connection

Page 244
System Administration Guide
226
System Settings
SMTP Configuration
Page 245
C H A P T E R 17
Advanced System Settings
• Advanced System Settings, on page 227
• SMPP Providers, on page 227
• Conversations, on page 227
• Messaging, on page 232
• Intrasite Networking, on page 232
• Telephony, on page 232
• Reports, on page 233
• Connection Administration, on page 237
• TRAP, on page 237
• Disk Capacity, on page 238
• PCA, on page 238
• RSS, on page 239
• Cluster Configuration, on page 240
• Fax, on page 240
• Unified Messaging Services, on page 240
• API Settings, on page 240
Advanced System Settings
The Advanced menu in Cisco Unity Connection Administration enables the administrator to manage the
system wide settings for different features and parameters, such as messaging and conversations in Cisco Unity
Connection.
SMPP Providers
The SMPP providers offer SMS messaging to Unity Connection users and enable message notifications.
Conversations
You can configure several system-wide conversation settings that affects all users in Unity Connection.
System Administration Guide
227

Page 246
Applying Conversation Settings for All Users
Step 1
In Cisco Unity Connection Administration, expand System Settings> Advanced and select Conversation.
Step 2
Enter the values of the in the required conversation settings and select Save. (For information on each field, see Help>
This Page).
Conversation Settings
Following are the conversation settings:
• Accessibility Settings in Effect During PIN Entry Conversation: The individual user phone menu
accessibility settings do not take effect until a user is authenticated by entering the voicemail PIN.
• Addressing Priority Lists: When a user attempts to address a message to a recipient by saying a name or
spelling part of a name, he/she may find multiple matching names. You can configure two mechanisms
that to prioritize certain recipients, sorting the results and offering the names with higher weights first
in the search results. You can customize how names are stored in addressing priority lists and how long
the names are stored.
• Addressing and Recording Order: The standard conversation can be customized in which users can
address and record when they send or forward messages to other users or distribution lists. You can
customize the user conversation to address a message before recording the message or an introduction.
This setting change is applied systemwide to all users. You cannot change the order in which users
address and record when they reply to messages.
• Announcing to Users when Messages are Marked Secure: When the Announce Secure Status in Message
Header check box is checked, Unity Connection plays a prompt to the user before playing a secure
message, announcing that it is a secure message.
If you have configured Unity Connection such that all messages left by both users and outside callers are
configured to be secure, consider unchecking this check box so that users do not hear the secure message
prompt before every message that they listen to.
• Announcing When a Message has been Sent to Multiple Recipients and Listing Message Recipients:
The conversation can be customized so that when a message has been sent to multiple recipients, Unity
Connection announces that fact to the user before playing the message.
Unity Connection can also be customized so that users can hear a list of all of the recipients of a message. By
default, this functionality is not enabled for the touchtone conversation, and must be configured using the
Custom Keypad Mapping tool. Depending on how you configure the key mapping, users can hear the list of
message recipients when they press the applicable key while listening to the message header, body, footer,
or after-message prompts.
• Automatically Added Alternate Extensions: When a user signs in from a phone number other than a
primary extension or alternate extension, the number is added to the calling party ID (CPID) history of
the user. When a number is added as an alternate extension, the user can sign in to Unity Connection
from the number without having to enter a user ID (the primary extension).
• Call Holding Wait Time: With call holding, when the phone is busy, Unity Connection can ask callers
to hold. Each caller remains in the queue according to the settings that you configure.
System Administration Guide
228
Advanced System Settings
Applying Conversation Settings for All Users
Page 247
• Announcing Message Status on Reply or Reply-All: Unity Connection announces message status to the
users when they reply or reply-all to a message. By default, when a user replies or reply-all to a message,
Unity Connection do not announce any message status.
• Announcing Recipient List on Reply or Reply-All: When a message is sent to multiple recipients and/or
distribution lists, recipients have the option to reply-all. Unity Connection announces the recipient list
to the users when they reply-all to a message whose number of recipients is less than the number specified
in the Maximum Number of Recipients Before Reply-all Warning field.
See Table 17-1, when the administrator enables or disables the Announce Message Status to User(s) while
Replying option.
Message Status Announcement
Expected Behavior of Unity Connection
Announce Message Status to
User(s) while Replying
User Action
Do not announce message status
Disabled
Reply to a message
Do not announce message status
Disabled
Reply-all to a message
Announces the status of the message
Enabled
Reply to a message
Announces the status of the message
Enabled
Reply-all to a message
• Announcing Message Status on Reply or Reply-All: When a message is sent to multiple recipients and/or
distribution lists, recipients have the option to reply-all. Unity Connection announces the recipient list
to the users when they reply-all to a message whose number of recipients is less than the number specified
in the Maximum Number of Recipients Before Reply-all Warning field.
Unity Connection 10.0(1) and later plays only the recipient name, when the user reply to a message. Reply
to a message is irrespective of the value mentioned in the Maximum Number of Recipients Before Reply-all
warning field.
See Table 17-2, when the administrator enable or disable the Announce Message Status to User(s) while
Replying option.
Message Status Announcement
Expected Behavior of Unity Connection
Announce Message
Status to User(s) while
Replying
User Action
Do not announce message status.
Disabled
Reply to a message
Do not announce message status.
Disabled
Reply-all to a message
Announces the status of the message.
Enabled
Reply to a message
Announces the status of the message.
Enabled
Reply-all to a message
• Announcing Recipient List on Reply or Reply-All: When a message is sent to multiple recipients and/or
distribution lists, recipients have the option to reply-all. Unity Connection 10.0(1) and later plays only
the recipient name, when the user reply to a message. Reply to a message is irrespective of the value
mentioned in the Maximum Number of Recipients Before Reply-all warning field.
System Administration Guide
229
Advanced System Settings
Conversation Settings
Page 248
See Table 17-3, when the administrator enable or disable the Announce Recipients list to User(s) while
Replying option.
Message Status Announcement
Expected Behavior of Unity Connection
Announce Message
Status to User(s) while
Replying
User Action
Do not play the recipient name.
Disabled
Reply to a message
Do not play the recipient list.
Disabled
Reply-all to a message
Plays the recipient name.
Enabled
Reply to a message
Plays the recipient list.
Enabled
Reply-all to a message
• Warning users on Reply-All When Number of Recipients Exceeds Maximum: When a message is sent
to multiple recipients and/or distribution lists, recipients have the option to reply-all. Unity Connection
warns users when they reply-all to a message whose number of recipients is equal to or exceeds the
number specified in the Maximum Number of Recipients Before Reply-all Warning field.
• Caller Information: The user conversation can be customized so that it provides users with additional
information about each caller who left a message, before it plays the message. See Table 11: Caller
Information that Unity Connection can Offer Before Message Playback for caller information.
Table 11: Caller Information that Unity Connection can Offer Before Message Playback
Cisco Unity Connection Plays Th
Additional Caller Information Is
Cisco Unity Connection Plays This by
Default
Message Type
For Messages Left by
This Type of Caller
Both the recorded name (if avail
the primary extension (if availab
playing the message.
If the user (or call handler) does
a recorded name, Unity Connect
Text to Speech to play the displa
the user (or call handler) instead
The recorded name of the user (or call
handler). If the user (or call handler) does
not have a recorded name, Unity
Connection uses Text to Speech to play
the display name. If the user does not have
a display name, Unity Connection plays
the primary extension instead.
Voice, receipts
Identified user
(including call
handlers)
The phone number (if available)
caller before playing the messag
The message, without announcing who it
is from or playing the phone number of
the caller first.
Voice
Outside caller
• Dial Prefix Settings for Live Reply to Unidentified Callers: When live reply is enabled, users who are
listening to messages by phone can reply to a message by calling the sender. When a user attempts to
reply by calling an unidentified caller, Unity Connection checks the calling number provided by the
phone system in the Automatic Number Identification (ANI) string against the transfer restriction table
that is associated with the user class of service.
• Deleting Messages: You can customize the standard conversation to change what users hear when they
manage their deleted messages in the following ways:
System Administration Guide
230
Advanced System Settings
Conversation Settings
Page 249
As alternatives to the default, you can specify that Unity Connection does not prompt users to choose, and
instead permanently deletes the type of messages that you specify: either deleted voice messages or all deleted
messages (voice and email, as applicable). To set up either alternative, change the Multiple Message Delete
Mode setting by entering one of the following values:
• 1—Users choose which messages are deleted; Unity Connection prompts them: “To delete only your
voice messages, press 1. To delete all messages, press 2.” (Default setting)
• 2—Unity Connection does not prompt users to choose which messages to delete; instead, Unity Connection
deletes all of their deleted voice messages.
• 3—Unity Connection does not prompt users to choose which messages to delete; instead, Unity Connection
deletes all of their deleted messages (voice messages, receipts, and email messages, as applicable).
• Language of System Prompts: Phone languages are the languages in which Unity Connection can play
system prompts to users and callers. The phone language setting is available for the following Unity
Connection components: user accounts, routing rules, call handlers, interview handlers, and directory
handlers.
• Sign in from a User Greeting: Caller input settings allow you to specify how users sign in to Unity
Connection when they are listening to a user greeting. Using the caller input settings you can specify
which keys users can press to interrupt a user greeting so that they can sign in to Unity Connection, and
what users hear after Unity Connection prompts them to sign in.
The Table 12: Summary of Caller Input Options Available for Specifying How Users Sign In to Unity
Connection from User Greetings summarizes the options available to you for specifying how users sign in to
Unity Connection from their own greeting or from another user greeting.
Table 12: Summary of Caller Input Options Available for Specifying How Users Sign In to Unity Connection from User Greetings
Best Practice
Use
Description
Conversation
Continue to offer the
conversation.
If you are considering
the key used to acces
conversation, conside
also access the Sign-In
by pressing * from th
Greeting.
To avoid leaving a message as an
unidentified caller, users can sign
in to Unity Connection from
another user greeting when they
call the user from a phone that is
not associated with their account.
(Unity Connection users cannot
reply to messages from unidentified
callers.)
Prompts users to enter an ID and
PIN when they press * during any
user greeting.
Enabled by default.
Sign-In
System Administration Guide
231
Advanced System Settings
Conversation Settings
Page 250
Best Practice
Use
Description
Conversation
Provide Easy Sign-In to
want a faster way to sign
their own greeting or to
accommodate users who
accustomed to another vo
messaging system.
Keys 1–9 are unmapped,
therefore good choices fo
assigning to the Easy Sig
conversation. Consider th
following if you are think
using the *, 0, or # key in
• Avoid reassigning th
so that you can cont
offer the Sign-In con
• The # key is already
skip greetings. It is
key that users use to
ahead throughout th
Connection convers
• The 0 key is already
send callers to the O
call handler.
Users can dial their extensions and
sign in quickly without having to
remember the pilot number to
access Unity Connection by phone.
Users may prefer Easy Sign-In to
the Sign-In conversation because it
saves them from having to re-enter
an extension during the sign-in
process. Note that Unity
Connection uses the calling
extension (rather than the dialed
extension) to determine which
mailbox the user is trying to sign
in to.
Prompts users to enter a PIN when
they press a key during any user
greeting.
Disabled by default. (No key is
mapped to the Easy Sign-In
conversation.)
Easy Sign-In
Messaging
The Messaging settings page enables to manage the message configuration values. For more information on
each field, see Help> This Page. For information on messaging, see the Messaging, on page 127 chapter.
Intrasite Networking
The Intrasite Networking settings page enables to manage the intrasite networking configuration. For more
information, see the Networking Guide for Cisco Unity Connection, Release 15, available at
https://www.cisco.com/c/en/us/td/docs/voice_ip_comm/connection/15/networking/guide/b_15cucnetx.html
.
Telephony
The Telephony settings enables to manage the telephony integration settings of Unity Connection. For more
information on each field, see Help> This Page.
For information on telephony integration, see the Telephony Integration, on page 61 chapter.
System Administration Guide
232
Advanced System Settings
Messaging
Page 251
Reports
Reports in Unity Connection are generated to gather information about the system configuration and call
management components, such as call handlers and users. Unity Connection is automatically set to gather
and store the data from which you can generate reports.
To manage reports in Unity Connection, sign in to Cisco Unity Connection Administration, expand System
Settings > Advanced and select Reports. (For more information on each field, see Help> This Page).
Available Reports
You can generate and view reports in Cisco Unity Connection Serviceability. To go to Cisco Unity Connection
Serviceability, select Cisco Unity Connection Serviceability in the navigation pane and select Go.
For details on generating and viewing reports for Cisco Unity Connection Serviceability, see the Administration
Guide for Cisco Unity Connection Serviceability at
http://www.cisco.com/en/US/products/ps6509/prod_maintenance_guides_list.html.
The Table 17-6 describes the reports available in Unity Connection.
Reports Available in Unity Connection
Description of Output
Report Name
Includes the following information for every failed attempt to sign in to Unity
Connection by phone:
• Username, alias, caller ID, and extension or URI of user who failed to sign
in.
• Date and time the failed sign in occurred.
• Whether the maximum number of failed sign in has reached for the user.
Phone Interface Failed
Sign-In
Includes the following information for each user:
• Last name, first name, and alias.
• Information that identifies the Unity Connection or Cisco Unified CMBE
server associated with the user.
• Billing ID, class of service, and extension or URI.
• Whether the account is locked.
• Whether the user has enabled personal call transfer rules.
Users
System Administration Guide
233
Advanced System Settings
Reports
Page 252
Description of Output
Report Name
Includes totals for the following traffic categories:
• Voice.
• Fax.
• Email.
• Non-delivery receipt (NDR).
• Delivery receipt.
• Read receipt.
• Hourly totals.
• Daily totals.
Message Traffic
Includes the following information for voice messaging ports:
• Name.
• Number of inbound calls handled.
• Number of outbound MWI calls handled.
• Number of outbound AMIS calls handled.
• Number of outbound notification calls handled.
• Number of outbound TRAP calls handled.
• Total number of calls handled.
Port Activity
Includes the following information about the specified mailbox stores:
• Mail database name.
• Display name.
• Server name.
• Whether access is enabled.
• Mailbox store size.
• Last error.
• Status.
• Whether the mail database can be deleted.
Mailbox Store
System Administration Guide
234
Advanced System Settings
Available Reports
Page 253
Description of Output
Report Name
Includes a list of the search spaces configured on the Unity Connection or Cisco
Unified CMBE server with an ordered list of partitions assigned to each search
space.
If the server is part of a digital network, the report also lists the search spaces
and associated partition membership on every other Unity Connection location
on the network.
Dial Plan
Includes a list of all the users and the extensions or URIs in the specified partition
that is configured in the Unity Connection directory. If a partition is not specified,
the report lists all users and their extensions for all partitions that are configured
in the directory.
Dial Search Scope
Includes the following information about phone sign-ins, MWI activity, and
message notifications to phone devices per user:
• Name, extension, and class of service.
• Date and time for each activity.
• The source of each activity.
• Action completed (for example, Sign-in, MWI On or Off, and Phone
Dialout).
• Dial out number and results (applicable only for message notifications to
phone devices).
• The number of new messages for a user at the time of sign in.
User Phone Sign-In and
MWI
Includes the following information about messages sent and received per user:
• Name, extension, and class of service.
• Date and time for each message.
• Type of message.
• Action completed, such as received new message or message saved.
• Information on the message sender.
User Message Activity
Includes the following information of a distribution list:
• Name and display name of the list.
• Date and time the list was created. (Date and time are given in Greenwich
Mean Time.)
• A count of the number of users included in the list.
• If the Include List Members check box is checked, a listing of the alias of
each user who is a member of the list.
Distribution Lists
System Administration Guide
235
Advanced System Settings
Available Reports
Page 254
Description of Output
Report Name
Includes user alias, the number of failed sign-in attempts for the user, credential
type (a result of “4” indicates a sign-in attempt from the Unity Connection
conversation; a result of “3” indicates a sign-in attempt from a web application),
and the date and time that the account was locked.
(Date and time are given in Greenwich Mean Time.)
User Lockout
Includes the user alias, display name, date and time when the user account was
created.
(Date and time are given in Greenwich Mean Time.)
Unused Voice Mail
Accounts
Includes the following information for each call:
• Name, extension, and billing ID of the user.
• Date and time that the call occurred.
• The phone number dialed.
• The result of the transfer (connected, ring-no-answer (RNA), busy, or
unknown).
Transfer Call Billing
Includes the following information, arranged by day and the extension of the
user who placed the call:
• Name, extension, and billing ID.
• Date and time the call was placed.
• The phone number called.
• The result of the call (connected, ring-no-answer (RNA), busy, or unknown).
• The duration of the call in seconds.
Outcall Billing Detail
Arranged by date and according to the name, extension or URI, and billing ID
of the user who placed the call. It is listed 24 hours of the day with a dialout time
in seconds specified for each hour span.
Outcall Billing Summary
Includes the following information for each call handler:
• Total number of calls.
• Number of times each key on the phone keypad was pressed.
• Extension.
• Invalid extension.
• Number of times the after greeting action occurred.
• Number of times the caller hung up.
Call Handler Traffic
Includes detailed information about all aspects of the configuration of the Unity
Connection system.
System Configuration
System Administration Guide
236
Advanced System Settings
Available Reports
Page 255
Description of Output
Report Name
Includes the total number of transcribed messages, failed transcriptions, and
truncated transcriptions for a given user during a given time period. If the report
is run for all users, then the output is broken out by user.
SpeechView Activity
Report by User
Includes the total number of transcribed messages, failed transcriptions, and
truncated transcriptions for the entire system during a given time period. When
messages are sent to multiple recipients, the message is transcribed only once,
so the transcription activity is counted only once.
SpeechView Activity
Summary Report
Connection Administration
Connection Administration modifies the following administration settings:
• Database Proxy
• Voice Mail Web Service
• Cisco Unified Mobile Advantage
• Session Timeout
• Display Schedules
• User Inactivity Timeout
Editing Administration Settings using Cisco Unity Connection Administration
Step 1
In Cisco Unity Connection Administration, expand System Settings > Advanced and select Connection Administration.
Step 2
On the Connection Administration Configuration page, enter the applicable settings and select Save. (For more information
on each field, see Help> This Page).
TRAP
TRAP modifies the Telephone Record and Play settings for session time out and dial-out.
Editing Telephone Record and Play Settings
Step 1
In Cisco Unity Connection Administration, expand System Settings > Advanced and select TRAP.
Step 2
On the TRAP Configuration page, enter the applicable settings and select Save. (For more information on each field, see
Help> This Page).
System Administration Guide
237
Advanced System Settings
Connection Administration
Page 256
Disk Capacity
The information about the messages in a database and the message content is stored as files on the Unity
Connection server. Depending on the number of Unity Connection users, the number and duration of messages
they receive, and the settings that you specify for the message aging policy and for quotas, it may be possible
for the hard disk on which messages and greetings are stored to fill up. This would cause Unity Connection
to stop functioning. As the hard disk approaches maximum capacity, you may also encounter unexpected
behavior.
The disk capacity page describes the maximum capacity of the hard disk on which messages and greetings
can be stored. The disk capacity can be managed in Cisco Unity Connection Administration> System Settings>
Advanced> Disk Capacity. For more information, see Help> This Page.
When the hard disk fills to the specified percentage limit, neither users nor outside callers are allowed to leave
voice messages. Unity Connection also logs an error that can be viewed on the Tools > SysLog Viewer page
in the Real-Time Monitoring Tool.
You can still send a broadcast message even when the hard disk exceeds the specified limit.
Note
If the disk capacity settings are changed, you need to restart the Connection Message Transfer Agent service
in Cisco Unity Connection Serviceability.
If the hard disk exceeds the value that you specify, users should immediately delete unnecessary voice messages.
In addition, to prevent a recurrence, you may want to re-evaluate message-aging policy and mailbox quotas.
For more information, see the Controlling the Size of Mailboxes section of the Message Storage, on page 109
chapter.
PCA
Cisco Personal Communications Assistant (PCA) modifies the settings for Cisco Personal Communications
Assistant Inbox and session time out. For more information, see the “Setting Up Access to the Cisco Personal
Communications Assistant” chapter of the User Workstation Setup Guide for Cisco Unity Connection, Release
15, available at https://www.cisco.com/c/en/us/td/docs/voice_ip_comm/connection/15/user_setup/guide/b_
15cucuwsx.html.
Editing the Settings for Cisco PCA Inbox
Step 1
In Cisco Unity Connection Administration, expand System Settings > Advanced and select PCA.
Step 2
On the PCA Configuration page, enter the applicable settings and select Save. (For information on each field, see Help>
This Page).
System Administration Guide
238
Advanced System Settings
Disk Capacity

Page 257
RSS
Really Simple Syndication (RSS) is a web application that enables access to voice messaging. The RSS setting
enables the insecure RSS connections.
By default, Unity Connection only supports secure connections to the RSS feed using SSL. Some RSS readers,
for example Apple iTunes, do not support secure connections.
If you want to allow users to be able to use RSS readers that do not support secure connections, see the
Enabling Insecure RSS Connections section.
Enabling Insecure RSS Connections
Step 1
In Cisco Unity Connection Administration, expand System Settings > Advanced and select RSS.
Step 2
On the RSS Configuration page, check the Allow Insecure RSS Connections check box and select Save. (For information
on each field, see Help> This Page).
Configuring an RSS Reader to View Voice Messages
Users can configure an RSS reader to view voice messages. Following are some important considerations:
• Use the following URL in the RSS Reader:
– https://<Unity Connection server name>/cisco-unity-rss/rss.do
The server name can either be the hostname, IPv4 address, or IPv6 address of the Unity Connection server.
• When users connect to the RSS feed, they are required to provide the following:
• Username: Enter the user alias.
• Password: Enter the Cisco PCA password of the user (also known as the web application password).
RSS Feed Limitations and Behavioral Notes
• Only the 20 most recent unread messages are presented in the RSS feed.
• If the message is secure or private, a decoy message plays instead of the actual message. The decoy
message indicates that the message is secure or private and that the user must retrieve the message by
calling in by phone.
• Broadcast messages are not included in the RSS feed.
• Messages cannot be deleted. Messages can only be marked read.
• Marking a message read removes it from the RSS feed.
• US English is the only language supported at this time.
System Administration Guide
239
Advanced System Settings
RSS
Page 258
• Dispatch messages cannot be accepted, declined or postponed. Dispatch messages cannot be marked as
read. A dispatch message remains in the RSS feed until it is handled via another interface or accepted
by another recipient.
• Some RSS readers do not allow the description of the message to contain hyperlinks. For those readers,
the feed does not offer the option to mark the message as read.
• For messages with multiple parts (for example a forwarded message with an introduction), not all parts
of the message can be played. Only the first part (for example, the introduction) is played and the subject
line indicates that there are more attachments. Users must retrieve the remaining message parts by calling
in by phone.
Cluster Configuration
The Cluster Configuration settings page enables to manage the cluster during a maintenance window scenario
when one of the server is not functional. For more information, see the “Configuring Cisco Unity Connection
Cluster” chapter in Install, Upgrade, and Maintenance Guide for Cisco Unity Connection, Release 15, available
at https://www.cisco.com/c/en/us/td/docs/voice_ip_comm/connection/15/install_upgrade/guide/b_
15cuciumg.html .
Fax
The Fax Settings page enables to manage the subject prefix for a successful or failed fax and the fax file types.
For more information, see the Fax Server, on page 243 chapter.
Unified Messaging Services
The Unified Messaging Services settings define the settings for calendar and contact integrations that are
supported with the unified messaging feature. For more information, see the Unified Messaging, on page 145
section.
API Settings
Application Programming Interface (API) provides provisioning, messaging, and telephony access to Unity
Connection. It is used to enable or disable the settings for Cisco Unity Connection Messaging Interface (CUMI)
API. For more information, see the “Cisco Unity Connection Overview” chapter of Design Guide for
Cisco Unity Connection Release 15, available at https://www.cisco.com/c/en/us/td/docs/voice_ip_comm/
connection/15/design/guide/b_15cucdg.html.
Enabling or Disable CUMI API Settings
Step 1
In Cisco Unity Connection Administration, expand System Settings > Advanced and select API Settings.
System Administration Guide
240
Advanced System Settings
Cluster Configuration
Page 259
Step 2
On the API Configuration page, enter the applicable settings and select Save. (For information on each field, see Help>
This Page).
System Administration Guide
241
Advanced System Settings
Enabling or Disable CUMI API Settings
Page 260
System Administration Guide
242
Advanced System Settings
Enabling or Disable CUMI API Settings
Page 261
C H A P T E R 18
Fax Server
• Fax Server, on page 243
• Task List for Configuring Fax Server Integration, on page 243
• Configuring Unity Connection for Fax Server Integration, on page 244
• Configuring or Updating Users for Fax Server Integration , on page 245
• Testing Fax Server Integration, on page 245
Fax Server
Cisco Unity Connection supports third-party fax servers. Fax server integration is one of the advanced features
supported with Unity Connection providing additional messaging capabilities. It enables users to receive faxes
in the mailbox and forward a received fax to other users or fax machines for printing. Users can manage faxes
using phone, Messaging Inbox, or IMAP client.
Unity Connection interacts with the third-party fax servers directly through Simple Mail Transport Protocol
(SMTP). Inbound faxes are received by the third-party fax servers and routed to the Unity Connection server
through SMTP. Similarly, faxes are routed to the third-party fax servers through SMTP for rendering and
outbound faxing.
For more information on fax servers supported with Unity Connection, see the “Third-Party Fax Servers
Integration” chapter of the Design Guide for Cisco Unity Connection Release 15, available at
https://www.cisco.com/c/en/us/td/docs/voice_ip_comm/connection/15/design/guide/b_15cucdg.html.
Cisco does not sell Cisco Fax Server. Refer to the end-of-sale/end-of-line notice at https://docplayer.net/
42962914-End-of-sale-and-end-of-life-announcement-for-the-cisco-fax-server.html.
Note
Task List for Configuring Fax Server Integration
Fax server must be installed and configured before configuring the Unity Connection server. Do the following
steps to create a Fax Server integration in Unity Connection:
1.
Install and Configure the Fax Server.
2.
Configure Unity Connection. See the Configuring Unity Connection for Fax Server Integration, on page
244 section.
System Administration Guide
243


Page 262
Configure the Unity Connection user accounts. See the Configuring or Updating Users for Fax Server
Integration , on page 245 section.
Configuring Unity Connection for Fax Server Integration
Configure SMTP on Unity Connection server
Step 1
In Cisco Unity Connection Administration, expand System Settings and select SMTP Configuration > Server.
Step 2
On the SMTP Server Configuration page, in the Edit menu, select Search IP Address Access List.
Step 3
On the Search IP Address Access List page, select Add New.
Step 4
On the New Access IP Address page, in the IP Address field, enter the IP address of the Fax Server and select Save.
Step 5
Check the Allow Unity Connection check box and select Save.
Enabling or Updating Fax Server Integration on Unity Connection
Step 1
In Unity Connection Administration, expand System Settings and select Fax Server.
Step 2
On the Edit Fax Server page, check the Enabled check box.
Step 3
In the Fax Server Name field, enter a descriptive name for the Fax Server.
Step 4
In the SMTP Address field, enter the fully qualified SMTP address of the SMTP server on the Fax Server.
This fully qualified SMTP address must match the server address and domain that are configured for the
POP3 mailbox on the Fax Server. Otherwise, the integration do not function correctly.
Caution
Step 5
In the IP Address field, enter the IP address of the Fax Server.
Step 6
If you use a smart host SMTP server to deliver faxes from the Fax Server to Unity Connection, check the Use Smart
SMTP Host check box. Otherwise, uncheck this check box.
Step 7
Select Save.
Customizing or Updating Fax Server Integration on Unity Connection
To Customize or Update the Fax Server Integration on Unity Connection
Step 1
In Unity Connection Administration, expand System Settings, then select Advanced > Fax.
Step 2
In the Fax Configuration page, in the Faxable File Types field, enter the file extensions (separated by a comma) that Unity
Connection keeps in messages that are delivered to the Fax Server. Unity Connection removes all files with other file
extensions before delivering the message to the Fax Server.
System Administration Guide
244
Fax Server
Configuring Unity Connection for Fax Server Integration
Page 263
Step 3
In the Subject Prefix for Notification of a Successful Fax field, enter the prefix that the Fax Server adds to the Subject
field of fax reports. When Unity Connection detects this prefix, it generates a delivery receipt and places it in the user
mailbox.
Step 4
In the Subject Prefix for Notification of a Failed Fax field, enter the prefix that the Fax Server adds to the Subject field
of fax reports. When Unity Connection detects this prefix, it generates a non-delivery receipt and places it in the user
mailbox.
Step 5
Select Save.
Configuring or Updating Users for Fax Server Integration
The Fax Server must have a subscriber for each Unity Connection user that you are configuring.
Note
While on the phone, users can add or change the number for the fax machine that they send faxes to for
printing.
To Configure Unity Connection Users for Fax Server Integration
Step 1
In Unity Connection Administration, expand Users and select Users.
Step 2
On the Search Users page, select the alias of a user.
If the user alias does not appear in the search results table, set the applicable parameters in the search fields
at the top of the page and select Search.
Note
Step 3
On the Edit User Basics page, in the Outgoing Fax Number field, enter the number for the fax machine that users send
faxes to for printing.
Step 4
In the Outgoing Fax Server field, select the name of the Fax Server.
Step 5
Select Save.
Step 6
Repeat Step 2 through Step 5 for all remaining users.
You can use Bulk Edit mode to add or change fax extensions for multiple users at once.
Note
Testing Fax Server Integration
Step 1
Send a fax to the fax extension of a user who has been configured for the Fax Server integration.
Step 2
Sign in to the Unity Connection mailbox of the user to whom you sent the fax.
Step 3
If the user account is configured for speech access, say Play Messages.
If the user account is not configured for speech access, press 1, and then follow the prompts to list messages.
System Administration Guide
245
Fax Server
Configuring or Updating Users for Fax Server Integration

Page 264
Step 4
When you hear the system announce the fax that you just sent, either say Fax, or press the applicable keys on the phone
keypad to print the fax.
System Administration Guide
246
Fax Server
Testing Fax Server Integration
Page 265
C H A P T E R 19
Tools
This chapter provides a brief descriptions and procedures for accessing different tools and utilities for
administering Cisco Unity Connection.
• Task Management Tool, on page 247
• Bulk Administration Tool, on page 248
• Custom Keypad Mapping Tool, on page 252
• Migrate Utilities, on page 263
• Grammar Statistics Tool, on page 264
• SMTP Address Search, on page 264
• Show Dependency Results, on page 264
• Other Administrative Tools, on page 265
Task Management Tool
The Task Definition page lists a variety of system maintenance and troubleshooting tasks that Unity Connection
automatically runs on a regular schedule. Tasks can be run at the same time as backups and anti-virus scans.
The default settings and schedules for each task are optimized for functionality and performance. You should
not change the default settings and schedules.
Some tasks are critical to Unity Connection functionality. Disabling or changing the frequency of critical
tasks may adversely affect performance or cause Unity Connection to stop functioning.
Caution
Viewing and Managing Tasks Using Task Management Tool
Procedure
Purpose
Command or Action
The Task Definitions page displays the Task Names.
In Cisco Unity Connection Administration, expand Tools
and select Task Management.
Step 1
To view and manage tasks (For more information, see Help>
This Page):
Step 2
• To view the Task Execution Results of any task, select
the applicable task. The Task Definition Basics page
System Administration Guide
247


Page 266
Purpose
Command or Action
displays the Time Started and Time Completed of the
task.
• To manage any task:
a.
On the Task Definition Basics page of the
applicable task, select Edit> Task Schedules.
b.
Enter the values of the required fields and select
Save.
Bulk Administration Tool
The Bulk Administration Tool (BAT) allows you to create, edit, and delete multiple user accounts, contacts,
distribution lists, distribution list members, unified messaging accounts, branches, or video service accounts
by importing information contained in a comma separated value (CSV) file. In addition, it allows you to export
information about users, contacts, distribution lists, or unified messaging accounts from Unity Connection to
a CSV file.
When export operation is running using Bulk Administration Tool (BAT), make sure that there is no delete
operation performed using any other tool or API.
Note
CSV is a common text file format for moving data from one data store to another. For example, importing
from a CSV file can be useful for transferring information from a corporate directory to Unity Connection.
Transferring the information allows users with voice mailboxes to add corporate directory users who are not
Unity Connection users to their address books and to then create call-routing rules based on calls from such
contacts.
For small numbers of users up to a few hundred, it may be faster and easier to use the Import Users functionality
to create Unity Connection users from an LDAP directory. See the Using Import Users and Synch Users
Functionalities, on page 42.
The information in this section is not applicable for updating user accounts, system distribution lists, or system
distribution list members in Cisco Business Edition.
Note
Configuring the Objects Using BAT
Step 1
In Cisco Unity Connection Administration, expand Tools and select Bulk Administration Tool.
Step 2
On the Bulk Administration Tool page, in the Select Operation section, select the applicable option:
• Create
• Update
System Administration Guide
248
Tools
Bulk Administration Tool

Page 267
• Delete
• Export
Step 3
In the Select Object Type section, select the applicable option:
• Users
• Users With Mailbox
• System Contacts
• Distribution Lists
• Distribution List Members
• Unified Messaging Accounts
• Branches
• Video Service Accounts
Step 4
(When Creating Users or Users with Mailbox only): In the Override CSV Fields When Creating User Accounts section,
select the applicable option.
Step 5
In the Select File section, in the CSV File field, enter the full path of the CSV input file.
If you are importing a CSV file that you created by exporting data from Unity Connection, you may need to
manually create the ContactTemplateAlias column header, if applicable, and manually enter data, as this
column header is not included in an export.
Note
Step 6
In the Failed Objects Filename field, enter the name of the failed objects report file. For example, enter errors.csv.
Step 7
Select Submit.
BAT begins configuring the select object and displays the summary page when the operation has completed.
If the operation results in any failures, you can immediately inspect the failed objects report file by selecting
Download the Failed Objects File. For information about correcting errors, see the Correcting Errors Using
Failed Objects File, on page 251.
Constructing Input CSV Files
BAT supports only UTF-8 and UTF-16 character set encoding for the text in the CSV file.
To quickly construct an input CSV file, you can use BAT to export the applicable type of user, contact, system
distribution list, system distribution list members, unified messaging accounts, or video service accounts, and
use the resulting output CSV file as a template.
The following example shows a CSV file for creating voicemail users. To construct the file as shown in the
example, you need to first export the voicemail users to a CSV file, remove the unwanted columns and data
from the file, and then add the TemplateAlias column and the applicable data.
The DisplayName is an optional field and the data for this field is missing for several users.
Note
System Administration Guide
249
Tools
Constructing Input CSV Files

Page 268
Example CSV Input File for Creating Voicemail Users
Alias,DisplayName,FirstName,LastName,TemplateAlias,Extension,ListInDirectory
iwinkler,"Winkler, Ian",Ian,Winkler,VoiceMailUserTemplate,5321,1
jsmith,,John,Smith,VoiceMailUserTemplate,5126,1 cjones,"Jones,
Cris",Cris,Jones,VoiceMailUserTemplate,5249,1 dalbert,,Dan,Albert,VoiceMailUserTemplate,5299,1 jlee,"Lee,
Jane",Jane,Lee,VoiceMailUserTemplate,5324,1 jthompson,"Thompson,
Jim",Jim,Thompson,VoiceMailUserTemplate,5029,1 swong,"Wong,
Sara",Sara,Wong,VoiceMailUserTemplate,5260,1 rhunter,"Hunter,
Russ",Russ,Hunter,VoiceMailUserTemplate,5229,1 cashmore,,Carol,Ashmore,VoiceMailUserTemplate,5403,1
lcarson,"Carson, Lauren",Lauren,Carson,VoiceMailUserTemplate,5999,1
Whether you edit an output CSV file or create a CSV file from scratch, use the following guidelines, along
with the tables in the Required and Optional CSV Fields in BAT, on page 285 section to construct a valid input
CSV file for use with the BAT:
• The first row in the CSV file must contain column headings that identify the type of data in each column
and the information in the subsequent rows must contain the data that you want to import.
• Ensure that commas separate the data in each row in the CSV file, including the column headings in the
first row. Do not use a tab, spaces, or a semicolon to separate values in the file.
• Although the data must be arranged in the same order as the column heading, the order in which you
arrange the columns is not important.
• If the CSV file includes a column that you want BAT to ignore, use the column heading “Junk.”
• If any data includes a space, quotes, or commas, specify it within quotes.
The data in the CSV file should not include double-quotes because it can cause problems with interactions
with external servers. If the data does include double-quotes, place an additional double-quote next to each
double-quote. For example, if the data is My “Spare Phone”, the entry must be My ““Spare Phone””.
• Column headings are not case sensitive, but they must be spelled as indicated in the tables in the Required
and Optional CSV Fields in BAT, on page 285 section. Columns that are designated not applicable (N/A)
for an operation are ignored.
• (Applicable only to Unity Connection configurations) For creating user accounts, most optional fields
that are listed in the CSV field tables correspond to settings defined in a user template. For example, for
voicemail users, the default template includes class of service (COS), call transfer, and message notification
settings. When data for a particular user setting is not included in the CSV file, BAT uses settings in the
user template that you specify in the required field TemplateAlias. For this reason, you should review
the settings in the user template that you use to create the accounts before adding any of the optional
column headers to your CSV file. If a value for an optional field is not included in the CSV file and if
the template does not specify a default value, then the value for the field is not set.
If you specify an administrator template for TemplateAlias, the users do not have mailboxes
• To explicitly set the value of a field to empty (or to null, if allowed), use the expression %null% for the
value in the CSV file.
• You should not include more than 5,000 records in an input CSV file.
System Administration Guide
250
Tools
Constructing Input CSV Files
Page 269
Correcting Errors Using Failed Objects File
When you run BAT, it copies each record that it cannot process to a failed objects report file, along with the
reason that the record was not processed correctly. For example, in the following CSV file, the first record
includes an invalid entry for the Country field, and the second record specifies a template that is not a voicemail
user template:
Alias, City, PostalCode, State, Country, TemplateAlias
Jsmith, Beverly Hills, 90210, Ca., United States, VoiceMailUserTemplate BRobertson, Seattle, 98121, WA,
US, AdminUserTemplate
Using this file to create users with voice mailboxes produces the following failed objects file:
FailureReason, alias, city, postalcode, state, country, templatealias United States is invalid for column Country|,
Jsmith, Beverly Hills, 90210, Ca., United States, VoiceMailUserTemplate Object not found or is not a template:
Parameter = [@TemplateObjectId], Table = [vw_SubscriberTemplate], Column = [Alias,ObjectId]|, BRobertson,
Seattle, 98121, WA, US, AdminUserTemplate
The FailureReason column, which provides information about the invalid data, is added before the first column.
To correct errors, do the following procedure to edit the failed objects file, rename it, and use it as the input
file when you re-run BAT.
Note that depending on the type of problem with the data in the CSV file, for each problem record, BAT may
report multiple errors or only the first error encountered. Therefore, after you correct errors, BAT may detect
additional errors in the same record when the data is processed again. Thus, you may need to repeat the
correction process, which is running the tool and correcting an error, several times to find and correct all
errors.
Correcting Errors Using the Failed Objects File
Step 1
If the Bulk Administration Tool operation results in any failures, you can immediately inspect the failed objects report
file by selecting Download the Failed Objects File.
Step 2
Open the file and correct all problems with the data, as indicated by the information in the FailureReason column for
each record.
Step 3
Remove the FailureReason column or change the heading to “junk.”
Step 4
Save the file as a CSV file with a new name after editing the data.
Step 5
Run BAT again with the CSV file that you saved in Step 4 as the input file.
Each time that you run BAT, the failed objects file is overwritten (unless you specify a new name for the
file each time you run the tool).
Note
Step 6
Repeat this procedure until all records are processed without error.
System Administration Guide
251
Tools
Correcting Errors Using Failed Objects File
Page 270
If you have navigated away from the Bulk Administration Tool page, you can go back and select the Display
Last Operation button to bring up a download link for the output file from the previous operation. If you
need a failed objects file from more than one previous operation, you can use the Command Line Interface
(CLI) command “file view activelog cuc/<filename>” to view failed object files. For more information on
using CLI commands, see the applicable Cisco Unified Communications Operating System Administration
Guide for Cisco Unity Connection. The guide is available at http://www.cisco.com/c/en/us/support/
unified-communications/unity-connection/products-maintenance-guides-list.html.
Note
Custom Keypad Mapping Tool
The Custom Keypad Mapping tool allows you to edit the key mappings that are associated with the Custom
Keypad Mapping conversations. Within each of these conversations—which are assigned to individual users
or user templates on the Phone Menu page in Cisco Unity Connection Administration—there are eight different
menus that can be customized. Changing keypad mappings using this tool does not affect any of the other
Unity Connection conversation versions.
You can assign any one-, two-, or three-key sequence to any defined option for the Main menu, the Message
Playback menu (the message header, body and footer can be mapped separately), the After Message menu,
the Settings menu, the Message Settings menu, and the Preferences menu. You can customize which options
are voiced in each menu and the order in which they are offered.
Using the Custom Keypad Mapping Tool
The Custom Keypad Mapping tool is divided into eight tabs that represent eight different conversation menus
that can be customized. On each of these menu tabs you can:
• Customize which key or keys are assigned to each menu option. Leaving a key assignment blank disables
that option for the menu.
• Configure whether the option is voiced in the menu. This allows you to assign a key or keys to an option
but not have it presented verbally in the menu. The option would still be enabled for that menu and Unity
Connection would respond appropriately if the assigned key is pressed, but the user would not hear the
option in the menu.
• Configure the order in which the menu items are offered to users. This is done by selecting the radio
button of the row that you want to reorder and then using either the Up or Down arrows or the Move To
button to arrange the menu items. The order in which the options appear in the tool is the order in which
they are presented to the user by phone regardless of which keys are mapped to the options
Step 1
In Cisco Unity Connection Administration, expand Tools and select Custom Keypad Mapping.
Step 2
On the Search Custom Keypad Mappings page, select the applicable custom keypad mapping conversation.
Unity Connection supports six Custom Keypad Mappings.
Note
Step 3
On the Edit Custom Keypad Mapping page, select the applicable tab to select the menu for which you would like to
change key assignments.
System Administration Guide
252
Tools
Custom Keypad Mapping Tool
Page 271
Step 4
Change key assignments as applicable. (For guidelines on allowed entries, see the Guidelines for Assigning Keys to Menu
Options, on page 253.)
Step 5
Select Save.
When changes are saved, all new calls that use this conversation follow the new key mapping settings.
Step 6
Repeat Step 3 through Step 5 for each menu that you want to customize.
Guidelines for Assigning Keys to Menu Options
• The only characters allowed are: 0 – 9, *, # or blank.
• A maximum of 3 digits is allowed for each menu option.
• Duplicate key entries are not allowed for any unique menu. (For example, you cannot map the “1” key
to both Hear New Messages and Send a Message in the Main menu. However, you can map the “1” key
to Hear New Messages in the Main menu and also to Greetings in the Settings menu.)
• Leaving a key assignment blank disables that option for the menu.
• When you leave a key assignment blank, uncheck the Option Voiced in Menu check box.
• When changes are saved, all new calls that use the conversation follow the new key mapping settings.
Setting a Keypad Mapping to Match an Existing Conversation Mapping
You can change the key mappings for all menus to match that of an existing conversation. For example, you
can have all of the key mappings for a selected custom keypad mapping replaced with the mappings of Optional
Conversation 1. This can be useful if you want to make a small number of changes to an existing conversation
and do not want to manually remap every option.
Step 1
In Cisco Unity Connection Administration, expand Tools and select Custom Keypad Mapping.
Step 2
On the Search Custom Keypad Mappings page, select the applicable custom keypad mapping conversation.
Step 3
On any tab of the Edit Custom Keypad Mapping page, in the Reset Mappings on All Tabs To list, select the conversation
that you want to use and select Reset.
Step 4
When asked to confirm that you want to replace all key mappings with those of the selected conversation before continuing,
select OK.
Conversation Menus in Custom Keypad Mapping Tool
The Custom Keypad Mapping tool is divided into eight tabs that represent eight different conversation menus
that can be customized. The Message Playback menu is represented on three tabs because the messages contain
three distinct parts: the message header, the message body, and the message footer. The options on these three
tabs are identical, but you may want to map different options to different keys for certain parts.
Main Menu Tab
The Main menu is what users hear immediately after they sign in and hear their message counts (if applicable).
System Administration Guide
253
Tools
Guidelines for Assigning Keys to Menu Options
Page 272
See the table for a list of options that can be mapped.
Table 13: Main Menu Tab
Description
Option
Takes users to the new (unread) message stack.
Play New Messages
Takes users to the Send Message menu.
Send a Message
Takes users to the saved message stack. If applicable, users are also offered
an opportunity to review deleted messages.
Review Old Messages
Takes users to the Settings menu where they can configure settings for
greetings, transfer rules, and alternate contact numbers, and access their
message settings and preferences.
Change Setup Options
Takes users to the Message Locator feature where they can search for new
messages by the calling number or name of the sender.
This option is offered only when the Finding Messages With Message
Locator feature is enabled for each user on the Phone Menu page.
Find Messages
Lists the time, meeting organizer, and subject for all current and upcoming
meetings.
For Cisco Unified MeetingPlace and Cisco Unified MeetingPlace Express
meetings, the user is offered the option to join current meetings.
Integrations with Cisco Unified MeetingPlace Express are not
supported in Unity Connection.
Note
List Meetings
Provides the count of messages that are stored on an external message store.
The user is offered the option to listen to these messages.
Play External Messages
Allows users to access the Greetings Administrator conversation to change
greetings for call handlers that have been assigned an extension.
Users who are assigned to the Greetings Administrator role on the Edit
Roles page can change the greetings for any system call handler.
Users who are not assigned to the Greetings Administrator role can change
the greetings only for call handlers that they own.
Manage Call Handler Greetings
Allows users to access the User System Transfer conversation and dial any
number that is allowed by their transfer restriction table.
Call a Number
Allows users to access the Broadcast Message Administration conversation.
This option is offered only when the Send or Update Broadcast Messages
setting is configured for each user on the Send Message Settings page.
Manage Broadcast Messages
Plays the Main menu again.
Repeat Menu Options
Plays the Main menu Help.
Help
System Administration Guide
254
Tools
Main Menu Tab
Page 273
Description
Option
Exits the user mailbox.
By default, when users exit their mailboxes they are sent to the Opening
Greeting call handler. However, you can customize the exit behavior by
changing the When Exiting the Conversation setting on the Phone Menu
page for each user.
Cancel or Back Up
Allows users to toggle between the touchtone and voice-recognition
conversations:
• When users are listening to the touchtone conversation, and press the
applicable keys, they are immediately switched to the voice-recognition
conversation.
• When users are listening to the voice-recognition conversation, and
press the applicable keys, they are immediately switched to the
touchtone conversation.
Note that the toggle persists until the user toggles back, or until the end of
the call.
In case of a video call, the toggle key is not supported as Unity
Connection 10.0(1) and later always plays touchtone
conversation.
Note
Switch Between Using the
Phone Keypad and Using Voice
Commands
Allows users to change alternate greetings by activating and re-recording.
In case of a video call, when users are listening to the main menu options
and press the applicable key, Unity Connection plays your alternate video
greeting and asks you to re-record your alternate greeting. For more details
on enabling alternate greetings for each user, see the Task List for
Configuring Video Messaging, on page 195 section.
Change Alternate Greeting
Message Playback Menu Tabs
Message Playback Menu tabs include Message Header, Message Body, and Message Footer tabs that you can
use to customize the conversation settings, such as defining the speed and volume of the message header via
TUI. When a message is played in the Unity Connection user conversation, there are three separate parts: the
header, the body, and the footer. By default, the message header contains the message number and the sender
information. The message body is the actual recording of the message. The message footer is the time stamp.
The contents of the header and footer sections can be modified on the Playback Message Settings page. For
example, the message number, the sender information, the sender extension, and the time stamp can be added
or removed from the header. These settings are controlled by the check boxes under the “Before Playing Each
Message, Play” section on the Playback Message Settings page. For the message footer, you have the option
of playing the time stamp after the message; you can exclude it altogether or have it played as part of the
header. This option is controlled with the check box under the “After Playing Each Message, Play” section
on the Playback Message Settings page. If you choose not to play the time stamp after the message, the effect
is to have no footer to the message. In Unity Connection, the “After Playing Each Message, Play” section
now includes the sender information, extension or ANI, and the message number, in addition to the time the
message was sent and message duration.
System Administration Guide
255
Tools
Message Playback Menu Tabs
Page 274
The Custom Keypad Mapping tool includes separate tabs for each part of the message. As a best practice, you
should map the same keys to each option for all three parts. However, in some cases it may be useful to map
the same key to different actions. For example, during the message header you might want to press the “1”
key to skip to the start of the message body, and during the message body press the “1” key to skip to the
message footer.
The same message playback key mappings are used when listening to new messages, saved messages, and
deleted messages, rather than separate mappings for each message stack. Keep this in mind as you are deciding
on key mapping preferences, particularly for options such as marking messages as new (unread) or saved
(read).
Message playback options are not voiced in a menu format by phone, but they are listed if the user presses
the key that is mapped to the Help option. The Custom Keypad Mapping tool allows you to configure which
items are voiced in the Help.
See the below table for a list of options that can be mapped.
Table 14: Message Playback Menu Tabs
Description
Option
Jumps to the beginning of the header portion of the message.
Repeat Message
Skips to the next message and marks the current message as saved.
Save
Deletes the message that is currently being played.
The user class of service determines whether the message is moved to the
deleted items folder or is deleted permanently.
Delete
Slows down the message that is currently being played. Pressing the mapped
key slows the message playback by 50 percent.
If the Save Speed and Volume Changes Made by User setting
is enabled on the System Settings > Advanced > Conversation
Configuration page, the last change made to playback speed
is saved as the default playback speed for the user.
Note
Slow Playback
Speeds up the message that is currently being played. Pressing the mapped
key speeds the message playback by 50 percent. Pressing the key again
speeds the message playback by 100 percent.
If the Save Speed and Volume Changes Made by User setting
is enabled on the System Settings > Advanced > Conversation
Configuration page, the last change made to playback speed
is saved as the default playback speed for the user.
Note
Fast Playback
Resets the speed of the message that is currently being played to the default
message playback speed setting for the user.
If the Save Speed and Volume Changes Made by User setting
is enabled on the System Settings > Advanced > Conversation
Configuration page, the last change made to playback speed
is saved as the default playback speed for the user.
Note
Reset Speed to Default
System Administration Guide
256
Tools
Message Playback Menu Tabs
Page 275
Description
Option
Cycles the volume of the message that is currently being played through
three volume levels: normal, loud, and quiet.If the Save Speed and Volume
Changes Made by User setting is enabled on the System Settings >
Advanced > Conversation Configuration page, the last change made to
playback volume is saved as the default playback volume for the user.
Change Volume
Resets the volume of the message that is currently being played to the default
message playback volume setting for the user.
If the Save Speed and Volume Changes Made by User setting
is enabled on the System Settings > Advanced > Conversation
Configuration page, the last change made to playback volume
is saved as the default playback volume for the user.
Note
Reset Volume to Default
Decreases the volume of the message that is currently being played.
If the Save Speed and Volume Changes Made by User setting
is enabled on the System Settings > Advanced > Conversation
Configuration page, the last change made to playback volume
is saved as the default playback volume for the user.
Note
Quieter Playback
Increases the volume of the message that is currently being played.
If the Save Speed and Volume Changes Made by User setting
is enabled on the System Settings > Advanced > Conversation
Configuration page, the last change made to playback volume
is saved as the default playback volume for the user.
Note
Louder Playback
Pauses playback of the message, or resumes playback when the message is
already paused.
Pause/Resume
Jumps backward in the message that is currently being played.
By default, the message rewinds five seconds. You can adjust the rewind
time on the Playback Message Settings page.
Rewind
Jumps forward in the message that is currently being played.
By default, the message fast-forwards five seconds. You can adjust the
fast-forward time on the Playback Message Settings page.
Fast-Forward
Jumps directly to the After Message menu.
Skip to After Message Menu
Skips to the next message in the stack and leaves the message in the state it
was in. When a new message is skipped, it is saved as unread; when a saved
message is skipped, it remains saved; and when a deleted message is skipped,
it remains deleted.
Skip Message, Save As Is
Skips to the next message in the stack and marks the message as new. When
this option is selected, if a user skips messages when listening to saved or
deleted messages, the messages are marked as unread and are moved to the
new message stack.
Save as New
System Administration Guide
257
Tools
Message Playback Menu Tabs
Page 276
Description
Option
Asks the user to enter the number of a message in the current stack (new,
saved, or deleted messages) and then takes the user directly to that message.
For users who have large numbers of messages, this is a useful way to jump
ahead or back in the stacks.
This option is offered only when the Enable Go to Message setting is enabled
on the System Settings > Advanced > Conversation page.
Play Message By Number
Takes the user to the previous message in the stack.
Go to Previous Message
Takes the user to the next message in the stack. The message the user was
listening to is left in the state it was in (new, saved, or deleted). Go to Next
Message functions the same as the Skip Message, Save As Is option.
Go to Next Message
Terminates message playback and goes up a menu level. Users who are
listening to new or saved messages go to the Main menu. Users who are
listening to deleted messages go to the Deleted Message Option menu.
Cancel or Back Up
Replies to the sender of the message. Only the sender receives the reply.
Other recipients of the original message do not receive the reply.
This option is available only when the message is from another user; users
cannot reply to outside caller messages.
Reply
Replies to all recipients of the message.
Reply to All
Terminates message playback, signs users out of their mailboxes, and
transfers users to the person who left the message. This feature is also known
as Live Reply. This key option is used to return calls to both users and
unidentified callers.
This option is available only when the user is assigned to a class of service
that has enabled either the Users Can Reply to Messages from Other Users
by Calling Them or the Users Can Reply to Messages from Unidentified
Callers by Calling Them setting.
Call the Sender
Allows the user to forward the message to another user or distribution list.
Forward Message
Forwards the original voice message and removes any forwarded
introductions that may have been added to the message by previous forwards.
Forward Original Message
Jumps to the beginning of the message footer.
When the After Playing Each Message, Play options are not enabled for the
user on the Playback Message Settings page, these options effectively skips
to the end of the message and goes directly to the After Message menu.
Skip to End
Jumps to the beginning of the message body, effectively repeating the
message. If you assign a key to this option for the message header, it allows
users to skip the header and jump right to the message.
Replay Message
System Administration Guide
258
Tools
Message Playback Menu Tabs
Page 277
Description
Option
Plays the properties of the message that is currently being played. This
includes the sender information (including ANI if it is provided for outside
callers) and the time that the message was sent.
Play Message Properties
Signs users out of their mailboxes and sends them to the Operator call
handler. The message is left in the state that it was in.
Operator
Jumps to the first message of the message stack. Unity Connection plays
the “First message” prompt as an audible cue to the user.
Go to First Message
Jumps to the last message of the message stack. Unity Connection plays the
“Last message” prompt as an audible cue to the user.
Go to Last Message
Lists all recipients of the current message.
List Message Recipients
Toggles the priority flag on a received message between urgent and normal.
Users who want to identify the high-priority messages among all of their
received messages may be interested in this functionality. By default, Unity
Connection plays messages that are marked urgent first.
Toggle Urgency Flag
Sends the message to a fax machine. This option is available for fax messages
and any message that has an attachment that can be sent to a fax machine.
This option is available only when the fax is configured as an external service
for the user.
Send to Fax Machine for
Printing
Plays Help for all of the options that are mapped to a key, and for which the
Option Voiced in Help check box is checked.
Help
Describes the files that are attached to the message. Files in compatible
formats are played or read.
Play Message Attachments
After Message Menu Tab
The After Message menu plays after the user has listened to a message.
See the below table for a list of options that can be mapped.
Table 15: After Message Menu Tab
Description
Option
Plays the message again, starting with the header.
Repeat Message
Marks the message as saved (read) and moves to the next message in the
stack. When the user is listening to a deleted message, this option moves the
message to the saved message stack.
Save
Deletes the message that is currently being played.
The user class of service determines whether the message is moved to the
deleted items folder or is deleted permanently.
Delete
System Administration Guide
259
Tools
After Message Menu Tab
Page 278
Description
Option
Replies to the sender of the message. Only the sender receives the reply;
other recipients of the original message do not receive the reply.
This option is available only when the message is from another user; users
cannot reply to outside caller messages.
Reply
Allows the user to forward the message to another user or distribution list.
Forward Message
Forwards the original voice message and removes any forwarded introductions
that may have been added to the message by previous forwards.
Forward Original Message
Marks the message as new (unread) and moves to the next message in the
stack. When the user is listening to a saved or deleted message, this option
moves the message to the new message stack.
Save as New
Jumps backward into the message.
By default, the message rewinds five seconds. You can adjust the rewind
time on the Playback Message Settings page.
Rewind
Sends the message to a fax machine. This option is available for fax messages
and any message that has an attachment that can be sent to a fax machine.
This option is available only when fax is configured as an external service
for the user.
Send to Fax Machine for
Printing
Plays the properties of the current message. This includes the sender
information (including ANI if it is provided for outside callers) and the time
that the message was sent.
Play Message Properties
Exits the After Message menu and goes up a menu level. Users who are
listening to new or saved messages go to the Main menu. Users who are
listening to deleted messages go to the Deleted Message Option menu.
Cancel or Back Up
Plays the After Message menu Help.
Help
Signs users out of their mailboxes and sends them to the operator call handler.
The message is left in the state it was in.
Operator
Describes the files that are attached to the message. Files in compatible
formats are played or read.
Play Message Attachments
Asks the user to enter the number of a message in the current stack (new,
saved, or deleted messages) and then takes the user directly to that message.
For users who have large numbers of messages, this is a useful way to jump
ahead or back in the stacks.
This option is available only when the Enable Go to Message setting is
enabled on the System Settings > Advanced > Conversations page.
Play Message By Number
Takes the user to the previous message in the stack.
Go to Previous Message
System Administration Guide
260
Tools
After Message Menu Tab
Page 279
Description
Option
Takes the user to the next message in the stack. The message the user was
listening to is left in the state that it was in (new, saved, or deleted). Go to
Next Message functions the same as the Skip Message, Save As Is option.
Go to Next Message
Goes to the next message in the stack and leaves the message in the state that
it was in. New messages are saved as unread; saved messages remain saved;
and deleted messages remain deleted.
Save As Is
Jumps to the first message of the message stack. Unity Connection plays the
“First message” prompt as an audible cue to the user.
Go to First Message
Jumps to the last message of the message stack. Unity Connection plays the
“Last message” prompt as an audible cue to the user.
Go to Last Message
Toggles the priority flag on a received message between urgent and normal.
Users who want to identify the high-priority messages among all of their
received messages may be interested in this functionality. By default, Unity
Connection plays messages that are marked urgent first.
Toggle Urgency Flag
Terminates message playback, signs users out of their mailboxes, and transfers
users to the person who left the message. This feature is also known as Live
Reply. This key option is used to return calls to both other users and
unidentified callers.
This option is available only when the user is assigned to a class of service
that has enabled either the Users Can Reply to Messages from Other Users
by Calling Them or the Users Can Reply to Messages from Unidentified
Callers by Calling Them setting.
Call the Sender
Skips to the next message in the stack and leaves the message in the state it
was in. When a new message is skipped, it is saved as unread; when a saved
message is skipped, it remains saved; and when a deleted message is skipped,
it remains deleted.
Skip Message, Save As Is
Lists all recipients of the current message.
List Message Recipients
Replies to all recipients of the message.
Reply to All
Settings Menu Tab
The Settings menu is what users hear when they choose Change Setup Options from the Main menu. See the
below table for a list of options that can be mapped.
Table 16: Settings Menu Tab
Description
Option
Allows users to edit their greetings.
Greetings
Takes users to the Message Settings menu.
Message Settings
System Administration Guide
261
Tools
Settings Menu Tab
Page 280
Description
Option
Takes users to the Preferences menu.
Preferences
Allows users to edit their transfer rules.
Transfer Settings
Allows users to change their alternate contact phone numbers.
This option is available for a user only when an administrator has configured
one or more caller input keys to transfer to an alternate contact number on the
user Edit Caller Input page.
Alternate Contact
Numbers
Plays the Settings menu again.
Repeat Menu
Plays the Settings menu Help.
Help
Exits the Settings menu and goes up a menu level to the Main menu.
Cancel or Back Up
Allows users to change alternate greetings by activating and re-recording.
In case of a video call, when users are listening to the main menu options and
press the applicable key, Unity Connection plays your alternate video greeting
and asks you to re-record your alternate greeting.
Change Alternate
Greeting
Message Settings Menu Tab
The Message Settings menu is what users hear when they choose Message Settings from the Settings menu.
See the below table for a list of options that can be mapped.
Table 17: Message Settings Menu Tab
Description
Option
Allows users to edit the settings for their message notification devices.
Message Notification
Allows users to change the phone number of the fax machine to which they can
send faxes for printing.
Fax Delivery
Allows users to switch between the full or brief menu styles.
Menu Style
Allows users to edit their private lists.
Private Lists
Allows users to review and add or remove names from their addressing priority
list.
Addressing Priority List
Plays the Message Settings menu again.
Repeat Menu
Plays the Message Settings menu Help.
Help
Exits the Message Settings menu and goes up a menu level to the Settings menu.
Cancel or Back Up
Preferences Menu Tab
The Preferences menu is what users hear when they choose Preferences from the Settings menu.
System Administration Guide
262
Tools
Message Settings Menu Tab
Page 281
See the below table for a list of options that can be mapped.
Table 18: Preferences Menu Tab
Description
Option
Allows users to edit their phone PINs.
This option is not available for a user when the User Cannot Change check
box is checked on the user Edit Password Settings page.
Change Phone Password
Allows users to record names.
This option is available only when the user is assigned to a class of service that
has enabled the Allow Recording of Name option.
Change Recorded Name
Allows users to choose whether or not they want to be listed in the directory.
This option is available only when the user is assigned to a class of service that
has enabled the Allow Users to Choose to Be Listed in the Directory option.
Change Directory Listing
Allows users to list and delete their alternate extensions. Also allows users to
add the current number they are calling from as an alternate extension (if it is
not already an alternate extension and does not match a blocked pattern in the
User-Defined or Automatically-Added Alternate Extensions restriction table).
Edit User-Defined Alternate
Extensions
Plays the Preferences menu again.
Repeat Menu
Plays the Preferences menu Help.
Help
Exits the Preferences menu and goes up a menu level to the Settings menu.
Cancel or Back Up
Documenting Your Keymap
The Wallet Card wizard is available for creating a PDF file of a wallet card based on your custom keypad
mappings. For details, see the Wallet Card Wizard, on page 267.
Migrate Utilities
The Migrate Utilities tool includes Migrate Users and Migrate Messages to migrate users and messages
respectively, from Cisco Unity 9.x or later to Unity Connection 15. However, you should use the Cisco Unified
Backup and Restore Application Suite (COBRAS) tool to quickly migrate huge amount of data as COBRAS
does not require you to configure a secure shell (SSH) server application.
You can only migrate messages if you have first migrated the user data.
Note
System Administration Guide
263
Tools
Documenting Your Keymap

Page 282
Accessing the Migrate Utilities
For a task list that enumerates the steps for migrating from Cisco Unity to Unity Connection 15 either using
COBRAS or Migrate Messages and Migrate Users utilities, see the “Maintaining Cisco Unity Connection
Server” chapter of the Install, Upgrade, and Maintenance Guide for Cisco Unity Connection Release 15
available at https://www.cisco.com/c/en/us/td/docs/voice_ip_comm/connection/15/install_upgrade/guide/b_
15cuciumg.html .
Step 1
In Cisco Unity Connection Administration, expand Tools and select Migration Utilities.
Step 2
Expand Migration Utilities, then select the applicable option (Migrate Users > or > Migrate Messages).
Grammar Statistics Tool
The Grammar Statistics tool shows information about all of the dynamic name grammars that are used by the
Unity Connection voice-recognition conversation to match caller utterances to the names of objects on the
system (for example, usernames and alternate names, distribution list names, and so on). When administrators
add or change names on the Unity Connection system, the names are not recognized by the voice-recognition
conversation until they are compiled in the grammars.
For each name grammar, the tool displays information such as the finish time of the last grammar recompilation,
the total number of unique items in the grammar, whether there are updates pending to the grammar, and
whether the grammar is currently in the process of being recompiled.
By default, Unity Connection recompiles grammars when administrators add named objects or change object
names on the system (unless a bulk operation is in progress, in which case Unity Connection waits ten minutes
for the operation to complete before recompiling the grammars), or when there are more than five changes
requested in a minute. If the grammars have grown to the point where the name grammar recompilation process
is affecting the performance of your Unity Connection server during busy periods, you can edit the default
Voice Recognition Update Schedule (under System Settings > Schedules in Cisco Unity Connection
Administration) to limit the times and days when the Unity Connection voice-recognition transport utility can
automatically rebuild the voice-recognition name grammars. By default, all the days and times are active for
this schedule; if you edit the schedule but want to override the schedule while it is inactive and force an
immediate recompilation of all grammars, or if you want to force recompilation during the ten minute wait
period after a bulk operation has been initiated, you can select the Rebuild Grammars button on the Grammar
Statistics tool.
SMTP Address Search
The SMTP Address Search tool allows you to search a particular object, such as a user or a distribution list,
based on the SMTP address of the object. For example, if there are two users with the same display name in
different domains, you can search the desired user by specifying the complete SMTP address.
Show Dependency Results
The Show Dependency Results page provides a way to view the results of the most recent dependency search.
System Administration Guide
264
Tools
Accessing the Migrate Utilities
Page 283
When database objects such as user accounts are referenced by other objects in Unity Connection (for example,
if a user is set to be a recipient of messages left in an interview handler, or if a call handler is set to transfer
incoming calls to a user phone), you cannot delete the referenced objects until you have changed settings on
the dependent objects.
To determine the dependencies of an object that you want to delete, select the Show Dependencies option on
the search page for the object type. The option initiates a search for database objects that are dependent on
the object you want to delete. From the dependency search results, follow links to the dependent objects and
reassign the dependencies. When all dependencies have been reassigned, you can delete the object.
Some dependency searches can take several minutes, depending on the object being searched. While a search
is in progress, if you browse to another page, or your browser session times out, navigate to Tools > Show
Dependency Results to view the dependency search results.
Other Administrative Tools
In addition to the tools that appear on Unity Connection Administration interface, Unity Connection provides
the following tools, which you can use to monitor system performance:
Remote Database Administration Tools
A database proxy can be enabled to allow the use of some Windows-based remote database administration
tools that are available on the Cisco Unity Tools website (http://ciscounitytools.com), where updates to the
utilities are frequently posted between Cisco Unity Connection releases.
You can sign up to be notified when the utilities posted on the Cisco Unity Tools website are updated. Go to
http://ciscounitytools.com and select Sign Up Here.
Note
Enabling Database Access for Remote Administration Tools
In order to use the remote tools, you must first enable remote database access. As opening up database access
for remote administration tools can introduce a security risk to your system, several layers of security are
involved with enabling access:
• The username and password of a user with the Remote Administrator role is required to run remote tools.
• The Unity Connection Database Proxy service is disabled by default.
Assigning the Remote Administrator Role to One or More Users
Step 1
In Cisco Unity Connection Administration, expand Users and select Users.
Step 2
On the Search Users page, find the applicable user account.
As a best practice, do not use the default system administrator user account for remote access. Instead, use
a different administrative user account to avoid the default system administrator account become locked due
to too many failed authentication attempts.
Note
Step 3
On the Edit User Basics page, in the Edit menu, select Roles.
System Administration Guide
265
Tools
Other Administrative Tools

Page 284
Step 4
On the Edit Roles page, in the Available Roles field, select Remote Administrator, then select the Up arrow to move it
into the Assigned Roles field.
Step 5
Select Save.
Step 6
Repeat Step 2 through Step 5 for each user who needs access to remote administration tools.
Starting the Database Proxy Service
Step 1
In Cisco Unity Connection Serviceability, expand Tools and select Service Management.
Step 2
In the Optional Services section, find the Unity Connection Database Proxy row and select Activate.
Cisco Unified Backup and Restore Application Suite (COBRAS)
Cisco Unified Backup and Restore Application Suite (COBRAS) is the application you use to migrate data
and messages from Unity Connection 1.2 to 15. Download the latest version, and view training videos and
Help at http://www.ciscounitytools.com/Applications/General/COBRAS/COBRAS.html.
Alternatively, you can use the Unity Connection Migrate Messages and Migrate Users utilities to migrate
messages and user data when you are migrating from Cisco Unity 4.0(4) and earlier and you cannot upgrade
to Cisco Unity 4.0(5) or later for some reason. For more information, see the Migrate Utilities.
Migration in a Tenant Partitioned environment using COBRAS tool allows the administrator to export the
data from a non-partitioned Unity Connection system or a Tenant-Partitioned Unity Connection system. For
more information on each scenario and on migration process using COBRAS tools, refer to
http://www.ciscounitytools.com/Applications/General/COBRAS/COBRAS.html link.
Note
For a task list that enumerates the steps for migrating from Cisco Unity or from Unity Connection 7.x to Unity
Connection 15 either using COBRAS or Migrate Messages and Migrate Users utilities, see the “Backing Up
and Restoring Cisco Unity Connection Components” chapter of the Install, Upgrade, and Maintenance Guide
for Cisco Unity Connection, Release 15 available at https://www.cisco.com/c/en/us/td/docs/voice_ip_comm/
connection/15/install_upgrade/guide/b_15cuciumg.html.
Cisco Voice Technology Group Subscription Tool
You can use the Cisco Voice Technology Group Subscription tool to be notified by email of any Cisco Unity
Connection software updates. To subscribe, go to the Cisco Voice Technology Group Subscription Tool page
at http://www.cisco.com/cgi-bin/Software/Newsbuilder/Builder/VOICE.cgi.
Cisco Utilities Database Link for Informix (CUDLI)
The Cisco Utilities Database Link for Informix (CUDLI) tool allows you to navigate the Cisco Unity Connection
database, learn about the purpose of data in a particular table or column, and jump between referenced objects
in the database. It also shows stored procedures and includes a custom query builder.
System Administration Guide
266
Tools
Starting the Database Proxy Service

Page 285
Download the tool and view training videos and Help at
http://www.ciscounitytools.com/Applications/CxN/CUDLI/CUDLI.html.
Unity Connection User Data Dump (CUDD)
The Unity Connection User Data Dump (CUDD) allows you to export specific information about users to a
file that can then be viewed or imported into another application such as a database utility or Excel. When
the data is exported, the tool automatically creates a header row that lists the data type found in each column
of the output, for ease of import into other programs.
Download the tool and view training videos and Help at
http://www.ciscounitytools.com/Applications/CxN/UserDataDump/UserDataDump.html.
Wallet Card Wizard
The Wallet Card wizard is available for creating a PDF file of a wallet card based on any of the Unity
Connection conversations, including custom keypad mappings. The templates in the wizard list frequently
use menu options and shortcuts for managing Unity Connection messages and user preferences by phone; the
wizard fills in the applicable keys based on the conversation that you specify. The resulting PDF is formatted
as a wallet card that can be printed, then cut out and folded by users.
The wizard also allows you to customize technical support information and instructions for signing in to Unity
Connection. The Wallet Card wizard is a Windows-based remote database administration tool. Download the
tool and view Help at
http://www.ciscounitytools.com/Applications/CxN/WalletCardWizard/WalletCardWizard.html.
System Administration Guide
267
Tools
Unity Connection User Data Dump (CUDD)
Page 286
System Administration Guide
268
Tools
Wallet Card Wizard
Page 287
A P P E N D I X A
User Settings
• Settings for User Accounts and User Templates, on page 269
• User Template Basics, on page 270
• User Basics, on page 270
• Password Settings, on page 271
• Change Password, on page 273
• Roles, on page 274
• Message Waiting Indicator, on page 275
• Transfer Rules, on page 275
• Message Settings, on page 276
• Message Actions, on page 276
• Caller Input, on page 277
• Mailbox, on page 278
• Phone Menu, on page 278
• Playback Message Settings, on page 279
• Send Message Settings, on page 279
• Greeting, on page 280
• Post Greeting Recording, on page 281
• Notification Devices, on page 281
• Unified Messaging Account, on page 281
• Video Service Accounts, on page 282
• Alternate Extensions, on page 282
• Alternate Names, on page 283
• Private Distribution Lists, on page 284
• SMTP Proxy Addresses, on page 284
Settings for User Accounts and User Templates
You can specify different settings, such as password and transfer rules associated with a user template or a
particular user account through Cisco Unity Connection Administration interface. For information on user
accounts, see the Users, on page 37 chapter and for information on user templates, see the User Templates,
on page 24 section.
System Administration Guide
269

Page 288
User Template Basics
The Edit User Template Basics page allows you to specify the settings, such as alias and first name associated
with a particular user template.
User Basics
The Edit User Basics page allows you specify the settings, such as alias and first name associated with a
particular user account.
Consider the following points while changing the alias of a user:
• If you change the alias for a user, Unity Connection automatically creates an SMTP proxy address for
the previous alias. This allows the other Unity Connection users to reply to the messages that were sent
from the previous alias but the replies automatically reach to the new alias of the user.
• When Unity Connection is integrated with an LDAP directory, the Alias field cannot be changed for any
user who is integrated with an LDAP user. However, if you are using Active Directory as the LDAP
directory, you can change the value of the LDAP field that is mapped to the Alias field. The alias change
is replicated to Unity Connection when the Unity Connection database is synchronized with the LDAP
directory. This also causes Unity Connection to automatically create an SMTP proxy address for the
previous alias.
If you are using an LDAP directory other than Active Directory and you change the value of the LDAP field
that is mapped to the Alias field, the user is converted to a non-LDAP-integrated user.
Caution
In the following configurations, you cannot edit fields, such as Alias (User ID in Cisco Unified Communications
Manager Administration), and First Name:
• In Cisco Business Edition, when the Unity Connection user is integrated with the Cisco Unified CM
Application User. You can only edit these fields in Cisco Unified CM Administration.
• In Unity Connection or in Cisco Business Edition, when Unity Connection user data is synchronized
with data in an LDAP directory. You can only edit these fields in the LDAP directory.
If Unity Connection is configured to authenticate Unity Connection web
application user names and passwords against the LDAP directory, you cannot
change the Unity Connection web application password.
Note
• In Unity Connection, if digital networking is configured, you cannot edit any fields for a user on servers
other than the home server of the user. You must edit user settings on the server on which the user account
was created.
For information on moving mailboxes from one mailbox store to another, see the LDAP, on page 147
chapter.
System Administration Guide
270
User Settings
User Template Basics


Page 289
Password Settings
Default phone PINs and web application passwords are applied to each user account that you create. The web
application password and voicemail PIN settings for individual users determine:
• The authentication rule that governs the user account.
• The time of password or PIN lockout if the user password or PIN is locked by an administrator.
• The password changing settings of a user, whether user is allowed to change the password or the password
must be changed during next sign in.
• The expiry of a password or PIN.
• The last time a password or PIN was changed.
• The number of failed sign-in attempts, the time of the last failed sign-in attempt, and the time period that
the lockout is enforced.
Securing and Changing User Phone PINs
To help protect Unity Connection from unauthorized access and toll fraud, every user should be assigned a
unique phone PIN. Additionally, each PIN should be six or more characters long and non-trivial.
To assign unique PINs to Unity Connection end user accounts (users with mailboxes) after they have been
created, use the Bulk Password Edit tool along with a CSV file that contains unique strings for the PINs to
apply PINs in bulk. The Bulk Password Edit tool is a Windows-based tool. Download the tool and view Help
at http://www.ciscounitytools.com/applications/cxn/bulkpasswordedit/bulkpasswordedit.html.
Note
PIN Synchronization between Unity Connection and Cisco Unified CM
PIN Synchronization feature in Unity connection allows the administrator to configure Unity Connection to
maintain the common PIN for the users to access the Cisco Unity Connection Voicemail, Extension Mobility,
Conference Now and Mobile Connect. Using this feature, when a user updates the voicemail PIN for Unity
Connection, the PIN automatically gets synchronized with the corresponding user account on Cisco Unified
CM and vice versa. PIN Synchronization is supported only with Cisco Unified CM 11.5(1) and later.
To enable this feature, check the Enable End User PIN Synchronization for Primary AXL Server check
box on the Edit AXL Servers page of Cisco Unity Connection Administration.
For field information, see Help > This Page.
Before using PIN Synchronization feature, ensure the following:
• The alias of the user on Cisco Unity Connection must be same as the user ID on the Cisco Unified CM
or the users should be integrated with Cisco Unified CM through AXL server or LDAP.
• Authentication Rules on Cisco Unity Connection must be same as the Credential Policies on Cisco
Unified CM to reduce possible error conditions.
For more information on authentication rules, see "Passwords, PINs, and Authentication Rule
Management" chapter in the Security Guide for Cisco Unity Connection Release 14 available at
https://www.cisco.com/c/en/us/td/docs/voice_ip_comm/connection/15/security/guide/b_15cucsecx.html
.
System Administration Guide
271
User Settings
Password Settings

Page 290
For successful synchronization of the PIN, make sure that publisher server of Cisco Unified CM is up and
running.
Note
Task List for Configuring PIN Synchronization in Unity Connection
Do the following to configure PIN Synchronization feature in Unity Connection:
• In Cisco Unity Connection Administration, go to Telephony Integrations > Phone System and select
the Phone system associated with the user. On the Phone System Basics page go to Edit > Cisco Unified
Communication Manager AXL Servers. On the Edit AXL server page, configure the primary AXL
server with valid username and password. The feature is not applicable for secondary AXL server.
For more information on how to configure the AXL server, see the "Configuring an AXL Server in Unity
Connection" section in the "Telephony Integration" chapter.
• After configuring the AXL server, select Test under section AXL Servers to check that AXL server is
up and running.
• On the same page, check the Enable End User PIN Synchronization for Primary AXL Server check
box to enable the feature.
• Log in to the Cisco Unified OS Administration, go to Security > Certificate Management. On the Find
and List Certificates page, select Upload Certificate\Certificate Chain. On the Upload
Certificate\Certificate Chain page upload a valid certificate for the Cisco Unified CM to the Cisco Unity
Connection tomcat-trust.
To ignore the certificate validation errors for AXL server, check the Ignore Certificate Errors check
box on the Edit AXL Server page.
For more information on certificates, see “Security” chapter of Cisco Unified Communications Operating
System Administration Guide for Cisco Unity Connection Release 15 at https://www.cisco.com/c/en/us/
td/docs/voice_ip_comm/connection/15/os_administration/guide/b_15cucosagx.html.
Configuring PIN Synchronization in Cisco Unified CM
Do the following to configure PIN Synchronization feature in Cisco Unified CM:
• To enable PIN Synchronization, first upload a valid certificate for the Cisco Unity Connection from the
Cisco Unified OS Administration page to the Cisco Unified Communications Manager tomcat-trust.
• To create an Application user in Cisco Unified CM, go to User Management > Application User and
select Add New. On the Application User Configuration page, enter the values of the required field and
select Save.
Make sure that the User ID and password entered on the Application User
Configuration page must match the username and password of the Cisco Unity
Connection system administrator.
Note
• In Cisco Unified CM, go to System > Application Servers and select the application server that you set
up for Cisco Unity Connection. On the Application Server Configuration page, in the Available
Application User field, select the application user that is created with Cisco Unity Connection
administrator credentials and move it to the Selected Application User field.
System Administration Guide
272
User Settings
Task List for Configuring PIN Synchronization in Unity Connection

Page 291
If Cisco Unity Connection server is not available on the Find and List Application Servers page, you
need to create a new application server for Cisco Unity Connection. For more information on how to
add a new application server, see the "Integrate Applications, Configure Application Servers " chapter
in the System Configuration Guide for Cisco Unified Communications Manager at http://www.cisco.com/
c/en/us/support/unified-communications/unified-communications-manager-callmanager/
products-installation-and-configuration-guides-list.html.
• On the Application Server Configuration page, check the Enable End User PIN Synchronization check
box and Select Save.
For more information to enable PIN Synchronization in Cisco Unified CM, see "PIN Synchronization" section
in the "New and Changed Features" chapter in the Release Notes for Cisco Unified Communications Manager
and IM & Presence Service, Release 11.5(1) at
http://www.cisco.com/c/en/us/td/docs/voice_ip_comm/cucm/rel_notes/11_5_1/cucm_b_release-notes-cucm-imp-1151.html.
Password and PIN Security Considerations for Template Defaults
Following are the considerations when preparing user templates for voicemail or administrator users:
Users with Voice Mailbox Accounts
The web application passwords and voicemail PINs for voicemail users are either set by default Voicemail
User Template during installation or the passwords set on the Change Password page for the user template
that you select when the creating accounts.
You need to share the PINs and passwords with users so that they can sign in to the Unity Connection
conversation and to the Cisco Personal Communications Assistant (Cisco PCA). To increase system security,
users must change both PIN and password as soon as possible, and enforce the PIN and password complexity
rules.
Users Without Voice Mailbox Accounts
A default web application password is applied to each administrative account that you create. If the administrator
user is associated with the default Administrator User Template, then the web application password is a
randomly generated string.
Therefore, if you base new administrative accounts on the default Administrator User Template, you must
either enter a new default password for the user template to replace the randomly generated string or change
the password for each newly created administrator account. To increase system security, the administrators
must change the password as soon as possible and enforce password complexity rules.
Change Password
You can change the web application password and voicemail PIN settings for a user on the Edit > Password
Settings page for the user or associated user template.
In Cisco Business Edition, you can change user voice mail PINs and web application passwords either from
the User Management pages in Cisco Unified CM Administration.
Note
System Administration Guide
273
User Settings
Password and PIN Security Considerations for Template Defaults

Page 292
If Unity Connection is integrated with an LDAP directory, the web application password and password settings
(for example, password-complexity settings and whether the password expires) are controlled by the LDAP
server.
Note
Users can also use the Messaging Assistant to change the passwords and PINs.
Securing and Changing the Web Application (Cisco PCA) Password
You can change the and specify the web application password and voicemail PIN settings for users from Cisco
Unity Connection Administration.
The Cisco PCA password is referred to as the Web Application password in Cisco Unity Connection
Administration.
Note
Each user must be assigned a unique password with the following properties:
• The password must contain at least three of the following four characters: an uppercase character, a
lowercase character, a number, or a symbol.
• The password cannot contain the user alias or its reverse.
• The password cannot contain the primary extension or any alternate extensions.
• A character cannot be used more than three times consecutively (for example, !Cooool).
The characters cannot all be consecutive, in ascending or descending order (for example, abcdef or fedcba).
Following are the considerations when securing Cisco PCA passwords for users:
• Users can change the Cisco PCA password only using the Messaging Assistant.
• The Cisco PCA password is not related to the Unity Connection phone PIN and the two are not
synchronized. The users do not change the Cisco PCA passwords when prompted to change the phone
PIN during first time enrollment.
Users that can access voice messages using an IMAP client must change the Cisco PCA password when
updating the password in IMAP client. Passwords are not synchronized between IMAP clients and Cisco
PCA. If users have trouble receiving voice messages in an IMAP client after updating Cisco PCA password,
see the "Troubleshooting IMAP Client Sign-In Problems in Cisco Unity Connection" section in the "Configuring
an Email Account to Access Cisco Unity Connection Voice Messages" chapter of the User Workstation Setup
Guide for Cisco Unity Connection Release 15, available at https://www.cisco.com/c/en/us/td/docs/voice_ip_
comm/connection/15/user_setup/guide/b_15cucuwsx.html.
Roles
You can assign different roles (System Roles and Custom Roles) to a user from the Edit Roles page of a user
or the associated user template. System Roles are the predefined roles provided by Unity Connection whereas
Custom Roles are the roles that the administrator creates based on the requirements. For more information on
different roles and privileges, see the Roles, on page 26 section of the "User Attributes" chapter..
System Administration Guide
274
User Settings
Securing and Changing the Web Application (Cisco PCA) Password

Page 293
While specifying the user account settings, you can assign multiple roles to a particular user through Edit
Roles page. The role you assign to the user account defines the privileges and tasks that an administrator can
perform.
Note
Message Waiting Indicator
Unity Connection can set message waiting indicators (MWIs) at up to 10 extensions for a user when new
voice messages arrive. When a user account is added, Unity Connection automatically enables the MWI at
the primary extension for the user.
You can change MWI settings, add or delete MWI extensions in Cisco Unity Connection Administration on
the Message Waiting Indicators page for a user.
In a SCCP integration with Cisco Unified CM or in a SIP trunk integration with Cisco Unified CM 7.1 and
later, Unity Connection can also send message counts to supported Cisco IP phones.
You cannot specify MWI settings for user templates.
Note
Transfer Rules
The transfer rules specify how Unity Connection handles calls transferred from an automated attendant to
user phones. As per the call transfer settings, Unity Connection can either release the call to the phone system,
or it can supervise the transfer.
When Unity Connection is set to supervise transfers, it can provide additional call control with call holding
and call screening for indirect calls:
• With call holding, when the phone is busy, Unity Connection can ask callers to hold. Unity Connection
manages each caller in the queue according to the settings that you configure.
The wait time in the call holding queue for the first caller in the queue defaults to 25 seconds. If the caller
is still on hold after this amount of time, Unity Connection asks if the caller wants to continue holding,
leave a message, or try another extension. If the caller does not press 1 to continue holding, or press 2
to leave a message, the caller is transferred back to the Opening Greeting. If call holding is not selected,
callers are sent to whichever user greeting is enabled.
• With call screening, Unity Connection can ask for the name of the caller before connecting to a user.
The user can then hear who is calling and, when a phone is shared by more than one user, who the call
is for. The user can then accept or refuse the call.
If the call is accepted, it is transferred to the user phone. If the call is refused, Unity Connection plays
the applicable user greeting.
System Administration Guide
275
User Settings
Message Waiting Indicator

Page 294
Transfer, screening, and holding settings do not apply when an outside caller or another user dials a user
extension directly.
Note
To control how Unity Connection handles indirect calls at different times of the day or for specified period
of time, you can define Standard, Closed, and Alternate transfer rules. The Standard transfer rule is always
enabled and cannot be turned off. You can determine whether to enable Closed and Alternate transfer rules
or customize the time for which the transfer rules should be enabled.
Message Settings
You can specify message settings for a specific user on the Edit Message Settings page for the user or user
template that you use to create users. The message settings determine the message recording length, secure
access, and message action of the outside (unidentified) callers when leaving messages for a user. You can
specify the following settings:
• The maximum recording length for messages left for a user by outside callers.
• The action of outside callers when leaving messages for a user. For example, mark messages urgent or
private, or re-record the messages.
• The secure access for the messages left by outside callers are secure. For more information, see the
"Securing User Messages in Cisco Unity Connection" chapter of the Security Guide for Cisco Unity
Connection Release 15 to learn how Unity Connection handles secure messages. The guide is available
at https://www.cisco.com/c/en/us/td/docs/voice_ip_comm/connection/15/security/guide/b_15cucsecx/
b_15cucsecx_chapter_0110.html.
The language of the Unity Connection prompts that callers hear when leaving messages for a user.
Message Actions
Message actions determine how Unity Connection handles different types of messages that it receives for a
user. Unity Connection applies the configured action for all messages of a given type that are addressed to
the user. For example, if the message action for voice messages is set to relay messages of this type to a user
at an alternate SMTP address, Unity Connection relays all voice messages including VPIM messages, messages
that are sent from an IMAP client, and messages that are recorded and sent by phone. By default, Unity
Connection is configured to accept each type of message, meaning that it delivers the message to the user
mailbox.
If you choose to relay voice messages to another address, you should consider the following:
• When messages are set to be relayed, users are no longer able to access relayed messages from the Unity
Connection phone interface, Web Inbox, Messaging Inbox, or other clients, such as Phone View or Cisco
Unified Personal Communicator. You can use the Accept and Relay the Message action to instruct Unity
Connection to save a copy of the message in the local user mailbox (where it is accessible by user
interfaces) and also relay a copy to another address.
• Unity Connection relays dispatch messages as regular messages.
• Unity Connection does not relay broadcast messages.
System Administration Guide
276
User Settings
Message Settings

Page 295
• You can configure whether Unity Connection relays private messages and secure messages on the System
Settings > Advanced > Messaging page. Private messages are relayed as regular messages with the private
flag and secure messages are relayed as regular messages.
• If user accounts are configured to relay voice messages to an alternate SMTP address, the voice messages
cannot be transcribed. If users want transcriptions along with the relay feature, you can configure user
accounts to Accept and Relay voice messages. This allows the copy of the message that is stored on the
Unity Connection server to be transcribed.
• When you configure SMTP notification devices for users, transcription is sent to the user SMTP address.
This means that users receive two emails at the SMTP addresses. The first one is the relayed copy of the
message WAV file. The second is the notification that includes the transcription. If the users need to
access the original recording, users can call in Unity Connection or use an IMAP client to access the user
account.
SMTP Relay functionality has been primarily designed to configure corporate email address only. In order
to avoid any loop in relaying the message, Primary SMTP address of Unity Connection should not be configured
as Relay address.
Note
Unity Connection supports the relay function in message action only when you have configured an SMTP
smart host on the System Settings > SMTP Configuration > Smart Host page.
Note
Caller Input
The caller input settings define actions that Unity Connection takes in response to phone keypad keys pressed
by callers during a user greeting. For each greeting that allows caller input, you can specify whether callers
can skip the greeting, record a message, exit the greeting, transfer to numbers that are not associated with
users or call handlers, or transfer to an alternate contact number, call handler, directory handler, or interview
handler of your choice. You also use caller input settings to specify which keys users can press to interrupt a
user greeting so that they can sign in to Unity Connection.
The caller input settings can be changed only by an administrator user. By default, for each user greeting,
Unity Connection acts on certain keys and ignores others.
Table A-1 lists the default actions assigned to phone keypad keys.
Table 19: Table A-1 Default Actions Assigned to Phone Keypad Keys
Cisco Unity Connection Does This
When Callers Press This Key
Skips the greeting.
Prompts the caller to sign in
*
Sends the caller to the Operator call handler
0
Ignores the caller
1 through 9
System Administration Guide
277
User Settings
Caller Input

Page 296
Verify that the phone keypad key you select to lock is not the first digit of any of the extensions in your system.
If it is, locking the key prevents callers from dialing an extension.
Note
Mailbox
Unity Connection allows you to specify the maximum size, or quota, for every user mailbox. You can configure
mailbox quotas that permits Unity Connection to:
• Issue a warning when a mailbox reaches a specified size.
• Prevent a user from sending messages when the mailbox reaches a larger size.
• Prevent a user from sending or receiving messages when the mailbox reaches the largest size that you
want to allow.
To handle the varying needs of users in your organization, you can override the systemwide quotas for
individual mailboxes and for user templates. For example, you may want to allow employees in the sales
department to have larger mailboxes than other employees. If you create user accounts for all sales employees
using the same template, you can either specify higher quotas for the user template or higher quotas for
individual user accounts.
Quotas are not enforced for messages left by outside callers if the Full Mailbox Check for Outside Caller
Messages check box is not checked. This check box appears on the System Settings > Advanced >
Conversations page. For more information, see the Help for that page.
Caution
Message Aging Policy
To ensure that the hard disk where voice messages are stored does not fill up, you can configure Unity
Connection message aging rules to automatically move read messages to the Deleted Items folder after a
specified number of days and to permanently delete messages in the Deleted Items folder after a specified
number of days.
To help enforce a message retention policy, you can configure Unity Connection message aging rules to
permanently delete secure messages that are older than a specified number of days based on whether or not
users have touched the messages in some way.
Phone Menu
Unity Connection offers several versions of the phone conversation that users hear and use. The version you
select determines whether Unity Connection responds only to phone keypad input or also uses voice recognition
to interpret spoken commands:
• Touchtone Conversation- Users press keys to tell Unity Connection what they want to do. There are
several touchtone conversations to choose from. Each one offers a unique keypad mapping for the message
retrieval menus. For some, the keys assigned to options in the Main menu are also unique.
System Administration Guide
278
User Settings
Mailbox


Page 297
• Voice-Recognition Conversation- Users say voice commands to interact with Unity Connection. Even
when assigned to the voice-recognition conversation, users can also press keys on the phone to tell Unity
Connection what they want to do; in this case, the touchtone conversation setting is used to determine
which keys are mapped to which options. This allows the touchtone conversation setting to serve as a
backup if the voice-recognition services are unavailable, and also when users simply choose to use the
keypad instead of voice commands to interact with Unity Connection.The user account or template must
be assigned to a class of service that enables a license and the voice-recognition feature.
In case of a video call, Unity Connection plays the touchtone conversation only, even if the user is enabled
for voice-recognition conversation (Use Voice Recognition Input Style). The user selects the applicable key
to switch to voice-recognition conversation (Switch Between Using the Phone Keypad and Using Voice
Commands) using custom keypad mapping.
Phone View feature
The Phone View feature allows users to see search results on the LCD screens of their Cisco IP phones when
they use the Find Message or the Display Message menu. When it is enabled, Unity Connection users can
search for the following types of messages:
• All new voice messages.
• All voice messages
• Messages from a particular user
• Messages from all outside callers
• Messages from a particular outside caller
For more information, see the "Cisco Unity Connection Phone Menus and Voice Commands " chapter of the
User Guide for the Cisco Unity Connection Phone Interface for Release 15, available at https://www.cisco.com/
c/en/us/td/docs/voice_ip_comm/connection/15/user/guide/phone/b_15cucugphone.html.
Playback Message Settings
All of the settings on the Playback Message Settings page, with the exception of the For Draft Messages, Play
field, are applicable both to Unity Connection messages and to messages stored externally, depending on
whether users are enabled to access email in third party message stores, and are enabled to use the single inbox
feature.
Send Message Settings
System broadcast messages are recorded announcements that are sent to everyone in an organization. Users
can either send system broadcast messages to all users or update the system broadcast messages stored in user
mailboxes.
By default, Unity Connection users are not enabled to send or update broadcast messages.
Note
To send or update system broadcast messages, users log on to Broadcast Message Administrator which is a
special conversation that permits the users to send or update broadcast messages. For more information, see
the Messaging, on page 127 chapter.
System Administration Guide
279
User Settings
Phone View feature

Page 298
Greeting
Users can enable or record up to seven greetings using Messaging Assistant or phone. The greeting settings
in Cisco Unity Connection Administration for a user template or user account allow you to specify which
greetings are enabled, how long they are enabled, the greeting source, and the actions that Unity Connection
takes during and after each greeting.
When a greeting is enabled, Unity Connection plays the greeting in the applicable situation until the specified
date and time arrives, and then the greeting is automatically disabled. A greeting can also be enabled to play
indefinitely, which is useful for busy or closed greetings, or when an alternate greeting is enabled by a user
during a leave of absence.
Following are the types of greetings that a user can record:
• Audio Greeting: Allows you to record an audio message that must be played when a particular greeting
is enabled. For example, you can record an audio message for the Busy greeting, which the callers hear
when the call is busy.
• Video Greeting: Allows you to record a video message that must be displayed when a particular greeting
is enabled. For example, you can record a video message for the Holiday greeting, which the callers hear
when the recipient is on holiday. For more information on Video greetings, see Video, on page 195 chapter.
Changing the Audio or Video Format of Recordings
Unity Connection uses the same audio or video format (or codec) for recording a message that the playback
device uses. For example, if users listen to messages primarily on a phone system extension, you should
configure users to record messages in the same audio or video format that the phone system uses. If users
listen to messages on Personal Digital Assistants (PDAs), however, you should configure users to record
messages in the audio format that the PDAs use (such as GSM 6.10).
Consider the following when setting the audio or video format for recording messages:
• Setting the audio or video format for recordings affects all messages, greetings, and names systemwide
for all users.
• The audio or video format that you select affects only recordings made by phone, either using TUI, Media
Player or TRAP. The recordings made using the Media Player and a microphone are always stored in
G.711 mu-law.
• Minimizing the number of different audio formats in used for recording and playback of recorded
messages, greetings, and names reduces transcoding between audio or video formats.
• When a message, greeting, or name is recorded in a lower quality audio or video format and later
transcoded to a higher quality audio or video format during playback, the sound quality is not improved.
Usually, the sound quality of a recording suffers when the sampling rate is changed.
• Changing the audio or video format for recordings affects only messages, greetings, and names that are
recorded after the setting is changed. Existing messages, greetings, and names that were recorded in a
different audio format are not affected by the new setting.
To Change the Audio or Video Format of Recorded Messages Using Phone
Step 1
In Cisco Unity Connection Administration, expand System Settings and select General Configuration.
System Administration Guide
280
User Settings
Greeting
Page 299
Step 2
On the Edit General Configuration page, in the Recording Format list, select the applicable setting and select Save.
Post Greeting Recording
Post greeting recordings are the recorded messages that are played after greetings but before callers are allowed
to leave a message for a user. For example, you may want to enable a post greeting recording for a particular
group of users to convey a confidentiality policy or to let callers know when they can expect a response to
the message. You can also use the feature to remind callers to include contact information, invoice or policy
numbers, and other such information when they leave messages.
For each post-greeting recording, you use the Media Player on the Edit Post Greeting Recording page of a
user template or user to record what you want callers to hear. Post greeting recordings are configured on the
Call Management > Custom Recordings page in Cisco Unity Connection Administration. For information on
custom recordings, see the Custom Recordings, on page 106 section.
Notification Devices
Users can be configured to call a phone or a pager or send text, or SMS messages to notify users of new
messages and calendar events. You can configure the parameters for the call or notification message, the
events that trigger the notification, and the schedule on which the notification occurs by setting up notification
devices.
You can setup the notification devices for users using the Edit Notification Devices page of a user or user
template. For more information, see the Notifications, on page 173 chapter.
With Unity Connection 10.5 and later, you can also enter the URI number for the work, mobile, and home
notification devices.
Note
Unified Messaging Account
When configuring the single inbox for Unity Connection, check the Generate SMTP Proxy Address From
Corporate Email Address check box. When you check this check box, Unity Connection automatically creates
a new SMTP proxy address for the value in the Corporate Email Address field. An SMTP proxy address
allows Unity Connection to map the sender to a user and to map the message recipients to users by comparing
the SMTP addresses in the message header to its list of SMTP proxy addresses. Applicable SMTP proxy
addresses are necessary when using Cisco ViewMail for Microsoft Outlook with the single inbox feature to
send messages.
When integrated with Exchange, Unity Connection allows touchtone and voice-recognition conversation users
to hear the emails read to them when they sign in to Unity Connection using phone. The Text-to- Speech
(TTS) playback is available provided that the text portion of the message does not exceed 1 MB in size and
the text format of the message is supported by Unity Connection. Supported formats include plain text,
quoted-printable text, HTML, and XML.
System Administration Guide
281
User Settings
Post Greeting Recording

Page 300
To enable users to access email in Exchange, configure unified messaging and select the options applicable
to text to speech. For more information, see Unified Messaging Guide for Cisco Unity Connection for Release
15 available at https://www.cisco.com/c/en/us/td/docs/voice_ip_comm/connection/15/unified_messaging/
guide/b_15cucumgx.html .
Video Service Accounts
Unity Connection allows the users to record and play video greetings using a video endpoint. Unity Connection
facilitates you to record and play all types of following greetings as video:
• Alternate
• Busy
• Internal
• Closed
• Standard
• Holiday
Error greetings are played only as audio greetings.
Note
Alternate Extensions
In addition to the primary extension for each user, you can set up alternate extensions. Alternate extensions
can be used for various reasons, such as handling multiple line appearances on user phones. Alternate extensions
can also make calling Unity Connection from an alternate device, such as a mobile phone or a phone at another
work site more convenient.
When you specify the phone number or URI for an alternative extension, Unity Connection handles all calls
from that number in the same way that it handles calls from a primary extension (assuming that ANI or caller
ID is passed along to Unity Connection from the phone system). This means that Unity Connection associates
the alternate phone number with the user account and when a call comes from that number, Unity Connection
prompts the user to enter a PIN and sign in.
If users set an alternate device to forward to Unity Connection, callers can hear the user greeting and leave
messages for the user, just as they would when dialing the primary extension of the user. (Callers can also be
transferred to the alternate extension for a user from the automated attendant.) Users need to set forwarding
from the device itself, not in Unity Connection. Note that the phone number must be passed to Unity Connection
for the system to recognize the device.
Users can also address messages to an alternate extension that is associated with another user.
Alternate extensions are grouped into two categories:
• Administrator-defined alternate extensions-Administrators can add up to 9 alternate extensions.
Administrators can view and edit both administrator-defined and user-defined alternate extensions.
• User-defined alternate extensions-Users can add up to 10 alternate extensions if they belong to a class
of service that allows them to manage user-defined alternate extensions. Users can view
administrator-defined alternate extensions if they belong to a class of service that allows them to do so.
System Administration Guide
282
User Settings
Video Service Accounts

Page 301
Class of service settings allow you to determine whether users can view or manage alternate extensions and
whether they can use the Unity Connection Messaging Assistant to manage a set of own alternate extensions.
Users who belong to a class of service with the Allow Users to Manage Their User-Defined Alternate Extensions
option enabled can automatically add alternate extensions.To learn more about this feature, see the System
Settings, on page 201 chapter.
Using the Custom Keypad Mapping tool in Cisco Unity Connection Administration, you can provide users
with the option to edit the alternate extensions from the Preferences menu in the phone interface. When a user
selects the option to edit the alternate devices, Unity Connection allows you to list or delete the existing
alternate extensions. If the user signs in from a phone number that is not the primary extension or an existing
alternate extension or in the Excluded Extensions for Automatically Added Alternate Extensions restriction
table, when they select the option to edit the alternate devices, Unity Connection offers to add the phone
number as a new alternate extension. For more information on custom keypad mapping, see the Using the
Custom Keypad Mapping Tool, on page 252 section.
Alternate Extension Custom Settings
There are several conversation settings that can be customized for alternate extensions. By default, each
alternate extension uses the same settings that have been configured for the primary extension of the user.
You can also edit advanced settings, such as conversation volume and message speed for alternate extensions
(work phone or mobile phone) from which the user is calling. For example, a user calling from a mobile phone
may want to use the voice-recognition input style and not be asked for a PIN. But a user calling from a work
phone may want to use the touch tone input style and be required to enter a PIN.
Alternate Names
Alternate names are different versions of a name than what is listed in the corporate directory. Cisco Unity
Connection considers these names when a caller uses voice recognition to place a call. For example, if a caller
asks Unity Connection to dial "Mary Jameson," which was the maiden name of Mary Brown, Unity Connection
can reference this information and connect the caller to the correct user.
In addition to recognizing alternate names when users and outside callers use voice recognition to place a
call, Unity Connection recognizes alternate names when callers and users use voice recognition to address
voice messages. Alternate names can be created for users, VPIM contacts, administrator-defined contacts,
system distribution lists, private lists, and user-defined contacts.
While Unity Connection already recognizes hundreds of common shortened names (Bill in place of William,
for example), you might want to add another version of an uncommon name, unusual nicknames, or maiden
names. You could also use alternate names to add phonetic spellings of hard-to-pronounce names. For example,
you could add "Goolay" as an alternate name for the last name "Goulet."
From the Cisco PCA, users can edit or change the alternate names and can also create alternate names for
customers, suppliers, family members, and friends who are not included in the Unity Connection directory,
or for private lists. This helps in making it easier for the users or outside callers to dial the contacts or address
to the lists when using voice commands.
You cannot add or edit alternate names on a user template, nor can you use the Bulk Edit utility to add or edit
alternate names for multiple user accounts.
Note
System Administration Guide
283
User Settings
Alternate Extension Custom Settings

Page 302
Private Distribution Lists
Users can use the private distribution lists that are associated with the accounts to send voice messages to
more than one user at a time. The users can set up and manage the private lists using the Messaging Assistant
or the phone. For more information on private distribution list, see the " Managing your Private List " chapter
of the User Guide for the Cisco Unity Connection Messaging Assistant Web Tool (Release 15) at
https://www.cisco.com/c/en/us/td/docs/voice_ip_comm/connection/15/user/guide/assistant/b_15cucugasst.html.
You cannot specify private lists on a user template or for multiple user accounts at once.
Note
SMTP Proxy Addresses
Unity Connection uses SMTP proxy addresses to map the recipients of an incoming SMTP message sent from
an IMAP client to the appropriate Unity Connection user or VPIM contact. If users use IMAP clients to send,
reply to, or forward messages to VPIM contacts you should configure each VPIM contact with an SMTP
address.
Unity Connection handles SMTP messages sent to the contacts that are not associated with a VPIM location
according to the option selected for the System Settings > General Configuration > When a Recipient
Cannot Be Found setting.
Note
For example, when Robin Smith, whose email client is configured to access Unity Connection with the email
address robin.smith@example.com, records a voice message in ViewMail for Outlook and sends it to
chris.jones@example.com, Unity Connection searches the list of SMTP proxy addresses for
robin.smith@example.com and chris.jones@example.com. If these addresses are defined as SMTP proxy
addresses for the Unity Connection users Robin Smith and Chris Jones respectively, Unity Connection delivers
the message as a voice message from Robin Smith to Chris Jones.
For more information on configuring Unity Connection so that users can use IMAP clients to send, forward,
or reply to messages through the Unity Connection server, see the Integrated Messaging, on page 139
Note
System Administration Guide
284
User Settings
Private Distribution Lists

Page 303
A P P E N D I X B
Bulk Administration Tool
• Required and Optional CSV Fields in BAT, on page 285
• Required and Optional CSV Fields for User, on page 285
• Required and Optional CSV Fields for Contacts, on page 306
• Required and Optional CSV Fields for Distribution Lists, on page 312
• Required and Optional CSV Fields for Distribution List Members, on page 313
• Required and Optional CSV Fields for Unified Messaging Accounts , on page 313
Required and Optional CSV Fields in BAT
The BAT tool allows you to create, update, and delete multiple user accounts, contacts, distribution lists,
distribution list members, or unified messaging accounts by importing information contained in a comma
separated value (CSV) file. For more information on BAT, see the Bulk Administration Tool, on page 248
section.
The tables in this section list the required and optional fields to include input CSV files. The fields are listed
in alphabetical order, except for the required fields that are listed first.
Use the applicable table, depending on the type of object:
• Users With or Without Voice Mailboxes
• Contacts
• Distribution Lists
• Distribution List Members
• Unified Messaging Accounts
Required and Optional CSV Fields for User
Table 20: Required and Optional CSV Fields for User
Descriptions
Deleting
Updating
Creating
Column Heading
System Administration Guide
285

Page 304
The unique text name for the user account.
Any combination of ASCII or unicode
alphanumeric characters, periods, commas,
spaces, and the special characters `, ~, !, @, #,
$, %, ^, &, -, , ', up to a maximum of 64
characters.
You should use only printable ASCII characters
in the Alias field, because some messaging
features do not support non-printing ASCII
characters or Unicode. (The non-printing ASCII
control characters are those below code 0x20.)
For example, IMAP only supports user names
that contain printable ASCII characters, so users
with aliases that contain non-printing characters
or unicode are unable to access their Connection
messages via IMAP clients. In addition, the
Cisco Object Backup and Restore Application
Suite (COBRAS) is unable to back up messages
for such users, because COBRAS uses IMAP
to perform the backup.
Required
Required
Required
Alias
The number that callers dial to reach the user.
The value must be unique among users in the
partition.
Any combination of ASCII alphanumeric
characters, from 3 to 40 characters long.
N/A
Optional
Required
Extension
(Users With Mailbox
Only)
The unique text name for the user template to
apply to the account during creation.
If you specify an administrator
template for TemplateAlias, the
users do not have mailboxes.
Caution
N/A
N/A
Required
TemplateAlias
The unique characters that the user enters to
access Unity Connection web applications.
Any combination of alphanumeric characters,
and the following special characters:
~!@#$%^&*()-+={}|[]:"';<>?/.
To help protect Unity Connection from
unauthorized access and toll fraud, enter a long,
eight or more characters and non-trivial
password.
N/A
Optional
Optional
Password
System Administration Guide
286
Bulk Administration Tool
Bulk Administration Tool
Page 305
The unique digits that the user enters to access
voice messages by phone.
Any combination of digits 0 through 9.
To help protect Unity Connection from
unauthorized access and toll fraud, enter a
long-six or more digits-and non-trivial PIN.
Whenever you update the phone
PIN for multiple users through
BAT on Unity Connection, the
PIN gets updated on Cisco Unified
CM for the users if the PIN
synchronization feature is enabled
on the Edit AXL Server page.
Note
For more information on PIN Synchronization,
see the "PIN Synchronization between Unity
Connection and Cisco Unified CM" section of
the "User Settings" chapter.
N/A
Optional
Optional
PIN
(Users With Mailbox
Only)
The physical address, such as a house number
and street name where the user is located, or
with which the user is associated.
Any combination of ASCII or unicode
characters up to a maximum of 128 characters.
N/A
Optional
Optional
Address
System Administration Guide
287
Bulk Administration Tool
Bulk Administration Tool
Page 306
An alternate version of the first name. Unity
Connection considers alternate names when
users and callers use voice recognition to place
a call or address voice messages.
To create/update more than one alternate first
name per user, separate them by semicolons (;).
If an alternate name needs to contain a
semicolon, precede the semicolon with another
semicolon to indicate to Unity Connection that
the name contains a semicolon.
Use this field in conjunction with the
AltLastNames field to add nicknames or maiden
names for users. You can also use alternate
names to add phonetic spellings of
hard-to-pronounce names.
Alternate first names and alternate last names
are stored as a pair in the database. When
submitting multiple alternate names, make sure
that you have the same number of alternate first
names and alternate last names.
For example, if you have a user named Elizabeth
Brown, who is sometimes known as "Liz" and
sometimes known by her maiden name of
"Smith," you would enter the following
AltFirstNames and AltLastNames to ensure that
all four combinations are submitted to the
database:
• Elizabeth; Liz; Elizabeth; Liz
• Brown; Brown; Smith; Smith
N/A
Optional
Optional
AltFirstNames
(Users With Mailbox
Only)
System Administration Guide
288
Bulk Administration Tool
Bulk Administration Tool
Page 307
An alternate version of the last name. Unity
Connection considers alternate names when
users and callers use voice recognition to place
a call or address voice messages.
To create/update more than one alternate last
name per user, separate them by semicolons (;).
If an alternate name needs to contain a
semicolon, precede the semicolon with another
semicolon to indicate to Unity Connection that
the name contains a semicolon.
Use this field in conjunction with the
AltFirstNames field to add nicknames or maiden
names for users. You can also use alternate
names to add phonetic spellings of
hard-to-pronounce names.
Alternate first names and alternate last names
are stored as a pair in the database. When
submitting multiple alternate names, make sure
that you have the same number of alternate first
names and alternate last names.
For example, if you have a user named Elizabeth
Brown, who is sometimes known as "Liz" and
sometimes known by her maiden name of
"Smith," you would enter the following
AltFirstNames and AltLastNames to ensure that
all four combinations are submitted to the
database:
• Elizabeth; Liz; Elizabeth; Liz
• Brown; Brown; Smith; Smith
N/A
Optional
Optional
AltLastNames
(Users With Mailbox
Only)
An alternate spelling of the user first name in
an internationally recognizable format (i.e.,
ASCII only characters). The value is used by
the phone interface to search for users and to
address messages.
Any combination of ASCII alphanumeric
characters up to maximum of 64 characters.
N/A
Optional
Optional
AltFirstName
(Users With Mailbox
Only)
An alternate spelling of the user first name in
an internationally recognizable format (i.e.,
ASCII only characters). The value is used by
the phone interface to search for users and to
address messages.
Any combination of ASCII alphanumeric
characters up to maximum of 64 characters.
N/A
Optional
Optional
AltLastName
(Users With Mailbox
Only)
System Administration Guide
289
Bulk Administration Tool
Bulk Administration Tool
Page 308
Organization-specific information about the
user, such as accounting information,
department names, or project codes. The
information can be included in user reports.
Any combination of digits from 0 through 9 up
to a maximum of 32 digits.
N/A
Optional
Optional
BillingId
The name of the building where the user is
based.
Any combination of ASCII or unicode
characters up to a maximum of 64 characters.
N/A
Optional
Optional
Building
The name of a locality, such as a city or other
geographic region where the user is located, or
with which the user is associated.
Any combination of ASCII or unicode
characters up to a maximum of 64 characters.
N/A
Optional
Optional
City
The two letter ISO 3166-1 country code where
the user is located, or with which the user is
associated.
Two ASCII lower or upper case alpha
characters.
N/A
Optional
Optional
Country
The name or number for the department or sub
division of an organization to which the user
belongs.
Any combination of ASCII or unicode
characters up to a maximum of 64 characters.
N/A
Optional
Optional
Department
The user name that appears on the administration
and user interfaces.
If Displayname is empty and both Firstname,
Lastname are present, then Displayname would
be combination of "Firstname Lastname", else
Displayname would be Alias.
Any combination of ASCII or unicode
characters up to a maximum of 64 characters.
N/A
Optional
Optional
DisplayName
The user name that appears on the administration
and user interfaces.
If Displayname is empty and both Firstname,
Lastname are present, then Displayname would
be combination of "Firstname Lastname", else
Displayname would be Alias.
Any combination of ASCII or unicode
characters up to a maximum of 64 characters.
N/A
Optional
Optional
DisplayName
(Users With Mailbox
Only)
System Administration Guide
290
Bulk Administration Tool
Bulk Administration Tool
Page 309
The email address of the user. This corresponds
to the Corporate Email Address field in Cisco
Unity Connection Administration.
The field is only for directory
information purposes. Unity
Connection does not use the
address to deliver incoming
messages.
Note
Any combination of ASCII alphanumeric
characters, and the special characters hyphen,
underscore, period and at sign ("@"), up to a
maximum of 320 characters.
N/A
Optional
Optional
EmailAddress
Name used to construct part of SMTP address
before the @ sign.
A name is needed for unicode aliases that cannot
be converted into a valid SMTP addresses.
N/A
Optional
Optional
MailName
(Users With Mailbox
Only)
The numeric or alphanumeric identifier assigned
to a user, typically based on order of hire or
association with an organization.
Any combination of ASCII or unicode
characters up to a maximum of 64 characters.
N/A
Optional
Optional
EmployeeId
The unique text name used to identify and
authenticate the user with an RSA SecurID
security system.
Any combination of ASCII or unicode
characters up to a maximum of 50 characters.
N/A
Optional
Optional
EnhancedSecurityAlias
The user first name.
Any combination of ANSI or Unicode
alphanumeric characters, periods, commas,
spaces, and the special characters , ~, !, @, #, $, %, ^, &, -, _, ', up to a maximum of 64 characters. N/A Optional Optional FirstName The initials of part or all of the user name. Any combination of ANSI or unicode alphanumeric characters, periods, commas, spaces, and the special characters , ~, !, @, #,
$, %, ^, &, -, _, ', up to a maximum of 6
characters.
N/A
Optional
Optional
Initials
System Administration Guide
291
Bulk Administration Tool
Bulk Administration Tool
Page 310
The preferred language of the user.
Use the Windows language code, such as 1033
for U.S. English. For a list of supported
languages and the corresponding language
codes, see the "Numeric and Alphabetic Codes
for Supported Languages" section in the System
Requirements for Cisco Unity Connection 15 at
https://www.cisco.com/c/en/us/td/docs/voice_
ip_comm/connection/15/requirements/b_
15cucsysreqs.html.
N/A
Optional
Optional
Language
The user last name.
Any combination of ANSI or unicode
alphanumeric characters, periods, commas,
spaces, and the special characters `, ~, !, @, #,
$, %, ^, &, -, _, ', up to a maximum of 64
characters.
N/A
Optional
Optional
LastName
The name of the manager or supervisor of the
user.
Any combination of ASCII or unicode
characters up to a maximum of 64 characters.
N/A
Optional
Optional
Manager
For users located in the United States, the zip
code where the user is located, or with which
the user is associated. For users located in
Canada, Mexico, and other countries, the postal
code where the user is located, or with which
the user is associated.
Any combination of ASCII or unicode
characters up to a maximum of 40 characters.
N/A
Optional
Optional
PostalCode
The full name of the state or province where the
user is located, or with which the user is
associated.
Any combination of ASCII or unicode
characters up to a maximum of 64 characters.
N/A
Optional
Optional
State
The time zone with which the user account is
associated.
N/A
Optional
Optional
TimeZone
The position or function of the user within the
organization, for example "Vice President."
Any combination of ASCII or unicode
characters up to a maximum of 64 characters.
N/A
Optional
Optional
Title
System Administration Guide
292
Bulk Administration Tool
Bulk Administration Tool
Page 311
The unique text name that is displayed on the
user interfaces for the class of service (COS)
with which the user account is associated.
Any combination of ASCII or Unicode
characters, up to a maximum of 64 characters.
N/A
Optional
Optional
COSDisplayName
(Users With Mailbox
Only)
The required Client Matter Code (CMC) to
transmit to Cisco Unified Communications
Manager (CM), if applicable, when the user
makes an outbound call.
CMCs are typically used to enable the system
to track calls for account or billing purposes.
The value is used only if the system is using
Cisco Unified CM and if the version of Cisco
Unified CM is 4.1 and later.
Whether the CMC is transmitted depends on the
setting for outbound calls. The user CMC is used
only if the outbound call does not have its own
CMC.
The code length can be from 1 through 40
characters.
N/A
Optional
Optional
ClientMatterCode
(Users With Mailbox
Only)
(Applicable only to the Alternate transfer rule.)
Determines the way in which Unity Connection
transfers calls from the automated attendant or
a directory handler to the user phone for the
Alternate transfer rule:
• 0-supervised
• 1-unsupervised (also called a "Release to
Switch" transfer)
N/A
Optional
Optional
TransferType
(Users With Mailbox
Only)
(Applicable only to the Alternate transfer rule.)
Determines the number of times the user
extension rings before Unity Connection
considers the call unanswered
("ring-no-answer") and plays the applicable
greeting. This setting is applicable only when
the TransferType is configured for a supervised
transfer.
An integer value from 2 through 100.
N/A
Optional
Optional
TransferRings
(Users With Mailbox
Only)
(Applicable only to the Alternate transfer rule.)
The phone number that Unity Connection
transfers calls to if TransferAction is set to 1.
N/A
Optional
Optional
TransferExtension
(Users With Mailbox
Only)
System Administration Guide
293
Bulk Administration Tool
Bulk Administration Tool
Page 312
(Applicable only to the Alternate transfer rule.)
Determines whether Unity Connection transfers
the incoming calls for the user to the user
greeting or to the extension specified in
TransferExtension:
• 0-Transfer to the greeting.
• 1-Transfer to TransferExtension.
N/A
Optional
Optional
TransferAction
(Users With Mailbox
Only)
(Applicable only to the Alternate transfer rule.)
This setting is applicable only when the
TransferType is configured for a supervised
transfer. Determines whether Unity Connection
transfers the call to the applicable greeting or
releases the call to the phone system when a call
is unanswered ("ring-no-answer"):
• 0-Release the call to the phone system.
• 1-After the number of rings specified in
the TransferRings field, transfer the call to
the appropriate greeting.
N/A
Optional
Optional
RnaAction
(Users With Mailbox
Only)
(Applicable only to the Standard transfer rule.)
Determines the way in which Unity Connection
transfers calls from the automated attendant or
a directory handler to the user phone for the
standard (default) transfer rule:
• 0-supervised
• 1-unsupervised (also called a "Release to
Switch" transfer)
N/A
Optional
Optional
StandardTransferType
(Users With Mailbox
Only)
(Applicable only to the Standard transfer rule.)
Determines the number of times the user
extension rings before Unity Connection
considers the call unanswered
("ring-no-answer") and plays the applicable
greeting. This setting is applicable only when
the StandardTransferType is configured for a
supervised transfer.
An integer value from 2 through 100.
N/A
Optional
Optional
StandardTransferRings
(Users With Mailbox
Only)
(Applicable only to the Standard transfer rule.)
The phone number that Unity Connection
transfers calls to if StandardTransferAction is
set to 1.
N/A
Optional
Optional
StandardTransferExtension
(Users With Mailbox
Only)
System Administration Guide
294
Bulk Administration Tool
Bulk Administration Tool
Page 313
(Applicable only to the Standard transfer rule.)
Determines whether Unity Connection transfers
the incoming calls for the user to the user
greeting or to the extension specified in
StandardTransferExtension:
• 0-Transfer to the greeting.
• 1-Transfer to StandardTransferExtension.
N/A
Optional
Optional
StandardTransferAction
(Applicable only to the Standard transfer rule.)
This setting is applicable only when the
StandardTransferType is configured for a
supervised transfer. Determines whether Unity
Connection transfers the call to the applicable
greeting or releases the call to the phone system
when a call is unanswered ("ring-no-answer"):
• 0-Release the call to the phone system.
• 1-After the number of rings specified in
the StandardTransferRings field, transfer
the call to the appropriate greeting.
N/A
Optional
Optional
StandardRnaAction
(Users With Mailbox
Only)
(Applicable only to the Closed transfer rule.)
Determines the way in which Unity Connection
transfers calls from the automated attendant or
a directory handler to the user phone for the
Closed transfer rule:
• 0-supervised
• 1-unsupervised (also called a "Release to
Switch" transfer)
N/A
Optional
Optional
ClosedTransferType
(Users With Mailbox
Only)
(Applicable only to the Closed transfer rule.)
Determines the number of times the user
extension rings before Unity Connection
considers the call unanswered
("ring-no-answer") and plays the applicable
greeting. This setting is applicable only when
the ClosedTransferType is configured for a
supervised transfer.
An integer value from 2 through 100.
N/A
Optional
Optional
ClosedTransferRings
(Users With Mailbox
Only)
(Applicable only to the Closed transfer rule.)
The phone number that Unity Connection
transfers calls to if ClosedTransferAction is set
to 1.
N/A
Optional
Optional
ClosedTransferExtension
(Users With Mailbox
Only)
System Administration Guide
295
Bulk Administration Tool
Bulk Administration Tool
Page 314
(Applicable only to the Closed transfer rule.)
Determines whether Cisco Unity Connection
transfers the incoming calls for the user to the
user greeting or to the extension specified in
ClosedTransferExtension:
• 0-Transfer to the greeting.
• 1-Transfer to ClosedTransferExtension.
N/A
Optional
Optional
ClosedTransferAction
(Users With Mailbox
Only)
(Applicable only to the Closed transfer rule.)
This setting is applicable only when the
StandardTransferType is configured for a
supervised transfer. Determines whether Unity
Connection transfers the call to the applicable
greeting or releases the call to the phone system
when a call is unanswered ("ring-no-answer"):
• 0-Release the call to the phone system.
• 1-After the number of rings specified in
the ClosedTransferRings field, transfer the
call to the appropriate greeting.
N/A
Optional
Optional
ClosedRnaAction
(Users With Mailbox
Only)
The phone number (extension) of the default
message waiting indicator (MWI) to light when
callers leave messages for the user.
If no value is provided, Unity Connection uses
the number of the primary extension.
N/A
Optional
Optional
MWIExtension
(Users With Mailbox
Only)
The text name displayed on the system
administration interface of the phone system
used to turn message waiting indicators on and
off for the phone number specified in the
MWIExtension column.
If no value is provided, Unity Connection uses
the phone system specified in the
MediaSwitchDisplayName column.
N/A
Optional
Optional
MWIMediaSwitchDisplay
Name
(Users With Mailbox
Only)
The maximum duration (in seconds) for
recording a message from an outside
(unidentified) caller.
The length specified can be from 1 through
1,200 seconds.
N/A
Optional
Optional
MaxMsgLen
(Users With Mailbox
Only)
System Administration Guide
296
Bulk Administration Tool
Bulk Administration Tool
Page 315
Indicates whether Unity Connection plays a
recording to the callers after a message has been
sent:
• 0-Do Not Play Recording. Select this
setting to disable the feature. After a
message is sent, users do not hear any
recording.
• 1-System Default Recording. After a
message is sent, users hear the default
system recording.
• 2-Play Recording. After a message is sent,
users hear the cutomized recording.
By Default the System Default
Recording option is selected.
Note
N/A
Optional
Optional
Play After Message
Recording
(Users With Mailbox
Only)
Indicates whether Unity Connection plays a
recording to callers before allowing them to
leave a message for the user. You can also
indicate whether all callers hear the recording
or only unidentified callers:
• 0-Do Not Play Recording. Select this
setting to disable the feature. Before they
leave a message, callers hear only the user
greeting.
• 1-Play Recording to All Callers. Before
they leave a message, users and outside
callers hear the user or call handler greeting
and then the recording.
• 2-Play Recording Only to Unidentified
Callers. Before they leave a message,
outside callers hear the user greeting and
then the post-greeting recording. Likewise,
users who call from a phone that is not
associated with their account and do not
sign in to Unity Connection hear the
post-greeting recording.
N/A
Optional
Optional
PlayPostGreetingRecording
(Users With Mailbox
Only)
The display name of the post-greeting recording
that plays after the greeting for this user.
N/A
Optional
Optional
PostGreetingRecordingDisplayName
(Users With Mailbox
Only)
System Administration Guide
297
Bulk Administration Tool
Bulk Administration Tool
Page 316
The required forced-authorization code (FACs)
to transmit to Cisco Unified Communications
Manager, if applicable, when the user makes an
outbound call.
Your organization may use FACs to prevent toll
fraud. For example, users may have to provide
FACs to place long-distance calls.
The value is used only if the system is using
Cisco Unified CM and its version is 4.1 and
later.
The code length can be from 1 to 40 characters.
N/A
Optional
Optional
ForcedAuthoizationCode
(Users With Mailbox
Only)
Determines whether the user is included in the
phone directory for outside callers:
• 0-Not included in the directory
• 1-Included in the directory
N/A
Optional
Optional
ListInDirectory
(Users With Mailbox
Only)
Determines whether Unity Connection uses the
value in the EmailAddress column (Corporate
Email Address field in Cisco Unity Connection
Administration) to automatically create a new
SMTP proxy address, so that IMAP messages
to or from this email address can be properly
identified by Unity Connection as belonging to
this user. If you uncheck it, no such SMTP
proxy address is automatically created.
• 0-SMTP proxy address is not automatically
created.
• 1-SMTP proxy address is automatically
created using the Corporate Email Address
field.
N/A
Optional
Optional
CreateSmtpProxyFromCorp
(Users With Mailbox
Only)
The text name displayed on the system
administration interface of the phone system
used for Telephone Record and Playback
(TRAP) sessions and to turn message waiting
indicators on and off.
Any combination of ASCII or unicode
characters up to a maximum of 64 characters.
N/A
Optional
Optional
MediaSwitchDisplayName
(Users With Mailbox
Only)
The user home phone number.
Any combination of the digits 0-9, T, t, commas,
hashes (#), and asterisks (*), up to a maximum
of 38 characters.
N/A
Optional
Optional
PhoneNumber_HomePhone
(Users With Mailbox
Only)
Whether the user home phone device is enabled:
• 0-disabled
• 1-enabled
N/A
Optional
Optional
Active_HomePhone
(Users With Mailbox
Only)
System Administration Guide
298
Bulk Administration Tool
Bulk Administration Tool
Page 317
The text name for the user home phone
displayed on the Unity Connection interfaces.
Any combination of ASCII or Unicode
characters, up to a maximum of 64 characters.
N/A
Optional
Optional
DisplayName_HomePhone
(Users With Mailbox
Only)
The user work phone number.
Any combination of the digits 0-9, T, t, commas,
hashes (#), and asterisks (), up to a maximum
of 38 characters.
N/A
Optional
Optional
PhoneNumber_WorkPhone
(Users With Mailbox
Only)
Whether the user work phone device is enabled:
• 0-disabled
• 1-enabled
N/A
Optional
Optional
Active_WorkPhone
(Users With Mailbox
Only)
The text name for the user work phone displayed
on the Unity Connection interfaces.
Any combination of ASCII or unicode
characters up to a maximum of 64 characters.
N/A
Optional
Optional
DisplayName_WorkPhone
(Users With Mailbox
Only)
The user mobile phone number.
Any combination of the digits 0-9, T, t, commas,
hashes (#), and asterisks (), up to a maximum
of 38 characters.
N/A
Optional
Optional
PhoneNumber_MobilePhone
(Users With Mailbox
Only)
Whether the user mobile phone device is
enabled:
• 0-disabled
• 1-enabled
N/A
Optional
Optional
Active_MobilePhone
(Users With Mailbox
Only)
The text name for the user mobile phone
displayed on the Unity Connection interfaces.
Any combination of ASCII or unicode
characters up to a maximum of 64 characters.
N/A
Optional
Optional
DisplayName_MobilePhone
(Users With Mailbox
Only)
The user pager number.
Any combination of the digits 0-9, T, t, commas,
hashes (#), and asterisks (*), up to a maximum
of 38 characters.
N/A
Optional
Optional
PhoneNumber_Pager
(Users With Mailbox
Only)
Digits to send to the pager. This is referred to
in Unity Connection Administration as "Extra
Digits." For numeric pagers, the field holds
numeric text to send to the pager; for text pagers,
the field is blank.
The maximum length is 32 digits.
N/A
Optional
Optional
AfterDialDigits_Pager
(Users With Mailbox
Only)
System Administration Guide
299
Bulk Administration Tool
Bulk Administration Tool
Page 318
Whether the user pager device is enabled:
• 0-disabled
• 1-enabled
N/A
Optional
Optional
Active_Pager
(Users With Mailbox
Only)
The text name for the user pager displayed on
the Unity Connection interfaces.
Any combination of ASCII or unicode
characters up to a maximum of 64 characters.
N/A
Optional
Optional
DisplayName_Pager
(Users With Mailbox
Only)
This phone number is entered in the From field
on the default SMTP device for the user.
Any combination of ASCII only alphanumeric
characters, hyphens, underscores, periods, at
signs ("@"), commas and hashes (#), up to a
maximum of 40 characters.
N/A
Optional
Optional
PhoneNumber_TextPager1
(Users With Mailbox
Only)
Message notifications for the user are sent to
this SMTP address.
The SMTP address cannot include
non-ASCII characters.
Note
N/A
Optional
Optional
SmtpAddress_TextPager1
(Users With Mailbox
Only)
Whether the user text pager device is enabled:
• 0-disabled
• 1-enabled
N/A
Optional
Optional
Active_TextPager1
(Users With Mailbox
Only)
The text name for the user text pager displayed
on the Unity Connection interfaces.
Any combination of ASCII or unicode
characters up to a maximum of 64 characters.
N/A
Optional
Optional
DisplayName_TextPager1
(Users With Mailbox
Only)
The first alternate extension for the user.
The value must be unique in the partition.
Any combination of ASCII alphanumeric
characters, from 1 to 40 characters long.
N/A
Optional
Optional
Extension_Alt1
(Users With Mailbox
Only)
The text name of the partition to which the first
alternate extension belongs.
N/A
Optional
Optional
Extension_Alt1_Partition
(Users With Mailbox
Only)
The second alternate extension for the user.
The value must be unique in the partition.
Any combination of ASCII alphanumeric
characters, from 1 to 40 characters long.
N/A
Optional
Optional
Extension_Alt2
(Users With Mailbox
Only)
The text name of the partition to which the
second alternate extension belongs.
N/A
Optional
Optional
Extension_Alt2_Partition
(Users With Mailbox
Only)
System Administration Guide
300
Bulk Administration Tool
Bulk Administration Tool
Page 319
The third alternate extension for the user.
The value must be unique in the partition.
Any combination of ASCII alphanumeric
characters, from 1 to 40 characters long.
N/A
Optional
Optional
Extension_Alt3
(Users With Mailbox
Only)
The text name of the partition to which the third
alternate extension belongs.
N/A
Optional
Optional
Extension_Alt3_Partition
(Users With Mailbox
Only)
The fourth alternate extension for the user.
The value must be unique in the partition.
Any combination of ASCII alphanumeric
characters, from 1 to 40 characters long.
N/A
Optional
Optional
Extension_Alt4
(Users With Mailbox
Only)
The text name of the partition to which the
fourth alternate extension belongs.
N/A
Optional
Optional
Extension_Alt4_Partition
(Users With Mailbox
Only)
The fifth alternate extension for the user.
The value must be unique in the partition.
Any combination of ASCII alphanumeric
characters, from 1 to 40 characters long.
N/A
Optional
Optional
Extension_Alt5
(Users With Mailbox
Only)
The text name of the partition to which the fifth
alternate extension belongs.
N/A
Optional
Optional
Extension_Alt5_Partition
(Users With Mailbox
Only)
The sixth alternate extension for the user.
The value must be unique in the partition.
Any combination of ASCII alphanumeric
characters, from 1 to 40 characters long.
N/A
Optional
Optional
Extension_Alt6
(Users With Mailbox
Only)
The text name of the partition to which the sixth
alternate extension belongs.
N/A
Optional
Optional
Extension_Alt6_Partition
(Users With Mailbox
Only)
The seventh alternate extension for the user.
The value must be unique in the partition.
Any combination of ASCII alphanumeric
characters, from 1 to 40 characters long.
N/A
Optional
Optional
Extension_Alt7
(Users With Mailbox
Only)
The text name of the partition to which the
seventh alternate extension belongs.
N/A
Optional
Optional
Extension_Alt7_Partition
System Administration Guide
301
Bulk Administration Tool
Bulk Administration Tool
Page 320
The eighth alternate extension for the user.
The value must be unique in the partition.
Any combination of ASCII alphanumeric
characters, from 1 to 40 characters long.
N/A
Optional
Optional
Extension_Alt8
(Users With Mailbox
Only)
The text name of the partition to which the
eighth alternate extension belongs.
N/A
Optional
Optional
Extension_Alt8_Partition
(Users With Mailbox
Only)
The ninth alternate extension for the user.
The value must be unique in the partition.
Any combination of ASCII alphanumeric
characters, from 1 to 40 characters long.
N/A
Optional
Optional
Extension_Alt9
(Users With Mailbox
Only)
The text name of the partition to which the ninth
alternate extension belongs.
N/A
Optional
Optional
Extension_Alt9_Partition
(Users With Mailbox
Only)
The Cisco Unified Communications Manager
user ID that is associated with the user.
Any combination of characters except for
non-printing ASCII characters, up to a
maximum of 128 characters.
N/A
Optional
Optional
CcmId
(Users With Mailbox
Only)
The display name of the Exchange 2010 external
service that corresponds with the Exchange 2010
server that contains the Exchange 2010 mailbox
for this user.
To add an Exchange 2010 external service for
a user, include values for both the
Exchange2010Service_ServiceDisplayName
and Exchange2010Service_EmailAddress fields
in the CSV input file.
To remove the Exchange 2010 service for a user,
set at least one of either the
Exchange2010Service_ServiceDisplayName
and Exchange2010Service_EmailAddress fields
to %null% in the CSV input file
N/A
Optional
Optional
Exchange2010Service_Service
DisplayName
(Users With Mailbox
Only)
The primary email address that is associated
with the Exchange mailbox that you want this
user to be able to access.
To add an Exchange 2010 external service for
a user, include values for both the
Exchange2010Service_ServiceDisplayName
and Exchange2010Service_EmailAddress fields
in the CSV input file
N/A
Optional
Optional
Exchange2010Service_Email
Address
(Users With Mailbox
Only)
System Administration Guide
302
Bulk Administration Tool
Bulk Administration Tool
Page 321
The Windows domain alias for the user in
Exchange 2010 (useful when the setting is
different from the user alias).
N/A
Optional
Optional
Exchange2010Service_UserId
(Users With Mailbox
Only)
The Windows domain password for the user.
N/A
Optional
Optional
Exchange2010Service_User
Password
(Users With Mailbox
Only)
Action to take for a voice message:
• 0-Reject the message
• 1-Accept the message
• 2-Relay the message
• 3-Accept the message and relay a copy
N/A
Optional
Optional
EmailAction
(Users With Mailbox
Only)
Action to take for a voice message:
• 0-Reject the message
• 1-Accept the message
• 2-Relay the message
• 3-Accept the message and relay a copy
N/A
Optional
Optional
VoiceMailAction
(Users With Mailbox
Only)
Action to take for a voice message:
• 0-Reject the message
• 1-Accept the message
• 2-Relay the message
• 3-Accept the message and relay a copy
N/A
Optional
Optional
FaxAction
(Users With Mailbox
Only)
Action to take for a voice message:
• 0-Reject the message
• 1-Accept the message
• 2-Relay the message
• 3-Accept the message and relay a copy
N/A
Optional
Optional
DeliveryReceiptAction
(Users With Mailbox
Only)
Specifies the address to relay incoming message
when one or more of the actions (EmailAction,
VoicemailAction, FaxAction,
DeliveryReceiptAction) is set to 2 (Relay the
message).
RelayAddress is in the format of
someone@somewhere or
someone@somewhere.com.
N/A
Optional
Optional
RelayAddress
(Users With Mailbox
Only)
The full SMTP proxy addresses for users. To
create/update more than one address per user,
separate them by commas and surround them
all with double quotes. For example:
"someone1@somewhere.com,someone2@somewhere.com"
N/A
Optional
Optional
SmtpProxyAddresses
(Users With Mailbox
Only)
System Administration Guide
303
Bulk Administration Tool
Bulk Administration Tool
Page 322
The value of the LDAP field that you mapped
to the Unity Connection Alias field when you
configured Cisco Unity Connection to integrate
with an LDAP directory. See the Task List for
Configuring LDAP, on page 148 section.
This field is used when you create Unity
Connection users by importing LDAP user data
and when you integrate existing Unity
Connection users with LDAP users.
N/A
Optional
Optional
LdapCcmUserID
The phone number of the user.
Note that the field is only for directory
information purposes. Cisco Unity Connection
does not use the phone number to route calls.
N/A
Optional
Optional
CorporatePhoneNumber
(Users With Mailbox
Only)
A descriptive name for the notification device.
This field is required if you want to create an
HTML notification device.
N/A
Optional
Optional
DisplayName_HTML1
(Users With Mailbox
Only)
Enables the HTML notification device.
N/A
Optional
Optional
Active_HTML1
(Users With Mailbox
Only)
The phone number that the user use to play and
record voice message.
N/A
Optional
Optional
callback_HTML1
(Users With Mailbox
Only)
Disallow the users to change the mobile number
from Cisco PCA and Mini Web inbox for
HTML notification.
N/A
Optional
Optional
disableMobPCA_HTML1
(Users With Mailbox
Only)
Disallow the users to change the notification
template from PCA.
N/A
Optional
Optional
disableTemplatePCA_HTML1
(Users With Mailbox
Only)
The email address of the user text-compatible
mobile phone, or another email account (such
as a home email address) on which the user
receives the HTML notification. Up to 128
characters can be entered in this field.
SmtpAddress_HTML1 column is mandatory if
Active_HTML1 column is set to 1.
N/A
Optional
Optional
SmtpAddress_HTML1
(Users With Mailbox
Only)
A default or a customized template name for
HTML notification device.
N/A
Optional
Optional
templateName_HTML1
(Users With Mailbox
Only)
System Administration Guide
304
Bulk Administration Tool
Bulk Administration Tool
Page 323
A descriptive name for the notification device.
This field is required if you want to create an
HTML Missed Call notification device.
N/A
Optional
Optional
DisplayName_HTML2
(Users With Mailbox
Only)
Enables the HTML Missed Call notification
device.
N/A
Optional
Optional
Active_HTML2
(Users With Mailbox
Only)
The phone number that the user use to view the
missed calls.
N/A
Optional
Optional
callback_HTML2
(Users With Mailbox
Only)
Disallow the users to change the mobile number
from Cisco PCA and Mini Web inbox for
HTML Missed Call notification.
N/A
Optional
Optional
disableMobPCA_HTML2
(Users With Mailbox
Only)
Disallow the users to change the notification
template from PCA. This field is applicable for
HTML Missed Call notification template.
N/A
Optional
Optional
disableTemplatePCA_HTML2
(Users With Mailbox
Only)
The email address of the user text-compatible
mobile phone, or another email account (such
as a home email address) on which the user
receives the HTML Missed Call notification.
Up to 128 characters can be entered in this field.
SmtpAddress_HTML2 column is mandatory if
Active_HTML2 column is set to 1.
N/A
Optional
Optional
SmtpAddress_HTML2
(Users With Mailbox
Only)
A default or a customized template name for
HTML Missed Call notification device.
N/A
Optional
Optional
templateName_HTML2
(Users With Mailbox
Only)
A descriptive name for the notification device.
This field is required if you want to create an
HTML Scheduled Summary notification device.
N/A
Optional
Optional
DisplayName_HTML3
(Users With Mailbox
Only)
Enables the HTML Scheduled Summary
notification device.
N/A
Optional
Optional
Active_HTML3
(Users With Mailbox
Only)
The phone number that the user use to play the
voice messages received in Summary
notification.
N/A
Optional
Optional
callback_HTML3
(Users With Mailbox
Only)
Disallow the users to change the mobile number
from Cisco PCA and Mini Web inbox for
HTML Scheduled Summary notification.
N/A
Optional
Optional
disableMobPCA_HTML3
(Users With Mailbox
Only)
System Administration Guide
305
Bulk Administration Tool
Bulk Administration Tool
Page 324
Disallow the users to change the notification
template from PCA. This field is applicable for
HTML Scheduled Summary notification
template.
N/A
Optional
Optional
disableTemplatePCA_HTML3
(Users With Mailbox
Only)
The email address of the user text-compatible
mobile phone, or another email account (such
as a home email address) on which the user
receives the Summary notification of the voice
messages. Up to 128 characters can be entered
in this field.
SmtpAddress_HTML3 column is mandatory if
Active_HTML3 column is set to 1.
N/A
Optional
Optional
SmtpAddress_HTML3
(Users With Mailbox
Only)
A default or a customized template name for
HTML Scheduled Summary notification device.
N/A
Optional
Optional
templateName_HTML3
(Users With Mailbox
Only)
A descriptive name for the notification device.
This field is required if you want to create an
HTML Scheduled Summary notification device.
N/A
Optional
Optional
DisplayName_HTML3
(Users With Mailbox
Only)
Enables the HTML Scheduled Summary
notification device.
N/A
Optional
Optional
Active_HTML3
(Users With Mailbox
Only)
Required and Optional CSV Fields for Contacts
Table 21: Required and Optional CSV Fields for Contacts
Descriptions
Deleting
Updating
Creating
Column Heading
The unique text name for the contact.
Any combination of ASCII or unicode
alphanumeric characters, periods, commas, spaces,
and the special characters `, ~, !, @, #, $, %, ^, &,
-, _, ', up to a maximum of 64 characters.
Required
Required
Required
Alias
The number that callers dial to reach the contact.
The value must be unique among users and contacts
in the partition.
Any combination of ASCII alphanumeric
characters up to a maximum of 40 characters.
N/A
Optional
Required
Extension
The unique text name for the contact template to
apply to the contact during creation.
N/A
N/A
Optional
ContactTemplateAlias
System Administration Guide
306
Bulk Administration Tool
Required and Optional CSV Fields for Contacts
Page 325
An alternate version of the first name. Unity
Connection considers alternate names when users
and callers use voice recognition to place a call or
address voice messages.
To create/update more than one alternate first name
per contact, separate them by semicolons (;). If an
alternate name needs to contain a semicolon,
precede the semicolon with another semicolon to
indicate to Unity Connection that the name contains
a semicolon.
Use this field in conjunction with the AltLastNames
field to add nicknames or maiden names for users.
You can also use alternate names to add phonetic
spellings of hard-to-pronounce names.
Alternate first names and alternate last names are
stored as a pair in the database. When submitting
multiple alternate names, make sure that you have
the same number of alternate first names and
alternate last names.
For example, if you have a contact named Elizabeth
Brown, who is sometimes known as "Liz" and
sometimes known by her maiden name of "Smith,"
you would enter the following AltFirstNames and
AltLastNames to ensure that all four combinations
are submitted to the database:
• Elizabeth; Liz; Elizabeth; Liz
• Brown; Brown; Smith; Smith
N/A
Optional
Optional
AltFirstNames
System Administration Guide
307
Bulk Administration Tool
Bulk Administration Tool
Page 326
An alternate version of the last name. Unity
Connection considers alternate names when users
and callers use voice recognition to place a call or
address voice messages.
To create/update more than one alternate last name
per contact, separate them by semicolons (;). If an
alternate name needs to contain a semicolon,
precede the semicolon with another semicolon to
indicate to Unity Connection that the name contains
a semicolon.
Use this field in conjunction with the
AltFirstNames field to add nicknames or maiden
names for users. You can also use alternate names
to add phonetic spellings of hard-to-pronounce
names.
Alternate first names and alternate last names are
stored as a pair in the database. When submitting
multiple alternate names, make sure that you have
the same number of alternate first names and
alternate last names.
For example, if you have a contact named Elizabeth
Brown, who is sometimes known as "Liz" and
sometimes known by her maiden name of "Smith,"
you would enter the following AltFirstNames and
AltLastNames to ensure that all four combinations
are submitted to the database:
• Elizabeth; Liz; Elizabeth; Liz
• Brown; Brown; Smith; Smith
N/A
Optional
Optional
AltLastNames
An alternate spelling of the contact first name in
an internationally recognizable format (ASCII
characters). The value is used by the phone
interface to search for users and to address
messages.
Any combination of ASCII alphanumeric
characters up to maximum of 64 characters.
N/A
Optional
Optional
AltFirstName
An alternate spelling of the contact last name in an
internationally recognizable format (ASCII
characters). The value is used by the phone
interface to search for users and to address
messages.
Any combination of ASCII alphanumeric
characters up to maximum of 64 characters.
N/A
Optional
Optional
AltLastName
System Administration Guide
308
Bulk Administration Tool
Bulk Administration Tool
Page 327
The contact name that appears on the administration
and user interfaces.
If no value is provided, the value is set to the Alias.
Any combination of ASCII or unicode characters
up to a maximum of 64 characters.
N/A
Optional
Optional
DisplayName
The contact first name.
Any combination of ANSI or unicode alphanumeric
characters, periods, commas, spaces, and the special
characters , ~, !, @, #, $, %, ^, &, -, _, ', up to a maximum of 64 characters. N/A Optional Optional FirstName The contact last name. Any combination of ANSI or unicode alphanumeric characters, periods, commas, spaces, and the special characters , ~, !, @, #, $, %, ^, &, -, _, ', up to a
maximum of 64 characters.
N/A
Optional
Optional
LastName
Determines whether the contact is included in the
phone directory for outside callers:
• 0-Not included in the directory
• 1-Included in the directory
N/A
Optional
Optional
ListInDirectory
For VPIM contacts, enter the mailbox number of
the VPIM contact on the remote voice messaging
system.
The maximum length is 256 characters.
N/A
Optional
Optional
RemoteMailAddress
Determines whether Unity Connection transfers
calls from the automated attendant or a directory
handler to the phone number that is specified in the
TransferExtension field.
• 0-Do not transfer calls. Unity Connection
takes a message and sends it to the remote
mailbox for the VPIM contact instead.
• 1-Transfer incoming calls to
TransferExtension.
N/A
Optional
Optional
TransferEnabled
System Administration Guide
309
Bulk Administration Tool
Bulk Administration Tool
Page 328
The extension or phone number to which Unity
Connection transfers calls when TransferEnabled
is set to 1.
When entering a phone number, include any
additional numbers necessary to dial outside calls
(for example, 9) and for long-distance dialing (for
example, 1).
Any combination of numeric digits, commas, and
the special characters # and *, up to a maximum
of 40 characters.
N/A
Optional
Optional
TransferExtension
Determines the number of times the extension of
the contact rings before Unity Connection considers
the call unanswered ("ring-no-answer") and plays
the applicable greeting.
An integer value from 2 through 100.
N/A
Optional
Optional
TransferRings
Determines the way in which Unity Connection
transfers calls from the automated attendant or a
directory handler to the contact phone for the
standard (default) transfer rule:
• 0-supervised
• 1-unsupervised (also called a "Release to
Switch" transfer)
N/A
Optional
Optional
TransferType
For VPIM contacts, the VPIM delivery location on
which the contact mailbox resides. Use the display
name of the VPIM location as it is listed in Cisco
Unity Connection Administration.
Any combination of ASCII or Unicode characters
(except nonprinting ASCII characters), up to
maximum of 64 characters.
N/A
Optional
Optional
DeliveryLocation
DisplayName
The display name of the partition to which the
contact belongs.
N/A
Optional
Optional
PartitionDisplayName
The full SMTP proxy addresses for contacts. To
create/update more than one address per user,
separate them by commas and surround them all
with double quotes. For example:
"someone1@somewhere.com,someone2@somewhere.com"
N/A
Optional
Optional
SmtpProxyAddresses
System Administration Guide
310
Bulk Administration Tool
Bulk Administration Tool
Page 329
A phone number that voice recognition users can
use to call the contact. Include any additional
numbers necessary to dial outside calls (for
example, 9) and for long-distance dialing (for
example, 1).
Any combination of numeric digits, commas, and
the special characters # and *, from 1 to 255
characters long.
N/A
Optional
Optional
DialableWorkPhone
A phone number that voice recognition users can
use to call the contact. Include any additional
numbers necessary to dial outside calls (for
example, 9) and for long-distance dialing (for
example, 1).
Any combination of numeric digits, commas, and
the special characters #, and *, from 1 to 255
characters long.
N/A
Optional
Optional
DialableHomePhone
A phone number that voice recognition users can
use to call the contact. Include any additional
numbers necessary to dial outside calls (for
example, 9) and for long-distance dialing (for
example, 1).
Any combination of numeric digits, commas, and
the special characters #, and *, from 1 to 255
characters long.
N/A
Optional
Optional
DialableMobilePhone
The name of a locality including a city, county or
other geographic region where the contact is
located, or with which the contact is associated.
Callers who reach a voice-enabled directory handler
can narrow down their search for a contact by
saying the name and city of the contact if this field
is defined for the contact. (ListInDirectory must
also be set to 1 for the contact to be reachable via
directory handlers.)
Any combination of ASCII or Unicode characters,
up to a maximum of 64 characters.
N/A
Optional
Optional
City
System Administration Guide
311
Bulk Administration Tool
Bulk Administration Tool
Page 330
The name or number for the department or
subdivision of an organization to which the contact
belongs.
Callers who reach a voice-enabled directory handler
can narrow down their search for a contact by
saying the name and department of the contact if
this field is defined for the contact. (ListInDirectory
must also be set to 1 for the contact to be reachable
via directory handlers.)
Any combination of ASCII or Unicode characters,
up to a maximum of 64 characters.
N/A
Optional
Optional
Department
Required and Optional CSV Fields for Distribution Lists
Table 22: Required and Optional CSV Fields for Distribution Lists
Descriptions
Deleting
Updating
Creating
Column Heading
The unique text name for the distribution list.
Any combination of ASCII or unicode
alphanumeric characters, periods, commas, spaces,
and the special characters `, ~, !, @, #, $, %, ^, &,
-, _, ', up to a maximum of 64 characters.
Required
Required
Required
Alias
The name of the distribution list.
N/A
Optional
Required
Display Name
An alternate version of the name. Unity Connection
considers alternate names when users or contacts
use voice recognition to place a call or address
voice messages.
To create/update more than one alternate name
distribution list, separate them by semicolons (;).
If an alternate name needs to contain a semicolon,
precede the semicolon with another semicolon to
indicate to Unity Connection that the name contains
a semicolon.
N/A
Optional
Optional
AltNames
The number that callers dial to reach the
distribution list.
Any combination of ASCII alphanumeric
characters, up to a maximum of 40 characters.
N/A
Optional
Optional
Extension
Allows contacts to be added as members of the
distribution list.
N/A
Optional
Optional
AllowContacts
Allows users on remote voice messaging systems
that are configured as VPIM locations to send
messages to this distribution list.
N/A
Optional
Optional
AllowForeignMessage
System Administration Guide
312
Bulk Administration Tool
Required and Optional CSV Fields for Distribution Lists
Page 331
The name of the partition to which the distribution
list belongs.
N/A
Optional
Optional
PartitionName
Required and Optional CSV Fields for Distribution List Members
Table 23: Required and Optional CSV Fields for Distribution List Members
Descriptions
Deleting
Creating
Column Heading
The unique text name of the distribution list to which the
member belongs.
Required
Required
DLAlias
The unique text name of the member (a user, contact, user
template, or another distribution list).
Required
Required
MemberAlias
The display name of the location where the member is
homed. By default, this is the display name of the local
system.
Optional
Optional
LocationNames
Required and Optional CSV Fields for Unified Messaging
Accounts
Table 24: Required and Optional CSV Fields for Unified Messaging Accounts
Descriptions
Deleting
Updating
Creating
Column Heading
The alias of the Unity Connection user for which
you want to add a unified messaging account. Note
the following:
• When creating unified messaging accounts,
this column is required.
• When updating and deleting unified messaging
accounts, you should use
OptionalServiceAccountID to identify the
unified messaging accounts that you want to
update or delete. You can also use
subscriberAlias and serviceDisplayName.
Optional.
See
Description
Optional.
See
Description
Required
subscriberAlias
System Administration Guide
313
Bulk Administration Tool
Required and Optional CSV Fields for Distribution List Members
Page 332
The descriptive name for the unified messaging
service that you want to associate with this unified
messaging account. Note the following:
• When creating unified messaging accounts,
this column is required.
• When updating and deleting unified messaging
accounts, you should use
OptionalServiceAccountID to identify the
unified messaging accounts that you want to
update or delete. You can also use
subscriberAlias and serviceDisplayName.
Optional.
See
Description
Optional.
See
Description
Required
serviceDisplayName
A unique identifier that distinguishes multiple
unified messaging accounts for the same user. Note
the following:
• When creating unified messaging accounts,
leave this column blank.
• When updating and deleting unified messaging
accounts, you should use
OptionalServiceAccountID to identify the
unified messaging accounts that you want to
update or delete. You can also use
subscriberAlias and serviceDisplayName.
Recommended.
See
Description
Recommended.
See
Description
Omit
OptionalServiceAccountID
Exchange only: If you set the
emailAddressUseCorp to:
• 0-Enter the Exchange email address that you
want Unity Connection to access for unified
messaging features for this user.
• 1-Leave this field blank. If you enter a value,
Unity Connection ignores it.
Optional
Optional
Optional
UMEmailAddress
Exchange only: Determines which Exchange email
address to access for unified messaging features:
• 0-Do not use the EmailAddress column in
Table 1 , which corresponds with the
Corporate Email Address field on the New
and Edit User Basics pages. Instead, use the
UMEmailAddress column in this table, which
is associated with the Use This Email Address
option on the New or Edit Unified Messaging
Account pages.
• 1-Use the EmailAddress column in Table 1 ,
which corresponds with the Corporate Email
Address field on the New and Edit User Basics
pages.
Optional
Optional
Optional
emailAddressUseCorp
System Administration Guide
314
Bulk Administration Tool
Bulk Administration Tool
Page 333
Exchange only: Determines whether calendar and
contact functionality is enabled for this user:
• 0-Not enabled
• 1-Enabled
Optional
Optional
Optional
enableCalendar
Cisco Unified MeetingPlace only: Determines
whether the MeetingPlace Scheduling and Joining
feature is enabled for this user.
• 0-Not enabled
• 1-Enabled
If the feature is not enabled in the unified
messaging service specified by
serviceDisplayName, the value that you specify
here, if any, is ignored.
Optional
Optional
Optional
enableMeeting
Exchange only: Determines whether the
Synchronize Connection and Exchange Mailboxes
(single inbox) feature is enabled for this user.
• 0-Not enabled
• 1-Enabled
If the feature is not enabled in the unified
messaging service specified by
serviceDisplayName, the value that you specify
here, if any, is ignored.
Optional
Optional
Optional
enableMbxSynch
Cisco Unified MeetingPlace only: Determines
whether MeetingPlace meetings sre set up through
the server listed in the unified messaging service
specified by serviceDisplayName.
• 0-MeetingPlace meetings are set up through
a different server.
• 1-MeetingPlace meetings are set up through
the server listed in the service specified by
serviceDisplayName.
Optional
Optional
Optional
isPrimaryMeetingService
System Administration Guide
315
Bulk Administration Tool
Bulk Administration Tool
Page 334
Required when creating unified messaging accounts
for MeetingPlace.
Required when creating unified messaging accounts
for Exchange when all of the following are true:
• You are creating users.
• You want the user to be able to access
Exchange email using text to speech.
If you specify a loginType of:
• 0-Unity Connection uses the alias to sign in
to MeetingPlace.
• 1-Unity Connection signs in using the
MeetingPlace server guest account.
• 2-Unity Connection uses the value specified
in the userID column to sign in to
MeetingPlace for this user. The value of the
userID column corresponds with the User ID
field on the New and Edit Unified Messaging
Accounts pages.
Optional
Optional
See
Description
loginType
Required when creating unified messaging accounts
for MeetingPlace.
Required when creating unified messaging accounts
for Exchange when all of the following are true:
• You are creating users.
• You want the user to be able to access
Exchange email using text to speech.
• You specify a loginType of 2.
Optional
Optional
See
Description
userId
System Administration Guide
316
Bulk Administration Tool
Bulk Administration Tool
Page 335
A P P E N D I X C
Tenant Partitioning
• Understanding Tenant, on page 317
• Tenant Provisioning using APIs, on page 317
• Working with Tenant Partitioning, on page 318
• Modifying the Objects after Tenant Creation, on page 319
Understanding Tenant
Each tenant has its own set of partition, schedule set, schedule, schedule detail, search space, search space
member, phone system, class of service, user template, distribution list, distribution list membership, user
operator, call handler template, directory handler, interview handler, call handlers (Operator, Opening Greeting,
Goodbye), and routing rules. The configuration objects are shared across multiple tenants such as, all the
system settings like mailbox store, custom keypad, restriction tables etc. are shared across the multiple tenants.
Tenant partitioning also introduces the concept of using the corporate email addresses as their alias, which
enables alias uniqueness across tenants. To achieve this, the aliases assigned to the users (in multi-tenancy
environment) must be in the form of alias@smtpdomain, which would be the corporate email address of the
tenant's user. To login into the Unity Connection Web interfaces like Cisco PCA, Web Inbox, VMREST API,
users have to use this alias format. Two different tenants configured on the same Unity Connection can never
have the same alias for the users as the smtp domain always differ.
There are no changes done for touchtone conversation and voice-recognition users.
Note
Tenant Provisioning using APIs
Cisco Unity Connection Provisioning Interface (CUPI) provides set of APIs for Unity Connection that can
be used for tenant provisioning. To support the Tenant Partitioning feature using APIs in Unity Connection,
few new APIs have been developed and few existing APIs have been modified.
• For more information about provisioning APIs, see the documentation wiki: http://docwiki.cisco.com/
wiki/Cisco_Unity_Connection_Provisioning_Interface_%28CUPI%29_API
System Administration Guide
317


Page 336
Working with Tenant Partitioning
Steps to List the Basic Configuration Settings to Provision a Tenant
Step 1
Create Tenant: A new API has been introduced for tenant provisioning. All its associated objects are created by executing
a single API request. If the operation fails at any point in time, the entire process is rolled back. To create a tenant, an
HTTP POST request should be sent to the URI: https://<connection-server>/vmrest/tenants
For the optional parameters, if no value is specified then system default values be used.
Step 2
Create Port Group: To create a port group, an HTTP POST request should be sent to the URI:
https://<connection-server>/vmrest/portgroups
Tenant partitioning supports SIP integration only.
Step 3
Create Ports: To create a port, an HTTP POST request should be sent to the URI:
https://<connection-server>/vmrest/ports
Step 4
Integrate with Call Manager: To integrate with Call Manager, do the following:
• Create SIP Security Profile
• Create SIP Profile
• Create Trunk to Publisher and Subscriber
• Create Route Group
• Create Route List
• Create Route Pattern
• Create Voicemail Pilot and Voicemail Profile
Step 5
Create User for the Tenant: To create a user, an HTTP POST request should be sent to the URI:
https://<connection-server>/vmrest/users?templateAlias=<TenantUserTemplate>
User template specified in the URI should belong to the tenant for which you are creating the user.
Step 6
Record Greetings: To record the greetings, do the following:
• Create a temporary place-holder WAV file on Unity Connection via POST operation on the URI:
https://<connection-server>/vmrest/voicefiles
• Use the temporary file name created before to upload the new audio. The HTTP content type is "audio/wav" and
the payload content is the audio data.
PUT https://<connection-server>/vmrest/voicefiles/<TemporaryFileName>
• Assign temporary audio WAV file to the target resource. Perform a POST operation on the following URI:
https://<connection-server>/vmrest/handlers/callhandlers/<TenantCallHandlerObjectId>/greetings/Standard/greetingstreamfiles/1033
Step 7
Call Pilot Number: Dial the pilot number. You hear the recorded opening greeting.
For more information about provisioning APIs, see the documentation wiki: http://docwiki.cisco.com/wiki/Cisco_Unity_
Connection_Provisioning_Interface_%28CUPI%29_API.
System Administration Guide
318
Tenant Partitioning
Working with Tenant Partitioning
Page 337
Phone System Integration
For multiple phone systems integration with Unity Connection, see the Multiple Phone System Integration Guide for
Cisco Unity Connection Release 15 available at https://www.cisco.com/c/en/us/td/docs/voice_ip_comm/connection/15/
integration/guide/multiple_integration/b_cuc15intmultiple.html.
Modifying the Objects after Tenant Creation
The administrator can modify the objects associated with a tenant after its creation.
Steps to Add a New Routing Rule for a Tenant
Before you begin
Step 1
Create a new routing rule, by sending the below POST request:
POST https://<connection-server>/vmrest/routingrules
Set the search space for the routing rule as per the tenant's search space for which this routing rule is getting created.
Step 2
Create a new routing rule condition, by sending the below POST request:
POST https://<connection-server>/vmrest/routingrules/<routingrulesobjectId>/routingruleconditions
Add the tenant's phone system as the routing rule condition.
System Administration Guide
319
Tenant Partitioning
Modifying the Objects after Tenant Creation
Page 338
System Administration Guide
320
Tenant Partitioning
Modifying the Objects after Tenant Creation